LikosArktos (talk | contribs) (Agility gets its other alias) Tag: rte-wysiwyg |
Brok Enwings (talk | contribs) (agility image) Tag: rte-wysiwyg |
||
| Line 5: | Line 5: | ||
|image = [[File:Agility-icon.png]] |
|image = [[File:Agility-icon.png]] |
||
|release = [[12 December]] [[2002]]}} |
|release = [[12 December]] [[2002]]}} |
||
| + | |||
| − | [[File:Agility cape equipped.png|left]] |
||
| − | <br />'''Agility''' is a members only [[skill]] which gives access to various shortcuts around ''[[RuneScape]]'', and a higher Agility level makes your run energy recharge significantly faster. At level 1 agility, run energy recharges at approximately 1 percent per 7.5 seconds whereas at level 50 agility, the rate is 1 energy per 4 seconds. Higher Agility levels may also allow you to avoid the damage taken when caught pickpocketing. |
+ | <br />'''[[File:Agility.png|left]]Agility''' is a members only [[skill]] which gives access to various shortcuts around ''[[RuneScape]]'', and a higher Agility level makes your run energy recharge significantly faster. At level 1 agility, run energy recharges at approximately 1 percent per 7.5 seconds whereas at level 50 agility, the rate is 1 energy per 4 seconds. Higher Agility levels may also allow you to avoid the damage taken when caught pickpocketing. |
Agility is one of the most straightforward skills in ''RuneScape. ''However, due to the fact that it's trained through monotonous clicking, it is widely unpopular among players. |
Agility is one of the most straightforward skills in ''RuneScape. ''However, due to the fact that it's trained through monotonous clicking, it is widely unpopular among players. |
||
Revision as of 19:40, 28 March 2015
Template:RSW

Agility is a members only skill which gives access to various shortcuts around RuneScape, and a higher Agility level makes your run energy recharge significantly faster. At level 1 agility, run energy recharges at approximately 1 percent per 7.5 seconds whereas at level 50 agility, the rate is 1 energy per 4 seconds. Higher Agility levels may also allow you to avoid the damage taken when caught pickpocketing.
Agility is one of the most straightforward skills in RuneScape. However, due to the fact that it's trained through monotonous clicking, it is widely unpopular among players.
Training areas
It is helpful in almost all agility courses to take food in case you fail, and energy or super energy potions made using the Herblore skill. This allows you to keep running continually around the courses and gaining experience faster. For each course you normally receive an amount of experience per obstacle completed, and a bonus reward for completing the course.
On many courses, the amount of damage taken after failing an obstacle is based on your remaining Hitpoints, so to conserve food it is often worthwhile having your Hitpoints fairly low. For example, falling into the lava might cause 12 points of damage in the Wilderness course when you have full Hitpoints, but only cause 6 if you have 20 Hitpoints left.
It is also recommended that you wear:
- Graceful outfit obtained via Rooftop Agility Courses
- Boots of lightness obtained during the Temple of Ikov quest. These take 4.5 kg of weight off of you, which helps to conserve run energy. (Note: You do not need to start Temple of Ikov to get Boots of lightness.)
- The Hunter skill allows players to collect furs that can be traded for weight reducing capes:
- Spotted cape reduces weight by 2 kg. (Requires level 40 Hunter to wear.)
- Spottier cape reduces weight by 4.5 kg. (Requires level 66 Hunter to wear.)
- Penance gloves from Barbarian Assault minigame reduces your weight by 4.5 kg.
The training courses are identified with a running figure File:Agility training.png icon on the map.
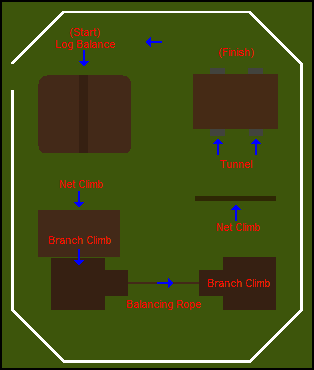
Gnome Stronghold course
Gnome Agility Arena
| Obstacle | XP Gain |
|---|---|
| Log Balance | 7.5 |
| Net Climb | 7.5 |
| Branch Climb | 5 |
| Balancing Rope | 7.5 |
| Net Climb | 7.5 |
| Tunnel | 7.5 |
| Agility Bonus | 39 |
| Total Gain | 86.5 |
As it has no requirements, it is recommended that new Agility trainers begin here. It is located near the Grand Tree in the Tree Gnome Stronghold, northwest of Ardougne.
It is impossible to fail any of the obstacles at this course so no food is required, though some energy potions may be helpful for faster training.
Brimhaven agility arena
The Brimhaven agility arena is different from other agility training spots. In the arena players have to tag pillars separated by agility obstacles. Every time players enter the arena, they must tag the pillar with the flashing arrow above it, and upon every consecutive time they manage to tag the right pillar, they will receive a ticket, which is redeemable by Pirate Jackie the Fruit for various rewards, including Agility experience.
Agility pyramid
The Agility pyramid is located in the Kharidian Desert and is available for players with a minimum of level 30 Agility. As it is located in the desert (where the desert heat effect is present) any player planning to stay there for any extended period of time should bring waterskins and wear desert robes to make the waterskins last longer. Failing the obstacles tends to be quite damaging, so players best fill their inventory with good food as well. The experience this course gives is somewhat generous regarding the level that the course requires. However, the conditions that only allow the player to stay for a limited amount of time as well as the pyramid's remote location render the course rather obscure, and ultimately, unpopular.
Along with the primary goal of completing the circuit for experience, players can also complete a secondary task of retrieving the artifact at the top of the pyramid for Simon Templeton.
Penguin course
Only available to players after they have completed Cold War (level 30 Agility) and are in a penguin suit. This course offers some of the best Agility experience in the game. Players with low Hitpoints may find this course useful as minimal damage is received upon failure.
| Obstacle | XP Gain |
|---|---|
| Platform Jump | 80 |
| Icicles | 40x4 |
| Ice Slope | 180 |
| Ramp jumps | 0 |
| Agility Bonus | 65 |
| Total Gain | 540 |
Hint: When the crushers come, click on the minimap. The platform jump is the easiest or hardest. This one depends on your Agility level. When doing icicles, there is no real easy way. If you avoid clicking on "tread softly" on the wrong icicles, you will always get hurt. Finally, for the ice slope, you must click on the ice when it is not sparkling. If you do it too late or too slowly, you will get sent back with 2 points of damage. If you click on it when it is plain without sparkles, you should make it through without losing a single hitpoint.
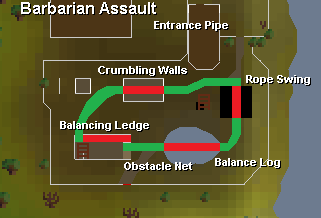
Barbarian Outpost
| Obstacle | XP Gain |
|---|---|
| Rope Swing | 22 |
| Balance Log | 13.5 |
| Net | 8 |
| Balance Ledge | 22 |
| Climb-down ladder | 0 |
| Wall climb | 13.5 |
| Agility Bonus | 46.5 |
| Total Gain | 152.5 |
Squeezing through the entrance (Obstacle pipe, requires 35 Agility) yields 10 Agility XP.
The Barbarian Outpost Agility Training Area is available to players with level 35 Agility who have completed the Bar Crawl miniquest. This course is a lap-based obstacle course, similar to the Gnome Stronghold agility course. The rope swing, the balance log, and the balance ledge can be failed, resulting in lost hitpoints. Failed obstacles should be repeated in order to receive the lap bonus of 46.5 XP. A completed lap yields 152.5 Agility experience.
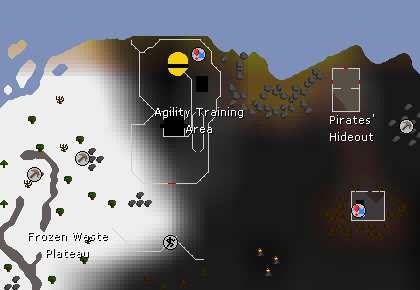
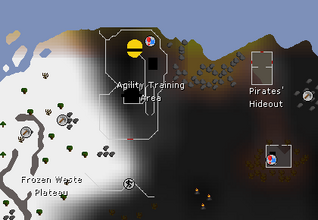
Wilderness course
| Obstacle | XP |
|---|---|
| Pipe | 12.5 |
| Ropeswing | 20 |
| Stepping stones | 20 |
| Log balance | 20 |
| Climb up rocks | 0 |
| Lap bonus | 498.9 |
| Total | 571.4 |
The wilderness course requires level 52 Agility to enter. A temporary agility boost (e.g. with an Agility potion) is sufficient to enter the course, however level 49 agility is required to use the obstacles. It is one of the fastest agility experience gaining methods. Its only problem is the location in level 50-56 Wilderness. Training here can be fairly dangerous and the course can be difficult to get to. You will be attacked by Skeletons as you go around the course, but these are only level 25 and should not do you much harm. It's recommended that you take plenty of food such as cakes, and energy potions if you can afford to lose them. The easiest method to get to the course is to use either the ancients or lunar teleport to the Ice Plateau. If this method is unavailable to you, use the Ardougne teleport lever behind the castle, which teleports to deep wilderness east of the Mage Arena. In the wilderness, a knife is needed to slash a web to exit the peninsula with the teleport lever. After slashing the web, it is recommended to go south to the fence before traveling west to the entrance of the agility course. This route avoids the northern side of the Mage Arena which is a popular PK location. If you die, a quick way to get back is to bank and grab Ardougne teleport runes, steal some cakes and quickly return to the course using the wilderness teleport lever. World hopping may help in avoiding PK-ers. Make sure not to bring more items than you are willing to risk.
You receive 571 Agility experience per lap.
It is possible to fall on the ropeswing and the log, if the player fails these obstacles they will be damaged and placed in a small dungeon, with 4 bone spawns and several skeletons. The ladder to escape is in the north-eastern part of this dungeon.
Werewolf course
The werewolf course is located between Port Phasmatys and Canifis in the swamps. It's almost directly east of Canifis bank, but you'll have to go around to get to it. You must have completed the Creature of Fenkenstrain quest to gain access to this course through the use of the Ring of Charos. The werewolf course requires level 60 Agility.
When you start the course (jump on to the stepping stones), the nearby trainer will throw a stick. Carry on over the jumps and through the pipe and pick up the stick. You will get an additional 190 experience if you return the stick to the trainer at the bottom of the death-slide.
The only obstacle you can fail on this course is the death-slide, but be warned, you can be hit for over 30 damage if you fail this obstacle, and you can quite easily die if you're running around with low hitpoints! The higher your Strength, the less likely you are to fail this obstacle, so using the dragon battleaxe special every now and again on your laps can really help. A low weight also is highly effective, so take any weight reducing equipment if possible. Consider bringing low weight food items (e.g. baskets of strawberries) and Super energy potions.
You will gain 350 experience for a successful lap, plus another 190 experience if you retrieved the stick for a total of 540 experience per lap.
Though this course has higher minimum Agility requirements than the wilderness course, the experience is slightly worse, and you take significantly more damage from falling so you have to return to the bank more often. However, this course lacks the dangerous player-killers who sometimes plague the Wilderness course.
At level 72 Agility, players will fail the death-slide so infrequently that food is no longer necessary. From level 93 Agility onwards the death-slide will always be successful, though by that point Agility experts should already be training at Ape Atoll anyway.
Ape Atoll
The Ape Atoll agility course is available to players with Agility level of 48 or higher who have completed the Monkey Madness quest. Also players need a Ninja greegree to play the course. This course is a lap-based obstacle course. One completed lap gives 580 experience. You will not fail any obstacles on the course if you have 75 Agility or higher.
Dorgesh-Kaan
The Dorgesh-Kaan course was opened 20 March 2007. To access it requires 70 Agility, completion of the quest Death to the Dorgeshuun, and a light source. The course can be used to train Agility, Ranged, or split for both skills. The basic premise of the course is to cross obstacles using one of two routes to retrieve an item requested by the goblin Turgall. Either path can also be used to return an item to Turgall, who will bestow an experience bonus depending on which route the player used to depart and return. In order to train Ranged, a mithril grapple and appropriate crossbow will be required, along with 70 Strength and 70 Ranged. The course looms above the Dorgesh-Kaan South Dungeon.
To reach the course, travel to Dorgesh-Kaan and go to the very south of the city and ascend to the highest level, not far from the anvil and furnace, then ascend the southern stairs to reach the south dungeon's upper level.
Turgall is found in a well-lit generator room at the northeast corner of the cave and down some stairs. To start training, a player will need to offer to help him retrieve an item from the other generator room to the southwest. Complete the conversation in order to receive the spanner used to extract items from the other generator. He will always give a choice of two items, one delicate and one heavy. The heavy items can only be returned via the agility route, and the delicate items can only be returned via the grapple route. Using the wrong route will result in the item being destroyed.
| Delicate Items | Heavy Items |
|---|---|
| Capacitor | Power box |
| Fuse | Lever |
| Meter | Cog |
The player must travel to the disused southwest generator using either the agility obstacle route or the ranged grapple route and use the spanner on either the boiler (heavy items) or console (delicate items) to extract the item Turgall requested. Upon return with one of the correct items, the player is rewarded with Agility experience (2432 experience) when using the obstacle route and ranged experience (1142 experience) when using the grapple route. If both were used, half experience is given for each.
Agility Route
The path of the obstacle course is as follows:
New Generator <-> Walk-across cable (tightrope) <-> Swing Cable <-> Swing-across Ladder <-> Swing Cable <-> Squeeze-past Jutting Wall <-> Squeeze-through tunnel <-> Walk-Across cable <-> Swing-across Ladder <-> Old Generator; and reverse to return.
Total experience for a single round trip is 2750; 2432 from the end bonus, 318 from the sum of the obstacles.
The Squeeze-through Tunnel serves as the checkpoint for delicate items, destroying any carried by the player. It is possible to fail on Cables and Ladders even at level 99 Agility, but is not common even with the required minimum of level 70 Agility. A fall will drop a player to the lower level of the dungeon, causing about 10 damage and destroying any item retrieved from the generator. To return to the course, use the stairs found at the north side of the dungeon near the entrance from Dorgesh-Khan.
Having as low a weight as possible is as prudent as ever for agility training. The ""heavy item"" weighs 3kg, so running on the return will drain slightly more energy. (The heavy item originally weighed 30kg!) Running to the old generator and walking on the return will conserve energy, causing little to no energy loss over a whole lap. A typical lap time for the run-there, walk-back method is 3 minutes, 15 seconds, but can be shortened significantly by queuing up right-click menus and actions.
| Name | XP | Name | XP |
|---|---|---|---|
| Cable balance | Cable swing | ||
| Ladder | Wall | ||
| Tunnel | Retrieving the requested object |
Grapple Route
The grapple route is much much faster than the agility route, needing only 3 obstacles to be bypassed - all grapples. A crossbow and mithril grapple is required to pass this course, and it is possible to lose the grapple whilst training, so if you use this route, bring several grapples. You receive Ranged experience for using this route, and a small amount of Agility experience. It is possible to fall whilst using this route. Carrying a "heavy item" on this route will result in falling.
Timings and Experience
| Route | Time | Agility Experience | Ranged Experience |
|---|---|---|---|
| Agility course both ways | 3.10 | 2750 | 0 |
| Agility course there, grapple route return, or vice-versa | 2.30 | 1444 | 625 |
| Grapple route both ways | 1.49 | 108 | 1250 |
Tips & Tricks
- This course seems well designed - there are large "hotspots" to click on for each obstacle (as opposed to 2-pixel wide targets at other courses), it involves a little brain-work (retrieving the correct item), and an option of using two separate paths go gain either Agility or Ranged experience, or both. One downside is that if you use the agility course all the time (as no doubt people will), is that any fall means that you receive a negligible amount of experience.
- A fairy ring AJQ is present at the eastern end of the Dorgesh-Kaan South Dungeon which is just below the agility course. The ladder to the agility course is north-east of the ring.
- Mining helmet is lower weight than a lantern, and should have no chance to become extinguished by accident.
- When Turgall tells you what to retrieve, type it in public chat but don't hit return - then cross all the way to the other generator and the item you need to get is always at the bottom of the screen.
Rooftop Agility Courses
Rooftop Agility Courses were introduced to Old School Runescape on 5 December 2013. A total of nine courses have been released.
Draynor Village
10 Agility or higher is needed for this course.
| Obstacle | XP Gain |
|---|---|
| Climb Rough Wall | 5 |
| Cross Tightrope 1 | 8 |
| Cross Tightrope 2 | 7 |
| Balance Narrow Wall | 7 |
| Jump-up Wall | 10 |
| Jump Gap | 4 |
| Climb-down Crate | 79 |
| TOTAL | 120 |
Al Kharid
20 Agility or higher is needed for this course.
| Obstacle | XP Gain |
|---|---|
| Climb Rough Wall | 10 |
| Cross Tightrope 1 | 30 |
| Swing-across Cable | 40 |
| Teeth-grip Zip Line | 40 |
| Swing-across Tropical Tree | 10 |
| Climb Roof top beams | 5 |
| Cross Tightrope 2 | 15 |
| Jump Gap | 30 |
| TOTAL | 180 |
Varrock
30 Agility or higher is needed for this course.
| Obstacle | XP Gain |
|---|---|
| Climb Rough Wall | 12 |
| Cross Clothes Line | 21 |
| Leap Gap | 17 |
| Balance Wall | 25 |
| Leap Gap | 9 |
| Leap Gap | 22 |
| Leap Gap | 4 |
| Hurdle Ledge | 3 |
| Jump-off Edge | 125 |
| TOTAL | 238 |
Canifis
40 Agility or higher is needed for this course.
| Obstacle | XP Gain |
|---|---|
| Climb Tall Tree | 10 |
| Jump Gap 1 | 8 |
| Jump Gap 2 | 8 |
| Jump Gap 3 | 10 |
| Jump Gap 4 | 8 |
| Pole Vault | 10 |
| Jump Gamp 5 | 11 |
| Final Jump | 175 |
| TOTAL | 240 |
Falador
50 Agility or higher is needed for this course.
| Obstacle | XP Gain |
|---|---|
| Wall Climb | 8 |
| Rope Crawl 1 | 17 |
| Ledge Crawl | 45 |
| Roof Jump 1 | 20 |
| Rope Crawl 2 | 20 |
| Rope Crawl 3 | 45 |
| Roof Jump 3 | 40 |
| Roof Jump 4 | 25 |
| Roof Jump 5 | 10 |
| Roof Jump 6 | 10 |
| Roof Jump 7 | 10 |
| Roof Jump 8 | 10 |
| Complete Course | 180 |
| Total | 440 |
Seers' Village
60 Agility or higher is needed for this course.
| Obstacle | XP Gain |
|---|---|
| Climb-up Wall | 45 |
| Jump Gap 1 | 20 |
| Cross Tightrope | 20 |
| Jump Gap 2 | 35 |
| Jump Gap 3 | 15 |
| Jump Edge | 435 |
| Total | 570 |
Pollnivneach
70 Agility or higher is needed for this course.
| Obstacle | XP Gain |
|---|---|
| Climb-on Basket | 10 |
| Jump-on Market Stall | 45 |
| Grab Banner | 65 |
| Leap Gap | 35 |
| Jump to Tree | 75 |
| Climb Rough wall | 5 |
| Cross Monkeybars | 55 |
| Jump-on Tree | 60 |
| Jump-to Drying line | 540 |
| Total | 890 |
Rellekka
80 Agility or higher is needed for this course.
| Obstacle | XP Gain |
|---|---|
| Climb Rough wall | 20 |
| Jump Gap 1 | 30 |
| Walk Tightrope 1 | 40 |
| Jump Gap 2 + Wall Walk + Walk Tightrope 2 | 85 |
| Jump Gap 3 | 25 |
| Walk Tightrope 3 | 105 |
| Jump on Pile of Fish | 475 |
| Total | 780 |
Ardougne
90 Agility or higher is needed for this course.
| Obstacle | XP Gain |
|---|---|
| Climb-Up Wooden Beams | 46 |
| Jump Gap 1 | 65 |
| Walk-On Plank | 50 |
| Jump Gap 2 | 21 |
| Jump Gap 3 | 28 |
| Balance-Across Steep Roof | 57 |
| Jump Gap 4 | 529 |
| Total | 793 |
Other training
Werewolf skullball
Skull ball is played in the Werewolf agility area east of Canifis. You need to be wearing the Ring of Charos gained through the Creature of Fenkenstrain quest. You must also have a minimum of level 25 Agility.
To play, talk to the Skullball boss at the start of the course. From there, you must kick the ball through a course of 10 obstacles. To kick the ball, right click on it and select how far you want to kick it. A tap advances the ball 1 space away from you, a kick is 5 spaces, and shoot is 10 spaces. You also have the option of having the map highlight the goal.
When you successfully get the ball through the final obstacle, you will get a reward based on your time. If it's under 4 minutes, you will gain the maximum 750 experience. Any more and the experience becomes less.
Gnome Ball
Gnome Ball is a small members only minigame in which one or more players aim to score goals against gnomes. This is done by throwing the gnome ball into the goal. Ranged experience is gained each time you throw the ball, you get Ranged and Agility experience when you score a goal too. When you enter the field, you should talk to the referee to get the rules, and how to play.
Toy Mouse
You can make a Toy Mouse on a Crafting Table in your house or bought from a player who can make it. Winding, releasing and catching it will give you 3 Agility experience each time. It is also randomly obtained while using Ava's Accumulator, but it is quite rare.
Blast Furnace
The multi player blast furnace minigame has a facility to operate a belt to transport ores into the furnace. This gives a modest amount of agility experience. See the relevant page for more details.
Shortcuts
Shortcuts are identified with a twisting green arrow icon File:Shortcut icon.png on the minimap.
| Level | Obstacle | Location | Grapple? | Description |
|---|---|---|---|---|
| 1 | Stile | Multiple | No | Free players can use these, members receive 1 Agility experience, (not really a shortcut). |
| 5 | Crumbling wall | Falador | No | Right next to the west bank. Provides easy access to the areas south of Taverley. |
| 8 | Broken raft | South of Lumbridge | Yes[1] | Provides slightly quicker route between Lumbridge Swamp and Al Kharid. Goes both ways. |
| 10 | Rope swing | West Brimhaven | No | Provides access to small island with Moss giants and a respawn of a slice of cake. |
| 11 | Wall | Falador | Yes[2] | Allows you to climb the wall northeast of the Park. Faster access from Falador east bank to the north entrance of the Dwarven Mine and Barbarian Village. |
| 12 | Stepping stones | Brimhaven Dungeon | No | A quick shortcut deeper into the dungeon. Just west of the entrance. |
| 15 | Monkey bars | Edgeville dungeon | No | Provides access to the Earth Warriors |
| 16 | Underwall tunnel | Yanille | No | Near the Watchtower. Gives easy access to the west parts of Yanille from the teleport point. |
| 20 | Log balance | West of Seers' Village | No | Near the coal trucks. Provides easier access between the mining spot and the pickup location near Seers' Village |
| 21 | Underwall tunnel | Varrock | No | Northwest side of the Palace. Gives easier access to the nearby Spirit tree. |
| 22 | Pipe squeeze | Brimhaven Dungeon | No | Provides easier access to the Moss giants. Just west of the entrance. |
| 26 | Underwall tunnel | Falador | No | Southwest corner of Falador. Provides easier travel between the west bank and Rimmington, as well as the Crafting Guild. |
| 29 | Obstacle pipe | Yanille Agility dungeon | No | Allows access to a room with Skeletons and the Sinister chest. |
| 30 | Stepping stones | Brimhaven Dungeon | No | Allows access to the Red Dragons. |
| 31 | Stepping stones | Near Draynor Manor | No | Allows you to cross the River Lum between the Manor and Varrock. |
| 32 | Rock | East Catherby | Yes[3] | Allows easier passage from Catherby to Taverley. One way. Must have completed Fishing Contest. |
| 32 | Rock slide | East Cairn Isle | No | Allows access to Cairn Isle from Karamja Island and completion of an Easy task in the Karamja Achievement Diary. |
| 33 | Log balance | Ardougne | No | Allows easy passage across the river. |
| 34 | Pipe squeeze | Brimhaven Dungeon | No | Allows passage between the Red dragon and Black demon rooms. |
| 36 | Rock | Taverley Dungeon | Yes[4] | Allows escape from the Taverley Dungeon by crossing the water to Catherby from the Water obelisk island. One way. |
| 37 | Rocks | Tree Gnome Stronghold | No | Northeast of the Grand Tree. Allows easy access to Barbarian Outpost and the Lighthouse. |
| 38 | Rocks | Al Kharid | No | Allows easy access into the desert mining area from the north end. |
| 39 | Wall | Yanille | Yes[5] | South-west Yanille. Provides easier access to Gu'Tanoth and southern areas. |
| 40 | Balancing ledge | Yanille Agility dungeon | No | First obstacle into the Agility Dungeon, giving access to the Chaos druid warriors. Drops you into a pit of Poison spiders if you fail. |
| 41 | Rocks | Trollheim | No | Easy cliffside scramble. Allows easier travel over the hill near the Troll Stronghold. |
| 42 | Narrow crevice | Dwarven Mine | No | Provides a shortcut between the two arms of the mine. |
| 43 | Rocks | Trollheim | No | Medium cliffside scramble. Allows easier travel over the hill near the Troll Stronghold. |
| 44 | Rocks | Trollheim | No | Advanced cliffside scramble. Allows easier travel over the hill near the Troll Stronghold. |
| 45 | Log balance | Tirannwn | No | Allows passage between different parts of the forest. |
| 46 | Narrow walkway | Zanaris | No | Provides faster travel between the bank and the Cosmic altar. |
| 47 | Rocks | Trollheim | No | Hard cliffside scramble. Allows easier travel over the hill near the Troll Stronghold. |
| 48 | Log balance | North of Camelot | No | Provides slightly faster travel to eastern Fremmenick province. |
| 51 | Pipe squeeze | Varrock Sewers/Edgeville dungeon | No | Allows passage between the eastern part of the Edgeville dungeon and the Moss Giants in the Varrock Sewers. |
| 53 | Rock | Karamja | Yes[6] | Provides easier travel between the Karamja volcano area and lower Karamja. |
| 57 | Monkey bars | Yanille Agility dungeon | No | Provides access to the Chaos druids deeper in the dungeon, as well as a lockpick respawn down the nearby stairs. |
| 58 | Weathered wall | Ectofunctus | No | Provides faster travel down to the pool of slime. |
| 59 | Rocks | Arandar | No | Easy cliffside scramble. Helps when using the elven shortcut to Tirannwn. |
| 61 | Spiked chain | Slayer Tower | No | Shortcut between Crawling hand area and Aberrant spectre area on the second floor. |
| 62 | Narrow crevice | Slayer Dungeon | No | Shortcut between Basilisk area and Turoth area. |
| 64 | Rocks | Trollheim | No | Shortcut from Trollheim to level 20 Wilderness. One way. |
| 65 | Loose railing | River Salve | No | Slightly faster way to get from East Varrock to Canifis, bypassing the underground route at the Temple. |
| 66 | Narrow walkway | Zanaris | No | Much faster travel between the bank and the Cosmic altar. |
| 67 | Pile of rubble | Yanille Agility dungeon | No | Access to an area with 4 Chaos druids and Salarin the Twisted. |
| 68 | Rocks | Arandar | No | Medium cliffside scramble. Helps when using the elven shortcut to Tirannwn. |
| 70 | Pipe squeeze | Taverley Dungeon | No | Quick passage between the entrance and the Blue dragon area. Bypasses need for the Dusty key. |
| 70-72 | Mud Pile | Strongold Slayer Cave | No | Shortcut between Bloodveld area and Nechryael area. |
| 71 | Spiked chain | Slayer Tower | No | Shortcut between Infernal Mages area on the second floor and Nechryael area on the third floor. |
| 80 | Spiked blades | Taverley Dungeon | No | Shortcut between the entrance and the Poison spider area. Bypasses need for the Dusty key. |
| 81 | Spiked blades | Slayer Dungeon | No | Shortcut between the Cave crawler area and the Pyrefiend area. |
| 85 | Rocks | Arandar | No | Advanced cliffside scramble. Helps when using the elven shortcut to Tirannwn. |
Temporary boosts
- An Agility potion will boost Agility by 3. You can make these at level 34 Herblore.
- A Summer pie will boost Agility by 5. You can make these at level 95 Cooking.
- A yellow Spicy stew will boost or lower Agility by up to 5.
Quests rewarding Agility experience
| Quest | Required agility level |
Experience |
|---|---|---|
| Cabin Fever | 42 | 7,000 |
| Cold War | 30 | 5,000 |
| Darkness of Hallowvale | 26 | 7,000 |
| The Fremennik Trials | None | 2,812 |
| The Grand Tree | 25 | 7,900 |
| Grim Tales | 59 | 6,000 |
| Icthlarin's Little Helper | None | 4,000 |
| Mourning's Ends Part II | 56 (because of Regicide) | 20,000 |
| Recipe for Disaster (Awowogei section) | 48 | 10,000 |
| Recruitment Drive | None | 1,000 |
| Regicide | 56 | 13,750 |
| Royal Trouble | 40 | 5,000 |
| Troll Romance | 28 | 8,000 |
| Underground Pass | 30+ recommended | 3,000 |
External links
Hiscores
(2 February, 2015) There are 797 players with 99. The most agile player has 200M XP.
| Support | |
| Gathering |
|
| Combat |
|
| Artisan |
|