(cleanup) |
mNo edit summary |
||
| Line 1: | Line 1: | ||
| − | {{External|rs}}This page shows various strategies which may help you to kill the |
+ | {{External|rs}}This page shows various strategies which may help you to kill the {{Link|Barrows brothers}}. |
[[File:Barrows Grave.png|thumb|250px|right|This is the six Barrows brothers' graveyard as well as each brother's combat discipline.]] |
[[File:Barrows Grave.png|thumb|250px|right|This is the six Barrows brothers' graveyard as well as each brother's combat discipline.]] |
||
| Line 8: | Line 8: | ||
3.) Green is the penultimate shortest route and makes use of the [[Myreque shortcut]].<br> |
3.) Green is the penultimate shortest route and makes use of the [[Myreque shortcut]].<br> |
||
4.) Dark blue is the shortest route making use of [[Morytania legs 3]], [[Morytania legs 4|4]], or [[Mort'ton teleport]]s.]] |
4.) Dark blue is the shortest route making use of [[Morytania legs 3]], [[Morytania legs 4|4]], or [[Mort'ton teleport]]s.]] |
||
| − | The most direct route to |
+ | The most direct route to {{Link|Barrows}} is the {{Link|Barrows teleport|type=item}} tablet or the level 83 {{Link|Barrows Teleport}} spell in the {{Link|Arceuus spellbook}}. |
| − | Alternatively, players could choose to teleport to Mort'ton and run north-east to Barrows. After completing the |
+ | Alternatively, players could choose to teleport to Mort'ton and run north-east to Barrows. After completing the {{Link|Shades of Mort'ton}} {{Link|Quests|quest}} a teleport to Mort'ton via the {{Link|Minigame Group Finder}} becomes unlocked. It is possible to teleport there via a {{Link|Mort'ton teleport|Mort'ton teleport scroll|type=item}}, but they are more expensive and less convenient than {{Link|Barrows teleport|type=item}} tablets. |
| − | + | {{Link|Morytania legs 3|type=item}} or {{Link|Morytania legs 4|4|type=item}} grant unlimited {{Link|Burgh de Rott}} teleports, which is very useful for banking and getting to Barrows. Paired with a {{Link|Crafting cape|type=item}}, this is by far one of the best ways to do Barrows trips. |
|
| − | An alternative way is by use of the |
+ | An alternative way is by use of the {{Link|Myreque Hideout#The Myreque Shortcut|Myreque tunnel}}, unlocked during and after {{Link|In Search of the Myreque}} and then using the {{Link|Swamp Boaty|Swamp Boat}} to travel to {{Link|Mort'ton|Mor'ton}} at which point you will travel east to reach the Barrows mounds. |
| − | It is '''extremely''' useful to have level 50 |
+ | It is '''extremely''' useful to have level 50 {{Link|Construction|type=skill}} for the ability to build a {{Link|Kharyrll}} (or {{Link|Canifis}}) portal and an altar in your {{Link|player-owned house}}. This allows {{Link|Teleport to House}} tabs to be used after looting each chest, which will allow you to quickly recharge your {{Link|Prayer|type=skill}} and bank in Canifis (not to mention returning to Barrows). |
| − | If In Search of the Myreque has not been completed to the point in which you gain use of the swamp boat<ref>[[In Search of the Myreque]] is only needed to use the [[Swamp Boaty]] at [[Mort'ton]]. The Swamp boaty '''travelling to''' Mort'ton is accessible without completing the quest.</ref>, then the only way to get to Barrows from Canifis by running through the swamp, which is not recommended as it takes a long time and much of your |
+ | If In Search of the Myreque has not been completed to the point in which you gain use of the swamp boat<ref>[[In Search of the Myreque]] is only needed to use the [[Swamp Boaty]] at [[Mort'ton]]. The Swamp boaty '''travelling to''' Mort'ton is accessible without completing the quest.</ref>, then the only way to get to Barrows from Canifis by running through the swamp, which is not recommended as it takes a long time and much of your {{Link|food}} will be rotted by {{Link|ghast|img=Ghast.png}}s. |
| − | If |
+ | If {{Link|Making Friends with My Arm|img=Burntmeat chathead.png}} has been completed, a {{Link|Fire pit#Fire of Dehumidification|Fire of Dehumidification}} can be built in the {{Link|Fire pit}} in the swamp to negate the effect of the ghasts. |
==Recommended requirements== |
==Recommended requirements== |
||
'''Required quests''' |
'''Required quests''' |
||
| − | * |
+ | * {{Link|Priest in Peril}} [completed] |
| − | * |
+ | * {{Link|Nature Spirit|type=chat}} [begun] |
'''Suggested quests''' |
'''Suggested quests''' |
||
| − | * |
+ | * {{Link|Fairytale II - Cure a Queen|Fairy Tale II|img=Martin the Master Gardener chathead.png}} (for access to fairy rings) [begun] |
| − | ** |
+ | ** {{Link|Fairytale I - Growing Pains|Fairy Tale I|img=Martin the Master Gardener chathead.png}} (for access to Fairy Tale II) [completed] |
| − | * |
+ | * {{Link|In Search of the Myreque}} (for Agility shortcut to {{Link|The Hollows}}) [completed] |
| − | * |
+ | * {{Link|In Aid of the Myreque}} (for access to Burgh de Rott bank) [completed] |
| − | * |
+ | * {{Link|Rum Deal}} (for holy wrench) [completed] |
| − | * |
+ | * {{Link|Morytania Diary#Hard|Morytania Hard Diary}} (for unlimited teleports to {{Link|Burgh de Rott}} and 50% more runes from every chest opened at Barrows) [completed] |
'''Suggested skills (to survive underground)''' |
'''Suggested skills (to survive underground)''' |
||
| − | *{{Scm|Attack|60}} (70 for |
+ | *{{Scm|Attack|60}} (70 for {{Link|Abyssal whip|type=item}}) |
*{{Scm|Strength|60}} |
*{{Scm|Strength|60}} |
||
| − | *{{Scm|Defence|60}} (70 for |
+ | *{{Scm|Defence|60}} (70 for {{Link|Barrows equipment}}) |
| − | *{{Scm|Ranged|50}} (61 for |
+ | *{{Scm|Ranged|50}} (61 for {{Link|Rune crossbow|type=item}}, 75 for {{Link|Toxic blowpipe|type=item}}) |
| − | *{{Scm|Magic|50}} (75 for |
+ | *{{Scm|Magic|50}} (75 for {{Link|Trident of the swamp|type=item}}/{{Link|Trident of the seas|type=item}}) |
*{{Scm|Prayer|43}} (protection prayers) |
*{{Scm|Prayer|43}} (protection prayers) |
||
| − | *{{Scm|Slayer|55}} ( |
+ | *{{Scm|Slayer|55}} ({{Link|Magic Dart}} & {{Link|Broad bolts|img=Broad bolts 1.png}}) |
*{{Scm|Agility|40}} (stamina for the runs) |
*{{Scm|Agility|40}} (stamina for the runs) |
||
==Equipment== |
==Equipment== |
||
| − | The general idea for Barrows is that you should equip the best equipment you have at your disposal for your level. As a low-mid level player (i.e. with stats just around the required levels), your best bet is to wear defensive melee armour, with as much mage bonus as you can in your other slots. Because the |
+ | The general idea for Barrows is that you should equip the best equipment you have at your disposal for your level. As a low-mid level player (i.e. with stats just around the required levels), your best bet is to wear defensive melee armour, with as much mage bonus as you can in your other slots. Because the {{Link|Barrows brothers}} have such low {{Link|Magic|Magic Defence|type=skill}}, it '''does not''' matter whether you wear {{Link|Armour/Melee armour|Melee|img=Bronze full helm chathead.png}} or {{Link|Armour/Magic armour|Magic gear}} if you plan to attack them with Magic. However, without at least some bonus, your hits will suffer. |
Below is a general guide for armour, but generally you really cannot go wrong with going with your best set-up. |
Below is a general guide for armour, but generally you really cannot go wrong with going with your best set-up. |
||
| Line 126: | Line 126: | ||
==Notes & general strategy== |
==Notes & general strategy== |
||
| − | *Kiting is a method used to safe spot the melee brothers in the room with their sarcophagus. This method can be used to kill the melee brothers without the use of food or prayer. It is recommended for low to med level Ironmen who would otherwise use a lot of resources. In order to kite properly, the player must have their run turned off. This is due to the player moving two tiles per tick. Verac and Torag are the only brothers where kiting is possible on the north, south, east, and west sides of the sarcophagus. This method can only be done with a magic spell, therefore, the trident of the sea will not work. |
+ | *Kiting is a method used to safe spot the melee brothers in the room with their sarcophagus. This method can be used to kill the melee brothers without the use of food or prayer. It is recommended for low to med level Ironmen who would otherwise use a lot of resources. In order to kite properly, the player must have their run turned off. This is due to the player moving two tiles per tick. Verac and Torag are the only brothers where kiting is possible on the north, south, east, and west sides of the sarcophagus. This method can only be done with a magic spell, therefore, the trident of the sea will not work. {{Link|Iban Blast|Iban's Blast}}, {{Link|Magic Dart|Slayer dart}}, or fire bolt with {{Link|Chaos gauntlets|type=item}} and {{Link|Tome of fire|type=item}} are recommended for this method. Since the player will be running a lot, stamina potions and/or full {{Link|Graceful outfit|img=Graceful hood chathead.png}} are highly recommended. |
**The player must first spawn the melee brother. Run can be turned on at this point. For any melee brother besides Verac and Torag, the player must run on either the north side or south side of the sarcophagus to block the brother on the other side. |
**The player must first spawn the melee brother. Run can be turned on at this point. For any melee brother besides Verac and Torag, the player must run on either the north side or south side of the sarcophagus to block the brother on the other side. |
||
**With run '''turned off''', the player must '''use''' the magic spell on the brother. Autocast will not work. As soon as the experience drop shows, the player must use the control key to run, and lure the brother onto the other side of the sarcophagus. Holding the control key before clicking to move will turn the player's run on for the duration of the movement. This is the only way this method can work. |
**With run '''turned off''', the player must '''use''' the magic spell on the brother. Autocast will not work. As soon as the experience drop shows, the player must use the control key to run, and lure the brother onto the other side of the sarcophagus. Holding the control key before clicking to move will turn the player's run on for the duration of the movement. This is the only way this method can work. |
||
| Line 133: | Line 133: | ||
**It is recommended not to kite Dharok, since one false move can result in being one hit. It's recommended for the player to kill Dharok before any other brother, so they can use the prayer that they already have when arriving to Barrows. |
**It is recommended not to kite Dharok, since one false move can result in being one hit. It's recommended for the player to kill Dharok before any other brother, so they can use the prayer that they already have when arriving to Barrows. |
||
**With practice and done properly, this can be used to avoid all damage from the melee brothers, besides their initial hit when spawning the brother. |
**With practice and done properly, this can be used to avoid all damage from the melee brothers, besides their initial hit when spawning the brother. |
||
| − | *The |
+ | *The {{Link|black salamander|img=Black salamander.png}} is a good versatile weapon to use against all the brothers, and its ammunition ({{Link|harralander tar|type=item}}) is extremely cheap. Pairing it with full {{Link|Verac the Defiled's equipment|Verac's}} is a great alternative. |
| − | *You should always use |
+ | *You should always use {{Link|rune arrow|img=Rune arrow 1.png}}s for {{Link|Ahrim the Blighted|Ahrim|img=Ahrim the Blighted.png}}. It can be worthwhile to bring a {{Link|ranging potion|img=Ranging potion(1).png}}, as he has high {{Link|Ranged|type=skill}} {{Link|Defence|type=skill}} despite being weak to ranged attacks. |
| − | *Imbuing the |
+ | *Imbuing the {{Link|magic shortbow|type=item}} with a {{Link|Bounty Hunter}} Scroll will give you a second {{Link|Special attacks|special}}. |
| − | *Half keys and |
+ | *Half keys and {{Link|dragon med helm|type=item}}s are bonus loot added to the chest, and can be affected by the {{Link|ring of wealth|type=item}}. |
| − | *Once you can use a 15-second hold ( |
+ | *Once you can use a 15-second hold ({{Link|Entangle}}, {{Link|Ice Blitz}}, or {{Link|Ice Barrage}}) you can hold the 4 {{Link|Melee}} brothers to not take damage while you attack. This is a cheap way to save supplies. |
| − | *A |
+ | *A {{Link|Stamina potion|img=Stamina potion(1).png}} can be used to make the run through the tunnels simpler. |
| − | *Completing the |
+ | *Completing the {{Link|Morytania Diary#Hard|Morytania Hard Diary}} will grant you 50% more runes when looting from the chest. |
*The maximum damage by each brother: |
*The maximum damage by each brother: |
||
| − | ** |
+ | **{{Link|Dharok the Wretched|Dharok|img=Dharok the Wretched.png}} - 30 at full HP, 57 at 1 HP |
| + | **{{Link|Guthan the Infested|Guthan|img=Guthan the Infested.png}} - 26 |
||
| − | **[[Guthan]] - 26 |
||
| − | ** |
+ | **{{Link|Karil the Tainted|Karil|img=Karil the Tainted.png}} - 20 (Attacks rapidly) |
| + | **{{Link|Ahrim the Blighted|Ahrim|img=Ahrim the Blighted.png}} - 20 |
||
| − | **[[Ahrim]] - 20 |
||
| + | **{{Link|Torag the Corrupted|Torag|img=Torag the Corrupted.png}} - 25 |
||
| − | **[[Torag]] - 25 |
||
| − | ** |
+ | **{{Link|Verac the Defiled|Verac|img=Verac the Defiled.png}} - 25, 15 if praying {{Link|Protect from Melee}} |
| − | * |
+ | *{{Link|Bones to Peaches}} tablets are an excellent way to extend Barrows trips. Just fill empty spaces with {{Link|bones|type=item}} while gathering kill count, and convert as needed. |
| − | *There are limited safespots in the tunnels, however, if you know how to exploit them, you can effectively safespot any melee brother you may have in there and/or hide to eat if you are not using prayer. With enough skill, prayer potions are not even necessary, even if you get |
+ | *There are limited safespots in the tunnels, however, if you know how to exploit them, you can effectively safespot any melee brother you may have in there and/or hide to eat if you are not using prayer. With enough skill, prayer potions are not even necessary, even if you get {{Link|Dharok the Wretched|Dharok|img=Dharok the Wretched.png}} in the tunnels. |
**Like all NPCs, the Barrows brothers will attempt to move in a straight line towards the player, however ''they will move east/west first before moving north/south.'' This opens up many opportunities to safespot melee brothers on corners of debris that can be shot through. |
**Like all NPCs, the Barrows brothers will attempt to move in a straight line towards the player, however ''they will move east/west first before moving north/south.'' This opens up many opportunities to safespot melee brothers on corners of debris that can be shot through. |
||
**''Debris on the floor that resemble bricks cannot be shot through'', nor can the standing torches in the chest room, nor the chest itself. The bricks cannot be shot through as they are the same objects (merely recoloured) as the piles of bricks in the brothers' individual crypts. |
**''Debris on the floor that resemble bricks cannot be shot through'', nor can the standing torches in the chest room, nor the chest itself. The bricks cannot be shot through as they are the same objects (merely recoloured) as the piles of bricks in the brothers' individual crypts. |
||
| Line 155: | Line 155: | ||
**''Any other debris on the floor that cannot be walked through can be shot through'', including skeletons, boulders, rocks, and the ladder, even in other rooms than the room where you came down when it is invisible to you. It can be difficult to tell which squares can be walked on with some of the piles of boulders in some rooms. |
**''Any other debris on the floor that cannot be walked through can be shot through'', including skeletons, boulders, rocks, and the ladder, even in other rooms than the room where you came down when it is invisible to you. It can be difficult to tell which squares can be walked on with some of the piles of boulders in some rooms. |
||
**''The ladder and ladder squares can be shot through''. You will only see the ladder in the room that you came down on; however, the square containing the other possible ladder locations can still be used as a safespot. This may lead to some potentially hilarious and very useful safespot opportunities where brothers appear to be frozen. |
**''The ladder and ladder squares can be shot through''. You will only see the ladder in the room that you came down on; however, the square containing the other possible ladder locations can still be used as a safespot. This may lead to some potentially hilarious and very useful safespot opportunities where brothers appear to be frozen. |
||
| − | * |
+ | *{{Link|Ice Blitz}} runes are roughly equal in cost to {{Link|Entangle}}, binding for the same 15 seconds, but hitting up to 26. |
| − | *When killing |
+ | *When killing {{Link|Verac the Defiled|Verac|img=Verac the Defiled.png}}, because his set allows him to hit through {{Link|protection prayers}}, most players who kill him usually use {{Link|Entangle}} or {{Link|Ice Barrage}} once he spawns to bind him for a decent amount of time. This will save food should he be lucky enough for his set effect to activate. |
| − | ** |
+ | **{{Link|Snare}} allows for 3 attacks before Verac starts moving again. |
| − | ** |
+ | **{{Link|Entangle}}/{{Link|Ice Blitz}} allows for 5 attacks before Verac starts moving again. |
| − | ** |
+ | **{{Link|Ice Barrage}} allows for 6 attacks before Verac starts moving again. |
| − | *A full set of |
+ | *A full set of {{Link|Guthan the Infested's equipment|Guthan's}} is helpful at the tunnels to restore lost health from encounters with the Brothers and gaining killcount. This will require 70 {{Link|Attack|type=skill}} and {{Link|Defence|type=skill}} in order to use, however. |
==Inventory== |
==Inventory== |
||
====Option 1: Extended trips==== |
====Option 1: Extended trips==== |
||
| − | * |
+ | * {{Link|Spade|type=item}} or a free inventory space |
| − | * |
+ | * {{Link|Ectophial|type=item}} or any other one-click {{Link|Teleportation|teleport}} |
| − | * |
+ | * {{Link|Black d'hide chaps|Black|type=item}}/{{Link|Blessed chaps}} |
| − | * |
+ | * {{Link|Magic shortbow|type=item}} / {{Link|Toxic blowpipe|type=item}} / {{Link|Crystal bow|type=item}} |
| − | * |
+ | * {{Link|Abyssal whip|type=item}} / {{Link|Dragon scimitar|type=item}} |
| − | * |
+ | * {{Link|Melee}} {{Link|platebody}} / {{Link|D'hide body}} |
| − | * |
+ | * {{Link|Runes}} for attacking and binding {{Link|List of spells|spell}} to be cast (only if necessary) |
| − | * |
+ | * {{Link|Ranging potion|img=Ranging potion(1).png}} (if you wish) |
| − | * 10-20 |
+ | * 10-20 {{Link|Prayer potion|img=Prayer potion(1).png}}s |
| − | * 5+ |
+ | * 5+ {{Link|Bones to Peaches}} tablets |
| − | * |
+ | * {{Link|Stamina potion|img=Stamina potion(1).png}}s (especially due to Karil's set effect which may drain {{Link|Agility|type=skill}} to cripplingly low levels) |
| − | * Emergency |
+ | * Emergency {{Link|food}}, preferably that can be eaten {{Link|Tick manipulation|without interrupting combat}}, that heals 10+ in a single click for the remaining inventory space. ({{Link|Pineapple pizza|type=item}}s are excellent.) |
====Option 2: Efficient, frequent banking and prayer restoration==== |
====Option 2: Efficient, frequent banking and prayer restoration==== |
||
| − | This set-up enables much cheaper and somewhat faster runs, assuming the player has high enough overall defence and experience with the Barrows to tank brothers other than |
+ | This set-up enables much cheaper and somewhat faster runs, assuming the player has high enough overall defence and experience with the Barrows to tank brothers other than {{Link|Dharok the Wretched|Dharok|img=Dharok the Wretched.png}} as may be necessary. |
| − | * |
+ | * {{Link|Spade|type=item}} or a free inventory space, though bringing one will save significant time |
| − | * |
+ | * {{Link|Barrows teleport|Barrows tablets|type=item}} |
| − | * |
+ | * {{Link|Ardougne cloak 1|Ardougne cloak|type=item}} for free teleports very close to an altar, useful for saving some time over going to {{Link|Clan Wars}} when only prayer restoration is necessary |
| − | * |
+ | * {{Link|Ring of dueling|Dueling ring|type=item}} for teleports to Clan Wars or for fast banking at {{Link|Castle Wars}}. Clan Wars has a bank (slightly further than the one at Castle Wars) and a Free-for-All portal that can be used to restore all drained attributes: stats (Agility being important), run energy, health, prayer, and special attack energy. |
| − | * One |
+ | * One {{Link|Prayer potion|img=Prayer potion(1).png}} and/or a {{Link|Falador shield 2|Falador shield|type=item}}, in case Dharok is in the tunnels |
* Choice of appropriate weaponry, armour, and food |
* Choice of appropriate weaponry, armour, and food |
||
| Line 190: | Line 190: | ||
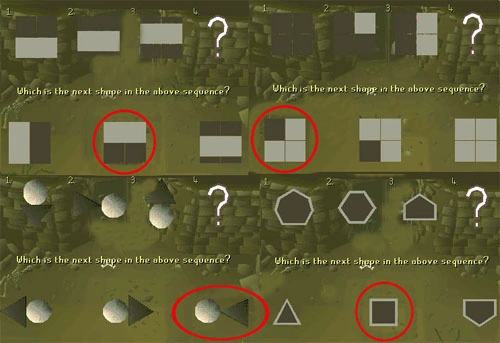
The tunnels should not prove to be a great challenge to any experienced player. They are a series of 9 rooms, connected by passageways. At the center of the tunnels, there is the room containing the rewards chest (in this chest there will always be a brother, just in case a player doesn't encounter any of them before that point). This room is only reachable by one of the 4 doors connecting to it, and which door this is changes every time a player leaves the crypts. The aforementioned door is a locked one, requiring the player to solve a multiple choice puzzle to unlock the door. |
The tunnels should not prove to be a great challenge to any experienced player. They are a series of 9 rooms, connected by passageways. At the center of the tunnels, there is the room containing the rewards chest (in this chest there will always be a brother, just in case a player doesn't encounter any of them before that point). This room is only reachable by one of the 4 doors connecting to it, and which door this is changes every time a player leaves the crypts. The aforementioned door is a locked one, requiring the player to solve a multiple choice puzzle to unlock the door. |
||
| − | '''Note:''' When opening any door in the tunnels, a monster will always pop out and attack the player. The monster can be a |
+ | '''Note:''' When opening any door in the tunnels, a monster will always pop out and attack the player. The monster can be a {{Link|bloodworm|img=Bloodworm.png}}, {{Link|crypt rat|img=Crypt rat.png}}, {{Link|skeleton|img=Skeleton.png}} or any surviving Barrows brothers. It is advised to keep health at least 50+ in case a brother appears upon opening a door, or the player may die from the unexpected attack. |
<span style="color: red">'''CAUTION:'''</span> If you get the puzzle wrong, the crypt formation will shift, requiring you to go around the tunnels another time to one of the other 4 doors. Also, remember as long as there is one brother left, there is always the possibility that, upon entering one of the crypt rooms, he will attack, even if the chest has been looted. |
<span style="color: red">'''CAUTION:'''</span> If you get the puzzle wrong, the crypt formation will shift, requiring you to go around the tunnels another time to one of the other 4 doors. Also, remember as long as there is one brother left, there is always the possibility that, upon entering one of the crypt rooms, he will attack, even if the chest has been looted. |
||
Revision as of 14:36, 24 February 2019
This page shows various strategies which may help you to kill the ![]() Barrows brothers.
Barrows brothers.
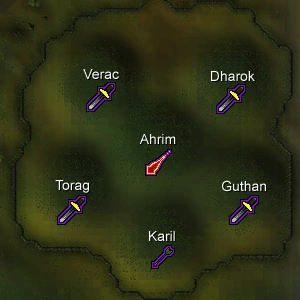
This is the six Barrows brothers' graveyard as well as each brother's combat discipline.
Getting there
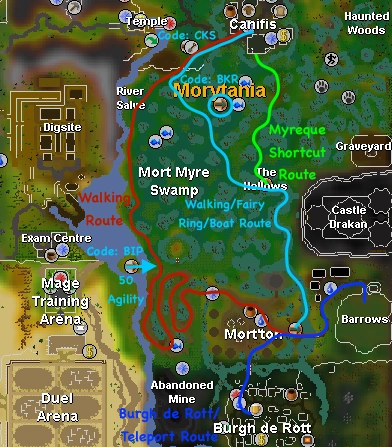
1.) Red is the longest and most tedious route.
2.) Sky blue is the moderate route if no additional quests are completed aside from In Aid of the Myreque. Those who have access to fairy rings can also use this route.
3.) Green is the penultimate shortest route and makes use of the Myreque shortcut.
4.) Dark blue is the shortest route making use of Morytania legs 3, 4, or Mort'ton teleports.
The most direct route to ![]() Barrows is the
Barrows is the ![]() Barrows teleport tablet or the level 83
Barrows teleport tablet or the level 83 ![]() Barrows Teleport spell in the
Barrows Teleport spell in the ![]() Arceuus spellbook.
Arceuus spellbook.
Alternatively, players could choose to teleport to Mort'ton and run north-east to Barrows. After completing the ![]() Shades of Mort'ton
Shades of Mort'ton ![]() quest a teleport to Mort'ton via the
quest a teleport to Mort'ton via the ![]() Minigame Group Finder becomes unlocked. It is possible to teleport there via a
Minigame Group Finder becomes unlocked. It is possible to teleport there via a ![]() Mort'ton teleport scroll, but they are more expensive and less convenient than
Mort'ton teleport scroll, but they are more expensive and less convenient than ![]() Barrows teleport tablets.
Barrows teleport tablets.
![]() Morytania legs 3 or
Morytania legs 3 or ![]() 4 grant unlimited
4 grant unlimited ![]() Burgh de Rott teleports, which is very useful for banking and getting to Barrows. Paired with a
Burgh de Rott teleports, which is very useful for banking and getting to Barrows. Paired with a ![]() Crafting cape, this is by far one of the best ways to do Barrows trips.
Crafting cape, this is by far one of the best ways to do Barrows trips.
An alternative way is by use of the ![]() Myreque tunnel, unlocked during and after
Myreque tunnel, unlocked during and after ![]() In Search of the Myreque and then using the
In Search of the Myreque and then using the ![]() Swamp Boat to travel to
Swamp Boat to travel to ![]() Mor'ton at which point you will travel east to reach the Barrows mounds.
Mor'ton at which point you will travel east to reach the Barrows mounds.
It is extremely useful to have level 50 ![]() Construction for the ability to build a
Construction for the ability to build a ![]() Kharyrll (or
Kharyrll (or ![]() Canifis) portal and an altar in your
Canifis) portal and an altar in your ![]() player-owned house. This allows
player-owned house. This allows ![]() Teleport to House tabs to be used after looting each chest, which will allow you to quickly recharge your
Teleport to House tabs to be used after looting each chest, which will allow you to quickly recharge your ![]() Prayer and bank in Canifis (not to mention returning to Barrows).
Prayer and bank in Canifis (not to mention returning to Barrows).
If In Search of the Myreque has not been completed to the point in which you gain use of the swamp boat[1], then the only way to get to Barrows from Canifis by running through the swamp, which is not recommended as it takes a long time and much of your ![]() food will be rotted by
food will be rotted by ![]() ghasts.
ghasts.
If ![]() Making Friends with My Arm has been completed, a
Making Friends with My Arm has been completed, a ![]() Fire of Dehumidification can be built in the
Fire of Dehumidification can be built in the ![]() Fire pit in the swamp to negate the effect of the ghasts.
Fire pit in the swamp to negate the effect of the ghasts.
Recommended requirements
Required quests
 Priest in Peril [completed]
- Nature Spirit [begun]
Suggested quests
- Fairy Tale II (for access to fairy rings) [begun]
- Fairy Tale I (for access to Fairy Tale II) [completed]
- In Search of the Myreque (for Agility shortcut to The Hollows) [completed]
- In Aid of the Myreque (for access to Burgh de Rott bank) [completed]
- Rum Deal (for holy wrench) [completed]
- Morytania Hard Diary (for unlimited teleports to Burgh de Rott and 50% more runes from every chest opened at Barrows) [completed]
Suggested skills (to survive underground)
- 60 (70 for Abyssal whip)
- 60
- 60 (70 for Barrows equipment)
- 50 (61 for Rune crossbow, 75 for Toxic blowpipe)
- 50 (75 for Trident of the swamp/ Trident of the seas)
- 43 (protection prayers)
- 55 ( Magic Dart & Broad bolts)
- 40 (stamina for the runs)
Equipment
The general idea for Barrows is that you should equip the best equipment you have at your disposal for your level. As a low-mid level player (i.e. with stats just around the required levels), your best bet is to wear defensive melee armour, with as much mage bonus as you can in your other slots. Because the ![]() Barrows brothers have such low
Barrows brothers have such low ![]() Magic Defence, it does not matter whether you wear
Magic Defence, it does not matter whether you wear ![]() Melee or
Melee or ![]() Magic gear if you plan to attack them with Magic. However, without at least some bonus, your hits will suffer.
Magic gear if you plan to attack them with Magic. However, without at least some bonus, your hits will suffer.
Below is a general guide for armour, but generally you really cannot go wrong with going with your best set-up.
Warning: Don't forget that when bringing your best items, that you can die. This minigame is not a safe death.
- References
- ↑ In Search of the Myreque is only needed to use the Swamp Boaty at Mort'ton. The Swamp boaty travelling to Mort'ton is accessible without completing the quest.
- ↑ 2.0 2.1 2.2 2.3 2.4 Give magic strength (max hit), very low defences, a mix is advised.
- ↑ Only useful for prayer bonus, contrary to popular belief Book of darkness does NOT increase damage, Barrows brothers have 0 magic defence, magic attack bonus does nothing (same goes for seers ring).
Recommended weapons
| Item (most effective > least effective) | |||
|---|---|---|---|
| Style | 1 | 2 | 3 |
- References
- ↑ 1.0 1.1 Only when using tome of fire + fire elemental spell.
- ↑ Only with Salve amulet(ei) for fastest kc (skeletons only!) / salve amulet(e) for melee.
Notes & general strategy
- Kiting is a method used to safe spot the melee brothers in the room with their sarcophagus. This method can be used to kill the melee brothers without the use of food or prayer. It is recommended for low to med level Ironmen who would otherwise use a lot of resources. In order to kite properly, the player must have their run turned off. This is due to the player moving two tiles per tick. Verac and Torag are the only brothers where kiting is possible on the north, south, east, and west sides of the sarcophagus. This method can only be done with a magic spell, therefore, the trident of the sea will not work. Iban's Blast, Slayer dart, or fire bolt with Chaos gauntlets and Tome of fire are recommended for this method. Since the player will be running a lot, stamina potions and/or full Graceful outfit are highly recommended.
- The player must first spawn the melee brother. Run can be turned on at this point. For any melee brother besides Verac and Torag, the player must run on either the north side or south side of the sarcophagus to block the brother on the other side.
- With run turned off, the player must use the magic spell on the brother. Autocast will not work. As soon as the experience drop shows, the player must use the control key to run, and lure the brother onto the other side of the sarcophagus. Holding the control key before clicking to move will turn the player's run on for the duration of the movement. This is the only way this method can work.
- The player will first have to run the distance of the sarcophagus on the north or south side before clicking over to the other side, or else the player will path directly through the melee brother. This is not the case for Verac or Torag since the east and west sides will work to block them.
- For Verac and Torag, all four sides of the sarcophagus can be used to effectively kite, as stated, the other melee brothers are only safe spotable on the north and south side. Due to their pathing mechanics.
- It is recommended not to kite Dharok, since one false move can result in being one hit. It's recommended for the player to kill Dharok before any other brother, so they can use the prayer that they already have when arriving to Barrows.
- With practice and done properly, this can be used to avoid all damage from the melee brothers, besides their initial hit when spawning the brother.
- The black salamander is a good versatile weapon to use against all the brothers, and its ammunition ( harralander tar) is extremely cheap. Pairing it with full Verac's is a great alternative.
- You should always use rune arrows for Ahrim. It can be worthwhile to bring a ranging potion, as he has high Ranged Defence despite being weak to ranged attacks.
- Imbuing the magic shortbow with a Bounty Hunter Scroll will give you a second special.
- Half keys and dragon med helms are bonus loot added to the chest, and can be affected by the ring of wealth.
- Once you can use a 15-second hold ( Entangle, Ice Blitz, or Ice Barrage) you can hold the 4 Melee brothers to not take damage while you attack. This is a cheap way to save supplies.
- A Stamina potion can be used to make the run through the tunnels simpler.
- Completing the Morytania Hard Diary will grant you 50% more runes when looting from the chest.
- The maximum damage by each brother:
- Bones to Peaches tablets are an excellent way to extend Barrows trips. Just fill empty spaces with bones while gathering kill count, and convert as needed.
- There are limited safespots in the tunnels, however, if you know how to exploit them, you can effectively safespot any melee brother you may have in there and/or hide to eat if you are not using prayer. With enough skill, prayer potions are not even necessary, even if you get Dharok in the tunnels.
- Like all NPCs, the Barrows brothers will attempt to move in a straight line towards the player, however they will move east/west first before moving north/south. This opens up many opportunities to safespot melee brothers on corners of debris that can be shot through.
- Debris on the floor that resemble bricks cannot be shot through, nor can the standing torches in the chest room, nor the chest itself. The bricks cannot be shot through as they are the same objects (merely recoloured) as the piles of bricks in the brothers' individual crypts.
- The brothers will not get stuck on other NPCs or players.
- Of all the long corridors, it is only not possible to find a safespot for a melee brother if you are entering the northern corridor from the northwest room. The nearest safespot here is too far and will cause the brother to disappear. All of the other long corridors and the four 'corner' rooms can be utilised effectively.
- Any other debris on the floor that cannot be walked through can be shot through, including skeletons, boulders, rocks, and the ladder, even in other rooms than the room where you came down when it is invisible to you. It can be difficult to tell which squares can be walked on with some of the piles of boulders in some rooms.
- The ladder and ladder squares can be shot through. You will only see the ladder in the room that you came down on; however, the square containing the other possible ladder locations can still be used as a safespot. This may lead to some potentially hilarious and very useful safespot opportunities where brothers appear to be frozen.
- Ice Blitz runes are roughly equal in cost to Entangle, binding for the same 15 seconds, but hitting up to 26.
- When killing Verac, because his set allows him to hit through protection prayers, most players who kill him usually use Entangle or Ice Barrage once he spawns to bind him for a decent amount of time. This will save food should he be lucky enough for his set effect to activate.
- Snare allows for 3 attacks before Verac starts moving again.
- Entangle/ Ice Blitz allows for 5 attacks before Verac starts moving again.
- Ice Barrage allows for 6 attacks before Verac starts moving again.
- A full set of Guthan's is helpful at the tunnels to restore lost health from encounters with the Brothers and gaining killcount. This will require 70 Attack and Defence in order to use, however.
Inventory
Option 1: Extended trips
- Spade or a free inventory space
- Ectophial or any other one-click teleport
- Black/ Blessed chaps
- Magic shortbow / Toxic blowpipe / Crystal bow
- Abyssal whip / Dragon scimitar
- Melee platebody / D'hide body
- Runes for attacking and binding spell to be cast (only if necessary)
- Ranging potion (if you wish)
- 10-20 Prayer potions
- 5+ Bones to Peaches tablets
- Stamina potions (especially due to Karil's set effect which may drain Agility to cripplingly low levels)
- Emergency food, preferably that can be eaten without interrupting combat, that heals 10+ in a single click for the remaining inventory space. ( Pineapple pizzas are excellent.)
Option 2: Efficient, frequent banking and prayer restoration
This set-up enables much cheaper and somewhat faster runs, assuming the player has high enough overall defence and experience with the Barrows to tank brothers other than ![]() Dharok as may be necessary.
Dharok as may be necessary.
- Spade or a free inventory space, though bringing one will save significant time
- Barrows tablets
- Ardougne cloak for free teleports very close to an altar, useful for saving some time over going to Clan Wars when only prayer restoration is necessary
- Dueling ring for teleports to Clan Wars or for fast banking at Castle Wars. Clan Wars has a bank (slightly further than the one at Castle Wars) and a Free-for-All portal that can be used to restore all drained attributes: stats (Agility being important), run energy, health, prayer, and special attack energy.
- One Prayer potion and/or a Falador shield, in case Dharok is in the tunnels
- Choice of appropriate weaponry, armour, and food
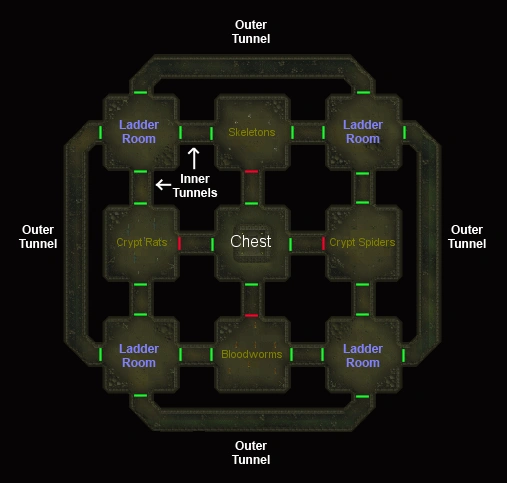
It's Barrows from the crypt!
The tunnels should not prove to be a great challenge to any experienced player. They are a series of 9 rooms, connected by passageways. At the center of the tunnels, there is the room containing the rewards chest (in this chest there will always be a brother, just in case a player doesn't encounter any of them before that point). This room is only reachable by one of the 4 doors connecting to it, and which door this is changes every time a player leaves the crypts. The aforementioned door is a locked one, requiring the player to solve a multiple choice puzzle to unlock the door.
Note: When opening any door in the tunnels, a monster will always pop out and attack the player. The monster can be a ![]() bloodworm,
bloodworm, ![]() crypt rat,
crypt rat, ![]() skeleton or any surviving Barrows brothers. It is advised to keep health at least 50+ in case a brother appears upon opening a door, or the player may die from the unexpected attack.
skeleton or any surviving Barrows brothers. It is advised to keep health at least 50+ in case a brother appears upon opening a door, or the player may die from the unexpected attack.
CAUTION: If you get the puzzle wrong, the crypt formation will shift, requiring you to go around the tunnels another time to one of the other 4 doors. Also, remember as long as there is one brother left, there is always the possibility that, upon entering one of the crypt rooms, he will attack, even if the chest has been looted.
Once you go down the ladder, check your surroundings to figure out which corner your ladder is in. Remember this room, to return up the ladder for multiple chest runs if you can attempt it.
By tilting the camera, and looking at the interior tunnel rooms, you can scan ahead to see which door will contain your puzzle and route to the center room. Only the middle path with the Open Door option will have your puzzle. The other 3 will only have Examine Door as an option. In a corner room, you can see 2 of your 4 potential internal rooms.