(→Kill count and loot: Added information about how many monsters to kill if players want more runes over bolt racks and key halves.) Tags: Visual edit apiedit |
(cleanup) |
||
| (117 intermediate revisions by 73 users not shown) | |||
| Line 1: | Line 1: | ||
| − | {{ |
+ | {{External|rs}} |
{{Dangerous minigame}} |
{{Dangerous minigame}} |
||
{{HasStrategy}} |
{{HasStrategy}} |
||
{{HasMMG|Barrows}} |
{{HasMMG|Barrows}} |
||
| + | {{Infobox Minigame |
||
| ⚫ | |||
| − | [[File:Barrows minigame.png|thumb|300px |
+ | |image = [[File:Barrows minigame.png|thumb|300px]] |
| + | |release = 9 May [[2005]] |
||
| + | |update = Barrows |
||
| + | |members = Yes |
||
| + | |location = East of [[Burgh de Rott]] |
||
| + | |players = 1 |
||
| + | |skills = [[Combat]] |
||
| + | |currency = N/A |
||
| + | |tutorial = No |
||
| + | |music = [[Dangerous Way]] |
||
| ⚫ | |||
| ⚫ | |||
{{Relativelocation |
{{Relativelocation |
||
|location = Barrows |
|location = Barrows |
||
| Line 12: | Line 23: | ||
|west = Mort'ton |
|west = Mort'ton |
||
}} |
}} |
||
| + | |||
| − | The '''Barrows''' minigame is an area-based [[Combat]] [[minigame]] released on 9 May 2005. It is popular due to the potential of receiving valuable rewards, including the unique [[Barrows equipment]]. The objective is to defeat the six [[Barrows brothers]]: [[Ahrim the Blighted]], [[Dharok the Wretched]], [[Guthan the Infested]], [[Karil the Tainted]], [[Torag the Corrupted]] and [[Verac the Defiled]]. Each brother has his own burial mound and possesses a [[Combat level]] of 115, except Ahrim the Blighted and Karil the Tainted, who both have a Combat level of 98. To enter a mound, the player must stand on top of it and dig using a [[spade]]. ('''Note:''' As of Content Poll #14, there will be a spade [[Spawning|spawn]] near the Barrows area.) The Barrows brothers are very strong, each with high [[Defence]] levels. Each brother also has a different [[Special attacks|special ability]], which is the same as the set effect of the corresponding armour set. Because of this, special consideration should be given to the methods with and order in which the brothers are killed. |
||
| + | The '''Barrows''' minigame is an area-based [[Combat]] [[minigame]] released on 9 May 2005. It is popular due to the potential of receiving valuable rewards, including the unique [[Barrows equipment]]. The objective is to defeat the six [[Barrows brothers]]: [[Ahrim the Blighted]], [[Dharok the Wretched]], [[Guthan the Infested]], [[Karil the Tainted]], [[Torag the Corrupted]] and [[Verac the Defiled]]. |
||
| + | |||
| + | Each brother has his own burial mound and possesses a [[combat level]] of 115, except Ahrim the Blighted and Karil the Tainted, who both have a combat level of 98. To enter a mound, the player must stand on top of it and dig using a [[spade]]. There is a spade [[Item spawn|spawn]] in the nearby shack. |
||
| + | |||
| + | The Barrows brothers are very strong, each with high [[Defence]] levels and strong [[armour]]. Each brother has a [[passive effect|set effect]], which is the same as the corresponding armour set. Because of this, consideration should be given to the methods with and order in which the brothers are killed. |
||
==Getting there== |
==Getting there== |
||
| + | [[File:Barrows Map.png|thumb|250px| |
||
| − | [[File:Barrows Map.png|thumb|250px|Red is the longest and most tedious route. Sky blue is the moderate route if no additional quests are completed aside from [[In Aid of the Myreque]]. Green is the shortest route and makes use of the [[In Search of the Myreque#The Myreque Shortcut|Myreque shortcut]].]] |
||
| + | 1.) Red is the longest and most tedious route.<br> |
||
| + | 2.) Sky blue is the moderate route if no additional quests are completed aside from [[In Aid of the Myreque]]. Those who have access to [[fairy rings]] can also use this route.<br> |
||
| + | 3.) Green is the penultimate shortest route and makes use of the [[Myreque shortcut]].<br> |
||
| + | 4.) Dark blue is the shortest route making use of [[Morytania legs 3]], [[Morytania legs 4|4]], or [[Mort'ton teleport]]s.]] |
||
There are several different methods for travelling to Barrows and for banking. Some of which are: |
There are several different methods for travelling to Barrows and for banking. Some of which are: |
||
| − | *Casting [[Barrows Teleport]] in the [[Arceuus spellbook]]. Requires 83 Magic and at least 60% favour with the [[Arceuus House]]. Alternatively, using a [[Barrows teleport]] [[Magic tablet|tablet]] will work just as well. |
+ | *Casting [[Barrows Teleport]] in the [[Arceuus spellbook]]. Requires 83 [[Magic]] and at least 60% favour with the [[Arceuus House]]. Alternatively, using a [[Barrows teleport]] [[Magic tablet|tablet]] will work just as well. |
| − | *Using the [[fairy ring]] code {{Fairycode|bkr}} to travel to the fairy ring inside [[Mort Myre Swamp]] and heading south through the swamp and then through [[Mort'ton]] to Barrows. |
+ | *Using the [[fairy ring]] code {{Fairycode|bkr}} to travel to the fairy ring inside [[Mort Myre Swamp]] and heading south through the swamp and then through [[Mort'ton]] to Barrows. Alternatively, at 50 [[Agility]], players can use the fairy ring code {{Fairycode|bip}}, go east, and south, following the path through Mort'ton. |
*:'''Note:''' Fairy ring travel requires [[Fairytale II - Cure a Queen]] to be started, and [[Nature Spirit]] is required to be started for travel through Mort Myre Swamp. |
*:'''Note:''' Fairy ring travel requires [[Fairytale II - Cure a Queen]] to be started, and [[Nature Spirit]] is required to be started for travel through Mort Myre Swamp. |
||
*With completion of [[In Search of the Myreque]], players gain access to an alternative route to Mort'ton. |
*With completion of [[In Search of the Myreque]], players gain access to an alternative route to Mort'ton. |
||
*After completion of [[Ghosts Ahoy]], players can use the [[Ectophial]] and travel from there. (It also serves as a one-click teleport in case of emergencies.) |
*After completion of [[Ghosts Ahoy]], players can use the [[Ectophial]] and travel from there. (It also serves as a one-click teleport in case of emergencies.) |
||
*Players can teleport to [[Varrock]] and head east (allows players to restore [[Prayer points]] at the [[Paterdomus|temple]] on the way). |
*Players can teleport to [[Varrock]] and head east (allows players to restore [[Prayer points]] at the [[Paterdomus|temple]] on the way). |
||
| − | *Players can teleport directly to [[Canifis]] using the [[Kharyll Teleport]] spell, provided they have completed [[Desert Treasure]]. This option can be made more convenient by adding a Kharyll [[Portal Chamber|portal]] in your [[player-owned house]] (50 [[Construction]] needed). This makes it so you can teleport to Canifis while on your [[regular spellbook]] and can benefit greatly should you also have an [[altar]] to recharge [[Prayer]] in your house (also 50 Construction). This method is best used in conjunction with the [[ |
+ | *Players can teleport directly to [[Canifis]] using the [[Kharyll Teleport]] spell, provided they have completed [[Desert Treasure]]. This option can be made more convenient by adding a Kharyll [[Portal Chamber|portal]] in your [[player-owned house]] (50 [[Construction]] needed). This makes it so you can teleport to Canifis while on your [[regular spellbook]] and can benefit greatly should you also have an [[altar]] to recharge [[Prayer]] in your house (also 50 Construction). This method is best used in conjunction with the [[Myreque shortcut|Myreque's alternative route to Mort'ton]]. |
*With the release of the [[Minigame Group Finder|minigame channels]], players can quickly teleport to Mort'ton through the [[Shades of Mort'ton (minigame)|Shades of Mort'ton]] minigame channel (only if you have completed the quest, [[Shades of Mort'ton]]). This method is free and takes up no inventory or equipment spaces. |
*With the release of the [[Minigame Group Finder|minigame channels]], players can quickly teleport to Mort'ton through the [[Shades of Mort'ton (minigame)|Shades of Mort'ton]] minigame channel (only if you have completed the quest, [[Shades of Mort'ton]]). This method is free and takes up no inventory or equipment spaces. |
||
*Using the [[Mort'ton teleport]] scroll and then running to Barrows. |
*Using the [[Mort'ton teleport]] scroll and then running to Barrows. |
||
*Using the [[Morytania legs 3]] or [[Morytania legs 4|4]] to [[Burgh de Rott]] and running north through Mort'ton towards Barrows. |
*Using the [[Morytania legs 3]] or [[Morytania legs 4|4]] to [[Burgh de Rott]] and running north through Mort'ton towards Barrows. |
||
| − | Completion of [[In Aid of the Myreque]] up until the point in which the bank in |
+ | Completion of [[In Aid of the Myreque]] up until the point in which the bank in Burgh de Rott is restored is useful for a convenient banking method for multiple trips. |
==Exploring the Barrows== |
==Exploring the Barrows== |
||
| Line 40: | Line 60: | ||
The room in which the player enters the tunnels has a ladder leading out. It will often not have any [[monsters]] in it the first time the player enters it (but will if entered subsequently). All other rooms and corridors always have some monsters in them (if only the sixth brother) when entered. When passing through a door, the sixth brother may appear and attack. If he does not appear before the chest is reached, he will definitely appear when the chest is opened. Kill the last brother when he appears. Once the chest is opened, the player can get the treasure by searching the chest. |
The room in which the player enters the tunnels has a ladder leading out. It will often not have any [[monsters]] in it the first time the player enters it (but will if entered subsequently). All other rooms and corridors always have some monsters in them (if only the sixth brother) when entered. When passing through a door, the sixth brother may appear and attack. If he does not appear before the chest is reached, he will definitely appear when the chest is opened. Kill the last brother when he appears. Once the chest is opened, the player can get the treasure by searching the chest. |
||
| ⚫ | |||
| − | If [[Guthan]] is the brother in your tunnel, there is a small possibility he will die, but you will get a message saying ''"We'll finish this later..."'', and he will not count towards your kill-count, or loot, but he may not be able to be killed in the tunnel until you do another run after leaving. |
||
| + | If you have adequate supplies to kill the brothers again, it is recommended to use a [[Barrows teleport|Barrows Teleport Tab]] to get out of the tunnels and start your next run. Running back to the ladder will result a reasonable amount of food supplies and time wasted for no particular reason. Using any other means of teleportation will also provide an long run-time compared to the cheap and easy to buy Barrows Teleport Tab. You should also use a different form of banking, such as the [[Ring of dueling]] to bank. |
||
| ⚫ | After the chest is looted, the tunnels start collapsing, which will cause damage. Some players teleport away after looting the chest, while others with adequate supplies retrace their route back to the room with the ladder |
||
| + | |||
| + | '''Note:''' Using the ring of dueling will also allow you to fully restore your stats, health, prayer and run if you enter the [[Clan Wars]] portal before teleporting to your next destination. |
||
It is not required to kill all the brothers before looting the chest, but the chance of getting [[Barrows equipment]] from the chest increases as more brothers are killed. It is possible to skip every brother but the one in the tunnels. |
It is not required to kill all the brothers before looting the chest, but the chance of getting [[Barrows equipment]] from the chest increases as more brothers are killed. It is possible to skip every brother but the one in the tunnels. |
||
| − | A good method to heal, if you're not using Prayer to kill the brothers, is to find the tunnel in the middle of, or after killing the brothers, use [[Guthan's]] and/or a [[Saradomin godsword]] to heal off the low level monsters inside the tunnel, and then go back out and finish killing the brothers. |
+ | A good method to heal, if you're not using [[Prayer]] to kill the brothers, is to find the tunnel in the middle of, or after killing the brothers, use [[Guthan's]] and/or a [[Saradomin godsword]] to heal off the low level monsters inside the tunnel, and then go back out and finish killing the brothers. |
| + | |||
| + | [[File:Safespotting brother.png|thumb|A player safespotting a brother behind a ladder.]] |
||
| + | In the tunnels, [[melee]]-using brothers can be [[safespotted]] in many places, such as behind the ladder used to descend into the tunnels (this also works if there is no ladder visible) and rocks. Some players may force the melee tunnel brother to spawn by reentering a door so that they can safespot them and conserve supplies. |
||
==Monsters in the crypt== |
==Monsters in the crypt== |
||
*[[Barrows brother]]—One of the brothers' sarcophagi leads to a tunnel into the crypt. |
*[[Barrows brother]]—One of the brothers' sarcophagi leads to a tunnel into the crypt. |
||
*[[Bloodworm]]s |
*[[Bloodworm]]s |
||
| − | *[[Skeleton]]s |
+ | *[[Skeleton]]s (level 77) |
*[[Crypt rat]]s |
*[[Crypt rat]]s |
||
*[[Crypt spider]]s |
*[[Crypt spider]]s |
||
| Line 57: | Line 82: | ||
*[[Giant crypt spider]]s |
*[[Giant crypt spider]]s |
||
| − | == |
+ | ==Door puzzles== |
| − | [[File:Barrows |
+ | [[File:Barrows Puzzles.png|frame|centre|Solutions to the puzzles.]] |
| − | *If one decides not to kill a specific [[Barrows brothers|brother]] (e.g. killing all the brothers except [[Ahrim]]), that brother's loot will not be available in the [[Barrows chest|chest]]. |
||
| − | *The order in which you kill the brothers does not matter. However, it is still recommended that you kill five brothers before venturing into the tunnels to kill the sixth. (When inside the tunnel, if you find an [[aggressive]] low level enemy, [[rat]] or [[bloodworm]], you can continuously enter and leave a doorway to enable them to [[respawn]] to get [[killcount]] faster. ('''<span style="color:red">Warning:</span>''' '''Beware, this can also enable the sixth brother to spawn randomly!''') |
||
| − | *:'''Note:''' This method still works but is no longer considered optimal, upon the release of official drop table mechanics of barrows it is now more efficient to kill all 6 and get 0 additional kill count. This will give you a better rate at receiving a desired item from a single brother. |
||
| − | *You unlock more drops in the loot table depending on the total '''combat level''' of the monsters you kill, including the barrows brothers. The brothers contribute 656 to this value, and for maximum loot (which includes items like bolt racks and key halves), this value should be above 1012. For example, killing 5 of the level 77 Skeletons will contribute 385 points to this value. This was confirmed by Mod Kieren. <ref>https://twitter.com/JagexKieren/status/705428283509366785</ref> |
||
| − | *However, if players wish to receive more runes (which are generally worth more gold) instead of bolt racks and key halves, they should keep the total combat level of the monsters killed to around 880. Which means that aside from killing the 6 brothers, players should kill either 3 Skeletons, 5 Bloodworms, 3 Giant Crypt Rats, 6 Crypt Rats, 3 Giant Crypt Spiders, or 4 Crypt Spiders. |
||
| − | *For each brother you have killed, you will get a roll in the drop table. For example, if you kill all six brothers, you will get six rolls at the drop table, which means you theoretically can get six Barrows items. It is possible to get two items from the same brother in one chest, although this is extremely rare. |
||
==Entering the chest room== |
==Entering the chest room== |
||
[[File:Barrows Crypt.png|thumb|300px|It's Barrows from the Crypt!]] |
[[File:Barrows Crypt.png|thumb|300px|It's Barrows from the Crypt!]] |
||
Once the player locates the operational door that leads to the [[Barrows chest|chest]], he or she will have to solve a simple puzzle in order to open the door. Due to the [[monster]] that [[Spawning|spawns]] when you go into the room, some players prefer killing it, while others simply move back and forth to chase it off. This is useful in the [[giant crypt rat]] room, as their large size can block enemies. If you get the puzzle wrong, the catacombs will move around, ''meaning that the ladder will be in a different room, and so will be the door to the chest room''. |
Once the player locates the operational door that leads to the [[Barrows chest|chest]], he or she will have to solve a simple puzzle in order to open the door. Due to the [[monster]] that [[Spawning|spawns]] when you go into the room, some players prefer killing it, while others simply move back and forth to chase it off. This is useful in the [[giant crypt rat]] room, as their large size can block enemies. If you get the puzzle wrong, the catacombs will move around, ''meaning that the ladder will be in a different room, and so will be the door to the chest room''. |
||
| + | {{clear}} |
||
| − | |||
==Rewards== |
==Rewards== |
||
| − | === |
+ | ===Mechanics=== |
| + | [[File:Barrows loot mechanics.png|thumb|300px|Barrows drop mechanics{{CiteTwitter|author = Mod Kieren|url = https://twitter.com/JagexKieren/status/705428283509366785|quote = You guys wanted info on Barrows loot, here it is... Full size: [http://i.imgur.com/oZSMkAX.png] Explained the best I can!|date = 3 Mar 2016}}]] |
||
| + | *There is initially one roll at the drop table. |
||
| + | *Each brother killed grants an additional roll at the drop table, to a maximum of six rolls. |
||
| + | *Each brother killed has his associated items added to the possible rewards. |
||
| + | |||
| + | For each roll: |
||
| + | *First, the [[Barrows equipment]] is rolled against. The chance of getting a Barrows item is <math>\frac{1}{450 - 58 \times N}</math>, where <math>N</math> is the number of [[Barrows brothers|brothers]] killed. Or, in tabular format: |
||
| + | ::{| class="wikitable" style="text-align:right;" |
||
| + | |+ Barrows equipment chance per roll |
||
| + | ! rowspan="2" | Brothers<br />killed |
||
| + | ! colspan="2" | Chance |
||
| ⚫ | |||
| + | ! Frac |
||
| + | ! % |
||
| ⚫ | |||
| + | | 1 |
||
| + | | 1/392 |
||
| + | | 0.255% |
||
| ⚫ | |||
| + | | 2 |
||
| + | | 1/334 |
||
| + | | 0.299% |
||
| ⚫ | |||
| + | | 3 |
||
| + | | 1/276 |
||
| + | | 0.362% |
||
| ⚫ | |||
| + | | 4 |
||
| + | | 1/218 |
||
| + | | 0.458% |
||
| ⚫ | |||
| + | | 5 |
||
| + | | 1/160 |
||
| + | | 0.625% |
||
| ⚫ | |||
| + | | 6 |
||
| + | | 1/102 |
||
| + | | 0.980% |
||
| ⚫ | |||
| + | *If the [[Barrows item]] chance is successfully hit, one of the available Barrows items is chosen at random - each part has equal chance, but once chosen it will not be chosen again on future rolls. |
||
| + | * If the Barrows item chance is not met, an additional measure is calculated (here called ''rewards potential'' or ''RP''). This is <math>\text{min}(\text{sum}(combat\ level\ of\ all\ monsters\ killed)), 1000) + 2N</math>. |
||
| + | ** Or simply, reward potential is the sum of all the [[combat level]]s of the monsters killed, capped at 1000 - including the brothers (all six have a combat sum of 656). This is then added to the two times the number of brothers killed, giving a total maximum reward potential of 1012. |
||
| + | * A roll is performed for a value between one and your reward potential (each inclusive). The result then determines what item is awarded, and how many of it. |
||
| + | ** Each item has a range, and the larger the number in that range, the more of it that is awarded. |
||
| + | ::{| class="wikitable" style="text-align:right;" |
||
| + | ! rowspan="2" | Item |
||
| + | ! rowspan="2" | RP required<br />to unlock |
||
| + | ! rowspan="2" | RP required for<br />maximum quantity |
||
| + | ! colspan="2" | Chance at max RP per roll |
||
| + | |- |
||
| + | ! Frac |
||
| + | ! % |
||
| + | |- |
||
| + | | style="text-align:left;" | {{plink|Coins}} |
||
| + | | 1 |
||
| + | | 380 |
||
| + | | 380/1012 |
||
| + | | 37.5% |
||
| + | |- |
||
| + | | style="text-align:left;" | {{plink|Mind rune}} |
||
| + | | 381 |
||
| + | | 505 |
||
| + | | 125/1012 |
||
| + | | 12.4% |
||
| + | |- |
||
| + | | style="text-align:left;" | {{plink|Chaos rune}} |
||
| + | | 506 |
||
| + | | 630 |
||
| + | | 125/1012 |
||
| + | | 12.4% |
||
| + | |- |
||
| + | | style="text-align:left;" | {{plink|Death rune}} |
||
| + | | 631 |
||
| + | | 755 |
||
| + | | 125/1012 |
||
| + | | 12.4% |
||
| + | |- |
||
| + | | style="text-align:left;" | {{plink|Blood rune}} |
||
| + | | 756 |
||
| + | | 880 |
||
| + | | 125/1012 |
||
| + | | 12.4% |
||
| + | |- |
||
| + | | style="text-align:left;" | {{plink|Bolt rack}} |
||
| + | | 881 |
||
| + | | 1005 |
||
| + | | 125/1012 |
||
| + | | 12.4% |
||
| + | |- |
||
| + | | style="text-align:left;" | {{plinkp|Tooth half of key}}{{plink|Loop half of key|txt=Key half}} |
||
| + | | 1006 |
||
| + | | style="text-align:center;" | ''N/A (always 1)'' |
||
| + | | 6/1012 |
||
| + | | 0.6% |
||
| + | |- |
||
| + | | style="text-align:left;" | {{plink|Dragon med helm}} |
||
| + | | 1012 |
||
| + | | style="text-align:center;" | ''N/A (always 1)'' |
||
| + | | 1/1012 |
||
| + | | 0.1% |
||
| + | |} |
||
| + | |||
| + | If players wish to receive more [[runes]] (which are generally worth more gold) instead of [[bolt racks]] and [[key halves]], they should aim for a Reward Potential of 880. Having exactly 880 points maximises the quantity of [[blood runes]] without having bolt racks take up reward slots. Players can achieve exactly 880 points by killing the six brothers, three [[bloodworm]]s, and one [[crypt spider]] (656 + 3(52) + 56 + 2(6)) = 880. It is impractical, however, to get exactly 880 RP every run because crypt spiders will never spawn upon opening doors beneath Barrows, and can only be found in their own room on the east side of the tunnels. It is not worth going out of your way to find and kill one crypt spider, and going for exactly 880 RP should only be done if the configuration of the tunnel allows for an easy way to kill one crypt spider. |
||
| + | |||
| + | A common misconception is that the ideal combination would be killing the six brothers and three [[skeletons]], which would result in 880 RP. The actual value for this would be 899 RP (656 +3(77)+2(6)) = 899, which puts one a fair way past the threshold for getting bolt racks. |
||
| + | |||
| + | Possible [[KC]] options to maximise overall profit, without needing to go out of your way to gather KC could be the following: |
||
| + | |||
| + | 2 Skeletons, 1 Bloodworm (874 RP) |
||
| + | |||
| + | 4 Bloodworms - (876 RP) |
||
| + | |||
| + | 5 Crypt Rats - (883 RP) |
||
| + | |||
| + | 1 Skeleton, 1 Bloodworm, 2 Crypt Rats - (883 RP) |
||
| + | |||
| + | N.B. It is usually easier to get [[killcount]] with these three types of creatures as they are the types that will spawn upon opening doors beneath Barrows and will automatically become aggressive towards the player. It is usually impractical to include the other types of monsters since one cannot control what their tunnel configuration will be every time. |
||
| + | |||
| + | ===Runes/Ammunition=== |
||
{{DropsTableHead}} |
{{DropsTableHead}} |
||
| − | {{DropsLine|Name=Mind rune|Quantity=1–2889|Rarity=Common}} |
+ | {{DropsLine|Name=Mind rune|Quantity=1–2889|Rarity=Common|raritynotes=<ref group="A">Requires 381 reward potential to roll.</ref>}} |
| − | {{DropsLine|Name=Chaos rune|Quantity=1-885|Rarity=Common}} |
+ | {{DropsLine|Name=Chaos rune|Quantity=1-885|Rarity=Common|raritynotes=<ref group="A">Requires 506 reward potential to roll.</ref>}} |
| − | {{DropsLine|Name=Death rune|Quantity=1- |
+ | {{DropsLine|Name=Death rune|Quantity=1-578|Rarity=Common|raritynotes=<ref group="A">Requires 631 reward potential to roll.</ref>}} |
| − | {{DropsLine|Name= |
+ | {{DropsLine|Name=Bolt rack|Quantity=1-191|Rarity=Common|raritynotes=<ref group="A">Requires 881 reward potential to roll.</ref>}} |
| + | {{DropsLine|Name=Blood rune|Quantity=1-236|Rarity=Uncommon|raritynotes=<ref group="A">Requires 756 reward potential to roll.</ref>}} |
||
|} |
|} |
||
| ⚫ | |||
| − | ===Barrows |
+ | ===Barrows Equipment=== |
| − | ==== |
+ | ====Ahrim's==== |
{{DropsTableHead}} |
{{DropsTableHead}} |
||
| − | {{DropsLine|Name=Ahrim's hood|Quantity=1|Rarity=Rare}} |
+ | {{DropsLine|Name=Ahrim's hood|Quantity=1|Rarity=Rare|raritynotes=<small>(1/418)</small><ref name="equipment" group="B">When all brothers are slain.</ref>}} |
| − | {{DropsLine|Name=Ahrim's robetop|Quantity=1|Rarity=Rare}} |
+ | {{DropsLine|Name=Ahrim's robetop|Quantity=1|Rarity=Rare|raritynotes=<small>(1/418)</small><ref name="equipment" group="B"/>}} |
| − | {{DropsLine|Name=Ahrim's robeskirt|Quantity=1|Rarity=Rare}} |
+ | {{DropsLine|Name=Ahrim's robeskirt|Quantity=1|Rarity=Rare|raritynotes=<small>(1/418)</small><ref name="equipment" group="B"/>}} |
| − | {{DropsLine|Name=Ahrim's staff|Quantity=1|Rarity=Rare}} |
+ | {{DropsLine|Name=Ahrim's staff|Quantity=1|Rarity=Rare|raritynotes=<small>(1/418)</small><ref name="equipment" group="B"/>}} |
|} |
|} |
||
| + | <references group="B"/> |
||
| ⚫ | |||
| + | |||
| + | ====Dharok's==== |
||
{{DropsTableHead}} |
{{DropsTableHead}} |
||
| − | {{DropsLine|Name=Dharok's helm|Quantity=1|Rarity=Rare}} |
+ | {{DropsLine|Name=Dharok's helm|Quantity=1|Rarity=Rare|raritynotes=<small>(1/418)</small><ref name="equipment" group="C">When all brothers are slain.</ref>}} |
| − | {{DropsLine|Name=Dharok's platebody|Quantity=1|Rarity=Rare}} |
+ | {{DropsLine|Name=Dharok's platebody|Quantity=1|Rarity=Rare|raritynotes=<small>(1/418)</small><ref name="equipment" group="C"/>}} |
| − | {{DropsLine|Name=Dharok's platelegs|Quantity=1|Rarity=Rare}} |
+ | {{DropsLine|Name=Dharok's platelegs|Quantity=1|Rarity=Rare|raritynotes=<small>(1/418)</small><ref name="equipment" group="C"/>}} |
| − | {{DropsLine|Name=Dharok's greataxe|Quantity=1|Rarity=Rare}} |
+ | {{DropsLine|Name=Dharok's greataxe|Quantity=1|Rarity=Rare|raritynotes=<small>(1/418)</small><ref name="equipment" group="C"/>}} |
|} |
|} |
||
| + | <references group="C"/> |
||
| ⚫ | |||
| + | |||
| + | ====Guthan's==== |
||
{{DropsTableHead}} |
{{DropsTableHead}} |
||
| − | {{DropsLine|Name=Guthan's helm|Quantity=1|Rarity=Rare}} |
+ | {{DropsLine|Name=Guthan's helm|Quantity=1|Rarity=Rare|raritynotes=<small>(1/418)</small><ref name="equipment" group="D">When all brothers are slain.</ref>}} |
| − | {{DropsLine|Name=Guthan's platebody|Quantity=1|Rarity=Rare}} |
+ | {{DropsLine|Name=Guthan's platebody|Quantity=1|Rarity=Rare|raritynotes=<small>(1/418)</small><ref name="equipment" group="D"/>}} |
| − | {{DropsLine|Name=Guthan's chainskirt|Quantity=1|Rarity=Rare}} |
+ | {{DropsLine|Name=Guthan's chainskirt|Quantity=1|Rarity=Rare|raritynotes=<small>(1/418)</small><ref name="equipment" group="D"/>}} |
| − | {{DropsLine|Name=Guthan's warspear|Quantity=1|Rarity=Rare}} |
+ | {{DropsLine|Name=Guthan's warspear|Quantity=1|Rarity=Rare|raritynotes=<small>(1/418)</small><ref name="equipment" group="D"/>}} |
|} |
|} |
||
| + | <references group="D"/> |
||
| ⚫ | |||
| + | |||
| ⚫ | |||
{{DropsTableHead}} |
{{DropsTableHead}} |
||
| − | {{DropsLine|Name=Karil's coif|Quantity=1|Rarity=Rare}} |
+ | {{DropsLine|Name=Karil's coif|Quantity=1|Rarity=Rare|raritynotes=<small>(1/418)</small><ref name="equipment" group="E">When all brothers are slain.</ref>}} |
| − | {{DropsLine|Name=Karil's leathertop|Quantity=1|Rarity=Rare}} |
+ | {{DropsLine|Name=Karil's leathertop|Quantity=1|Rarity=Rare|raritynotes=<small>(1/418)</small><ref name="equipment" group="E"/>}} |
| − | {{DropsLine|Name=Karil's leatherskirt|Quantity=1|Rarity=Rare}} |
+ | {{DropsLine|Name=Karil's leatherskirt|Quantity=1|Rarity=Rare|raritynotes=<small>(1/418)</small><ref name="equipment" group="E"/>}} |
| − | {{DropsLine|Name=Karil's crossbow|Quantity=1|Rarity=Rare}} |
+ | {{DropsLine|Name=Karil's crossbow|Quantity=1|Rarity=Rare|raritynotes=<small>(1/418)</small><ref name="equipment" group="E"/>}} |
|} |
|} |
||
| + | <references group="E"/> |
||
| ⚫ | |||
| + | |||
| ⚫ | |||
{{DropsTableHead}} |
{{DropsTableHead}} |
||
| − | {{DropsLine|Name=Torag's helm|Quantity=1|Rarity=Rare}} |
+ | {{DropsLine|Name=Torag's helm|Quantity=1|Rarity=Rare|raritynotes=<small>(1/418)</small><ref name="equipment" group="F">When all brothers are slain.</ref>}} |
| − | {{DropsLine|Name=Torag's platebody|Quantity=1|Rarity=Rare}} |
+ | {{DropsLine|Name=Torag's platebody|Quantity=1|Rarity=Rare|raritynotes=<small>(1/418)</small><ref name="equipment" group="F"/>}} |
| − | {{DropsLine|Name=Torag's platelegs|Quantity=1|Rarity=Rare}} |
+ | {{DropsLine|Name=Torag's platelegs|Quantity=1|Rarity=Rare|raritynotes=<small>(1/418)</small><ref name="equipment" group="F"/>}} |
| − | {{DropsLine|Name=Torag's hammers|Quantity=1|Rarity=Rare}} |
+ | {{DropsLine|Name=Torag's hammers|Quantity=1|Rarity=Rare|raritynotes=<small>(1/418)</small><ref name="equipment" group="F"/>}} |
|} |
|} |
||
| + | <references group="F"/> |
||
| ⚫ | |||
| + | |||
| ⚫ | |||
{{DropsTableHead}} |
{{DropsTableHead}} |
||
| − | {{DropsLine|Name=Verac's helm|Quantity=1|Rarity=Rare}} |
+ | {{DropsLine|Name=Verac's helm|Quantity=1|Rarity=Rare|raritynotes=<small>(1/418)</small><ref name="equipment" group="G">When all brothers are slain.</ref>}} |
| − | {{DropsLine|Name=Verac's brassard|Quantity=1|Rarity=Rare}} |
+ | {{DropsLine|Name=Verac's brassard|Quantity=1|Rarity=Rare|raritynotes=<small>(1/418)</small><ref name="equipment" group="G"/>}} |
| − | {{DropsLine|Name=Verac's plateskirt|Quantity=1|Rarity=Rare}} |
+ | {{DropsLine|Name=Verac's plateskirt|Quantity=1|Rarity=Rare|raritynotes=<small>(1/418)</small><ref name="equipment" group="G"/>}} |
| − | {{DropsLine|Name=Verac's flail|Quantity=1|Rarity=Rare}} |
+ | {{DropsLine|Name=Verac's flail|Quantity=1|Rarity=Rare|raritynotes=<small>(1/418)</small><ref name="equipment" group="G"/>}} |
|} |
|} |
||
| + | <references group="G"/> |
||
| − | === |
+ | ===Other=== |
{{DropsTableHead}} |
{{DropsTableHead}} |
||
{{DropsLine|Name=Coins|Quantity=1-5306|Rarity=Common|gemw=No}} |
{{DropsLine|Name=Coins|Quantity=1-5306|Rarity=Common|gemw=No}} |
||
| − | {{DropsLine|Name= |
+ | {{DropsLine|Name=Loop half of key|Quantity=1|Rarity=Uncommon|raritynotes=<ref name="key" group="H">Requires 1006 reward potential to roll. Only one half will be received.</ref>}} |
| − | {{DropsLine|Name= |
+ | {{DropsLine|Name=Tooth half of key|Quantity=1|Rarity=Uncommon|raritynotes=<ref name="key" group="H"/>}} |
| ⚫ | |||
| − | {{DropsLine|Name=Tooth half of key|Quantity=1|Rarity=Uncommon}} |
||
| − | {{DropsLine|Name=Dragon med helm|Quantity=1|Rarity=Rare}} |
+ | {{DropsLine|Name=Dragon med helm|Quantity=1|Rarity=Rare|raritynotes=<ref group="H">Requires 1012 reward potential to roll.</ref>}} |
| ⚫ | |||
|} |
|} |
||
| + | <references group="H"/> |
||
| − | |||
| − | === Odds === |
||
| − | |||
| − | In the table below are some odds you might be interested about. Calculations assume all 6 brothers are killed for each chest. Only "One RANDOM set" is an approximation, the average of 5 million simulations. Where for example "5 unique items" means you have 19/24 items and you need 5 more unique items to complete all sets. |
||
| − | |||
| − | {| class="article-table" style="width:100%; font-size:90%;" |
||
| ⚫ | |||
| − | ! style="width:40%;" | Description |
||
| − | ! style="width:60%;" | You type |
||
| ⚫ | |||
| − | |All 24 unique items |
||
| − | |1541 chests |
||
| ⚫ | |||
| − | |One unique item |
||
| − | |408 chests |
||
| ⚫ | |||
| − | |Two unique items |
||
| − | |612 chests |
||
| ⚫ | |||
| − | |Three unique items |
||
| − | |748 chests |
||
| ⚫ | |||
| − | |Four unique items |
||
| − | |850 chests |
||
| ⚫ | |||
| − | |Five unique items |
||
| − | |932 chests |
||
| ⚫ | |||
| − | |One RANDOM set(elite diary ironman req) |
||
| − | |365 chests |
||
| ⚫ | |||
| − | |||
| − | |||
| ⚫ | |||
===Notes=== |
===Notes=== |
||
| − | *According to the formula released by Mod Kieren on his Twitter, the chances of getting at least one piece of [[Barrows equipment]] is 1/17.42 if you kill all six brothers. This chance is unaffected by the kill count of the other monsters in the crypt. |
+ | *According to the formula released by Mod Kieren on his Twitter, the chances of getting at least one piece of [[Barrows equipment]] is 1/17.42 if you kill all six brothers. This chance is unaffected by the [[kill count]] of the other monsters in the crypt. Therefore, the chance of receiving a specific equipment piece is approximately 1/418 (17.42*24). |
| − | *In order to receive a piece of |
+ | *In order to receive a piece of Barrows equipment, the corresponding [[Barrows brothers|brother]] must be killed before the [[Barrows chest|chest]] is looted. Thus, if you wanted a piece of [[Guthan's equipment]], you would have to kill [[Guthan]] before you are eligible to obtain his equipment. Therefore, it is impossible to acquire Barrows equipment if no brothers are slain. |
| − | *For every brother killed, you get an extra roll for rewards; so if all six brothers are killed, it is possible to obtain six pieces of Barrows equipment. However, this is extremely rare. It is possible to get multiple items from the same brother, contrary to popular belief. |
+ | *For every brother killed, you get an extra roll for rewards; so if all six brothers are killed, it is possible to obtain six pieces of Barrows equipment. Thus giving you a 0.000003578% chance of seeing a six item drop. However, this is extremely rare. It is possible to get multiple items from the same brother, contrary to popular belief. |
*Killing all of the brothers is '''not''' required to receive loot; however, not killing all brothers decreases your chance of receiving a Barrows item, and you will not be able to receive the items from the brothers that you missed. |
*Killing all of the brothers is '''not''' required to receive loot; however, not killing all brothers decreases your chance of receiving a Barrows item, and you will not be able to receive the items from the brothers that you missed. |
||
| − | * |
+ | *50% more [[runes]] are received with the completion of the [[Hard Morytania Diary]]. |
==Trivia== |
==Trivia== |
||
| + | *There is currently a glitch where if [[Guthan the Infested|Guthan]] is slain and he heals simultaneously, a message will appear in the player's chatbox stating ''"We'll finish this later..."''. |
||
| − | *Prior to an update, Barrows did not tell you what [[Barrows brothers|brothers]] |
+ | *Prior to an update, Barrows did not tell you what [[Barrows brothers|brothers]] the player had slain. In addition, before the aforementioned update, there was no looting interface upon searching the chest for rewards. |
| + | **Upon release, there was also no [[spade]] spawn in the nearby shack. This was added in Content Poll #14. |
||
| + | |||
| + | ==References== |
||
| + | <references/> |
||
{{Minigames}} |
{{Minigames}} |
||
Latest revision as of 11:49, 28 July 2019
| Location on World Map | ||||
| Mort'ton | ← | Barrows | → | Meiyerditch |
The Barrows minigame is an area-based Combat minigame released on 9 May 2005. It is popular due to the potential of receiving valuable rewards, including the unique Barrows equipment. The objective is to defeat the six Barrows brothers: Ahrim the Blighted, Dharok the Wretched, Guthan the Infested, Karil the Tainted, Torag the Corrupted and Verac the Defiled.
Each brother has his own burial mound and possesses a combat level of 115, except Ahrim the Blighted and Karil the Tainted, who both have a combat level of 98. To enter a mound, the player must stand on top of it and dig using a spade. There is a spade spawn in the nearby shack.
The Barrows brothers are very strong, each with high Defence levels and strong armour. Each brother has a set effect, which is the same as the corresponding armour set. Because of this, consideration should be given to the methods with and order in which the brothers are killed.
Getting there


1.) Red is the longest and most tedious route.
2.) Sky blue is the moderate route if no additional quests are completed aside from In Aid of the Myreque. Those who have access to fairy rings can also use this route.
3.) Green is the penultimate shortest route and makes use of the Myreque shortcut.
4.) Dark blue is the shortest route making use of Morytania legs 3, 4, or Mort'ton teleports.
There are several different methods for travelling to Barrows and for banking. Some of which are:
- Casting Barrows Teleport in the Arceuus spellbook. Requires 83 Magic and at least 60% favour with the Arceuus House. Alternatively, using a Barrows teleport tablet will work just as well.
- Using the fairy ring code bkr to travel to the fairy ring inside Mort Myre Swamp and heading south through the swamp and then through Mort'ton to Barrows. Alternatively, at 50 Agility, players can use the fairy ring code bip, go east, and south, following the path through Mort'ton.
- Note: Fairy ring travel requires Fairytale II - Cure a Queen to be started, and Nature Spirit is required to be started for travel through Mort Myre Swamp.
- With completion of In Search of the Myreque, players gain access to an alternative route to Mort'ton.
- After completion of Ghosts Ahoy, players can use the Ectophial and travel from there. (It also serves as a one-click teleport in case of emergencies.)
- Players can teleport to Varrock and head east (allows players to restore Prayer points at the temple on the way).
- Players can teleport directly to Canifis using the Kharyll Teleport spell, provided they have completed Desert Treasure. This option can be made more convenient by adding a Kharyll portal in your player-owned house (50 Construction needed). This makes it so you can teleport to Canifis while on your regular spellbook and can benefit greatly should you also have an altar to recharge Prayer in your house (also 50 Construction). This method is best used in conjunction with the Myreque's alternative route to Mort'ton.
- With the release of the minigame channels, players can quickly teleport to Mort'ton through the Shades of Mort'ton minigame channel (only if you have completed the quest, Shades of Mort'ton). This method is free and takes up no inventory or equipment spaces.
- Using the Mort'ton teleport scroll and then running to Barrows.
- Using the Morytania legs 3 or 4 to Burgh de Rott and running north through Mort'ton towards Barrows.
Completion of In Aid of the Myreque up until the point in which the bank in Burgh de Rott is restored is useful for a convenient banking method for multiple trips.
Exploring the Barrows

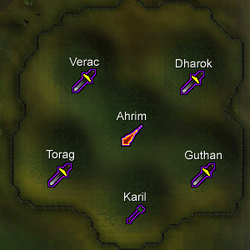
This is the six Barrows brothers' graveyard as well as each brother's combat discipline.
The above-ground portion of Barrows consists of six grave mounds inside a fence. A Prayer-using player should prepare to fight the brother in the mound before entering as preparing after entering the mound will waste prayer points, which constantly drain away when inside the Barrows. To enter a mound, stand on top of a mound, and dig with a spade. The player should enter a crypt with a sarcophagus in the centre. Open the sarcophagus and pray if using Prayer. Every time but once, the brother who is buried there will appear and attack. Kill the brother, leave and proceed to the next one.
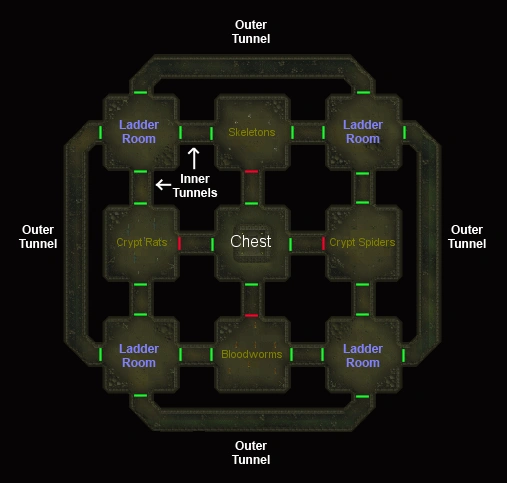
At one of the crypts, the brother will not appear. Instead, there will be an entrance to a maze-like lower level of tunnels. If the player has not killed all the other brothers in their crypts yet, it is not recommended to enter the tunnels at this time. Once all the others have been killed, the player should return to this crypt and enter the tunnels.
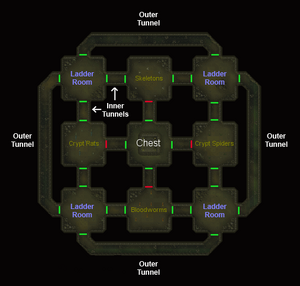
The tunnels contain nine rooms in a 3x3 grid, connected by short and long corridors. The player must find the way to the central room and the rewards chest there. Some of the doors will be locked, so the player must explore.
The room in which the player enters the tunnels has a ladder leading out. It will often not have any monsters in it the first time the player enters it (but will if entered subsequently). All other rooms and corridors always have some monsters in them (if only the sixth brother) when entered. When passing through a door, the sixth brother may appear and attack. If he does not appear before the chest is reached, he will definitely appear when the chest is opened. Kill the last brother when he appears. Once the chest is opened, the player can get the treasure by searching the chest.
After the chest is looted, the tunnels start collapsing, which will cause damage. Some players teleport away after looting the chest, while others with adequate supplies retrace their route back to the room with the ladder.
If you have adequate supplies to kill the brothers again, it is recommended to use a Barrows Teleport Tab to get out of the tunnels and start your next run. Running back to the ladder will result a reasonable amount of food supplies and time wasted for no particular reason. Using any other means of teleportation will also provide an long run-time compared to the cheap and easy to buy Barrows Teleport Tab. You should also use a different form of banking, such as the Ring of dueling to bank.
Note: Using the ring of dueling will also allow you to fully restore your stats, health, prayer and run if you enter the Clan Wars portal before teleporting to your next destination.
It is not required to kill all the brothers before looting the chest, but the chance of getting Barrows equipment from the chest increases as more brothers are killed. It is possible to skip every brother but the one in the tunnels.
A good method to heal, if you're not using Prayer to kill the brothers, is to find the tunnel in the middle of, or after killing the brothers, use Guthan's and/or a Saradomin godsword to heal off the low level monsters inside the tunnel, and then go back out and finish killing the brothers.
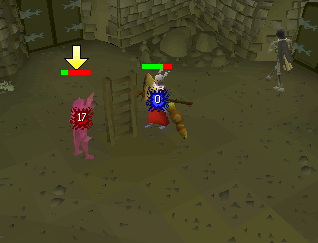

A player safespotting a brother behind a ladder.
In the tunnels, melee-using brothers can be safespotted in many places, such as behind the ladder used to descend into the tunnels (this also works if there is no ladder visible) and rocks. Some players may force the melee tunnel brother to spawn by reentering a door so that they can safespot them and conserve supplies.
Monsters in the crypt
- Barrows brother—One of the brothers' sarcophagi leads to a tunnel into the crypt.
- Bloodworms
- Skeletons (level 77)
- Crypt rats
- Crypt spiders
- Giant crypt rats
- Giant crypt spiders
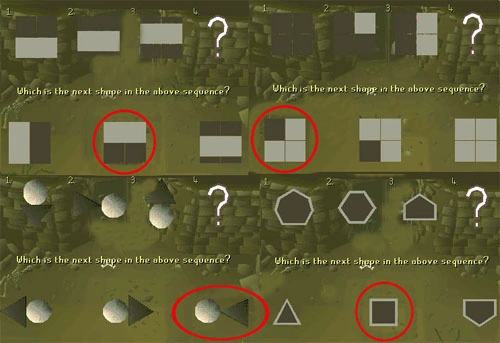
Door puzzles
Entering the chest room
It's Barrows from the Crypt!
Once the player locates the operational door that leads to the chest, he or she will have to solve a simple puzzle in order to open the door. Due to the monster that spawns when you go into the room, some players prefer killing it, while others simply move back and forth to chase it off. This is useful in the giant crypt rat room, as their large size can block enemies. If you get the puzzle wrong, the catacombs will move around, meaning that the ladder will be in a different room, and so will be the door to the chest room.
Rewards
Mechanics
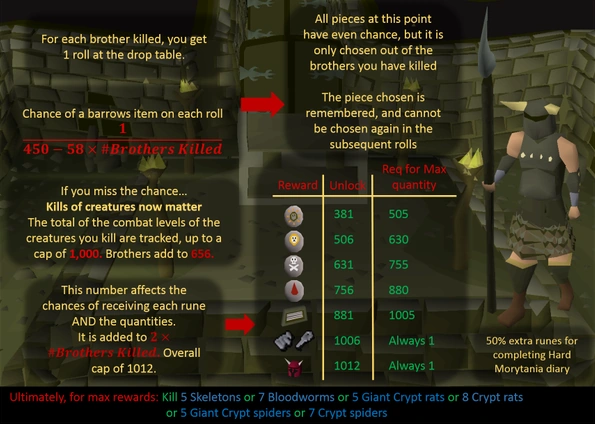

Barrows drop mechanics[1]
- There is initially one roll at the drop table.
- Each brother killed grants an additional roll at the drop table, to a maximum of six rolls.
- Each brother killed has his associated items added to the possible rewards.
For each roll:
- First, the Barrows equipment is rolled against. The chance of getting a Barrows item is , where is the number of brothers killed. Or, in tabular format:


Barrows equipment chance per roll Brothers
killedChance Frac % 1 1/392 0.255% 2 1/334 0.299% 3 1/276 0.362% 4 1/218 0.458% 5 1/160 0.625% 6 1/102 0.980%
- If the Barrows item chance is successfully hit, one of the available Barrows items is chosen at random - each part has equal chance, but once chosen it will not be chosen again on future rolls.
- If the Barrows item chance is not met, an additional measure is calculated (here called rewards potential or RP). This is .
- Or simply, reward potential is the sum of all the combat levels of the monsters killed, capped at 1000 - including the brothers (all six have a combat sum of 656). This is then added to the two times the number of brothers killed, giving a total maximum reward potential of 1012.
- A roll is performed for a value between one and your reward potential (each inclusive). The result then determines what item is awarded, and how many of it.
- Each item has a range, and the larger the number in that range, the more of it that is awarded.

Item RP required
to unlockRP required for
maximum quantityChance at max RP per roll Frac %  Coins
Coins
1 380 380/1012 37.5% Mind rune
381 505 125/1012 12.4% Chaos rune
506 630 125/1012 12.4% Death rune
631 755 125/1012 12.4% Blood rune
756 880 125/1012 12.4% Bolt rack
881 1005 125/1012 12.4% Key half
1006 N/A (always 1) 6/1012 0.6% Dragon med helm
1012 N/A (always 1) 1/1012 0.1%
If players wish to receive more runes (which are generally worth more gold) instead of bolt racks and key halves, they should aim for a Reward Potential of 880. Having exactly 880 points maximises the quantity of blood runes without having bolt racks take up reward slots. Players can achieve exactly 880 points by killing the six brothers, three bloodworms, and one crypt spider (656 + 3(52) + 56 + 2(6)) = 880. It is impractical, however, to get exactly 880 RP every run because crypt spiders will never spawn upon opening doors beneath Barrows, and can only be found in their own room on the east side of the tunnels. It is not worth going out of your way to find and kill one crypt spider, and going for exactly 880 RP should only be done if the configuration of the tunnel allows for an easy way to kill one crypt spider.
A common misconception is that the ideal combination would be killing the six brothers and three skeletons, which would result in 880 RP. The actual value for this would be 899 RP (656 +3(77)+2(6)) = 899, which puts one a fair way past the threshold for getting bolt racks.
Possible KC options to maximise overall profit, without needing to go out of your way to gather KC could be the following:
2 Skeletons, 1 Bloodworm (874 RP)
4 Bloodworms - (876 RP)
5 Crypt Rats - (883 RP)
1 Skeleton, 1 Bloodworm, 2 Crypt Rats - (883 RP)
N.B. It is usually easier to get killcount with these three types of creatures as they are the types that will spawn upon opening doors beneath Barrows and will automatically become aggressive towards the player. It is usually impractical to include the other types of monsters since one cannot control what their tunnel configuration will be every time.
Runes/Ammunition
Item Quantity Rarity GE market price
Mind rune 1–2,889 Common [A 1] 3–8,667
Chaos rune 1–885 Common [A 2] 89–78,765
Death rune 1–578 Common [A 3] 203–117,334
Bolt rack 1–191 Common [A 4] 94–17,954
Blood rune 1–236 Uncommon [A 5] 367–86,612
Barrows Equipment
Ahrim's
Item Quantity Rarity GE market price
Ahrim's hood 1 Rare (1/418)[B 1] 61,586
Ahrim's robetop 1 Rare (1/418)[B 1] 2,900,631
Ahrim's robeskirt 1 Rare (1/418)[B 1] 2,169,900
Ahrim's staff 1 Rare (1/418)[B 1] 104,883
Dharok's
Item Quantity Rarity GE market price
Dharok's helm 1 Rare (1/418)[C 1] 243,630
Dharok's platebody 1 Rare (1/418)[C 1] 978,025
Dharok's platelegs 1 Rare (1/418)[C 1] 1,026,058
Dharok's greataxe 1 Rare (1/418)[C 1] 652,656
Guthan's
Item Quantity Rarity GE market price
Guthan's helm 1 Rare (1/418)[D 1] 550,010
Guthan's platebody 1 Rare (1/418)[D 1] 819,022
Guthan's chainskirt 1 Rare (1/418)[D 1] 427,208
Guthan's warspear 1 Rare (1/418)[D 1] 917,108
Karil's
Item Quantity Rarity GE market price
Karil's coif 1 Rare (1/418)[E 1] 62,835
Karil's leathertop 1 Rare (1/418)[E 1] 1,972,648
Karil's leatherskirt 1 Rare (1/418)[E 1] 224,442
Karil's crossbow 1 Rare (1/418)[E 1] 107,192
Torag's
Item Quantity Rarity GE market price
Torag's helm 1 Rare (1/418)[F 1] 95,267
Torag's platebody 1 Rare (1/418)[F 1] 218,595
Torag's platelegs 1 Rare (1/418)[F 1] 241,084
Torag's hammers 1 Rare (1/418)[F 1] 97,256
Verac's
Item Quantity Rarity GE market price
Verac's helm 1 Rare (1/418)[G 1] 116,139
Verac's brassard 1 Rare (1/418)[G 1] 177,411
Verac's plateskirt 1 Rare (1/418)[G 1] 624,036
Verac's flail 1 Rare (1/418)[G 1] 102,775
Other
Item Quantity Rarity GE market price
Coins 1–5,306 Common Not sold
Loop half of key 1 Uncommon [H 1] 10,307
Tooth half of key 1 Uncommon [H 1] 10,840
Clue scroll (elite) 1 Uncommon (1/33.75)[H 2] Not sold
Dragon med helm 1 Rare [H 3] 58,488
Notes
- According to the formula released by Mod Kieren on his Twitter, the chances of getting at least one piece of Barrows equipment is 1/17.42 if you kill all six brothers. This chance is unaffected by the kill count of the other monsters in the crypt. Therefore, the chance of receiving a specific equipment piece is approximately 1/418 (17.42*24).
- In order to receive a piece of Barrows equipment, the corresponding brother must be killed before the chest is looted. Thus, if you wanted a piece of Guthan's equipment, you would have to kill Guthan before you are eligible to obtain his equipment. Therefore, it is impossible to acquire Barrows equipment if no brothers are slain.
- For every brother killed, you get an extra roll for rewards; so if all six brothers are killed, it is possible to obtain six pieces of Barrows equipment. Thus giving you a 0.000003578% chance of seeing a six item drop. However, this is extremely rare. It is possible to get multiple items from the same brother, contrary to popular belief.
- Killing all of the brothers is not required to receive loot; however, not killing all brothers decreases your chance of receiving a Barrows item, and you will not be able to receive the items from the brothers that you missed.
- 50% more runes are received with the completion of the Hard Morytania Diary.
Trivia
- There is currently a glitch where if Guthan is slain and he heals simultaneously, a message will appear in the player's chatbox stating "We'll finish this later...".
- Prior to an update, Barrows did not tell you what brothers the player had slain. In addition, before the aforementioned update, there was no looting interface upon searching the chest for rewards.
- Upon release, there was also no spade spawn in the nearby shack. This was added in Content Poll #14.
References
- ↑ Jagex. Mod Kieren's Twitter account. 3 Mar 2016. Mod Kieren: "You guys wanted info on Barrows loot, here it is... Full size: [1] Explained the best I can!"
| Team games |
Barbarian Assault • Blast Furnace • Burthorpe Games Room • Castle Wars • Fishing Trawler • Nightmare Zone • Pest Control • Shades of Mort'ton • Trouble Brewing • Volcanic Mine |
| Solo games |
Barrows • Blast mine • Brimhaven Agility Arena • Champions' Challenge • Gnome Ball • Gnome Restaurant • Impetuous Impulses • Inferno • Mage Arena • Mage Training Arena • Pyramid Plunder • Ranging Guild Activities • Rat Pits • Rogue Trader • Rogues' Den • Sorceress's Garden • Tai Bwo Wannai Cleanup • Tears of Guthix • Temple Trekking • Tithe Farm • Treasure Trails • TzHaar Fight Cave |
| PvP games |
Bounty Hunter • Castle Wars • Clan Wars • Duel Arena • Last Man Standing • TzHaar Fight Pit |