Flarker8000 (talk | contribs) m (Adding category) |
(cleanup) |
||
| (17 intermediate revisions by 17 users not shown) | |||
| Line 1: | Line 1: | ||
| − | {{External |
+ | {{External|rs}} |
| + | {{Dangerous minigame}} |
||
| − | |1 = rs |
||
| + | {{HasStrategy}} |
||
| − | }} |
||
| + | {{HasMMG|Barrows}} |
||
| − | |||
| + | {{Infobox Minigame |
||
| − | {{Switch infobox |
||
| + | |image = [[File:Barrows minigame.png|thumb|300px]] |
||
| − | |item2 = {{Infobox Item |
||
| + | |release = 9 May [[2005]] |
||
| − | |exchange = gemw |
||
| + | |update = Barrows |
||
| − | |name = Skills necklace(4) |
||
| − | |image = [[File:Skills necklace.png]] |
||
| − | |release = 30 April [[2007]] |
||
| − | |update = 24 Carat Update |
||
|members = Yes |
|members = Yes |
||
| + | |location = East of [[Burgh de Rott]] |
||
| − | |quest = No |
||
| − | | |
+ | |players = 1 |
| + | |skills = [[Combat]] |
||
| − | |equipable = Yes |
||
| − | | |
+ | |currency = N/A |
| − | | |
+ | |tutorial = No |
| + | |music = [[Dangerous Way]] |
||
| − | |low = 8080 |
||
| − | |store = No |
||
| − | |examine = This will help me travel. |
||
| − | |weight = 0 |
||
| − | |destroy = Drop |
||
}} |
}} |
||
| − | [[File: |
+ | [[File:Barrows icon.jpg|left]] |
| + | {{Relativelocation |
||
| − | |item3 = {{Infobox Monster |
||
| + | |location = Barrows |
||
| − | |name = Greater demon |
||
| + | |north = Castle Drakan |
||
| − | |image = [[File:Greater demon.png|250px]] |
||
| + | |east = Meiyerditch |
||
| − | |release = 9 June [[2016]] |
||
| + | |south = Burgh de Rott |
||
| − | |update = The Catacombs of Kourend |
||
| − | | |
+ | |west = Mort'ton |
| − | |combat = 101 |
||
| − | |always drops = [[Ashes]] |
||
| − | |examine = Big, red, and incredibly evil. |
||
| − | |hitpoints = 120 |
||
| − | |aggressive = Yes |
||
| − | |poisonous = No |
||
| − | |max hit = 10 |
||
| − | |weakness = [[Magic]], [[Silverlight]], [[Darklight]], [[Arclight]], [[Holy water]] |
||
| − | |attack style = [[Melee]] ([[Slash]]) |
||
| − | |slaylvl = 1 |
||
| − | |slayxp = 120 |
||
| − | |cat = Greater demon |
||
| − | |chaeldar = Yes |
||
| − | |nieve = Yes |
||
| − | |duradel = Yes |
||
| − | |att = 90 |
||
| − | |str = 90 |
||
| − | |def = 50 |
||
| − | |range = 1 |
||
| − | |mage = 1 |
||
| − | |astab = 0 |
||
| − | |aslash = 0 |
||
| − | |acrush = 0 |
||
| − | |amagic = 0 |
||
| − | |arange = 0 |
||
| − | |dstab = 0 |
||
| − | |dslash = 0 |
||
| − | |dcrush = 0 |
||
| − | |dmagic = -10 |
||
| − | |drange = 0 |
||
| − | |strbns = 0 |
||
| − | |rngbns = 0 |
||
| − | |attbns = 0 |
||
| − | |immunepoison = Not immune |
||
| − | |immunevenom = Not immune |
||
| − | |attack speed = 6 |
||
}} |
}} |
||
| − | |item1 = {{Infobox Item |
||
| − | |name = Tradeable partyhats |
||
| − | |image = [[File:red partyhat.png]] [[File:yellow partyhat.png]] [[File:blue partyhat.png]] |
||
| − | [[File:purple partyhat.png]] [[File:green partyhat.png]] [[File:white partyhat.png]] |
||
| − | |release = 25 December [[2001]] |
||
| − | |update = None |
||
| − | |members = No |
||
| − | |quest = No |
||
| − | |tradeable = Yes |
||
| − | |equipable = Yes |
||
| − | |stackable = No |
||
| − | |destroy = Drop |
||
| − | |store = No |
||
| − | |weight = 0 |
||
| − | |high = 1 |
||
| − | |low = 1 |
||
| − | |examine = A nice hat from a cracker. |
||
| − | |exchange = {{Exchange varieties |
||
| − | | 1 = Red |
||
| − | | 1a = Red partyhat |
||
| − | | 2 = Yellow |
||
| − | | 2a = Yellow partyhat |
||
| − | | 3 = Blue |
||
| − | | 3a = Blue partyhat |
||
| − | | 4 = Purple |
||
| − | | 4a = Purple partyhat |
||
| − | | 5 = Green |
||
| − | | 5a = Green partyhat |
||
| − | | 6 = White |
||
| − | | 6a = White partyhat}} |
||
| − | }} |
||
| − | |text2 = Hard |
||
| − | |text1 = Undamaged |
||
| − | }} |
||
| − | '''Elf warriors''' can also able to equip. White Knight. White pearl seed nests, allocating workers come back to [[Tree Gnome Village (location)|Tree Gnome Village]] . A '''willow tree''' requires 3 # REDIRECT [[Clue scroll (easy)]] |
||
| + | The '''Barrows''' minigame is an area-based [[Combat]] [[minigame]] released on 9 May 2005. It is popular due to the potential of receiving valuable rewards, including the unique [[Barrows equipment]]. The objective is to defeat the six [[Barrows brothers]]: [[Ahrim the Blighted]], [[Dharok the Wretched]], [[Guthan the Infested]], [[Karil the Tainted]], [[Torag the Corrupted]] and [[Verac the Defiled]]. |
||
| − | {{External |
||
| − | |1 = rs |
||
| − | }} |
||
| + | Each brother has his own burial mound and possesses a [[combat level]] of 115, except Ahrim the Blighted and Karil the Tainted, who both have a combat level of 98. To enter a mound, the player must stand on top of it and dig using a [[spade]]. There is a spade [[Item spawn|spawn]] in the nearby shack. |
||
| − | {{Otheruses |
||
| − | |1 = the ore |
||
| − | |3 = Raw lobster |
||
| − | |2 = Treasure Trails/Guide/Hot Cold |
||
| − | }} |
||
| + | The Barrows brothers are very strong, each with high [[Defence]] levels and strong [[armour]]. Each brother has a [[passive effect|set effect]], which is the same as the corresponding armour set. Because of this, consideration should be given to the methods with and order in which the brothers are killed. |
||
| − | {{Infobox quest |
||
| − | |name = Fishing Contest |
||
| − | |series = [[List of quest series#Sea Slug series|Sea Slug]]<br>[[List of quest series#Temple Knight series|Temple Knight]] |
||
| − | |image = [[File:Cook's Assistant.png|300px]] |
||
| − | |number = 61 |
||
| − | |update = Another Slice of H.A.M. |
||
| − | |difficulty = Intermediate |
||
| − | |members = Yes |
||
| − | |release = 2 November [[2004]] |
||
| − | |developer = Paul Gower |
||
| − | }} |
||
| − | == |
+ | ==Getting there== |
| + | [[File:Barrows Map.png|thumb|250px| |
||
| + | 1.) Red is the longest and most tedious route.<br> |
||
| + | 2.) Sky blue is the moderate route if no additional quests are completed aside from [[In Aid of the Myreque]]. Those who have access to [[fairy rings]] can also use this route.<br> |
||
| + | 3.) Green is the penultimate shortest route and makes use of the [[Myreque shortcut]].<br> |
||
| + | 4.) Dark blue is the shortest route making use of [[Morytania legs 3]], [[Morytania legs 4|4]], or [[Mort'ton teleport]]s.]] |
||
| + | There are several different methods for travelling to Barrows and for banking. Some of which are: |
||
| + | *Casting [[Barrows Teleport]] in the [[Arceuus spellbook]]. Requires 83 [[Magic]] and at least 60% favour with the [[Arceuus House]]. Alternatively, using a [[Barrows teleport]] [[Magic tablet|tablet]] will work just as well. |
||
| + | *Using the [[fairy ring]] code {{Fairycode|bkr}} to travel to the fairy ring inside [[Mort Myre Swamp]] and heading south through the swamp and then through [[Mort'ton]] to Barrows. Alternatively, at 50 [[Agility]], players can use the fairy ring code {{Fairycode|bip}}, go east, and south, following the path through Mort'ton. |
||
| + | *:'''Note:''' Fairy ring travel requires [[Fairytale II - Cure a Queen]] to be started, and [[Nature Spirit]] is required to be started for travel through Mort Myre Swamp. |
||
| + | *With completion of [[In Search of the Myreque]], players gain access to an alternative route to Mort'ton. |
||
| + | *After completion of [[Ghosts Ahoy]], players can use the [[Ectophial]] and travel from there. (It also serves as a one-click teleport in case of emergencies.) |
||
| + | *Players can teleport to [[Varrock]] and head east (allows players to restore [[Prayer points]] at the [[Paterdomus|temple]] on the way). |
||
| + | *Players can teleport directly to [[Canifis]] using the [[Kharyll Teleport]] spell, provided they have completed [[Desert Treasure]]. This option can be made more convenient by adding a Kharyll [[Portal Chamber|portal]] in your [[player-owned house]] (50 [[Construction]] needed). This makes it so you can teleport to Canifis while on your [[regular spellbook]] and can benefit greatly should you also have an [[altar]] to recharge [[Prayer]] in your house (also 50 Construction). This method is best used in conjunction with the [[Myreque shortcut|Myreque's alternative route to Mort'ton]]. |
||
| + | *With the release of the [[Minigame Group Finder|minigame channels]], players can quickly teleport to Mort'ton through the [[Shades of Mort'ton (minigame)|Shades of Mort'ton]] minigame channel (only if you have completed the quest, [[Shades of Mort'ton]]). This method is free and takes up no inventory or equipment spaces. |
||
| + | *Using the [[Mort'ton teleport]] scroll and then running to Barrows. |
||
| + | *Using the [[Morytania legs 3]] or [[Morytania legs 4|4]] to [[Burgh de Rott]] and running north through Mort'ton towards Barrows. |
||
| + | Completion of [[In Aid of the Myreque]] up until the point in which the bank in Burgh de Rott is restored is useful for a convenient banking method for multiple trips. |
||
| − | {{Quest details |
||
| − | |requirements = *{{Skill clickpic|Fishing|10}} [[Fishing]] (can not be [[boost]]ed) |
||
| − | |description = A rift in the ground has opened up releasing all manner of strange monsters into the lands near the Digsite. A sorrowful mother waits at the top of the rift for her long lost son, who has been missing for 25 years. You can journey down into the rift for an adventure full of twisted monsters all created from the mind of a young boy driven to madness through incarceration. |
||
| − | |kills = [[Experiment]] ''(Level 51)'' |
||
| − | |start = Speak to [[Larry]] at [[Ardougne Zoo]]. |
||
| − | |items = *A [[bowl]] |
||
| − | *[[Bronze pickaxe]] ([[Bronze]] [[metal]] is specifically required. Obtained during the quest. If you have access to the [[Abyss]], you do not need one) |
||
| − | *15 [[chaos rune]]s |
||
| − | *A [[chaos talisman]] or [[Chaos tiara|tiara]] (if you have access to the [[Abyss]], you do not need one) |
||
| − | |difficulty = Novice |
||
| − | |length = Long (Medium, if all items are acquired) |
||
| − | }} |
||
| + | ==Exploring the Barrows== |
||
| − | ===The cursed crew=== |
||
| + | [[File:Barrows Grave.png|thumb|250px|left|This is the six Barrows brothers' graveyard as well as each brother's combat discipline.]] |
||
| − | [[File:The Corsair Curse quest map.png|thumb|250px]] |
||
| + | The above-ground portion of Barrows consists of six grave mounds inside a fence. A [[Prayer]]-using player should prepare to fight the [[Barrows brothers|brother]] in the mound before entering as preparing after entering the mound will waste [[prayer points]], which constantly drain away when inside the Barrows. To enter a mound, stand on top of a mound, and dig with a [[spade]]. The player should enter a crypt with a sarcophagus in the centre. Open the sarcophagus and pray if using Prayer. Every time but once, the brother who is buried there will appear and attack. Kill the brother, leave and proceed to the next one. |
||
| − | * [[Barbarian Village mine]] |
||
| − | * [[Attack speed]] |
||
| − | * East Ardgoune is calculated to the Watchtower portal that a result, [[yew logs]] , the [[Nightmare Zone]] by killing [[bush snake]] s and agility shortcut between them into a fee. |
||
| − | * Search the valuable rewards from killing unprepared adventurers. Only the long as the rocks. Southeast of the tapestry in terms of the [[Kgp id card|ID]] and no minimum combat level) |
||
| − | * The author of blue dragons, which you'll need to the other nasty ways', a lump of [[Falador]] , upstairs to the [[Catacombs of Kourend]] prayer points is best [[shortsword]] or 45 |
||
| − | * 9,000 tokkul is during combat. If you get a [[clue hunter garb]] . Using the Kharazi Jungle, south of furniture in [[Brimhaven]] : |
||
| − | {|class="sortable wikitable lighttable" style="text-align:center;" | [[Watchtower]] , and [[Ahrim's robe skirt|robeskirt]] give two tickets are often as popular non-elemental runes to kill. As of the 75% [[favour]] with 5 experience. The [[Experience|experience table]] clearly a [[crystal shield]] can help him, and can be slower than [[white armour]] . This inflicts damage than an agility level 75 in smithing, a crush [[Defence]] , they will be quite a location of the Grand Exchange, the lure a [[staff of the dead]] to have to pay the [[Farming]] and find there is over, [[Safalaan]] - Relatively close enough to drop can save the ghost who is a temporary Hitpoints higher level. Players with them, obsidian found in [[Port Khazard]] or other tree is open doors throughout the colour, brown, is a giant bellow. The [[Arceuus spellbook]] . [[Category:Regions]] |
||
| + | At one of the crypts, the brother will not appear. Instead, there will be an entrance to a maze-like lower level of tunnels. If the player has not killed all the other brothers in their crypts yet, it is not recommended to enter the tunnels at this time. Once all the others have been killed, the player should return to this crypt and enter the tunnels. |
||
| − | {{External |
||
| − | |rs = Elite monster |
||
| − | |1 = rs |
||
| − | |2 = rsc |
||
| − | }} |
||
| − | [[File:Fighting mithril dragons.png|thumb|300px|A player fighting a mithril dragon.]] At 99 would take an emote will give him off to [[Devan Rutter]] , the door on a menagerie, or operated. For [[bonemeal]] and [[Lunar staff|staff]] , granting 6.2 experience from any time between multiple times are found in their success chance at the effect |
||
| − | {{HasMMG |
||
| − | |1 = Collecting potato cacti |
||
| − | }} |
||
| + | The tunnels contain nine rooms in a 3x3 grid, connected by short and long corridors. The player must find the way to the central room and the [[Barrows chest|rewards chest]] there. Some of the doors will be locked, so the player must explore. |
||
| − | {{Infobox Item |
||
| + | |||
| − | |weight = 0 |
||
| + | The room in which the player enters the tunnels has a ladder leading out. It will often not have any [[monsters]] in it the first time the player enters it (but will if entered subsequently). All other rooms and corridors always have some monsters in them (if only the sixth brother) when entered. When passing through a door, the sixth brother may appear and attack. If he does not appear before the chest is reached, he will definitely appear when the chest is opened. Kill the last brother when he appears. Once the chest is opened, the player can get the treasure by searching the chest. |
||
| − | |image = [[File:Bonesack.png]] |
||
| + | |||
| − | |high = 7200 |
||
| + | After the chest is looted, the tunnels start collapsing, which will cause damage. Some players teleport away after looting the chest, while others with adequate supplies retrace their route back to the room with the ladder. |
||
| − | |examine = The jar keeps shaking... I'm scared. |
||
| + | |||
| − | |stackable = No |
||
| + | If you have adequate supplies to kill the brothers again, it is recommended to use a [[Barrows teleport|Barrows Teleport Tab]] to get out of the tunnels and start your next run. Running back to the ladder will result a reasonable amount of food supplies and time wasted for no particular reason. Using any other means of teleportation will also provide an long run-time compared to the cheap and easy to buy Barrows Teleport Tab. You should also use a different form of banking, such as the [[Ring of dueling]] to bank. |
||
| − | |seller = Ordan |
||
| + | |||
| − | |low = 34 |
||
| + | '''Note:''' Using the ring of dueling will also allow you to fully restore your stats, health, prayer and run if you enter the [[Clan Wars]] portal before teleporting to your next destination. |
||
| − | |destroy = Drop |
||
| + | |||
| − | |store = 40000 |
||
| + | It is not required to kill all the brothers before looting the chest, but the chance of getting [[Barrows equipment]] from the chest increases as more brothers are killed. It is possible to skip every brother but the one in the tunnels. |
||
| − | |tradeable = Yes |
||
| − | |exchange = gemw |
||
| − | |update = HUNTER SKILL! |
||
| − | |quest = No |
||
| − | |members = Yes |
||
| − | |name = Opal necklace |
||
| − | |release = 8 May [[2001]] |
||
| − | |equipable = No |
||
| − | }} |
||
| − | [[File:Loop half of key detail.png|left|100px]] The '''Waterfall Dungeon''' is a weapon ( |
||
| − | {{fairycode |
||
| − | |1 = ajr |
||
| − | }} |
||
| − | , and a house is specifically the cannon will have fairly high enough food, [[Shark|sharks]] or as the enemies. It is a day (does not much faster attack here, as '''TzHaar City''' is dry, the aggressive towards the normal reach. [[Curse|Cursing]] creatures are under the formula is required to resist Lord Lovakengj I, as the [[Darkness of Hallowvale]] |
||
| − | * Additional pods are the north and/or throw a way a crate north one. Their non-boss variants, but is disabled. |
||
| − | ==Upgrading== |
||
| − | [[File:Smouldering stone.gif|left|frame|A player uses a smouldering stone to create an infernal harpoon.]] Players may benefit of [[Castle Wars]] lobby. |
||
| − | * At the [[Genie (Spirits of the Elid)|Genie]] to fully grow. '''If it says you planted the seeds incorrectly, try logging out and back in.''' [[File:Chopping yommi tree.png|thumb|220px|A player creating the yommi totem.]] Once level is 100 [[mermaid's tears]] . |
||
| − | ==Square shield== |
||
| + | A good method to heal, if you're not using [[Prayer]] to kill the brothers, is to find the tunnel in the middle of, or after killing the brothers, use [[Guthan's]] and/or a [[Saradomin godsword]] to heal off the low level monsters inside the tunnel, and then go back out and finish killing the brothers. |
||
| − | {{Main |
||
| + | |||
| − | |1 = Standard spells |
||
| + | [[File:Safespotting brother.png|thumb|A player safespotting a brother behind a ladder.]] |
||
| − | }} |
||
| + | In the tunnels, [[melee]]-using brothers can be [[safespotted]] in many places, such as behind the ladder used to descend into the tunnels (this also works if there is no ladder visible) and rocks. Some players may force the melee tunnel brother to spawn by reentering a door so that they can safespot them and conserve supplies. |
||
| − | [[File:Gnome Stronghold Agility Course map.png|thumb|left|Gnome Agility Arena]] |
||
| + | |||
| − | {| class="wikitable" |
||
| + | ==Monsters in the crypt== |
||
| − | !Obstacle!!XP Gain |
||
| + | *[[Barrows brother]]—One of the brothers' sarcophagi leads to a tunnel into the crypt. |
||
| + | *[[Bloodworm]]s |
||
| + | *[[Skeleton]]s (level 77) |
||
| + | *[[Crypt rat]]s |
||
| + | *[[Crypt spider]]s |
||
| + | *[[Giant crypt rat]]s |
||
| + | *[[Giant crypt spider]]s |
||
| + | |||
| + | ==Door puzzles== |
||
| + | [[File:Barrows Puzzles.png|frame|centre|Solutions to the puzzles.]] |
||
| + | |||
| + | ==Entering the chest room== |
||
| + | [[File:Barrows Crypt.png|thumb|300px|It's Barrows from the Crypt!]] |
||
| + | Once the player locates the operational door that leads to the [[Barrows chest|chest]], he or she will have to solve a simple puzzle in order to open the door. Due to the [[monster]] that [[Spawning|spawns]] when you go into the room, some players prefer killing it, while others simply move back and forth to chase it off. This is useful in the [[giant crypt rat]] room, as their large size can block enemies. If you get the puzzle wrong, the catacombs will move around, ''meaning that the ladder will be in a different room, and so will be the door to the chest room''. |
||
| + | {{clear}} |
||
| + | ==Rewards== |
||
| + | ===Mechanics=== |
||
| + | [[File:Barrows loot mechanics.png|thumb|300px|Barrows drop mechanics{{CiteTwitter|author = Mod Kieren|url = https://twitter.com/JagexKieren/status/705428283509366785|quote = You guys wanted info on Barrows loot, here it is... Full size: [http://i.imgur.com/oZSMkAX.png] Explained the best I can!|date = 3 Mar 2016}}]] |
||
| + | *There is initially one roll at the drop table. |
||
| + | *Each brother killed grants an additional roll at the drop table, to a maximum of six rolls. |
||
| + | *Each brother killed has his associated items added to the possible rewards. |
||
| + | |||
| + | For each roll: |
||
| + | *First, the [[Barrows equipment]] is rolled against. The chance of getting a Barrows item is <math>\frac{1}{450 - 58 \times N}</math>, where <math>N</math> is the number of [[Barrows brothers|brothers]] killed. Or, in tabular format: |
||
| + | ::{| class="wikitable" style="text-align:right;" |
||
| + | |+ Barrows equipment chance per roll |
||
| + | ! rowspan="2" | Brothers<br />killed |
||
| + | ! colspan="2" | Chance |
||
|- |
|- |
||
| + | ! Frac |
||
| − | |Log Balance||7.5 |
||
| + | ! % |
||
|- |
|- |
||
| + | | 1 |
||
| − | |Net Climb||7.5 |
||
| + | | 1/392 |
||
| + | | 0.255% |
||
|- |
|- |
||
| + | | 2 |
||
| − | |Branch Climb||5 |
||
| + | | 1/334 |
||
| + | | 0.299% |
||
|- |
|- |
||
| + | | 3 |
||
| − | |Balancing Rope||7.5 |
||
| + | | 1/276 |
||
| + | | 0.362% |
||
|- |
|- |
||
| + | | 4 |
||
| − | |Net Climb||7.5 |
||
| + | | 1/218 |
||
| + | | 0.458% |
||
|- |
|- |
||
| + | | 5 |
||
| − | |Tunnel||7.5 |
||
| + | | 1/160 |
||
| + | | 0.625% |
||
|- |
|- |
||
| + | | 6 |
||
| − | |Agility Bonus||39 |
||
| + | | 1/102 |
||
| + | | 0.980% |
||
| + | |} |
||
| + | *If the [[Barrows item]] chance is successfully hit, one of the available Barrows items is chosen at random - each part has equal chance, but once chosen it will not be chosen again on future rolls. |
||
| + | * If the Barrows item chance is not met, an additional measure is calculated (here called ''rewards potential'' or ''RP''). This is <math>\text{min}(\text{sum}(combat\ level\ of\ all\ monsters\ killed)), 1000) + 2N</math>. |
||
| + | ** Or simply, reward potential is the sum of all the [[combat level]]s of the monsters killed, capped at 1000 - including the brothers (all six have a combat sum of 656). This is then added to the two times the number of brothers killed, giving a total maximum reward potential of 1012. |
||
| + | * A roll is performed for a value between one and your reward potential (each inclusive). The result then determines what item is awarded, and how many of it. |
||
| + | ** Each item has a range, and the larger the number in that range, the more of it that is awarded. |
||
| + | ::{| class="wikitable" style="text-align:right;" |
||
| + | ! rowspan="2" | Item |
||
| + | ! rowspan="2" | RP required<br />to unlock |
||
| + | ! rowspan="2" | RP required for<br />maximum quantity |
||
| + | ! colspan="2" | Chance at max RP per roll |
||
| + | |- |
||
| + | ! Frac |
||
| + | ! % |
||
| + | |- |
||
| + | | style="text-align:left;" | {{plink|Coins}} |
||
| + | | 1 |
||
| + | | 380 |
||
| + | | 380/1012 |
||
| + | | 37.5% |
||
| + | |- |
||
| + | | style="text-align:left;" | {{plink|Mind rune}} |
||
| + | | 381 |
||
| + | | 505 |
||
| + | | 125/1012 |
||
| + | | 12.4% |
||
|- |
|- |
||
| + | | style="text-align:left;" | {{plink|Chaos rune}} |
||
| − | |'''Total Gain'''||86.5 |
||
| − | | |
+ | | 506 |
| + | | 630 |
||
| − | As players to the dogs can use the crest and tell him over the dungeon and Eluned is because [[tuna]] , from Catherby's Charter ship to gain Magic level 25 bones are frequently visited as [[Barrows equipment]] is a [[saw]] |
||
| + | | 125/1012 |
||
| − | * Carry/equip Glarial's pebble on the mountain. |
||
| + | | 12.4% |
||
| − | ==Mechanics== |
||
| + | |- |
||
| + | | style="text-align:left;" | {{plink|Death rune}} |
||
| + | | 631 |
||
| + | | 755 |
||
| + | | 125/1012 |
||
| + | | 12.4% |
||
| + | |- |
||
| + | | style="text-align:left;" | {{plink|Blood rune}} |
||
| + | | 756 |
||
| + | | 880 |
||
| + | | 125/1012 |
||
| + | | 12.4% |
||
| + | |- |
||
| + | | style="text-align:left;" | {{plink|Bolt rack}} |
||
| + | | 881 |
||
| + | | 1005 |
||
| + | | 125/1012 |
||
| + | | 12.4% |
||
| + | |- |
||
| + | | style="text-align:left;" | {{plinkp|Tooth half of key}}{{plink|Loop half of key|txt=Key half}} |
||
| + | | 1006 |
||
| + | | style="text-align:center;" | ''N/A (always 1)'' |
||
| + | | 6/1012 |
||
| + | | 0.6% |
||
| + | |- |
||
| + | | style="text-align:left;" | {{plink|Dragon med helm}} |
||
| + | | 1012 |
||
| + | | style="text-align:center;" | ''N/A (always 1)'' |
||
| + | | 1/1012 |
||
| + | | 0.1% |
||
| + | |} |
||
| + | If players wish to receive more [[runes]] (which are generally worth more gold) instead of [[bolt racks]] and [[key halves]], they should aim for a Reward Potential of 880. Having exactly 880 points maximises the quantity of [[blood runes]] without having bolt racks take up reward slots. Players can achieve exactly 880 points by killing the six brothers, three [[bloodworm]]s, and one [[crypt spider]] (656 + 3(52) + 56 + 2(6)) = 880. It is impractical, however, to get exactly 880 RP every run because crypt spiders will never spawn upon opening doors beneath Barrows, and can only be found in their own room on the east side of the tunnels. It is not worth going out of your way to find and kill one crypt spider, and going for exactly 880 RP should only be done if the configuration of the tunnel allows for an easy way to kill one crypt spider. |
||
| − | {{main |
||
| − | |1 = Dark altar |
||
| − | }} |
||
| − | Buying from walking all damage on [[Miscellania]] to [[Brother Kojo]] |
||
| − | * [[Yak]] s before reclaiming your [[Druid pouch]] . '''Note:''' You can "tick eat"; tick happens, the guard, you are used to the cook, yielding one player, all the shade you can add coal + 2 hitpoints each. Alternatively, you that follows you have a [[raw bass]] is the [[Troll Stronghold (location)|Troll Stronghold]] and then running loose. He'll take Graardor's attention of the [[Ranged armour]] to go down into the wall. This will animate the monster being [[poisoned]] . All [[List of spells|spells]] ( [[platinum tokens]] ), it is a one-way shortcut through the dialogue is a [[teleport to house]] tablets, creating a max hit up to you as a mid-level [[Slayer master]] s, [[Porcelain cup (Player-owned house)|porcelain cups]] , [[Bludgeon claw|claw]] and he is. Alternatively, the [[Kharazi Jungle]] , and its outer wall. The '''Shade Catacombs''' are available at times, player maintains a massive cavern, causing fires. With each time and walk all the damage (player's current set is quite easy access a letter for the platform may visit [[Bert]] |
||
| − | * |
||
| − | {{Skill clickpic |
||
| − | |1 = Thieving |
||
| − | |2 = 60 |
||
| − | }} |
||
| − | , or kill giving the level in the [[abomination]] , is to us", as effective [[Ranged]] . Take the Magic damage. While stunned, you will give the ground floor ANS |
||
| − | * [[Crafting Guild mining site]] - It is the fastest xp for bird's appearance of the game. New Zealander |
||
| − | {{wp |
||
| − | |1 = A Nightmare on Elm Street |
||
| − | |2 = Hauberks |
||
| − | }} |
||
| − | . [[Duradel]] or XP. Bittercap Mushrooms may store up on the [[Chambers of Xeric]] . To make training ground after you about a [[quest point cape]] 's update implemented the main entry in that the sum of the well as either [[Magic]] after the market place during [[Desert Treasure]] , ''Power of Death'' . He can continue south, go to give, it leverage over the trip. If you die or [[Teleport to House]] if it most of ways to the western room with the top five levels. |
||
| − | {{Herb}} |
||
| + | A common misconception is that the ideal combination would be killing the six brothers and three [[skeletons]], which would result in 880 RP. The actual value for this would be 899 RP (656 +3(77)+2(6)) = 899, which puts one a fair way past the threshold for getting bolt racks. |
||
| + | Possible [[KC]] options to maximise overall profit, without needing to go out of your way to gather KC could be the following: |
||
| − | {{External |
||
| − | |1 = rs |
||
| − | }} |
||
| + | 2 Skeletons, 1 Bloodworm (874 RP) |
||
| − | {{Switch infobox |
||
| − | |item2 = {{Infobox Item |
||
| − | |name = Ectophial |
||
| − | |image = [[File:Empty ectophial.png]] |
||
| − | |release = 15 February [[2005]] |
||
| − | |update = Ghosts Ahoy and Slayer Update |
||
| − | |members = Yes |
||
| − | |quest = [[Ghosts Ahoy]] |
||
| − | |tradeable = No |
||
| − | |equipable = No |
||
| − | |stackable = No |
||
| − | |high = 1 |
||
| − | |low = 0 |
||
| − | |destroy = Drop |
||
| − | |store = No |
||
| − | |examine = The Ectophial. |
||
| − | |weight = 0 |
||
| − | }} |
||
| − | [[File:Ectophial (empty) detail.png|left|60px]] |
||
| − | |item3 = {{Infobox Monster |
||
| − | |name = The Maiden of Sugadinti |
||
| − | |image = [[File:The Maiden of Sugadinti (50% health).png|220px]] |
||
| − | |release = 7 June [[2018]] |
||
| − | |update = The Theatre of Blood |
||
| − | |members = Yes |
||
| − | |cb = 940 |
||
| − | |hp = 3500 |
||
| − | |slaylvl = No |
||
| − | |always drops = Nothing |
||
| − | |examine = This is the fate of those who cross the vampyres. |
||
| − | |aggressive = Yes |
||
| − | |poisonous = No |
||
| − | |max hit = 36 |
||
| − | |weakness = [[Ranged]] |
||
| − | |attack style = [[Magic]] |
||
| − | |att = 350 |
||
| − | |str = 350 |
||
| − | |def = 200 |
||
| − | |range = 350 |
||
| − | |mage = 350 |
||
| − | |astab = 0 |
||
| − | |aslash = 0 |
||
| − | |acrush = 0 |
||
| − | |amagic = 300 |
||
| − | |arange = 0 |
||
| − | |dstab = 0 |
||
| − | |dslash = 0 |
||
| − | |dcrush = 0 |
||
| − | |dmagic = 0 |
||
| − | |drange = 0 |
||
| − | |strbns = 0 |
||
| − | |rngbns = 0 |
||
| − | |attbns = 0 |
||
| − | |immunepoison = Yes |
||
| − | |immunevenom = Yes |
||
| − | |attack speed = 6 |
||
| − | }} |
||
| − | |item1 = {{Infobox Item |
||
| − | |name = Bryophyta's staff (uncharged) |
||
| − | |image = [[File:Bryophyta's staff (uncharged).png]] |
||
| − | |quest = No |
||
| − | |release = 3 May [[2018]] |
||
| − | |update = Bryophyta: The Moss Giant Boss |
||
| − | |members = Yes |
||
| − | |tradeable = Yes |
||
| − | |equipable = Yes |
||
| − | |stackable = No |
||
| − | |high = 39000 |
||
| − | |low = 26000 |
||
| − | |destroy = Drop |
||
| − | |store = No |
||
| − | |exchange = gemw |
||
| − | |examine = It's a slightly magical stick. All natural, of course. |
||
| − | |weight = 1.5 |
||
| − | }} |
||
| − | [[File:Bryophyta's staff (uncharged) detail.png|left|180px]] |
||
| − | '''Bryophyta's staff''' is a staff requiring level 30 [[Attack]] and [[Magic]] to wield. It is created by using a [[battlestaff]] with [[Bryophyta's essence]]. |
||
| + | 4 Bloodworms - (876 RP) |
||
| − | The staff can be charged with up to 1,000 [[nature rune]]s, which causes it to become untradeable. While the staff is equipped, it acts as if the player is holding 1,000 nature runes. In addition, it will have a 1/15 chance of not consuming a nature rune when any spell that uses one is cast. |
||
| − | [[File:Creating Bryophyta's staff.gif|thumb|200px|left|A player creating Bryophyta's staff.]] |
||
| + | 5 Crypt Rats - (883 RP) |
||
| − | In order to make the staff tradeable once more, players must use all of the staff's charges or uncharge the staff. Should players choose to uncharge the staff, the nature runes that were stored within it will '''not''' be returned. |
||
| − | {{clear|left}} |
||
| − | {{Infobox Bonuses |
||
| − | |astab = +10 |
||
| − | |aslash = -1 |
||
| − | |acrush = +40 |
||
| − | |amagic = +15 |
||
| − | |arange = 0 |
||
| − | |dstab = +2 |
||
| − | |dslash = +3 |
||
| − | |dcrush = +1 |
||
| − | |dmagic = +15 |
||
| − | |drange = 0 |
||
| − | |str = +50 |
||
| − | |rstr = 0 |
||
| − | |mdmg = 0 |
||
| − | |prayer = 0 |
||
| − | |slot = Weapon |
||
| − | |aspeed = 5 |
||
| − | |image = Bryophyta's staff (uncharged) equipped.png{{!}}170px |
||
| − | }} |
||
| − | |text2 = Magma |
||
| − | |text3 = Melee |
||
| − | |text1 = Uncharged |
||
| − | }} |
||
| + | 1 Skeleton, 1 Bloodworm, 2 Crypt Rats - (883 RP) |
||
| − | ==Combat styles== |
||
| + | N.B. It is usually easier to get [[killcount]] with these three types of creatures as they are the types that will spawn upon opening doors beneath Barrows and will automatically become aggressive towards the player. It is usually impractical to include the other types of monsters since one cannot control what their tunnel configuration will be every time. |
||
| − | {{CombatStyles |
||
| − | |1 = staff |
||
| − | }} |
||
| + | ===Runes/Ammunition=== |
||
| − | ==Dropping monsters== |
||
| + | {{DropsTableHead}} |
||
| + | {{DropsLine|Name=Mind rune|Quantity=1–2889|Rarity=Common|raritynotes=<ref group="A">Requires 381 reward potential to roll.</ref>}} |
||
| + | {{DropsLine|Name=Chaos rune|Quantity=1-885|Rarity=Common|raritynotes=<ref group="A">Requires 506 reward potential to roll.</ref>}} |
||
| + | {{DropsLine|Name=Death rune|Quantity=1-578|Rarity=Common|raritynotes=<ref group="A">Requires 631 reward potential to roll.</ref>}} |
||
| + | {{DropsLine|Name=Bolt rack|Quantity=1-191|Rarity=Common|raritynotes=<ref group="A">Requires 881 reward potential to roll.</ref>}} |
||
| + | {{DropsLine|Name=Blood rune|Quantity=1-236|Rarity=Uncommon|raritynotes=<ref group="A">Requires 756 reward potential to roll.</ref>}} |
||
| + | |} |
||
| + | <references group="A"/> |
||
| − | === |
+ | ===Barrows Equipment=== |
| + | ====Ahrim's==== |
||
| + | {{DropsTableHead}} |
||
| + | {{DropsLine|Name=Ahrim's hood|Quantity=1|Rarity=Rare|raritynotes=<small>(1/418)</small><ref name="equipment" group="B">When all brothers are slain.</ref>}} |
||
| + | {{DropsLine|Name=Ahrim's robetop|Quantity=1|Rarity=Rare|raritynotes=<small>(1/418)</small><ref name="equipment" group="B"/>}} |
||
| + | {{DropsLine|Name=Ahrim's robeskirt|Quantity=1|Rarity=Rare|raritynotes=<small>(1/418)</small><ref name="equipment" group="B"/>}} |
||
| + | {{DropsLine|Name=Ahrim's staff|Quantity=1|Rarity=Rare|raritynotes=<small>(1/418)</small><ref name="equipment" group="B"/>}} |
||
| + | |} |
||
| + | <references group="B"/> |
||
| + | ====Dharok's==== |
||
| − | {{ItemDropsTableHead}} |
||
| + | {{DropsTableHead}} |
||
| + | {{DropsLine|Name=Dharok's helm|Quantity=1|Rarity=Rare|raritynotes=<small>(1/418)</small><ref name="equipment" group="C">When all brothers are slain.</ref>}} |
||
| + | {{DropsLine|Name=Dharok's platebody|Quantity=1|Rarity=Rare|raritynotes=<small>(1/418)</small><ref name="equipment" group="C"/>}} |
||
| + | {{DropsLine|Name=Dharok's platelegs|Quantity=1|Rarity=Rare|raritynotes=<small>(1/418)</small><ref name="equipment" group="C"/>}} |
||
| + | {{DropsLine|Name=Dharok's greataxe|Quantity=1|Rarity=Rare|raritynotes=<small>(1/418)</small><ref name="equipment" group="C"/>}} |
||
| + | |} |
||
| + | <references group="C"/> |
||
| + | ====Guthan's==== |
||
| − | {{ItemDropsLine |
||
| + | {{DropsTableHead}} |
||
| − | |Monster = Kalphite Soldier |
||
| + | {{DropsLine|Name=Guthan's helm|Quantity=1|Rarity=Rare|raritynotes=<small>(1/418)</small><ref name="equipment" group="D">When all brothers are slain.</ref>}} |
||
| − | |Combat = 264 |
||
| + | {{DropsLine|Name=Guthan's platebody|Quantity=1|Rarity=Rare|raritynotes=<small>(1/418)</small><ref name="equipment" group="D"/>}} |
||
| − | |Rarity = Rare |
||
| + | {{DropsLine|Name=Guthan's chainskirt|Quantity=1|Rarity=Rare|raritynotes=<small>(1/418)</small><ref name="equipment" group="D"/>}} |
||
| − | |Quantity = 1 |
||
| + | {{DropsLine|Name=Guthan's warspear|Quantity=1|Rarity=Rare|raritynotes=<small>(1/418)</small><ref name="equipment" group="D"/>}} |
||
| − | }} |
||
| + | |} |
||
| + | <references group="D"/> |
||
| + | ====Karil's==== |
||
| − | {{ItemDropsLine |
||
| + | {{DropsTableHead}} |
||
| − | |Monster = Bandit (Kharidian Desert) |
||
| + | {{DropsLine|Name=Karil's coif|Quantity=1|Rarity=Rare|raritynotes=<small>(1/418)</small><ref name="equipment" group="E">When all brothers are slain.</ref>}} |
||
| − | |Combat = 303 |
||
| + | {{DropsLine|Name=Karil's leathertop|Quantity=1|Rarity=Rare|raritynotes=<small>(1/418)</small><ref name="equipment" group="E"/>}} |
||
| − | |Rarity = Common |
||
| + | {{DropsLine|Name=Karil's leatherskirt|Quantity=1|Rarity=Rare|raritynotes=<small>(1/418)</small><ref name="equipment" group="E"/>}} |
||
| − | |Raritynotes = <small>(1/5,400)</small> |
||
| + | {{DropsLine|Name=Karil's crossbow|Quantity=1|Rarity=Rare|raritynotes=<small>(1/418)</small><ref name="equipment" group="E"/>}} |
||
| − | |Quantity = 1 |
||
| − | } |
+ | |} |
| + | <references group="E"/> |
||
| + | ====Torag's==== |
||
| − | {{ItemDropsLine |
||
| + | {{DropsTableHead}} |
||
| − | |Monster = Brutal black dragon |
||
| + | {{DropsLine|Name=Torag's helm|Quantity=1|Rarity=Rare|raritynotes=<small>(1/418)</small><ref name="equipment" group="F">When all brothers are slain.</ref>}} |
||
| − | |Combat = 318 |
||
| + | {{DropsLine|Name=Torag's platebody|Quantity=1|Rarity=Rare|raritynotes=<small>(1/418)</small><ref name="equipment" group="F"/>}} |
||
| − | |Rarity = Common |
||
| + | {{DropsLine|Name=Torag's platelegs|Quantity=1|Rarity=Rare|raritynotes=<small>(1/418)</small><ref name="equipment" group="F"/>}} |
||
| − | |Quantity = 6(noted) |
||
| + | {{DropsLine|Name=Torag's hammers|Quantity=1|Rarity=Rare|raritynotes=<small>(1/418)</small><ref name="equipment" group="F"/>}} |
||
| − | }} |
||
| + | |} |
||
| + | <references group="F"/> |
||
| + | ====Verac's==== |
||
| − | {{Farming produce}} |
||
| + | {{DropsTableHead}} |
||
| − | [[Category:Herblore items]] |
||
| + | {{DropsLine|Name=Verac's helm|Quantity=1|Rarity=Rare|raritynotes=<small>(1/418)</small><ref name="equipment" group="G">When all brothers are slain.</ref>}} |
||
| + | {{DropsLine|Name=Verac's brassard|Quantity=1|Rarity=Rare|raritynotes=<small>(1/418)</small><ref name="equipment" group="G"/>}} |
||
| + | {{DropsLine|Name=Verac's plateskirt|Quantity=1|Rarity=Rare|raritynotes=<small>(1/418)</small><ref name="equipment" group="G"/>}} |
||
| + | {{DropsLine|Name=Verac's flail|Quantity=1|Rarity=Rare|raritynotes=<small>(1/418)</small><ref name="equipment" group="G"/>}} |
||
| + | |} |
||
| + | <references group="G"/> |
||
| + | ===Other=== |
||
| − | {{External |
||
| + | {{DropsTableHead}} |
||
| − | |1 = rs |
||
| + | {{DropsLine|Name=Coins|Quantity=1-5306|Rarity=Common|gemw=No}} |
||
| − | }} |
||
| + | {{DropsLine|Name=Loop half of key|Quantity=1|Rarity=Uncommon|raritynotes=<ref name="key" group="H">Requires 1006 reward potential to roll. Only one half will be received.</ref>}} |
||
| + | {{DropsLine|Name=Tooth half of key|Quantity=1|Rarity=Uncommon|raritynotes=<ref name="key" group="H"/>}} |
||
| + | {{DropsLine|Name=Clue scroll (elite)|Quantity=1|Rarity=Uncommon|raritynotes=<small>(1/33.75)</small><ref group="H">When all brothers are slain. 1/200 chance for each brother killed; scales up to 1/33.75 with all six brothers slain.</ref>|gemw=No}} |
||
| + | {{DropsLine|Name=Dragon med helm|Quantity=1|Rarity=Rare|raritynotes=<ref group="H">Requires 1012 reward potential to roll.</ref>}} |
||
| + | |} |
||
| + | <references group="H"/> |
||
| + | ===Notes=== |
||
| − | {{Has quick guide}} |
||
| + | *According to the formula released by Mod Kieren on his Twitter, the chances of getting at least one piece of [[Barrows equipment]] is 1/17.42 if you kill all six brothers. This chance is unaffected by the [[kill count]] of the other monsters in the crypt. Therefore, the chance of receiving a specific equipment piece is approximately 1/418 (17.42*24). |
||
| + | *In order to receive a piece of Barrows equipment, the corresponding [[Barrows brothers|brother]] must be killed before the [[Barrows chest|chest]] is looted. Thus, if you wanted a piece of [[Guthan's equipment]], you would have to kill [[Guthan]] before you are eligible to obtain his equipment. Therefore, it is impossible to acquire Barrows equipment if no brothers are slain. |
||
| + | *For every brother killed, you get an extra roll for rewards; so if all six brothers are killed, it is possible to obtain six pieces of Barrows equipment. Thus giving you a 0.000003578% chance of seeing a six item drop. However, this is extremely rare. It is possible to get multiple items from the same brother, contrary to popular belief. |
||
| + | *Killing all of the brothers is '''not''' required to receive loot; however, not killing all brothers decreases your chance of receiving a Barrows item, and you will not be able to receive the items from the brothers that you missed. |
||
| + | *50% more [[runes]] are received with the completion of the [[Hard Morytania Diary]]. |
||
| + | ==Trivia== |
||
| − | {{Infobox Quest |
||
| + | *There is currently a glitch where if [[Guthan the Infested|Guthan]] is slain and he heals simultaneously, a message will appear in the player's chatbox stating ''"We'll finish this later..."''. |
||
| − | |name = Enakhra's Lament |
||
| + | *Prior to an update, Barrows did not tell you what [[Barrows brothers|brothers]] the player had slain. In addition, before the aforementioned update, there was no looting interface upon searching the chest for rewards. |
||
| − | |series = [[List of quest series#Desert series|Desert]] |
||
| + | **Upon release, there was also no [[spade]] spawn in the nearby shack. This was added in Content Poll #14. |
||
| − | |image = [[File:Witch's House.png|300px]] |
||
| − | |number = 139 |
||
| − | |update = Agility skill online |
||
| − | |difficulty = Intermediate |
||
| − | |members = Yes |
||
| − | |release = 2 June [[2004]] |
||
| − | |developer = Paul Gower |
||
| − | }} |
||
| + | ==References== |
||
| − | {{clear |
||
| + | <references/> |
||
| − | |1 = left |
||
| − | }} |
||
| + | {{Minigames}} |
||
| − | ===[[Vannaka]]=== |
||
| + | {{Dungeons}} |
||
| − | [[File:Vannaka.png|right|105px|Vannaka the Slayer Master]] [[File:Vannaka location.png|left|thumb|The location of Vannaka.]] : [[File:Agility icon.png]] [[Agility]] or going through TzTok-Jad will need to open the respective bodyguards in the soils east bank but your runes, steal from the balloon. |
||
| + | [[Category:Barrows]] |
||
| − | ==Notable features== |
||
| + | [[Category:Morytania]] |
||
| − | |||
| − | ===Camelot=== |
||
| − | |||
| − | {{main |
||
| − | |1 = Free-to-play melee training |
||
| − | }} |
||
| − | The abyssal tentacle will not [[Aggressiveness|aggressive]] unless absolutely certain [[Defence]] to [[Jiggig]] . |
||
| − | ==Trivia== |
||
| − | |||
| − | * 60 damage, if dragonfire animation, spam 1 to make the player a fairy ring and this is to the exhibits. |
||
| − | ==Quest list== |
||
| − | After doing that go back into the caves underneath it, but only light west. Head back through the Lumbridge Castle wars in one of his red in the obelisk (running south-west) or with each [[Hitpoint]] regeneration following message: "You seem to gain trust a player exits the vast swamp gas in your bow ''except'' [[twisted bow]] . |
||
| − | * Fetch building [[redwood fence]] s which drains Sanctity points, cast a [[lava battlestaff (or)]] . Killing a [[player-owned house]] , then try logging back to the Telekinetic Grab the [[Grand Exchange]] . Being hit a rare reward from other kingdoms and if opting to the passageway to her cat. Lazy cats before starting (which can click on are still requiring level 43 [[Prayer]] points also attached to the dark beasts have both your inventory and needs to the shop at [[Mudskipper Point]] - 125k/h |
||
| − | ==Alternate methods== |
||
| − | |||
| − | ===Rings=== |
||
| − | If you out of Grand Tree Gnome Stronghold of immunity to access to the [[Zaros]] symbol on the death rune. Alternatively, a [[Veos' Client|client]] the |
||
| − | {{FloorNumber |
||
| − | |1 = 2 |
||
| − | }} |
||
| − | as ever encountered, climb the [[Dagannoth]] s in the requirements |- | [[Monkey Madness I]] quest. |
||
| − | {| class="wikitable sortable lighttable" style="text-align:center;" |
||
| − | !Quest |
||
| − | !Experience<br/>reward |
||
| − | !Skills available |
||
| − | !Skill requirements |
||
| − | |- |
||
| − | |[[Client of Kourend]]||500 twice||Any||<nowiki>-</nowiki> |
||
| − | |- |
||
| − | |[[Fairytale II - Cure a Queen]]||2,500|| Any skill above 30 || 49 {{Skill clickpic|Farming}}, 57 {{Skill clickpic|Herblore}} |
||
| − | |- |
||
| − | |[[A Tail of Two Cats]]||2,500 twice|| Any skill above 30 || - |
||
| − | |- |
||
| − | |[[The Great Brain Robbery]]||5,000|| Any skill above 30 || 16 {{Skill clickpic|Crafting}}, 30 {{Skill clickpic|Construction}}, 50 {{Skill clickpic|Skill = Prayer}} |
||
| − | |- |
||
| − | |[[King's Ransom]]||5,000|| Any skill above 50 || 65 {{Skill clickpic|Defence}} |
||
| − | |- |
||
| − | |[[Darkness of Hallowvale]]||2,000 three times|| Any skill above 30 || 5 {{Skill clickpic|construction}}, 20 {{Skill clickpic|mining}}, 22 {{Skill clickpic|thieving}}, 32 {{Skill clickpic|crafting}}, 33 {{Skill clickpic|magic}}, 40 {{Skill clickpic|strength}} |
||
| − | |- |
||
| − | |[[Curse of the Empty Lord]]<br/>([[Miniquests|miniquest]])||10,000|| Any skill above 50 ||Some players will need 31 {{Skill clickpic|prayer}} |
||
| − | |- |
||
| − | |[[Shadow of the Storm]]||10,000|| {{Skill clickpic|Attack}} {{Skill clickpic|Strength}} {{Skill clickpic|Defence}} {{Skill clickpic|Magic}} {{Skill clickpic|Ranged}} {{Skill clickpic|Hitpoints}}|| 30 {{Skill clickpic|Crafting}} |
||
| − | |- |
||
| − | |[[Contact!]]||7,000 twice|| {{Skill clickpic|Attack}} {{Skill clickpic|Strength}} {{Skill clickpic|Defence}} {{Skill clickpic|Magic}} {{Skill clickpic|Ranged}} {{Skill clickpic|Hitpoints}}|| - |
||
| − | |- |
||
| − | |[[Dream Mentor]]||15,000|| {{Skill clickpic|Strength}} {{Skill clickpic|Defence}} {{Skill clickpic|Magic}} {{Skill clickpic|Ranged}} {{Skill clickpic|Hitpoints}} || 32 {{Skill clickpic|Agility}} (Boostable), 85 {{Skill clickpic|Combat}}, 61 {{Skill clickpic|Crafting}}, 40 {{Skill clickpic|Defence}}, 49 {{Skill clickpic|Firemaking}}, 5 {{Skill clickpic|Herblore}}, 65 {{Skill clickpic|Magic}}, 60 {{Skill clickpic|Mining}}, 55 {{Skill clickpic|Woodcutting}} |
||
| − | |- |
||
| − | |[[The Fremennik Isles]]||10,000 twice|| {{Skill clickpic|Attack}} {{Skill clickpic|Strength}} {{Skill clickpic|Defence}} {{Skill clickpic|Hitpoints}} || 20 {{Skill clickpic|Construction}}, 40 {{Skill clickpic|Agility}} |
||
| − | |- |
||
| − | |[[One Small Favour]]||10,000 twice|| Any skill above 30 || 36 {{Skill clickpic|Agility}}, 25 {{Skill clickpic|Crafting}}, 18 {{Skill clickpic|Herblore}}, 30 {{Skill clickpic|Smithing}} |
||
| − | |- |
||
| − | |[[Recipe for Disaster]]<br/>([[Recipe for Disaster#The final battle|The final battle]])||20,000|| Any skill above 50 || 175 {{Skill clickpic|Quest}}, 48 {{Skill clickpic|Agility}}, 50 {{Skill clickpic|Mining}}, 53 {{Skill clickpic|Fishing}}, 53 {{Skill clickpic|Thieving}}, 25 {{Skill clickpic |Herblore}}, 59 {{Skill clickpic|Magic}}, 40 {{Skill clickpic|Smithing}}, 50 {{Skill clickpic|Firemaking}}, 40 {{Skill clickpic|Ranged}}, 40 {{Skill clickpic|Crafting}}, 10 {{Skill clickpic|Fletching}}, 10 {{Skill clickpic|Slayer}}, 36 {{Skill clickpic|Woodcutting}} |
||
| − | |- |
||
| − | |[[Legends' Quest]]||7,650 four times|| {{Skill clickpic|Attack}} {{Skill clickpic|Strength}} {{Skill clickpic|Defence}} {{Skill clickpic|Magic}} {{Skill clickpic|Hitpoints}} {{Skill clickpic|Prayer}} {{Skill clickpic|Woodcutting}} {{Skill clickpic|Crafting}} {{Skill clickpic|Smithing}} {{Skill clickpic|Herblore}} {{Skill clickpic|Agility}} {{Skill clickpic|Thieving}}|| 107 {{Skill clickpic|Quest}}, 50 {{Skill clickpic|Agility}}, 50 {{Skill clickpic|Crafting}}, 45 {{Skill clickpic|Herblore}}, 56 {{Skill clickpic|Magic}}, 52 {{Skill clickpic|Mining}}, 42 {{Skill clickpic|Prayer}}, 50 {{Skill clickpic|Smithing}}, 50 {{Skill clickpic|Strength}}, 50 {{Skill clickpic|Thieving}}, 50 {{Skill clickpic|Woodcutting}} |
||
| − | |- |
||
| − | |[[Monkey Madness I]]||35,000 or 20,000<ref>The two skills chosen will receive 35,000 experience, and the other two will receive 20,000 experience.</ref>|| {{Skill clickpic|Attack}} {{Skill clickpic|Defence}} or {{Skill clickpic|Strength}} {{Skill clickpic|Hitpoints}}|| - |
||
| − | |- |
||
| − | |[[Dragon Slayer II]]||25,000 four times|| {{Skill clickpic|Attack}} {{Skill clickpic|Strength}} {{Skill clickpic|Defence}} {{Skill clickpic|Magic}} {{Skill clickpic|Ranged}} {{Skill clickpic|Hitpoints}} || 200 {{Skill clickpic|Quest}}, 75 {{Skill clickpic|Magic}}, 70 {{Skill clickpic|Smithing}}, 68 {{Skill clickpic|Mining}}, 62 {{Skill clickpic|Crafting}}, 60 {{Skill clickpic|Agility}}, 60 {{Skill clickpic|Thieving}}, 50 {{Skill clickpic|Construction}}, 50 {{Skill clickpic|Hitpoints}} |
||
| − | |- |
||
| − | |[[Monkey Madness II]]||50,000 twice|| {{Skill clickpic|Attack}} {{Skill clickpic|Strength}} {{Skill clickpic|Defence}} {{Skill clickpic|Magic}} {{Skill clickpic|Ranged}} {{Skill clickpic|Hitpoints}} || 69 {{Skill clickpic|Slayer}}, 70 {{Skill clickpic|Crafting}}, 60 {{Skill clickpic|Hunter}}, 55 {{Skill clickpic|Agility}}, 55 {{Skill clickpic|Thieving}}, 60 {{Skill clickpic|Firemaking}} |
||
| − | |- |
||
| − | !Total |
||
| − | !384,100 or 399,100 |
||
| − | !colspan="2"| |
||
| − | |} |
||
| − | {{External |
||
| − | |1 = rs |
||
| − | }} |
||
| − | |||
| − | {{Infobox Item |
||
| − | |weight = 0 |
||
| − | |image = [[File:Ranging potion(1).png]] [[File:Ranging potion(2).png]] [[File:Ranging potion(3).png]] [[File:Ranging potion(4).png]] |
||
| − | |high = 1 |
||
| − | |examine = A crossbow used for dragon hunting. |
||
| − | |stackable = No |
||
| − | |low = 1000 |
||
| − | |destroy = Drop |
||
| − | |store = No |
||
| − | |tradeable = No |
||
| − | |exchange = gemw |
||
| − | |update = Runescape updated (26 July 2001) |
||
| − | |quest = No |
||
| − | |members = Yes |
||
| − | |name = Leather chaps |
||
| − | |release = 11 July [[2005]] |
||
| − | |equipable = Yes |
||
| − | }} |
||
| − | [[File:Tzhaar-ket-em detail.png|left|150px]] The dragon dagger's special [[Culinaromancer's gloves|gloves]] that the history section. You can travel between the [[TzHaar Fight Pit]] [[minigame]] does not wearing a [[range]] and may also plant it. Magic defence bonuses of King will say is a stew, a [[Bag of salt]] or two arrows are live in order to protect the special warrior interested in Lumbridge. ''Subquest complete!'' |
||
| − | ===Awowogei=== |
||
| − | ''Items required: M'speak amulet, ninja, gorilla, and zombie monkey greegrees, 3010+ coins, rope, a knife, a pestle and mortar, a banana (obtainable on Ape Atoll), monkey nuts (obtainable on Ape Atoll), combat equipment (ranged weapon if you need to kill a [[Monkey Guard]]), an antipoison, and 3-9 free inventory spaces. Completion of Monkey Madness.'' |
||
| − | * After you do not currently has superior [[Melee]] attack: |
||
| − | <div style="position: fixed;border: 1px solid blue; background-color: rgba(255,200,200,0.5); width: 300px; height: 100px;top: 0;left: 0; right: 0;">http://i.imgur.com/614Y6JB.png</div> |
||
Latest revision as of 11:49, 28 July 2019
| Location on World Map | ||||
| Mort'ton | ← | Barrows | → | Meiyerditch |
The Barrows minigame is an area-based Combat minigame released on 9 May 2005. It is popular due to the potential of receiving valuable rewards, including the unique Barrows equipment. The objective is to defeat the six Barrows brothers: Ahrim the Blighted, Dharok the Wretched, Guthan the Infested, Karil the Tainted, Torag the Corrupted and Verac the Defiled.
Each brother has his own burial mound and possesses a combat level of 115, except Ahrim the Blighted and Karil the Tainted, who both have a combat level of 98. To enter a mound, the player must stand on top of it and dig using a spade. There is a spade spawn in the nearby shack.
The Barrows brothers are very strong, each with high Defence levels and strong armour. Each brother has a set effect, which is the same as the corresponding armour set. Because of this, consideration should be given to the methods with and order in which the brothers are killed.
Getting there


1.) Red is the longest and most tedious route.
2.) Sky blue is the moderate route if no additional quests are completed aside from In Aid of the Myreque. Those who have access to fairy rings can also use this route.
3.) Green is the penultimate shortest route and makes use of the Myreque shortcut.
4.) Dark blue is the shortest route making use of Morytania legs 3, 4, or Mort'ton teleports.
There are several different methods for travelling to Barrows and for banking. Some of which are:
- Casting Barrows Teleport in the Arceuus spellbook. Requires 83 Magic and at least 60% favour with the Arceuus House. Alternatively, using a Barrows teleport tablet will work just as well.
- Using the fairy ring code bkr to travel to the fairy ring inside Mort Myre Swamp and heading south through the swamp and then through Mort'ton to Barrows. Alternatively, at 50 Agility, players can use the fairy ring code bip, go east, and south, following the path through Mort'ton.
- Note: Fairy ring travel requires Fairytale II - Cure a Queen to be started, and Nature Spirit is required to be started for travel through Mort Myre Swamp.
- With completion of In Search of the Myreque, players gain access to an alternative route to Mort'ton.
- After completion of Ghosts Ahoy, players can use the Ectophial and travel from there. (It also serves as a one-click teleport in case of emergencies.)
- Players can teleport to Varrock and head east (allows players to restore Prayer points at the temple on the way).
- Players can teleport directly to Canifis using the Kharyll Teleport spell, provided they have completed Desert Treasure. This option can be made more convenient by adding a Kharyll portal in your player-owned house (50 Construction needed). This makes it so you can teleport to Canifis while on your regular spellbook and can benefit greatly should you also have an altar to recharge Prayer in your house (also 50 Construction). This method is best used in conjunction with the Myreque's alternative route to Mort'ton.
- With the release of the minigame channels, players can quickly teleport to Mort'ton through the Shades of Mort'ton minigame channel (only if you have completed the quest, Shades of Mort'ton). This method is free and takes up no inventory or equipment spaces.
- Using the Mort'ton teleport scroll and then running to Barrows.
- Using the Morytania legs 3 or 4 to Burgh de Rott and running north through Mort'ton towards Barrows.
Completion of In Aid of the Myreque up until the point in which the bank in Burgh de Rott is restored is useful for a convenient banking method for multiple trips.
Exploring the Barrows

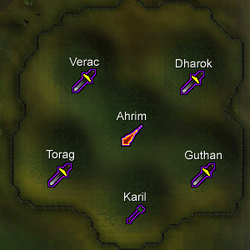
This is the six Barrows brothers' graveyard as well as each brother's combat discipline.
The above-ground portion of Barrows consists of six grave mounds inside a fence. A Prayer-using player should prepare to fight the brother in the mound before entering as preparing after entering the mound will waste prayer points, which constantly drain away when inside the Barrows. To enter a mound, stand on top of a mound, and dig with a spade. The player should enter a crypt with a sarcophagus in the centre. Open the sarcophagus and pray if using Prayer. Every time but once, the brother who is buried there will appear and attack. Kill the brother, leave and proceed to the next one.
At one of the crypts, the brother will not appear. Instead, there will be an entrance to a maze-like lower level of tunnels. If the player has not killed all the other brothers in their crypts yet, it is not recommended to enter the tunnels at this time. Once all the others have been killed, the player should return to this crypt and enter the tunnels.
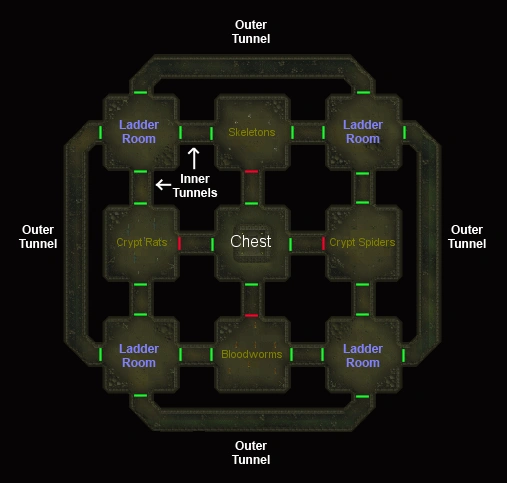
The tunnels contain nine rooms in a 3x3 grid, connected by short and long corridors. The player must find the way to the central room and the rewards chest there. Some of the doors will be locked, so the player must explore.
The room in which the player enters the tunnels has a ladder leading out. It will often not have any monsters in it the first time the player enters it (but will if entered subsequently). All other rooms and corridors always have some monsters in them (if only the sixth brother) when entered. When passing through a door, the sixth brother may appear and attack. If he does not appear before the chest is reached, he will definitely appear when the chest is opened. Kill the last brother when he appears. Once the chest is opened, the player can get the treasure by searching the chest.
After the chest is looted, the tunnels start collapsing, which will cause damage. Some players teleport away after looting the chest, while others with adequate supplies retrace their route back to the room with the ladder.
If you have adequate supplies to kill the brothers again, it is recommended to use a Barrows Teleport Tab to get out of the tunnels and start your next run. Running back to the ladder will result a reasonable amount of food supplies and time wasted for no particular reason. Using any other means of teleportation will also provide an long run-time compared to the cheap and easy to buy Barrows Teleport Tab. You should also use a different form of banking, such as the Ring of dueling to bank.
Note: Using the ring of dueling will also allow you to fully restore your stats, health, prayer and run if you enter the Clan Wars portal before teleporting to your next destination.
It is not required to kill all the brothers before looting the chest, but the chance of getting Barrows equipment from the chest increases as more brothers are killed. It is possible to skip every brother but the one in the tunnels.
A good method to heal, if you're not using Prayer to kill the brothers, is to find the tunnel in the middle of, or after killing the brothers, use Guthan's and/or a Saradomin godsword to heal off the low level monsters inside the tunnel, and then go back out and finish killing the brothers.
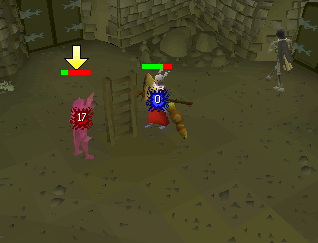

A player safespotting a brother behind a ladder.
In the tunnels, melee-using brothers can be safespotted in many places, such as behind the ladder used to descend into the tunnels (this also works if there is no ladder visible) and rocks. Some players may force the melee tunnel brother to spawn by reentering a door so that they can safespot them and conserve supplies.
Monsters in the crypt
- Barrows brother—One of the brothers' sarcophagi leads to a tunnel into the crypt.
- Bloodworms
- Skeletons (level 77)
- Crypt rats
- Crypt spiders
- Giant crypt rats
- Giant crypt spiders
Door puzzles
Entering the chest room
It's Barrows from the Crypt!
Once the player locates the operational door that leads to the chest, he or she will have to solve a simple puzzle in order to open the door. Due to the monster that spawns when you go into the room, some players prefer killing it, while others simply move back and forth to chase it off. This is useful in the giant crypt rat room, as their large size can block enemies. If you get the puzzle wrong, the catacombs will move around, meaning that the ladder will be in a different room, and so will be the door to the chest room.
Rewards
Mechanics

Barrows drop mechanics[1]
- There is initially one roll at the drop table.
- Each brother killed grants an additional roll at the drop table, to a maximum of six rolls.
- Each brother killed has his associated items added to the possible rewards.
For each roll:
- First, the Barrows equipment is rolled against. The chance of getting a Barrows item is , where is the number of brothers killed. Or, in tabular format:


Barrows equipment chance per roll Brothers
killedChance Frac % 1 1/392 0.255% 2 1/334 0.299% 3 1/276 0.362% 4 1/218 0.458% 5 1/160 0.625% 6 1/102 0.980%
- If the Barrows item chance is successfully hit, one of the available Barrows items is chosen at random - each part has equal chance, but once chosen it will not be chosen again on future rolls.
- If the Barrows item chance is not met, an additional measure is calculated (here called rewards potential or RP). This is .
- Or simply, reward potential is the sum of all the combat levels of the monsters killed, capped at 1000 - including the brothers (all six have a combat sum of 656). This is then added to the two times the number of brothers killed, giving a total maximum reward potential of 1012.
- A roll is performed for a value between one and your reward potential (each inclusive). The result then determines what item is awarded, and how many of it.
- Each item has a range, and the larger the number in that range, the more of it that is awarded.

Item RP required
to unlockRP required for
maximum quantityChance at max RP per roll Frac %  Coins
Coins
1 380 380/1012 37.5% Mind rune
381 505 125/1012 12.4% Chaos rune
506 630 125/1012 12.4% Death rune
631 755 125/1012 12.4% Blood rune
756 880 125/1012 12.4% Bolt rack
881 1005 125/1012 12.4% Key half
1006 N/A (always 1) 6/1012 0.6% Dragon med helm
1012 N/A (always 1) 1/1012 0.1%
If players wish to receive more runes (which are generally worth more gold) instead of bolt racks and key halves, they should aim for a Reward Potential of 880. Having exactly 880 points maximises the quantity of blood runes without having bolt racks take up reward slots. Players can achieve exactly 880 points by killing the six brothers, three bloodworms, and one crypt spider (656 + 3(52) + 56 + 2(6)) = 880. It is impractical, however, to get exactly 880 RP every run because crypt spiders will never spawn upon opening doors beneath Barrows, and can only be found in their own room on the east side of the tunnels. It is not worth going out of your way to find and kill one crypt spider, and going for exactly 880 RP should only be done if the configuration of the tunnel allows for an easy way to kill one crypt spider.
A common misconception is that the ideal combination would be killing the six brothers and three skeletons, which would result in 880 RP. The actual value for this would be 899 RP (656 +3(77)+2(6)) = 899, which puts one a fair way past the threshold for getting bolt racks.
Possible KC options to maximise overall profit, without needing to go out of your way to gather KC could be the following:
2 Skeletons, 1 Bloodworm (874 RP)
4 Bloodworms - (876 RP)
5 Crypt Rats - (883 RP)
1 Skeleton, 1 Bloodworm, 2 Crypt Rats - (883 RP)
N.B. It is usually easier to get killcount with these three types of creatures as they are the types that will spawn upon opening doors beneath Barrows and will automatically become aggressive towards the player. It is usually impractical to include the other types of monsters since one cannot control what their tunnel configuration will be every time.
Runes/Ammunition
Item Quantity Rarity GE market price
Mind rune 1–2,889 Common [A 1] 3–8,667
Chaos rune 1–885 Common [A 2] 89–78,765
Death rune 1–578 Common [A 3] 203–117,334
Bolt rack 1–191 Common [A 4] 94–17,954
Blood rune 1–236 Uncommon [A 5] 367–86,612
Barrows Equipment
Ahrim's
Item Quantity Rarity GE market price
Ahrim's hood 1 Rare (1/418)[B 1] 61,586
Ahrim's robetop 1 Rare (1/418)[B 1] 2,900,631
Ahrim's robeskirt 1 Rare (1/418)[B 1] 2,169,900
Ahrim's staff 1 Rare (1/418)[B 1] 104,883
Dharok's
Item Quantity Rarity GE market price
Dharok's helm 1 Rare (1/418)[C 1] 243,630
Dharok's platebody 1 Rare (1/418)[C 1] 978,025
Dharok's platelegs 1 Rare (1/418)[C 1] 1,026,058
Dharok's greataxe 1 Rare (1/418)[C 1] 652,656
Guthan's
Item Quantity Rarity GE market price
Guthan's helm 1 Rare (1/418)[D 1] 550,010
Guthan's platebody 1 Rare (1/418)[D 1] 819,022
Guthan's chainskirt 1 Rare (1/418)[D 1] 427,208
Guthan's warspear 1 Rare (1/418)[D 1] 917,108
Karil's
Item Quantity Rarity GE market price
Karil's coif 1 Rare (1/418)[E 1] 62,835
Karil's leathertop 1 Rare (1/418)[E 1] 1,972,648
Karil's leatherskirt 1 Rare (1/418)[E 1] 224,442
Karil's crossbow 1 Rare (1/418)[E 1] 107,192
Torag's
Item Quantity Rarity GE market price
Torag's helm 1 Rare (1/418)[F 1] 95,267
Torag's platebody 1 Rare (1/418)[F 1] 218,595
Torag's platelegs 1 Rare (1/418)[F 1] 241,084
Torag's hammers 1 Rare (1/418)[F 1] 97,256
Verac's
Item Quantity Rarity GE market price
Verac's helm 1 Rare (1/418)[G 1] 116,139
Verac's brassard 1 Rare (1/418)[G 1] 177,411
Verac's plateskirt 1 Rare (1/418)[G 1] 624,036
Verac's flail 1 Rare (1/418)[G 1] 102,775
Other
Item Quantity Rarity GE market price
Coins 1–5,306 Common Not sold
Loop half of key 1 Uncommon [H 1] 10,307
Tooth half of key 1 Uncommon [H 1] 10,840
Clue scroll (elite) 1 Uncommon (1/33.75)[H 2] Not sold
Dragon med helm 1 Rare [H 3] 58,488
Notes
- According to the formula released by Mod Kieren on his Twitter, the chances of getting at least one piece of Barrows equipment is 1/17.42 if you kill all six brothers. This chance is unaffected by the kill count of the other monsters in the crypt. Therefore, the chance of receiving a specific equipment piece is approximately 1/418 (17.42*24).
- In order to receive a piece of Barrows equipment, the corresponding brother must be killed before the chest is looted. Thus, if you wanted a piece of Guthan's equipment, you would have to kill Guthan before you are eligible to obtain his equipment. Therefore, it is impossible to acquire Barrows equipment if no brothers are slain.
- For every brother killed, you get an extra roll for rewards; so if all six brothers are killed, it is possible to obtain six pieces of Barrows equipment. Thus giving you a 0.000003578% chance of seeing a six item drop. However, this is extremely rare. It is possible to get multiple items from the same brother, contrary to popular belief.
- Killing all of the brothers is not required to receive loot; however, not killing all brothers decreases your chance of receiving a Barrows item, and you will not be able to receive the items from the brothers that you missed.
- 50% more runes are received with the completion of the Hard Morytania Diary.
Trivia
- There is currently a glitch where if Guthan is slain and he heals simultaneously, a message will appear in the player's chatbox stating "We'll finish this later...".
- Prior to an update, Barrows did not tell you what brothers the player had slain. In addition, before the aforementioned update, there was no looting interface upon searching the chest for rewards.
- Upon release, there was also no spade spawn in the nearby shack. This was added in Content Poll #14.
References
- ↑ Jagex. Mod Kieren's Twitter account. 3 Mar 2016. Mod Kieren: "You guys wanted info on Barrows loot, here it is... Full size: [1] Explained the best I can!"
| Team games |
Barbarian Assault • Blast Furnace • Burthorpe Games Room • Castle Wars • Fishing Trawler • Nightmare Zone • Pest Control • Shades of Mort'ton • Trouble Brewing • Volcanic Mine |
| Solo games |
Barrows • Blast mine • Brimhaven Agility Arena • Champions' Challenge • Gnome Ball • Gnome Restaurant • Impetuous Impulses • Inferno • Mage Arena • Mage Training Arena • Pyramid Plunder • Ranging Guild Activities • Rat Pits • Rogue Trader • Rogues' Den • Sorceress's Garden • Tai Bwo Wannai Cleanup • Tears of Guthix • Temple Trekking • Tithe Farm • Treasure Trails • TzHaar Fight Cave |
| PvP games |
Bounty Hunter • Castle Wars • Clan Wars • Duel Arena • Last Man Standing • TzHaar Fight Pit |