Straekeai129 (talk | contribs) (Updating the GE prices.) |
(cleanup) |
||
| Line 1: | Line 1: | ||
| + | {{redirect3|Catas|For other uses, see [[Catablepon]] or [[Catacombs]]}} |
||
| − | aa |
||
| + | {{redirect3|Cok|For the quest, see [[Client of Kourend]]}} |
||
| − | aaaaaaaaaaaaaaaa |
||
| + | {{Infobox Dungeon |
||
| − | aaaaaa |
||
| + | |name = Catacombs of Kourend |
||
| − | aaaaaaaaaaaaaaaaaaaaaaaaaaaa |
||
| + | |image = [[File:Catacombs of Kourend.png|300px]] |
||
| − | aaaaaaaaaaaaaaaaaaaaaaaaaaaaaaaaaaaaaaaaaaaaaaaaaaaaaaaaaaaaaaaaaaaaaaaaaaaaaaaaaaaaaaaaaaaaaaaa |
||
| + | |map = [[File:Catacombs of Kourend map.png|300px]] |
||
| − | aaaaaaaaaaaaaaaaaaaaaaaaaaaaaaaaaaaaaaaaaaaaaaaaaaaa |
||
| + | |quests = No |
||
| − | aaaaaaaaaaaaaaaaaaaaaaaaaaaaaaaaaaaaaaaaaaaaaa |
||
| + | |race = Varies |
||
| − | aaaaaaaaaaaaaaaaaa |
||
| + | |monster = [[Skotizo]] (level 321) |
||
| − | aaaaaaaaaaaaaaaaaaaaaaaaaaaaaaaaaaaa |
||
| + | |kingdom = [[Great Kourend]] |
||
| − | aaaaaaaaaaaaaaaaaaaaaaaaaaaaaaaaaaaaaaaaaaaaaaaaaaaaaaaaaaaaaaaa |
||
| + | |music = [[Arcane (music track)|Arcane]] |
||
| − | aaaaaaaaaaaaaaaaaaaaaaaaaaaaaaaaaaaaaaaaaaaaaaaaaaaaaaaaaaaaaaaaaaaaaaaaaaaaaaaaaaaaaaaaaaaaaaaaaaaaaaaaaaaaaa |
||
| + | |level = One |
||
| − | aaa |
||
| + | }} |
||
| − | aaaaaaaaaaaaaaaaa |
||
| + | The '''Catacombs of Kourend''' is a massive [[dungeons|dungeon]] located beneath [[Great Kourend]]. It contains many [[Slayer monsters|monsters]] that are commonly [[Slayer task|assigned]] to players as [[Slayer]] [[Slayer assignment|assignments]]. |
||
| − | aaaaaaaaaaaaaaaaaaaaaa |
||
| − | aaaaaaaaaaaaaaaaaaaaaaaaaaaaaaaaaaaaaaaaaaaaaaaaaaaaaaaaaaaaaaaaaaaaaaaaaaaaaaaaaaaaaaaaaaaaaaaaaaaaaaaaaaaaaaaaa |
||
| − | aaaaaaaaaaaaaaaaaaaaaaaaaaaaaaaaaaaaaaaaaaaaaaaaaaaaaaaaaaaaaaaaaaaaaaaaaaaaaaaaaaaaaaa |
||
| − | aaaaaaaaaa |
||
| − | aaaaaaaaaaaaaaaaaaaaaaaaaaaaa |
||
| − | aaaaaaaaaa |
||
| − | aaaaaaaaaaaaaaaaaaaaaaaaaaaaaaaaaaaaaaaaaaaaaaaaaaaaaaaaaaaaaaaaaaaaaaaaaaaaaaaaaaaaaaaaaaaaaaaaaaaaaaaaaaa |
||
| − | aaaaaaaaaaaaaaaaaaaaaaaaaaaaaaaaaaaaaaaaa |
||
| − | aaaaaaa |
||
| − | aaaaaaaaaaaaaaaaaaaaaaaaaaaaaaaaaaaaaaaaaa |
||
| − | aaaa |
||
| − | a |
||
| − | aaaaaaaaaaaaaaaaaaaaaaaaaaaaaaaaaaaaaaaaaaaaaaaaaaaaaaaa |
||
| − | aaaaaaaaaaaaaaaaaaaaaaaaaaaaaaaaaa |
||
| + | '''Note that the [[dwarf multicannon]] cannot be used here.''' |
||
| − | aaaaaaaaaaaaaaaaaaaaaaaaaaaaaaaaaaaaaaaaaaa |
||
| − | aaaaaaaaaaaaaaaaaaaaaaaaaaaaaaaaaaaaaaaaaaaaaaaaaaaaaaaaaaaaaaaaaaaaa |
||
| − | aaaaaaaaaaaaaaaaaaaaaaaaaaaaaaaaaaaaaaaaaaaaaaaaaaaaaaaaaaaaaaa |
||
| − | aaaaaaaaaaaaaaaaaaaaaaaaaaaaaaaaaaaaaaaaaaaaaaaaaaaaaaaaaaaaaaaaaaaaaaaaaaaaaaa |
||
| − | aaaaaaaaaaaa |
||
| − | aaaaaaaaaaaaaaaaaaaaaaaaaaaaaaaaaaaaaaaaaaaaaaaa |
||
| − | aaaaaaaaaaaaaaaaaaaaaaaaaaaaaaaaaaaaaaaaaaaaaaaaaaaaaaaaaaaaaaaaaaaaaaaaaaaaaaaaaaa |
||
| − | aaaaaaaaaaaaaaaaaaaaaaaaaaaaaaaaaaaaaaaaaaaaaaaaaaa |
||
| − | aaaa |
||
| − | aaaaaaa |
||
| − | aaaaaaaaaaaaaaaaaaaaaaaaaaaaaaaaaaaaaaaaaaaaaaaaaaa |
||
| − | aaaaa |
||
| − | aaaa |
||
| − | aaaaaaaaaaaaaaaaaaaaaaaaaaaaaaaaaaaaaaaaaaaaaaaaaaaa |
||
| − | aaaaaaaaaaaaaaaaaaaaaaaaaaaaaaaaaaaaaaaaaaaaaaaaaaaaaaaaaaaaaaaaaaaaaaaaaaa |
||
| − | aaaaaaaaaaaaaaaaaaaaaaaaaaaaaaaaaaaaaaaaaaaaaaaaaaaaaaaaaaaaaaaaaaaaaaaaaa |
||
| − | aaaaaaaaaaaaaaaaaaaaaaaaaaaaaaaaaaaaaaaaaaaa |
||
| − | aaaaaaaaaaaaaaaaaaaaaa |
||
| − | aaaaaaa |
||
| − | aaaaaaaaaaaaaaaaaaaaaaaaa |
||
| − | aaaaaaaaaaaaaaaaaaaaaaaaaaaaaaaaaaaaaaaaaaaaaaaaaaaa |
||
| − | aaaaaaaaaaa |
||
| − | aaaaaaaaaa |
||
| − | aaaaaa |
||
| − | aaa |
||
| − | aaaaaaaaaaaaaaaaaaaaaaaaaaaaaaaaaaaaaaa |
||
| − | aaaaaaaaaaaaaaaaaaaaaaaaaaaaaaaaaaaaaaaaaaaaaaaaaaaaaaaaaaaaaaaaaaaaaaaaaaaaaaaaaaaaaaaaaaaaaaaaaaaaaaaaaaaaaaaaaaaaaaaaaa |
||
| − | aaaaaaaaaaaaaaaaaaaaaaaaaaaaaaaaaa |
||
| − | a |
||
| − | aaaaaaaaaaaaaaaaaaaaaaa |
||
| − | aaaaaaaaaaaaaaaaaaaaaaaaaaaaaaaaaaaaaaaaaaaaaaaaaaaaaaaaaaaaaaaaaaaaaaaaaaaaaaaa |
||
| − | aaaaaaaa |
||
| − | aaaaaaaaaaaaaaaaaaaaaaaaaaaaaaaaaaaaaaaaaaaaaaaaaaaaaaaaaaaaaaaaaaaaaaaaaaaaaaaaaaaaa |
||
| − | aaaaaaaaaaaaaaaaaaaaaaaa |
||
| − | aaa |
||
| − | aaaaaaaaaaaaaaaaaaaaaaaaaaaaaaaaaaaaaaaaaaaaaaaaaaaaaaaaaaaaaaaaaa |
||
| − | aaaaaaaaaaaaaaaaaaaaaaaaaaaaaaaaaaaaaaaaaaaaaaaaaaaaaaaaaaaaaaaaaaaaaaaaaaaaaaaaaaaaaaaaaaaaaaaaaaaaaaaaaaaaaaaaaaaaaaaaaaaaaaaaaaaaaa |
||
| − | aaaaaaa |
||
| − | aaaaaaaaaaa |
||
| − | aaaaaaaaaaaaaaaaaaaaaaaaaaaaaaaaaaaaaaaaaaaaaaaaaaa |
||
| − | aaaaaaaaaaaaaaaaaaaaaaaaaaaaaaaaaaaaaaaaaaaaaaaaaaaaa |
||
| − | aaaaaaaaaaaaaaaaaaaaaaaaaaaaaaa |
||
| − | aaaaaaa |
||
| − | aaaaaaaaaaaaaaaaaaaaaaaaaaaaaaaaaaaaaaaaaaaaaaaaaaaaaaaaaaaaaaaaaaaaaaaaaaaaaaaaaaaaaaaaaaaaaaaaaaa |
||
| − | aaaaaaaaaaaaaaaaaaaaaaa |
||
| − | aaaaaaaaaaaaaaaaaaaaaaaaaaaaaaaaaaaaaaaaaaaaaaaaaaaaaaa |
||
| − | aa |
||
| − | aaaaaaaa |
||
| − | aaaaaaaaaaaaaaaaaaaaaaaaaaaaaaaaaa |
||
| − | aaaaaaaaaaaaaaaa |
||
| − | aaaaaaaaaaaaaaaaaaaaaaaaaaaaaaaaaaaaaaaaaaaaaaaaaaaaaaaaaaaaaaaaaaaaaaaaaa |
||
| + | A special effect of the Catacombs is that players who bury [[bones]] of any type within it will have a small amount of their [[prayer points]] restored. Having a [[Bonecrusher]] in your inventory will automatically give you the prayer point restore after each kill. |
||
| − | aaaaaaaaaaaaaaaaaaaaaaaaaaaaaaaaaaaaaaaaaaaaaaaaaaaaaaaaaaaaaaa |
||
| + | * [[Bones]] restore 1 prayer point. |
||
| − | aaaaaaaaaaaaaaaaaaaaaaaaaaaaaaaaaaaaaaaaaaaaaaaaaaa |
||
| + | * [[Big bones]] restore 2 prayer points. |
||
| − | aaa |
||
| + | * [[Dragon bones]] restore 4 prayer points. |
||
| − | aaaaaaaaaaaaaaaaaaaaaaa |
||
| − | aaaaaaaaaa |
||
| − | aaaaaaaaaaaaaaaaaaaaaaaaaaaaaaaaaaaaaaaaaaaaaaaaaaaaaaaaaaaaa |
||
| − | aaaaaaaaaaaaaaaaaaaaaaa |
||
| − | aaaaaaaaaaaaaaaaaa |
||
| − | aaaaaaaaaaaaaaaaaaaaaaaaaaaaaaaaaaa |
||
| − | aaaaaaaaaaaaaaaaaaaaaaaaaaa |
||
| − | aaaaaaaaaaaaaaaaaaaaaaaaaaaaaaaaaaaaaaaaaaaaaaaaaaaaaaaaaaaaaaaaaaaaaaaaaaaaaaaaaaaaaaaaaaaaaaaaaaaaaaaaaaaaaaaaaaaa |
||
| − | aaa |
||
| − | aaaaaaaaaaaaaaaaaaaaaaaaaa |
||
| − | aa |
||
| − | aaaaaaaa |
||
| − | aaaaaaaaaaaaaaaaaaaaaaaaaaaaaaaaaaaaaaaaaaaaaa |
||
| − | aaaa |
||
| − | aaaaaaaaaaaaaaaa |
||
| − | aaaaaaaaaaaaa |
||
| − | aaaaaaaaaaaaaaaaaaaaaaaaaa |
||
| − | aaaaaaaaaaaaaaaaaaaaaaaaaaaaaaaaaaaaaaaaaaaaaaaaaaaaaaaaaaaaaaaaaaaaaaaaaaaaaaaaaaaaaaaaaaaaaaaaaaaaaaaaaaaaaaaaaaaaaaaaa |
||
| − | aaaaaaaaaaaaaaaaaaaaaaaaaaaaaaaaaaaaaaaaaaaaaaaaaaaaaaaaaaaaaaaaaaaaaaaaaaaaaaaaaaaaaaaaaaaaaaaaaaaaaaaaaaaaaaaaaaaaaaaaaaa |
||
| − | aaaaaaaaaaaaaaaaaaaaaaaaaaaaaaaaaaaaaaaaaaaaaaaaaaaaaaaaa |
||
| − | aaaaaaaaaaaaaaaaaaaaaaaaaaaaaaaaaaaaaaaaaaaaaaaaaaaaaa |
||
| − | aaaaaaaaaaaaaaaaaaaaaaaaaaa |
||
| − | aaaaaaaaaaaaaa |
||
| − | a |
||
| − | aaaaaa |
||
| + | ==Entrance== |
||
| − | aaaaaaaaaaaaaaaaaaaaaaaaaaaaa |
||
| + | The main entrance is found by investigating the statue of [[King Rada I]] in the centre of the city. There are four other entrances scattered around the Houses of [[Great Kourend]]; however, these additional entrances will only appear once the player has used the respective rope inside the catacombs. |
||
| − | aaaaaaaaa |
||
| − | aaaaaaaaa |
||
| − | a |
||
| − | aaaaaaaaaaaaaaaaaaaaaaaaaaa |
||
| − | aaaaaaaaaaaaaaa |
||
| − | aaaaaaaaaaaaaaaa |
||
| − | aaaaaaaaaaaaaaaaaaaaaaaa |
||
| − | aaaaaaaaaaaaaaaaaaaaaaaaaaaaaaaaaaaaaaaaaaaaaaa |
||
| − | aaaaaaaaaaaaaaa |
||
| − | aaaaaaaaaaa |
||
| − | aaaaaaaaaaaaaaaaaaaa |
||
| − | aaaaaaa |
||
| − | aaaaa |
||
| − | aaaaaaaaaaaaaaaaaaaaaaaaaaaaaaaaaaaaaaaaaaaaaa |
||
| − | aaaaaaaaaaaaaaaaaaaaaaaaaaaaaaaaaaaaaaaaaaaaaaaaaaaaaaaaaaaaaaaaaaaaaaaaaaaaaaaaaaaaaaaaaaaaaaaaaaaaaaaaaaaaaaaaaaaaaaaaaaaaaaaaaaaaaaaaaaaaaaaaaaaaaaaaaaaaaaaaaaaaaaaaaaaaaaaaaaaaaaaaaaaaaaaaaaaaaaaaaaaaaaaaaaaaaaaaaaaaaaaaaaaaaaaaaaaaaaaaaaaaaaaaaaaaaaaaaaaaaaaaaaaaaaa |
||
| − | aaaaaaaaaaaaaaaaaaaaaaaaaaa |
||
| − | a |
||
| − | aaaaaaaaaaaaaaaaaaaaaaaaaaaaaaaaaaaaaaaaaaaaaaaaaaaaaaaaaaaaaaaaaaaaa |
||
| − | aa |
||
| − | aaaaaaaaaaaaaaaaaaaaaaaaaaa |
||
| − | aaaaaaaaaaaaaaaaaaaaaaaaaaaaa |
||
| − | aaaaaaaaaaaaaaaaaaa |
||
| − | aaaaaaaaaaaaaaaaaaaaaaaaaaaaaaaaaaaaaaaaaaaaaaaaaaaaaaaaaaaaaaaaaaaaaaaaaaaaaaaaaaaaaaaaaaaaaaaaaaaaaaaaaaaaaaaaaaaaaaaaaaaaaaaaaaaaaaaaaaaaaaaaaaaaaaaaaaaaaaaaa |
||
| − | aaaaaaaaaaaaaaaaaaaaaaaaaaaaaaaaaaaaaaaaaaaaaaaaaaaaaaaaaaaaaaaaaaaaaaaaaaaaaaaaaaaaaaaaaa |
||
| − | aaaaaaaaaaaaaaaaaaaaaaaaaaaaaaaaaaaaaaaaaaaaaa |
||
| − | aaaaaaaaaaaaaaaaaaaaaa |
||
| − | aaaaaaaaaaaaaaaaaaaaaaaaaaaaaaaaaaaaaaaaaaaaaaaaaaaaaaaaaaaaaaaaaaaaaaaaaaaaaaaaaaaaaaaaaaaaaaaaaaaaaaaaaaaaaaaaaaa |
||
| − | aa |
||
| − | aa |
||
| − | aaaaaaaaaaaaaaaaaaaaaaaaaaaaaaa |
||
| − | aaaaaaaaa |
||
| − | aaaaaaaaaaaaaaaaaaa |
||
| − | aaaaaaaaaaaaaaaaaaaaaaaaaaaaaaaaaa |
||
| + | The fastest way to the center of the catacombs is through [[Xeric's talisman]], with the "Xeric's Heart" function, which teleports you outside the statue of King Rada I. This does, however, require completion of the [[Architectural Alliance]] miniquest. Alternatively, the [[Teleport to Kourend]] spell can be used for fast access, which requires finding and reading the book [[Transportation incantations]]. A house portal attuned to Kourend can also be substituted for those on different spellbooks. |
||
| − | aaaaaaaaaaaaaaaaaaaaaaaaaaaaaaaaaaaaaaaaaaaaaaaaa |
||
| + | |||
| − | aa |
||
| + | The climbing ropes are located in the following areas: |
||
| − | aaaaaaaaaaaaaaaaaaaaaaaaaaaaaaaaaaaaaaaaaaaaaaaaaaaaaaaaaaaaaaaaaaaaaaaaaaaaaaaaaaaaaaaaaaaaaaaaaaaaaaaaaaaaaaaaaaaaaaaaaaaaaaaaaaaaaaaaaa |
||
| + | [[File:Catacombs of Kourend entrances.png|thumb|250px|The four other entrances, unlocked by climbing up the ropes from within the Catacombs.]] |
||
| − | aaaaaaaaaaaaaaaaaaaaaaaaaaaaa |
||
| + | *Demon's Run - north-east corner with the [[greater demon]]s. Leads up to the hole west of the [[Arceuus essence mine]]. Can be quickly accessed via [[Fairy ring]] {{Fairycode|cis}} (if unlocked). |
||
| − | aaaaaaaaaaaaaaaaaaaaaaaaaaaaaaaaaaaaaaaaaaaaaaaaaaaaaaaaaaaaaaaaaaaaaaaaaaaaaaaaaaaaaaaaa |
||
| + | *Dragon's Den - north-west corner with the [[brutal black dragon]]s. Leads up to the hole north of [[The Deeper Lode]] pub in the [[Lovakengj House]]. |
||
| − | aaaaaaaaaaaaaaaaaaaaaaaaaaaaaaaaaaaaaaaaaaaaaaaaaaaaaaaaaaaaaaaaaaa |
||
| + | *Reeking Cove - southern area with the [[deviant spectre]]s. Leads up to the hole north-west of the [[Shayzien House]] bank. Can be quickly accessed via [[Fairy ring]] {{Fairycode|djr}} (if unlocked). |
||
| − | aaaaaaaaaaaaaaaaaaaaaaaaaaaaaaaaaaaaaaaaaaaaaaaaaaaaaaaaaaaa |
||
| + | *The Shallows - south-east corner with the [[King Sand Crab]]s. Leads up to the hole next to the [[Hosidius House]] bank (with the [[poll booth]]). |
||
| − | aaaaaaaaaaaaaaaaaaaaaaaaaaaaaaaa |
||
| + | A cheap, efficient way of training here is by using [[Teleport to house]] [[Magic tablet|tablets]], as you can use your own or a friend's house's [[Ornate rejuvenation pool]] (or better) to refill prayer and health, then a Kourend portal to return. |
||
| − | aaaaaaaaaa |
||
| + | |||
| − | aaa |
||
| + | ==The Catacombs== |
||
| − | aaaaaaaaaaaaaaaaaaaaaaaaaaaaaaaaaaaaaaaaaaaaaaaaa |
||
| + | Many of the normal [[monsters]] in the catacombs are slightly stronger compared to those found elsewhere on [[Gielinor]]. In addition, the majority of the catacombs are [[multi-combat]]. The only area where [[single-way combat]] appears is in the [[brutal dragon]] area. |
||
| − | aaaaaaaaa |
||
| + | |||
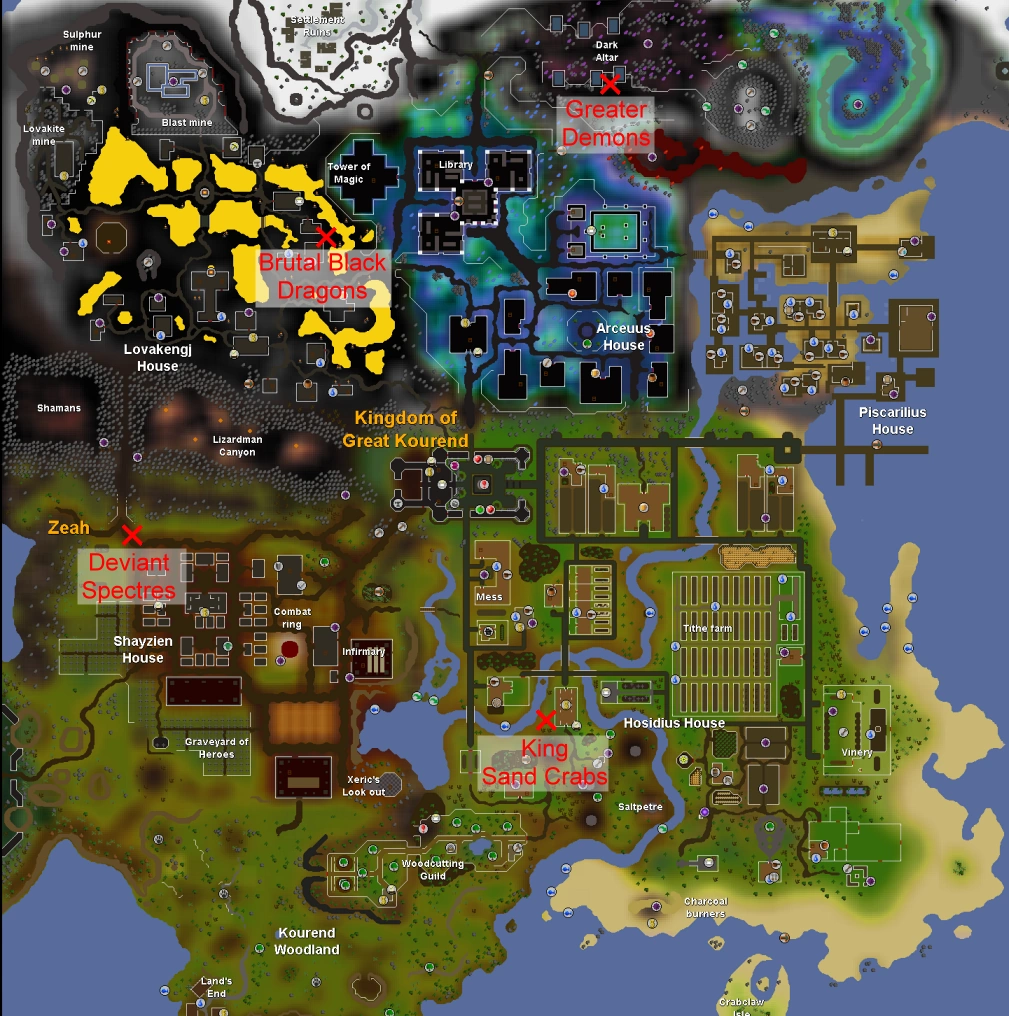
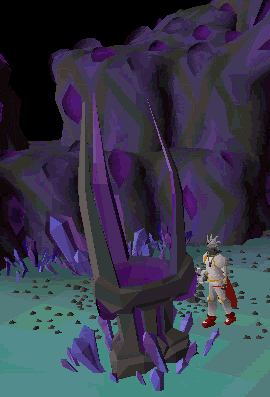
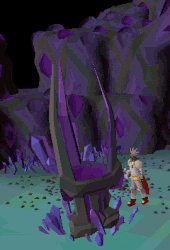
| + | The dark altar in the main entrance of the catacombs can be used to teleport to the four sections of the Catacombs; doing so requires using an [[ancient shard]], which is obtained from the monsters in the catacombs. |
||
| + | |||
| + | There are also a few [[Agility shortcut]]s around the dungeon, the highest of them requiring 34 [[Agility]] to use. These shortcuts are found in the following areas: |
||
| + | |||
| + | [[File:Using dark totem.gif|left|thumb|170px|A player uses the dark totem on the Dark Altar in the centre of the Catacombs.]] |
||
| + | *Stepping stones: Two-way shortcut between the [[steel dragon]] and [[brutal red dragon]] area. |
||
| + | **'''Note:''' Steel/Brutal red dragons can attack you while using the shortcut, and can damage you. Each stepping stone must also be clicked on to jump to it. |
||
| + | *Crevices: |
||
| + | **Crevice A: Two-way shortcut between [[cyclops]] and [[ankous]]. |
||
| + | **Crevice B: Two-way shortcut between [[warped jellies]] and [[greater nechryael]]s. Requires 34 Agility to use. |
||
| + | |||
| + | Beneath the Catacombs lurks [[Skotizo]], a demi-boss whose lair requires the use of a [[dark totem]]. Components for the dark totem are obtained by killing the monsters (excluding [[ghost]]s) throughout the catacombs. The totem is used on the dark altar to access the lair. |
||
| + | |||
| + | '''Note:''' If the player has not used all totem pieces on each other upon getting the top piece, the player will not get any more dark totem components until all three components are fused. |
||
| + | |||
| + | ==Monsters== |
||
| + | There are four sections of the catacombs, which host a large variety of monsters: |
||
| + | *Demon's Run - north-east area |
||
| + | **[[Abyssal demon]] (124) |
||
| + | **[[Black demon]] (178 & 184) |
||
| + | **[[Ghost]] (19) |
||
| + | **[[Greater demon]] (100, 101, & 113) |
||
| + | **[[Greater Nechryael]] (200) |
||
| + | **[[Mutated Bloodveld]] (123) |
||
| + | **[[Lesser demon]] (87 & 94) |
||
| + | *Dragon's Den - north-west area |
||
| + | **[[Bronze dragon]] (143) |
||
| + | **[[Brutal black dragon]] (318) |
||
| + | **[[Brutal blue dragon]] (271) |
||
| + | **[[Brutal red dragon]] (289) |
||
| + | **[[Dark beast]] (182) |
||
| + | **[[Fire giant]] (104 & 109) |
||
| + | **[[Hellhound]] (122) |
||
| + | **[[Iron dragon]] (215) |
||
| + | **[[Steel dragon]] (274) |
||
| + | *Reeking Cove - south-west area |
||
| + | **[[Ankou]] (95) |
||
| + | **[[Cyclopes]] (56 & 76) |
||
| + | **[[Deviant spectre]] (169) |
||
| + | **[[Ghost]] (19) |
||
| + | **[[Hill Giant]] (28) |
||
| + | **[[Magic axe]] (42) |
||
| + | **[[Moss giant]] (42) |
||
| + | **[[Mutated Bloodveld]] (123) |
||
| + | **[[Possessed pickaxe]] (42 & 50) |
||
| + | **[[Shade (monster)|Shade]] (140) |
||
| + | **[[Skeleton]] (22) |
||
| + | **[[Twisted Banshee]] (89) |
||
| + | *The Shallows - south-east area |
||
| + | **[[Cyclopes]] (56 & 76) |
||
| + | **[[Dagannoth (Lighthouse)|Dagannoth]] (74 & 92) |
||
| + | **[[Dust devil]] (110) |
||
| + | **[[King Sand Crab]] (107) |
||
| + | **[[Moss giant]] (42) |
||
| + | **[[Warped Jelly]] (112) |
||
| + | |||
| + | {{Catacombs of Kourend}} |
||
| + | {{Zeah}} |
||
Latest revision as of 11:51, 28 July 2019
The Catacombs of Kourend is a massive dungeon located beneath Great Kourend. It contains many monsters that are commonly assigned to players as Slayer assignments.
Note that the dwarf multicannon cannot be used here.
A special effect of the Catacombs is that players who bury bones of any type within it will have a small amount of their prayer points restored. Having a Bonecrusher in your inventory will automatically give you the prayer point restore after each kill.
- Bones restore 1 prayer point.
- Big bones restore 2 prayer points.
- Dragon bones restore 4 prayer points.
Entrance
The main entrance is found by investigating the statue of King Rada I in the centre of the city. There are four other entrances scattered around the Houses of Great Kourend; however, these additional entrances will only appear once the player has used the respective rope inside the catacombs.
The fastest way to the center of the catacombs is through Xeric's talisman, with the "Xeric's Heart" function, which teleports you outside the statue of King Rada I. This does, however, require completion of the Architectural Alliance miniquest. Alternatively, the Teleport to Kourend spell can be used for fast access, which requires finding and reading the book Transportation incantations. A house portal attuned to Kourend can also be substituted for those on different spellbooks.
The climbing ropes are located in the following areas:
The four other entrances, unlocked by climbing up the ropes from within the Catacombs.
- Demon's Run - north-east corner with the greater demons. Leads up to the hole west of the Arceuus essence mine. Can be quickly accessed via Fairy ring cis (if unlocked).
- Dragon's Den - north-west corner with the brutal black dragons. Leads up to the hole north of The Deeper Lode pub in the Lovakengj House.
- Reeking Cove - southern area with the deviant spectres. Leads up to the hole north-west of the Shayzien House bank. Can be quickly accessed via Fairy ring djr (if unlocked).
- The Shallows - south-east corner with the King Sand Crabs. Leads up to the hole next to the Hosidius House bank (with the poll booth).
A cheap, efficient way of training here is by using Teleport to house tablets, as you can use your own or a friend's house's Ornate rejuvenation pool (or better) to refill prayer and health, then a Kourend portal to return.
The Catacombs
Many of the normal monsters in the catacombs are slightly stronger compared to those found elsewhere on Gielinor. In addition, the majority of the catacombs are multi-combat. The only area where single-way combat appears is in the brutal dragon area.
The dark altar in the main entrance of the catacombs can be used to teleport to the four sections of the Catacombs; doing so requires using an ancient shard, which is obtained from the monsters in the catacombs.
There are also a few Agility shortcuts around the dungeon, the highest of them requiring 34 Agility to use. These shortcuts are found in the following areas:
A player uses the dark totem on the Dark Altar in the centre of the Catacombs.
- Stepping stones: Two-way shortcut between the steel dragon and brutal red dragon area.
- Note: Steel/Brutal red dragons can attack you while using the shortcut, and can damage you. Each stepping stone must also be clicked on to jump to it.
- Crevices:
- Crevice A: Two-way shortcut between cyclops and ankous.
- Crevice B: Two-way shortcut between warped jellies and greater nechryaels. Requires 34 Agility to use.
Beneath the Catacombs lurks Skotizo, a demi-boss whose lair requires the use of a dark totem. Components for the dark totem are obtained by killing the monsters (excluding ghosts) throughout the catacombs. The totem is used on the dark altar to access the lair.
Note: If the player has not used all totem pieces on each other upon getting the top piece, the player will not get any more dark totem components until all three components are fused.
Monsters
There are four sections of the catacombs, which host a large variety of monsters:
- Demon's Run - north-east area
- Abyssal demon (124)
- Black demon (178 & 184)
- Ghost (19)
- Greater demon (100, 101, & 113)
- Greater Nechryael (200)
- Mutated Bloodveld (123)
- Lesser demon (87 & 94)
- Dragon's Den - north-west area
- Bronze dragon (143)
- Brutal black dragon (318)
- Brutal blue dragon (271)
- Brutal red dragon (289)
- Dark beast (182)
- Fire giant (104 & 109)
- Hellhound (122)
- Iron dragon (215)
- Steel dragon (274)
- Reeking Cove - south-west area
- Ankou (95)
- Cyclopes (56 & 76)
- Deviant spectre (169)
- Ghost (19)
- Hill Giant (28)
- Magic axe (42)
- Moss giant (42)
- Mutated Bloodveld (123)
- Possessed pickaxe (42 & 50)
- Shade (140)
- Skeleton (22)
- Twisted Banshee (89)
- The Shallows - south-east area
- Cyclopes (56 & 76)
- Dagannoth (74 & 92)
- Dust devil (110)
- King Sand Crab (107)
- Moss giant (42)
- Warped Jelly (112)
Catacombs of Kourend | |||||||||
|---|---|---|---|---|---|---|---|---|---|
| NPCs | |||||||||
| Monsters |
| ||||||||
| Skotizo |
| ||||||||
| Upgrades | |||||||||
| Other | |||||||||