(cleanup) |
(cleanup) |
||
| Line 1: | Line 1: | ||
| + | {{External|rs}} |
||
| − | #REDIRECT [[Twisted bow]] |
||
| + | {{Otheruses|the Construction skill|information on training Construction|Construction training}} |
||
| + | {{Otheruses|def=no|a list of all items and upgrades within the Construction skill|Construction/All milestones}} |
||
| + | {{Infobox Skill |
||
| + | |AKA = Con, Cons |
||
| + | |release = 31 May [[2006]] |
||
| + | |update = PLAYER-OWNED HOUSES! |
||
| + | |members = Yes |
||
| + | }} |
||
| + | [[File:Construction.png|left]] |
||
| + | '''Construction''' is a [[Members|members-only]] [[Skills|skill]] that allows players to build [[Player-owned house|their own houses]] and provide furniture for them. To begin Construction, players must buy a house from one of the [[estate agent]]s. A starter house will cost 1,000 [[coins]], and will be in [[Rimmington]]. A level 40 [[Magic]] spell can then be used to teleport to the house, or players can walk to Rimmington, where there is a portal ([[File:House portal icon.png]] [[icon]] on the [[World map|map]]) that will teleport players to their house. |
||
| + | |||
| + | The house starts off with only a small room and garden, but more can be built. To build, go to the [[options]] menu, select [[Options#House options|house options]], and set the build mode to on. Players will then see what looks like ghost-like "Hot Spots" where new objects can be built. See the [[Constructed items]] list for details on what you can build at what level. Players can also visit a friend's house if they are home and using the same portal. Construction is widely regarded as one of the most costly skills to level up. |
||
| + | |||
| + | {{Listen |
||
| + | |title = Construction level-up |
||
| + | |desc = The first music that can be played when levelled up. |
||
| + | |filename = Construction Level up 1.ogg |
||
| + | }} |
||
| + | {{Listen |
||
| + | |title = Construction level-up |
||
| + | |desc = The second music that can be played when levelled up. |
||
| + | |filename = Construction Level up 2.ogg |
||
| + | }} |
||
| + | |||
| + | == Significant milestones == |
||
| + | * Level 47 - [[Quest Hall]] for [[mounted glory]] |
||
| + | * Level 50 - Unlock all [[house locations]] |
||
| + | * Level 65 - [[Superior Garden]] |
||
| + | ** Pools |
||
| + | ** Level 80 - [[Obelisk (Construction)|Wilderness obelisk]] |
||
| + | ** Level 85 - [[POH]] fairy ring |
||
| + | ** Spirit tree |
||
| + | * Level 80 - [[Achievement Gallery]] |
||
| + | ** Level 80 - [[Achievement gallery|Spell book altars]] |
||
| + | ** Level 81 - [[Jewellery box]] |
||
| + | * Level 99 - [[Construct. cape|The Skill cape]] |
||
| + | |||
| + | ==Estate agents== |
||
| + | [[Estate agent]]s are located (identified with the house [[File:Estate Agent icon.png]] [[icon]] on the [[World map|map]]) in |
||
| + | *[[Varrock]], just east of the [[Varrock Palace|palace]]. |
||
| + | *[[Seers' Village]] northeast of the [[bank]]. |
||
| + | *[[Falador]] between the [[furnace]] and the east bank. |
||
| + | *[[Ardougne]] west of the south bank. |
||
| + | *[[Hosidius House]] south of the [[Mess]], on [[Great Kourend]] |
||
| + | |||
| + | ===House portals=== |
||
| + | [[Estate agent]]s can move a player's house from its starter location [[Rimmington]] to a new location identified by the portal [[File:House portal icon.png]] [[icon]] on the [[World map|map]]. Your house cannot be moved to Yanille on the Deadman Mode servers. |
||
| + | {|class="wikitable" style="text-align:center;" |
||
| + | |- |
||
| + | !Location |
||
| + | !Level |
||
| + | !Cost to move |
||
| + | !Map |
||
| + | |- |
||
| + | |[[Rimmington]] |
||
| + | |1 |
||
| + | |5,000 |
||
| + | |[[File:POH location - Rimmington.png|200px]] |
||
| + | |- |
||
| + | |[[Taverley]] |
||
| + | |10 |
||
| + | |5,000 |
||
| + | |[[File:POH location - Taverley.png|200px]] |
||
| + | |- |
||
| + | |[[Pollnivneach]] |
||
| + | |20 |
||
| + | |7,500 |
||
| + | |[[File:POH location - Pollnivneach.png|200px]] |
||
| + | |- |
||
| + | |[[Great Kourend]] |
||
| + | |25 |
||
| + | |8,750 |
||
| + | |[[File:POH location - Great Kourend.png|200px]] |
||
| + | |- |
||
| + | |[[Rellekka]] |
||
| + | |30 |
||
| + | |10,000 |
||
| + | |[[File:POH location - Rellekka.png|200px]] |
||
| + | |- |
||
| + | |[[Brimhaven]] |
||
| + | |40 |
||
| + | |15,000 |
||
| + | |[[File:POH location - Brimhaven.png|200px]] |
||
| + | |- |
||
| + | |[[Yanille]] |
||
| + | |50 |
||
| + | |25,000 |
||
| + | |[[File:POH location - Yanille.png|200px]] |
||
| + | |} |
||
| + | |||
| + | ===Additional house location info=== |
||
| + | {|class="wikitable" |
||
| + | |- |
||
| + | !Location |
||
| + | !Advantages |
||
| + | !Disadvantages |
||
| + | !Skill Usage |
||
| + | |- |
||
| + | |[[Rimmington]] |
||
| + | | |
||
| + | *Since the [[Non-player character|NPC]] [[Phials]] was added into the [[general store]] to un-note your items (for a fee), Rimmington is now the best location for a [[Gilded altar]]. |
||
| + | *There are 2 [[oak tree]]s only steps away from the portal, and 4 [[yew tree]]s just west of the portal. [[Willow tree]]s can be found just south of Rimmington center. |
||
| + | *The nearby mine has 2 [[clay rock]]s on the far east side. |
||
| + | *Only minutes away from [[Port Sarim]], and thus most of ''RuneScape'' and [[Pest Control]]. |
||
| + | *There is a [[Farming/Patch locations#Bush patches|bush patch]] right next to the house portal. |
||
| + | | |
||
| + | *Relatively far from a [[bank]]. |
||
| + | | |
||
| + | *Construction |
||
| + | *[[Woodcutting]] |
||
| + | *[[Fletching]] |
||
| + | *[[Firemaking]] |
||
| + | *[[Prayer]] |
||
| + | |- |
||
| + | |[[Taverley]] |
||
| + | | |
||
| + | *Close to the [[Heroes' Guild]] for quick [[amulet of glory]] recharging. |
||
| + | *[[Taverley Dungeon]] located nearby to the south. |
||
| + | *Dwarven underpass to [[Catherby]] nearby, along with the [[Keldagrim mine cart system]]. |
||
| + | *[[Vial]]s and [[Eye of newt|eyes of newt]] available in the [[Jatix's Herblore Shop|nearby store]]. |
||
| + | *Can use a [[games necklace]] to teleport close to portal. |
||
| + | *Close to Taverley [[tree patch]]. |
||
| + | | |
||
| + | *Far fewer nearby resources compared to Rimmington. |
||
| + | *Nearest [[bank]] is the [[Rogues' Den]]. |
||
| + | | |
||
| + | *[[Herblore]] |
||
| + | *[[Combat]] |
||
| + | |- |
||
| + | |[[Pollnivneach]] |
||
| + | | |
||
| + | *Close to the [[Smoke Dungeon]]. |
||
| + | *Faster [[Ancient Magicks]] access. |
||
| + | *The town has a [[Rooftop Agility Courses|rooftop agility course]] for those with 70+ [[Agility]]. |
||
| + | *Easy desert access and two [[magic carpet]] stations nearby. |
||
| + | | |
||
| + | *Far from anything truly useful. |
||
| + | *Closest [[bank]] is in [[Nardah]] but you may take a carpet to the [[Shantay Pass]]. |
||
| + | | |
||
| + | *[[Thieving]] |
||
| + | *[[Combat]] |
||
| + | *[[Agility]] |
||
| + | |- |
||
| + | |[[Rellekka]] |
||
| + | | |
||
| + | *Close to the marketplace and a [[dairy churn]]. |
||
| + | *Provides quick access to the [[Fremennik Slayer Dungeon|Slayer Dungeon]] and [[Keldagrim]]. |
||
| + | *Nearby are many [[seaweed]] respawns, as well as a [[sandpit]] and [[furnace]] for making [[molten glass]]. |
||
| + | *Nearby mine contains [[clay]] for making [[Magic tablet|teleportation tablets]] and [[Crafting#Pottery|pottery]]. |
||
| + | *Easy access to the [[Lunar Isle]], [[Waterbirth Island]], [[Neitiznot]], [[Jatizso]], [[Ungael]] and [[Miscellania]]. |
||
| + | | |
||
| + | *You will need many house teleport tablets to use Rellekka effectively, as there is no [[bank]] in town. |
||
| + | | |
||
| + | *[[Woodcutting]] |
||
| + | *[[Fletching]] |
||
| + | *[[Combat]] |
||
| + | |- |
||
| + | |[[Brimhaven]] |
||
| + | | |
||
| + | *[[Karamja]] access. |
||
| + | *[[Brimhaven Dungeon]] is right next to the house portal. |
||
| + | *[[Brimhaven Agility Arena]] is very close. |
||
| + | *Close to the [[Nature altar]]. |
||
| + | *Close to the [[Shilo Village (location)|Shilo Village]] [[Shilo Village cart system|cart]], and subsequently close to [[Duradel]] the [[Slayer master]]. |
||
| + | | |
||
| + | *No usable trees, few resources. |
||
| + | *Requires at least 30 [[coins]] to enter the area unless you use house teleports, gnome gliders, [[Karamja gloves]], or the [[ring of charos]]. |
||
| + | | |
||
| + | *[[Slayer]] |
||
| + | *[[Agility]] |
||
| + | |- |
||
| + | |[[Yanille]] |
||
| + | | |
||
| + | *Very close to a [[fairy ring]] ({{Fairycode|ciq}}) for travelling to or from Yanille to many places. Partial completion of [[Fairytale II - Cure a Queen]] is required to use the fairy rings. |
||
| + | *[[Nightmare Zone]] [[Minigame Group Finder|minigame teleport]] can be used to access Yanille easily if a player has low [[Magic]]. |
||
| + | *[[Bank]] just down the road. |
||
| + | *The [[Frenita's Cookery Shop|cooking ingredient shop]] is nearby, making Yanille the best spot for chefs. |
||
| + | *There are [[cow]]s located north of the city walls. |
||
| + | *[[Hunter shops|Hunter shop]] nearby. |
||
| + | *Can bypass the need for the [[Watchtower Teleport]] if you have 40 Magic. |
||
| + | *[[Castle Wars]], [[Fishing Trawler]], and [[Nightmare Zone]] [[minigames]] are nearby. |
||
| + | *A useful spot to use an elemental balance if you or a friend has 66 Magic. |
||
| + | *The [[Dragon Inn|bar]] that sells [[dragon bitter]] is nearby, making it easy to build a barrel of it here. |
||
| + | | |
||
| + | *Takes a long time to reach this location without teleports. |
||
| + | | |
||
| + | *[[Cooking]] |
||
| + | *[[Prayer]] |
||
| + | *[[Hunter]] |
||
| + | |} |
||
| + | |||
| + | ===House styles=== |
||
| + | Estate agents can also redecorate the outside of your house for a fee. |
||
| + | {| class="wikitable" |
||
| + | !Style |
||
| + | !Level |
||
| + | !Cost |
||
| + | !Styled like |
||
| + | |- |
||
| + | ![[Basic wood]] |
||
| + | |align=center|1 |
||
| + | |align=center|5,000 |
||
| + | |[[Rimmington]] |
||
| + | |- |
||
| + | ![[Basic stone]] |
||
| + | |align=center|10 |
||
| + | |align=center|5,000 |
||
| + | |[[Burthorpe]] |
||
| + | |- |
||
| + | ![[Whitewashed stone]] |
||
| + | |align=center|20 |
||
| + | |align=center|7,500 |
||
| + | |[[Pollnivneach]] |
||
| + | |- |
||
| + | ![[Fremennik-style wood]] |
||
| + | |align=center|30 |
||
| + | |align=center|10,000 |
||
| + | |[[Rellekka]] |
||
| + | |- |
||
| + | ![[Tropical wood]] |
||
| + | |align=center|40 |
||
| + | |align=center|15,000 |
||
| + | |[[Brimhaven]] |
||
| + | |- |
||
| + | ![[Fancy stone]] |
||
| + | |align=center|50 |
||
| + | |align=center|25,000 |
||
| + | |[[Falador]] |
||
| + | |- |
||
| + | ![[Deathly mansion]] |
||
| + | |align=center|1 |
||
| + | |align=center|35,000 |
||
| + | |[[Great Kourend]] |
||
| + | |} |
||
| + | |||
| + | It is worth noting that for each new style of house you get, the enter tune for the house changes, based on the style your house has. |
||
| + | |||
| + | ==Rooms== |
||
| + | There are many different rooms that can be added to houses. The house a player buys will begin with a garden and parlour, but more rooms can be added. Different rooms will require different Construction levels and will cost money. |
||
| + | {|class="wikitable" style="text-align:center;" |
||
| + | |- |
||
| + | !Room!!Level!!Cost |
||
| + | |- |
||
| + | |[[Garden]]||1||1,000 |
||
| + | |- |
||
| + | |[[Parlour]]||1||1,000 |
||
| + | |- |
||
| + | |[[Kitchen]]||5||5,000 |
||
| + | |- |
||
| + | |[[Dining Room]]||10||5,000 |
||
| + | |- |
||
| + | |[[Workshop]]||15||10,000 |
||
| + | |- |
||
| + | |[[Bedroom]]||20||10,000 |
||
| + | |- |
||
| + | |[[Skill Hall]]||25||15,000 |
||
| + | |- |
||
| + | |[[Games room]]||30||25,000 |
||
| + | |- |
||
| + | |[[Combat Room]]||32||25,000 |
||
| + | |- |
||
| + | |[[Quest Hall]]||35||25,000 |
||
| + | |- |
||
| + | |[[Menagerie]]||37||30,000 |
||
| + | |- |
||
| + | |[[Study]]||40||50,000 |
||
| + | |- |
||
| + | |[[Costume Room]]||42||50,000 |
||
| + | |- |
||
| + | |[[Chapel]]||45||50,000 |
||
| + | |- |
||
| + | |[[Portal Chamber]]||50||100,000 |
||
| + | |- |
||
| + | |[[Formal Garden]]||55||75,000 |
||
| + | |- |
||
| + | |[[Throne Room]]||60||150,000 |
||
| + | |- |
||
| + | |[[Oubliette]]||65||150,000 |
||
| + | |- |
||
| + | |[[Superior Garden]]||65||75,000 |
||
| + | |- |
||
| + | |[[Dungeon]]||70||7,500 |
||
| + | |- |
||
| + | |[[Treasure Room]]||75||250,000 |
||
| + | |- |
||
| + | |[[Achievement Gallery]]||80||200,000 |
||
| + | |} |
||
| + | |||
| + | ===Maximum number of rooms and area=== |
||
| + | Up to level 49 Construction, a maximum of 23 rooms and gardens can be built. This rises to a maximum of 33 rooms at level 99 Construction. |
||
| + | |||
| + | There is also a maximum area that can be built on that also goes up with Construction level, starting at 3 rooms by 3 rooms up to 8 rooms by 8 rooms. |
||
| + | |||
| + | As your maximum house dimensions goes up, so does your yard space. Yard space increases by adding a row to the top of your current yard space, and a column to the right. You should plan accordingly should you desire a centered house, as increasing your construction over time will off-center it. |
||
| + | {|class="wikitable" style="text-align:center;" |
||
| + | |- |
||
| + | !Construction<br />level |
||
| + | !Maximum number<br />of rooms |
||
| + | !Maximum house<br />dimensions |
||
| + | !Yard space |
||
| + | |- |
||
| + | |1||23||3 x 3||5 x 5 |
||
| + | |- |
||
| + | |15||23||4 x 4||6 x 6 |
||
| + | |- |
||
| + | |30||23||5 x 5||7 x 7 |
||
| + | |- |
||
| + | |45||23||6 x 6||8 x 8 |
||
| + | |- |
||
| + | |50||24||6 x 6||8 x 8 |
||
| + | |- |
||
| + | |56||25||6 x 6||8 x 8 |
||
| + | |- |
||
| + | |60||25||7 x 7||9 x 9 |
||
| + | |- |
||
| + | |62||26||7 x 7||9 x 9 |
||
| + | |- |
||
| + | |68||27||7 x 7||9 x 9 |
||
| + | |- |
||
| + | |74||28||7 x 7||9 x 9 |
||
| + | |- |
||
| + | |75||28||8 x 8||10 x 10 |
||
| + | |- |
||
| + | |80||29||8 x 8||10 x 10 |
||
| + | |- |
||
| + | |86||30||8 x 8||10 x 10 |
||
| + | |- |
||
| + | |92||31||8 x 8||10 x 10 |
||
| + | |- |
||
| + | |96||32||8 x 8||10 x 10 |
||
| + | |- |
||
| + | |99||33||8 x 8||10 x 10 |
||
| + | |} |
||
| + | |||
| + | ==Materials== |
||
| + | Many different items are needed for Construction, especially [[plank]]s, [[nails]], [[Bolt of cloth|cloth]], bricks, [[soft clay]], and [[steel bar]]s. |
||
| + | |||
| + | ===Sawmill operator=== |
||
| + | {{Main|Sawmill}}There are two sawmill operators in the game and can be identified by the [[File:Sawmill icon.png]] [[icon]] on the [[minimap]], their main purpose is to exchange [[logs]] into [[plank]]s for a fee. They also sell other construction supplies such as [[Bolt of cloth|bolts of cloth]], some [[nails]], and [[saw]]s, by trading with them. A saw is essential to begin construction. |
||
| + | |||
| + | The Sawmills are located at [[Varrock]] [[Lumber Yard]] and in the [[Woodcutting Guild]]. |
||
| + | |||
| + | ===Nails=== |
||
| + | [[Nails]] can be made using the [[Smithing]] skill from all types of [[bars]]. Additionally, the [[sawmill operator]] sells [[Bronze nails|bronze]], [[Iron nails|iron]], and [[steel nails]] for 2, 3 and 5 [[coins]] each, respectively. When constructing objects using nails, there is a possibility that players will bend a nail. With higher level nails such as [[Rune nails|rune]], this possibility becomes less likely. Because higher level nails are expensive, most players prefer to use mid-level nails such as iron or steel. |
||
| + | |||
| + | ===Stonemason=== |
||
| + | Players can buy various stoneworking materials from the [[stonemason]] in [[Keldagrim]]. |
||
| + | {|class="wikitable" style="text-align:center;" |
||
| + | !Item!!Cost |
||
| + | |- |
||
| + | |[[Limestone brick]]||26 |
||
| + | |- |
||
| + | |[[Marble block]]||325,000 |
||
| + | |- |
||
| + | |[[Gold leaf]]||130,000 |
||
| + | |- |
||
| + | |[[Magic stone]]||975,000 |
||
| + | |} |
||
| + | |||
| + | Limestone bricks (21 [[coins]]) and [[limestone]] (10 coins) can also be bought from the [[Mort'ton]] [[Razmire Builders Merchants|building]]/[[Razmire General Store|general store]]. |
||
| + | |||
| + | Players can also mine their own limestone east of [[Varrock]] or [[Arandar]] and use a [[chisel]] to make it into limestone bricks. |
||
| + | |||
| + | ===Bagged plants=== |
||
| + | The [[Garden supplier]] in the [[Falador Park]] sells a variety of different plants that can be used by players in their Gardens and Formal Gardens. |
||
| + | {|class="wikitable" style="text-align:center;" |
||
| + | !Plant!!Cost!!Garden |
||
| + | |- |
||
| + | |Bagged dead tree||1,000||Garden |
||
| + | |- |
||
| + | |Bagged nice tree||3,200||Garden |
||
| + | |- |
||
| + | |Bagged oak tree ||5,000||Garden |
||
| + | |- |
||
| + | |Bagged willow tree ||10,000||Garden |
||
| + | |- |
||
| + | |Bagged maple tree||15,000||Garden |
||
| + | |- |
||
| + | |Bagged yew tree||20,000||Garden |
||
| + | |- |
||
| + | |Bagged magic tree||50,000||Garden |
||
| + | |- |
||
| + | |Bagged plant 1||1,000||Garden |
||
| + | |- |
||
| + | |Bagged plant 2||5,000||Garden |
||
| + | |- |
||
| + | |Bagged plant 3||10,000||Garden |
||
| + | |- |
||
| + | |Thorny hedge||5,000||Formal Garden |
||
| + | |- |
||
| + | |Nice hedge||10,000||Formal Garden |
||
| + | |- |
||
| + | |Small box hedge ||15,000||Formal Garden |
||
| + | |- |
||
| + | |Topiary hedge ||20,000||Formal Garden |
||
| + | |- |
||
| + | |Fancy hedge||25,000||Formal Garden |
||
| + | |- |
||
| + | |Tall fancy hedge||50,000||Formal Garden |
||
| + | |- |
||
| + | |Tall box hedge||100,000||Formal Garden |
||
| + | |- |
||
| + | |Bagged flower||5,000||Formal Garden |
||
| + | |- |
||
| + | |Bagged daffodils||10,000||Formal Garden |
||
| + | |- |
||
| + | |Bagged bluebells||15,000||Formal Garden |
||
| + | |- |
||
| + | |Bagged sunflower||5,000||Formal Garden |
||
| + | |- |
||
| + | |Bagged marigolds||10,000||Formal Garden |
||
| + | |- |
||
| + | |Bagged roses||15,000||Formal Garden |
||
| + | |} |
||
| + | |||
| + | ===Stuffed heads=== |
||
| + | Players can get monster heads, randomly dropped from monsters, turned into frightening trophies at the [[Taxidermist]] in [[Canifis]]. These trophies can then be displayed in the [[Skill Hall]]. |
||
| + | {|class="wikitable" style="text-align:center;" |
||
| + | !Item!!Cost!!Level |
||
| + | |- |
||
| + | |[[Crawling hand]]||1,000||38 |
||
| + | |- |
||
| + | |[[Cockatrice head|Cockatrice]]||2,000||38 |
||
| + | |- |
||
| + | |[[Basilisk head|Basilisk]]||4,000||38 |
||
| + | |- |
||
| + | |[[Kurask head|Kurask]]||6,000||58 |
||
| + | |- |
||
| + | |[[Abyssal head|Abyssal demon]]||12,000||58 |
||
| + | |- |
||
| + | |[[Kbd heads|King Black Dragon]]||50,000||78 |
||
| + | |- |
||
| + | |[[Kq head|Kalphite Queen]]||50,000||78 |
||
| + | |- |
||
| + | |[[Vorkath]] |
||
| + | |50,000 |
||
| + | |82 |
||
| + | |} |
||
| + | |||
| + | The taxidermist can also stuff your [[big bass]], [[big swordfish]] and [[big shark]], which are randomly obtained through fishing the correct type of fish. |
||
| + | |||
| + | ===Herald=== |
||
| + | Players can buy maps, landscapes and portraits for decoration by talking to [[Sir Renitee]] in the [[White Knights' Castle]] - he's upstairs on the east side of the building. Additionally, the Herald can change a player's family crest, which appears on decorations throughout the house and on [[armour]] created by the player. |
||
| + | |||
| + | ==Servants== |
||
| + | Servants can be hired at the [[Servants' Guild]], the very northeastern building in [[Ardougne]]. There are five different [[servant]]s, which can perform various services. All servants are able to greet guests entering a players' home, but some will have different abilities, such as taking items to and from the [[bank]] or [[sawmill]]. The higher level servant a player has, the faster his or her service is, the better food he or she provides, and the more items he or she can carry to or from a bank or sawmill. |
||
| + | |||
| + | After using a servant's services seven times, the servant will ask the player to pay him or her. After using a servant's services eight times, the player is required to pay him or her or the servant will quit. A player can build a [[Servant's moneybag]] and put coins in it to automatically pay his or her servant. |
||
| + | |||
| + | A player must have at least two bedrooms with [[Bedroom#Bed|beds]] in them in order to hire a servant. A player may only have one servant at a time; if a player wants to hire a new servant, he or she must fire his or her current one first. |
||
| + | {|class="wikitable" style="text-align:center;" |
||
| + | !Servant!!Wages!!Level!!Food provided!!Services!!Items |
||
| + | |- |
||
| + | |[[Rick]]||500||20||Shrimp||Bank||6 |
||
| + | |- |
||
| + | |[[Maid]]||1,000||25||Stew||Bank||10 |
||
| + | |- |
||
| + | |[[Cook (servant)|Cook]]||3,000||30||Pineapple pizza||Bank, Sawmill||16 |
||
| + | |- |
||
| + | |[[Butler]]||5,000||40||Chocolate cake||Bank, Sawmill||20 |
||
| + | |- |
||
| + | |[[Demon butler]]||10,000||50||Curry||Bank, Sawmill||26 |
||
| + | |} |
||
| + | |||
| + | ==Strategy== |
||
| + | Building oak furniture at your [[workbench]] provides a nice balance of cost and [[experience]]. You could also break down and build [[oak larder]]s in your [[kitchen]], which uses 8 [[plank]]s each build and is thus as fast or faster than building oak furniture at your workbench which you have to drop. |
||
| + | |||
| + | You can use noted [[oak logs]] with your [[servant]], who will exchange them for unnoted oak logs, and then send him to the [[sawmill]] to get [[oak plank]]s. |
||
| + | |||
| + | At level 28 Construction, players can make [[Skill Hall]] armour stands, provided that they have either full [[Castle Wars]] armour or have 68 or higher [[smithing]]. These stands provide from 67.5-80 experience per oak plank (2 needed), and can be taken apart, allowing players to regain their armour. As most things made with oak planks provide only 60 experience per plank, this provides more experience, however, it is much slower than building oak larders which use 8 oak planks instead of 2. |
||
| + | |||
| + | For level 33-40, [[limestone]] seems to be a cheap option - building lots of fireplaces. After you have reached level 40 or above, you should switch back to oak because the experience will be too slow after this for you to level. |
||
| + | |||
| + | At level 74 Construction, [[dungeon]] [[oak door]]s (10 oak planks) will be faster than [[oak larder]]s (8 oak planks); 4 dungeon doors instead of 5 larders for the same experience. In the skill room, or elsewhere, build a stairway going down to a dungeon stair room. Costs would be same as armour stands. |
||
| + | {|class="wikitable" style="text-align:center;" |
||
| + | |- |
||
| + | !# |
||
| + | !Strategy |
||
| + | !Raw materials cost |
||
| + | !Butler costs |
||
| + | !Planking costs |
||
| + | !Cost per experience point (larders/workbench) |
||
| + | !Cost per experience point (rune or cw3 armour stands)<ref>Butler costs roughly halved if you're doing armour stands, because you only have 20 free inventory spots you may as well have a normal butler rather than a demon butler.</ref> |
||
| + | |- |
||
| + | |1 |
||
| + | |Buy [[oak plank]]s for 500 [[coins]] each, use them with your butler to exchange them for unnoted ones. |
||
| + | |500 |
||
| + | |52 |
||
| + | |0 |
||
| + | |9.2 |
||
| + | |6.6 |
||
| + | |- |
||
| + | |2 |
||
| + | |Buy [[oak logs]] for 50 [[coins]] each, use them with your butler to exchange them for unnoted ones, and then send him to the [[sawmill]]. |
||
| + | |50 |
||
| + | |104.2 |
||
| + | |250 |
||
| + | |6.73 |
||
| + | |4.4 |
||
| + | |- |
||
| + | |3 |
||
| + | |Use the [[Balloon transport system]] to go from [[Castle Wars]] to the [[Varrock]] [[sawmill]] (cost: 1 [[willow logs]] each time), cut your own [[oak logs]] and turn them into planks yourself, using a [[ring of dueling]] to bank. Same as strategy 1 in all other respects (rings of dueling and [[willow logs]] assumed to be largely free in calculation) |
||
| + | |0 |
||
| + | |52 |
||
| + | |250 |
||
| + | |5 |
||
| + | |3.5 |
||
| + | |- |
||
| + | |4 |
||
| + | |Use the [[Balloon transport system]] to go from [[Castle Wars]] to the [[Varrock]] [[sawmill]] (cost: 1 [[willow logs]] each time), cut your own [[oak logs]] and turn them into planks yourself. Teleport to your house with a [[Teleport to house|tablet]] to do some construction work and use a [[ring of dueling]] to bank. Transport cost per log/plank is 840/24 or 35 [[coins]]. |
||
| + | |0 |
||
| + | |35 |
||
| + | |250 |
||
| + | |4.75 |
||
| + | |3.45 |
||
| + | |- |
||
| + | |5 |
||
| + | |Use same method as 4, but this time with [[teak logs]] from [[Managing Miscellania]]. |
||
| + | |165 |
||
| + | |35 |
||
| + | |500 |
||
| + | |7.78 |
||
| + | |N/A |
||
| + | |} |
||
| + | |||
| + | <references/> |
||
| + | |||
| + | As we can see from the table, Construction costs at least 3 [[coins]] per experience point, and in practice, getting fast experience will mean spending closer to 6-7 coins per experience point. |
||
| + | |||
| + | Have a [[Dining Room]] near the [[Kitchen]] (if you're doing larders), the [[Workshop]] (if you're making [[flatpack]]s) or the [[Skill Hall]] (if you're making armour stands) and therefore a butler bell-pull so you can summon him quickly when he wanders off around the house. You can also keep him near you while training by starting to build before completing conversation with your butler. This will usually prevent them from moving. |
||
| + | |||
| + | ===Experience=== |
||
| + | This chart shows the experience given per object when each object is used. |
||
| + | {| class="wikitable" style="text-align:center;" |
||
| + | !Item |
||
| + | !Experience<br />given |
||
| + | !Cost per Item |
||
| + | !Cost per Exp |
||
| + | |- |
||
| + | |[[Plank]] & [[Nails]]||29||{{coins|({{GEP|Plank|1}}+{{GEP|Bronze nails|1}})}} - {{coins|({{GEP|Plank|1}}+{{GEP|Rune nails|1}})}}<br />(Depending on nail quality)||{{coins|({{GEP|Plank|1}}+{{GEP|Bronze nails|1}})/29}} - {{coins|({{GEP|Plank|1}}+{{GEP|Rune nails|1}})/29}}<br />(Depending on nail quality) |
||
| + | |- |
||
| + | |[[Oak plank]]||60||{{coins|({{GEP|Oak plank|1}})}}||{{coins|({{GEP|Oak plank|1}})/60}} |
||
| + | |- |
||
| + | |[[Teak plank]]||90||{{coins|({{GEP|Teak plank|1}})}}||{{coins|({{GEP|Teak plank|1}})/90}} |
||
| + | |- |
||
| + | |[[Mahogany plank]]||140||{{coins|({{GEP|Mahogany plank|1}})}}||{{coins|({{GEP|Mahogany plank|1}})/140}} |
||
| + | |- |
||
| + | |[[Soft clay]]||10||{{coins|({{GEP|Soft clay|1}})}}||{{coins|({{GEP|Soft clay|1}})/10}} |
||
| + | |- |
||
| + | |[[Bolt of cloth]]||15||{{coins|({{GEP|Bolt of cloth|1}})}}||{{coins|({{GEP|Bolt of cloth|1}})/15}} |
||
| + | |- |
||
| + | |[[Steel bar]]||20||{{coins|({{GEP|Steel bar|1}})}}||{{coins|({{GEP|Steel bar|1}})/20}} |
||
| + | |- |
||
| + | |[[Limestone brick]]||20||{{coins|({{GEP|Limestone brick|1}})}}||{{coins|({{GEP|Limestone brick|1}})/20}} |
||
| + | |- |
||
| + | |[[Gold leaf]]||300||{{coins|({{GEP|Gold leaf|1}})}}||{{coins|({{GEP|Gold leaf|1}})/300}} |
||
| + | |- |
||
| + | |[[Marble block]]||450||{{coins|({{GEP|Marble block|1}})}}||{{coins|({{GEP|Marble block|1}})/450}} |
||
| + | |- |
||
| + | |[[Magic stone]]||1,000||{{coins|({{GEP|Magic stone|1}})}}||{{coins|({{GEP|Magic stone|1}})/1000}} |
||
| + | |} |
||
| + | |||
| + | ===Get there fast=== |
||
| + | {| class="wikitable" style="text-align:center;" |
||
| + | ! Levels !! Strategy |
||
| + | |- |
||
| + | |1-14 |
||
| + | |Buy 500 [[iron nails]] and 109 [[plank]]s then make [[crude wooden chair]]s. |
||
| + | |- |
||
| + | |14-17 |
||
| + | |Make [[rocking chair]]s. |
||
| + | |- |
||
| + | |17 |
||
| + | |Build a [[Workshop]] for 10,000 [[coins]]. |
||
| + | |- |
||
| + | |17-22 |
||
| + | |Buy 230 [[oak plank]]s (no [[nails]] needed from this point on) and build [[pluming stand]]s. |
||
| + | |- |
||
| + | |22 |
||
| + | |Build [[Dining Room]] for 5,000 [[coins]]. |
||
| + | |- |
||
| + | |22-32 |
||
| + | |Build [[oak dining table]]s (4 [[oak plank]]s). |
||
| + | |- |
||
| + | |32 |
||
| + | |Build oak workbench (5 [[oak plank]]s) |
||
| + | |- |
||
| + | |32-38 |
||
| + | |Build [[carved oak table]]s (6 [[oak plank]]s). at your [[workbench]]. You will need around 235 oak planks. |
||
| + | |- |
||
| + | |38-46 |
||
| + | |Build [[teak table]]s, at your [[workbench]], which you will need around 420 [[teak plank]]s. |
||
| + | |- |
||
| + | |46 |
||
| + | |Build a [[steel framed workbench]] (6 [[oak plank]]s and 4 [[steel bar]]s). |
||
| + | |- |
||
| + | |46-52 |
||
| + | |Build [[carved teak table]]s (6 [[teak plank]]s and 4 [[Bolt of cloth|bolts of cloth]]) at your [[steel framed workbench]]. You will use around 620 teak planks. |
||
| + | |- |
||
| + | |52-99 |
||
| + | |Build [[mahogany table]]s in your [[Dining Room]]. You will use 92,140 [[mahogany plank]]s |
||
| + | |- |
||
| + | |99 |
||
| + | |Build your [[Player-owned house|house]] the way you want it. |
||
| + | |} |
||
| + | |||
| + | ====Total supplies==== |
||
| + | *A [[hammer]] and a [[saw]] |
||
| + | *500 [[Iron nails]] |
||
| + | *120 [[Plank]]s |
||
| + | *510 [[Oak plank]]s |
||
| + | *4 [[Steel bar]]s |
||
| + | *1,040 [[Teak plank]]s |
||
| + | *92,140 [[Mahogany plank]]s |
||
| + | *480 [[Bolt of cloth|Bolts of cloth]] |
||
| + | |||
| + | ==Temporary boosts== |
||
| + | Depending on the type of shelf, tea will give a 1, 2, or 3 level bonus. With a normal cup, tea gives +1 Construction. With a porcelain cup, tea gives +2 Construction. With a gold-rimmed cup, tea gives +3 Construction. |
||
| + | {| class="wikitable" style="text-align:center;" |
||
| + | |- |
||
| + | !Tea cup |
||
| + | !Shelf |
||
| + | !Bonus |
||
| + | |- |
||
| + | |[[Cup of tea (Player-owned house)#Tea strengths|Clay]] |
||
| + | |Wooden 1-2, Oak 1 |
||
| + | | +1 |
||
| + | |- |
||
| + | |[[Cup of tea (Player-owned house)#Tea strengths|Porcelain white]] |
||
| + | |Wooden 3, Oak 2, Teak 1 |
||
| + | | +2 |
||
| + | |- |
||
| + | |[[Cup of tea (Player-owned house)#Tea strengths|Porcelain white with gold trim]] |
||
| + | |Teak 2 (Teak 1 with Butler glitch was fixed) |
||
| + | | +3 |
||
| + | |- |
||
| + | !Other items!!Notes!! |
||
| + | |- |
||
| + | |[[Crystal saw]] |
||
| + | |Obtained from the [[The Eyes of Glouphrie]] |
||
| + | | +3 |
||
| + | |- |
||
| + | |Evil Dave's [[spicy stew]] |
||
| + | |Made by adding orange spice to stew |
||
| + | | -5 to +5 |
||
| + | |} |
||
| + | |||
| + | The [[crystal saw]] will only work with items that require a [[saw]] to build them (it will not work when building rooms, placing monsters, or growing plants.) It will also work simultaneously with bonuses from tea (to get max of +6) or [[Evil Dave]]'s [[spicy stew]], allowing for a maximum boost of +8 to Construction. |
||
| + | |||
| + | For the maximum effect in Evil Dave's stew, add the orange spice 3 times. |
||
| + | |||
| + | ==Quests rewarding Construction experience== |
||
| + | {{Main|Quest experience rewards}} |
||
| + | {| class="wikitable sortable lighttable" style="text-align:center;" |
||
| + | !Quest |
||
| + | !Experience<br />reward |
||
| + | !Construction req. |
||
| + | !Other requirements |
||
| + | |- |
||
| + | |[[The Eyes of Glouphrie]]||250||5 {{Skill clickpic|Construction}}||46 {{Skill clickpic|Magic}}, 45 {{Skill clickpic|Woodcutting}} {{Ironman|icon}} |
||
| + | |- |
||
| + | |[[Tower of Life]]||1,000||10 {{Skill clickpic|Construction}}|| - |
||
| + | |- |
||
| + | |[[Cold War]]||1,500||34 {{Skill clickpic|Construction}}||10 {{Skill clickpic|Hunter}}, 30 {{Skill clickpic|Agility}}, 30 {{Skill clickpic|Crafting}}, 15 {{Skill clickpic|Thieving}} |
||
| + | |- |
||
| + | |[[Darkness of Hallowvale]]||2,000||5 {{Skill clickpic|construction}}||26 {{Skill clickpic|agility}}, 20 {{Skill clickpic|mining}}, 22 {{Skill clickpic|thieving}}, 32 {{Skill clickpic|crafting}}, 33 {{Skill clickpic|magic}}, 40 {{Skill clickpic|strength}} |
||
| + | |- |
||
| + | |[[The Great Brain Robbery]]||2,000||30 {{Skill clickpic|Construction}}||16 {{Skill clickpic|Crafting}}, 50 {{Skill clickpic|Prayer}} |
||
| + | |- |
||
| + | |[[Making Friends with My Arm]]||2,000||35 {{Skill clickpic|construction}}||66 {{Skill clickpic|Firemaking}}, 72 {{Skill clickpic|mining}}, 68 {{Skill clickpic|Agility}} |
||
| + | |- |
||
| + | |[[The Fremennik Isles]]||5,000||20 {{Skill clickpic|Construction}}|| 40 {{Skill clickpic|Agility}}, 56 {{Skill clickpic|Woodcutting}}, 46 {{Skill clickpic|Crafting}} |
||
| + | |- |
||
| + | !Total |
||
| + | !13,750 |
||
| + | !colspan="2"| |
||
| + | |} |
||
| + | |||
| + | ===Skill choice=== |
||
| + | Upon completing any of the following quests, players may choose to allocate experience to Construction. These rewards usually come in the form of items, such as lamps or books, and are independent of any experience rewards directly received for completing the quest. |
||
| + | {| class="wikitable sortable lighttable" style="text-align:center;" |
||
| + | !Quest |
||
| + | !Experience<br />reward |
||
| + | !Skills available |
||
| + | !Skill requirements |
||
| + | |- |
||
| + | |[[Client of Kourend]]||500 twice||Any||<nowiki>-</nowiki> |
||
| + | |- |
||
| + | |[[Fairytale II - Cure a Queen]]||2,500|| Any skill above 30 || 49 {{Skill clickpic|Farming}}, 57 {{Skill clickpic|Herblore}} |
||
| + | |- |
||
| + | |[[A Tail of Two Cats]]||2,500 twice|| Any skill above 30 || - |
||
| + | |- |
||
| + | |[[The Great Brain Robbery]]||5,000|| Any skill above 30 || 16 {{Skill clickpic|Crafting}}, 30 {{Skill clickpic|Construction}}, 50 {{Skill clickpic|Skill = Prayer}} |
||
| + | |- |
||
| + | |[[King's Ransom]]||5,000|| Any skill above 50 || 65 {{Skill clickpic|Defence}} |
||
| + | |- |
||
| + | |[[Darkness of Hallowvale]]||2,000 three times|| Any skill above 30 || 5 {{Skill clickpic|construction}}, 20 {{Skill clickpic|mining}}, 22 {{Skill clickpic|thieving}}, 32 {{Skill clickpic|crafting}}, 33 {{Skill clickpic|magic}}, 40 {{Skill clickpic|strength}} |
||
| + | |- |
||
| + | |[[Curse of the Empty Lord]]<br />([[Miniquests|miniquest]])||10,000|| Any skill above 50 ||Some players will need 31 {{Skill clickpic|prayer}} |
||
| + | |- |
||
| + | |[[One Small Favour]]||10,000 twice|| Any skill above 30 || 36 {{Skill clickpic|Agility}}, 25 {{Skill clickpic|Crafting}}, 18 {{Skill clickpic|Herblore}}, 30 {{Skill clickpic|Smithing}} |
||
| + | |- |
||
| + | |[[Recipe for Disaster]]<br />([[Recipe for Disaster#The final battle|The final battle]])||20,000|| Any skill above 50 || 175 {{Skill clickpic|Quest}}, 48 {{Skill clickpic|Agility}}, 50 {{Skill clickpic|Mining}}, 53 {{Skill clickpic|Fishing}}, 53 {{Skill clickpic|Thieving}}, 25 {{Skill clickpic |Herblore}}, 59 {{Skill clickpic|Magic}}, 40 {{Skill clickpic|Smithing}}, 50 {{Skill clickpic|Firemaking}}, 40 {{Skill clickpic|Ranged}}, 40 {{Skill clickpic|Crafting}}, 10 {{Skill clickpic|Fletching}}, 10 {{Skill clickpic|Slayer}}, 36 {{Skill clickpic|Woodcutting}} |
||
| + | |- |
||
| + | !Total |
||
| + | !74,500 |
||
| + | !colspan="2"| |
||
| + | |} |
||
| + | |||
| + | ==Trivia== |
||
| + | *The [[watch]], [[sextant]] and [[chart]] cannot be used in your house, trying to use it will give the message: "The sextant doesn't seem to work here". |
||
| + | *In ''[[RuneScape Classic]]'', there was a skill that had no use called Carpentry. The skill today of Construction was an updated version of this unused skill. |
||
| + | |||
| + | ==See also== |
||
| + | *[[Constructed Items]] |
||
| + | *[[Player-owned house]] |
||
| + | *[[Template:POH room|POH room template]] |
||
| + | |||
| + | {{Skills}} |
||
| + | [[Category:Construction]] |
||
Revision as of 13:22, 16 March 2019

Construction is a members-only skill that allows players to build their own houses and provide furniture for them. To begin Construction, players must buy a house from one of the estate agents. A starter house will cost 1,000 coins, and will be in Rimmington. A level 40 Magic spell can then be used to teleport to the house, or players can walk to Rimmington, where there is a portal (![]() icon on the map) that will teleport players to their house.
icon on the map) that will teleport players to their house.
The house starts off with only a small room and garden, but more can be built. To build, go to the options menu, select house options, and set the build mode to on. Players will then see what looks like ghost-like "Hot Spots" where new objects can be built. See the Constructed items list for details on what you can build at what level. Players can also visit a friend's house if they are home and using the same portal. Construction is widely regarded as one of the most costly skills to level up.
Significant milestones
- Level 47 - Quest Hall for mounted glory
- Level 50 - Unlock all house locations
- Level 65 - Superior Garden
- Pools
- Level 80 - Wilderness obelisk
- Level 85 - POH fairy ring
- Spirit tree
- Level 80 - Achievement Gallery
- Level 80 - Spell book altars
- Level 81 - Jewellery box
- Level 99 - The Skill cape
Estate agents
Estate agents are located (identified with the house ![]() icon on the map) in
icon on the map) in
- Varrock, just east of the palace.
- Seers' Village northeast of the bank.
- Falador between the furnace and the east bank.
- Ardougne west of the south bank.
- Hosidius House south of the Mess, on Great Kourend
House portals
Estate agents can move a player's house from its starter location Rimmington to a new location identified by the portal ![]() icon on the map. Your house cannot be moved to Yanille on the Deadman Mode servers.
icon on the map. Your house cannot be moved to Yanille on the Deadman Mode servers.
| Location | Level | Cost to move | Map |
|---|---|---|---|
| Rimmington | 1 | 5,000 | 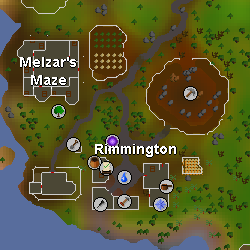
|
| Taverley | 10 | 5,000 | 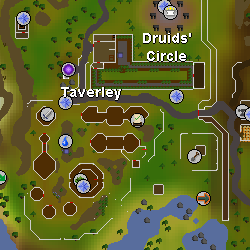
|
| Pollnivneach | 20 | 7,500 | 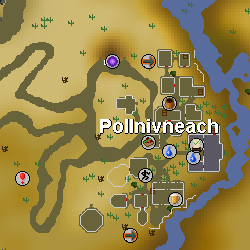
|
| Great Kourend | 25 | 8,750 | 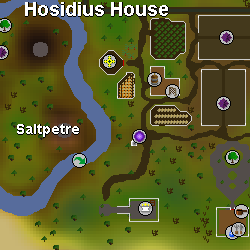
|
| Rellekka | 30 | 10,000 | 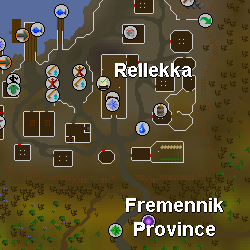
|
| Brimhaven | 40 | 15,000 | 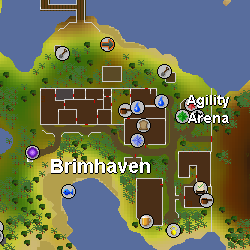
|
| Yanille | 50 | 25,000 | 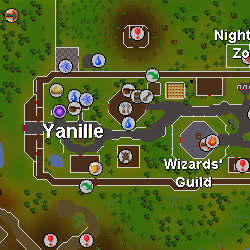
|
Additional house location info
| Location | Advantages | Disadvantages | Skill Usage |
|---|---|---|---|
| Rimmington |
|
|
|
| Taverley |
|
|
|
| Pollnivneach |
|
|
|
| Rellekka |
|
|
|
| Brimhaven |
|
|
|
| Yanille |
|
|
House styles
Estate agents can also redecorate the outside of your house for a fee.
| Style | Level | Cost | Styled like |
|---|---|---|---|
| Basic wood | 1 | 5,000 | Rimmington |
| Basic stone | 10 | 5,000 | Burthorpe |
| Whitewashed stone | 20 | 7,500 | Pollnivneach |
| Fremennik-style wood | 30 | 10,000 | Rellekka |
| Tropical wood | 40 | 15,000 | Brimhaven |
| Fancy stone | 50 | 25,000 | Falador |
| Deathly mansion | 1 | 35,000 | Great Kourend |
It is worth noting that for each new style of house you get, the enter tune for the house changes, based on the style your house has.
Rooms
There are many different rooms that can be added to houses. The house a player buys will begin with a garden and parlour, but more rooms can be added. Different rooms will require different Construction levels and will cost money.
| Room | Level | Cost |
|---|---|---|
| Garden | 1 | 1,000 |
| Parlour | 1 | 1,000 |
| Kitchen | 5 | 5,000 |
| Dining Room | 10 | 5,000 |
| Workshop | 15 | 10,000 |
| Bedroom | 20 | 10,000 |
| Skill Hall | 25 | 15,000 |
| Games room | 30 | 25,000 |
| Combat Room | 32 | 25,000 |
| Quest Hall | 35 | 25,000 |
| Menagerie | 37 | 30,000 |
| Study | 40 | 50,000 |
| Costume Room | 42 | 50,000 |
| Chapel | 45 | 50,000 |
| Portal Chamber | 50 | 100,000 |
| Formal Garden | 55 | 75,000 |
| Throne Room | 60 | 150,000 |
| Oubliette | 65 | 150,000 |
| Superior Garden | 65 | 75,000 |
| Dungeon | 70 | 7,500 |
| Treasure Room | 75 | 250,000 |
| Achievement Gallery | 80 | 200,000 |
Maximum number of rooms and area
Up to level 49 Construction, a maximum of 23 rooms and gardens can be built. This rises to a maximum of 33 rooms at level 99 Construction.
There is also a maximum area that can be built on that also goes up with Construction level, starting at 3 rooms by 3 rooms up to 8 rooms by 8 rooms.
As your maximum house dimensions goes up, so does your yard space. Yard space increases by adding a row to the top of your current yard space, and a column to the right. You should plan accordingly should you desire a centered house, as increasing your construction over time will off-center it.
| Construction level |
Maximum number of rooms |
Maximum house dimensions |
Yard space |
|---|---|---|---|
| 1 | 23 | 3 x 3 | 5 x 5 |
| 15 | 23 | 4 x 4 | 6 x 6 |
| 30 | 23 | 5 x 5 | 7 x 7 |
| 45 | 23 | 6 x 6 | 8 x 8 |
| 50 | 24 | 6 x 6 | 8 x 8 |
| 56 | 25 | 6 x 6 | 8 x 8 |
| 60 | 25 | 7 x 7 | 9 x 9 |
| 62 | 26 | 7 x 7 | 9 x 9 |
| 68 | 27 | 7 x 7 | 9 x 9 |
| 74 | 28 | 7 x 7 | 9 x 9 |
| 75 | 28 | 8 x 8 | 10 x 10 |
| 80 | 29 | 8 x 8 | 10 x 10 |
| 86 | 30 | 8 x 8 | 10 x 10 |
| 92 | 31 | 8 x 8 | 10 x 10 |
| 96 | 32 | 8 x 8 | 10 x 10 |
| 99 | 33 | 8 x 8 | 10 x 10 |
Materials
Many different items are needed for Construction, especially planks, nails, cloth, bricks, soft clay, and steel bars.
Sawmill operator
- There are two sawmill operators in the game and can be identified by the
 icon on the minimap, their main purpose is to exchange logs into planks for a fee. They also sell other construction supplies such as bolts of cloth, some nails, and saws, by trading with them. A saw is essential to begin construction.
The Sawmills are located at Varrock Lumber Yard and in the Woodcutting Guild.
Nails
Nails can be made using the Smithing skill from all types of bars. Additionally, the sawmill operator sells bronze, iron, and steel nails for 2, 3 and 5 coins each, respectively. When constructing objects using nails, there is a possibility that players will bend a nail. With higher level nails such as rune, this possibility becomes less likely. Because higher level nails are expensive, most players prefer to use mid-level nails such as iron or steel.
Stonemason
Players can buy various stoneworking materials from the stonemason in Keldagrim.
| Item | Cost |
|---|---|
| Limestone brick | 26 |
| Marble block | 325,000 |
| Gold leaf | 130,000 |
| Magic stone | 975,000 |
Limestone bricks (21 coins) and limestone (10 coins) can also be bought from the Mort'ton building/general store.
Players can also mine their own limestone east of Varrock or Arandar and use a chisel to make it into limestone bricks.
Bagged plants
The Garden supplier in the Falador Park sells a variety of different plants that can be used by players in their Gardens and Formal Gardens.
| Plant | Cost | Garden |
|---|---|---|
| Bagged dead tree | 1,000 | Garden |
| Bagged nice tree | 3,200 | Garden |
| Bagged oak tree | 5,000 | Garden |
| Bagged willow tree | 10,000 | Garden |
| Bagged maple tree | 15,000 | Garden |
| Bagged yew tree | 20,000 | Garden |
| Bagged magic tree | 50,000 | Garden |
| Bagged plant 1 | 1,000 | Garden |
| Bagged plant 2 | 5,000 | Garden |
| Bagged plant 3 | 10,000 | Garden |
| Thorny hedge | 5,000 | Formal Garden |
| Nice hedge | 10,000 | Formal Garden |
| Small box hedge | 15,000 | Formal Garden |
| Topiary hedge | 20,000 | Formal Garden |
| Fancy hedge | 25,000 | Formal Garden |
| Tall fancy hedge | 50,000 | Formal Garden |
| Tall box hedge | 100,000 | Formal Garden |
| Bagged flower | 5,000 | Formal Garden |
| Bagged daffodils | 10,000 | Formal Garden |
| Bagged bluebells | 15,000 | Formal Garden |
| Bagged sunflower | 5,000 | Formal Garden |
| Bagged marigolds | 10,000 | Formal Garden |
| Bagged roses | 15,000 | Formal Garden |
Stuffed heads
Players can get monster heads, randomly dropped from monsters, turned into frightening trophies at the Taxidermist in Canifis. These trophies can then be displayed in the Skill Hall.
| Item | Cost | Level |
|---|---|---|
| Crawling hand | 1,000 | 38 |
| Cockatrice | 2,000 | 38 |
| Basilisk | 4,000 | 38 |
| Kurask | 6,000 | 58 |
| Abyssal demon | 12,000 | 58 |
| King Black Dragon | 50,000 | 78 |
| Kalphite Queen | 50,000 | 78 |
| Vorkath | 50,000 | 82 |
The taxidermist can also stuff your big bass, big swordfish and big shark, which are randomly obtained through fishing the correct type of fish.
Herald
Players can buy maps, landscapes and portraits for decoration by talking to Sir Renitee in the White Knights' Castle - he's upstairs on the east side of the building. Additionally, the Herald can change a player's family crest, which appears on decorations throughout the house and on armour created by the player.
Servants
Servants can be hired at the Servants' Guild, the very northeastern building in Ardougne. There are five different servants, which can perform various services. All servants are able to greet guests entering a players' home, but some will have different abilities, such as taking items to and from the bank or sawmill. The higher level servant a player has, the faster his or her service is, the better food he or she provides, and the more items he or she can carry to or from a bank or sawmill.
After using a servant's services seven times, the servant will ask the player to pay him or her. After using a servant's services eight times, the player is required to pay him or her or the servant will quit. A player can build a Servant's moneybag and put coins in it to automatically pay his or her servant.
A player must have at least two bedrooms with beds in them in order to hire a servant. A player may only have one servant at a time; if a player wants to hire a new servant, he or she must fire his or her current one first.
| Servant | Wages | Level | Food provided | Services | Items |
|---|---|---|---|---|---|
| Rick | 500 | 20 | Shrimp | Bank | 6 |
| Maid | 1,000 | 25 | Stew | Bank | 10 |
| Cook | 3,000 | 30 | Pineapple pizza | Bank, Sawmill | 16 |
| Butler | 5,000 | 40 | Chocolate cake | Bank, Sawmill | 20 |
| Demon butler | 10,000 | 50 | Curry | Bank, Sawmill | 26 |
Strategy
Building oak furniture at your workbench provides a nice balance of cost and experience. You could also break down and build oak larders in your kitchen, which uses 8 planks each build and is thus as fast or faster than building oak furniture at your workbench which you have to drop.
You can use noted oak logs with your servant, who will exchange them for unnoted oak logs, and then send him to the sawmill to get oak planks.
At level 28 Construction, players can make Skill Hall armour stands, provided that they have either full Castle Wars armour or have 68 or higher smithing. These stands provide from 67.5-80 experience per oak plank (2 needed), and can be taken apart, allowing players to regain their armour. As most things made with oak planks provide only 60 experience per plank, this provides more experience, however, it is much slower than building oak larders which use 8 oak planks instead of 2.
For level 33-40, limestone seems to be a cheap option - building lots of fireplaces. After you have reached level 40 or above, you should switch back to oak because the experience will be too slow after this for you to level.
At level 74 Construction, dungeon oak doors (10 oak planks) will be faster than oak larders (8 oak planks); 4 dungeon doors instead of 5 larders for the same experience. In the skill room, or elsewhere, build a stairway going down to a dungeon stair room. Costs would be same as armour stands.
| # | Strategy | Raw materials cost | Butler costs | Planking costs | Cost per experience point (larders/workbench) | Cost per experience point (rune or cw3 armour stands)[1] |
|---|---|---|---|---|---|---|
| 1 | Buy oak planks for 500 coins each, use them with your butler to exchange them for unnoted ones. | 500 | 52 | 0 | 9.2 | 6.6 |
| 2 | Buy oak logs for 50 coins each, use them with your butler to exchange them for unnoted ones, and then send him to the sawmill. | 50 | 104.2 | 250 | 6.73 | 4.4 |
| 3 | Use the Balloon transport system to go from Castle Wars to the Varrock sawmill (cost: 1 willow logs each time), cut your own oak logs and turn them into planks yourself, using a ring of dueling to bank. Same as strategy 1 in all other respects (rings of dueling and willow logs assumed to be largely free in calculation) | 0 | 52 | 250 | 5 | 3.5 |
| 4 | Use the Balloon transport system to go from Castle Wars to the Varrock sawmill (cost: 1 willow logs each time), cut your own oak logs and turn them into planks yourself. Teleport to your house with a tablet to do some construction work and use a ring of dueling to bank. Transport cost per log/plank is 840/24 or 35 coins. | 0 | 35 | 250 | 4.75 | 3.45 |
| 5 | Use same method as 4, but this time with teak logs from Managing Miscellania. | 165 | 35 | 500 | 7.78 | N/A |
- ↑ Butler costs roughly halved if you're doing armour stands, because you only have 20 free inventory spots you may as well have a normal butler rather than a demon butler.
As we can see from the table, Construction costs at least 3 coins per experience point, and in practice, getting fast experience will mean spending closer to 6-7 coins per experience point.
Have a Dining Room near the Kitchen (if you're doing larders), the Workshop (if you're making flatpacks) or the Skill Hall (if you're making armour stands) and therefore a butler bell-pull so you can summon him quickly when he wanders off around the house. You can also keep him near you while training by starting to build before completing conversation with your butler. This will usually prevent them from moving.
Experience
This chart shows the experience given per object when each object is used.
| Item | Experience given |
Cost per Item | Cost per Exp |
|---|---|---|---|
| Plank & Nails | 29 | 434 - 1,225 (Depending on nail quality) |
14.97 - 42.24 (Depending on nail quality) |
| Oak plank | 60 | 507 | 8.45 |
| Teak plank | 90 | 967 | 10.74 |
| Mahogany plank | 140 | 2,110 | 15.07 |
| Soft clay | 10 | 213 | 21.3 |
| Bolt of cloth | 15 | 851 | 56.73 |
| Steel bar | 20 | 473 | 23.65 |
| Limestone brick | 20 | 180 | 9 |
| Gold leaf | 300 | 133,875 | 446.25 |
| Marble block | 450 | 329,397 | 731.99 |
| Magic stone | 1,000 | 994,155 | 994.16 |
Get there fast
| Levels | Strategy |
|---|---|
| 1-14 | Buy 500 iron nails and 109 planks then make crude wooden chairs. |
| 14-17 | Make rocking chairs. |
| 17 | Build a Workshop for 10,000 coins. |
| 17-22 | Buy 230 oak planks (no nails needed from this point on) and build pluming stands. |
| 22 | Build Dining Room for 5,000 coins. |
| 22-32 | Build oak dining tables (4 oak planks). |
| 32 | Build oak workbench (5 oak planks) |
| 32-38 | Build carved oak tables (6 oak planks). at your workbench. You will need around 235 oak planks. |
| 38-46 | Build teak tables, at your workbench, which you will need around 420 teak planks. |
| 46 | Build a steel framed workbench (6 oak planks and 4 steel bars). |
| 46-52 | Build carved teak tables (6 teak planks and 4 bolts of cloth) at your steel framed workbench. You will use around 620 teak planks. |
| 52-99 | Build mahogany tables in your Dining Room. You will use 92,140 mahogany planks |
| 99 | Build your house the way you want it. |
Total supplies
- A hammer and a saw
- 500 Iron nails
- 120 Planks
- 510 Oak planks
- 4 Steel bars
- 1,040 Teak planks
- 92,140 Mahogany planks
- 480 Bolts of cloth
Temporary boosts
Depending on the type of shelf, tea will give a 1, 2, or 3 level bonus. With a normal cup, tea gives +1 Construction. With a porcelain cup, tea gives +2 Construction. With a gold-rimmed cup, tea gives +3 Construction.
| Tea cup | Shelf | Bonus |
|---|---|---|
| Clay | Wooden 1-2, Oak 1 | +1 |
| Porcelain white | Wooden 3, Oak 2, Teak 1 | +2 |
| Porcelain white with gold trim | Teak 2 (Teak 1 with Butler glitch was fixed) | +3 |
| Other items | Notes | |
| Crystal saw | Obtained from the The Eyes of Glouphrie | +3 |
| Evil Dave's spicy stew | Made by adding orange spice to stew | -5 to +5 |
The crystal saw will only work with items that require a saw to build them (it will not work when building rooms, placing monsters, or growing plants.) It will also work simultaneously with bonuses from tea (to get max of +6) or Evil Dave's spicy stew, allowing for a maximum boost of +8 to Construction.
For the maximum effect in Evil Dave's stew, add the orange spice 3 times.
Quests rewarding Construction experience
| Quest | Experience reward |
Construction req. | Other requirements |
|---|---|---|---|
| The Eyes of Glouphrie | 250 | 5 |
46 |
| Tower of Life | 1,000 | 10 |
- |
| Cold War | 1,500 | 34 |
10 |
| Darkness of Hallowvale | 2,000 | 5 |
26 |
| The Great Brain Robbery | 2,000 | 30 |
16 |
| Making Friends with My Arm | 2,000 | 35 |
66 |
| The Fremennik Isles | 5,000 | 20 |
40 |
| Total | 13,750 | ||
Skill choice
Upon completing any of the following quests, players may choose to allocate experience to Construction. These rewards usually come in the form of items, such as lamps or books, and are independent of any experience rewards directly received for completing the quest.
| Quest | Experience reward |
Skills available | Skill requirements |
|---|---|---|---|
| Client of Kourend | 500 twice | Any | - |
| Fairytale II - Cure a Queen | 2,500 | Any skill above 30 | 49 |
| A Tail of Two Cats | 2,500 twice | Any skill above 30 | - |
| The Great Brain Robbery | 5,000 | Any skill above 30 | 16 |
| King's Ransom | 5,000 | Any skill above 50 | 65 |
| Darkness of Hallowvale | 2,000 three times | Any skill above 30 | 5 |
| Curse of the Empty Lord (miniquest) |
10,000 | Any skill above 50 | Some players will need 31 |
| One Small Favour | 10,000 twice | Any skill above 30 | 36 |
| Recipe for Disaster (The final battle) |
20,000 | Any skill above 50 | 175 |
| Total | 74,500 | ||
Trivia
- The watch, sextant and chart cannot be used in your house, trying to use it will give the message: "The sextant doesn't seem to work here".
- In RuneScape Classic, there was a skill that had no use called Carpentry. The skill today of Construction was an updated version of this unused skill.
See also
| Support | |
| Gathering |
|
| Combat |
|
| Artisan |
|