The Mol Man (talk | contribs) m (Undid revision 6050169 by 92.20.42.53 (Talk)that was never assumed) |
m (clean up, typos fixed: agressively → aggressively) |
||
| Line 44: | Line 44: | ||
[[File:High priest (sop) chathead.png|left]] |
[[File:High priest (sop) chathead.png|left]] |
||
=== Starting off === |
=== Starting off === |
||
| − | Travel to [[Sophanem]] and speak to the [[High Priest (Sophanem)|High Priest]] in the western temple. There will be a cut scene that will say that they have been having problems getting in contact with their sister city of [[Menaphos]], due to [[Coenus]] and his [[Menaphite guard|archers]] |
+ | Travel to [[Sophanem]] and speak to the [[High Priest (Sophanem)|High Priest]] in the western temple. There will be a cut scene that will say that they have been having problems getting in contact with their sister city of [[Menaphos]], due to [[Coenus]] and his [[Menaphite guard|archers]] aggressively guarding the gates. Ask him about ways of getting into Menaphos and pick the option about accessing "from below". |
Talk to [[Jex]], who is in the North-east part of the city in a building with a broken altar. He will tell you how to access the dungeons beneath the building. Go down the ladder east of [[Jex]] and talk to the guard if you haven't got any lighting source already. He will sell you a [[torch]] for 200 [[coins]], and a tinderbox for 50 [[coins]]. A bullseye lantern is a better choice because it will go out less often, but you '''must''' take your tinderbox into the dungeon. Alternatively you can take a seers village headband as your light source as it never goes out. It is strongly recommended that you take good [[food]] ([[monkfish]] or above), an emergency escape [[teleport]] such as the [[ectophial]], a [[tinderbox]], light source such as a [[bullseye lantern]], and an [[antipoison potion]]. |
Talk to [[Jex]], who is in the North-east part of the city in a building with a broken altar. He will tell you how to access the dungeons beneath the building. Go down the ladder east of [[Jex]] and talk to the guard if you haven't got any lighting source already. He will sell you a [[torch]] for 200 [[coins]], and a tinderbox for 50 [[coins]]. A bullseye lantern is a better choice because it will go out less often, but you '''must''' take your tinderbox into the dungeon. Alternatively you can take a seers village headband as your light source as it never goes out. It is strongly recommended that you take good [[food]] ([[monkfish]] or above), an emergency escape [[teleport]] such as the [[ectophial]], a [[tinderbox]], light source such as a [[bullseye lantern]], and an [[antipoison potion]]. |
||
| Line 108: | Line 108: | ||
===Lower Dungeon=== |
===Lower Dungeon=== |
||
| − | [[File: |
+ | [[File:Maisa in dungeon.png|thumb|left|Meeting Maisa in the lowest level of the dungeon.]] |
*Once you have found the correct ladder (see map above), follow the passage around until you come to the corpse of [[Kaleef]]. Search the corpse to get a [[Parchment (Contact!)|parchment]], read it and continue west to [[Maisa]]. Once you tell her that Kaleef is dead, she wants to confirm your identity before trusting you. |
*Once you have found the correct ladder (see map above), follow the passage around until you come to the corpse of [[Kaleef]]. Search the corpse to get a [[Parchment (Contact!)|parchment]], read it and continue west to [[Maisa]]. Once you tell her that Kaleef is dead, she wants to confirm your identity before trusting you. |
||
| Line 189: | Line 189: | ||
**[[Summoning]] (if over level 30) |
**[[Summoning]] (if over level 30) |
||
| − | '''Note:''' If you accidentally destroy the experience lamp, another may be obtained by seeing the [[High Priest (Sophanem)|High Priest |
+ | '''Note:''' If you accidentally destroy the experience lamp, another may be obtained by seeing the [[High Priest (Sophanem)|High Priest]] . |
==Music unlocked== |
==Music unlocked== |
||
Revision as of 06:32, 16 August 2012
Contact! is a members quest that takes place in the Kharidian Desert, which a player attempts to help the city of Sophanem contact its neighbouring city of Menaphos.
Official description
| “ | The High Priest of Icthlarin has problems again - this time with the inhabitants of Menaphos. Sophanem is recovering from the plague, yet most of its citizens are still trapped on the other side of the river. Diplomacy has failed and subterfuge beckons. Clearly, this is the sort of job that a shifty adventurer could excel in. | ” |
— Game Guide
|
Walkthrough
| Start point | |||
| Official difficulty | Master | ||
| Description | None | ||
| Length | Medium | ||
| Requirements | |||
| Items required |
Recommended:
| ||
| Enemies to defeat |
|
_chathead.png)
Starting off
Travel to Sophanem and speak to the High Priest in the western temple. There will be a cut scene that will say that they have been having problems getting in contact with their sister city of Menaphos, due to Coenus and his archers aggressively guarding the gates. Ask him about ways of getting into Menaphos and pick the option about accessing "from below".
Talk to Jex, who is in the North-east part of the city in a building with a broken altar. He will tell you how to access the dungeons beneath the building. Go down the ladder east of Jex and talk to the guard if you haven't got any lighting source already. He will sell you a torch for 200 coins, and a tinderbox for 50 coins. A bullseye lantern is a better choice because it will go out less often, but you must take your tinderbox into the dungeon. Alternatively you can take a seers village headband as your light source as it never goes out. It is strongly recommended that you take good food (monkfish or above), an emergency escape teleport such as the ectophial, a tinderbox, light source such as a bullseye lantern, and an antipoison potion.
Dungeon
Note: The dungeon under Sophanem is very dangerous, and protection prayers are strongly advised for protection from the monsters that patrol the dungeon.
A map of the Sophanem dungeon.
Turn auto-retaliate off in the weapon interface, since it might cause you to waste some prayer points fighting back, and/or also cause you to run into a trap, if you're hit at an inopportune moment. Go down the trapdoor and follow the dungeon around until you get to the ladder north of the South-west corner using protect from magic prayer.
When following the route to the right, the player will only encounter scarab mages. Therefore, use protect from magic and keep auto-retaliate off.
Traps
The dungeon is ridden with various types of traps, which should generally be avoided or bypassed.
| Trap | Image | Description |
|---|---|---|
| Floor Trap - Spikes | 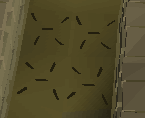
|
By selecting 'Search floor', these can be avoided using agility. If you run over them without searching, you will be hit for 140-180 life points. |
| Wall Trap | 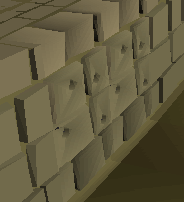
|
'These traps 'can be disabled by selecting 'Search Odd markings', which requires thieving. Similar to the wall traps in Rogue's Den, be very careful to select the wall with the trap and search it. If you do not, then you will walk through (and get hit) before you're asked to disable it. If you run through them you will be hit for 140-180 life points. |
| Crusher Blocks | 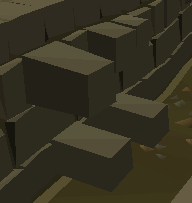
|
Simply move diagonally carefully around them. If you run into them you will be hit for 80 life points of damage. These are also found in the pyramid in Icthlarin's Little Helper. |
| Sand Pits | 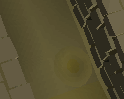
|
Walk around the pit, its worth it. If you step on these, the ground will crack open and a scarab swarm will come out and poison you. |
| Scarab Trap | 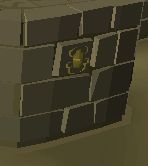
|
In order to avoid these traps, simply walk near the opposite wall at each scarab trap on the wall. Here are three reasons why:
|
Note: Scarab mages can extinguish your light source even if it's a closed lantern, unless you are using the Seers' headband. You will not be able to continue attacking (if you were in combat) until your light source is relit.
Lower Dungeon
Meeting Maisa in the lowest level of the dungeon.
- Once you have found the correct ladder (see map above), follow the passage around until you come to the corpse of Kaleef. Search the corpse to get a parchment, read it and continue west to Maisa. Once you tell her that Kaleef is dead, she wants to confirm your identity before trusting you.
Tell her that you helped rescue Prince Ali, and that he was being held in Draynor Village. Leela assisted you.
(The answer to the first set of choices for question one is Draynor Village, and the answer for the second set of choices is Leela)
She will then decide you are trustworthy and tell you to speak to Osman, the spy master in Al-Kharid.
Osman
Osman sneaks into the temple, after knocking Jex out.
Travel to Al-Kharid and speak to Osman, who is standing against the north wall of the palace. Try to convince him to come to Sophanem (picking the "drive a wedge..." option does the trick).
Before returning to Sophanem, make whatever arrangements are necessary to battle a level 191 Giant scarab.
- Good food (Monkfish or better are recommended)
- One or two prayer potions
- a one-click escape teleport
- light source
Travel back to Sophanem. Osman is just outside the gates. Talk to him again and suggest the secret entrance just north of the city. You will then see a cutscene where Osman sneaks past Jex into the caves below by blackjacking him.
The Final Battle: Giant Scarab
.png)
Go back through Sophanem Dungeon to where you found the body of Kaleef. Once you have passed through the maze turn auto-retaliate back on in order to avoid being interrupted in your fight. As soon as you go down the ladder you will see another cut scene where a large scarab appears.
The Giant Scarab may not summon his minions if you stand behind Kaleef's body, which can make the fight considerably easier.
Battling the nasty bug.
One of the possible safespots (wait in the tunnel till the bug approaches the far side of the room)
Travel into the cave and fight the level 191 Giant Scarab, which can hit up to 200 with melee and ranged. It summons level 68 Locust riders and Scarab mages (which can also do 90 life points of damage with poison) to aid it, which will attack the player at the same time. The riders will attack with ranged or melee, and the mages will attack with magic so you are being attacked by all 3 combat styles at once.
It is recommended to defeat the magic-casters and rangers as soon as they spawn, but ignore the melee riders as your prayer makes them harmless.
Magic:
- The scarab is easiest to defeat with magic. Use Protect from Ranged. The scarab is particularly weak to earth spells. Iban Blast and Ice Rush are also quick ways to beat the scarab. A full set of mystic robes or Ahrim's robes are effective, as well as a staff of light.
- Since the scarab will use only ranged attacks, you should save your food for the minions and defeat them as quickly as possible, as they have low life points (around 200, easily killable in one hit of Iban Blast) but regularly hit above 100. You can then return your focus to the boss; just make sure not to run out of prayer. With the proper tactics and a decent magic level, it is possible to not need a single dose of potion or food.
Melee:
- Using Protect from Melee prayer is recommended against the scarab, and having plenty of food is extremely helpful in this fight. Wearing dragonhide armour will help protect against both magic and ranging. The Giant Scarab has extremely high defence against slash attacks, so weapons that use only slash attacks are not recommended. The scarab is very weak to stabbing attacks, however, so a Zamorakian spear or Brackish Blade is a better choice.
- The Dragon dagger's special attack can come in handy as well. Assuming that all your melee stats are above 75, you should have no difficulty in dispatching it, using boosting potions and melee prayers. Another good method is to use a full Guthan's set, as the spear is only slightly less powerful than the Zamorakian Spear, uses the stab attack type, and you receive the bonus of the full set special - the chance that the damage you do will recover some of your health.
- Another quite effective way is to use a Dragon halberd with the stab attack style to kill the Giant Scarab. Since it is an halberd, it can attack from 2 squares away, and when you will attack the scarab it will stay on its spot, only using its ranged attack (as long as you do not come closer to it) and allowing you to put on the protect from Ranged prayer. At the same time, it will protect you from the powerful Locust ranger's attacks, and you will be able to easily kill the other minions as the halberd has a high accuracy and strength bonus. The special attack is very effective on this monster, as it is considered a large monster, thus making the special hit twice.
Ranged:
- A crystal bow or rune crossbow would be the ideal weapon to fight the Scarab with. Use Karil's or black dragonhide armour, and use Protect from Ranged. Diamond bolts (e) can also hit through its armour. A Hand Cannon also works as well, but due to the possibility of it exploding, a backup weapon is recommended.
Battle notes
The battle site has lost most of its original safespots and cannon uses in updates. Still, if you stand a distance away, the scarab will not approach. A good method is to turn on protect from range, and range it with black dragonhide and rune arrows, or any equivalent. Be sure to kill the riders as soon as possible, as they'll be the only thing that can really damage you.
In some apparently rare cases, you will get very lucky and the scarab will not summon a single monster to help him fight. Immediately attack the scarab, most likely using Ice Rush, before you get close to it. Your character will move to the most far away spot possible while still being able to attack.
You can protect yourself from the scarab by simply attracting the scarab then standing to the left of the skeleton right before kaleefs' body although doing this will allow the scarab to summon mages and locusts; however, it will not take long to kill if you are using Ice Rush, Iban Blast or an earth based spell.
If players are afraid of dying while fighting the giant scarab, it is recommended that they wear the Ring of life, but beware because you may be hit with enough damage to kill you before you teleport to your respawn location.
Note: The Anti-poison totem will not protect you from the Scarab's poison mandables. The poison hits for around 40 life points, and can be cured with antipoisons.
After the fight
Once the scarab is defeated, another cut scene will happen where Osman is revealed to be alive (since he blended into the shadows as a spy master). He talks to you and tells you to take the Keris on the floor, and then teleports away.
If you happen to die at the same time as the scarab or fail to pick up the Keris for some other reason, you can still get it from Osman in Al Kharid for free.
Go back to the high priest. It is suggested that you teleport out instead of tracing back through the dungeon, since there is no quick and easy way to get above ground. Restore prayer and lifepoints before coming to Sophanem again. He will confirm that Maisa was successful, and reward you.
Rewards
- 1 Quest point
- Keris, a dagger which is very effective against Kalphites and Scarabs
- 7,000
 experience
 - Access to Sophanem's bank under the Temple of Lesser Deities in the northeast corner (useful for Pyramid Plunder)
- 2 extra spins on the Squeal of Fortune
- Combat lamp giving 2 wishes each granting 7000 experience to:
Note: If you accidentally destroy the experience lamp, another may be obtained by seeing the High Priest .
Music unlocked
Required for completing
Completion of Contact! is required for the following:
Trivia
- Upon the completion of this quest, one's Adventurer's Log will read: "I kept my promise to Maisa and brought Osman to see her. As a result, the Sophanem exiles have returned and the city is bustling again."
- If a player returns to Al-Kharid for any reason whilst Osman is inside the dungeon, an NPC named Osman will still be there who the player claim is an agent of Osman. The 'Agent' seems to deny existing.
- There is currently a glitch where if you took a dose of Prayer Renewal before seeing the Giant Scarab cutscene, the swirls from the potion would appear around Osman.
Template:Sophanem and Menaphos fi:Contact! no:Contact! es:Contact! nl:Contact!