Zinzulation (talk | contribs) m (→Blood diamond) Tag: Visual edit |
Zinzulation (talk | contribs) (→Ice diamond: updated, fixed grammatical errors, and organized) Tag: Visual edit |
||
| Line 123: | Line 123: | ||
==Ice diamond== |
==Ice diamond== |
||
| − | '''''Items needed for this section:''' Runes for fire spell, [[Spiked boots]] (made by bringing [[Dunstan]] a pair of [[climbing boots]] and an [[iron bar]]), [[Climbing boots]] (not needed if [[Eadgar's Ruse]] is done and 61 [[Magic]] for [[Trollheim Teleport]]), 3-5 [[Super restore potion]]s or [[Restore potion]] and [[Prayer potion]]s |
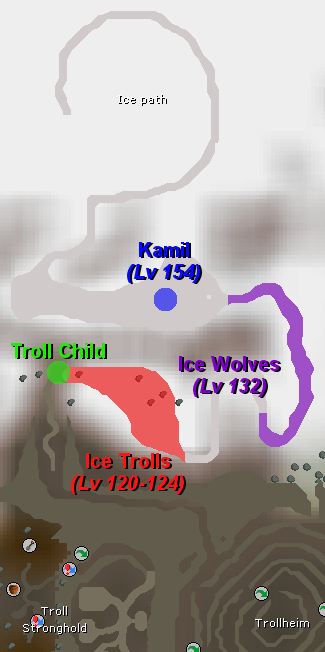
+ | '''''Items needed for this section:''' Runes for fire spell, [[Spiked boots]] (made by bringing [[Dunstan]] a pair of [[climbing boots]] and an [[iron bar]]), [[Climbing boots]] (not needed if [[Eadgar's Ruse]] is done and 61 [[Magic]] for [[Trollheim Teleport]]), 3-5 [[Super restore potion]]s or [[Restore potion]] and [[Prayer potion]]s to restore stats drained by the cold, [[lobster]]s or better [[food]], ([[Super set]] recommended for [[Melee]] users), and an emergency teleport that doesn't have a Magic requirement, such as the [[Ectophial]] or a [[magic tablet]] for a quick teleport out. Mages planning to cast fire spells should be on the normal spellbook (instead of lunar or necromancer).''[[File:Ice Path map.png|thumb|200px|After reaching [[Trollheim]], the [[Ice Path]] is due northwest.]] |
| + | :This section deals with [[Kamil]], one of the harder bosses of the quest. [[Protect from Melee]] proves '''extremely''' valuable, as the path to Kamil is filled with multiple level 100+ creatures who can hit in the 20s in multicombat. Players are recommended to read this entire section through before attempting to complete it, and strongly encouraged to restock after each section. |
||
| − | |||
| − | ''It is recommended to be on the regular spellbook (instead of lunar or necromancer) in order to cast fire spells.'' |
||
| − | [[File:Ice Path map.png|thumb|200px|After reaching [[Trollheim]], the [[Ice Path]] is due northwest.]] |
||
| − | :'''Tip:''' The [[Toxic blowpipe]] works wonders—better than Magic and saves inventory space! [[Trident of the seas]] doesn't work as it just constantly splashes. Also, [[Iban Blast]] and [[Flames of Zamorak]] are completely ineffective and will only hit 0s. |
||
: |
: |
||
| + | :*Make your way to [[Trollheim]], either by following the path used in Troll Stronghold or using the [[Trollheim Teleport]] spell (requires completion of [[Eadgar's Ruse]] and at least 61 Magic), and then make your way towards the western path to the [[Troll child]]. If following the path from [[Burthorpe]], you will need to pass the [[Thrower Troll|thrower trolls]]; [[Protect from Ranged]] will negate their damage entirely, but those without prayer can follow other players and allow them to tank the hits to avoid taking damage. If you are running pass the thrower trolls, '''DO NOT''' enter the path with a boulder in the way; this leads to the [[God Wars Dungeon]]. Continue past it until you see the path that leads to a troll [[Troll child|child]] standing by an ice gate; this is the entrance to the [[Ice Path]]. It should start to snow as you walk down the passage. |
||
| − | : |
||
| + | <blockquote>'''Note:''' While on the Ice Path, your stats will be drained every few seconds, your run energy will instantly be reduced to 0, and you will be hit for 1's every time the cold hits. All of your [[Special attack]] energy will be drained as well while in the icy area, so those planning to use specials such as [[Excalibur]] to raise stats should do so before entering. Restore potions will recover drained stats, and Super restore potions will do the same as well as restore Prayer points. For those who don't mind taking multiple trips, a free but slightly longer way of restoring stats is to use a [[ring of dueling]] to teleport to [[Castle Wars]] and enter and leave a portal. This will restore all stats and fully recover prayer. It should also be noted that if not in combat (such as right after entering the ice cave), it's possible to stall the cold by activating a prayer that you don't have unlocked yet, and leaving the dialogue box open. This can be good for those who need to reread a section before proceeding.</blockquote> |
||
| − | :'''Tip: '''if you prefer to use melee and have Trollheim Teleport unlocked you can kill the 5 trolls without the use of any expensive potions. take a Ring of Dueling, and enough runes for 5 trollheim teleports, as well as an inventory of food. When you manage to kill 1 troll, teleport to Clan Wars and run to the portal to fully restore your stats and restock at the bank chest before teleporting back. Repeat this process for each troll you fight, going back to restore stats each time. '''Make sure to bring a chocolate cake.''' |
||
| + | :*Enter the ice gate and kill five [[Ice troll grunt|trolls]] (any of those in the area). Note that '''the trolls can hit up to 21''', so those with low Hitpoints or without Protect from Melee should avoid getting in melee distance. [[Dwarf multicannon|Cannons]] work here, but are inaccurate against the trolls, so be sure to bring enough cannonballs (it can take up to several hundred, especially since they retreat when safespotted). Once you have killed five trolls at the gate, the cave at the back should open, allowing you to enter and proceed to Kamil. Pures may find reaching the cave difficult, as there are dozens of trolls in the area, and it's single combat; one way around this is to enter a [[PvP world]] and remove your weapon and attack a friend, keeping them in combat with you and as such avoiding being attacked by the trolls. If using this method, '''do NOT eat until you've made it to the cave, as the delay from combat while eating will cause the trolls to attack you'''. If you forget how many trolls you've killed, you can check your progress by examining the cave. '''It is recommended you go back to the bank and restock your supplies before returning.''' |
||
| − | |||
| − | :'''Note:''' If you are using [[Magic]], you are going to need [[runes]] to cast [[Fire spells]] significantly below your level '''Kamil cannot be damaged by any other magics than fire spells''' ([[Fire Bolt]] is recommended since your Magic level will be drained during the coming battles. If you have Fire Bolt, utilise [[Chaos gauntlets]] to increase your maximum hit) and your best magic-based gear to kill multiple enemies as well as [[Kamil]]. |
||
| − | |||
| − | *Teleport to [[Trollheim]] (if completed [[Eadgar's Ruse]] and at least 61 Magic; otherwise, use the passage taken in [[Troll Stronghold]]), and then climb down the hill and travel towards the [[Thrower Troll|thrower trolls]]. Run past them with [[Protect from Missiles]]. If you are travelling from the U-shaped cave, you should see a passage to the east. Go down the third passage until you see a troll [[Troll child|child]] standing by an ice gate. This is the entrance to the [[Ice Path]]. It should start to snow as you walk down the passage. |
||
| − | *All of your [[Special attack]] energy will be drained as well while in the icy area, so you can use [[Excalibur]] to raise your [[Defence]] briefly before you enter. |
||
| − | *Enter the ice gate and kill five [[Ice troll|trolls]] (any of those in the area). Once you have killed five trolls at the gate, the cave at the back should open. You can check your progress by examining the cave. It is recommended you go back to the bank and restock your supplies before returning. |
||
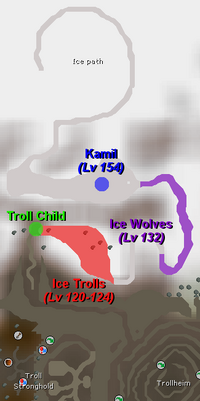
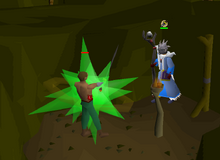
[[File:Kamil safespot.png|thumb|220px|Another player can block [[Kamil]], acting as a [[safespot]] for the attacker.]] |
[[File:Kamil safespot.png|thumb|220px|Another player can block [[Kamil]], acting as a [[safespot]] for the attacker.]] |
||
| + | *With the cave now open, you must now follow the [[Ice Path|path]] until you reach [[Kamil]]. Note that this section contains '''multiple [[Ice wolf|wolves]] capable of hitting 10s in multicombat, so protect from melee is a must;''' however, as with the thrower trolls, following a friend through this area allows pures to avoid taking damage by having their friends to tank the hits. |
||
| − | *Go through the cave at the back and follow the [[Ice Path|path]] round until you come to an open area, where you will find [[Kamil]] - you ought to activate [[Protect from Melee]] to protect against the deadly [[Ice wolf|wolves]] on the path. Once there, attack him with what ever means you have chosen up close, and have the appropriate [[protect prayer]] on at all times. Kamil utilises both Magic and [[Melee]], and it is recommended to use [[Protect from Melee]] as he does significantly more physical damage. His attack, while visibly resembling Ice Barrage, is its own unique spell. While he is casting it, you will be delayed from doing anything for a few seconds and he will hit 1-3 times for a maximum of 5. This delay is even more dramatic if you are [[autocasting]]; using a spell directly from the spellbook will work faster. He dies fairly quickly, but watch your health, your [[prayer points]] and your chosen combat stats. |
||
| + | *From the cave, continue along the path until you reach the wolves. Continue walking and the path will open up and turn to the left; continue along the path until you find a rock, marking the area where you will find Kamil. ''You'll get a message saying "You can feel an evil presence nearby..." when you enter the area.'' |
||
| − | *'''Tip: '''The fight is much easier if you protect from melee and when he starts freezing, flick to protect from mage for one tick and back to protect from melee. This will interrupt his freezing and still protect you from the next hit. |
||
| + | *It's now time to fight Kamil. He uses two attacks, a strong melee attack capable of hitting up to 23, and a magic attack similar to Dessous which hits double 5's. Unless blocked by the rock, he also consistently freezes you with a spell resembling [[Ice Barrage]], especially if outside of melee range. When frozen, you're unable to move or attack for several seconds. Because of this, it is recommended that mages cast directly from the spellbook instead of [[autocasting]]. |
||
| ⚫ | |||
| + | *#Melee combat is not recommended, although it's still possible to use. [[Protect from Melee]] is a must for this method unless you have very high defense, otherwise you'll be eating faster than you can damage him. |
||
| + | *#Mages are required to use fire spells, as no other spells will work; [[Trident of the seas]] constantly splashes, and [[Iban Blast]] and [[Flames of Zamorak]] will only hit 0s. Due to the constant stat drain, while it's possible to continuously restore your stats with potions, it's much easier to use a fire spell significantly below your level. Fire Bolt is recommended as it is still very accurate, and can be continuously cast without needing to restore for quite a while. Utilising the [[Chaos gauntlets]] will increase the spell's maximum hit. |
||
| + | *#Ranged is not recommended, but the [[Toxic blowpipe]] is accurate against him and can save inventory space. A cannon can also be used; those wishing to cannon completely should ensure that it's set up two squares north of the rock, allowing them to safely hide from Kamil, but restock it when it runs out of cannonballs. Since the cannon's position will cause it to attack the wolves as well, be sure to bring enough (100+) cannonballs to kill him. |
||
| ⚫ | |||
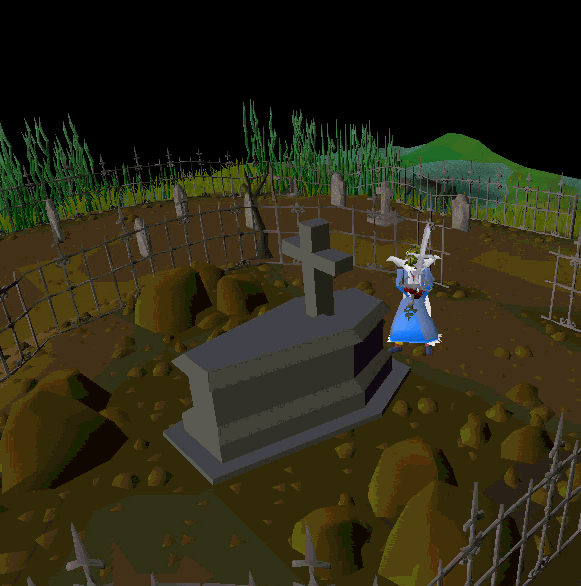
[[File:DT freeing ice trolls.png|thumb|220px|Thawing the ice troll child's parents.]] |
[[File:DT freeing ice trolls.png|thumb|220px|Thawing the ice troll child's parents.]] |
||
| − | *Put on your [[spiked boots]] and right click the front of the ledge to select "use ledge" in order to climb up |
+ | *Put on your [[spiked boots]] and right click the front of the ledge to select "use ledge" in order to climb up. A long ice path will appear. You might fall as you walk along the ice path and take damage; using your ([[Super restore potion|Super]]) [[restore potion]] to restore your [[Agility]] level will help here. Follow the ice path all the way to the top, through another ice gate. A path will appear after the ice gate as you walk. Continue until you see the troll's parents encased in ice. Attack the cases (they have 10 [[Hitpoints]] each and are easier to melt with Magic) and free the trolls. It's highly advised to bring an extra super restore or two to manage the ice path and to break the parents free from the ice; otherwise, it's very hard to break. After freeing the troll parents, they will take you back outside the gate and give you the [[Ice diamond]]. |
*If you are completely out of food when you reach the final ice path, you can use [[Redemption]] (requires 49 [[Prayer]]) to stay alive. Since you only take 1 or 2 damage at a time, this prayer will keep you alive without risk of dying, should you run out of food. However, note that this prayer will drain all your remaining prayer points when its effects are triggered, so it is advised to only use do this if you have several doses of super restores, or [[prayer potion]]s. |
*If you are completely out of food when you reach the final ice path, you can use [[Redemption]] (requires 49 [[Prayer]]) to stay alive. Since you only take 1 or 2 damage at a time, this prayer will keep you alive without risk of dying, should you run out of food. However, note that this prayer will drain all your remaining prayer points when its effects are triggered, so it is advised to only use do this if you have several doses of super restores, or [[prayer potion]]s. |
||
| − | *Because the majority of the damage you will be taking will be dealt by the bitter cold, bringing baskets of strawberries may be a good idea, though it is still necessary to bring enough good food to last in the fight against Kamil. |
||
| − | After completing this section, if you want to save a bit of cash on super restores you can teleport to clan wars using a Ring of Dueling and enter the safe free-for-all portal. This will restore your stats, run energy, and health. |
||
| − | |||
==Smoke diamond== |
==Smoke diamond== |
||
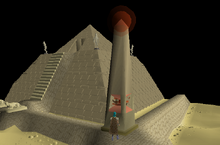
[[File:Smoke Dungeon location.png|thumb|200px|The [[Smoke Dungeon|Smokey Well]] is located west of [[Pollnivneach]].]] |
[[File:Smoke Dungeon location.png|thumb|200px|The [[Smoke Dungeon|Smokey Well]] is located west of [[Pollnivneach]].]] |
||
Revision as of 00:26, 19 October 2018
Desert Treasure is a quest surrounding the Mahjarrat Azzanadra's escape from his pyramid prison in the Kharidian Desert.
Details
| Start point | |
| Official difficulty | Master |
| Description | Rumours abound throughout Varrock and Al-Kharid that an archaeologist has discovered clues to a hoard of treasure hidden deep in the desert, south of Al-Kharid.
Anybody prepared to offer him assistance in his treasure hunting could well find themselves benefitting from a very large reward indeed... |
| Length | Long |
| Requirements |
|
| Items required |
Strongly suggested:
|
| Enemies to defeat |
|
Walkthrough
The Kharidian Desert - Desert Treasure starts in Bedabin Camp.
Enchanting the mirrors
Items needed for this part of the quest: Two Shantay passes, 1500 coins, blood rune. Several waterskins, and some Desert clothing. The following items can be noted: Ashes, bones, charcoal, 6 molten glass, 12 magic logs, 6 steel bars. Teleports to the Digsite and back to Al-Kharid are recommended.
- Travel through the Shantay Pass south of Al-Kharid, and then travel west via flying carpet or running until you reach the Bedabin Camp. Fairy ring code BIQ, near the Kalphite Lair, will also bring you northeast of the camp. Once there, talk to the archaeologist near the small water pool, and he'll give you some etchings to bring to the archaeological expert, Terry Balando, at the Digsite Exam Centre.
- Travel to the Digsite east of Varrock, and talk to the expert in the Exam Centre. He'll take the etchings; talk to him again to gain the translation to take back to the archaeologist.
- Go back to the archaeologist in the desert. When talking to the archaeologist, choose the Don't read book option, then talk to him again and agree to help.
- Go south to the Bandit Camp (before entering the camp, remove any equipment that depicts Saradomin or Zamorak imagery; otherwise, the bandits will be aggressive. Note that the Toxic staff of the dead counts as Zamorakian, and will make bandits hostile towards you). Talk to the bartender and buy a beer for 650 coins, and find out about the four Diamonds of Azzanadra.
- Talk to Eblis in the same camp (directly east of the bar past the general store). Ask him of the four diamonds, and he'll tell you that he needs various items to create some scrying glasses.
- If you did not bring them with you, go back to the bank and withdraw or collect necessary items, then return to Eblis and use the items on Eblis to hand them over. It's recommended that you note the bones when doing this to avoid accidentally burying them.
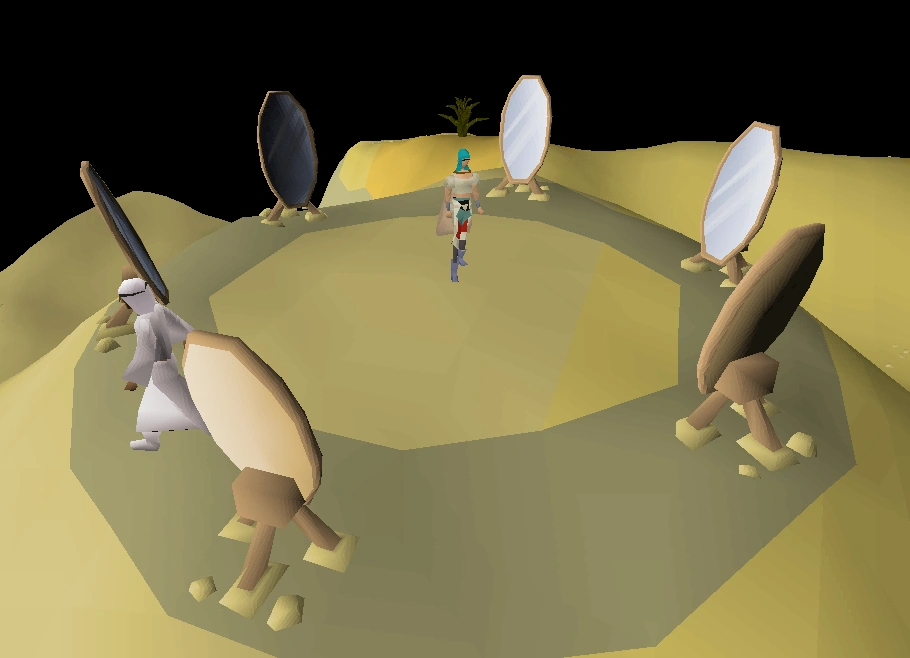

The mirrors, made by Eblis.
- Eblis will disappear, reappearing a little to the southeast on top of a hill, shown as a grey circle on the minimap, surrounded by six mirrors.
- Note: Those looking to save time don't need to look into the mirrors to continue the quest, but looking into them will show locations related to the diamonds and enhance the quest experience.
- Talking to Eblis reveals that due to the finicky nature of magic, the mirrors aren't perfect, and only show where the diamonds have been at one point in time. Two of the mirrors show other locations, the Bedabin Camp, and the Pyramid itself, which you need to acquire the diamonds from the other locations first in order to enter. You may attempt these diamonds in any order.
- Note: At some point in the quest, if you're carrying any of the diamonds, you may be attacked by a level 95 Stranger who carries a poisoned Dragon dagger. This is random and does not happen to everyone. Carry a teleport and Antipoison when moving the diamonds, and have some Prayer points remaining until you finish the quest, as he could appear the second you get the diamond. Players can simply flee from him when he appears if they do not wish to fight him. Simply banking the diamonds will prevent him from appearing.
- Bug warning: The stranger can appear next to you and attack you even after the quest is complete, without any diamonds in your inventory. It is unknown how long after the quest is completed that this bug will occur.
Blood diamond
Items needed for this section: (Save gearing up until after you get the Silver pot.) Garlic powder (created by using your pestle and mortar with garlic), silver bar, spice, pestle and mortar, good food (e.g. Swordfish, Monkfish, Sharks), 1-2 prayer potions. Optional: 3 Fenkenstrain's Castle Teleports and a Draynor teleport method.
- Note: You'll need to go to Entrana to bless your silver pot, which cannot be accessed with combat equipment; wait to get your armour/weapons out of the bank until after returning.

Reaching Dessous in the Morytania Graveyard.
- Travel to Canifis (Fairy ring code cks), and talk to Malak in the pub, telling him that you're looking for a diamond. He'll agree to give you the diamond if you kill Dessous, and give you a list of items that you need to kill him successfully.
- Note: Make sure to ask Malak how to kill Dessous before you go to Ruantun, or he won't make the silver pot for you.
- Travel to Draynor (if you need, you can pick up some garlic from the cupboard upstairs in Morgan's house while you're here). Take your silver bar, and go down the trapdoor just east of the bank by the jailhouse to enter Draynor Sewers. Head north and talk to Ruantun, and he'll make you a silver pot.
- Take the pot to Entrana (make sure you have no weapons/armour on you; there's a deposit box at the ship that can be used to bank before embarking). Once you arrive, head to the church, and use the silver pot on the High Priest to get it blessed.
- Note: If you forgot to bless your pots, the High Priest will still bless it when it is full of blood - although he will be slightly shocked!
- Go back to Canifis, and talk to Malak again. He'll fill the pot with blood - your blood! This will damage you for 5 Hitpoints. Add the garlic powder to the pot along with some spice to prepare for the battle.
The examine for the pot should read: A blessed silver pot filled with blood, garlic and spices. If the examine does not say this and you attempt to kill Dessous, he will regenerate to full Hitpoints, and you will need to refill the pot.
Once you arrive at the Graveyard, pour the blood on the tomb and Dessous will appear.
- Dessous teleports to you if you use prayer, making it difficult to safespot him. If you make him teleport more than three times, he'll say he's bored and will leave, causing you to have to start the fight again with a new pot.
- Dessous has two attacks, a melee attack that can hit up to 19, and a combination range and magic attack that hits double 5's. Because of this, it's strongly recommended to use protect from melee, reducing his max hit to 10 at any given time.
- Despite his teleport, it's possible to attack him through the fence using range, magic or a halberd - simply run behind the fence when he appears and attack. This is not recommended, as his range and magic defence are much weaker than his melee defence, and he'll teleport next to you at random times, but can nonetheless be used to avoid melee combat by running around the other side of the fence after he teleports. This allows you to avoid his strong melee for the majority of the time, and use Protect from Magic instead; keeping protection prayers disabled should disable the teleport, although he will still occasionally teleport randomly.
- He uses all three attack styles, so be prepared. Eat food as necessary, and never let your health drop below 16, as his double 5's will sometimes lag, stacking up to 15 altogether.
- For those using melee, utilize a stabbing weapon to take advantage of his low stab defence. It would be wise to bring a combat potion.
- Dessous is weak to air spells. Using the fence method to mage him will drastically reduce his damage-per-second if done correctly, but will also take much longer; if possible, standing next to him with protect from melee on and eating when necessary shouldn't take more than one prayer pot and a few pieces of food.
- Note for low HP pures: A Dwarf multicannon can be used to kill Dessous, but is fairly innacurate against him. High healing food is recommended. Tick eating can be used to survive with low HP, but the double 5s make this difficult to do. Keeping HP above 10 is a must, due to his double attack, so it's recommended to use foods that boost HP above your current level such as Guthix rests (requires One Small Favour) and Saradomin brews. At 10 HP, a brew will boost your hp by 3; you can eat a slice of Pineapple pizza and then drink a brew in the same tick, restoring/boosting your hp to 13 after every hit Dessous makes. Be sure to set up the cannon before opening the coffin, and bring at least 50 cannonballs. Since you won't be using prayer, the magic/ranged combo will always hit you for a 10, so just focus on bringing gear that gives you the highest ranged accuracy. Turn OFF auto retaliate, and then use the fence safespotting method. Be wary of his teleports, as his melee attacks can kill you in one hit. Be sure to click the other side of the fence immediately after using the pot on the coffin, otherwise you won't be able to trap him on it.
- Note: If your chatbox says Dessous has gotten bored and left when his health has been fully depleted, it means you have defeated him, so don't worry. However, if Dessous disappears before his health has been depleted, or you die or exit the fight early, you will have to make another pot of blood with the spices and garlic and fight him again.
- Return to Malak in Canifis to claim the Blood diamond, and deposit it in the bank as quickly as possible to avoid being attacked by the Stranger.
Ice diamond
Items needed for this section: Runes for fire spell, Spiked boots (made by bringing Dunstan a pair of climbing boots and an iron bar), Climbing boots (not needed if Eadgar's Ruse is done and 61 Magic for Trollheim Teleport), 3-5 Super restore potions or Restore potion and Prayer potions to restore stats drained by the cold, lobsters or better food, (Super set recommended for Melee users), and an emergency teleport that doesn't have a Magic requirement, such as the Ectophial or a magic tablet for a quick teleport out. Mages planning to cast fire spells should be on the normal spellbook (instead of lunar or necromancer).
- This section deals with Kamil, one of the harder bosses of the quest. Protect from Melee proves extremely valuable, as the path to Kamil is filled with multiple level 100+ creatures who can hit in the 20s in multicombat. Players are recommended to read this entire section through before attempting to complete it, and strongly encouraged to restock after each section.
-
- Make your way to Trollheim, either by following the path used in Troll Stronghold or using the Trollheim Teleport spell (requires completion of Eadgar's Ruse and at least 61 Magic), and then make your way towards the western path to the Troll child. If following the path from Burthorpe, you will need to pass the thrower trolls; Protect from Ranged will negate their damage entirely, but those without prayer can follow other players and allow them to tank the hits to avoid taking damage. If you are running pass the thrower trolls, DO NOT enter the path with a boulder in the way; this leads to the God Wars Dungeon. Continue past it until you see the path that leads to a troll child standing by an ice gate; this is the entrance to the Ice Path. It should start to snow as you walk down the passage.
Note: While on the Ice Path, your stats will be drained every few seconds, your run energy will instantly be reduced to 0, and you will be hit for 1's every time the cold hits. All of your Special attack energy will be drained as well while in the icy area, so those planning to use specials such as Excalibur to raise stats should do so before entering. Restore potions will recover drained stats, and Super restore potions will do the same as well as restore Prayer points. For those who don't mind taking multiple trips, a free but slightly longer way of restoring stats is to use a ring of dueling to teleport to Castle Wars and enter and leave a portal. This will restore all stats and fully recover prayer. It should also be noted that if not in combat (such as right after entering the ice cave), it's possible to stall the cold by activating a prayer that you don't have unlocked yet, and leaving the dialogue box open. This can be good for those who need to reread a section before proceeding.
- Enter the ice gate and kill five trolls (any of those in the area). Note that the trolls can hit up to 21, so those with low Hitpoints or without Protect from Melee should avoid getting in melee distance. Cannons work here, but are inaccurate against the trolls, so be sure to bring enough cannonballs (it can take up to several hundred, especially since they retreat when safespotted). Once you have killed five trolls at the gate, the cave at the back should open, allowing you to enter and proceed to Kamil. Pures may find reaching the cave difficult, as there are dozens of trolls in the area, and it's single combat; one way around this is to enter a PvP world and remove your weapon and attack a friend, keeping them in combat with you and as such avoiding being attacked by the trolls. If using this method, do NOT eat until you've made it to the cave, as the delay from combat while eating will cause the trolls to attack you. If you forget how many trolls you've killed, you can check your progress by examining the cave. It is recommended you go back to the bank and restock your supplies before returning.

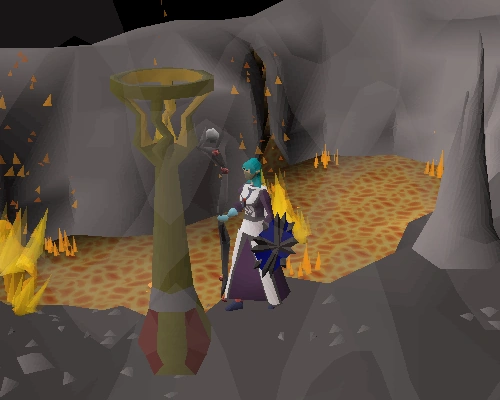
Another player can block Kamil, acting as a safespot for the attacker.
- With the cave now open, you must now follow the path until you reach Kamil. Note that this section contains multiple wolves capable of hitting 10s in multicombat, so protect from melee is a must; however, as with the thrower trolls, following a friend through this area allows pures to avoid taking damage by having their friends to tank the hits.
- From the cave, continue along the path until you reach the wolves. Continue walking and the path will open up and turn to the left; continue along the path until you find a rock, marking the area where you will find Kamil. You'll get a message saying "You can feel an evil presence nearby..." when you enter the area.
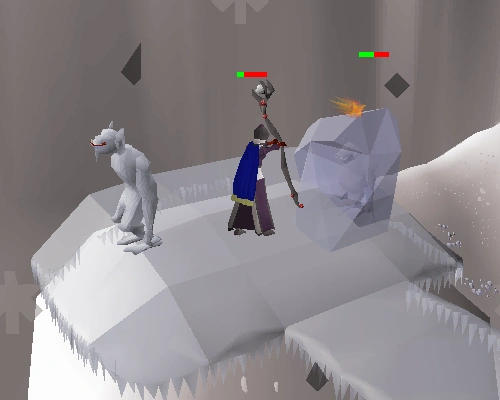
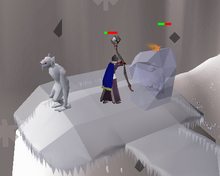
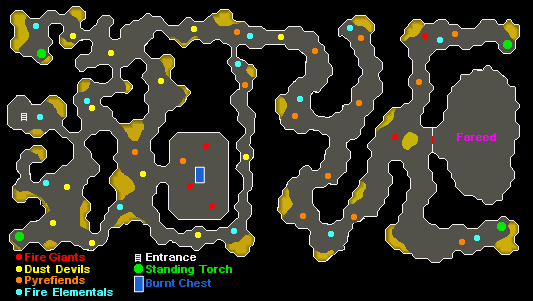
- It's now time to fight Kamil. He uses two attacks, a strong melee attack capable of hitting up to 23, and a magic attack similar to Dessous which hits double 5's. Unless blocked by the rock, he also consistently freezes you with a spell resembling Ice Barrage, especially if outside of melee range. When frozen, you're unable to move or attack for several seconds. Because of this, it is recommended that mages cast directly from the spellbook instead of autocasting.
- Melee combat is not recommended, although it's still possible to use. Protect from Melee is a must for this method unless you have very high defense, otherwise you'll be eating faster than you can damage him.
- Mages are required to use fire spells, as no other spells will work; Trident of the seas constantly splashes, and Iban Blast and Flames of Zamorak will only hit 0s. Due to the constant stat drain, while it's possible to continuously restore your stats with potions, it's much easier to use a fire spell significantly below your level. Fire Bolt is recommended as it is still very accurate, and can be continuously cast without needing to restore for quite a while. Utilising the Chaos gauntlets will increase the spell's maximum hit.
- Ranged is not recommended, but the Toxic blowpipe is accurate against him and can save inventory space. A cannon can also be used; those wishing to cannon completely should ensure that it's set up two squares north of the rock, allowing them to safely hide from Kamil, but restock it when it runs out of cannonballs. Since the cannon's position will cause it to attack the wolves as well, be sure to bring enough (100+) cannonballs to kill him.
- Once he is dead, you need to follow a very hard to see path. Travel west a little, then north, then east, north again until you can go no further, then west and south until you reach the edge of an ice ledge surrounded by ice formations.
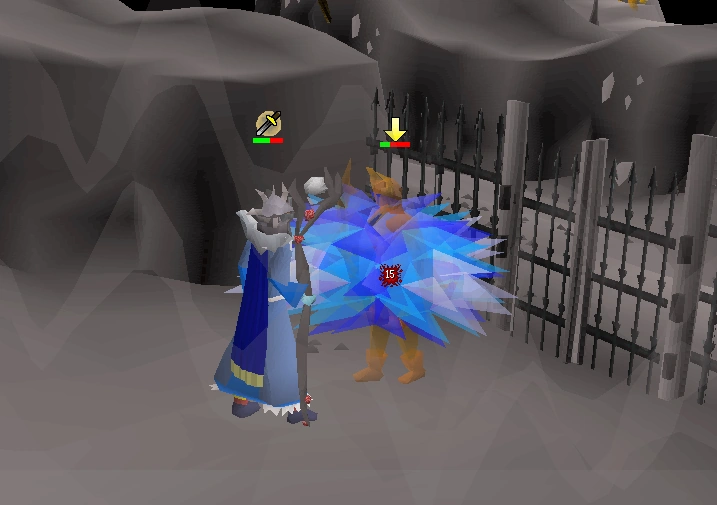
Thawing the ice troll child's parents.
- Put on your spiked boots and right click the front of the ledge to select "use ledge" in order to climb up. A long ice path will appear. You might fall as you walk along the ice path and take damage; using your (Super) restore potion to restore your Agility level will help here. Follow the ice path all the way to the top, through another ice gate. A path will appear after the ice gate as you walk. Continue until you see the troll's parents encased in ice. Attack the cases (they have 10 Hitpoints each and are easier to melt with Magic) and free the trolls. It's highly advised to bring an extra super restore or two to manage the ice path and to break the parents free from the ice; otherwise, it's very hard to break. After freeing the troll parents, they will take you back outside the gate and give you the Ice diamond.
- If you are completely out of food when you reach the final ice path, you can use Redemption (requires 49 Prayer) to stay alive. Since you only take 1 or 2 damage at a time, this prayer will keep you alive without risk of dying, should you run out of food. However, note that this prayer will drain all your remaining prayer points when its effects are triggered, so it is advised to only use do this if you have several doses of super restores, or prayer potions.
Smoke diamond
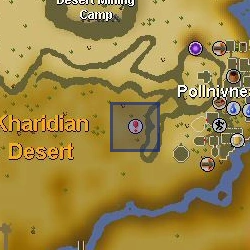
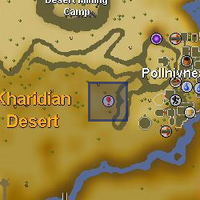
The Smokey Well is located west of Pollnivneach.
Items needed for this section: Tinderbox, facemask (Slayer helmet also works), (Super) energy/stamina potion, food and prayer potions, ice gloves or water spell runes, a weapon (only if wearing ice gloves), armour (resistant to Magic or with Prayer bonus), 200 coins and Shantay pass (if using carpet rides), and an emergency teleport.
- Note: In case you are using Magic or Ranged, make sure to use Water spells or ice arrows.
- Note: If you do not have ice gloves, you will not be able to wield a weapon (including bows). The heat will remove your weapon back into your inventory. Bring sufficient runes without reliance of a staff.

A map of the dungeon.
- Take all of the items listed above and travel to the Smokey Well. It is marked on the world map; hug the cliffs on the west side of Pollnivneach, and head south to find it.

The torch the player needs to light.
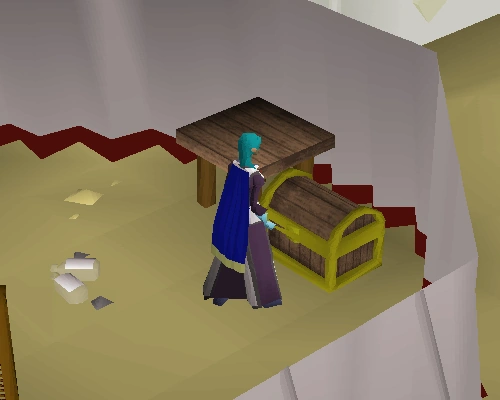
- Enter the well. In each of the four corners of this dungeon, there are torches that you need to light using your tinderbox. The torches will burn out if you take too long. If you walk, the first lamp will burn out by the time you reach the chest. Plan your route through the dungeon first. Run and light all the torches, sipping energy potions as you run, and when all four are lit, go to the centre of the dungeon and open the burnt chest that contains a key. You can light all torches in less than two minutes with 1 or 2 doses of a stamina potion.
- Note: It might be best to walk to the northeast torch and light it first, as it's a shorter distance from the southwest torch to the chest.
- Once you have the key, there's no need to run any more. Stroll to the east part of the dungeon where there is a gate. Use the key with the gate and Fareed will appear.
- Note: If you are not wearing ice gloves, you will not be able to wield anything in your weapon or shield slot. If you're unable to get ice gloves, it's still possible to kill Fareed by manually casting water spells without a staff; Fareed is very weak to water spells, but they are also the only damaging spells that work against him. (Note that the Trident of the seas and swamp will not work against Fareed.)

A player fights Fareed.
- Fareed is relatively easy compared to the other three diamond warriors. Nevertheless, caution is required! If you die after entering Fareed's lair, you will lose your key. If he kills you or you leave the fight, you do not need to relight the torches and reobtain the key. It is unlikely you will need prayer potions at all against him. Simply use the Protect from Melee prayer, and kill him in whatever way you choose. Protect from Melee is extremely important, however, because his Melee attacks can hit in the high 30s. Water spells and Ice Arrows are his main weakness, he is pretty resistant to melee. Magic-resistant armour such as studded leather or dragonhide will almost completely block out his magic attack. He is weak enough against Melee, but if you're planning on ranging, use ice arrows that are obtained during the Temple of Ikov quest.
- Pures should bring runes for the Snare spell as well as for the water spells and kite Fareed around the large room. Players can cast two or three offensive spells while Fareed is still bound, but should cast snare again immediately after Fareed moves again so as to not get hit with immense melee damage. Note that Fareed is immune to snares for a few seconds after he breaks free. The snares will bind Fareed even if the spell splashes, but this might be a bug.
- Note: Fareed will leave the fight if you walk too far away from him, so keep him at a safe distance, but not too far.
- Once he is dead, he will drop the Smoke diamond. If the Smoke diamond is lost, the diamond will reappear in the chamber on the ground; the player will not have to fight Fareed again.
Shadow diamond
Items required: (Suggested gearing after obtaining the cross.) 20 or more lockpicks (you can bring extra noted lockpicks and coins to exchange bank notes for items at the general store nearby by talking to Tiles), antipoisons, sharks or better food, at least 6 prayer potions, runes to cast spells such as Entangle and Earth Wave/Blast, Shantay pass, 2 stamina potions.
Optional: A Skills Necklace to teleport to the Fishing Guild, Dragon dagger (p++), and an emergency teleport.
- Travel west of the Fishing Guild to where there are several moss giants. Just to the north of there, is a fenced area and an NPC called Rasolo walking around this area. Talk to him, and he says that he will give you a ring of visibility if you give him a gilded cross.
The chest the player needs to open.
- Take some coins (5000 coins is more than enough), a noted stack of food (do about 10 just to be sure), noted antipoisons (at least 10) and noted lockpicks (do at least 20, but more is always better). Lockpicks can be bought from Martin Thwait's Lost and Found (if you have 50 Agility and 50 Thieving). Apart from all the items you have with you in noted form, take also a few pieces of food in un-noted form, one antipoison, and the rest of your inventory with lockpicks. Go to Bandit Camp, which is located south of Bedabin Camp which you can reach by the magic carpet originating from Shantay pass. In the most southern tent in Bandit Camp is a Secure Chest. Use your lockpicks on it until you manage to open it and get a gilded cross—this is usually easier said than done. There are three locks, which you must get through, all of which reset themselves if any attempt should fail. Each failure will use up a lockpick and will deal damage. There is also a chance you may be poisoned, so do not underestimate the value of an anti-poison potion or food. If you run out of lockpicks, antipoisons or food, you can un-note your items for a small fee by speaking to Tiles in the general store tent. Use the noted form of the items you want to un-note with him.
- Return to Rasolo, and exchange the gilded cross for the visibility ring.
- When you wear it, a ladder will appear to the east of him in the fenced area.
|
|
- Note: If you plan to use the safespot, lure his first form there. Otherwise, his second form will just disappear into the shadows. If you leave after defeating his first form, you do not have to fight it again! When you return, you will only have to defeat his second form.
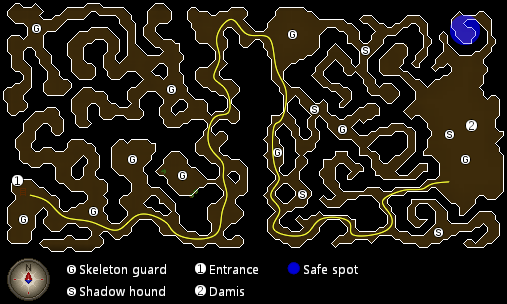
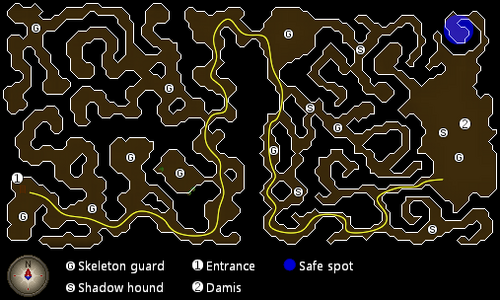
- When you climb down the ladder, head east as far as you can, then north as far as you can. Head east, and go south as far as possible at the first option. Go east again. You will see a little cave to your south as you go past. If you run into this, you can recharge Hitpoints and run energy without using vital supplies. After this, take the next turn north, then go east, and you will reach Damis' cave. Activate Protect from Melee to ward off the giant skeletons and shadow hounds since this is a multi-combat area. Run around for a while, and he'll appear.
- Attack and kill Damis' first form, which is level 103 and only attacks with Melee and is fairly easy to beat.
- He will then change to his second form, which is level 174 and rapidly drains Prayer (at a rate of 4-5 points per second). This form is significantly harder.
- There are several tried and tested methods for fighting the second form of Damis, and a few will be listed here. See which one looks best for you and try it. Whichever method you choose, he will drop the Shadow diamond after you defeat him.
- Players who wish to complete the Kandarin Diary are advised to kill a Shadow Hound while in the dungeon, as it is a hard task.
Method one
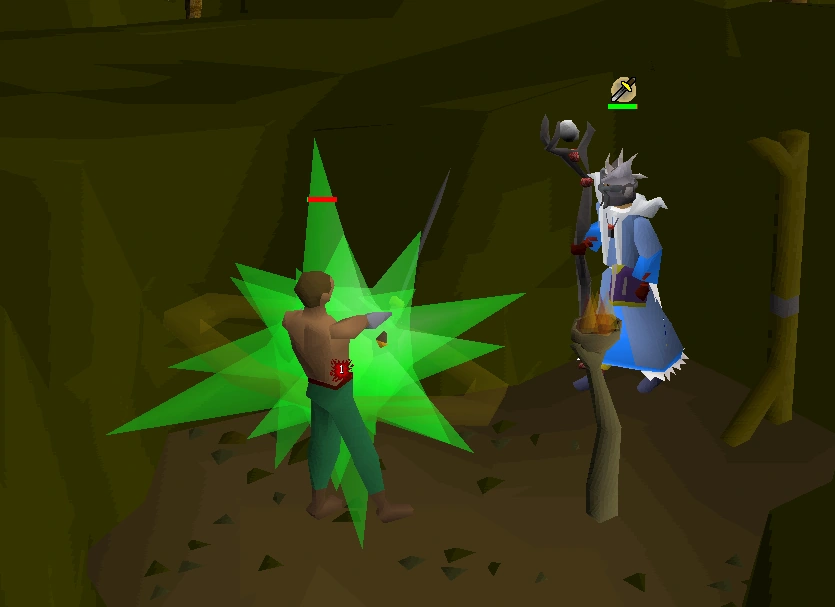
A player fights Damis.
Combat style: Magic
Inventory: Runes (nature, earth, water, blood/death, and air). A one-click teleport (like the Ectophial), fill your inventory with as many prayer potions (4) as possible (bring at least 8), and just a few sharks or better food. You will rely heavily on Protect from Melee, otherwise without it activated, you will die quickly because you will be tanking 2-4 giant skeletons and shadow hounds while trying to kill Damis. You will need to click on a prayer potion, to drink a dose, every 4–5 seconds. To make this much more effective, wait until having only about 5 prayer points left to drink another dose of potion. This is effective because prayer points are drained based on percentage.
Optional: A couple of super energy potions to be used for shortening the journey through the maze.
Tactic: This is basically making Damis into a regular fight, just a bit harder. If you have ever fought another creature that only uses Melee with Prayer, this is basically the same only you will be using more potions. Use Magic spells, and kill him quickly. It is possible to use Melee or Ranged, but he is weak to Magic and incredibly strong against Melee, so it is not recommended. While fighting or even initially, cast Snare/Entangle on Damis, once he moves, re-cast Snare/Entangle.
Note: Damis is not particularly weak to earth spells. This was confirmed by Mod Ash.[1]
You can also use a Trident of the seas for both forms.
Additionally, Damis only appears to drain Prayer when he is within a few tiles of you. Bringing a stamina potion and kiting him around the arena will help reduce the burden of using Prayer potions.
Method two (not recommended)
Combat style: Melee
Inventory: A dragon dagger (poison necessary), a one-click teleport (like the Ectophial), a few prayer potions, and the rest of your inventory full of sharks or better food.
Optional: A couple of super energy potions to be used for shortening the journey through the maze.
Tactic: As soon as you see Damis, put on the Protect from Melee prayer, and use all of your Dragon dagger (p++) special attacks on him. This will lower his health and poison him, but it's the poison that is most important. As soon as you have done this, run into the safe room to the northwest. Hide in there until you can see that his poison damage is as low as 2, and hit him with another 4 specials. Repeat until he is dead.
Method three (not recommended)
Inventory: Runes (nature, earth, water, blood/death, and air), a one-click teleport (like the Ectophial), and the rest of the space divided between prayer potions and sharks.
Optional: A couple of super energy potions to be used for shortening the journey through the maze.


Tactic: Once you encounter Damis, activate your Protect from Melee prayer. Once you have done that, exit out the way you came, and go south, then head towards east. From there, you should see a giant rat. There's also another rat roaming around a passage northwest of the area where Damis appears. Either way, position yourself behind the rat, and you can attack it with a weak attack or spell, and Damis can be attacked with Magic without you being harmed. This also works with the small bat found in the southwest corner of the arena from which you entered. Consider bringing a fun weapon such as flowers to draw its attention without killing it.
Jaldraocht pyramid
Items required: Smoke diamond, Shadow diamond, Blood diamond, Ice diamond
Recommended items: Prayer point-boosting equipment, Holy wrench, Weight-reducing equipment (such as Graceful clothing), 2+ Prayer potions, 1 Super antipoison (or some strange fruit), Some energy potions or one Stamina potion(4), Waterskin(s), Shantay pass, Some food—Cooked sweetcorn is recommended as it has no weight., Emergency teleport for low level players if you run out of prayer potions and/or food.
Pyramid

The pillar absorbs the gem.
Return to Eblis at the six mirrors in the desert. Be sure to have the four diamonds in your inventory. Go to the Pyramid southeast of Eblis (marked "Pyramid" on the world map), and place one diamond in each of the four obelisks at the outside corners of the pyramid. Each obelisk takes a specific diamond. You should be able to determine the diamond from the appearance of the obelisk, but trial-and-error placement also works. It is not possible to put a diamond into the wrong obelisk; it is also not possible to take a diamond back out of the obelisk.
When all four obelisks are activated, the pyramid will open and can be entered from the top.
Tomb raider
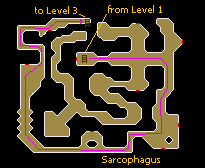
Desert heat is not a factor inside the pyramid, but almost all of the interior is dangerous, with level 124 scarab swarms occasionally boiling out of the floor, and level 110 mummies roaming about and spontaneously popping out of sarcophagi. All monsters use only Melee, though the scarab swarms can also poison. The scarab swarms, spontaneous mummies, and traps cannot be detected in advance. The room containing the altar on Level 4, however, is safe.
Every time a scarab swarm appears or a mummy pops out of a sarcophagus, you will stop moving, and will not be able to move until the animation has finished. It is possible to avoid a scarab swarm entirely by making sure it is behind a mummy. There are also randomly activated traps that will send you back to the entrance of the pyramid. By bringing weight-reducing clothing and plenty of super energy potions or stamina potions, you can greatly reduce the chance of running into one of these traps. If you get caught by a trap, you will be taken outside to the south side of the pyramid but with no damage done. Do not click directly to the ladder but keep clicking to your goal as this will reduce the chances of getting caught by traps. Just walk north and re-enter the pyramid to start over. It is useful to use a strange fruit while inside the pyramid due to the fact that it recovers 30% run energy and cures any kind of poison you may have gotten while inside the pyramid.
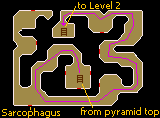
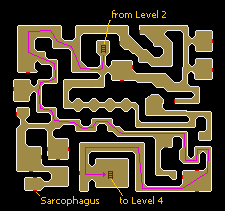
The levels in the pyramid are numbered in the order the player encounters them in the quest. The purple line marks the route.
Outside
Enter the pyramid from its top. The southern entrance to Level 4 and the Ancient Magicks altar can only be used after the quest has been completed.
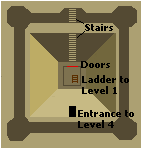
Level 1
Run from the entrance ladder to the Level 2 ladder. This level is the smallest in the area, with the fewest mummies. If possible, flick your prayer and save your run energy.
Level 2
Run from the Level 2 ladder to the Level 3 ladder. This level is the second smallest in area, with a few more mummies roaming about. This room might have a few traps. Be sure to look out for them.
Level 3
Run from the Level 3 ladder to the Level 4 ladder. This level is fairly large in area, presenting more of a challenge to players traversing it. A significant number of mummies are roaming about, and there is a vast amount of traps.
Level 4
Run from the Level 3 ladder to the altar room. This level is quite large in area, with a lot of mummies roaming about everywhere except the altar room. The altar room is separated by a door—do not rely on the minimap to run outside.
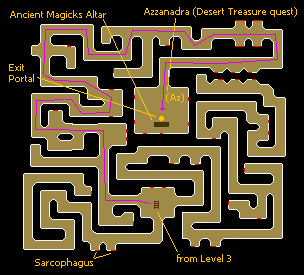
- Easy tip to remember which way to start running after each level: North, East, South, West.
Azzanadra

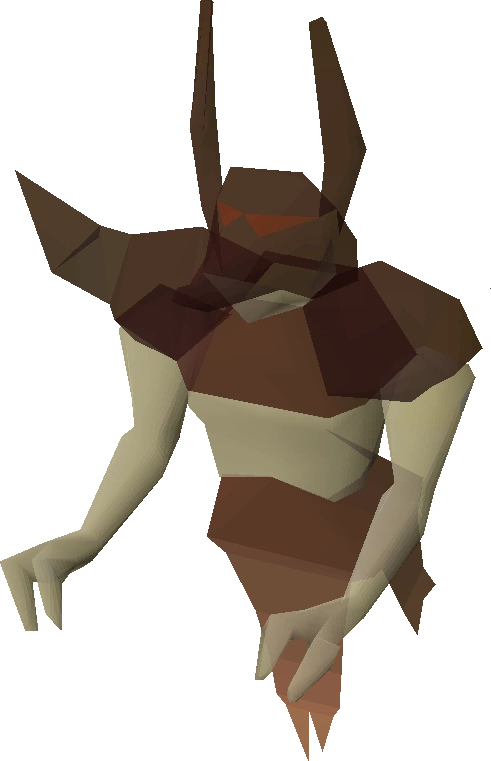
Azzanadra.
It is possible for a scarab swarm to boil up inside the altar room, but this only happens if it was boiling up as you were entering the room. If this is the case, trap it between the door and an obstacle that is just in front of the door. Speak to Azzanadra, who has lost track of time and believes that the God Wars are still going on. He goes on to talk about some ancient unknown civilisations like Paddewwa, Lassar and Annakarl. He is also surprised to see that he cannot hear Zaros in his mind anymore.
Azzanadra, finally coming to peace with the reality, rewards the adventurer with the Ancient Magicks of Zaros, for their efforts. (If Azzanadra is not present, use the altar and he should appear.)
Note: Praying at the altar twice after completing the quest will unlock a hard task in the Desert area.
Congratulations! Quest complete!
Rewards
- 3
 Quest points
 - 20,000 Magic experience
- The ability to use Ancient Magicks: At any time, you can pray at the altar and change between the standard and Ancient Magicks spellbooks. After traversing the pyramid for the first time, you may enter via the back-door of the pyramid to gain a short cut to the altar. Be warned that changing spellbooks will drain your prayer to 0.
- Ring of visibility: If you ever lose it, you can obtain another one from Rasolo.
- Access to the Curse of the Empty Lord miniquest (only requires the ring of visibility)
- Access to Ancient staff: You can also buy one from Eblis for 80,000 coins. If you lose the staff, you will have to kill mummies inside the pyramid, or buy it from other players. It can also be obtained as a rare drop from the Chaos Fanatic, as a rare drop from the Thermonuclear smoke devil or as an uncommon drop from Vet'ion.
- Access to the Smoke Dungeon, which can be used for various Slayer assignments.
Trivia
- If a player talks to the Archaeologist after the quest, he will tell a story very similar to 'Indiana Jones: Raiders of the Lost Ark'.
- In the Ice Diamond part, when the player speaks to the baby troll he asks "Why so sad, little troll?" and the troll replies "It was the bad man", this is probably a reference to Batman and the Joker.
References
Desert Treasure | |||||
|---|---|---|---|---|---|
| NPCs |
| ||||
| Items |
| ||||
| Related | |||||