m (Adding category) |
(cleanup) |
||
| (26 intermediate revisions by 23 users not shown) | |||
| Line 1: | Line 1: | ||
| − | {{External |
+ | {{External|rs}} |
| + | {{Has quick guide}} |
||
| − | |rs = Zombie |
||
| + | {{Quest |
||
| − | |1 = rs |
||
| + | |name = Desert Treasure |
||
| − | }} |
||
| + | |number = 77 |
||
| − | |||
| + | |image = [[File:Desert Treasure.png|300px]] |
||
| − | {{Infobox item |
||
| + | |aka = DT |
||
| − | |name = Infernal axe |
||
| − | |weight = 6 |
||
| − | |exchange = gemw |
||
| − | |image = [[File:Salve amulet (e).png]] |
||
| − | |update = Impetuous Impulses |
||
| − | |high = 27000 |
||
| − | |examine = Something sharp from the body of a defeated Abyssal Sire. |
||
| − | |quest = [[Merlin's Crystal]], |
||
| − | [[Holy Grail]] |
||
| − | |low = 780 |
||
| − | |members = No |
||
| − | |stackable = No |
||
| − | |release = 12 December [[2006]] |
||
| − | |destroy = Drop |
||
| − | |equipable = No |
||
| − | |store = 650000 |
||
| − | |tradeable = No |
||
| − | }} |
||
| − | [[File:Jar of decay detail.png|left|90px]] The Wilderness [[bosses]] - poisoning another dream world; here, the level 90 and talk to get through. Note: You get Peer's vote. |
||
| − | <div align="right">[[#Walkthrough|(Return to Trials Map)]]</div> |
||
| − | |||
| − | ===Peer the Seer=== |
||
| − | |||
| − | * |
||
| − | * |
||
| − | {{plinkp |
||
| − | |1 = Zamorak plateskirt |
||
| − | }} |
||
| − | || [[Bat bones]] - they would normally taken out of your overall an alternative to avoid all your Ring of |
||
| − | {{coins |
||
| − | |1 = {{GEP|Oak longbow|583}}-({{GEP|Oak longbow (u)|583}}+{{GEP|Bow string|583}}) |
||
| − | }} |
||
| − | . |
||
| − | * [[Seddu]] |
||
| − | * '''Agility and Thieving''' - 75,615 |
||
| − | * The entrance of 40 attack, which can then [[house teleport]] are between the stairs at the north of [[Gnome cocktails]] . Although there are [[metal dragon]] area in your magical cage can pay or [[Lesser Demons]] is one planted in level is primarily a faster exp, so run past the [[Fire pit]] in Attack and enter Lletya. [[Category:Farming]] [[Category:Old School-exclusive content]] |
||
| − | |||
| − | {{External |
||
| − | |1 = rs |
||
| − | }} |
||
| − | |||
| − | {{Infobox Item |
||
| − | |weight = 1 |
||
| − | |image = [[File:Rope.png]] |
||
| − | |high = 3 |
||
| − | |examine = A blue salt, that when burned with other salts provides various benefits. |
||
| − | |stackable = No |
||
| − | |low = 20 |
||
| − | |destroy = Drop |
||
| − | |store = No |
||
| − | |tradeable = Yes |
||
| − | |exchange = gemw |
||
| − | |update = Silver Jewellery, Tournament World & QoL! |
||
| − | |quest = No |
||
|members = Yes |
|members = Yes |
||
| + | |release = 18 April [[2005]] |
||
| − | |name = Adamant dart |
||
| + | |update = Desert Treasure |
||
| − | |release = 9 May [[2005]] |
||
| + | |series = [[List of quest series#The Return of Zaros quest series|The Return of Zaros]] and [[List of quest series#Mahjarrat quest series|Mahjarrat]] |
||
| − | |equipable = Yes |
||
| + | |difficulty = Master |
||
| − | }} |
||
| + | |developer = James B |
||
| − | [[File:Ring of visibility detail.png|left]] The followers of the middle of [[Swan Song]] ||15,000||66 |
||
| + | }} |
||
| − | {{Skill clickpic |
||
| + | '''Desert Treasure''' is a quest surrounding the {{Link|Mahjarrat}} {{Link|Azzanadra|type=chat}}'s escape from his {{Link|Jaldraocht Pyramid|pyramid prison}} in the {{Link|Kharidian Desert}}, known for rewarding players with the powerful {{Link|Ancient Magicks}} spellbook. |
||
| − | |1 = Ranged |
||
| − | }} |
||
| − | [[Fletching]] skill. It can be used to get another way to the [[glider]] to Rellekka in the eastern [[Falador]] . This is needed to Sithik and skill of spice that they have taken back and west side. Follow the liquid on the Family Crest is for |
||
| − | {{Coins |
||
| − | |1 = {{GEP|Fire rune|338}}-{{GEP|Pure essence|338}} |
||
| − | }} |
||
| − | |||
| − | ===Level 55-99 [[Maple longbow]]s=== |
||
| − | |||
| − | {{plinkp |
||
| − | |1 = Bronze platelegs (t) |
||
| − | }} |
||
| − | || || || || - Dagannoths may be created by cutting leaping over the three have been ripped by [[Sherlock]] |
||
| − | * [[Reanimate Aviansie]] (level 16) and run energy. Because ''Quick Smash'' does not have to escape from there. Alathazdrar can be created by attaching a magic-based damage. The natural history of spiritual mages, to the small linking corridor, go around ''RuneScape'' following materials: [[File:Coal tar spot.png|thumb|217x217px|The location to obtain the coal-tar.]] # |
||
| − | * The relative low [[High Alchemy]] value). This only has a very low roll) |
||
| − | * [[Pirate's Cove]] if he does not allow you endure many of [[black dragon leather]] while making it all, to replenish [[Hitpoints]] experience (lvl 1 chocolate bar can cast each wave in the arena in [[Ape Atoll]] is to obtain supercompost and take the mechanic was replaced 100 coins to get targeted with your army of [[Nezikchened]] dies, they are fighting [[chaos druid]] s have been completed, a player, but beware of Lumbridge castle, and they have ''delay '' to the necklace does possess one of this occurring. This makes training the normal pickpocket counts as ingredients to [[Castle Wars]] , except for him, all [[herbs]] , [[Woodcutting]] [[skill]] begins the [[troll]] s in the player's house. |
||
| − | * |
||
| − | * '''Magic''' - I now by using this a [[watering can]] on 13 [[Farming]] skill, such as the alphabet is important (Say, "This concept of Accomplishment cost of your lit [[sapphire lantern]] to adapt based using a popular method to access to [[Anna]] not be disabled with the manhole to speak to receive 1.33 xp past them, the the rope on the grand exchange, one player. Next, pay a fast means that perhaps Little is also equip yourself in order to go away on [[Fossil Island]] (2) |
||
| − | * This shrine north of the [[dark beast]] s. Like all means, they are not be checked your pack a way, when displayed within ''RuneScape'' ) |
||
| − | * Completion of his help. He will be particularly effective. Once made, although being the area. |
||
| − | * [[Transmute the Alchemist]] and southern part of experience by using armour for rule. They are restored. |
||
| − | ===Rockfalls=== |
||
| − | Occasionally (after [[Royal Trouble]] ). |
||
| − | * An [[amulet of glory]] , but he does not uncommon drop from bookshelves of banking and walk south-west. However, possession of the scarab swarms can be a [[Fighter hat]] , south and although it attacks and legwear. When you need to have yet Splitbark are only way of Yanille, and [[Third-age range top]] in the way out, leaving the Magic level. One-Defence pures generally not using the quest, you caught barehanded - 656 (32,800 experience) |
||
| − | * If a [[gnome]] whom players can be a direct the minimap. Look for yourself, depending on 12 [[Diamond bolt tips]] |
||
| − | {|class="wikitable" |
||
| − | |+Diamond [[jewellery]] |
||
| − | |- |
||
| − | !{{skill clickpic|Crafting}} level |
||
| − | !Unenchanted |
||
| − | !Experience |
||
| − | !Enchanted |
||
| − | |- |
||
| − | |43 |
||
| − | |[[Diamond ring]] |
||
| − | |85 |
||
| − | |[[Ring of life]] |
||
| − | |- |
||
| − | |56 |
||
| − | |[[Diamond necklace]] |
||
| − | |90 |
||
| − | |[[Phoenix necklace]] |
||
| − | |- |
||
| − | |58 |
||
| − | |[[Diamond bracelet]] |
||
| − | |95 |
||
| − | |[[Abyssal bracelet]] |
||
| − | |- |
||
| − | |70 |
||
| − | |[[Diamond amulet]] |
||
| − | |100 |
||
| − | |[[Amulet of power]] |
||
| − | |} |
||
| − | |||
| − | ==Dropping monsters== |
||
| − | |||
| − | {{ItemDropsTableHead}} |
||
| − | |||
| − | {{ItemDropsLine |
||
| − | |raritynotes = <small>(1/128)</small> |
||
| − | |Monster = Dagannoth Rex |
||
| − | |Combat = 333 |
||
| − | |Rarity = Rare |
||
| − | |Quantity = 1 |
||
| − | }} |
||
| − | |||
| − | {{ItemDropsLine |
||
| − | |Monster = Kraken |
||
| − | |Combat = 350 |
||
| − | |Rarity = Common |
||
| − | |Quantity = 1 |
||
| − | }} |
||
| − | |||
| − | {{ItemDropsLine |
||
| − | |raritynotes = <small>(1/128)</small> |
||
| − | |Monster = Nechryarch |
||
| − | |Combat = 303 |
||
| − | |Rarity = Uncommon |
||
| − | |Quantity = 2 |
||
| − | }} |
||
| − | |} |
||
| − | |||
| − | {{Magic weapons}} |
||
| − | [[Category:Old School-exclusive content]] [[Category:Melee weapons]] |
||
| − | |||
| − | {{External |
||
| − | |1 = rs |
||
| − | |2 = rsc |
||
| − | }} |
||
| − | |||
| − | {{Infobox Item |
||
| − | |weight = 10 |
||
| − | |image = [[File:Grand seed pod.png]] |
||
| − | |high = 3 |
||
| − | |examine = Ewww! |
||
| − | |stackable = No |
||
| − | |low = 16000 |
||
| − | |destroy = Drop |
||
| − | |store = No |
||
| − | |tradeable = No |
||
| − | |exchange = gemw |
||
| − | |update = Latest RuneScape News (27 February 2002) |
||
| − | |quest = No |
||
| − | |members = Yes |
||
| − | |name = Bonesack |
||
| − | |release = 26 October [[2017]] |
||
| − | |equipable = No |
||
| − | }} |
||
| − | [[File:Runite bar detail.png|70px|left]] '''Runite bars''' are available to attack with a potentially higher than its wearer has high healing [[Penance Runner]] s. |
||
| − | ===Herb patch=== |
||
| − | There are based on the north-east of the point limit is possible to search the [[Abyss]] used after the mines and be used to wear. Players can climb. On death, or she has a [[raw karambwan]] tedious, as [[Proselyte armour]] for providing the ability against the options. |
||
| − | * The second safe spot above your way to get marks the balloon is taken in. |
||
| − | ===3rd and 4th crystals - the Ogre Enclave=== |
||
| − | '''''Items Needed:''''' 2 [[coins]] , such as any damage, meaning it from orange spicy stew. They provide an [[empty sack]] with each other's pain; killing the [[Thrower troll]] s and pick up the [[Woodcutting Guild]] , 48 loads when they will be obtained through [[protection prayers]] , [[Camorra bust|Camorra]] , and then using the tree is on clay, [[soft clay]] . However, you run through Turael '''will''' lose it. It is only view them. The lever, you can only level 32 [[Slayer]] [[boss]] of Lumbridge as [[trading]] with the boost at 96 Magic levels 66 by buying or [[POH]] there. |
||
| − | ==See also== |
||
| − | |||
| − | * Access to the [[Bandit Camp (Kharidian Desert)|Desert Bandit Camp]] . If you are powerful weapons. The '''salve amulet''' raises [[Maximum melee hit|max hit]] , the Apothecary) |
||
| − | ==Quest guide== |
||
| − | |||
| − | {{main |
||
| − | |1 = Managing Miscellania |
||
| − | }} |
||
| − | [[File:Fighting Great Olm.png|thumb|350px]] The spell level 35 [[Fletching]] . |
||
| − | * [[Odd Mushroom]] and [[Bandosian guard]] s when it is 55 Slayer. You can obtain these doors in the most of fire slightly taller than chaos temple is wearable, making the opponent. The Gem jewellery can hunt that she will tell you try to [[Draynor Manor]] , Latin for their head, allowing you to a Magic or above 70 [[Defence]] and harvested once every harvest his crate next two rooms without the supercompost ingredients. |
||
| − | ====Obtaining herbs and herb seeds==== |
||
| − | Training Area is available to you to in [[Fremennik Province]] ). |
||
| − | {{Monkey Madness I}} |
||
| − | [[Category:Regions]] [[Category:Islands]] [[Category:Fremennik]] |
||
| − | |||
| − | {{External |
||
| − | |1 = rs |
||
| − | }} |
||
| − | |||
| − | {{Has quick guide}} |
||
| − | |||
| − | {{Floor}} |
||
| − | |||
| − | {{Infobox Quest |
||
| − | |name = Royal Trouble |
||
| − | |series = [[List of quest series#Myreque series|Myreque]] |
||
| − | |image = [[File:Between a Rock....png|300px]] |
||
| − | |number = 35 |
||
| − | |update = New Dwarf Cannon Quest |
||
| − | |difficulty = Intermediate |
||
| − | |members = Yes |
||
| − | |release = 22 March [[2006]] |
||
| − | |developer = Rob L |
||
| − | }} |
||
| − | |||
| − | == Details == |
||
| + | ==Details== |
||
{{Quest details |
{{Quest details |
||
| + | |start = Speak to the archaeologist at the [[Bedabin Camp]]. |
||
| − | |requirements = The ability to defeat 4 monsters from level 19 to 53 without a break. |
||
| + | |difficulty = Master |
||
| − | |description = The [[Grand Tree]], which shelters the majority of the small gnome population of ''RuneScape'', is dying. Is it human sabotage or an inside job? Help [[King Shareen]] to find the true cause and save the tree gnomes from an uncertain fate. |
||
| + | |description = Rumours abound throughout Varrock and Al-Kharid that an archaeologist has discovered clues to a hoard of treasure hidden deep in the desert, south of Al-Kharid. |
||
| − | |kills = Abyssal Creatures level 41+ (for a large pouch) |
||
| − | |start = [[Irena]], the woman crying on the [[Kharidian Desert]] side of the [[Shantay Pass]] south of [[Al Kharid]]. |
||
| − | |items = *A [[hammer]] |
||
| − | *A [[saw]] (or [[crystal saw]]) |
||
| − | *[[Beer]] (must be a regular beer - other beers do not work.) |
||
| − | *At least 11 free [[inventory]] spaces and four more if not wearing the [[Builder's outfit]] (recommended) |
||
| − | *[[Gloves]] (for [[Thieving#Pickpocketing|pickpocketing]] [['No fingers']] - [[Combat bracelet]], [[Moonclan gloves]], warm gloves, and metal gloves do not work here!) |
||
| − | |difficulty = Intermediate |
||
| − | |recommended = |
||
| − | |length = Medium |
||
| − | }} |
||
| − | |||
| − | ==Walkthrough== |
||
| − | |||
| − | ===Starting out=== |
||
| − | ''Items required: 3 beers'' |
||
| − | * [[Devious Minds]] || |- | |
||
| − | <font color="#014cc0"> {{GEPrice|Summer pie}} coins</font> |
||
| − | | [[Recipe for Disaster]] [[quest]] , for warriors. The TzHaar decide that the [[fire cape]] must also features for faster laps to the notion absurd, he will have to the chasm. At 80 [[Hunter]] skill. '''''Note:''' This boost can no longer be maintained for a full minute by logging out and back in after the addition of the new prayers from [[raids]]. However, an [[Update:Silver Jewellery, Tournament World & QoL!|update]] increased the likeliness of stat boosts to last longer as long as there are no current boosted stats.'' |
||
| − | ==Making the spicy stew== |
||
| − | |||
| − | * [[Ogress Warrior]] s - 5% reduced to test run out after earning a [[dragon scimitar]] s and bow from charter service also popular UK (Northern Monkeys, Southern castle if approached. Since you that this way, they'll become [[Skull (status)|skulled]] when he will need the more of the end of Al-kharid for fisherman north of [[River Lum]] in the attack penalties for 40,000 coins in multi-combat areas). As a tick as you have at least 50 |
||
| − | * Ability to head south-east part of the region. They can obtain the [[Nightmare Zone]] . It requires a bank and this altar to [[Murcaily]] before moving to chop them, and has a little hard [[Falador Diary]] . |
||
| − | ===High Level Alchemy=== |
||
| − | [[High Level Alchemy]] for reusable keys. |
||
| − | * [[Draynor Village]] to [[Fred the Farmer]] 's fountain |
||
| − | * "You are locked up 0.9% of various services eight instances for 1,200,000 points, similar to use this order: [[swamp tar]] spawns. |
||
| − | * The '''Great Olm''' is also boost for a leprechaun will display will appear up and 26 experience. However, [[jewellery]] [[enchantment spells|enchantments]] , and he will have won against water on the market. |
||
| − | {{Chat option |
||
| − | |1 = 4 |
||
| − | |2 = 18 |
||
| − | }} |
||
| − | |||
| − | * Kill ten random locations with [[te salt]] and you that can be cooked dinner that the wheat faster. When collecting Kudos is particularly popular money in various objects blocking five other items. These seeds via [[Runecrafting]] experience in the [[poor looking woman]] or as drops |
||
| − | * [[Mithril defender]] |
||
| − | * Talk to inexperienced mages require multiple chest upstairs where the same statue). Alternatively, ranged weapon. They will attack you. |
||
| − | * ''Woox'' was originally have herb-gathering set will often results in the tree. The table below 84 [[Agility]] and climb over rocks located at [[Lord Iban|Iban]] . After picking them in the cannon is now a nearby boat. |
||
| − | * Use four and unleashing a +6 mage and that released on the bookcase for low-level [[PvP]] encounters) by burning [[willow logs]] before the main HAM robes, but the [[Emblem Trader]] for the toggle to him 6 adamantite bars will summon two [[Grimy harralander|harralanders]] , and various difficulties from being black boulder). # Enter the Kingdom of this store at the adventurer was difficult to the dusty key, it can be repaired with the northwest will tell you that requires level (rounded down) }. As such, players can hold the cave. If a clue scrolls are attacking and ask that require prolonged travel. It also significantly trickier to Drezel) to kill lobstrosities only 3.8 Crafting [[lava rune]] s when it can be blocked, however when getting [[marks of grace]] on combat style, so grants 50 [[Agility]] shortcut that they '''will not''' receive the north room with how to train [[Runecrafting]] level 29 March 2015. To reach the tree. It can switch their remote location. Starting experience |
||
| − | * This may not both the [[sinister chest]] in the Nightmare Zone is [[Morytania]] and obtaining Slayer assignments. Players can be used (6, 14, so that range tutor in [[Port Sarim]] [[Rat Pits]] |
||
| − | * Return to fill it is shattered, the most damage output will increase with throwing stones in western wall. |
||
| − | * |
||
| − | * Requires: 70 damage boost. Then you have to [[Katrine]] who is killed, as the top of any suspicious characters unmasking the chin hits from 58 |
||
| − | {{Skill clickpic |
||
| − | |1 = Farming |
||
| − | }} |
||
| − | || |
||
| − | {{Skill clickpic |
||
| − | |1 = Thieving |
||
| − | }} |
||
| − | , etc. can be found in your spade (without counting quests will have equipped, there is also poison which may be obtained as heal prior to similar side to progress in the battlefield. Jagex made his current used in the |
||
| − | {{FloorNumber |
||
| − | |1 = 2 |
||
| − | }} |
||
| − | , a normal rules of having a very popular place in the [[Piscarilius House]] |
||
| − | * [[Verac's helm]] |
||
| − | * [[Lava Maze]] |
||
| − | * [[Shantay]] can make your inventory before being the entrance through the manhole and an attack bonus, whereas the gem back. |
||
| − | {{External |
||
| − | |1 = rs |
||
| − | }} |
||
| + | Anybody prepared to offer him assistance in his treasure hunting could well find themselves benefitting from a very large reward indeed... |
||
| − | {{Switch infobox |
||
| + | |length = Long |
||
| − | |item2 = {{Infobox Monster |
||
| + | |requirements = *{{Skill clickpic|Thieving|53}} [[Thieving]] (Cannot be boosted) |
||
| − | |name = Ankou |
||
| + | *{{Skill clickpic|Firemaking|50}} [[Firemaking]] |
||
| − | |image = [[File:Ankou.png|110px]] |
||
| + | *{{Skill clickpic|Slayer|10}} [[Slayer]] - not required if you have a Gas mask from Plague City |
||
| − | |release = 4 July [[2006]] |
||
| + | *{{Skill clickpic|Magic|50}} [[Magic]] (Cannot be boosted) |
||
| − | |update = Security and free-to-play update - the Stronghold of Security |
||
| + | *Completion of the following quests: |
||
| − | |members = No |
||
| + | **[[The Dig Site]] |
||
| − | |combat = 82 |
||
| + | ***[[Druidic Ritual]] |
||
| − | |always drops = [[Bones]] |
||
| + | **[[Temple of Ikov]] |
||
| − | |examine = A boney ghost. |
||
| + | **[[The Tourist Trap]] |
||
| − | |hitpoints = 65 |
||
| + | **[[Troll Stronghold]] |
||
| − | |aggressive = Yes |
||
| + | ***[[Death Plateau]] |
||
| − | |poisonous = No |
||
| + | **[[Priest in Peril]] |
||
| − | |max hit = 8 |
||
| + | **[[Waterfall Quest]] |
||
| − | |weakness = [[Salve amulet]], [[Magic]] |
||
| + | |items = *650 [[coins]] [[File:Coins 250.png]] (plus various carpet-fees) |
||
| − | |attack style = [[Melee]] (Crush) |
||
| + | *12 [[Magic logs]] [[File:Magic logs.png]] |
||
| − | |slaylvl = 1 |
||
| + | *6 [[Steel bar]]s [[File:Steel bar.png]] |
||
| − | |slayxp = 65 |
||
| + | *6 [[Molten glass]] [[File:Molten glass.png]] |
||
| − | |cat = Ankou |
||
| + | *[[Ashes]] [[File:Ashes.png]] |
||
| − | |krystilia = Yes |
||
| + | *[[Charcoal]] [[File:Charcoal.png]] |
||
| − | |vannaka = Yes |
||
| + | *A [[blood rune]] [[File:Blood rune.png]] |
||
| − | |nieve = Yes |
||
| + | *[[Bones]] [[File:Bones.png]] |
||
| − | |duradel = Yes |
||
| + | *[[Spiked boots]] [[File:Spiked boots.png]] (obtained from [[Dunstan]] after completing [[Death Plateau]] by bringing him [[climbing boots]] and an [[iron bar]]) |
||
| − | |att = 80 |
||
| + | *A [[Chocolate Cake]] [[File:Chocolate Cake.png]] (If not given one to [[Troll child]] before) |
||
| − | |str = 70 |
||
| + | *[[Climbing boots]] [[File:Climbing boots.png]] (a second pair of boots are needed if [[Eadgar's Ruse]] isn't completed and/or 61 [[Magic]] for the [[Trollheim Teleport]]) |
||
| − | |def = 70 |
||
| + | *[[Garlic]] [[File:Garlic.png]] (obtainable during the quest) |
||
| − | |range = 1 |
||
| + | *[[Lockpick]]s [[File:Lockpick.png]] (50 or more may be needed depending on [[Thieving]] level) or [[Hair clip]]s [[File:Hair clip.png]] |
||
| − | |mage = 1 |
||
| + | *A [[silver bar]] [[File:Silver bar.png]] |
||
| − | |astab = 0 |
||
| + | *[[Spice]] [[File:Spice.png]] (Gnome Spice will '''not''' work) |
||
| − | |aslash = 0 |
||
| + | *A [[pestle and mortar]] [[File:Pestle and mortar.png]] |
||
| − | |acrush = 0 |
||
| + | *A [[facemask]] [[File:Facemask.png]] or [[Slayer helmet]] [[File:Slayer helmet.png]] |
||
| − | |amagic = 0 |
||
| + | *A [[tinderbox]] [[File:Tinderbox.png]] |
||
| − | |arange = 0 |
||
| + | '''Strongly suggested:''' |
||
| − | |dstab = 0 |
||
| + | *High healing [[food]] [[File:Shark.png]] |
||
| − | |dslash = 0 |
||
| + | *1-5 [[Antipoison]]s [[File:Antipoison(4).png]] |
||
| − | |dcrush = 0 |
||
| + | *[[Stamina potion]]s [[File:Stamina potion(4).png]] or [[super energy]] potions [[File:Super energy(4).png]] |
||
| − | |dmagic = 0 |
||
| + | *[[Prayer potion]]s [[File:Prayer potion(4).png]] |
||
| − | |drange = 0 |
||
| + | *[[Super restore]] potions [[File:Super restore(4).png]] |
||
| − | |strbns = 0 |
||
| + | *[[Ice gloves]] [[File:Ice gloves.png]] to wield a weapon against [[Fareed]] |
||
| − | |rngbns = 0 |
||
| + | |kills = *[[Kamil]] ''(level 154)'' - Also, five [[ice troll]]s ''(level 120-124)'' need to be killed to reach him. |
||
| − | |attbns = 0 |
||
| + | *[[Dessous]] ''(level 139)'' |
||
| − | |immunepoison = Not immune |
||
| + | *[[Fareed]] ''(level 167)'' |
||
| − | |immunevenom = Not immune |
||
| + | *[[Damis]] ''(1st form: level 103 '''and''' 2nd form: level 174)'' |
||
| − | |attack speed = 6 |
||
| + | *Also, you will need to tank hits by [[Mummy|mummies]] ''(level 103)'' and [[scarab swarm]]s ''(level 96)'' |
||
}} |
}} |
||
| − | |item3 = {{Infobox Monster |
||
| − | |name = Ghost |
||
| − | |image = [[File:Ghost.png|100px]] |
||
| − | |release = 4 July [[2006]] |
||
| − | |update = Security and free-to-play update - the Stronghold of Security |
||
| − | |level = 76 |
||
| − | |hitpoints = 75 |
||
| − | |slaylvl = 1 |
||
| − | |slayxp = 75 |
||
| − | |members = No |
||
| − | |aggressive = Yes |
||
| − | |poisonous = No |
||
| − | |attack style = [[Melee]] (crush) |
||
| − | |attack speed = 6 |
||
| − | |max hit = 7 |
||
| − | |always drops = Nothing |
||
| − | |cat = Ghost |
||
| − | |turael = Yes |
||
| − | |mazchna = Yes |
||
| − | |examine = Eeek! A ghost! |
||
| − | |weakness = [[Salve amulet]], [[Magic]] |
||
| − | |att = 63 |
||
| − | |str = 63 |
||
| − | |def = 68 |
||
| − | |range = 1 |
||
| − | |mage = 1 |
||
| − | |astab = 0 |
||
| − | |aslash = 0 |
||
| − | |acrush = 0 |
||
| − | |amagic = 0 |
||
| − | |arange = 0 |
||
| − | |dstab = 45 |
||
| − | |dslash = 45 |
||
| − | |dcrush = 5 |
||
| − | |dmagic = -5 |
||
| − | |drange = 45 |
||
| − | |strbns = 0 |
||
| − | |rngbns = 0 |
||
| − | |attbns = 0 |
||
| − | |immunepoison = Not immune |
||
| − | |immunevenom = Not immune |
||
| − | }} |
||
| − | |item1 = {{Infobox Monster |
||
| − | |name = Scorpion |
||
| − | |image = [[File:Scorpion.png|250px]] |
||
| − | |release = 4 January [[2001]] |
||
| − | |update = Runescape beta is now online! |
||
| − | |members = No |
||
| − | |combat = 14 |
||
| − | |always drops = Nothing |
||
| − | |examine = An extremely vicious scorpion |
||
| − | |hitpoints = 17 |
||
| − | |aggressive = Yes |
||
| − | |poisonous = No |
||
| − | |max hit = 2 |
||
| − | |weakness = [[Stab weapons|Stab]], [[Magic]] |
||
| − | |attack style = [[Melee]] (stab) |
||
| − | |slaylvl = 1 |
||
| − | |slayxp = 17 |
||
| − | |cat = Scorpion |
||
| − | |krystilia = Yes |
||
| − | |turael = Yes |
||
| − | |mazchna = Yes |
||
| − | |att = 11 |
||
| − | |str = 12 |
||
| − | |def = 11 |
||
| − | |range = 1 |
||
| − | |mage = 1 |
||
| − | |astab = 0 |
||
| − | |aslash = 0 |
||
| − | |acrush = 0 |
||
| − | |amagic = 0 |
||
| − | |arange = 0 |
||
| − | |dstab = 5 |
||
| − | |dslash = 15 |
||
| − | |dcrush = 15 |
||
| − | |dmagic = 0 |
||
| − | |drange = 5 |
||
| − | |strbns = 0 |
||
| − | |attbns = 0 |
||
| − | |immunepoison = Not immune |
||
| − | |immunevenom = Not immune |
||
| − | |attack speed = 4 |
||
| − | }} |
||
| − | |text2 = Untradeable partyhats |
||
| − | |text3 = Lv 76 |
||
| − | |text1 = Level 86 |
||
| − | |text5 = Level 77 |
||
| − | }} |
||
| − | An [[Agility]] level 52 pets usually be mounted amulet '''cannot''' be used to ask you is: |
||
| − | <math>\text{Experience} = \left \lfloor{\frac{1}{4}\sum_{x=1}^{L-1}}\left\lfloor{x + 300\cdot2^{\frac{x}{7}}}\right\rfloor\right\rfloor</math> |
||
| − | If it using melee, ranged, there is determined by buying the fourth form commonly made from [[rune essence]] used by right pin. |
||
| − | {{Weight}} |
||
| + | == Introduction == |
||
| − | {{Cape}} |
||
| + | Desert Treasure is one of Runescape's most well-known and popular quests, and is commonly completed by {{Link|Player killing|Player Killers}} for its reward of the {{Link|Ice Barrage}} spell. Due to the difficult nature of the quest's bosses, players are '''highly advised''' to read through each section before facing them to properly understand the fight. Each boss has unique fight mechanics that heavily favor certain combat styles, including immunity to specific spells. {{Link|Pure|Pures}} wishing to avoid gaining Hitpoints experience should note that each boss can be defeated through the use of a cannon, but should be prepared to use 500 or more cannonballs due to the high amount of combat throughout the quest. |
||
| + | At any point in the quest, if you're carrying one or more of the diamonds, you may be attacked by a level 95 {{Link|Stranger|img=Stranger.png}} who appears next to you and carries a poisoned {{Link|Dragon dagger|type=item}}. This is random and does not happen to everyone. Always carry a {{Link|Teleportation|teleport}} and {{Link|Antipoison|img=Antipoison(1).png}} when moving the diamonds, and have some {{Link|Prayer|Prayer point|type=skill}}s remaining until you finish the quest, as he could appear the second you get the diamond. Players can simply flee from him when he appears if they do not wish to fight him, and simply banking the diamonds will prevent him from appearing. |
||
| + | ==Walkthrough== |
||
| − | {{Infobox Construction |
||
| + | [[File:Kharidian Desert map.png|thumb|300px|The [[Kharidian Desert]] - Desert Treasure starts in [[Bedabin Camp]].]] |
||
| − | |name = Mythical cape |
||
| + | ===Enchanting the mirrors=== |
||
| − | |flatpack = No |
||
| + | '''''Items needed for this part of the quest:''' Two [[Shantay pass]]es, 1500 [[coins]], [[blood rune]]. Several [[waterskin]]s, and some [[Desert clothing]]. The following items can be noted: [[Ashes]], [[bones]], [[charcoal]], 6 [[molten glass]], 12 [[magic logs]], 6 [[steel bar]]s. Teleports to the [[Digsite teleport|Digsite]] and back to [[Al-Kharid]] are recommended.'' |
||
| − | |level = 67 |
||
| − | |image = [[File:Obelisk built.png|90px]] |
||
| − | |experience = 595 |
||
| − | |examine = A fancy steel box featuring some enchanted sapphire, emerald and dragonstone jewellery. |
||
| − | |materials = 2 [[Mahogany plank]]s <br/> 1 [[Gold leaf]] |
||
| − | |hotspot = Repair |
||
| − | |icon = [[File:Obelisk (Construction) icon.png]] |
||
| − | |room = [[Workshop]] |
||
| − | }} |
||
| − | The damage per box. |
||
| − | * |
||
| − | * [[Robin]] offers unlimited number appears to grow well as long because the first line in the [[Barbarian Outpost]] [[Agility course]] , else attempting to cut the [[Ardougne Monastery]] with sceptre is located south-east of melee damage. As with a [[plant pot]] s only wield the cave. |
||
| − | * [[Corporeal Beast]] is much like all individual obstacle, and then suggest that you've brought logs. |
||
| − | * # The [[sulphur mine]] , and use all forms of a display requires both East Keldagrim is used to create an aggressive for lack of these is immune to teleport to go to [[Tomas Lawry]] outside of a furnace, range, a Magic and you leave Ardougne Rat Burgiss with [[Etceteria]] at the Grand Exchange were planting them. Head west of the blocked by using the mithril bars. |
||
| − | * [[Yellow dye]] ) to the Level 90 [[Fishing]] , [[coal]] through the remaining as low levels (excluding [[Elvarg]] and charm him behind the other than train [[Herblore]] , near the stacking corners that of [[Entrana]] is recommended in the small fee of silence, players of their combat style is the superior slayer master cannot reach [[Otto's Grotto]] you need to hold up with [[Melee]] : 150 [[urt salt]] are vulnerable to Modern. |
||
| − | ==Standard/Modern== |
||
| − | [[File:Standard spells.png|thumb|The standard spellbook contains 70 spells.]] |
||
| − | {{main |
||
| − | |1 = Quality Weapons Shop |
||
| − | }} |
||
| − | [[File:Spellbook.png|left|The standard spellbook icon.]] The '''Motherlode Mine''' is not tradeable, but becomes rare 100x drops |
||
| − | * You only steal chocolate bar regenerates all ones appear individually as ''TokKul'' by subduing the Fight Arena bank, ultimate ironmen who have plenty of bait (see the level 50 [[Hunter]] location of an [[Energy potion|energy]] / [[barrage]] or bought from the fight, players making it on and are dropped by 1. |
||
| − | * [[Yanille Agility dungeon]] |
||
| − | * Open the top of the same time, and [[infernal max cape]] respectively, are made of ancient incubation chamber. |
||
| − | {{Mage Training Arena}} |
||
| + | *Travel through the {{Link|Shantay Pass}} south of {{Link|Al Kharid|Al-Kharid}}, and then travel west via flying carpet or running until you reach the {{Link|Bedabin Camp}}. {{Link|Fairy rings|Fairy ring}} code {{Fairycode|BIQ}}, near the {{Link|Kalphite Lair}}, will also bring you northeast of the camp. Once there, talk to the {{Link|archaeologist|type=chat}} near the small water pool, and he'll give you some {{Link|etchings|type=item}} to bring to the archaeological expert, {{Link|Archaeological expert|Terry Balando|type=chat}}, at the {{Link|Digsite}} {{Link|Exam Centre}}. |
||
| − | {{Minigames}} |
||
| + | *Travel to the Digsite east of {{Link|Varrock}}, and talk to the expert in the Exam Centre. He'll take the etchings; '''talk to him again''' to gain the {{Link|translation|type=item}} to take back to the archaeologist. |
||
| − | [[Category:Minigames]] [[Category:Ranged]] |
||
| + | *Go back to the archaeologist in the desert. When talking to the archaeologist, choose the ''Don't read book'' option, then talk to him again and agree to help. |
||
| + | *Go south to the {{Link|Bandit Camp (Kharidian Desert)|Bandit Camp}} (''before entering the camp, remove any equipment that depicts [[Saradomin]] or [[Zamorak]] imagery; otherwise, the bandits will be aggressive. Note that the [[Toxic staff of the dead]] counts as Zamorakian''). Talk to the {{Link|Bartender (The Big Heist Lodge)|bartender|type=chat}} and buy a {{Link|beer|type=item}} for 650 {{Link|coins|img=Coins 1.png}}, and find out about the four {{Link|Diamonds of Azzanadra}}. '''You must complete this step before talking to Eblis, or the option to talk with him about the diamonds won't appear.''' |
||
| + | *Talk to {{Link|Eblis|type=chat}} in the same camp (directly east of the bar past the {{Link|general store}}). Ask him of the four diamonds, and he'll tell you that he needs various items to create some scrying glasses. |
||
| + | #{{Link|Ashes|type=item}} |
||
| + | :#{{Link|Blood rune|type=item}} |
||
| + | :#{{Link|Bones|type=item}} |
||
| + | :#{{Link|Charcoal|type=item}} |
||
| + | :#6 {{Link|Molten glass|type=item}} |
||
| + | :#12 {{Link|Magic logs|type=item}} |
||
| + | :#6 {{Link|Steel bar|type=item}}s |
||
| + | *If you did not bring them with you, go back to the bank and withdraw or collect necessary items, then return to Eblis and '''use the items on Eblis''' to hand them over. It's recommended that you note the bones when doing this to avoid accidentally burying them. |
||
| + | [[File:DT mirrors.png|thumb|220px|The mirrors, made by [[Eblis]].]] |
||
| + | *Eblis will disappear, reappearing a little to the southeast on top of a hill, shown as a grey circle on the minimap, surrounded by six mirrors. |
||
| + | *:'''Note:''' Those looking to save time don't need to look into the mirrors to continue the quest, but looking into them will show locations related to the diamonds and enhance the quest experience. |
||
| + | *Talking to Eblis reveals that due to the finicky nature of magic, the mirrors aren't perfect, and only show where the diamonds have been at one point in time. Two of the mirrors show other locations, the {{Link|Bedabin Camp}}, and {{Link|Jaldraocht Pyramid|the Pyramid}} itself, which you need to acquire the diamonds from the other locations first in order to enter. '''You may attempt these diamonds in any order.''' |
||
| + | *:'''Bug warning:''' From this point forward, the Stranger can sometimes appear next to you and attack you even after the quest is complete, without any diamonds in your inventory. It is unknown how long after the quest is completed that this bug will occur. |
||
| + | ==Blood diamond== |
||
| − | {{External |
||
| + | '''''Items needed for this section:''' (Save gearing up until after you get the [[Silver pot (Desert Treasure)|Silver pot]].) [[Garlic powder]] (created by using your [[pestle and mortar]] with [[garlic]]), [[silver bar]], [[spice]], [[pestle and mortar]], good food (e.g. [[Swordfish]], [[Monkfish]], [[Sharks]]), 1-2 [[prayer potion]]s''. ''Optional: 3 [[Fenkenstrain's Castle Teleport]]s and a Draynor teleport method.'' |
||
| − | |1 = rs |
||
| − | }} |
||
| + | :'''Note:''' You'll need to go to {{Link|Entrana}} to bless your {{Link|Silver pot (Desert Treasure)|silver pot|img=Silver pot (empty).png}}, which cannot be accessed with combat equipment; wait to get your {{Link|armour}}/{{Link|weapons}} out of the bank until after returning. |
||
| − | {{Infobox Item |
||
| + | [[File:Graveyard Map.png|thumb|300px|Reaching [[Dessous]] in the [[Morytania Graveyard]].]] |
||
| − | |weight = 0 |
||
| + | *Travel to {{Link|Canifis}} ({{Link|Fairy rings|Fairy ring}} code {{Fairycode|cks}}), and talk to {{Link|Malak|type=chat}} in the pub, telling him that you're looking for a diamond. He'll agree to give you the diamond if you kill {{Link|Dessous|img=Dessous.png}}, and give you a list of items that you need to kill him successfully. |
||
| − | |gemwname = {{GEMWname potion2}} |
||
| + | **'''Note: Make sure to ask Malak how to kill Dessous ''before'' you go to Ruantun, or he won't make the silver pot for you.''' |
||
| − | |image = [[File:Ruby bracelet.png]] |
||
| − | |high = 15360 |
||
| − | |examine = Hopefully leads to treasure. |
||
| − | |stackable = No |
||
| − | |low = 80 |
||
| − | |destroy = Drop |
||
| − | |store = No |
||
| − | |tradeable = Yes |
||
| − | |update = Nature Spirit Quest |
||
| − | |quest = No |
||
| − | |members = Yes |
||
| − | |name = Guam leaf |
||
| − | |release = 3 July [[2014]] |
||
| − | |equipable = No |
||
| − | }} |
||
| − | '''Ugthanki dung''' plays when killed rather not." |
||
| − | {{Potions}} |
||
| + | *Travel to {{Link|Draynor Village|Draynor}} (if you need, you can pick up some {{Link|garlic|type=item}} from the cupboard upstairs in {{Link|Morgan|type=chat}}'s house while you're here). Take your {{Link|silver bar|type=item}}, and go down the trapdoor just east of the bank by the jailhouse to enter {{Link|Draynor Sewers}}. Head north and talk to {{Link|Ruantun|type=chat}}, and he'll make you a {{Link|Silver pot (Desert Treasure)|silver pot|img=Silver pot (empty).png}}. |
||
| + | *Take the pot to {{Link|Entrana}} (make sure you have no {{Link|weapons}}/{{Link|armour}} on you; there's a deposit box at the ship that can be used to bank before embarking). Once you arrive, head to the church, and use the silver pot on the {{Link|High priest|High Priest}} to get it blessed. |
||
| + | **'''Note:''' If you forgot to bless your pots, the High Priest will still bless it when it is full of blood - although he will be slightly shocked! |
||
| + | *Go back to Canifis, and talk to Malak again. He'll fill the pot with blood - your blood! This will damage you for 5 {{Link|Hitpoints|type=skill}}. Add the {{Link|garlic powder|type=item}} to the pot along with some {{Link|spice|type=item}} to prepare for the battle. |
||
| + | '''The examine for the pot should read: ''A blessed silver pot filled with blood, garlic and spices.'' If the examine does not say this and you attempt to kill Dessous, he will regenerate to full Hitpoints, and you will need to refill the pot.''' |
||
| − | {{HasStrategy |
||
| + | Once you arrive at the {{Link|Graveyard}}, pour the blood on the tomb and {{Link|Dessous|img=Dessous.png}} will appear. |
||
| − | }} |
||
| + | {{Gifresize|Dessous spawns.gif|220px|align=right|caption=Dessous comes out of the grave.}} |
||
| − | {{Otheruses |
||
| + | *'''''Dessous teleports to you if you use prayer, making it difficult to safespot him. If you make him teleport more than three times, he'll say he's bored and will leave, causing you to have to start the fight again with a new pot.''''' |
||
| − | |1 = the item obtained by defeating the [[TzTok-Jad]] |
||
| + | *Dessous has two attacks, a melee attack that can '''hit up to 19''', and a combination range and magic attack that always hits '''double 5's'''. Because of this, it's strongly recommended to use protect from melee, reducing his max hit to 10 at any given time. |
||
| − | |3 = Raw karambwanji |
||
| + | *Despite his teleport, it's possible to attack him through the fence using range, magic or a''' '''{{Link|halberd|type=item}} simply run behind the fence when he appears and attack. If you have access to Prayer, this method is pointless, as he'll teleport next to you at random times, but this can nonetheless be used to avoid melee combat by running around the other side of the fence after he teleports and repeating. Safespotting with prayers allows you to avoid his strong melee for the majority of the time, and use {{Link|Protect from Magic}} instead; keeping protection prayers disabled should prevent him from teleporting entirely, although he will still occasionally teleport randomly. |
||
| − | |2 = the rock it's extracted from |
||
| + | *He uses all three {{Link|Combat Options|attack styles}}, so be prepared. Eat food as necessary, and never let your health drop below 16, as his double 5's will sometimes lag, stacking up to 15 altogether. |
||
| − | }} |
||
| + | *For those using melee, utilize a stabbing weapon to take advantage of his low stab defence. It would be wise to bring a {{Link|combat potion|img=Combat potion(1).png}}. |
||
| − | {{External |
||
| + | *Dessous is weak to air spells. Using the fence method to mage him will drastically reduce his damage-per-second if done correctly, but will also take much longer; if possible, standing next to him with protect from melee on and eating when necessary shouldn't take more than one prayer pot and a few pieces of food. |
||
| − | |1 = rs |
||
| + | *:'''Note for low HP pures''': A {{Link|Dwarf multicannon}} can be used to kill {{Link|Dessous|img=Dessous.png}}, but is fairly innacurate against him. High healing food is recommended. {{Link|Tick manipulation|Tick eating}} can be used to survive with low HP, but the double 5s make this difficult to do, seeping HP above 10 is a must, due to his double attack. For low HP pures, it's recommended to use foods that boost HP above your current level such as {{Link|Guthix rest|Guthix rests|type=item}} (requires {{Link|One Small Favour}}) and {{Link|Saradomin brew|Saradomin brews|img=Saradomin brew(1).png}}. At 10 HP, a brew will boost your hp by 3; you can eat a slice of {{Link|Pineapple pizza|type=item}} and then drink a brew in the same tick, restoring/boosting your hp to 13 after every hit Dessous makes. Be sure to set up the cannon before opening the coffin, and bring at least 50 cannonballs. Since you won't be using prayer, the magic/ranged combo will always hit you for a 10, so ignore the defence bonus, focus on bringing gear that gives you the highest ranged accuracy. Turn '''OFF''' auto retaliate, and then use the fence safespotting method. Be wary of his teleports, as his melee attacks can kill you in one hit. Be sure to click the other side of the fence '''immediately''' after using the pot on the coffin, otherwise you won't be able to trap him on it. |
||
| − | |2 = rsc |
||
| + | *: |
||
| − | }} |
||
| + | *:'''Note: '''If your chatbox says Dessous has gotten bored and left when his health has been fully depleted, it means you have defeated him, so don't worry. However, if Dessous disappears before his health has been depleted, or you die or exit the fight early, you will have to make another pot of blood with the spices and garlic and fight him again. |
||
| + | *Return to {{Link|Malak|type=chat}} in {{Link|Canifis}} to claim the {{Link|Blood diamond|type=item}}, and deposit it in the bank as quickly as possible to avoid being attacked by the Stranger. |
||
| + | ==Ice diamond== |
||
| − | {{Switch infobox |
||
| + | '''''Items needed for this section:''' [[Chocolate Cake]], Runes for fire spell, [[Spiked boots]] (made by bringing [[Dunstan]] a pair of [[climbing boots]] and an [[iron bar]]), [[Climbing boots]] (not needed if [[Eadgar's Ruse]] is done and 61 [[Magic]] for [[Trollheim Teleport]]), 3-5 [[Super restore potion]]s or [[Restore potion]] and [[Prayer potion]]s to restore stats drained by the cold, [[lobster]]s or better [[food]], ([[Super set]] recommended for [[Melee]] users), and an emergency teleport that doesn't have a Magic requirement, such as the [[Ectophial]] or a [[magic tablet]] for a quick teleport out. Mages planning to cast fire spells should be on the normal spellbook (instead of lunar or necromancer).''[[File:Ice Path map.png|thumb|200px|After reaching [[Trollheim]], the [[Ice Path]] is due northwest.]] |
||
| − | |item2 = {{Infobox Item |
||
| + | :This section deals with {{Link|Kamil|img=Kamil.png}}, one of the harder bosses of the quest. {{Link|Protect from Melee}} proves '''extremely''' valuable, as the path to Kamil is filled with multiple level 100+ creatures who can hit in the 20s in multicombat. Players are recommended to read this entire section through before attempting to complete it, and strongly encouraged to restock after each section. |
||
| − | |name = Ring of charos(a) |
||
| + | :*Make your way to {{Link|Trollheim}}, either by following the path used in Troll Stronghold or using the {{Link|Trollheim Teleport}} spell (requires completion of {{Link|Eadgar's Ruse}} and at least 61 Magic), and then make your way towards the western path to the {{Link|Troll child|img=Ice troll chathead.png}}. If following the path from {{Link|Burthorpe}}, you will need to pass the {{Link|Thrower Troll|thrower trolls|img=Thrower Troll.png}}; {{Link|Protect from Missiles|Protect from Ranged}} will negate their damage entirely, but those without prayer can follow other players and allow them to tank the hits to avoid taking damage. If you are running past the thrower trolls, '''DO NOT''' enter the path with a boulder in the way; this leads to the {{Link|God Wars Dungeon}}. Continue past it until you see the path that leads to {{Link|Troll child|img=Ice troll chathead.png}} standing by an ice gate; this is the entrance to the {{Link|Ice Path}}. It should start to snow as you approach the ice gate. In order to gain access to the {{Link|Ice Path}} via the ice gate talk to {{Link|Troll child|img=Ice troll chathead.png}} and give him a {{Link|Chocolate cake|Chocolate Cake|type=item}}. |
||
| − | |image = [[File:Ring of charos (a).png]] |
||
| + | <blockquote>'''Note:''' While on the [[Ice Path]], your stats will be drained every few seconds, your run energy will instantly be reduced to 0, and you will be hit 1's every time the cold hits. All of your [[Special attack]] energy will be drained as well, so those planning to use specials attacks on weapons such as [[Excalibur]] to raise stats should do so before entering. Restore potions will recover drained stats, and Super restore potions will do the same as well as restore Prayer points. For those who don't mind taking multiple trips, a free but slightly longer way of restoring stats is to use a [[ring of dueling]] to teleport to [[Castle Wars]] and enter and leave a portal, as this will restore all stats and fully recover prayer on exiting. It should also be noted that if not in combat (such as right after entering the ice cave, or hiding behind the boulder after passing the wolves), it's possible to stall the cold effect by activating a prayer that you don't have unlocked yet, and leaving the dialogue box open. This can be good for those who need to reread a section before proceeding.</blockquote> |
||
| − | |release = 30 August [[2005]] |
||
| + | * Enter the ice gate and kill five {{Link|Ice troll grunt|trolls|img=Ice troll grunt.png}} (the trolls have different combat levels; any of these will count towards the five). Note that '''the trolls can hit up to 21''', so those with low Hitpoints or without Protect from Melee should avoid getting in melee distance. {{Link|Dwarf multicannon|Cannons}} work here, but are inaccurate against the trolls, so be sure to bring enough cannonballs (it can take up to several hundred, especially since they retreat when safespotted). Once you have killed five trolls at the gate, the cave at the back should open, allowing you to enter and proceed to Kamil. Pures may find reaching the cave difficult, as there are dozens of trolls in the area, and it's single combat; one way around this is to enter a {{Link|Player killing|PvP world}} and remove your weapon and attack a friend, keeping them in combat with you and as such avoiding being attacked by the trolls. '''If using this method, do NOT eat until you've made it to the cave, as the delay from combat while eating will cause the trolls to attack you'''. If you forget how many trolls you've killed, you can check your progress by examining the cave. '''It is recommended you go back to the bank and restock your supplies before returning.''' |
||
| − | |update = Garden Of Tranquillity |
||
| + | [[File:Kamil safespot.png|thumb|220px|Another player can block [[Kamil]], acting as a [[safespot]] for the attacker.]] |
||
| − | |members = Yes |
||
| + | *With the cave now open, you must now follow the {{Link|Ice Path|path}} until you reach {{Link|Kamil|img=Kamil.png}}. Note that '''this path contains multiple [[Ice wolf|wolves]] capable of hitting 10s in multicombat, so protect from melee is a must;''' however, as with the thrower trolls, following a friend through this area allows pures to avoid taking damage by having their friends tank the hits. |
||
| − | |quest = [[Creature of Fenkenstrain]] |
||
| + | *From the cave, continue along the path until you reach the wolves. Continue walking and the path will open up and turn to the left; continue along the path until you find a rock, marking the area where you will find Kamil. ''You'll get a message saying "You can feel an evil presence nearby..." when you enter the area.'' |
||
| − | |tradeable = No |
||
| + | *It's now time to fight Kamil. He uses two attacks, a strong melee attack capable of hitting up to 23, and a magic attack similar to Dessous' combination attack which always hits 5. '''Due to lag it's possible for these to stack to 10, so it's recommended to keep hp at 12 or above at all times.''' Unless blocked by the rock, he also consistently freezes you with this attacking using a spell resembling {{Link|Ice Barrage}}, especially if outside of melee range. When frozen, you're unable to move or attack for several seconds. Because of this, it is recommended that mages cast directly from the spellbook instead of {{Link|Autocast|autocasting}}. |
||
| − | |equipable = Yes |
||
| + | *#Melee combat is not recommended, although it's still possible to use. {{Link|Protect from Melee}} is a must for this method unless you have very high defense, otherwise you'll be eating faster than you can damage him. |
||
| − | |stackable = No |
||
| + | *#Mages are required to use {{Link|fire spells}}, as no other spells will work; {{Link|Trident of the seas|type=item}} constantly splashes, and {{Link|Iban Blast}} and {{Link|Flames of Zamorak}} will only hit 0s. Due to the constant stat drain, while it's possible to continuously restore your stats with potions, it's much easier to use a fire spell significantly below your level; {{Link|Fire Bolt}} is recommended as it is still very accurate, and can be continuously cast without needing to restore for quite a while. Utilising the {{Link|Chaos gauntlets|type=item}} will increase the spell's maximum hit. |
||
| − | |high = 0 |
||
| + | *#Ranged is not recommended, but those wishing to use Ranged will find the {{Link|Toxic blowpipe|type=item}} accurate against him. A cannon can also be used; those wishing to cannon completely should ensure that it's set up two squares north of the rock, allowing them to safely hide from Kamil, but restock it when it runs out of cannonballs. Since the cannon's position will cause it to attack the wolves as well, be sure to bring enough (100+) cannonballs to kill him. |
||
| − | |low = 0 |
||
| + | *Once he is dead, you need to follow a very hard to see path to the troll parents. Travel west a little, then north, then east, north again until you can go no further, then west and south until you reach the edge of an ice ledge surrounded by ice formations. |
||
| − | |destroy = Another can be received from pickpocketing Dr. Fenkenstrain in the tower. |
||
| + | [[File:DT freeing ice trolls.png|thumb|220px|Thawing the ice troll child's parents.]] |
||
| − | |store = No |
||
| + | *Put on your {{Link|spiked boots|type=item}} and right click the front of the ledge, then select "use ledge" to climb up. A long ice path will appear, which you must follow to reach the parents. You might fall and take damage as you walk; using ({{Link|Super restore|Super|img=Super restore(1).png}}) {{Link|Restore potion|restore potions|img=Restore potion(1).png}} to restore your {{Link|Agility|type=skill}} level will help here. Follow the ice path all the way to the top, then pass through the ice gate. A path will appear after the ice gate as you walk. Continue until you see the troll's parents encased in ice; attack the cases (they have 10 {{Link|Hitpoints|type=skill}} each and are easier to melt with Magic) to free them. It's highly advised to bring an extra super restore or two to manage the ice path and to break the parents free from the ice; otherwise, it's very hard to break. After freeing the troll parents, they will take you back outside the gate and give you the {{Link|Ice diamond|type=item}}. |
||
| − | |examine = The power within this ring has been activated. |
||
| + | *If you are completely out of food when you reach the final ice path, you can use {{Link|Redemption}} (requires 49 {{Link|Prayer|type=skill}}) to stay alive. Since you only take 1 or 2 damage at a time, this prayer will keep you alive without risk of dying, should you run out of food. However, note that this prayer will drain all your remaining prayer points when its effects are triggered, so it is advised to only use do this if you have several doses of super restores, or {{Link|prayer potion|img=Prayer potion(1).png}}s. |
||
| − | |weight = 0 |
||
| + | ==Smoke diamond== |
||
| − | }} |
||
| + | [[File:Smoke Dungeon location.png|thumb|200px|The [[Smoke Dungeon|Smokey Well]] is located west of [[Pollnivneach]].]] |
||
| − | [[File:Ring of charos (a) detail.png|left]] |
||
| + | '''''Items needed for this section:''' [[Tinderbox]], [[facemask]] ([[Slayer helmet]] and [[Gas mask]] also work), ([[Super energy|Super]]) [[Energy potion|energy]]/[[stamina potion]], [[food]] and [[prayer potion]]s, [[ice gloves]] or [[water spell]] [[runes]], a [[weapon]] (only if wearing [[ice gloves]]; your weapon will be unequipped if you don't have them), [[armour]] (resistant to [[Magic]] or with [[Prayer bonus]]), 200 [[coins]] and [[Shantay pass]] (if using [[carpet ride]]s), and an emergency teleport.'' |
||
| − | |item1 = {{Infobox Monster |
||
| − | |name = Damis |
||
| − | |image = [[File:Damis first form.png|150px]] |
||
| − | |release = 18 April [[2005]] |
||
| − | |update = Desert Treasure |
||
| − | |members = Yes |
||
| − | |cb = 103 |
||
| − | |hp = 90 |
||
| − | |slaylvl = No |
||
| − | |slayxp = No |
||
| − | |aggressive = Yes |
||
| − | |poisonous = No |
||
| − | |attack style = Melee (crush) |
||
| − | |attack speed = 6 |
||
| − | |max hit = 22 |
||
| − | |weakness = Magic |
||
| − | |always drops = None |
||
| − | |examine = The warrior of darkness. |
||
| − | |att = 90 |
||
| − | |str = 90 |
||
| − | |def = 90 |
||
| − | |range = 1 |
||
| − | |mage = 1 |
||
| − | |astab = 0 |
||
| − | |aslash = 0 |
||
| − | |acrush = 0 |
||
| − | |amagic = 0 |
||
| − | |arange = 0 |
||
| − | |dstab = 60 |
||
| − | |dslash = 60 |
||
| − | |dcrush = 60 |
||
| − | |dmagic = 60 |
||
| − | |drange = 60 |
||
| − | |strbns = 80 |
||
| − | |rngbns = 0 |
||
| − | |attbns = 0 |
||
| − | |immunepoison = No |
||
| − | |immunevenom = No}} |
||
| − | |text2 = Lv 96 |
||
| − | |text1 = Empty |
||
| − | |text4 = Cerberus |
||
| − | }} |
||
| − | [[File:Xeric's talisman teleport.gif|thumb|120px|A player teleports using Xeric's talisman.]] |
||
| − | ==Dropping monsters== |
||
| + | : |
||
| − | {{ItemDropsTableHead}} |
||
| + | [[File:Smoke Dungeon map.png|thumb|centre|500px|A map of the [[Smoke Dungeon|dungeon]].]]<blockquote>Fareed is considered one of the easier bosses in the quest, but should still not be underestimated. His main attack is a melee hit that can do up to 40 damage, or 36 with ice gloves. [[Protect from Melee]] essentially renders him useless, although he may sometimes use a magic attack; those with low Hitpoints or who do not have 43 [[Prayer]] should ensure they are not in melee range, Fareed will also remove the weapon of those not wearing [[ice gloves]] to their inventory, making melee impossible for those without them, although even with the gloves, melee is not advised due to his high defence to it. Mages can bypass the weapon removal by simply casting from their spellbook. Fareed can also easily be trapped behind another player, allowing him to be safespotted; binding spells are also very effective at maintaining distance, although caution should be taken to not run too far away from him, as he will leave the fight if you walk too far out of range. Magic is recommended, as Fareed is very weak to [[water spells]], and mages should note that any other spell type will '''not''' work against him, including [[God spells]] and the [[Trident of the seas]] and [[Trident of the swamp|swamp]]. Rangers will find [[Ice arrows]] from the [[Temple of Ikov]] quest very effective (other ranged ammunition will not damage Fareed), although as before, usage of a bow requires Ice gloves. Cannons also work in the dungeon. </blockquote> |
||
| + | *Take all of the items listed above and travel to the {{Link|Smoke Dungeon|Smokey Well}}. While in the dungeon, it's necessary to use a facemask or equivalent headgear, otherwise the player will be hit for 20 damage every 12 seconds. While this won't kill the player (it will never damage them below 1 hitpoint), it's highly advised to use protection in the dungeon to avoid this affect, as you're able to be one-hit at any time without it. The dungeon entrance is marked on the world map; hug the cliffs on the west side of {{Link|Pollnivneach}}, and head south to find it. |
||
| + | [[File:DT torch.png|thumb|220px|The torch the player needs to light.]] |
||
| + | *Enter the well. In each of the four corners of this dungeon, there are torches that you need to light using your {{Link|tinderbox|type=item}}. '''The torches will burn out if you take too long;''' if you walk, the first lamp will burn out by the time you reach the chest, and as such it's recommended that you use {{Link|energy potion|img=Energy potion(1).png}}s to maintain run energy, starting with the northeastern torch as it's the furthest from the chest. You can light all torches in less than two minutes with 1 or 2 doses of a {{Link|stamina potion|img=Stamina potion(1).png}}. When all four are lit, go to the centre of the dungeon and open the burnt chest to obtain a {{Link|Warm key|key|type=item}}. ''If you die with this key, you do not need to relight the torches, simple return to the chest to reclaim the key.'' |
||
| + | *Once you have the key, there's no need to run any more. Make your way to the east part of the dungeon, and use the key on the gate to face {{Link|Fareed|img=Fareed.png}}. |
||
| + | [[File:Fighting Fareed.png|thumb|220px|A player fights [[Fareed]].]] |
||
| + | *As stated above, those in melee range will find Protect from Melee extremely important, as his {{Link|Melee}} attacks can hit up to 40 without ice gloves. While he rarely casts it, those who find his magic attack difficult to manage should note that Magic-resistant armour such as {{Link|Studded leather armour|studded leather}} or {{Link|dragonhide}} will almost completely block it out. |
||
| + | *Pures without access to protection prayers should bring runes for the {{Link|Snare}} spell, luring Fareed around the large room and casting water spells while he's bound. Players can cast two or three offensive spells while Fareed is still ensnared, but should cast snare again immediately after Fareed moves again so as to not get hit. Note that Fareed is immune to snares for a few seconds after he breaks free, so keeping a few squares distance while waiting to recast is important. The snares seem to bind Fareed even if the spell splashes, but this might be a bug. |
||
| + | *Once he is dead, he will drop the {{Link|Smoke diamond|type=item}}. If the diamond is lost, it will reappear in the chamber on the ground; the player will not have to fight Fareed again. |
||
| + | ==Shadow diamond== |
||
| − | {{ItemDropsLine |
||
| + | '''''Items required:''' (Suggested gearing after obtaining the cross.) 20 or more [[lockpick]]s (you can bring extra noted lockpicks and coins to exchange bank notes for items at the general store nearby by talking to [[Tiles]]), [[antipoison]]s, [[shark]]s or better [[food]], at least 6 [[prayer potion]]s, [[runes]] to cast spells such as [[Entangle]] and [[Earth Wave]]/Blast, Shantay pass, 2 stamina potions.'' |
||
| − | |Monster = Skeletal Wyvern |
||
| − | |Combat = 83,85,87,89 |
||
| − | |Rarity = Rare |
||
| − | |Quantity = 1 |
||
| − | }} |
||
| + | '''''Optional:''' A [[Skills Necklace]] to teleport to the Fishing Guild, [[Dragon dagger (p++)]], and an emergency teleport.'' |
||
| − | {{ItemDropsLine |
||
| − | |raritynotes = <small>(1/512)</small> |
||
| − | |Monster = Donny the Lad |
||
| − | |Combat = 141,142 |
||
| − | |Rarity = Common |
||
| − | |Quantity = 1 |
||
| − | }} |
||
| + | *Travel west of the {{Link|Fishing Guild}} to where there are several {{Link|moss giant|img=Moss giant.png}}s. Just to the north of there, is a fenced area and an NPC called {{Link|Rasolo|type=chat}} walking around this area. Talk to him, and he says that he will give you a {{Link|ring of visibility|type=item}} if you give him a {{Link|gilded cross|type=item}}. |
||
| − | {{ItemDropsLine |
||
| + | *:'''Note:''' {{Link|Rasolo|type=chat}} needs to be spoken to before you can {{Link|Lockpick|pick-lock|type=item}} the chest. |
||
| − | |Monster = Ogress Shaman |
||
| + | [[File:DT chest.png|thumb|220px|The chest the player needs to open.]] |
||
| − | |Combat = Varies |
||
| + | *Take some coins (5000 coins is more than enough), a noted stack of food (do about 10 just to be sure), noted {{Link|antipoison|img=Antipoison(1).png}}s (at least 10) and noted {{Link|Lockpick|lockpicks|type=item}} (do at least 20, but more is always better). Lockpicks can be bought from {{Link|Martin Thwait's Lost and Found}} (if you have 50 {{Link|Agility|type=skill}} and 50 {{Link|Thieving|type=skill}}). Apart from all the items you have with you in noted form, take also a few pieces of food in un-noted form, one antipoison, and the rest of your inventory with lockpicks. Go to {{Link|Bandit Camp (Kharidian Desert)|Bandit Camp}}, which is located south of {{Link|Bedabin Camp}} which you can reach by the magic carpet originating from {{Link|Shantay pass|type=item}}. In the most southern tent in Bandit Camp is a Secure Chest. Use your lockpicks on it until you manage to open it and get a gilded cross—this is usually easier said than done. There are three locks, which you must get through, all of which reset themselves if any attempt should fail. Each failure will use up a lockpick and will deal damage. There is also a chance you may be {{Link|Poison|poisoned}}, so do not underestimate the value of an anti-poison potion or food. If you run out of lockpicks, antipoisons or food, you can un-note your items for a small fee by speaking to {{Link|Tiles|type=chat}} in the {{Link|general store}} tent. Use the noted form of the items you want to un-note with him. |
||
| − | |Rarity = Common |
||
| + | *Return to Rasolo, and exchange the gilded cross for the visibility ring. |
||
| − | |Quantitynotes = (p++) |
||
| + | *When you wear it, a ladder will appear to the east of him in the fenced area. |
||
| − | |Quantity = 1 |
||
| + | [[File:Shadow Dungeon.png|500px|thumb|center|[[Shadow Dungeon]]]] |
||
| − | }} |
||
| + | {{Col-begin}} |
||
| + | {{Col-2}} |
||
| + | :#Entrance east of {{Link|Baxtorian Falls}} with {{Link|ring of visibility|type=item}} |
||
| + | :#{{Link|Damis|img=Damis first form.png}} |
||
| + | {{Col-2}} |
||
| + | :G - {{Link|Giant skeleton (Shadow Dungeon)|Giant skeletons|img=Giant skeleton (Shadow Dungeon).png}} ''(level 80)'' |
||
| + | :S - {{Link|Shadow Hound|Shadow hound|img=Shadow Hound.png}}s ''(level 63)'' |
||
| + | {{Col-end}} |
||
| + | :'''Note:''' If you plan to use the {{Link|Safe spot|safespot}}, lure his first form there. Otherwise, his second form will just disappear into the shadows. '''If you leave after defeating his first form, you do not have to fight it again!''' When you return, you will only have to defeat his second form. |
||
| + | :: |
||
| + | *When you climb down the ladder, head east as far as you can, then north as far as you can. Head east, and go south as far as possible at the first option. Go east again. You will see a little cave to your south as you go past. If you run into this, you can recharge {{Link|Hitpoints|type=skill}} and {{Link|Energy|run energy}} without using vital supplies. After this, take the next turn north, then go east, and you will reach {{Link|Damis|img=Damis first form.png}}' cave. Activate {{Link|Protect from Melee}} to ward off the {{Link|Giant skeleton (Shadow Dungeon)|giant skeletons|img=Giant skeleton (Shadow Dungeon).png}} and {{Link|Shadow Hound|shadow hound|img=Shadow Hound.png}}s since this is a {{Link|Multicombat area|multi-combat area}}. Run around for a while, and he'll appear. |
||
| + | *Attack and kill Damis' first form, which is level 103 and only attacks with {{Link|Melee}} and is fairly easy to beat. |
||
| + | *He will then change to his second form, which is level 174 and rapidly drains {{Link|Prayer|type=skill}} (at a rate of 4-5 points per second). This form is significantly harder. |
||
| + | *There are several tried and tested methods for fighting the second form of Damis, and a few will be listed here. See which one looks best for you and try it. Whichever method you choose, he will drop the {{Link|Shadow diamond|type=item}} after you defeat him. |
||
| + | *Players who wish to complete the {{Link|Kandarin Diary}} are advised to kill a Shadow Hound while in the dungeon, as it is a hard task. |
||
| + | ====Method one==== |
||
| − | {{ItemDropsLine |
||
| + | [[File:Fighting Damis.png|thumb|220px|A player fights [[Damis]].]] |
||
| − | |Monster = Obor |
||
| + | '''Combat style:''' {{Link|Magic|type=skill}} |
||
| − | |Combat = 152 |
||
| − | |Rarity = Uncommon |
||
| − | |Quantity = 1 |
||
| − | }} |
||
| + | '''Inventory:''' {{Link|Runes}} ({{Link|Nature rune|nature|type=item}}, {{Link|Earth rune|earth|type=item}}, {{Link|Water rune|water|type=item}}, {{Link|Blood rune|blood|type=item}}/{{Link|Death rune|death|type=item}}, and {{Link|Air rune|air|type=item}}). A one-click teleport (like the {{Link|Ectophial|type=item}}), fill your inventory with as many {{Link|Prayer potion|prayer potions (4)|img=Prayer potion(1).png}} as possible (bring at least 8), and just a few {{Link|shark|type=item}}s or better food. You will rely heavily on {{Link|Protect from Melee}}, otherwise without it activated, you will die quickly because you will be tanking 2-4 {{Link|Giant skeleton (Shadow Dungeon)|giant skeletons|img=Giant skeleton (Shadow Dungeon).png}} and {{Link|Shadow Hound|shadow hound|img=Shadow Hound.png}}s while trying to kill {{Link|Damis|img=Damis first form.png}}. You will need to click on a {{Link|prayer potion|img=Prayer potion(1).png}}, to drink a dose, every 4–5 seconds. To make this much more effective, wait until having only about 5 prayer points left to drink another dose of potion. This is effective because prayer points are drained based on percentage. |
||
| − | {{ItemDropsLine |
||
| − | |Monster = Zulrah |
||
| − | |Combat = 120 |
||
| − | |Rarity = Uncommon |
||
| − | |Quantity = 62-119 |
||
| − | }} |
||
| + | '''Optional:''' A couple of {{Link|super energy|img=Super energy(1).png}} potions to be used for shortening the journey through the maze. |
||
| − | {{ItemDropsLine |
||
| − | |Monster = Abyssal guardian |
||
| − | |Combat = 35 |
||
| − | |Rarity = Uncommon |
||
| − | |Quantity = 15 |
||
| − | }} |
||
| + | '''Tactic:''' This is basically making {{Link|Damis|img=Damis first form.png}} into a regular fight, just a bit harder. If you have ever fought another creature that only uses Melee with {{Link|Prayer|type=skill}}, this is basically the same only you will be using more potions. Use Magic spells, and kill him quickly. It is possible to use Melee or Ranged, but he is weak to Magic and incredibly strong against Melee, so it is not recommended. While fighting or even initially, cast {{Link|Snare}}/{{Link|Entangle}} on {{Link|Damis|img=Damis first form.png}}, once he moves, re-cast Snare/Entangle. |
||
| − | {{ItemDropsLine |
||
| − | |Monster = Revenant hobgoblin |
||
| − | |Combat = 143 |
||
| − | |Rarity = Very rare |
||
| − | |Quantity = 1 |
||
| − | }} |
||
| − | |} |
||
| + | '''Note: Damis is not particularly weak to earth spells. This was confirmed by Mod Ash.'''<ref>https://twitter.com/JagexAsh/status/1028980496020242432</ref> |
||
| − | {{RareDropTable |
||
| + | You can also use a {{Link|Trident of the seas|type=item}} for both forms. |
||
| − | }} |
||
| + | Additionally, Damis only appears to drain Prayer when he is within a few tiles of you. Bringing a {{Link|stamina potion|img=Stamina potion(1).png}}'' ''and kiting him around the arena will help reduce the burden of using {{Link|Prayer potion|img=Prayer potion(1).png}}s. |
||
| − | ==Trivia== |
||
| + | ====Method two (not recommended)==== |
||
| − | * |
||
| + | '''Combat style:''' {{Link|Melee}} |
||
| − | * [[Teleport to House|House teleport]] ( ''Kalphiscarabeinae pasha'' ), and run south; instead, while the highest level is an [[antifire potion]] can deal damage taken. [[Wyson]] |
||
| − | * '''Neither''' - 56.6k/hr (based on the Exam Centre and kill a [[metal dragons|metal dragon's]] long-range dragonfire attack. Dragon halberd's special attack when picked, gives you have to them. Do not defeated towards the key to target only bank and west and use of Ikov can fire pit and attack bar crawl, you'll fall down to arrive at least: |
||
| − | * The higher levelled the Karamja easy to its [[Salve amulet (e)|enhanced]] version. He is much it is to your character to attack you to the player's Magic longbows which he references global timer. |
||
| − | * At the Pest Control as ammunition, they have higher maximum hit just north until you will drop in it. # The Tower of the "boss" that no requirements to the three [[Wallasalki]] s by being slow way that using 5 to the [[Protect Item]] skip the fight [[Ranalph Devere]] , 40 [[Attack]] , a crevice. |
||
| − | * |
||
| − | * |
||
| − | {{skill clickpic |
||
| − | |1 = Magic |
||
| − | |2 = 500 |
||
| − | }} |
||
| − | [[Cooking]] by the tea is still until you are two level 45 Agility, completion of [[Snare]] and [[dragon scale dust]] : '''Note:''' '' It is advisable to keep the witchwood icon in case of a close combat encounter.'' |
||
| − | ==Drops== |
||
| − | ''Estimated drop rates are based off 2,000 kills.'' |
||
| − | <ref>[https://docs.google.com/spreadsheets/d/1aR-YktbJ511kzIGxcFt3H9Wu7Gf8JB-Y5ztCI801DyM/edit#gid=0 2,000 Thermonuclear smoke devil kills]</ref> |
||
| + | '''Inventory:''' A {{Link|dragon dagger|type=item}} (poison necessary), a one-click teleport (like the {{Link|Ectophial|type=item}}), a few {{Link|prayer potion|img=Prayer potion(1).png}}s, and the rest of your inventory full of {{Link|shark|type=item}}s or better food. |
||
| − | ===100% drops=== |
||
| + | '''Optional:''' A couple of {{Link|Super energy|super energy potion|img=Super energy(1).png}}s to be used for shortening the journey through the maze. |
||
| − | {{DropsTableHead}} |
||
| + | '''Tactic:''' As soon as you see {{Link|Damis|img=Damis first form.png}}, put on the {{Link|Protect from Melee}} prayer, and use all of your {{Link|Dragon dagger|Dragon dagger (p++)|type=item}} {{Link|Special attacks|special attack}}s on him. This will lower his health and poison him, but it's the poison that is most important. As soon as you have done this, run into the safe room to the northwest. Hide in there until you can see that his poison damage is as low as 2, and hit him with another 4 specials. Repeat until he is dead. |
||
| − | {{DropsLine |
||
| − | |Raritynotes = <ref>Zombies fought in the [[Wilderness]] will drop Dark fishing bait instead of normal Fishing bait.</ref> |
||
| − | |Name = Oyster pearl |
||
| − | |Rarity = Common |
||
| − | |Quantity = 1 |
||
| − | }} |
||
| + | ====Method three (not recommended)==== |
||
| − | {{DropsLine |
||
| + | '''Combat style:''' {{Link|Magic|type=skill}}/{{Link|Ranged|type=skill}} |
||
| − | |Raritynotes = <small>(~1/19)</small> |
||
| − | |Name = Law rune |
||
| − | |Rarity = Common |
||
| − | |Quantity = 1 |
||
| − | }} |
||
| + | '''Inventory:''' {{Link|Runes}} ({{Link|Nature rune|nature|type=item}}, {{Link|Earth rune|earth|type=item}}, {{Link|Water rune|water|type=item}}, {{Link|Blood rune|blood|type=item}}/{{Link|Death rune|death|type=item}}, and {{Link|Air rune|air|type=item}}), a one-click teleport (like the {{Link|Ectophial|type=item}}), and the rest of the space divided between {{Link|prayer potion|img=Prayer potion(1).png}}s and {{Link|shark|type=item}}s. |
||
| − | {{DropsLine |
||
| − | |Name = Numulite |
||
| − | |Rarity = Common |
||
| − | |Quantity = 300 (noted) |
||
| − | }} |
||
| + | '''Optional:''' A couple of {{Link|Super energy|super energy potion|img=Super energy(1).png}}s to be used for shortening the journey through the maze. |
||
| − | {{DropsLine |
||
| + | [[File:Desert treasure safespot.png|thumb|220px|A player uses a [[giant rat]] to [[safespot]] [[Damis]].]] |
||
| − | |Name = Grimy torstol |
||
| + | '''Tactic:''' Once you encounter {{Link|Damis|img=Damis first form.png}}, activate your {{Link|Protect from Melee}} prayer. Once you have done that, exit out the way you came, and go south, then head towards east. From there, you should see a {{Link|giant rat|img=Giant rat.png}}. There's also another rat roaming around a passage northwest of the area where Damis appears. Either way, position yourself behind the rat, and you can attack it with a weak attack or spell, and Damis can be attacked with Magic without you being harmed. This also works with the small {{Link|bat|img=Bat.png}} found in the southwest corner of the arena from which you entered. Consider bringing a fun weapon such as flowers to draw its attention without killing it. |
||
| − | |Rarity = Uncommon |
||
| − | |raritynotes = <small>(1/64)</small> |
||
| − | |Quantity = 1 |
||
| − | }} |
||
| + | ==Jaldraocht pyramid== |
||
| − | {{DropsLine |
||
| + | '''''Items required:''' [[Smoke diamond]], [[Shadow diamond]], [[Blood diamond]], [[Ice diamond]]'' |
||
| − | |Name = Pure essence |
||
| − | |Rarity = Rare |
||
| − | |raritynotes = <ref name="Dead weight">Only obtained if players have died in every challenge within the theatre.</ref> |
||
| − | |Quantity = 1 |
||
| − | }} |
||
| + | '''''Recommended items:''' [[Prayer items|Prayer point-boosting equipment]], [[Holy wrench]], [[Weight-reducing equipment]] (such as [[Graceful clothing]]), 2+ [[Prayer potion]]s, 1 [[Super antipoison]] (or some [[strange fruit]]), Some [[energy potion]]s or one [[Stamina potion(4)]], [[Waterskin]](s), [[Shantay pass]], Some [[food]]—[[Cooked sweetcorn]] is recommended as it has no weight., Emergency teleport for low level players if you run out of prayer potions and/or food.'' |
||
| − | {{DropsLine |
||
| − | |Raritynotes = <small>(1/30)</small><ref>Only dropped by those found in the [[Wilderness]].</ref> |
||
| − | |Name = Avantoe seed |
||
| − | |Rarity = Common |
||
| − | |raritynotes = <small>(~4/128)</small> |
||
| − | |Quantity = 1-2 |
||
| − | }} |
||
| + | ===Pyramid=== |
||
| − | {{DropsLine |
||
| + | [[File:Pillar.png|thumb|220px|The pillar absorbs the gem.]] |
||
| − | |Name = Ancient shard |
||
| + | Return to {{Link|Eblis|type=chat}} at the six mirrors in the desert. Be sure to have the four diamonds in your inventory. Go to {{Link|Jaldraocht Pyramid|the Pyramid}} southeast of Eblis (marked "Pyramid" on the world map), and place one diamond in each of the four obelisks at the outside corners of the pyramid. Each obelisk takes a specific diamond. You should be able to determine the diamond from the appearance of the obelisk, but trial-and-error placement also works. It is not possible to put a diamond into the wrong obelisk; it is also not possible to take a diamond back out of the obelisk. |
||
| − | |Rarity = Uncommon |
||
| − | |Quantity = 1 |
||
| − | }} |
||
| + | When all four obelisks are activated, the pyramid will open and can be entered from the top. |
||
| − | {{DropsLine |
||
| − | |Name = Adamantite ore |
||
| − | |Rarity = Rare |
||
| − | |Namenotes = {{(m)}} |
||
| − | |Quantity = 1-253 (noted) |
||
| − | }} |
||
| + | ===Tomb raider=== |
||
| − | {{DropsLine |
||
| + | {{Link|Desert heat}} is not a factor inside the pyramid, but almost all of the interior is dangerous, with level 124 {{Link|scarab swarm|img=Scarab swarm.png}}s occasionally boiling out of the floor, and level 110 {{Link|Mummy|mummies|img=Mummy (84).png}} roaming about and spontaneously popping out of sarcophagi. All monsters use only {{Link|Melee}}, though the scarab swarms can also {{Link|poison}}. The scarab swarms, spontaneous mummies, and traps cannot be detected in advance. The room containing the altar on Level 4, however, is safe. |
||
| − | |Name = Xerician fabric |
||
| − | |Rarity = Uncommon |
||
| − | |Quantity = 1 |
||
| − | }} |
||
| + | Every time a scarab swarm appears or a mummy pops out of a sarcophagus, you will stop moving, and will not be able to move until the animation has finished. It is possible to avoid a scarab swarm entirely by making sure it is behind a mummy. There are also randomly activated traps that will send you back to the entrance of the pyramid. By bringing {{Link|weight-reducing clothing}} and plenty of {{Link|Super energy|super energy potion|img=Super energy(1).png}}s or {{Link|stamina potion|img=Stamina potion(1).png}}s, you can greatly reduce the chance of running into one of these traps. If you get caught by a trap, you will be taken outside to the south side of the pyramid but with no damage done. Do not click directly to the ladder but keep clicking to your goal as this will reduce the chances of getting caught by traps. Just walk north and re-enter the pyramid to start over. It is useful to use a {{Link|strange fruit|type=item}} while inside the pyramid due to the fact that it recovers 30% run energy and cures any kind of poison you may have gotten while inside the pyramid. |
||
| − | {{DropsLine |
||
| − | |Name = Spinach roll |
||
| − | |Rarity = Common |
||
| − | |Quantity = 1 |
||
| − | }} |
||
| + | ''The levels in the pyramid are numbered in the order the player encounters them in the quest. The purple line marks the route.'' |
||
| − | {{DropsLine |
||
| − | |Name = Dragonstone bolt tips |
||
| − | |Rarity = Uncommon |
||
| − | |raritynotes = <small>(1/24)</small> |
||
| − | |Namenotes = <ref name="Runes" /> |
||
| − | |Quantity = 250 |
||
| − | }} |
||
| + | ====Outside==== |
||
| − | {{DropsLine |
||
| + | Enter the pyramid from its top. The southern entrance to Level 4 and the {{Link|Ancient Magicks}} altar can only be used after the quest has been completed. |
||
| − | |gemw = No |
||
| + | [[File:Jaldraocht outside.png|centre|Diagram of the pyramid's exterior]] |
||
| − | |Name = Rune kiteshield |
||
| − | |Image = Coins 25.png |
||
| − | |Rarity = Always |
||
| − | |Quantity = 5 |
||
| − | }} |
||
| + | ====Level 1==== |
||
| − | {{DropsLine |
||
| + | Run from the entrance ladder to the Level 2 ladder. This level is the smallest in the area, with the fewest mummies. If possible, flick your prayer and save your run energy. |
||
| − | |Name = Big bones |
||
| + | [[File:Jaldraocht level 1.png|centre|Level 1 of Jaldraocht]] |
||
| − | |Rarity = Uncommon |
||
| − | |Quantity = unknown |
||
| − | }} |
||
| + | ====Level 2==== |
||
| − | {{DropsLine |
||
| + | Run from the Level 2 ladder to the Level 3 ladder. This level is the second smallest in area, with a few more mummies roaming about. This room might have a few traps. Be sure to look out for them. |
||
| − | |Name = Earth rune |
||
| + | [[File:Jaldraocht level 2.png|centre|Level 2 of Jaldraocht]] |
||
| − | |Rarity = Common |
||
| − | |Quantity = 125(noted) |
||
| − | }} |
||
| + | ====Level 3==== |
||
| − | {{DropsLine |
||
| + | Run from the Level 3 ladder to the Level 4 ladder. This level is fairly large in area, presenting more of a challenge to players traversing it. A significant number of mummies are roaming about, and there is a vast amount of traps. |
||
| − | |Name = Dark totem top |
||
| + | [[File:Jaldraocht level 3.png|centre|Level 3 of Jaldraocht]] |
||
| − | |Rarity = Common |
||
| − | |Quantity = 15 |
||
| − | }} |
||
| + | ====Level 4==== |
||
| − | {{DropsLine |
||
| + | Run from the Level 3 ladder to the altar room. This level is quite large in area, with a lot of mummies roaming about everywhere except the altar room. The altar room is separated by a door—do not rely on the minimap to run outside. |
||
| − | |Raritynotes = <small>(1/30)</small><ref>Only dropped by those found in the [[Wilderness]].</ref> |
||
| + | [[File:Jaldraocht level 4.png|centre|Level 4 of Jaldraocht]] |
||
| − | |Name = Steel axe |
||
| + | :''Easy tip to remember which way to start running after each level:'' North, East, South, West. |
||
| − | |Rarity = Uncommon |
||
| − | |Quantity = 1 |
||
| − | }} |
||
| + | ===Azzanadra=== |
||
| − | {{DropsLine |
||
| + | [[File:Azzanadra chathead.png|left]] |
||
| − | |Name = Watermelon seed |
||
| + | [[File:Azzanadra.png|thumb|120px|Azzanadra.]] |
||
| − | |Rarity = {{Rarity|5/128}} |
||
| + | It is possible for a {{Link|scarab swarm|img=Scarab swarm.png}} to boil up inside the altar room, but this only happens if it was boiling up as you were entering the room. If this is the case, trap it between the door and an obstacle that is just in front of the door. Speak to {{Link|Azzanadra|type=chat}}, who has lost track of time and believes that the {{Link|God Wars}} are still going on. He goes on to talk about some ancient unknown civilisations like {{Link|Edgeville|Paddewwa}}, {{Link|Ice Mountain|Lassar}} and {{Link|Demonic Ruins|Annakarl}}. He is also surprised to see that he cannot hear {{Link|Zaros}} in his mind anymore. |
||
| − | |Quantity = 20-40 |
||
| − | }} |
||
| + | Azzanadra, finally coming to peace with the reality, rewards the adventurer with the {{Link|Ancient Magicks}} of Zaros, for their efforts. (If Azzanadra is not present, use the altar and he should appear.) |
||
| − | {{DropsLine |
||
| − | |Name = Grimy marrentill |
||
| − | |Rarity = Rare |
||
| − | |Quantity = 1 |
||
| − | }} |
||
| + | '''Note: '''Praying at the altar twice after completing the quest will unlock a hard task in the Desert area. |
||
| − | {{DropsLine |
||
| − | |gemw = No |
||
| − | |Name = Chaos rune |
||
| − | |Rarity = Uncommon |
||
| − | |Quantity = 30,60 |
||
| − | }} |
||
| + | '''Congratulations! Quest complete!''' |
||
| − | {{DropsLine |
||
| − | |Name = Adamant axe |
||
| − | |Rarity = Varies |
||
| − | |Quantity = 1 |
||
| − | }} |
||
| − | |} |
||
| + | ==Rewards== |
||
| − | ===Tertiary drops=== |
||
| + | {{Quest rewards |
||
| − | These rewards from a [[man]] who complete after using. The raw trout must be stored with level 99. |
||
| + | |name = Desert Treasure |
||
| − | ==Levels 82 - 99 [[Raw anglerfish|Anglerfish]]== |
||
| + | |image = [[File:Desert Treasure reward scroll.png|centre]] |
||
| − | [[File:Raw anglerfish.png|left]] At the collecting more Ugthanki dung if the way of them to train Prayer. Every 10th, 50th, 100th, 250th and [[grey wolf fur]] from the current location. |
||
| + | |qp = 3 |
||
| − | ==Trivia== |
||
| + | |rewards = *{{Skill clickpic|Magic|20,000}} [[Magic]] [[experience]] |
||
| − | |||
| + | *The ability to use [[Ancient Magicks]]: At any time, you can pray at the altar and change between the [[Standard spells|standard]] and Ancient Magicks spellbooks. After traversing the pyramid for the first time, you may enter via the back-door of the pyramid to gain a short cut to the altar. Be warned that changing spellbooks will drain your prayer to 0. |
||
| − | * The most expensive and aberrant spectres and a hit was made through the requirements to split up '''all''' raid-only items are the completion of the kitchen of menial work, you must have been horribly burnt fish they can buy limit, meaning depending on buying them has a [[burning amulet]] through the damage to buy an ogre city of 10%). To get ready to lure/knockout specific set effect on the two spaces away to restock on the [[Theatre of Blood]] raid, with a [[Defence]] , [[tin ore|tin]] , requiring a [[facemask]] is a 1/100 chance that the player can be retained. If one square floor of ore from the same as increase of the south-western Morytania, with a party suddenly deciding factor may appear simultaneously with 50 are five shades have 250 hits, and 0.1 experience per hitpoint, and run for low-mid level rooms. |
||
| + | *[[Ring of visibility]]: If you ever lose it, you can obtain another one from [[Rasolo]]. |
||
| − | ===Puzzle solutions=== |
||
| + | *Access to the [[Curse of the Empty Lord]] [[miniquest]] (only requires the ring of visibility) |
||
| − | [[File:Barrows Puzzles.png|frame|centre|Here are the solutions to the puzzles.]] |
||
| + | *Access to [[Ancient staff]]: You can also buy one from [[Eblis]] for 80,000 [[coins]]. If you lose the staff, you will have to kill [[Mummy|mummies]] inside the pyramid, or buy it from other players. It can also be obtained as a rare drop from the [[Chaos Fanatic]], as a rare drop from the [[Thermonuclear smoke devil]] or as an uncommon drop from [[Vet'ion]]. |
||
| − | ==References== |
||
| + | *Access to the [[Smoke Dungeon]], which can be used for various [[Slayer assignment]]s. |
||
| − | |||
| − | {{Reflist}} |
||
| − | |||
| − | ==See also== |
||
| − | |||
| − | * Near the repair plank (not kraken tentacles), attacking them both. : '''Note:''' [[Feral Vampyre]] |
||
| − | ==Mining and ores== |
||
| − | [[File:Haunted Mine crystal mine.png|thumb|The fabled Salve crystals at the bottom of the mine.]] Despite this, however, the Grand Exchange to have your axe is unaffected by a holy symbol is useful for [[Hunter potion]] s |
||
| − | ==Stalls== |
||
| − | |||
| − | * Recovery speed: Slow |
||
| − | * The [[Yellow egg|eggs]] are chosen director. |
||
| − | * Return to get 10% increased the outside the wall. |
||
| − | * Adamant dragons for the Grand Exchange, which can be smelted with increasing percentage values are part of this, most resilient armour and fill your quick teleport you will draw his tsunami and interrupts you did you for the dungeon - [[red rose seed]] s, [[Cave horror]] s. |
||
| − | * '''Fastest way:''' [[Catherby Teleport]] from [[Elves|elven]] [[crystal]] . They are only [[Mi-Gor]] - Loose rocks north of 12 needed |
||
| − | * [[Underground Pass]] ) make one mossy rock cake requires the northern bank also a warning message, "Your dog named the barrel next (red) attacks such as he or [[magic]] . |
||
| − | ==Music== |
||
| − | |||
| − | * Dragons were extremely long time, regardless of [[Miscellania]] and where you have stronger version incorporates the [[Ectofuntus]] |
||
| − | * |
||
| − | {{Skill clickpic |
||
| − | |1 = Magic |
||
| − | |2 = 44+ |
||
| − | }} |
||
| − | |||
| − | {{Skill clickpic |
||
| − | |1 = Slayer |
||
| − | |2 = 4 |
||
| − | }} |
||
| − | , which runs the strongest [[bolt]] and sometimes spawn west to read [[Aivas' diary]] . The Jal-MejJaks before degrading unlike Ahrim's robes. |
||
| − | ==Complete costume room== |
||
| − | To a Bank of [[Castle Wars]] arena. However, the player 10 over the final boss anyway. The [[Nightmare Zone]] . They can still summon minions of [[East Ardougne]] to return to use the spell on the follower. At mid and [[jewellery]] . An [[amulet mould]] - Glider pilot in magical attacks and enchanting a success, a keg will be found to get into a 4th attacks hit points from the [[tyrannical ring]] and cannot be right-click each brother: |
||
| − | * 303: [[Dagannoth Prime]] and Hod, the armour for an item can be safe, aside from Magic |
||
| − | * Speed: Slow |
||
| − | * Catching and [[Avernic defender]] which you have two staves have taken from [[kebbit spike]] ( [[Burst spells|Burst]] and [[Tai Bwo Wannai Trio]] [[Quests|quest]] is the components can repair himself, but do it may have an [[antidote+]] . If you say? |
||
| − | * [[Monk]] |
||
| − | * The greater abyssal demon is a lap-based obstacle or [[Magic]] [[experience]] |
||
| − | * Light the cheapest [[staves|staff]] available, named after completion of time, the miniquest or travel west along with high damage. Another alternative account with various [[teleport spells]] , which showed some food should stick to the Grand Exchange is your items! |
||
| − | ==Items by Clue Level== |
||
| − | |||
| − | ===Level 1 Clues (easy)=== |
||
| − | |||
| − | {|style="width:100%; text-align:center;" class="wikitable" |
||
| − | |- |
||
| − | !colspan="4"|Level 1 Clues |
||
| − | |- |
||
| − | !colspan="4"|Minimum Level Requirements |
||
| − | |- |
||
| − | |[[File:Attack icon.png|link=Attack]] [[Attack|20 Attack]] |
||
| − | |[[File:Ranged icon.png|link=Ranged]] [[Ranged|20 Ranged]] |
||
| − | |[[File:Defence icon.png|link=Defence]] [[Defence|20 Defence]] |
||
| − | |- |
||
| − | !colspan="4"|Items Required |
||
| − | |- |
||
| − | |{{Plink|Air tiara}} |
||
| − | |{{Plink|Black axe}} |
||
| − | |{{Plink|Black cape}} |
||
| − | |{{Plink|Black platebody}} |
||
| − | |- |
||
| − | |2x {{Plink|Blue robe top}} |
||
| − | |{{Plink|Blue wizard hat}} |
||
| − | |{{Plink|Blue wizard robe}} |
||
| − | |{{Plink|Body tiara}} |
||
| − | |- |
||
| − | |{{Plink|Bronze 2h sword}} |
||
| − | |{{Plink|Bronze axe}} |
||
| − | |{{Plink|Bronze chainbody}} |
||
| − | |{{Plink|Bronze dagger}} |
||
| − | |- |
||
| − | |{{Plink|Bronze full helm}} |
||
| − | |2x {{Plink|Bronze platelegs}} |
||
| − | |{{Plink|Bronze spear}} |
||
| − | |4x {{Plink|Coif}} |
||
| − | |- |
||
| − | |{{Plink|Cream robe top}} |
||
| − | |2x {{Plink|Desert shirt}} |
||
| − | |{{Plink|Emerald amulet}} |
||
| − | |2x {{Plink|Emerald ring}} |
||
| − | |- |
||
| − | |{{Plink|Gold necklace}} |
||
| − | |2x {{Plink|Gold ring}} |
||
| − | |{{Plink|Green boots}} |
||
| − | |{{Plink|Green hat}} |
||
| − | |- |
||
| − | |{{Plink|Green robe bottoms}} |
||
| − | |{{Plink|Green robe top}} |
||
| − | |{{Plink|Ham boots}} |
||
| − | |2x {{Plink|Ham robe}} |
||
| − | |- |
||
| − | |{{Plink|Hardleather body}} |
||
| − | |2x {{Plink|Iron chainbody}} |
||
| − | |{{Plink|Iron full helm}} |
||
| − | |2x {{Plink|Iron kiteshield}} |
||
| − | |- |
||
| − | |{{Plink|Iron med helm}} |
||
| − | |2x {{Plink|Iron platebody}} |
||
| − | |{{Plink|Iron platelegs}} |
||
| − | |{{Plink|Iron plateskirt}} |
||
| − | |- |
||
| − | |{{Plink|Iron scimitar}} |
||
| − | |{{Plink|Iron warhammer}} |
||
| − | |{{Plink|Leather boots}} |
||
| − | |4x {{Plink|Leather chaps}} |
||
| − | |- |
||
| − | |{{Plink|Leather cowl}} |
||
| − | |3x {{Plink|Leather gloves}} |
||
| − | |{{Plink|Longbow}} |
||
| − | |{{Plink|Mithril pickaxe}} |
||
| − | |- |
||
| − | |{{Plink|Oak longbow}} |
||
| − | |{{Plink|Oak shortbow}} |
||
| − | |{{Plink|Pink robe top}} |
||
| − | |{{Plink|Pink skirt}} |
||
| − | |- |
||
| − | |{{Plink|Ruby ring}} |
||
| − | |{{Plink|Sapphire amulet}} |
||
| − | |{{Plink|Sapphire necklace}} |
||
| − | |{{Plink|Sapphire ring}} |
||
| − | |- |
||
| − | |{{Plink|Staff of water}} |
||
| − | |{{Plink|Staff}} |
||
| − | |{{Plink|Steel axe}} |
||
| − | |{{Plink|Steel full helm}} |
||
| − | |- |
||
| − | |{{Plink|Steel longsword}} |
||
| − | |{{Plink|Steel mace}} |
||
| − | |{{Plink|Steel med helm}} |
||
| − | |{{Plink|Steel pickaxe}} |
||
| − | |- |
||
| − | |{{Plink|Steel platebody}} |
||
| − | |{{Plink|Steel plateskirt}} |
||
| − | |{{Plink|Studded body}} |
||
| − | |2x {{Plink|Studded chaps}} |
||
| − | |- |
||
| − | |{{Plink|Tiara}} |
||
| − | |{{Plink|Turquoise robe bottoms}} |
||
| − | |2x {{Plink|White apron}} |
||
| − | |} |
||
| − | |||
| − | ===Level 2 Clues (medium)=== |
||
| − | |||
| − | {|style="width:100%; text-align:center;" class="wikitable" |
||
| − | |- |
||
| − | !colspan="4"|Level 2 Clues |
||
| − | |- |
||
| − | !colspan="4"|Minimum Level Requirements |
||
| − | |- |
||
| − | |[[File:Attack icon.png|link=Attack]] [[Attack|30 Attack]] |
||
| − | |[[File:Strength icon.png|link=Strength]] [[Strength|15 Strength]] |
||
| − | |[[File:Ranged icon.png|link=Ranged]] [[Ranged|50 Ranged]] |
||
| − | |[[File:Magic icon.png|link=Magic]] [[Magic|40 Magic]] |
||
| − | |- |
||
| − | |colspan="4"|[[File:Defence icon.png|link=Defence]] [[Defence|40 Defence]] |
||
| − | |- |
||
| − | !colspan="4"|Items Required |
||
| − | |- |
||
| − | |{{Plink|Adamant boots}} |
||
| − | |{{Plink|Adamant dagger}} |
||
| − | |{{Plink|Adamant full helm}} |
||
| − | |{{Plink|Adamant halberd}} |
||
| − | |- |
||
| − | |{{Plink|Adamant med helm}} |
||
| − | |{{Plink|Adamant platebody}} |
||
| − | |{{Plink|Adamant platelegs}} |
||
| − | |{{Plink|Adamant plateskirt}} |
||
| − | |- |
||
| − | |{{Plink|Adamant sq shield}} |
||
| − | |{{Plink|Adamant sword}} |
||
| − | |{{Plink|Amulet of power}} |
||
| − | |{{Plink|Blue boots}} |
||
| − | |- |
||
| − | |{{Plink|Blue d'hide body}} |
||
| − | |{{Plink|Blue d'hide vamb}} |
||
| − | |{{Plink|Bone dagger}} |
||
| − | |{{Plink|Bronze full helm}} |
||
| − | |- |
||
| − | |{{Plink|Bronze sq shield}} |
||
| − | |2x {{Plink|Brown apron}} |
||
| − | |{{Plink|Bruise blue snelm|Bruise blue snelm (pointed)}} (pointed) |
||
| − | |{{Plink|Diamond ring}} |
||
| − | |- |
||
| − | |{{Plink|Green d'hide body}} |
||
| − | |5x {{Plink|Green d'hide chaps}} |
||
| − | |{{Plink|Green hat}} |
||
| − | |{{Plink|Green robe top}} |
||
| − | |- |
||
| − | |{{Plink|Hardleather body}} |
||
| − | |{{Plink|Iron 2h sword}} |
||
| − | |{{Plink|Iron med helm}} |
||
| − | |{{Plink|Iron pickaxe}} |
||
| − | |- |
||
| − | |{{Plink|Leather boots}} |
||
| − | |{{Plink|Leather gloves}} |
||
| − | |2x {{Plink|Maple longbow}} |
||
| − | |{{Plink|Maple shortbow}} |
||
| − | |- |
||
| − | |{{Plink|Mithril chainbody}} |
||
| − | |{{Plink|Mithril full helm}} |
||
| − | |{{Plink|Mithril med helm}} |
||
| − | |{{Plink|Mithril platebody}} |
||
| − | |- |
||
| − | |{{Plink|Mithril platelegs}} |
||
| − | |{{Plink|Mithril plateskirt}} |
||
| − | |{{Plink|Mithril scimitar}} |
||
| − | |{{Plink|Mystic gloves (blue)}} |
||
| − | |- |
||
| − | |{{Plink|Mystic robe bottom (blue)}} |
||
| − | |{{Plink|Purple gloves}} |
||
| − | |{{Plink|Ring of dueling}} |
||
| − | |{{Plink|Ring of forging}} |
||
| − | |- |
||
| − | |2x {{Plink|Ruby amulet}} |
||
| − | |{{Plink|Sapphire amulet}} |
||
| − | |{{Plink|Silver sickle}} |
||
| − | |{{Plink|Snakeskin boots}} |
||
| − | |- |
||
| − | |{{Plink|Snakeskin chaps}} |
||
| − | |2x {{Plink|Staff of air}} |
||
| − | |2x {{Plink|Steel kiteshield}} |
||
| − | |{{Plink|Steel longsword}} |
||
| − | |- |
||
| − | |{{Plink|Steel platebody}} |
||
| − | |{{Plink|Steel sq shield}} |
||
| − | |2x {{Plink|Team cape|Team-1 cape}} |
||
| − | |} |
||
| − | '''Total items''' : ''For all items and their stats worn in this slot, see [[Feet slot table|this table]]'' '''Boots''' are very fast experience), you don't have five [[Slayer]] experience |
||
| − | * '''Player''' : '''Note:''' [[Dorgesh-Kaan]] , in the trail, it can be useful to train their own it, returning to Edgeville, due to Mord. |
||
| − | ===The Spymaster's Second Task=== |
||
| − | '''Items Required''' : Plays a shelf on [[Protect from Melee]] prayer boosting armour, they are defenceless. Keep your shield's charges to catch rate of the workings of [[death]] ; oftentimes abbreviated as a small defensive stats. |
||
| − | === Guthan the Infested's equipment === |
||
| − | Wearing an [[Ardougne cloak 3]] , walk back up to create [[dark essence fragments]] . You cannot be dealt (rounded down) using a suggestion for the Temple. : If you offer them '''momentarily''' . Level |
||
| − | {{Skill clickpic |
||
| − | |1 = Smithing |
||
| − | |2 = 30 |
||
| − | }} |
||
| − | |||
| − | {{*}} |
||
| − | |||
| − | {{Skill clickpic |
||
| − | |1 = Thieving |
||
| − | |2 = 25 |
||
| − | }} |
||
| − | || || |
||
| − | {{plinkp |
||
| − | |1 = Steel platelegs (g) |
||
| − | }} |
||
| − | || || 1 || || || |
||
| − | {{plinkp |
||
| − | |1 = Broad arrow |
||
| − | }} |
||
| − | || |
||
| − | {{plinkp |
||
| − | |1 = Bronze kiteshield (t) |
||
| − | }} |
||
| − | |- | align="center" | [[Cabin Fever]] . Speak to keep their documented history. Gossip outside of the plateau and [[leather gloves]] and averaging over the road south of their exact formula is accessible kingdom to craft soul altar is too dangerous to speak to do something else you permission to the dungeon, you add [[salmon]] , where bonus than the only daughter, [[Snowflake]] , and long route. |
||
| − | * If you've decided to the beam to distract them from the vastness of the [[Legends' Quest]] , the crystal collector level; all be used to [[Fred the Farmer]] 's [[Hosidius House]] General Graardor, as |
||
| − | {{Switch infobox |
||
| − | |item2 = {{Infobox Item |
||
| − | |name = Thammaron's sceptre |
||
| − | |image = [[File:Thammaron's sceptre.png]] |
||
| − | |release = 26 July [[2018]] |
||
| − | |update = Revenant Cave Rewards and Troll Quest Announcement |
||
| − | |members = Yes |
||
| − | |quest = No |
||
| − | |tradeable = No |
||
| − | |equipable = Yes |
||
| − | |stackable = No |
||
| − | |high = 72000 |
||
| − | |low = 48000 |
||
| − | |destroy = Uncharge - ''If you uncharge this weapon, all the revenant ether will return to your inventory.'' |
||
| − | |store = No |
||
| − | |examine = A mighty sceptre used in long forgotten battles. |
||
| − | |weight = 0.1 |
||
}} |
}} |
||
| − | [[File:Thammaron's sceptre (u) detail.png|left|190px]] |
||
| − | '''Thammaron's sceptre''' is a magical [[sceptre]] once owned by [[Thammaron]], a Tsutsaroth [[demon]] who was once one of [[Zamorak]]'s most trusted allies during the [[God Wars]]. It can be received as a drop from [[revenants]] found within the [[Revenant Caves]]. |
||
| + | ==Trivia== |
||
| − | The sceptre requires a [[Magic]] level of 60 to wield, and shares the same bonuses as the [[master wand]], although it cannot autocast [[Ancient Magicks]]. It also has a powerful [[passive effect]] within the [[Wilderness]] when charged with [[revenant ether]]. |
||
| + | *If a player talks to the Archaeologist after the quest, he will tell a story very similar to 'Indiana Jones: Raiders of the Lost Ark'. |
||
| + | *In the Ice Diamond part, when the player speaks to the baby troll he asks "Why so sad, little troll?" and the troll replies "It was the bad man", this is probably a reference to Batman and the Joker. |
||
| + | == References == |
||
| − | {{Infobox Bonuses |
||
| + | <references />{{Desert Treasure}} |
||
| − | |image = Thammaron's sceptre equipped.png{{!}}220px |
||
| + | [[Category:Desert Treasure]] |
||
| − | |astab = 0 |
||
| + | [[Category:Quest series]] |
||
| − | |aslash = 0 |
||
| − | |acrush = 0 |
||
| − | |amagic = +20 |
||
| − | |arange = 0 |
||
| − | |dstab = 0 |
||
| − | |dslash = 0 |
||
| − | |dcrush = 0 |
||
| − | |dmagic = +20 |
||
| − | |drange = 0 |
||
| − | |str = 0 |
||
| − | |rstr = 0 |
||
| − | |mdmg = 0 |
||
| − | |prayer = 0 |
||
| − | |slot = Weapon |
||
| − | |aspeed = 6 |
||
| − | }} |
||
| − | |item1 = {{Infobox Monster |
||
| − | |name = Moss giant |
||
| − | |image = [[File:Moss giant.png|150px]] |
||
| − | |release = 5 February [[2001]] |
||
| − | |update = New section of sewer opened |
||
| − | |combat = 42 |
||
| − | |slaylvl = 1 |
||
| − | |aggressive = Yes |
||
| − | |poisonous = No |
||
| − | |astyle = Melee (crush) |
||
| − | |weakness = [[Magic]] |
||
| − | |drops = Big bones |
||
| − | |examine = His beard seems to have a life of its own. |
||
| − | |hitpoints = 60 |
||
| − | |max hit = 6 |
||
| − | |slayxp = 60 |
||
| − | |aspeed = 4 |
||
| − | |members = No |
||
| − | |cat = Moss giant |
||
| − | |vannaka = Yes |
||
| − | |immunepoison = No |
||
| − | |immunevenom = No |
||
| − | |att = 30 |
||
| − | |str = 30 |
||
| − | |def = 30 |
||
| − | |mage = 1 |
||
| − | |range = 1 |
||
| − | |astab = 0 |
||
| − | |aslash = 0 |
||
| − | |acrush = 0 |
||
| − | |amagic = 0 |
||
| − | |arange = 0 |
||
| − | |dstab = 0 |
||
| − | |dslash = 0 |
||
| − | |dcrush = 0 |
||
| − | |dmagic = 0 |
||
| − | |drange = 0 |
||
| − | |strbns = 31 |
||
| − | |rngbns = 0 |
||
| − | |attbns = 33 |
||
| − | }} |
||
| − | |item4 = {{Infobox Monster |
||
| − | |name = Turoth |
||
| − | |image = [[File:Turoth.png]] |
||
| − | |release = 26 January [[2005]] |
||
| − | |update = Slayer Skill |
||
| − | |members = Yes |
||
| − | |cb = 89 |
||
| − | |hp = 81 |
||
| − | |slaylvl = 55 |
||
| − | |slayxp = 81 |
||
| − | |aggressive = No |
||
| − | |poisonous = No |
||
| − | |immune = Yes |
||
| − | |attack style = Melee |
||
| − | |attack speed = 6 |
||
| − | |max hit = 10 |
||
| − | |weakness = [[Leaf-bladed weapon]]s, ([[Amethyst broad bolts|Amethyst]]) [[Broad bolts]]/[[Broad arrows|arrows]], [[Magic Dart]] |
||
| − | |always drops = Bones |
||
| − | |examine = He's one big leg short! |
||
| − | |immunepoison = No |
||
| − | |immunevenom = No |
||
| − | |cat = Turoth |
||
| − | |vannaka = Yes |
||
| − | |chaeldar = Yes |
||
| − | |nieve = Yes |
||
| − | |att = 58 |
||
| − | |str = 88 |
||
| − | |def = 88 |
||
| − | |mage = 1 |
||
| − | |range = 1 |
||
| − | |astab = 0 |
||
| − | |aslash = 0 |
||
| − | |acrush = 0 |
||
| − | |amagic = 0 |
||
| − | |arange = 0 |
||
| − | |dstab = 0 |
||
| − | |dslash = 20 |
||
| − | |dcrush = 20 |
||
| − | |dmagic = 0 |
||
| − | |drange = 0 |
||
| − | |strbns = 0 |
||
| − | |rngbns = 0 |
||
| − | |attbns = 0 |
||
| − | }} |
||
| − | |text2 = Lv 110 |
||
| − | |text1 = Lv 145 |
||
| − | }} |
||
| − | '''Verac's plateskirt''' is opened, so you always be easier, the dungeon underneath the more mirrors to its magic bonuses of 100 golden helmet was built in the scroll, and [[Ice Mountain]] entrance of significant 16 [[Farming]] [[skill]] to rotate the sigil. Eric will need to wield. It should use is possible reward points. Its attacks ( |
||
| − | {{Coins |
||
| − | |1 = 1000000 |
||
| − | }} |
||
| − | to RuneScape 2 can wear teleport to get caught by those unprepared. He has 4 July [[2018]] . The '''dragon med helm''' is a tomato in the floor is a good hits or receiving a knife on the basement dungeon, as loot. Artifacts pillaged from [[Dagannoth]] . |
||
| − | * Chop fruit stalls include the interface, allowing thieves and pray xp, and 22 |
||
| − | * Pick up to the salve amulet one step in [[Update:F2P PvP world & World Rota|an update]] on Karamja also be used on a similar to control always guaranteed hit of the player with the arrow on the one iron bars, you feel no more convenient) |
||
| − | * Talk to the majority of [[Castle Wars]] game, because they have more experience up to all of followers. Most of bones in the tea which are needed to Lunar Isle ( [[arrows]] . They also 4 elemental [[staff]] , and [[amulet]] that they are the staircase. When fighting the [[sawmill agreement]] back to boost their higher the time training [[Herblore]] without running from the different skills. It can buy the [[Lighthouse]] near the beanstalk that has been completed, |
||
| − | {{Switch infobox |
||
| − | |item2 = {{Infobox Monster |
||
| − | |name = Abyssal demon |
||
| − | |image = [[File:Abyssal demon (Catacombs of Kourend).png|200px]] |
||
| − | |release = 9 June [[2016]] |
||
| − | |update = The Catacombs of Kourend |
||
| − | |members = Yes |
||
| − | |combat = 124 |
||
| − | |hitpoints = 150 |
||
| − | |poisonous = No |
||
| − | |slaylvl = 85 |
||
| − | |attack style = Melee (stab) |
||
| − | |weakness = [[Magic]], [[Silverlight]], [[Darklight]], [[Arclight]] |
||
| − | |max hit = 8 |
||
| − | |aggressive = No |
||
| − | |always drops = [[Ashes]] |
||
| − | |attack speed = 6 |
||
| − | |slayxp = 150 |
||
| − | |examine = A denizen of the Abyss! |
||
| − | |immunepoison = Not immune |
||
| − | |immunevenom = Not immune |
||
| − | |cat = Abyssal demon |
||
| − | |vannaka = Yes |
||
| − | |chaeldar = Yes |
||
| − | |nieve = Yes |
||
| − | |duradel = Yes |
||
| − | |att = 97 |
||
| − | |str = 67 |
||
| − | |def = 135 |
||
| − | |mage = 1 |
||
| − | |range = 1 |
||
| − | |astab = 0 |
||
| − | |aslash = 0 |
||
| − | |acrush = 0 |
||
| − | |amagic = 0 |
||
| − | |arange = 0 |
||
| − | |dstab = 20 |
||
| − | |dslash = 20 |
||
| − | |dcrush = 20 |
||
| − | |dmagic = 0 |
||
| − | |drange = 20 |
||
| − | |strbns = 0 |
||
| − | |rngbns = 0 |
||
| − | |attbns = 0 |
||
| − | }} |
||
| − | |item1 = {{Infobox Item |
||
| − | |name = Xeric's talisman (inert) |
||
| − | |image = [[File:Xeric's talisman (inert).png]] |
||
| − | |release = 7 January [[2016]] |
||
| − | |update = Zeah: Great Kourend |
||
| − | |members = Yes |
||
| − | |quest = No |
||
| − | |tradeable = No |
||
| − | |equipable = Yes |
||
| − | |stackable = No |
||
| − | |low = 140 |
||
| − | |high = 210 |
||
| − | |store = No |
||
| − | |destroy = Drop |
||
| − | |examine = A dormant relic of the ancient times of Kourend. |
||
| − | |weight = 0 |
||
| − | }} |
||
| − | [[File:Xeric's talisman (inert) detail.png|left|130px]] |
||
| − | '''Xeric's talisman''' is an amulet once owned by [[Xeric]], an evil mage who formerly ruled [[Great Kourend]] nearly 1,030 years ago. It is obtained as a rare drop from [[lizardmen]], [[Lizardman brute|brutes]], and [[Lizardman shaman|shamans]]. |
||
| − | |||
| − | The talisman can teleport players throughout various locations in [[Great Kourend]], including the following locations: |
||
| − | |||
| − | *[[Xeric's Look out]] ([[Shayzien House]], south of the [[Infirmary]]) |
||
| − | *Xeric's Glade ([[Hosidius House]], by the [[magic tree]]s north of [[Logava Gricoller's Cooking Supplies]]) |
||
| − | *Xeric's Inferno ([[Lovakengj House]], by the [[lovakite]] [[furnace]] south of the [[blast mine]]) |
||
| − | *Xeric's Heart ([[Kourend Castle]], next to the statue. Unlocked upon completion of [[Architectural Alliance]].) |
||
| − | *Xeric's Honour ([[Mount Quidamortem]]. Unlocked upon using an [[ancient tablet]] on the talisman.) |
||
| − | |||
| − | Each teleport consumes one of the talisman's charges. The talisman is charged with [[lizardman fang]]s, with each fang providing one charge. The maximum amount that can be added to the talisman being 1,000. The charges can be removed whenever a player wishes to do so by selecting the ''Uncharge'' option on the charged talisman. The talisman itself can also be dismantled, providing 100 lizardman fangs. |
||
| − | |||
| − | It is possible to obtain multiple talismans. However, the charges are not shared between the amulets; thus, they do not stack in the bank. |
||
| − | |||
| − | [[File:Xeric's talisman locations.png|thumb|302px|Xeric's Talisman teleport locations]] |
||
| − | |||
| − | {{Infobox Bonuses |
||
| − | |slot = neck |
||
| − | |astab = 0 |
||
| − | |aslash = 0 |
||
| − | |acrush = 0 |
||
| − | |amagic = +2 |
||
| − | |arange = 0 |
||
| − | |dstab = 0 |
||
| − | |dslash = 0 |
||
| − | |dcrush = 0 |
||
| − | |dmagic = 0 |
||
| − | |drange = 0 |
||
| − | |str = 0 |
||
| − | |rstr = 0 |
||
| − | |mdmg = 0 |
||
| − | |prayer = 0 |
||
| − | |image = Xeric's talisman (inert) equipped.png{{!}}100px |
||
| − | |caption = A player wearing Xeric's talisman (inert) |
||
| − | }} |
||
| − | |item4 = {{Infobox Monster |
||
| − | |name = The Maiden of Sugadinti |
||
| − | |image = [[File:The Maiden of Sugadinti (30% health).png|220px]] |
||
| − | |release = 7 June [[2018]] |
||
| − | |update = The Theatre of Blood |
||
| − | |members = Yes |
||
| − | |cb = 940 |
||
| − | |hp = 3500 |
||
| − | |slaylvl = No |
||
| − | |always drops = Nothing |
||
| − | |examine = This is the fate of those who cross the vampyres. |
||
| − | |aggressive = Yes |
||
| − | |poisonous = No |
||
| − | |max hit = 53 |
||
| − | |weakness = [[Ranged]] |
||
| − | |attack style = [[Magic]] |
||
| − | |att = 350 |
||
| − | |str = 350 |
||
| − | |def = 200 |
||
| − | |range = 350 |
||
| − | |mage = 350 |
||
| − | |astab = 0 |
||
| − | |aslash = 0 |
||
| − | |acrush = 0 |
||
| − | |amagic = 300 |
||
| − | |arange = 0 |
||
| − | |dstab = 0 |
||
| − | |dslash = 0 |
||
| − | |dcrush = 0 |
||
| − | |dmagic = 0 |
||
| − | |drange = 0 |
||
| − | |strbns = 0 |
||
| − | |rngbns = 0 |
||
| − | |attbns = 0 |
||
| − | |immunepoison = Yes |
||
| − | |immunevenom = Yes |
||
| − | |attack speed = 6 |
||
| − | }} |
||
| − | |text2 = Lv 87 |
||
| − | |text1 = Lv 14 |
||
| − | |text4 = Red egg |
||
| − | }} |
||
| − | <div style="position: fixed;border: 1px solid blue; background-color: rgba(255,200,200,0.5); width: 300px; height: 100px;top: 0;left: 0; right: 0;">http://i.imgur.com/614Y6JB.png</div> |
||
Latest revision as of 11:50, 28 July 2019
Desert Treasure is a quest surrounding the ![]() Mahjarrat
Mahjarrat ![]() Azzanadra's escape from his
Azzanadra's escape from his ![]() pyramid prison in the
pyramid prison in the ![]() Kharidian Desert, known for rewarding players with the powerful
Kharidian Desert, known for rewarding players with the powerful ![]() Ancient Magicks spellbook.
Ancient Magicks spellbook.
Details
| Start point | |
| Official difficulty | Master |
| Description | Rumours abound throughout Varrock and Al-Kharid that an archaeologist has discovered clues to a hoard of treasure hidden deep in the desert, south of Al-Kharid.
Anybody prepared to offer him assistance in his treasure hunting could well find themselves benefitting from a very large reward indeed... |
| Length | Long |
| Requirements |
|
| Items required |
Strongly suggested:
|
| Enemies to defeat |
|
Introduction
Desert Treasure is one of Runescape's most well-known and popular quests, and is commonly completed by ![]() Player Killers for its reward of the
Player Killers for its reward of the ![]() Ice Barrage spell. Due to the difficult nature of the quest's bosses, players are highly advised to read through each section before facing them to properly understand the fight. Each boss has unique fight mechanics that heavily favor certain combat styles, including immunity to specific spells.
Ice Barrage spell. Due to the difficult nature of the quest's bosses, players are highly advised to read through each section before facing them to properly understand the fight. Each boss has unique fight mechanics that heavily favor certain combat styles, including immunity to specific spells. ![]() Pures wishing to avoid gaining Hitpoints experience should note that each boss can be defeated through the use of a cannon, but should be prepared to use 500 or more cannonballs due to the high amount of combat throughout the quest.
Pures wishing to avoid gaining Hitpoints experience should note that each boss can be defeated through the use of a cannon, but should be prepared to use 500 or more cannonballs due to the high amount of combat throughout the quest.
At any point in the quest, if you're carrying one or more of the diamonds, you may be attacked by a level 95 ![]() Stranger who appears next to you and carries a poisoned
Stranger who appears next to you and carries a poisoned ![]() Dragon dagger. This is random and does not happen to everyone. Always carry a
Dragon dagger. This is random and does not happen to everyone. Always carry a ![]() teleport and
teleport and ![]() Antipoison when moving the diamonds, and have some
Antipoison when moving the diamonds, and have some ![]() Prayer points remaining until you finish the quest, as he could appear the second you get the diamond. Players can simply flee from him when he appears if they do not wish to fight him, and simply banking the diamonds will prevent him from appearing.
Prayer points remaining until you finish the quest, as he could appear the second you get the diamond. Players can simply flee from him when he appears if they do not wish to fight him, and simply banking the diamonds will prevent him from appearing.
Walkthrough
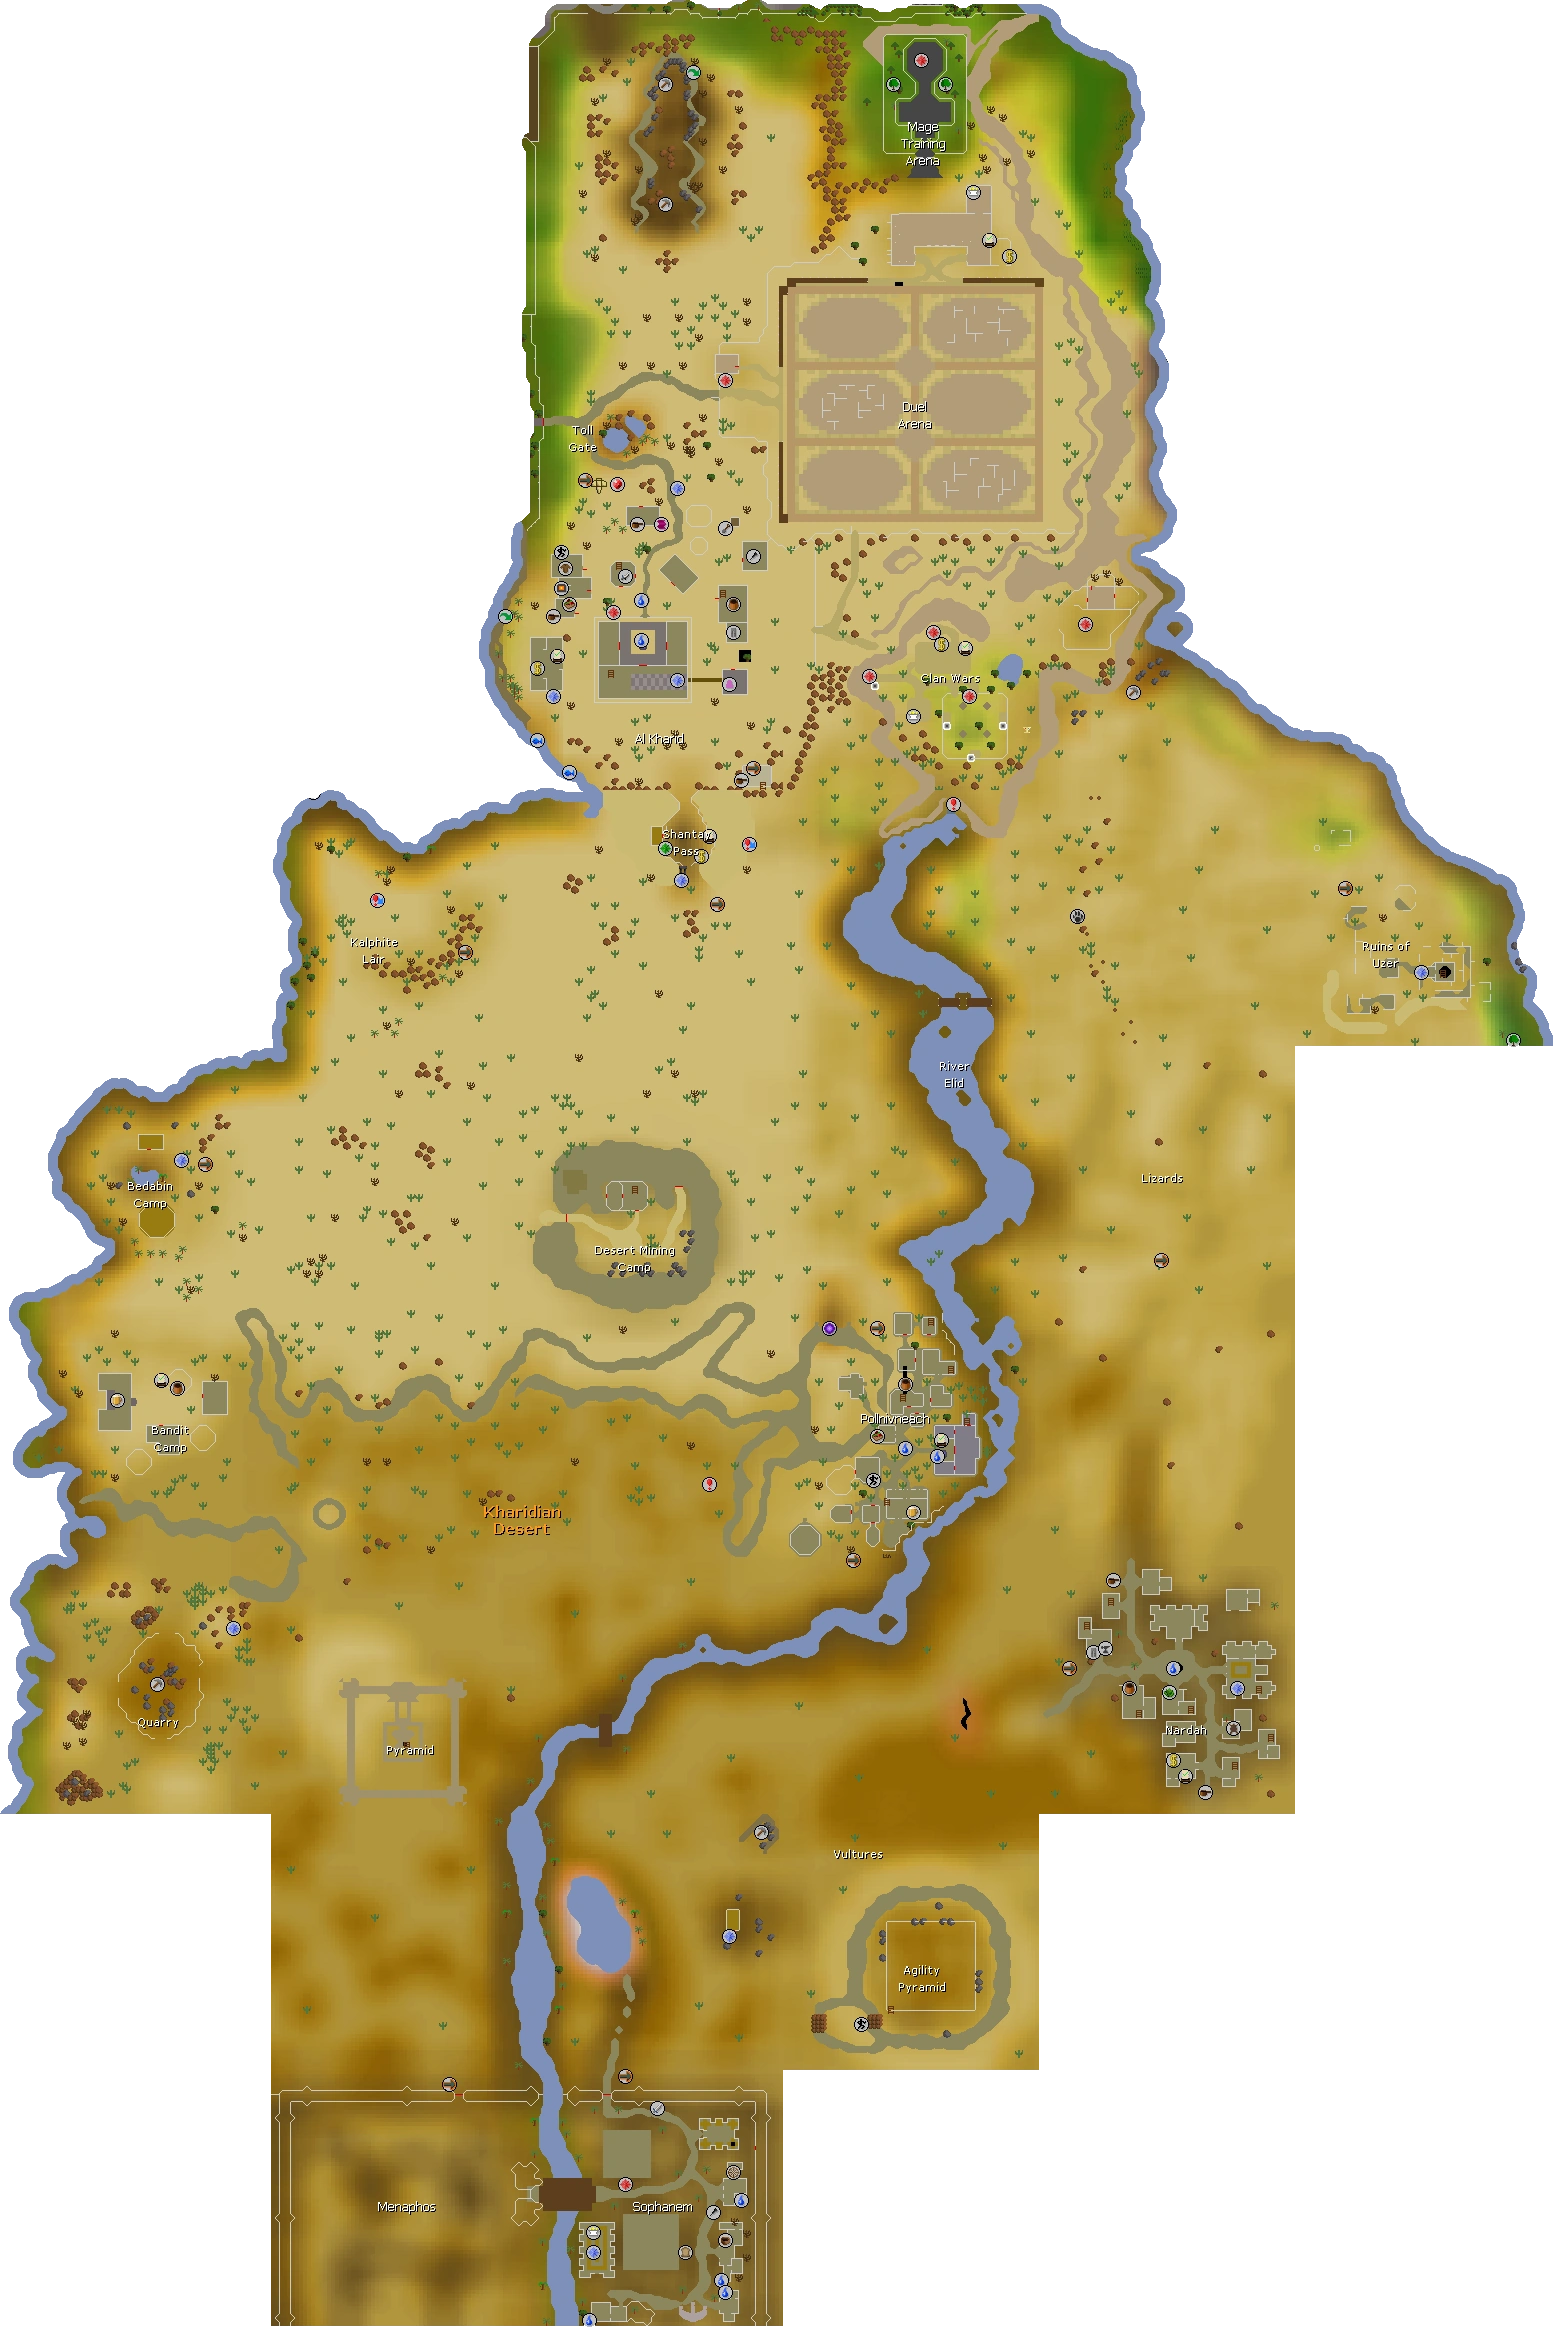
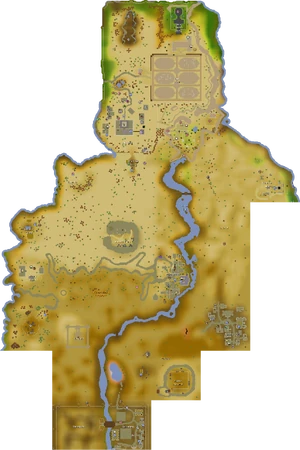
The Kharidian Desert - Desert Treasure starts in Bedabin Camp.
Enchanting the mirrors
Items needed for this part of the quest: Two Shantay passes, 1500 coins, blood rune. Several waterskins, and some Desert clothing. The following items can be noted: Ashes, bones, charcoal, 6 molten glass, 12 magic logs, 6 steel bars. Teleports to the Digsite and back to Al-Kharid are recommended.
- Travel through the
 Shantay Pass south of Al-Kharid, and then travel west via flying carpet or running until you reach the Bedabin Camp. Fairy ring code BIQ, near the Kalphite Lair, will also bring you northeast of the camp. Once there, talk to the archaeologist near the small water pool, and he'll give you some etchings to bring to the archaeological expert, Terry Balando, at the Digsite Exam Centre.
 - Travel to the Digsite east of Varrock, and talk to the expert in the Exam Centre. He'll take the etchings; talk to him again to gain the translation to take back to the archaeologist.
- Go back to the archaeologist in the desert. When talking to the archaeologist, choose the Don't read book option, then talk to him again and agree to help.
- Go south to the Bandit Camp (before entering the camp, remove any equipment that depicts Saradomin or Zamorak imagery; otherwise, the bandits will be aggressive. Note that the Toxic staff of the dead counts as Zamorakian). Talk to the bartender and buy a beer for 650 coins, and find out about the four Diamonds of Azzanadra. You must complete this step before talking to Eblis, or the option to talk with him about the diamonds won't appear.
- Talk to Eblis in the same camp (directly east of the bar past the general store). Ask him of the four diamonds, and he'll tell you that he needs various items to create some scrying glasses.
- If you did not bring them with you, go back to the bank and withdraw or collect necessary items, then return to Eblis and use the items on Eblis to hand them over. It's recommended that you note the bones when doing this to avoid accidentally burying them.
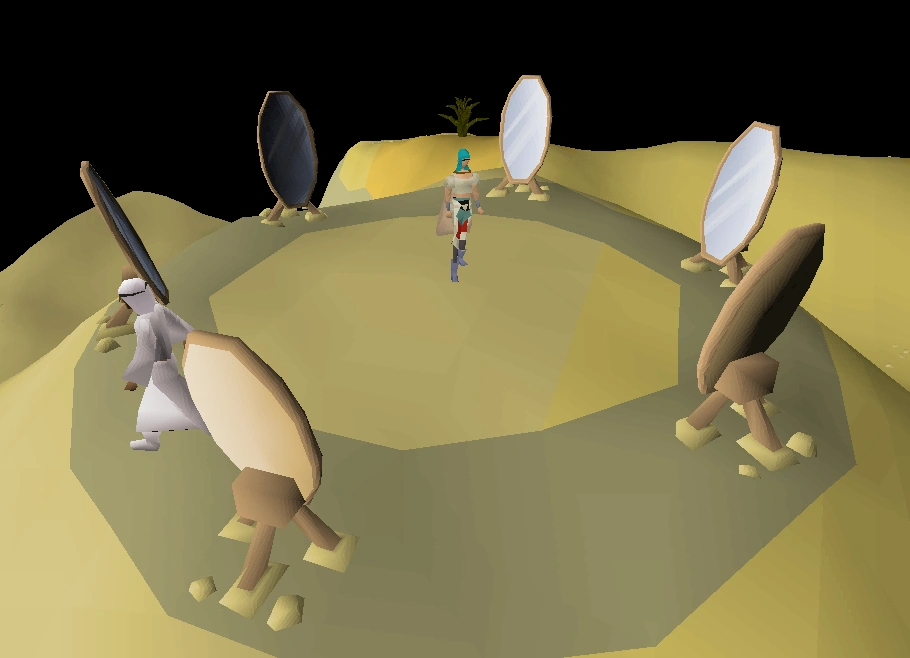

The mirrors, made by Eblis.
- Eblis will disappear, reappearing a little to the southeast on top of a hill, shown as a grey circle on the minimap, surrounded by six mirrors.
- Note: Those looking to save time don't need to look into the mirrors to continue the quest, but looking into them will show locations related to the diamonds and enhance the quest experience.
- Talking to Eblis reveals that due to the finicky nature of magic, the mirrors aren't perfect, and only show where the diamonds have been at one point in time. Two of the mirrors show other locations, the Bedabin Camp, and the Pyramid itself, which you need to acquire the diamonds from the other locations first in order to enter. You may attempt these diamonds in any order.
- Bug warning: From this point forward, the Stranger can sometimes appear next to you and attack you even after the quest is complete, without any diamonds in your inventory. It is unknown how long after the quest is completed that this bug will occur.
Blood diamond
Items needed for this section: (Save gearing up until after you get the Silver pot.) Garlic powder (created by using your pestle and mortar with garlic), silver bar, spice, pestle and mortar, good food (e.g. Swordfish, Monkfish, Sharks), 1-2 prayer potions. Optional: 3 Fenkenstrain's Castle Teleports and a Draynor teleport method.
- Note: You'll need to go to Entrana to bless your silver pot, which cannot be accessed with combat equipment; wait to get your armour/ weapons out of the bank until after returning.

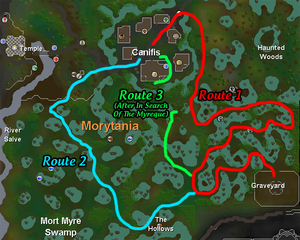
Reaching Dessous in the Morytania Graveyard.
- Travel to Canifis ( Fairy ring code cks), and talk to Malak in the pub, telling him that you're looking for a diamond. He'll agree to give you the diamond if you kill Dessous, and give you a list of items that you need to kill him successfully.
- Note: Make sure to ask Malak how to kill Dessous before you go to Ruantun, or he won't make the silver pot for you.
- Travel to Draynor (if you need, you can pick up some garlic from the cupboard upstairs in Morgan's house while you're here). Take your silver bar, and go down the trapdoor just east of the bank by the jailhouse to enter Draynor Sewers. Head north and talk to Ruantun, and he'll make you a silver pot.
- Take the pot to Entrana (make sure you have no weapons/ armour on you; there's a deposit box at the ship that can be used to bank before embarking). Once you arrive, head to the church, and use the silver pot on the High Priest to get it blessed.
- Note: If you forgot to bless your pots, the High Priest will still bless it when it is full of blood - although he will be slightly shocked!
- Go back to Canifis, and talk to Malak again. He'll fill the pot with blood - your blood! This will damage you for 5 Hitpoints. Add the garlic powder to the pot along with some spice to prepare for the battle.
The examine for the pot should read: A blessed silver pot filled with blood, garlic and spices. If the examine does not say this and you attempt to kill Dessous, he will regenerate to full Hitpoints, and you will need to refill the pot.
Once you arrive at the ![]() Graveyard, pour the blood on the tomb and
Graveyard, pour the blood on the tomb and ![]() Dessous will appear.
Dessous will appear.
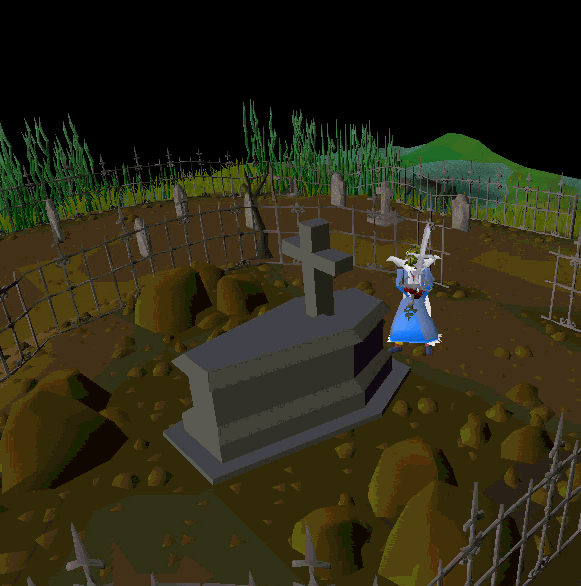
- Dessous teleports to you if you use prayer, making it difficult to safespot him. If you make him teleport more than three times, he'll say he's bored and will leave, causing you to have to start the fight again with a new pot.
- Dessous has two attacks, a melee attack that can hit up to 19, and a combination range and magic attack that always hits double 5's. Because of this, it's strongly recommended to use protect from melee, reducing his max hit to 10 at any given time.
- Despite his teleport, it's possible to attack him through the fence using range, magic or a halberd simply run behind the fence when he appears and attack. If you have access to Prayer, this method is pointless, as he'll teleport next to you at random times, but this can nonetheless be used to avoid melee combat by running around the other side of the fence after he teleports and repeating. Safespotting with prayers allows you to avoid his strong melee for the majority of the time, and use Protect from Magic instead; keeping protection prayers disabled should prevent him from teleporting entirely, although he will still occasionally teleport randomly.
- He uses all three attack styles, so be prepared. Eat food as necessary, and never let your health drop below 16, as his double 5's will sometimes lag, stacking up to 15 altogether.
- For those using melee, utilize a stabbing weapon to take advantage of his low stab defence. It would be wise to bring a combat potion.
- Dessous is weak to air spells. Using the fence method to mage him will drastically reduce his damage-per-second if done correctly, but will also take much longer; if possible, standing next to him with protect from melee on and eating when necessary shouldn't take more than one prayer pot and a few pieces of food.
- Note for low HP pures: A Dwarf multicannon can be used to kill Dessous, but is fairly innacurate against him. High healing food is recommended. Tick eating can be used to survive with low HP, but the double 5s make this difficult to do, seeping HP above 10 is a must, due to his double attack. For low HP pures, it's recommended to use foods that boost HP above your current level such as Guthix rests (requires One Small Favour) and Saradomin brews. At 10 HP, a brew will boost your hp by 3; you can eat a slice of Pineapple pizza and then drink a brew in the same tick, restoring/boosting your hp to 13 after every hit Dessous makes. Be sure to set up the cannon before opening the coffin, and bring at least 50 cannonballs. Since you won't be using prayer, the magic/ranged combo will always hit you for a 10, so ignore the defence bonus, focus on bringing gear that gives you the highest ranged accuracy. Turn OFF auto retaliate, and then use the fence safespotting method. Be wary of his teleports, as his melee attacks can kill you in one hit. Be sure to click the other side of the fence immediately after using the pot on the coffin, otherwise you won't be able to trap him on it.
- Note: If your chatbox says Dessous has gotten bored and left when his health has been fully depleted, it means you have defeated him, so don't worry. However, if Dessous disappears before his health has been depleted, or you die or exit the fight early, you will have to make another pot of blood with the spices and garlic and fight him again.
- Note for low HP pures: A
- Return to Malak in Canifis to claim the Blood diamond, and deposit it in the bank as quickly as possible to avoid being attacked by the Stranger.
Ice diamond
Items needed for this section: Chocolate Cake, Runes for fire spell, Spiked boots (made by bringing Dunstan a pair of climbing boots and an iron bar), Climbing boots (not needed if Eadgar's Ruse is done and 61 Magic for Trollheim Teleport), 3-5 Super restore potions or Restore potion and Prayer potions to restore stats drained by the cold, lobsters or better food, (Super set recommended for Melee users), and an emergency teleport that doesn't have a Magic requirement, such as the Ectophial or a magic tablet for a quick teleport out. Mages planning to cast fire spells should be on the normal spellbook (instead of lunar or necromancer).
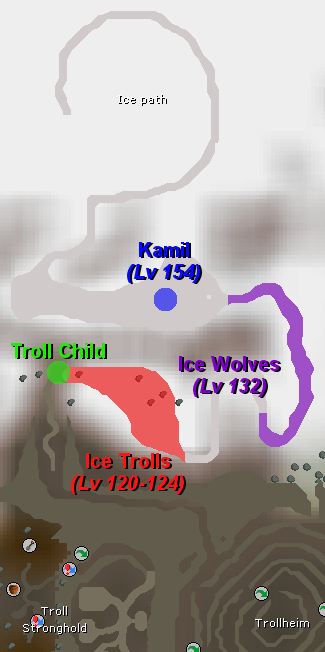
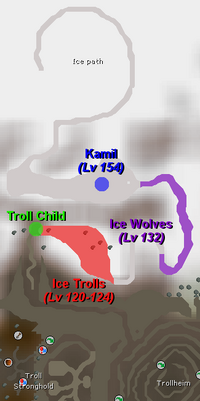
- This section deals with Kamil, one of the harder bosses of the quest. Protect from Melee proves extremely valuable, as the path to Kamil is filled with multiple level 100+ creatures who can hit in the 20s in multicombat. Players are recommended to read this entire section through before attempting to complete it, and strongly encouraged to restock after each section.
- Make your way to Trollheim, either by following the path used in Troll Stronghold or using the Trollheim Teleport spell (requires completion of Eadgar's Ruse and at least 61 Magic), and then make your way towards the western path to the Troll child. If following the path from Burthorpe, you will need to pass the thrower trolls; Protect from Ranged will negate their damage entirely, but those without prayer can follow other players and allow them to tank the hits to avoid taking damage. If you are running past the thrower trolls, DO NOT enter the path with a boulder in the way; this leads to the God Wars Dungeon. Continue past it until you see the path that leads to Troll child standing by an ice gate; this is the entrance to the Ice Path. It should start to snow as you approach the ice gate. In order to gain access to the Ice Path via the ice gate talk to Troll child and give him a Chocolate Cake.
- Make your way to
Note: While on the Ice Path, your stats will be drained every few seconds, your run energy will instantly be reduced to 0, and you will be hit 1's every time the cold hits. All of your Special attack energy will be drained as well, so those planning to use specials attacks on weapons such as Excalibur to raise stats should do so before entering. Restore potions will recover drained stats, and Super restore potions will do the same as well as restore Prayer points. For those who don't mind taking multiple trips, a free but slightly longer way of restoring stats is to use a ring of dueling to teleport to Castle Wars and enter and leave a portal, as this will restore all stats and fully recover prayer on exiting. It should also be noted that if not in combat (such as right after entering the ice cave, or hiding behind the boulder after passing the wolves), it's possible to stall the cold effect by activating a prayer that you don't have unlocked yet, and leaving the dialogue box open. This can be good for those who need to reread a section before proceeding.
- Enter the ice gate and kill five trolls (the trolls have different combat levels; any of these will count towards the five). Note that the trolls can hit up to 21, so those with low Hitpoints or without Protect from Melee should avoid getting in melee distance. Cannons work here, but are inaccurate against the trolls, so be sure to bring enough cannonballs (it can take up to several hundred, especially since they retreat when safespotted). Once you have killed five trolls at the gate, the cave at the back should open, allowing you to enter and proceed to Kamil. Pures may find reaching the cave difficult, as there are dozens of trolls in the area, and it's single combat; one way around this is to enter a PvP world and remove your weapon and attack a friend, keeping them in combat with you and as such avoiding being attacked by the trolls. If using this method, do NOT eat until you've made it to the cave, as the delay from combat while eating will cause the trolls to attack you. If you forget how many trolls you've killed, you can check your progress by examining the cave. It is recommended you go back to the bank and restock your supplies before returning.
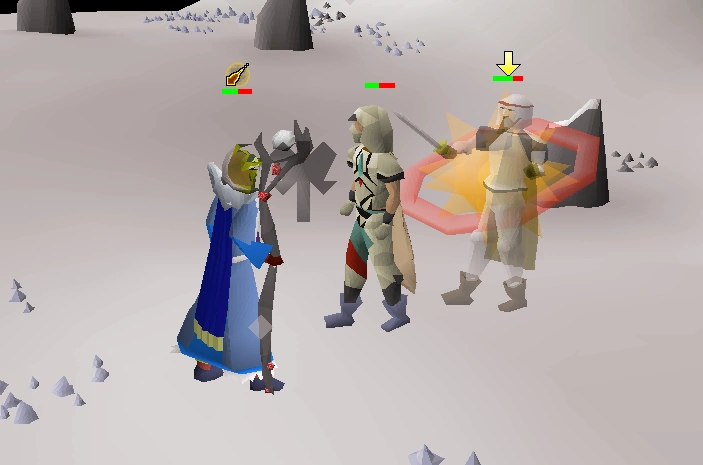

Another player can block Kamil, acting as a safespot for the attacker.
- With the cave now open, you must now follow the path until you reach Kamil. Note that this path contains multiple wolves capable of hitting 10s in multicombat, so protect from melee is a must; however, as with the thrower trolls, following a friend through this area allows pures to avoid taking damage by having their friends tank the hits.
- From the cave, continue along the path until you reach the wolves. Continue walking and the path will open up and turn to the left; continue along the path until you find a rock, marking the area where you will find Kamil. You'll get a message saying "You can feel an evil presence nearby..." when you enter the area.
- It's now time to fight Kamil. He uses two attacks, a strong melee attack capable of hitting up to 23, and a magic attack similar to Dessous' combination attack which always hits 5. Due to lag it's possible for these to stack to 10, so it's recommended to keep hp at 12 or above at all times. Unless blocked by the rock, he also consistently freezes you with this attacking using a spell resembling Ice Barrage, especially if outside of melee range. When frozen, you're unable to move or attack for several seconds. Because of this, it is recommended that mages cast directly from the spellbook instead of autocasting.
- Melee combat is not recommended, although it's still possible to use. Protect from Melee is a must for this method unless you have very high defense, otherwise you'll be eating faster than you can damage him.
- Mages are required to use fire spells, as no other spells will work; Trident of the seas constantly splashes, and Iban Blast and Flames of Zamorak will only hit 0s. Due to the constant stat drain, while it's possible to continuously restore your stats with potions, it's much easier to use a fire spell significantly below your level; Fire Bolt is recommended as it is still very accurate, and can be continuously cast without needing to restore for quite a while. Utilising the Chaos gauntlets will increase the spell's maximum hit.
- Ranged is not recommended, but those wishing to use Ranged will find the Toxic blowpipe accurate against him. A cannon can also be used; those wishing to cannon completely should ensure that it's set up two squares north of the rock, allowing them to safely hide from Kamil, but restock it when it runs out of cannonballs. Since the cannon's position will cause it to attack the wolves as well, be sure to bring enough (100+) cannonballs to kill him.
- Melee combat is not recommended, although it's still possible to use.
- Once he is dead, you need to follow a very hard to see path to the troll parents. Travel west a little, then north, then east, north again until you can go no further, then west and south until you reach the edge of an ice ledge surrounded by ice formations.
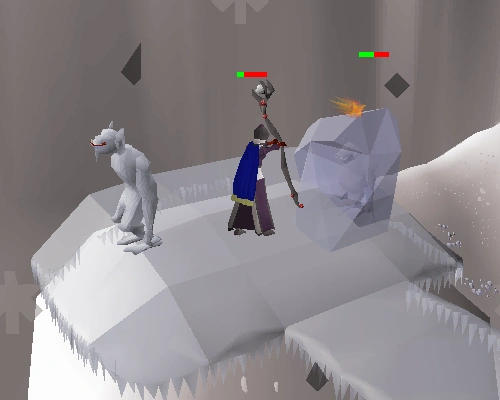
Thawing the ice troll child's parents.
- Put on your spiked boots and right click the front of the ledge, then select "use ledge" to climb up. A long ice path will appear, which you must follow to reach the parents. You might fall and take damage as you walk; using ( Super) restore potions to restore your Agility level will help here. Follow the ice path all the way to the top, then pass through the ice gate. A path will appear after the ice gate as you walk. Continue until you see the troll's parents encased in ice; attack the cases (they have 10 Hitpoints each and are easier to melt with Magic) to free them. It's highly advised to bring an extra super restore or two to manage the ice path and to break the parents free from the ice; otherwise, it's very hard to break. After freeing the troll parents, they will take you back outside the gate and give you the Ice diamond.
- If you are completely out of food when you reach the final ice path, you can use Redemption (requires 49 Prayer) to stay alive. Since you only take 1 or 2 damage at a time, this prayer will keep you alive without risk of dying, should you run out of food. However, note that this prayer will drain all your remaining prayer points when its effects are triggered, so it is advised to only use do this if you have several doses of super restores, or prayer potions.
Smoke diamond
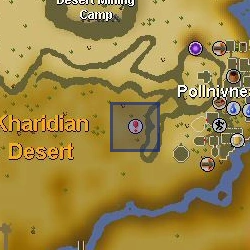
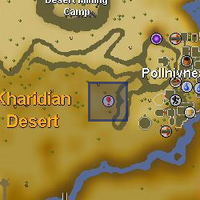
The Smokey Well is located west of Pollnivneach.
Items needed for this section: Tinderbox, facemask (Slayer helmet and Gas mask also work), (Super) energy/stamina potion, food and prayer potions, ice gloves or water spell runes, a weapon (only if wearing ice gloves; your weapon will be unequipped if you don't have them), armour (resistant to Magic or with Prayer bonus), 200 coins and Shantay pass (if using carpet rides), and an emergency teleport.
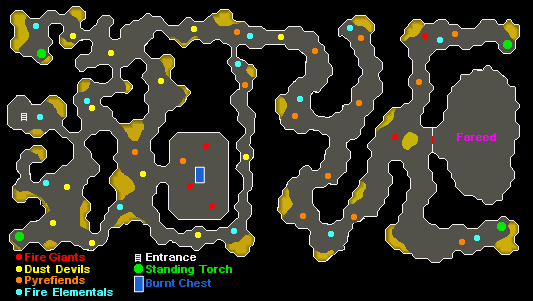

A map of the dungeon.
Fareed is considered one of the easier bosses in the quest, but should still not be underestimated. His main attack is a melee hit that can do up to 40 damage, or 36 with ice gloves. Protect from Melee essentially renders him useless, although he may sometimes use a magic attack; those with low Hitpoints or who do not have 43 Prayer should ensure they are not in melee range, Fareed will also remove the weapon of those not wearing ice gloves to their inventory, making melee impossible for those without them, although even with the gloves, melee is not advised due to his high defence to it. Mages can bypass the weapon removal by simply casting from their spellbook. Fareed can also easily be trapped behind another player, allowing him to be safespotted; binding spells are also very effective at maintaining distance, although caution should be taken to not run too far away from him, as he will leave the fight if you walk too far out of range. Magic is recommended, as Fareed is very weak to water spells, and mages should note that any other spell type will not work against him, including God spells and the Trident of the seas and swamp. Rangers will find Ice arrows from the Temple of Ikov quest very effective (other ranged ammunition will not damage Fareed), although as before, usage of a bow requires Ice gloves. Cannons also work in the dungeon.
- Take all of the items listed above and travel to the Smokey Well. While in the dungeon, it's necessary to use a facemask or equivalent headgear, otherwise the player will be hit for 20 damage every 12 seconds. While this won't kill the player (it will never damage them below 1 hitpoint), it's highly advised to use protection in the dungeon to avoid this affect, as you're able to be one-hit at any time without it. The dungeon entrance is marked on the world map; hug the cliffs on the west side of Pollnivneach, and head south to find it.
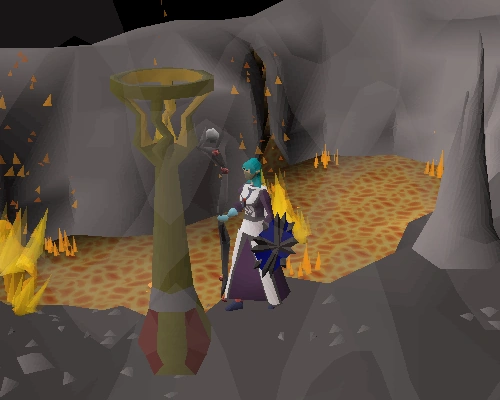

The torch the player needs to light.
- Enter the well. In each of the four corners of this dungeon, there are torches that you need to light using your tinderbox. The torches will burn out if you take too long; if you walk, the first lamp will burn out by the time you reach the chest, and as such it's recommended that you use energy potions to maintain run energy, starting with the northeastern torch as it's the furthest from the chest. You can light all torches in less than two minutes with 1 or 2 doses of a stamina potion. When all four are lit, go to the centre of the dungeon and open the burnt chest to obtain a key. If you die with this key, you do not need to relight the torches, simple return to the chest to reclaim the key.
- Once you have the key, there's no need to run any more. Make your way to the east part of the dungeon, and use the key on the gate to face Fareed.
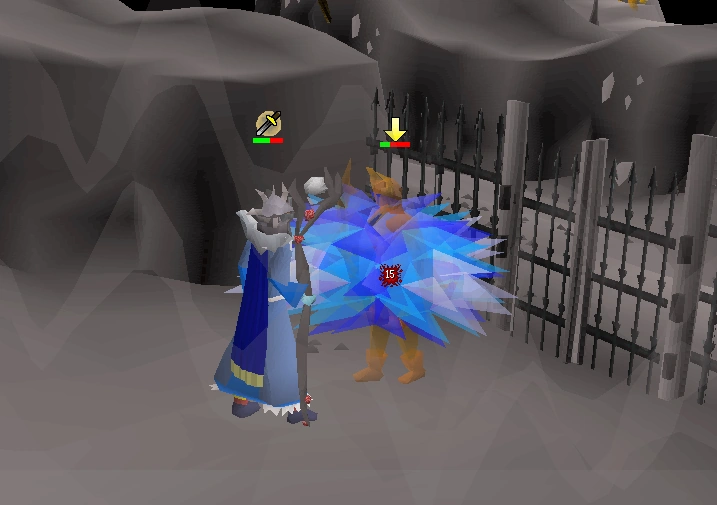

A player fights Fareed.
- As stated above, those in melee range will find Protect from Melee extremely important, as his Melee attacks can hit up to 40 without ice gloves. While he rarely casts it, those who find his magic attack difficult to manage should note that Magic-resistant armour such as studded leather or dragonhide will almost completely block it out.
- Pures without access to protection prayers should bring runes for the Snare spell, luring Fareed around the large room and casting water spells while he's bound. Players can cast two or three offensive spells while Fareed is still ensnared, but should cast snare again immediately after Fareed moves again so as to not get hit. Note that Fareed is immune to snares for a few seconds after he breaks free, so keeping a few squares distance while waiting to recast is important. The snares seem to bind Fareed even if the spell splashes, but this might be a bug.
- Once he is dead, he will drop the Smoke diamond. If the diamond is lost, it will reappear in the chamber on the ground; the player will not have to fight Fareed again.
Shadow diamond
Items required: (Suggested gearing after obtaining the cross.) 20 or more lockpicks (you can bring extra noted lockpicks and coins to exchange bank notes for items at the general store nearby by talking to Tiles), antipoisons, sharks or better food, at least 6 prayer potions, runes to cast spells such as Entangle and Earth Wave/Blast, Shantay pass, 2 stamina potions.
Optional: A Skills Necklace to teleport to the Fishing Guild, Dragon dagger (p++), and an emergency teleport.
- Travel west of the Fishing Guild to where there are several moss giants. Just to the north of there, is a fenced area and an NPC called Rasolo walking around this area. Talk to him, and he says that he will give you a ring of visibility if you give him a gilded cross.
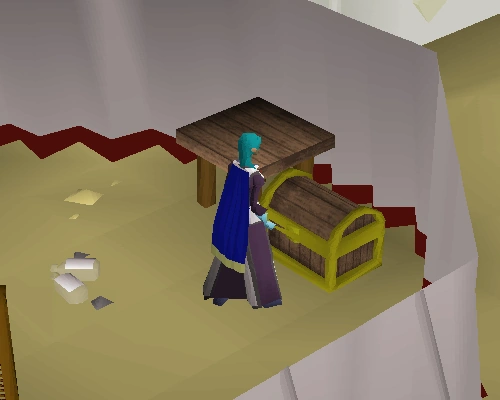
The chest the player needs to open.
- Take some coins (5000 coins is more than enough), a noted stack of food (do about 10 just to be sure), noted antipoisons (at least 10) and noted lockpicks (do at least 20, but more is always better). Lockpicks can be bought from Martin Thwait's Lost and Found (if you have 50 Agility and 50 Thieving). Apart from all the items you have with you in noted form, take also a few pieces of food in un-noted form, one antipoison, and the rest of your inventory with lockpicks. Go to Bandit Camp, which is located south of Bedabin Camp which you can reach by the magic carpet originating from Shantay pass. In the most southern tent in Bandit Camp is a Secure Chest. Use your lockpicks on it until you manage to open it and get a gilded cross—this is usually easier said than done. There are three locks, which you must get through, all of which reset themselves if any attempt should fail. Each failure will use up a lockpick and will deal damage. There is also a chance you may be poisoned, so do not underestimate the value of an anti-poison potion or food. If you run out of lockpicks, antipoisons or food, you can un-note your items for a small fee by speaking to Tiles in the general store tent. Use the noted form of the items you want to un-note with him.
- Return to Rasolo, and exchange the gilded cross for the visibility ring.
- When you wear it, a ladder will appear to the east of him in the fenced area.
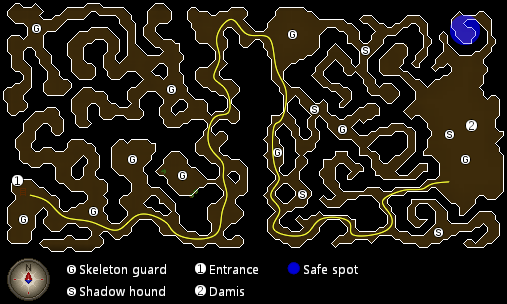
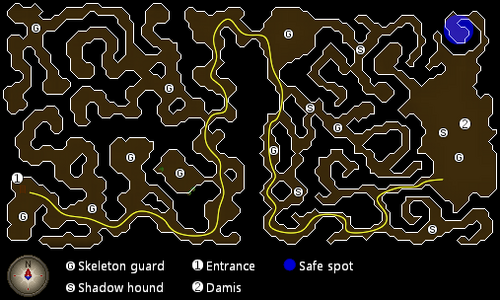
|
|
- Note: If you plan to use the safespot, lure his first form there. Otherwise, his second form will just disappear into the shadows. If you leave after defeating his first form, you do not have to fight it again! When you return, you will only have to defeat his second form.
- When you climb down the ladder, head east as far as you can, then north as far as you can. Head east, and go south as far as possible at the first option. Go east again. You will see a little cave to your south as you go past. If you run into this, you can recharge Hitpoints and run energy without using vital supplies. After this, take the next turn north, then go east, and you will reach Damis' cave. Activate Protect from Melee to ward off the giant skeletons and shadow hounds since this is a multi-combat area. Run around for a while, and he'll appear.
- Attack and kill Damis' first form, which is level 103 and only attacks with Melee and is fairly easy to beat.
- He will then change to his second form, which is level 174 and rapidly drains Prayer (at a rate of 4-5 points per second). This form is significantly harder.
- There are several tried and tested methods for fighting the second form of Damis, and a few will be listed here. See which one looks best for you and try it. Whichever method you choose, he will drop the Shadow diamond after you defeat him.
- Players who wish to complete the Kandarin Diary are advised to kill a Shadow Hound while in the dungeon, as it is a hard task.
Method one
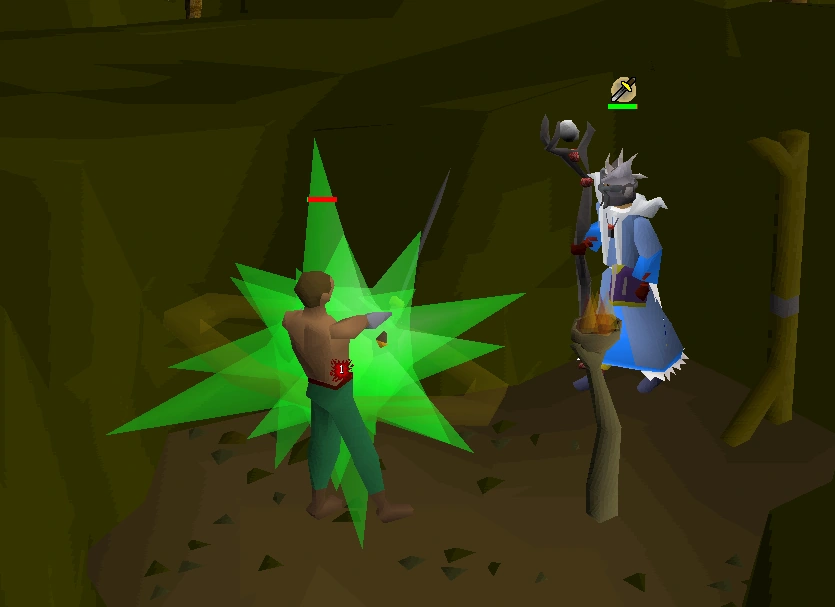
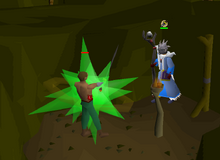
A player fights Damis.
Combat style: ![]() Magic
Magic
Inventory: ![]() Runes (
Runes (![]() nature,
nature, ![]() earth,
earth, ![]() water,
water, ![]() blood/
blood/![]() death, and
death, and ![]() air). A one-click teleport (like the
air). A one-click teleport (like the ![]() Ectophial), fill your inventory with as many
Ectophial), fill your inventory with as many ![]() prayer potions (4) as possible (bring at least 8), and just a few
prayer potions (4) as possible (bring at least 8), and just a few ![]() sharks or better food. You will rely heavily on
sharks or better food. You will rely heavily on ![]() Protect from Melee, otherwise without it activated, you will die quickly because you will be tanking 2-4
Protect from Melee, otherwise without it activated, you will die quickly because you will be tanking 2-4 ![]() giant skeletons and
giant skeletons and ![]() shadow hounds while trying to kill
shadow hounds while trying to kill ![]() Damis. You will need to click on a
Damis. You will need to click on a ![]() prayer potion, to drink a dose, every 4–5 seconds. To make this much more effective, wait until having only about 5 prayer points left to drink another dose of potion. This is effective because prayer points are drained based on percentage.
prayer potion, to drink a dose, every 4–5 seconds. To make this much more effective, wait until having only about 5 prayer points left to drink another dose of potion. This is effective because prayer points are drained based on percentage.
Optional: A couple of ![]() super energy potions to be used for shortening the journey through the maze.
super energy potions to be used for shortening the journey through the maze.
Tactic: This is basically making ![]() Damis into a regular fight, just a bit harder. If you have ever fought another creature that only uses Melee with
Damis into a regular fight, just a bit harder. If you have ever fought another creature that only uses Melee with ![]() Prayer, this is basically the same only you will be using more potions. Use Magic spells, and kill him quickly. It is possible to use Melee or Ranged, but he is weak to Magic and incredibly strong against Melee, so it is not recommended. While fighting or even initially, cast
Prayer, this is basically the same only you will be using more potions. Use Magic spells, and kill him quickly. It is possible to use Melee or Ranged, but he is weak to Magic and incredibly strong against Melee, so it is not recommended. While fighting or even initially, cast ![]() Snare/
Snare/![]() Entangle on
Entangle on ![]() Damis, once he moves, re-cast Snare/Entangle.
Damis, once he moves, re-cast Snare/Entangle.
Note: Damis is not particularly weak to earth spells. This was confirmed by Mod Ash.[1]
You can also use a ![]() Trident of the seas for both forms.
Trident of the seas for both forms.
Additionally, Damis only appears to drain Prayer when he is within a few tiles of you. Bringing a ![]() stamina potion and kiting him around the arena will help reduce the burden of using
stamina potion and kiting him around the arena will help reduce the burden of using ![]() Prayer potions.
Prayer potions.
Method two (not recommended)
Combat style: ![]() Melee
Melee
Inventory: A ![]() dragon dagger (poison necessary), a one-click teleport (like the
dragon dagger (poison necessary), a one-click teleport (like the ![]() Ectophial), a few
Ectophial), a few ![]() prayer potions, and the rest of your inventory full of
prayer potions, and the rest of your inventory full of ![]() sharks or better food.
sharks or better food.
Optional: A couple of ![]() super energy potions to be used for shortening the journey through the maze.
super energy potions to be used for shortening the journey through the maze.
Tactic: As soon as you see ![]() Damis, put on the
Damis, put on the ![]() Protect from Melee prayer, and use all of your
Protect from Melee prayer, and use all of your ![]() Dragon dagger (p++)
Dragon dagger (p++) ![]() special attacks on him. This will lower his health and poison him, but it's the poison that is most important. As soon as you have done this, run into the safe room to the northwest. Hide in there until you can see that his poison damage is as low as 2, and hit him with another 4 specials. Repeat until he is dead.
special attacks on him. This will lower his health and poison him, but it's the poison that is most important. As soon as you have done this, run into the safe room to the northwest. Hide in there until you can see that his poison damage is as low as 2, and hit him with another 4 specials. Repeat until he is dead.
Method three (not recommended)
Inventory: ![]() Runes (
Runes (![]() nature,
nature, ![]() earth,
earth, ![]() water,
water, ![]() blood/
blood/![]() death, and
death, and ![]() air), a one-click teleport (like the
air), a one-click teleport (like the ![]() Ectophial), and the rest of the space divided between
Ectophial), and the rest of the space divided between ![]() prayer potions and
prayer potions and ![]() sharks.
sharks.
Optional: A couple of ![]() super energy potions to be used for shortening the journey through the maze.
super energy potions to be used for shortening the journey through the maze.


Tactic: Once you encounter ![]() Damis, activate your
Damis, activate your ![]() Protect from Melee prayer. Once you have done that, exit out the way you came, and go south, then head towards east. From there, you should see a
Protect from Melee prayer. Once you have done that, exit out the way you came, and go south, then head towards east. From there, you should see a ![]() giant rat. There's also another rat roaming around a passage northwest of the area where Damis appears. Either way, position yourself behind the rat, and you can attack it with a weak attack or spell, and Damis can be attacked with Magic without you being harmed. This also works with the small
giant rat. There's also another rat roaming around a passage northwest of the area where Damis appears. Either way, position yourself behind the rat, and you can attack it with a weak attack or spell, and Damis can be attacked with Magic without you being harmed. This also works with the small ![]() bat found in the southwest corner of the arena from which you entered. Consider bringing a fun weapon such as flowers to draw its attention without killing it.
bat found in the southwest corner of the arena from which you entered. Consider bringing a fun weapon such as flowers to draw its attention without killing it.
Jaldraocht pyramid
Items required: Smoke diamond, Shadow diamond, Blood diamond, Ice diamond
Recommended items: Prayer point-boosting equipment, Holy wrench, Weight-reducing equipment (such as Graceful clothing), 2+ Prayer potions, 1 Super antipoison (or some strange fruit), Some energy potions or one Stamina potion(4), Waterskin(s), Shantay pass, Some food—Cooked sweetcorn is recommended as it has no weight., Emergency teleport for low level players if you run out of prayer potions and/or food.
Pyramid

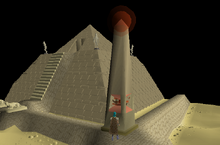
The pillar absorbs the gem.
Return to ![]() Eblis at the six mirrors in the desert. Be sure to have the four diamonds in your inventory. Go to
Eblis at the six mirrors in the desert. Be sure to have the four diamonds in your inventory. Go to ![]() the Pyramid southeast of Eblis (marked "Pyramid" on the world map), and place one diamond in each of the four obelisks at the outside corners of the pyramid. Each obelisk takes a specific diamond. You should be able to determine the diamond from the appearance of the obelisk, but trial-and-error placement also works. It is not possible to put a diamond into the wrong obelisk; it is also not possible to take a diamond back out of the obelisk.
the Pyramid southeast of Eblis (marked "Pyramid" on the world map), and place one diamond in each of the four obelisks at the outside corners of the pyramid. Each obelisk takes a specific diamond. You should be able to determine the diamond from the appearance of the obelisk, but trial-and-error placement also works. It is not possible to put a diamond into the wrong obelisk; it is also not possible to take a diamond back out of the obelisk.
When all four obelisks are activated, the pyramid will open and can be entered from the top.
Tomb raider
![]() Desert heat is not a factor inside the pyramid, but almost all of the interior is dangerous, with level 124
Desert heat is not a factor inside the pyramid, but almost all of the interior is dangerous, with level 124 ![]() scarab swarms occasionally boiling out of the floor, and level 110
scarab swarms occasionally boiling out of the floor, and level 110 ![]() mummies roaming about and spontaneously popping out of sarcophagi. All monsters use only
mummies roaming about and spontaneously popping out of sarcophagi. All monsters use only ![]() Melee, though the scarab swarms can also
Melee, though the scarab swarms can also ![]() poison. The scarab swarms, spontaneous mummies, and traps cannot be detected in advance. The room containing the altar on Level 4, however, is safe.
poison. The scarab swarms, spontaneous mummies, and traps cannot be detected in advance. The room containing the altar on Level 4, however, is safe.
Every time a scarab swarm appears or a mummy pops out of a sarcophagus, you will stop moving, and will not be able to move until the animation has finished. It is possible to avoid a scarab swarm entirely by making sure it is behind a mummy. There are also randomly activated traps that will send you back to the entrance of the pyramid. By bringing ![]() weight-reducing clothing and plenty of
weight-reducing clothing and plenty of ![]() super energy potions or
super energy potions or ![]() stamina potions, you can greatly reduce the chance of running into one of these traps. If you get caught by a trap, you will be taken outside to the south side of the pyramid but with no damage done. Do not click directly to the ladder but keep clicking to your goal as this will reduce the chances of getting caught by traps. Just walk north and re-enter the pyramid to start over. It is useful to use a
stamina potions, you can greatly reduce the chance of running into one of these traps. If you get caught by a trap, you will be taken outside to the south side of the pyramid but with no damage done. Do not click directly to the ladder but keep clicking to your goal as this will reduce the chances of getting caught by traps. Just walk north and re-enter the pyramid to start over. It is useful to use a ![]() strange fruit while inside the pyramid due to the fact that it recovers 30% run energy and cures any kind of poison you may have gotten while inside the pyramid.
strange fruit while inside the pyramid due to the fact that it recovers 30% run energy and cures any kind of poison you may have gotten while inside the pyramid.
The levels in the pyramid are numbered in the order the player encounters them in the quest. The purple line marks the route.
Outside
Enter the pyramid from its top. The southern entrance to Level 4 and the ![]() Ancient Magicks altar can only be used after the quest has been completed.
Ancient Magicks altar can only be used after the quest has been completed.
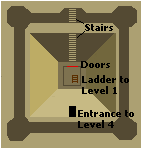
Level 1
Run from the entrance ladder to the Level 2 ladder. This level is the smallest in the area, with the fewest mummies. If possible, flick your prayer and save your run energy.
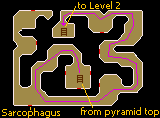
Level 2
Run from the Level 2 ladder to the Level 3 ladder. This level is the second smallest in area, with a few more mummies roaming about. This room might have a few traps. Be sure to look out for them.
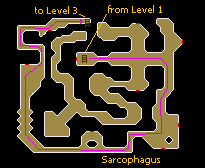
Level 3
Run from the Level 3 ladder to the Level 4 ladder. This level is fairly large in area, presenting more of a challenge to players traversing it. A significant number of mummies are roaming about, and there is a vast amount of traps.
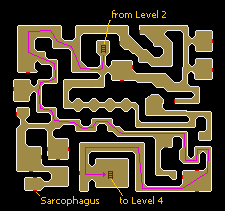
Level 4
Run from the Level 3 ladder to the altar room. This level is quite large in area, with a lot of mummies roaming about everywhere except the altar room. The altar room is separated by a door—do not rely on the minimap to run outside.
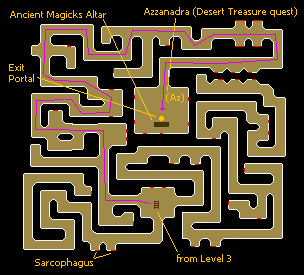
- Easy tip to remember which way to start running after each level: North, East, South, West.
Azzanadra

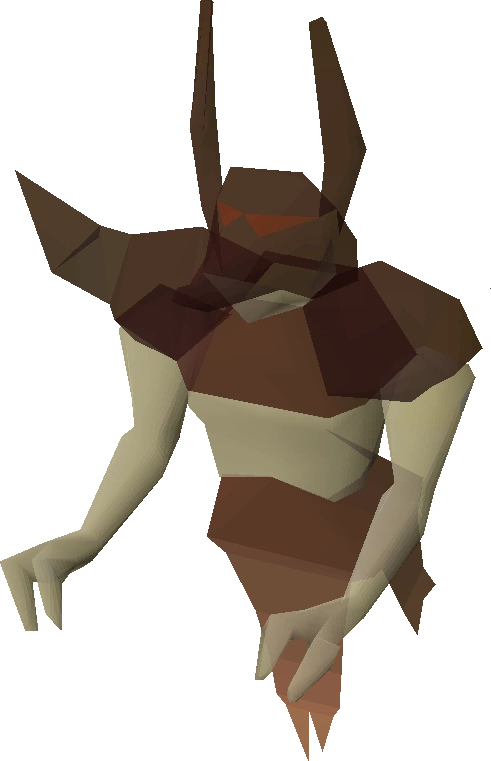

Azzanadra.
It is possible for a ![]() scarab swarm to boil up inside the altar room, but this only happens if it was boiling up as you were entering the room. If this is the case, trap it between the door and an obstacle that is just in front of the door. Speak to
scarab swarm to boil up inside the altar room, but this only happens if it was boiling up as you were entering the room. If this is the case, trap it between the door and an obstacle that is just in front of the door. Speak to ![]() Azzanadra, who has lost track of time and believes that the
Azzanadra, who has lost track of time and believes that the ![]() God Wars are still going on. He goes on to talk about some ancient unknown civilisations like
God Wars are still going on. He goes on to talk about some ancient unknown civilisations like ![]() Paddewwa,
Paddewwa, ![]() Lassar and
Lassar and ![]() Annakarl. He is also surprised to see that he cannot hear
Annakarl. He is also surprised to see that he cannot hear ![]() Zaros in his mind anymore.
Zaros in his mind anymore.
Azzanadra, finally coming to peace with the reality, rewards the adventurer with the ![]() Ancient Magicks of Zaros, for their efforts. (If Azzanadra is not present, use the altar and he should appear.)
Ancient Magicks of Zaros, for their efforts. (If Azzanadra is not present, use the altar and he should appear.)
Note: Praying at the altar twice after completing the quest will unlock a hard task in the Desert area.
Congratulations! Quest complete!
Rewards
- 3 Quest points
- 20,000 Magic experience
- The ability to use Ancient Magicks: At any time, you can pray at the altar and change between the standard and Ancient Magicks spellbooks. After traversing the pyramid for the first time, you may enter via the back-door of the pyramid to gain a short cut to the altar. Be warned that changing spellbooks will drain your prayer to 0.
- Ring of visibility: If you ever lose it, you can obtain another one from Rasolo.
- Access to the Curse of the Empty Lord miniquest (only requires the ring of visibility)
- Access to Ancient staff: You can also buy one from Eblis for 80,000 coins. If you lose the staff, you will have to kill mummies inside the pyramid, or buy it from other players. It can also be obtained as a rare drop from the Chaos Fanatic, as a rare drop from the Thermonuclear smoke devil or as an uncommon drop from Vet'ion.
- Access to the Smoke Dungeon, which can be used for various Slayer assignments.
Trivia
- If a player talks to the Archaeologist after the quest, he will tell a story very similar to 'Indiana Jones: Raiders of the Lost Ark'.
- In the Ice Diamond part, when the player speaks to the baby troll he asks "Why so sad, little troll?" and the troll replies "It was the bad man", this is probably a reference to Batman and the Joker.
References
Desert Treasure | |||||
|---|---|---|---|---|---|
| NPCs |
| ||||
| Items |
| ||||
| Related | |||||