(making use of Questreq module) |
m (cleanup) |
||
| (25 intermediate revisions by 25 users not shown) | |||
| Line 1: | Line 1: | ||
{{External|rs}} |
{{External|rs}} |
||
{{Has quick guide}} |
{{Has quick guide}} |
||
| + | {{Quest |
||
| − | {{Infobox quest |
||
|name = Eadgar's Ruse |
|name = Eadgar's Ruse |
||
|image = [[File:Eadgar's Ruse.png|300px]] |
|image = [[File:Eadgar's Ruse.png|300px]] |
||
| Line 20: | Line 20: | ||
Travel back to the Troll Stronghold to find this herb that the trolls use as an ingredient for their favourite dish. |
Travel back to the Troll Stronghold to find this herb that the trolls use as an ingredient for their favourite dish. |
||
|length = Medium-Long |
|length = Medium-Long |
||
| − | |requirements = |
+ | |requirements = *Completion of the following quests: |
| + | **[[Druidic Ritual]] |
||
| − | {{Questreq|Eadgar's Ruse|quests}} |
||
| + | **[[Troll Stronghold]] |
||
| − | {{Questreq|Eadgar's Ruse|skills}} |
||
| + | ***[[Death Plateau]] |
||
| − | |||
| + | *{{Skill clickpic|Herblore|31}} [[Herblore]] (boostable) |
||
| − | '''Recommended:''' |
||
| − | *{{Skill clickpic|Agility|44}} [[Agility]] to avoid rockthrowing trolls |
+ | *'''Recommended:''' {{Skill clickpic|Agility|44}} [[Agility]] to avoid rockthrowing trolls |
|items = *[[Climbing boots]] ''(or 12 [[coins]] to buy from Tenzing)'' |
|items = *[[Climbing boots]] ''(or 12 [[coins]] to buy from Tenzing)'' |
||
*[[Vodka]] ''(sold by [[Heckel Funch]] at the [[Tree Gnome Stronghold]] bar or at the pub in [[Pollnivneach]])'' |
*[[Vodka]] ''(sold by [[Heckel Funch]] at the [[Tree Gnome Stronghold]] bar or at the pub in [[Pollnivneach]])'' |
||
| Line 44: | Line 44: | ||
==Walkthrough== |
==Walkthrough== |
||
===Starting off=== |
===Starting off=== |
||
| ⚫ | |||
| ⚫ | |||
| ⚫ | |||
| ⚫ | Start the quest by speaking to |
||
| ⚫ | |||
| ⚫ | |||
| ⚫ | |||
| ⚫ | Start the quest by speaking to {{Link|Sanfew|type=chat}} (if boosting herblore use before talking to him), who lives on the top floor of the herb shop in {{Link|Taverley}} (ask him about the Varrock stone being cleansed). He will ask you to find out the secret of the herb {{Link|Goutweed|type=item}}, in order to perform the next part of the purifying ritual on the {{Link|Stone circle|Druid's circle}}. Only the {{Link|troll|img=Arrg chathead.png}}s in the {{Link|Troll Stronghold}} know about Goutweed, so Sanfew will suggest you speak to his friend {{Link|Eadgar|type=chat}} who lives near there at the top of {{Link|Trollheim}}. |
||
| ⚫ | |||
| + | |||
| ⚫ | |||
[[File:Eadgar's ruse cave map.png|thumb|200px|Use this route to get to Mad Eadgar's Cave.]] |
[[File:Eadgar's ruse cave map.png|thumb|200px|Use this route to get to Mad Eadgar's Cave.]] |
||
| − | You need to make your way to |
+ | You need to make your way to {{Link|Trollheim}} using the same route as in the {{Link|Troll Stronghold}} quest. Go north from {{Link|Taverley}} to {{Link|Burthorpe}} and follow the mountain path out of the northwestern corner of the town. Go south at the fork in the path to {{Link|Tenzing|type=chat}}'s house. If you don't already have {{Link|climbing boots|type=item}}, buy some here from Tenzing for 12 coins. Wear the climbing boots, and climb over the stile in his back yard, following the path north. At the next junction, climb over the rocks, follow the path, and go east at the next fork climbing over rocks as required. |
| − | Walk past |
+ | Walk past {{Link|Dad|type=chat}}, and use the northern Arena Exit gate. At the next two junctions, head west and then north, and go into the Cave Entrance. Follow the cave round, and use the exit to appear inside Trollheim. |
| − | : |
+ | :Eadgar is not located in the Troll Stronghold, but rather inside a cave on top of Trollheim on the minimap. |
| − | : |
+ | :You can use the secret entrance to the Troll Stronghold and then walk through to get to Eadgar. The shortcut is at the northern end of the western fork on the map. |
| − | ===Meeting Eadgar=== |
+ | ==== Meeting Eadgar ==== |
| − | Climb to the top of the hill in the centre of |
+ | Climb to the top of the hill in the centre of {{Link|Trollheim}} using {{Link|Protect from Missiles}} as you run past the {{Link|Thrower Troll|img=Thrower Troll.png}}s to avoid taking large amounts of damage. At the top of Trollheim there is an unmarked cave entrance on the southern side of the summit. When you get to the top, enter the cave and speak to {{Link|Eadgar|type=chat}} about {{Link|Goutweed|type=item}}. He will suggest that you speak to the {{Link|Burntmeat|Troll Cook|type=chat}}. |
| − | : |
+ | :If you didn't rescue Eadgar during the {{Link|Troll Stronghold}} quest, you will need to do so. He can be found in the prison in the stronghold. Pickpocket the two sleeping guards to get the key to his cell. Once you've rescued him, he will be in the Trollheim cave on the hill. (Even if you have freed Eadgar, he will still be in the prison cell. If you can't steal a cell key from the sleeping trolls to get him out, you know that you have previously freed Eadgar.) |
| − | ===The troll cook=== |
+ | ==== The troll cook ==== |
| − | Leave |
+ | Leave {{Link|Eadgar|type=chat}}'s cave, go back down the hill, and head southwest following the path round into the Troll Stronghold. Once in the stronghold, go south and then down the stairs. You'll see four {{Link|Burntmeat|Troll Cook|type=chat}}s here - one of them will be called {{Link|Burntmeat|type=chat}}. Speak to him, and he will offer to tell you about {{Link|Goutweed|type=item}} in exchange for a human to cook in his stew. |
| − | + | Go back and talk to Eadgar. He will have a quick think and then come up with a plan.... |
|
===The parrot=== |
===The parrot=== |
||
| Line 73: | Line 74: | ||
'''''Recommended:''' A [[Games necklace]].'' |
'''''Recommended:''' A [[Games necklace]].'' |
||
| − | + | {{Link|Eadgar|type=chat}} will tell you he needs a parrot in order to fool the {{Link|troll|img=Arrg chathead.png}}s into thinking you've given them a human. Go to the zoo in {{Link|Ardougne}}, and talk to {{Link|Parroty Pete|type=chat}} at the northern part of the zoo near the {{Link|wolf|img=Wolf (SOS).png}} enclosure. Ask him both of the possible questions, and he will tell you that their favourite food is {{Link|pineapple chunks|type=item}} and that they will get drunk if you feed them vodka. Do not accidentally drink the vodka or eat the pineapple chunks! Right click your pineapple chunks and use them on your vodka to make {{Link|alco-chunks|type=item}}, and then use them on the aviary hatch on the west side of the parrot cage. You'll obtain a {{Link|drunk parrot|type=item}}, and tell Parroty Pete that you will take it to the vet. (Do not drop the parrot or it will fly away. If this does happen, you can talk to Eadgar to retrieve it) While in Ardougne, it's also a good idea to pick up your logs, tinderbox, grain, and raw chicken from the bank. |
|
Take the parrot to Eadgar. You need to make it look like a human, taste like a human, smell like a human, and talk like a human. (You must do these steps in order, however, you may hand in the items after hiding the parrot.) |
Take the parrot to Eadgar. You need to make it look like a human, taste like a human, smell like a human, and talk like a human. (You must do these steps in order, however, you may hand in the items after hiding the parrot.) |
||
[[File:Parrot.png|thumb|220px|Inebriating the Parrot.]] |
[[File:Parrot.png|thumb|220px|Inebriating the Parrot.]] |
||
| − | : |
+ | :Go back to Eadgar to talk about the rest of his plan before proceeding to the next step. |
| − | : |
+ | :If you pick a Thistle now you can dry it on a fire on the way back to Eadgar. Scroll down to learn how to get the thistle. |
| − | *'''Talk like a human''' - Go back to the |
+ | *'''Talk like a human''' - Go back to the {{Link|Troll Stronghold (location)|Troll Stronghold}}, and find the prison cells. To get there, go north from the entrance to the stronghold, down the stairs, east through the door, and down another set of stairs. Go a bit further west and hide your parrot under the rack just north of the cells. |
| − | *: |
+ | *:You will come back for the parrot later. |
*'''Look/Taste like a human''' - Teleport out of Trollheim and grab your 10 grains, 2 logs, tinderbox, 5 raw chicken, pestle and mortar, and unfinished ranarr potion. |
*'''Look/Taste like a human''' - Teleport out of Trollheim and grab your 10 grains, 2 logs, tinderbox, 5 raw chicken, pestle and mortar, and unfinished ranarr potion. |
||
| − | ** |
+ | **Note for Ultimate Ironmen: You can make multiple trips with the items if you do not have the inventory space available to bring them in one trip. |
| − | *'''Smell like a human''' - Go to |
+ | *'''Smell like a human''' - Go to {{Link|Taverley}}. You will see {{Link|Tegid|type=chat}} washing robes in the lake. Talk to him, and ask for a {{Link|dirty robe|type=item}}. Then, threaten him with talking to Sanfew to get one. Take all items to Eadgar. |
===Truth serum=== |
===Truth serum=== |
||
[[File:Troll Thistle.png|thumb|220px]] |
[[File:Troll Thistle.png|thumb|220px]] |
||
| − | After you've done all of this, |
+ | After you've done all of this, {{Link|Eadgar|type=chat}} will tell you that you need to make a troll truth potion so that {{Link|Burntmeat|type=chat}} won't lie to you about {{Link|Goutweed|type=item}}. Look near the grass patches around Eadgar's hill until you find a tiny {{Link|Troll thistle|thistle|type=item}} growing in one of them. It may take you a while, but keep searching. If unable to find it, one may find it helpful to world hop and check the grass directly north or directly west of the cave. The Thistle's name is yellow when displayed at the top-left of the game window. |
| − | Once you've found the troll thistle, make a fire with your second |
+ | Once you've found the troll thistle, make a fire with your second {{Link|log}}, and cook it to get a {{Link|dried thistle|type=item}}. If you forgot a second log and/or tinderbox, there is a fire in the cave between the arena and Trollheim. Then, grind it with a {{Link|pestle and mortar|type=item}} to make {{Link|ground thistle|type=item}}. Finally, {{Link|Greenman's ale|boost|type=item}} your Herblore level (if necessary) and add the ground thistle to your {{Link|Ranarr potion (unf)|unfinished ranarr potion|type=item}} to make a {{Link|troll potion|type=item}}. |
| − | Talk to Eadgar again. He will take the potion off of you and tell you that the parrot has had enough by now, so you can get it back. Go back to the prison cells in the |
+ | Talk to Eadgar again. He will take the potion off of you and tell you that the parrot has had enough by now, so you can get it back. Go back to the prison cells in the {{Link|Troll Stronghold}} by going north from the entrance to the stronghold, down the stairs, east through the door and down another set of stairs, and search the rack to retrieve the parrot and then return to Eadgar. |
===Getting Goutweed=== |
===Getting Goutweed=== |
||
[[File:Goutweed Map.png|thumb|left|200px|Guide to getting the Goutweed.]] |
[[File:Goutweed Map.png|thumb|left|200px|Guide to getting the Goutweed.]] |
||
| − | After you give the parrot to |
+ | After you give the parrot to {{Link|Eadgar|type=chat}}, he will give you the {{Link|Fake man|type=item}}. Go back to the cooks in the stronghold by going south of the entrance and then down the stairs, and give the dummy to {{Link|Burntmeat|type=chat}}. He'll give you a piece of {{Link|burnt meat|type=item}} as a reward (which you can discard as it serves no purpose in the quest). He'll also tell you that the {{Link|Goutweed|type=item}} is kept in the storeroom and that you can find the key by searching the Kitchen Drawers. |
| − | Search the drawers in the southeastern corner of the room, and once you have the |
+ | Search the drawers in the southeastern corner of the room, and once you have the {{Link|storeroom key|type=item}}, go down the stairs just to the north. This next part is the hardest as you will need to sneak past the guards. If one of them sees you, you'll be knocked out and kicked out of the storeroom. The rocks hit 0-6 damage. {{Link|Protect from Missiles}} blocks the damage but doesn't prevent getting kicked out. |
<gallery> |
<gallery> |
||
| Line 106: | Line 107: | ||
</gallery> |
</gallery> |
||
| − | The best way to do this is to use the two most eastern guards as an indicator of when to move to the second safe spot. To do this turn on your run and wait until one of the two guards rounds the northern corner of the boxes that they rotate around. As soon as this happens run to the second safe spot. |
+ | The best way to do this is to use the two most eastern guards as an indicator of when to move to the second safe spot. To do this turn on your run and wait until one of the two guards rounds the northern corner of the boxes that they rotate around. As soon as this happens run to the second safe spot. Note that the darker coloured troll patrolling the small section of boxes must also be avoided. Once in the second safe spot simply run to the one of the safe spots adjacent to the crate when the guard that comes north and closest to you turns west, and then click on the goutweed crate. |
| − | The next way to do this is to use the safe spots, which are dead ends surrounded by three crates. Time your movement and run to the first safespot, then wait for your chance to run to the second. You can use the position of the troll guards as an indication of when to move, as the placements of the guards will repeat after one or two cycles. Wait at the second safespot until you get the chance to run to the Goutweed crate and search it. Be careful |
+ | The next way to do this is to use the safe spots, which are dead ends surrounded by three crates. Time your movement and run to the first safespot, then wait for your chance to run to the second. You can use the position of the troll guards as an indication of when to move, as the placements of the guards will repeat after one or two cycles. Wait at the second safespot until you get the chance to run to the Goutweed crate and search it. Be careful not to simply click ''search goutweed crate'' as this will get you stuck on the sleeping troll instead of going up to the crate. Make sure you click on the spot adjacent to the crate, and ''then'' click search goutweed crate. You'll be kicked out after you get one piece of goutweed. Also, if you plan to do {{Link|Dream Mentor}} or {{Link|Dragon Slayer II}} at any point, it is recommended to get two extra goutweed as it is a required item in those quests (note: you can only grab one goutweed per attempt and will have to traverse through again). |
| − | Give the Goutweed to |
+ | Give the Goutweed to {{Link|Sanfew|type=chat}} back in Taverley to finish the quest. |
==Rewards== |
==Rewards== |
||
| Line 123: | Line 124: | ||
}} |
}} |
||
==Required for completing== |
==Required for completing== |
||
| − | * |
+ | *{{Link|My Arm's Big Adventure}} |
| − | * |
+ | *{{Link|Dream Mentor}} |
| − | * |
+ | *{{Link|Dragon Slayer II}} |
{{Eadgar's Ruse}} |
{{Eadgar's Ruse}} |
||
Latest revision as of 10:14, 8 June 2019
Details
| Start point | |
| Official difficulty | Experienced |
| Description | Sanfew requires a rare herb for the next part of the purifying ritual.
Travel back to the Troll Stronghold to find this herb that the trolls use as an ingredient for their favourite dish. |
| Length | Medium-Long |
| Requirements | |
| Items required |
Recommended: |
| Enemies to defeat | None |
Walkthrough
Starting off
Items required: Food, armour and climbing boots, one bite of botanical pie if boosting Herblore.
Recommended: An Ardougne teleport.
It is safe practice to check the quest journal after each step to ensure you have completed each task. This may save you an extremely frustrating long walk or two.
Start the quest by speaking to ![]() Sanfew (if boosting herblore use before talking to him), who lives on the top floor of the herb shop in
Sanfew (if boosting herblore use before talking to him), who lives on the top floor of the herb shop in ![]() Taverley (ask him about the Varrock stone being cleansed). He will ask you to find out the secret of the herb
Taverley (ask him about the Varrock stone being cleansed). He will ask you to find out the secret of the herb ![]() Goutweed, in order to perform the next part of the purifying ritual on the
Goutweed, in order to perform the next part of the purifying ritual on the ![]() Druid's circle. Only the
Druid's circle. Only the ![]() trolls in the
trolls in the ![]() Troll Stronghold know about Goutweed, so Sanfew will suggest you speak to his friend
Troll Stronghold know about Goutweed, so Sanfew will suggest you speak to his friend ![]() Eadgar who lives near there at the top of
Eadgar who lives near there at the top of ![]() Trollheim.
Trollheim.
Getting to Trollheim

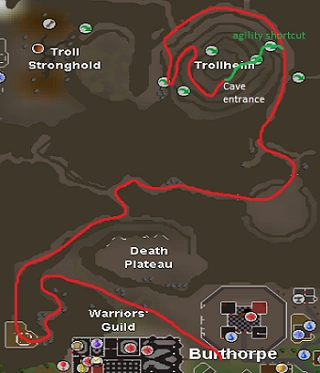
Use this route to get to Mad Eadgar's Cave.
You need to make your way to ![]() Trollheim using the same route as in the
Trollheim using the same route as in the ![]() Troll Stronghold quest. Go north from
Troll Stronghold quest. Go north from ![]() Taverley to
Taverley to ![]() Burthorpe and follow the mountain path out of the northwestern corner of the town. Go south at the fork in the path to
Burthorpe and follow the mountain path out of the northwestern corner of the town. Go south at the fork in the path to ![]() Tenzing's house. If you don't already have
Tenzing's house. If you don't already have ![]() climbing boots, buy some here from Tenzing for 12 coins. Wear the climbing boots, and climb over the stile in his back yard, following the path north. At the next junction, climb over the rocks, follow the path, and go east at the next fork climbing over rocks as required.
climbing boots, buy some here from Tenzing for 12 coins. Wear the climbing boots, and climb over the stile in his back yard, following the path north. At the next junction, climb over the rocks, follow the path, and go east at the next fork climbing over rocks as required.
Walk past ![]() Dad, and use the northern Arena Exit gate. At the next two junctions, head west and then north, and go into the Cave Entrance. Follow the cave round, and use the exit to appear inside Trollheim.
Dad, and use the northern Arena Exit gate. At the next two junctions, head west and then north, and go into the Cave Entrance. Follow the cave round, and use the exit to appear inside Trollheim.
- Eadgar is not located in the Troll Stronghold, but rather inside a cave on top of Trollheim on the minimap.
- You can use the secret entrance to the Troll Stronghold and then walk through to get to Eadgar. The shortcut is at the northern end of the western fork on the map.
Meeting Eadgar
Climb to the top of the hill in the centre of ![]() Trollheim using
Trollheim using ![]() Protect from Missiles as you run past the
Protect from Missiles as you run past the ![]() Thrower Trolls to avoid taking large amounts of damage. At the top of Trollheim there is an unmarked cave entrance on the southern side of the summit. When you get to the top, enter the cave and speak to
Thrower Trolls to avoid taking large amounts of damage. At the top of Trollheim there is an unmarked cave entrance on the southern side of the summit. When you get to the top, enter the cave and speak to ![]() Eadgar about
Eadgar about ![]() Goutweed. He will suggest that you speak to the
Goutweed. He will suggest that you speak to the ![]() Troll Cook.
Troll Cook.
- If you didn't rescue Eadgar during the
 Troll Stronghold quest, you will need to do so. He can be found in the prison in the stronghold. Pickpocket the two sleeping guards to get the key to his cell. Once you've rescued him, he will be in the Trollheim cave on the hill. (Even if you have freed Eadgar, he will still be in the prison cell. If you can't steal a cell key from the sleeping trolls to get him out, you know that you have previously freed Eadgar.)
The troll cook
Leave ![]() Eadgar's cave, go back down the hill, and head southwest following the path round into the Troll Stronghold. Once in the stronghold, go south and then down the stairs. You'll see four
Eadgar's cave, go back down the hill, and head southwest following the path round into the Troll Stronghold. Once in the stronghold, go south and then down the stairs. You'll see four ![]() Troll Cooks here - one of them will be called
Troll Cooks here - one of them will be called ![]() Burntmeat. Speak to him, and he will offer to tell you about
Burntmeat. Speak to him, and he will offer to tell you about ![]() Goutweed in exchange for a human to cook in his stew.
Goutweed in exchange for a human to cook in his stew.
Go back and talk to Eadgar. He will have a quick think and then come up with a plan....
The parrot
Items required: Climbing boots, Vodka, pineapple chunks, 10 grain, 2 logs, a tinderbox, 5 raw chickens, a pestle and mortar, Herblore boost (if not level 31), and a ranarr potion (unf).
Recommended: A Games necklace.
![]() Eadgar will tell you he needs a parrot in order to fool the
Eadgar will tell you he needs a parrot in order to fool the ![]() trolls into thinking you've given them a human. Go to the zoo in
trolls into thinking you've given them a human. Go to the zoo in ![]() Ardougne, and talk to
Ardougne, and talk to ![]() Parroty Pete at the northern part of the zoo near the
Parroty Pete at the northern part of the zoo near the ![]() wolf enclosure. Ask him both of the possible questions, and he will tell you that their favourite food is
wolf enclosure. Ask him both of the possible questions, and he will tell you that their favourite food is ![]() pineapple chunks and that they will get drunk if you feed them vodka. Do not accidentally drink the vodka or eat the pineapple chunks! Right click your pineapple chunks and use them on your vodka to make
pineapple chunks and that they will get drunk if you feed them vodka. Do not accidentally drink the vodka or eat the pineapple chunks! Right click your pineapple chunks and use them on your vodka to make ![]() alco-chunks, and then use them on the aviary hatch on the west side of the parrot cage. You'll obtain a
alco-chunks, and then use them on the aviary hatch on the west side of the parrot cage. You'll obtain a ![]() drunk parrot, and tell Parroty Pete that you will take it to the vet. (Do not drop the parrot or it will fly away. If this does happen, you can talk to Eadgar to retrieve it) While in Ardougne, it's also a good idea to pick up your logs, tinderbox, grain, and raw chicken from the bank.
Take the parrot to Eadgar. You need to make it look like a human, taste like a human, smell like a human, and talk like a human. (You must do these steps in order, however, you may hand in the items after hiding the parrot.)
drunk parrot, and tell Parroty Pete that you will take it to the vet. (Do not drop the parrot or it will fly away. If this does happen, you can talk to Eadgar to retrieve it) While in Ardougne, it's also a good idea to pick up your logs, tinderbox, grain, and raw chicken from the bank.
Take the parrot to Eadgar. You need to make it look like a human, taste like a human, smell like a human, and talk like a human. (You must do these steps in order, however, you may hand in the items after hiding the parrot.)


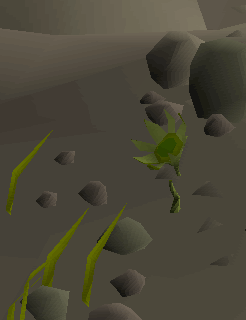
Inebriating the Parrot.
- Go back to Eadgar to talk about the rest of his plan before proceeding to the next step.
- If you pick a Thistle now you can dry it on a fire on the way back to Eadgar. Scroll down to learn how to get the thistle.
- Talk like a human - Go back to the Troll Stronghold, and find the prison cells. To get there, go north from the entrance to the stronghold, down the stairs, east through the door, and down another set of stairs. Go a bit further west and hide your parrot under the rack just north of the cells.
- You will come back for the parrot later.
- Look/Taste like a human - Teleport out of Trollheim and grab your 10 grains, 2 logs, tinderbox, 5 raw chicken, pestle and mortar, and unfinished ranarr potion.
- Note for Ultimate Ironmen: You can make multiple trips with the items if you do not have the inventory space available to bring them in one trip.
- Smell like a human - Go to Taverley. You will see Tegid washing robes in the lake. Talk to him, and ask for a dirty robe. Then, threaten him with talking to Sanfew to get one. Take all items to Eadgar.
Truth serum

After you've done all of this, ![]() Eadgar will tell you that you need to make a troll truth potion so that
Eadgar will tell you that you need to make a troll truth potion so that ![]() Burntmeat won't lie to you about
Burntmeat won't lie to you about ![]() Goutweed. Look near the grass patches around Eadgar's hill until you find a tiny
Goutweed. Look near the grass patches around Eadgar's hill until you find a tiny ![]() thistle growing in one of them. It may take you a while, but keep searching. If unable to find it, one may find it helpful to world hop and check the grass directly north or directly west of the cave. The Thistle's name is yellow when displayed at the top-left of the game window.
thistle growing in one of them. It may take you a while, but keep searching. If unable to find it, one may find it helpful to world hop and check the grass directly north or directly west of the cave. The Thistle's name is yellow when displayed at the top-left of the game window.
Once you've found the troll thistle, make a fire with your second ![]() log, and cook it to get a
log, and cook it to get a ![]() dried thistle. If you forgot a second log and/or tinderbox, there is a fire in the cave between the arena and Trollheim. Then, grind it with a
dried thistle. If you forgot a second log and/or tinderbox, there is a fire in the cave between the arena and Trollheim. Then, grind it with a ![]() pestle and mortar to make
pestle and mortar to make ![]() ground thistle. Finally,
ground thistle. Finally, ![]() boost your Herblore level (if necessary) and add the ground thistle to your
boost your Herblore level (if necessary) and add the ground thistle to your ![]() unfinished ranarr potion to make a
unfinished ranarr potion to make a ![]() troll potion.
troll potion.
Talk to Eadgar again. He will take the potion off of you and tell you that the parrot has had enough by now, so you can get it back. Go back to the prison cells in the ![]() Troll Stronghold by going north from the entrance to the stronghold, down the stairs, east through the door and down another set of stairs, and search the rack to retrieve the parrot and then return to Eadgar.
Troll Stronghold by going north from the entrance to the stronghold, down the stairs, east through the door and down another set of stairs, and search the rack to retrieve the parrot and then return to Eadgar.
Getting Goutweed

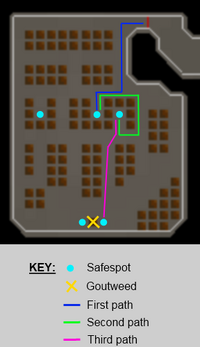
Guide to getting the Goutweed.
After you give the parrot to ![]() Eadgar, he will give you the
Eadgar, he will give you the ![]() Fake man. Go back to the cooks in the stronghold by going south of the entrance and then down the stairs, and give the dummy to
Fake man. Go back to the cooks in the stronghold by going south of the entrance and then down the stairs, and give the dummy to ![]() Burntmeat. He'll give you a piece of
Burntmeat. He'll give you a piece of ![]() burnt meat as a reward (which you can discard as it serves no purpose in the quest). He'll also tell you that the
burnt meat as a reward (which you can discard as it serves no purpose in the quest). He'll also tell you that the ![]() Goutweed is kept in the storeroom and that you can find the key by searching the Kitchen Drawers.
Goutweed is kept in the storeroom and that you can find the key by searching the Kitchen Drawers.
Search the drawers in the southeastern corner of the room, and once you have the ![]() storeroom key, go down the stairs just to the north. This next part is the hardest as you will need to sneak past the guards. If one of them sees you, you'll be knocked out and kicked out of the storeroom. The rocks hit 0-6 damage.
storeroom key, go down the stairs just to the north. This next part is the hardest as you will need to sneak past the guards. If one of them sees you, you'll be knocked out and kicked out of the storeroom. The rocks hit 0-6 damage. ![]() Protect from Missiles blocks the damage but doesn't prevent getting kicked out.
Protect from Missiles blocks the damage but doesn't prevent getting kicked out.
")
")
")
The best way to do this is to use the two most eastern guards as an indicator of when to move to the second safe spot. To do this turn on your run and wait until one of the two guards rounds the northern corner of the boxes that they rotate around. As soon as this happens run to the second safe spot. Note that the darker coloured troll patrolling the small section of boxes must also be avoided. Once in the second safe spot simply run to the one of the safe spots adjacent to the crate when the guard that comes north and closest to you turns west, and then click on the goutweed crate.
The next way to do this is to use the safe spots, which are dead ends surrounded by three crates. Time your movement and run to the first safespot, then wait for your chance to run to the second. You can use the position of the troll guards as an indication of when to move, as the placements of the guards will repeat after one or two cycles. Wait at the second safespot until you get the chance to run to the Goutweed crate and search it. Be careful not to simply click search goutweed crate as this will get you stuck on the sleeping troll instead of going up to the crate. Make sure you click on the spot adjacent to the crate, and then click search goutweed crate. You'll be kicked out after you get one piece of goutweed. Also, if you plan to do ![]() Dream Mentor or
Dream Mentor or ![]() Dragon Slayer II at any point, it is recommended to get two extra goutweed as it is a required item in those quests (note: you can only grab one goutweed per attempt and will have to traverse through again).
Dragon Slayer II at any point, it is recommended to get two extra goutweed as it is a required item in those quests (note: you can only grab one goutweed per attempt and will have to traverse through again).
Give the Goutweed to ![]() Sanfew back in Taverley to finish the quest.
Sanfew back in Taverley to finish the quest.
Rewards
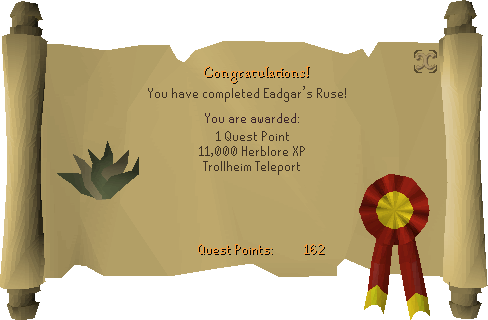
- 1 Quest point
- 11,000 Herblore experience
- The ability to grow and steal Goutweed, which can be traded for herbs.
- The ability to use the Trollheim Teleport spell.
- The ability to use a Scroll of redirection to redirect a Teleport to house tablet to Trollheim.
Required for completing
Eadgar's Ruse | |
|---|---|
| NPCs |
|
| Items |
|
| Related | |