m (Possible HP > LP conversion & cleanup, added check tag) |
m (→Trivia) |
||
| Line 128: | Line 128: | ||
*There is a reference to Wallace and Gromit: Curse of the Were-Rabbit. |
*There is a reference to Wallace and Gromit: Curse of the Were-Rabbit. |
||
*A glitch occurs when you perform the Turkey (Give Thanks) emote and rapidly click on the Extractor Hat; You glide close to it and you can see a skeleton wriggling on the chair and the damage is dealt after. |
*A glitch occurs when you perform the Turkey (Give Thanks) emote and rapidly click on the Extractor Hat; You glide close to it and you can see a skeleton wriggling on the chair and the damage is dealt after. |
||
| + | *Upon completeing this quest one's [[Adventurer's Log]] will read: "Documents from the Digsite Exam Centre led me deeper into the elemental workshop, where I learned to infuse elemental metal with the power of the mind." |
||
==See also== |
==See also== |
||
Revision as of 23:20, 27 March 2010
Details
| Start point | |
| Official difficulty | Intermediate |
| Description | There's new parts of the Elemental Workshop to explore, and new equipment to be made. Can you help put the shop back in working order? |
| Length | Medium |
| Requirements |
|
| Items required |
|
| Enemies to defeat | 2-3 Earth Elementals (level 35) |
Walkthrough
Starting Off
To begin with, you need to go to the Exam Centre of the Digsite south-east of Varrock. Search the bookcases there, and you'll find a Beaten book with a scroll in it as a bookmark. Make sure you keep the book as you will need it later. Read the scroll, then head to Seers' Village.
The Key
The key location
If players still have the key from the Elemental Workshop I quest, players can skip this bit and head straight to the next section, 'The Workshop', of this guide.
Once in Seers' Village, head to the house south-west of the bank and search the shelves to get a battered book and the battered key. You no longer need to use the knife on the battered book to get the battered key.
The Workshop
Go north to the building (next door to the bank) with an anvil, and use the key on the odd-looking wall on the north-wall, and go down the stairs you find there. Now, once inside, follow the directions on the scroll. Walk 2 spaces north, 2 east, 2 north, 2 east, 10 north, and finally 4 west. Players will end up in the water elemental room in front of some machinery. Search it for a key. Actually walking the steps is important. If players simply try to skip to the spot without following the path will result in possibly not being able to search the machinery for the key. After the steps have been followed the machine will have the search option available.
Mine two or three elemental ores from the west room and smelt them into elemental bars in the south room. You may need to repair the Bellows in order to get the furnace hot enough to smelt the Elemental bars. Use the elemental ore on the furnace with 4 coal in your inventory to get an elemental bar. Two ores/bars are needed to complete the quest. However, three ores/bars are needed to complete the quest AND make a mind shield.
Now head back into the middle of the area and use the key on the large hatch in the ground.
Making repairs
Map of the room
Claw repairs
Once downstairs, players will need to fix the machinery. First off, search the crate full of schematics just south of the stairs. There are two schematics players can choose, take both with you. First players will use the crane schematic. Go back upstairs and use one of the bars on the workbench. Make the crane claw. Players can also choose to make the helmet at this point. Players will need to have the battered book in their inventory to create the helmet. Save this for later.
Go back down the hatch and lower the claw using one of the levers at the south part of the room. Then lower the crane towards the ground with the other lever. Make the repairs by using the claw in the inventory with the claw on the crane. Once its repaired, raise it again.
Once the claw is repaired, place an elemental bar on the Jig Cart. Do not move it yet. Lower the crane again, and it should pick up your bar. Raise the crane again. Now, rotate it by so it can be above the lava by pulling the eastern lever. Lower the crane again. This should dip your elemental bar into the lava, and it will turn orange.
Raise the crane again, then turn it with the other lever once more so you can place on the jig cart. Lower the crane then raise it. DIRECTLY north of you will be a small area with fencing on 3 sides and a lever as a central viewpoint.
Northeast stairs to the gantry area.
Pull the lever, and the jig cart and bar should move on to the next step, the press.
Press repairs
Location of the pipe junction box.
(If you use the lever and a message says the system is not pressurized; go to the first workshop and activate both the waterwheel and the bellows by the valves or lever next to each.)
Use the short staircase on the south-west or north-east corners to get to the upper gantry area.
Open the junction box to work on the pipes for the press. To connect the pipe junctions, simply click on one pipe section and then click the section to which you want to connect it to. Players will want to arrange them as seen on the right.
Once they are connected in the proper way, go back downstairs and pull the lever that is just next to three small pipes. This should flatten the bar. Now, go back to the mine cart controls and pull the lever once. It should now move on in front of a water tank.
Water Tank
The pipes in the junction box.
The Pipe:
For the next two parts, search all the crates in the upper and lower sections of the secondary workshop to find a small cog, medium cog, big cog, and a pipe. The location of these items is random for every player Go up onto the platform again and replace the piece of pipe in the northern part of the piping that has a hole in it. The piping must be repaired before proceeding.
Cooling the bar:
Now, go back downstairs and pull the "old lever" beside the water hatch, in the northern section of the room. This will open the door. Next, turn the corkscrew lever twice, which will move the jig inside the chamber. Seal the water hatch again by pulling the old Lever. Now turn both of the Water Valves, found to the east and west of the old Lever: the water hatch should now be flooded. Make sure you do the one on the west first, then turn the east one. Turn both water valves again, pull the old lever, turn the corkscrew twice and pull the old lever again to bring the jig back onto the track. Now pull the mine cart control lever and the jig will move along to the next area.
The Cogs
Take the three cogs to the machine on the east side. On the side of the machine are three pins. Stick the small one on the upper left, the medium on the lower left, and large on the right.
Turn on the fan with the lever, then turn it back off again and advance the bar back to the south, where a primed bar can now be picked up. Now you need to go down one more level there you should see two doors (look under to see more information)
Finishing Up
The pipes in the junction box.
A bit of mind draining
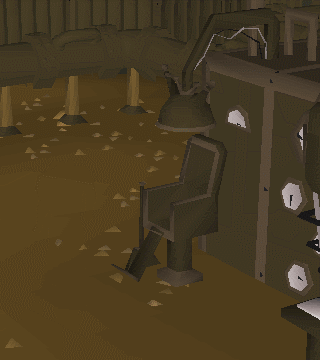
Go down one more level to where there are two doors; one with the mind symbol and another other with the body symbol. The body door cannot be opened yet, so go into the mind room. Place the bar on the extractor gun and sit on the rather intimidating extractor hat chair next to it. You will temporarily lose 20 magic levels, as a part of you will be drained into the bar turning it into a primed mind bar. Any amount of primed mind bars can be made as long as the magic level does not fall below 20. There is no danger of dying or receiving hitpoints etc, if your magic level is less than 20, you wont be allowed to even sit in the chair, although a stat restore potion works quite nicely here.
Note: If you don't place anything under the gun, and put on the extractor hat, your character will receive a shock, depleting 40-90 LP.
Primed mind bar.
Now, simply go back up to the workshop, and, with the Beaten Book inventory, make a Mind Helmet out of the primed mind bar: quest complete! To make a mind shield repeat this process on another elemental bar, but have a slashed book in inventory instead.
Rewards
Full elemental mind (so far)
- 1 Quest Point
- 7,500
 Experience
 - 7,500 Experience
- Ability to make mind shield and a Mind helmet.
- To make a mind shield: get a Slashed book from the Elemental Workshop I quest house, then smith a primed mind bar into a mind shield.
Music
Music tracks unlocked:
Trivia
Elemental Workshop III...?
- Down the hall from the mind chamber, another door can be seen, with the symbol for the body rune. When one tries to open it, the player receives the message "The door is securely locked, for now." This hints to the next installment of the series. Mod Mark confirmed they are making a Elemental Workshop III in his Q&A.
- Shortly after the quest was released, in a forum thread, a Jagex Mod joked about the body door and what it would be used for, saying "It could be anything. Imagine, a Body body?"
- This may be a reference to 'mind, body and soul', and there may even be a 'soul door' in the future.
- If you look closely at the mind extracter machine it looks like part of the machine is floating.
- When inside the workshop, it appears that your kitten stops growing and doesn't get hungry.
- There is a reference to Wallace and Gromit: Curse of the Were-Rabbit.
- A glitch occurs when you perform the Turkey (Give Thanks) emote and rapidly click on the Extractor Hat; You glide close to it and you can see a skeleton wriggling on the chair and the damage is dealt after.
- Upon completeing this quest one's Adventurer's Log will read: "Documents from the Digsite Exam Centre led me deeper into the elemental workshop, where I learned to infuse elemental metal with the power of the mind."
See also
Template:Elemental Workshop quest series
Template:Check HP