Tag: Visual edit |
Tag: Visual edit |
||
| Line 184: | Line 184: | ||
*[[Throne of Miscellania]] |
*[[Throne of Miscellania]] |
||
*[[Legends' Quest]] |
*[[Legends' Quest]] |
||
| + | *Recipe for Disaster |
||
==Trivia== |
==Trivia== |
||
Revision as of 21:47, 22 January 2018
Details
| Start point | |
| Official difficulty | Experienced |
| Description | Prove you are worthy to enter the Heroes' Guild. To prove your status as a hero you will need to obtain a number of items. There are many challenges standing between you and these items. |
| Length | Medium-Long (can be completed in less than 25 minutes if you already have a partner and all the required items) |
| Requirements |
Recommended:
|
| Items required |
If you are a Black Arm Gang member:
If you are a Phoenix Gang member: Recommended:
|
| Enemies to defeat |
|
Walkthrough
Start
Talk to Achietties outside the Heroes' Guild about joining the guild. She will tell you that in order to get in you need to give her three items: a fire feather from an Entrana firebird, a cooked lava eel, and a Master Thieves' Armband.
Master Thieves' armband
For this part of the quest, you will need the help of a player of the opposite gang. Players that have completed the quest may go back and help others. For finding a quest partner, the Minigame Group Finder is useful. You can also usually find a partner of the clan chat 'Osrs Soa' during peak hours.
- Note: You do not need to meet the quest's skill requirements (Cooking, Fishing, Herblore, Mining) in order to complete this part of the quest. This means that you can obtain help from someone who does not meet these requirements, or complete it ahead of time yourself if you do not meet those requirements. You can also partner up with someone if you have finished the quest - see Trivia for more details.
Black Arm Gang members
Items required: A black full helm, a black platebody and black platelegs.
The location of ScarFace Pete's mansion in Brimhaven.
The black full helm and black platelegs can be purchased from the Champions' Guild and the black platebody can be obtained from Horvik's Armour Shop in Varrock.
Go to Varrock and talk to Katrine who is just west of the south Varrock entrance. She will tell you the gang's password which is "four leafed clover". She will tell you that you have to steal ScarFace Pete's candlesticks who is in Brimhaven.
Go to Brimhaven and find the gang office, which is the building along the fence, east of the bar and south of the Agility Arena. Talk to Trobert who is in the building south of the agility arena, and he will give you some id papers, which you will need to get into ScarFace Pete's mansion. Equip the black full helm, black platebody and black platelegs; then, go to the mansion. When you try to enter ScarFace Pete's Mansion, you will be stopped by Garv. Show him the id papers, and he will let you pass. Once inside, talk to Grip and ask him what your duties involve; then, ask him if there is anything you can do. He will give you a miscellaneous key (has to be done for those who've already done the quest if the key isn't banked). Leave the building and give the key to your Phoenix Gang partner.
If grip won't hand you the key, chances are you already have it banked from shield of arrav.
A player attacking Grip.
Back inside, head into the northeastern room of the entrance. Wait for your partner to be on the other side of the wall (on the east side); then, search the cupboard. A guard will tell you that Grip really doesn't like his drinks being touched; ignore the guard's comments. Grip will then come into the room, yelling at you to get your hands off them. Your Phoenix Gang partner will then kill Grip through the slot in the hidden room. If Grip backs away from your partner, search the cupboard again to get him back into position. Once he dies, pick up the key he drops.
Using the key, go to the treasure room (the ground floor[?] room with coins on the floor) and open the chest in the first room to receive two candlesticks. Give one candlestick to your Phoenix Gang partner. Go back to Varrock and talk to Katrine. She will give you the Thieves' armband.
- Note: Be sure to pick up the candlesticks yourself; otherwise, Katrine will say you weren't the one to retrieve the candlestick and you will have to go back to do it all over again.
Phoenix Gang members
Items required: A bow and arrows (brutal arrows will not work) or runes for Magic.
Head to Varrock, and speak to Straven at the hideout to get the password for Alfonse. Get a bow and arrows before heading to Brimhaven. First, get the miscellaneous key from your Black Arm Gang partner.
Go to The Shrimp and Parrot bar (not the southern bar) in Brimhaven. Once you are there, talk to Alfonse the waiter and then to Charlie the cook. Give them the password. Charlie the cook will tell you about secret wall that you are able to push. The pushable wall is in the kitchen, same place as where Charlie is, near where you will see some guard dogs.
Get past these and into the mansion by the western door. Once inside, use the miscellaneous key on the northern door. This brings you in a closet with a window into a room with a cupboard. Shoot through the hole in the wall at Grip and kill him with Ranged or Magic. He will drop the key for your Black Arm Gang partner.
Your Black Arm Gang partner will get two candlesticks and should trade you one of them. Go back to Varrock, and talk to Straven to get the Thieves' armband.
NOTE: You MUST kill Grip! If you don't, Straven will NOT accept your candlestick.
Fire feather
Items required: None (Pickaxe and combat equipment if you need the ice gloves).
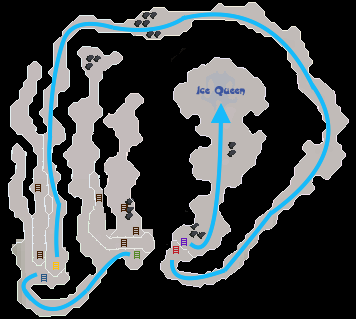
In order to pick up the fire feather, you'll need ice gloves. They are dropped by the level 111 Ice Queen located underneath White Wolf Mountain.
If you already have a pair of ice gloves, simply equip them, travel to Entrana, and defeat the firebird to obtain the feather.
If you do not already own Ice gloves, go to White Wolf Mountain (east of Catherby, west of Taverley). Enter the mountain at the southern entrance, and walk or run north until you come to a rock slide. Use a pickaxe on the rock slide and go through it (this requires 50 Mining). Once you are through, you will be near level 57 ice warriors and three ladders.
Compass pointing north; location of the rockslide to get into the lair.

The Ice Queen's Lair
Use the southern ladder and go down the southwestern tunnel. Go up the ladder just after the tunnel bends north. Once you go up, you will see level 53 ice giants there. Take the eastern ladder down. Go north through the long tunnel with level 61 ice spiders and ice giants (the spiders in the tunnel do not show up on minimap). The tunnel makes a loop and ends at a ladder. Go up the ladder, then go down the other. Continue down the tunnel until it opens up into a large room full of ice warriors and the Ice Queen. Be careful because this is a multicombat area, so you will be attacked by multiple enemies at once!
If you stand behind the throne, you can avoid the ice warriors and can still attack the Ice Queen if positioned right. Kill her and she will drop the ice gloves. Once you have the gloves, exit using the same route back or teleport out.
Bank your weapons and armour, but keep your ice gloves. Head to Port Sarim and talk to the Monk of Entrana to travel to Entrana or teleport to Castle Wars and use the hot air balloon to go there. Go to the northeastern part of the island to find the Entrana firebird. Kill it and it will drop the fire feather. Make sure to have the ice gloves equipped before picking it up.
Cooked lava eel
Items required: A fishing rod, fishing bait, Dusty key (if you don't have 70 Agility), harralander potion (unf) (or a harralander and vial of water), and a slashing weapon or knife (only if going to Lava Maze in Wilderness).
Recommended: energy/stamina potions.
Go to Port Sarim and talk to Gerrant at the fishing shop. He will give you a bottle of blamish snail slime. Once you have the items, make sure you have fishing bait in your inventory while doing this - use the Harralander with the vial of water and then the unfinished potion with the blamish snail slime. Right-click the blamish oil and use it on a normal fishing rod to get an oily fishing rod.
There are two possible locations where you can catch lava eels: the Taverley Dungeon or the Wilderness Lava Maze. It takes somewhat longer to reach the lava eel fishing spot in the Taverley Dungeon (if you don't have 70 or 63 Agility to skip the throwing axe room), but it's safer than travelling to levels 40-45 in the Wilderness to reach the Lava Maze. Don't forget your dusty key!
- Note: Lava eels do not burn when cooked. Do not worry about obtaining multiple eels if you are worried about burning one.
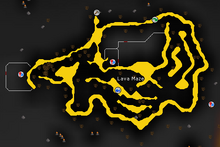
Lava Maze
Items required: A knife or a slash weapon, oily fishing rod, fishing bait.

- Warning: The Lava Maze is located in deep Wilderness. Beware of any player killers. You may likely lose any quest items you are carrying and may end up needing to gather the items to make another oily fishing rod. Make sure to bring some food in case someone does try to kill you.
If you're going to the fishing spot in the Lava Maze, there are several methods to reach there:
- Teleporting there with the burning amulet. This is the quickest way.
- Casting the Ghorrock Teleport spell (or tablet) in the Ancient Magicks spellbook, although this requires completing the quest Desert Treasure.
- Use a Waka Canoe from Edgeville into the Wilderness. This requires 57 Woodcutting. From there, simply walk west to arrive near the entrance.
- Use the Wilderness Obelisks to arrive in level 35 or 44 Wilderness. Either teleport will place you close to the entrance of the maze.
Make your way through the aggressive black knights at the entrance. Make your way through the maze until the fishing icon appears on your minimap. This is where the lava eels are caught.
Fishing a lava eel here will also complete a Hard Wilderness Diary objective.
Taverley Dungeon
Items required: The Dusty key (if you don't have 70 Agility), oily fishing rod, bait.
Recommended: The anti-dragon shield or a dragonfire shield.
Routes to the lava eels and dusty key.
Bring your fishing rod, bait, and other items. Teleport to Falador and walk west over the Agility shortcut (requires 5 Agility) or teleport to your house if it is in Taverley.
If you have 70 Agility (which can be boosted), enter the pipe (be sure to wear your anti-dragon shield) and run south. The fishing spot is near some baby blue dragons and catch a few lava eels.
If you don't have 70 Agility, follow the cyan path on the image to the right. Walk through the dungeon and use the Dusty key on the door between the lesser demons and blue dragons. If you have 63 Agility, you can save a bit of time by squeezing through loose railings to go straight to the lesser demon area.
If you don't have the dusty key, go past the bridge, continue south-west past the Hill Giants, and you will enter a fortress with a few black knights. Go to the east into a jail, kill the jailer, and then pick up his key. Use it with the jail cell holding Velrak the explorer. Talk to him to get the dusty key. Head back north past the hill giants and follow the cyan path to the fishing spot. Use the key on the door between the lesser demons and blue dragons. The fishing spot is near some baby blue dragons; from here, catch a lava eel.
Cook the raw lava eel on a fire or a range (remember that you are not able to burn them).
Quest end
Go back to the Heroes' Guild, talk to Achietties outside and give her the three collected items.
Congratulations! Quest complete!
Rewards

- 1
 Quest point
 - 3,075 Attack experience
- 3,075 Defence experience
- 3,075 Strength experience
- 3,075 Hitpoints experience
- 2,075 Ranged experience
- 2,725 Fishing experience
- 2,825 Cooking experience
- 1,575 Woodcutting experience
- 1,575 Firemaking experience
- 2,257 Smithing experience
- 2,575 Mining experience
- 1,325 Herblore experience
- Access to the Heroes' Guild
- The ability to purchase and wield dragon battleaxes and maces
- Access to the Fountain of Heroes, where players can recharge their amulets of glory
Required for completing
- Throne of Miscellania
- Legends' Quest
- Recipe for Disaster
Trivia
- If you have completed the quest and are a part of the Black Arm Gang, you have the ability to help others who have not completed the quest and are members of the Phoenix Gang. First, you can enter the mansion without your full black armour and ask Grip for another miscellaneous key for your partner - to get another key, first ask him what your duties involve before asking "what can I do now?". Open the cabinet and allow Grip to walk into the room. Shut the door and trap him and the Phoenix Gang member must kill Grip. This will update their quest journal for the Heroes' Quest.
- Members of the Phoenix Gang who have already completed the quest also have the ability to help others who have not, and are members of the Black Arm Gang. Either use the miscellaneous key received while completing the quest initially, or get a new one from the Black Arm Gang member. Return through The Shrimp and Parrot bar to the kitchen, and then through the secret panel. Head past the guard dogs again and into mansion. Use the miscellaneous key on the door, and kill Grip once the Black Arm Gang member has lured him into position.