Walkthrough
| Start point | |
| Official difficulty | Master |
| Description | Only the elite are allowed to call themselves a Legend of RuneScape. Do you have what it takes to make it into the guild? |
| Length | Long |
| Requirements | NOTE: Only the quest requirements must be met to start this quest. If you do not have the skill requirements, you may be unable to continue at certain points until you meet them. |
| Items required |
Highly recommended:
|
| Enemies to defeat |
|
Radimus Erkle
- Talk to a Legends guard east of Ardougne(
 ••). Fairy ring blr.
 - Talk to Radimus.( •)
Kharazi Jungle
Items needed: Radimus notes, 3-5 papyrus, 1-3 charcoal, an axe, a machete (one can be obtained from the cupboards next to Radimus Erkle.)
- Head to Kharazi Jungle, south of Shilo Village (Fairy ring CKR). You will need to chop through the jungle bush.
- Head to the west part of the jungle. Right-click Radimus notes and select the 'complete' option. Repeat this step for the middle and east parts of the jungle.
- Use the notes on a Jungle forester, south of Shilo. (If they don't want it. Read the Map Select option 2) ( )
Cave
Items needed: Radimus notes, Bull roarer, lockpick, soul rune, mind rune, earth rune, 2 law runes, opal, jade, red topaz, sapphire, emerald, ruby, diamond, a pickaxe, an axe, and a machete
- Cut your way back into Kharazi Jungle.
- Swing the bull roarer (near one of the totems).
- Talk to Gujuo. ( •••••)
- Search the rocks at the north-western section of the jungle and crawl inside.
- Investigate the fire wall. ( •)
- Leave the cave and use the bull roarer again.( ••)
- Re-enter the cave and search the crate (southeast of cave), bed, and table for a scrawled note, scrumpled note, and a scribbled note.
- Search the eastern bookcase to squeeze through the crevice.
- Search the gate, then smash the boulders. (WARNING: Failing to smash the boulder reduces your Mining level by 1).
- Continue through the dungeon until you reach a marked wall. (Kill a death wing for the Hard Karamja Diary if needed!)
- Use your runes on the marked wall in order (Soul, Mind, Earth, Law, Law).
- Use the cut gems on the Carved rocks. Use this map to see which gem goes where.
- Pick up the binding book.
- Make sure you have 3 notes from Ungadulu's cave and 1 sketch from Gujuo
Sacred pool
Items needed: Radimus notes, 2 gold bars, hammer, at least 42 prayer points, binding book, sketch, an axe, machete and bull roarer. Combat equipment is needed as well. 1 Prayer potion.
- Use 2 gold bars on any anvil for a golden bowl.
- Use the bull roarer in Kharazi. Enchant the bowl. ( )
- Go to the pool (center of Kharazi jungle), use your machete on the nearby reeds, and use the reeds on the pool.
- Use the bowl of water on the ring of fire.
- Use the Binding book on Ungadulu.
- Defeat Nezikchened.
- Talk to Ungadulu. ( •••)
- Exit, then call for Gujuo. ( •)
- Refill your bowl then use it on your seeds (remember to cut the reeds and use them on the pool).
- Attempt to refill it again.
- Call for Gujuo. ( ••)
Restoring the pool
Items needed: Radimus notes, ardrigal, snake weed, vial of water, runes for a Charge Orb spell, an unpowered orb, blessed gold bowl, Yommi tree seeds, a lockpick, a rope, a pickaxe, combat equipment, axe and a machete
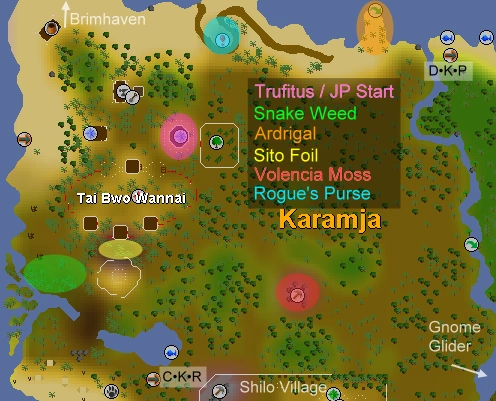
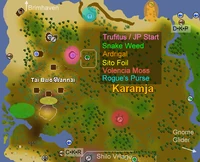
- Collect the ardrigal (search the palm tree to find the ardrigal) and snake weed using the map above. Mix them with a vial of water for a bravery potion.
- Run back to the cave where you found the binding book. Cast the charge orb spell on the north door.
- Use your rope on the winch. Drink your potion then climb down. (If you forgot a rope, smash a barrel)
- Climb over the rocks to reach the bottom.
- Kill the 3 different skeletons until you get 3 crystal pieces.
- Use each crystal on the northeast furnace.
- There is 1 searchable mossy rock in the middle of this room. Use the heart on it.
- Run south and use the heart on the recess (recess is right next to the barrier entrance). Walk through.
- Push the boulders to the west. ( •••)
- Climb back to the top of the ridge. Equip the dagger, try to take the hat, kill Viyeldi. Make sure you actually kill Viyeldi and your dagger is glowing before you go back down the ridge to the south back to the boulder ghost.
- Warning: level 187 demon will spawn as soon as this step is complete. Go back and push the boulder, the ghost will take the dagger from you.
- Defeat Nezikchened.
- Stand directly East of the most Western boulder and push it
- Fill your bowl with water and use it on your seeds if you haven't done so already. Refill the bowl. If you teleport out of the Kharazi Jungle, you will need to refill your bowl at the sacred pool.
- Return to Kharazi Jungle, use the germinated seeds on the fertile soil patch (8 steps north, 5 steps west of the pool).
- Once planted, the yommi bush will grow leaves. Use the sacred water on it and it will become an Adult yommi tree.
- Use your axe on the Adult yommi tree. Use your axe on the downed tree twice more until the "lift" option appears.
- Lift the yommi totem from the ground and you will now have a Yommi totem in your inventory.
The final fight
Items needed: Yommi totem, Radimus notes, Bull roarer, combat equipment, axe & machete (if you banked before fight)
- Turn on melee pray before the demon appears, you will take 4 melee hits without being able to move, eat, or turn on prayers - you can get hit for up to 72 damage all on the same tick. Highly recommend to keep melee pray on at all times.
- Use your totem on the totem pole east of the pool.
- Kill the three skeletons that each appear one at a time. After the third skeleton dies, kill the demon.
- Use the totem on the pole again.
- Call for Gujuo if he doesn't appear, he then will give you a Gilded Totem.
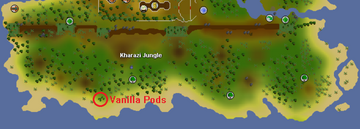
PRIOR TO LEAVING COLLECT A VANILLA POD FOR Recipe for Disaster if needed.

Finishing up
Items needed: Gilded totem, Radimus notes
- Return to Radimus in the legends guild main building with the Gilded totem AND Radimus notes. Fairy ring blr.
- Select four skills for the training.
- Quest complete!
| NPCs |
| ||||||
| Items |
| ||||||
| Related |
Quick Guide • Barrel | ||||||