Old School RuneScape uses the British convention for floor numbering: Ground floor, first floor, etc.
Mourning's Ends Part II (The Temple of Light), often abbreviated as MEP2, is the seventh quest in the Elf quest series. This quest is often described as challenging by players who have completed it due to it having arguably the most difficult quest puzzle in the game.
None (but powerful level 73 Shadows are aggressive to players inside the temple)
Walkthrough
Begin by speaking to Arianwyn in Lletya. He will tell you to go and stop the mourners from excavating under West Ardougne, and that you need a key from the head mourner to enter the excavation site (Note: you will not start the quest until you get the new key from the head mourner).
Next, put on your full mourner gear and remove all of your other worn items. Bring a teleport crystal, and some food if you have low Defence or do not have 43 Prayer for Protect from Melee. Also bring along a chisel. Go to the basement of the Mourner HQ in Ardougne and talk to the head mourner.
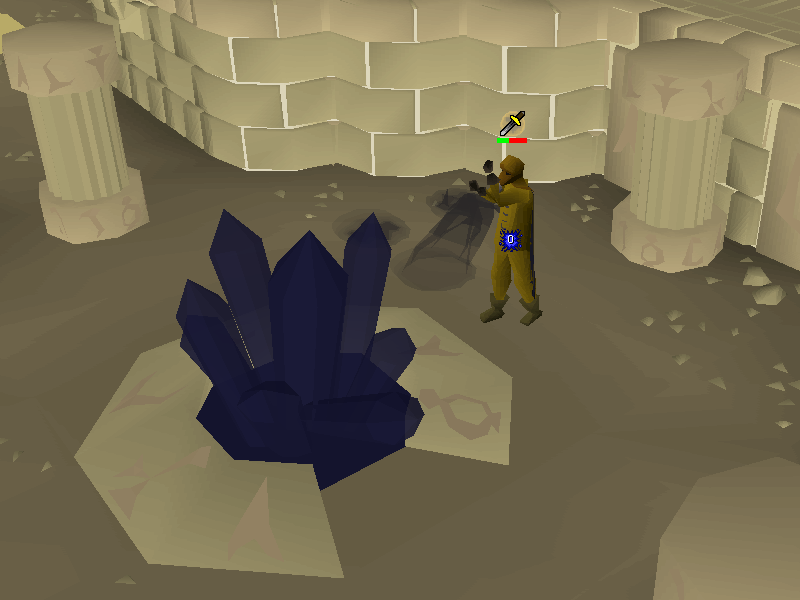
He will give you a new key to the nearby tunnels that they dug to the Temple of Light. He will ask you to find the digging team, a group of slaves and Mourners that have high enough slayer skills to defeat the beasts in the area. Go into the tunnel. You will see level 182 Dark beasts. They require level 90 slayer to kill, can hit up to 17 with melee and up to 8 with magic, and aggressively guard a rune rock. They can be killed for a Death Talisman drop that will be used later in the quest. Run past them (to the West, then take the southwestern turn) to reach the temple entrance. They hit hard, it would be a good idea to use Protect from Melee whilst running past. You'll see a cutscene, shortly thereafter you may be attacked by level 74 Shadows. Search the corpses of the digging team to get a diary and a colour wheel. The wheel is unnecessary for the quest and can be dropped. Read the diary - But DONT teleport to Lletya just yet!
The broken, blackened crystals.
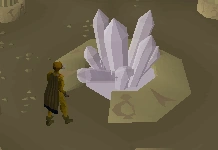
From there, go west and climb up the stairs. Then go as far south as you can go and climb up the ladder. Go north and take the second left opening, then take the stairs immediately north. Go up the northern set of stairs and run as much east as is possible, then south to the crystal. Use a chisel on it to break off a piece. Now teleport to Lletya and go back to Arianwyn.
He will summon Eluned, who will enchant the black crystal in your inventory. It will be used at the end of the quest. Talk to Arianwyn again, then you will need to prepare for a long and potentially frustrating puzzle.
If you want to attempt the puzzle in one trip, bring the crystal with you, a rope, and leave 10-15 inventory spaces free as the mourner clothing, crystals, and mirrors will leave you strained for inventory space. The mirrors and crystals will be in the same positions you've left them if you decide to teleport out. However, you cannot bank the mirrors and crystals received in the temple, so prepare to at least do the puzzle from the beginning to the end before doing anything else.
It is highly recommended to bring some of the following: Prayer boosting equipment, super energy potions, weight-reducing gear, prayer potions, and food. If you find that prayer potions are too expensive, bring good armour and defence potions instead. It is much, much more convenient to buy a Death Talisman (for a considerable price) from another player, and to bring it if you have one. Otherwise you will have to give an NPC a long list of items (see below) to get a Death Talisman. The Death Talisman is not consumed during the quest, and you can either keep it or sell it.
Blue door
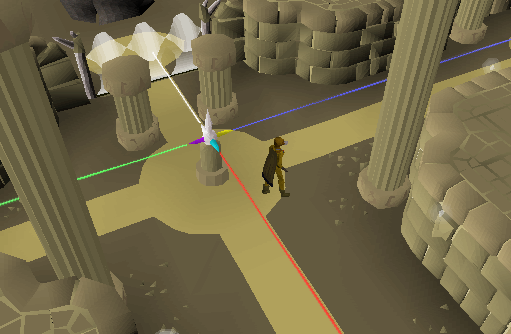
Go back to the Temple of Light. Go up the stairs, then go east to the crystal collector. If there is a beam coming out of the Pillar of Light, search it and take the mirror, then pull the crystal collector and collect the items inside. You'll get a yellow crystal and 3 more mirrors. You need to unlock the blue door with a yellow beam of light. The pillar next to the crystal collector has a beam of light flowing through it.
Put a mirror in it and reflect the light north.
Walk north to the next pillar. Add a mirror and reflect the light west.
Go west, add a mirror, and reflect the light south.
Go south to the next pillar. Use your yellow crystal on it to dye the light yellow.
Go south and put a mirror in the pillar. Reflect the light east.
This part is very frustrating. You must climb across several handholds, but each one can be failed, so you have a very good chance of falling off. Falling will hit 5 damage on you, and several Shadows will attack you. Go back up the stairs and try again until you make it. It helps to bring items that boost your Agility level such as Agility potions or Summer pies. Having full run energy will also drastically improve your odds of success.
Pass through the blue door and open the chest. You will get two more mirrors and a cyan crystal.
Pink door
Go back to the crystal collector and pull the lever. Collect all of your items.
Go west and put a mirror in the pillar. Reflect the light north.
Walk north to the next pillar. Add a mirror and reflect the light west.
Go west to the next pillar and use the cyan crystal on it to dye the light cyan.
Go west to the next pillar. Add a mirror and reflect the light north.
Go north to the next pillar. Add a mirror and reflect the light east.
Go east to the next pillar and add the yellow crystal. This will dye the cyan light green.
Go east and pass through the pink door. Open the chest to get more mirrors.
Yellow and Cyan doors
Go back to the crystal collector and pull the lever. Collect all of the items.
Put a mirror in the pillar giving out light. Reflect the light north.
Walk north to the next pillar and use a mirror to reflect the light down (south).
Go downstairs to the bottom floor. If you did the above step correctly, you should see a little beam of light coming into the pillar north of the stairs. Put a mirror in it and reflect the light west.
Walk west to the next pillar and using a mirror, reflect the light north (through a hole in the wall, a cave and another hole in the wall).
Go around to the pillar north of the one you just put a mirror in. Use a mirror on it and reflect the light up (north). If done correctly, you should see a little beam of light flowing up.
Go back upstairs to the middle floor and find the pillar with a little beam of light flowing up. It is near the ladder to the next floor up, on the north side of the temple. Put the yellow crystal in that pillar to dye the light yellow.
There is a ladder to the north of this pillar. Go up the ladder to the top floor. Put a mirror in the pillar and reflect the light west. It should pass through a pillar that has a magenta crystal in it. The yellow light beam should go through the magenta crystal, creating a red beam of light.
Go back down the ladder and go south. When you reach the south wall, go all the way up the ladder. Then go as far north as you can, as far west as you can, and all the way to the north-west corner. Put a mirror in this pillar and reflect the light south.
Follow the beam to the south-west corner and add a mirror. Reflect the light down (south) to the floor below.
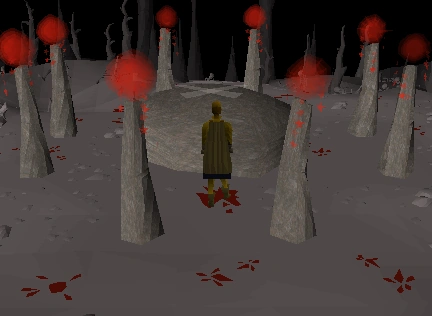
Return to the ladder that brought you to this floor (next to handholds). Descend the ladder and travel a few steps west and a few steps north to a circular, dead-end room where you may enter by climbing over a low wall. Climb over the low wall and enter the circular room, where you will see a large hole in the floor with a rock directly beside it. Use your rope on the rock, and climb down. Go southwest, Passing through the door to where you may open the chest to get a blue crystal.
Don't reset the system otherwise you will have to repeat the previous steps.
Go to the pillar where you put the yellow crystal in during the last step (north side of the middle floor). Remove the yellow crystal, and replace it with the blue crystal. You should now see a blue light going up. The mirror you placed above this pillar during the last step will reflect the light west, like before. However, this time, a blue light will be going west.
Start to run south. When you reach the south wall, go up the ladder. Then go as far north as you can, as far west as you can, and all the way to the north-west corner. Rotate the mirror in this pillar to reflect the light down (the mirror will look as though it is pointing east, with the widest part on the right-hand side)
Go to the bottom floor (use the southern ladder down, and then the stairs near the crystal collector, not the room with the rope). In the north-west corner, pass through the yellow door by rotating the mirror south, Go south then east, then go open the chest to get 2 more mirrors and the first fractured crystal.
Pink and yellow doors
You now need to open two doors: A new pink door and a new yellow door, using your fractured crystal. Go back to the crystal collector and pull the lever. Collect all of your items.
The first thing you need to do is open the blue door again. Follow the above steps to open it. Yes, you need to cross those handholds again. Once you get inside, use your blue crystal on the pillar, then exit. Collect your mirrors and yellow crystal by walking around and getting them by hand. Do not use the crystal collector!
Go back to the first pillar with the light beam shining up and add a mirror. Reflect the light north.
Go north to the next pillar. Add a mirror and reflect the light west.
Go west to the next pillar, add a mirror, and reflect the light up.
Walk to the south end of the room, climb up the ladder, and go north. Make your way to the next pillar. Add a mirror and reflect the light south.
Make your way south to the next pillar. Add your fractured crystal to split the beam into three parts. You will use one of these to open the pink door and the other to open the yellow door.
Yellow door part 1
From the fractured crystal, follow the beam of light south. Add a mirror and reflect the light east.
Go east to the southeast corner. Add a mirror and reflect the light down (not south). Go back to the fractured crystal that split your beam into three parts.
Pink door
From the fractured crystal, go west to the next pillar. Add a mirror and reflect the light down (not south). It should show the mirror's big side pointing towards East.
Go down to the bottom floor and find the pillar with a little beam of light coming out (head south, then west from the stairs). You will see that a green crystal has dyed the light green. Add a mirror and reflect the light south.
Go south, add a mirror, and reflect the light east. This will unlock the pink door.
Yellow door part 2
Go to the southeast corner. Pass through the pink door, then add a mirror to the pillar inside. Reflect the blue light north and pass through the door.
Open the chest to get more mirrors and another fractured crystal.
Cyan and black doors
You now need to open two doors: A new cyan door and a huge black door, using everything you have. Go back to the crystal collector and pull the lever. Collect all of your items. You do not need the cyan crystal for the last puzzle. It's easier to destroy it for space and for less confusion.
Go west to the first pillar, and put a mirror in the pillar. Reflect the light north.
Go north to the next pillar, add a mirror, and reflect the light down (long edge facing south).
Go to the bottom floor. Go north and add a mirror to the pillar with light coming out. Reflect the light west.
Go west to the next pillar and add the fractured crystal with the bright side on the left and the dark side on the right in order to split the beam.
Go south to the next pillar and add the other fractured crystal to split the beam.
You now need to get a red beam, a blue beam, and a green beam of light pointed at the column in the final room. This will make a new clear beam that you can use to enter the black door.
Green beam
From the second fractured crystal, walk west, put a mirror, and reflect the light up. This will make it go through the green crystal.
Go to the top floor from the south ladder on the middle floor. Find the column with the green light coming out, add a mirror, and reflect it west.
The light will then reflect off of a mirror already in the final column and go down. It will now be in the final room pointed at the final pillar.
Blue beam
From the second fractured crystal, walk east. Add a mirror to this pillar and reflect the light up.
Go to the top floor. Find the pillar with a little beam of light coming up and add a mirror. It should be directly south of the black crystal. Reflect the light west.
Follow the beam of light to the next pillar. Add a mirror and reflect the light north.
Follow the beam of light to the next pillar and add a mirror. Reflect the light west.
Go west to the next pillar. Add the blue crystal to dye the beam blue.
The blue beam will then reflect down off of a mirror already in the next column. It will now be in the final room, pointed at the final pillar.
Red beam
From the first fractured crystal, walk north. Add a mirror and reflect the light up.
Go to the middle floor and find the pillar with the beam of light coming up. Add the yellow crystal to dye the light yellow.
Climb up the ladder(right next to where you put the yellow crystal, not the one to the south) to the top floor. Add a mirror to the pillar and reflect the light west. It will go through a purple crystal, where the blue and yellow will cancel each other out, leaving you with a red beam.
The puzzle has been completed!
Go back to the middle floor. Go to the south end, climb up the ladder, and make your way to the northwest corner. Add a mirror and reflect the light south.
Go south to the next pillar. Add a mirror and reflect the light east. It will now be in the final room, pointed at the final pillar.
Go down the stairs in the middle of the top floor, then go down the next set of stairs. Go through the cyan door. Turn the mirror towards the final pillar to merge it with the other two beams. It will be pointed at the black door.
Pass through the now white door.
The death altar
You can skip this whole section if you have already bought/received a death talisman or death tiara.
After you go through the final door, talk to the dwarf Thorgel. You will ask each other how you got to the altar, and he will reveal there is a passage from the Underground Pass created by him and his companions. You will ask if he knows Klank, after which he will realise you are the one who slew Iban. Because of this, he agrees to trade you a death talisman in return for some supplies.
He gives you an item list that tells you what you need to get him. By bringing Thorgel each of the fifty items on the list, you will be able to obtain a death talisman. The items on the list are as follows:
Door key (door key for witches house under potted plant not hallowvale)
Which one you have to find is random.
You can give these items in more than one load. WARNING: If you teleport out, make sure you turn the mirror towards the cyan door first! Otherwise, you'll lock yourself out and you'll have to go through the Underground Pass and enter the tunnel near the dwarf camp or redo the final puzzle. The entry at the dwarf camp is most easily reached from the Lletya village, which is fairly close to the elf land side of the Underground Pass. Doing the Underground Pass in reverse to get to the dwarf village is a lot easier. The tunnel in located directly south of the main building. It is not marked on the minimap, so it is rather difficult to see.
The Power of Death
The temple's safeguard is now restored.
Use your death talisman on the death altar, then use the newly made crystal that Arianwyn repaired for you on it to charge it. Exit the death altar, and then exit the final chamber and make your way to the black crystal that you observed at the beginning of the quest. Use this charged crystal on the black crystal. This will stop people from entering the temple for another thousand years! Go back to Lletya and talk to Arianwyn for your reward.


