(→The Temple: Fixes) |
(cleanup) |
||
| (77 intermediate revisions by 57 users not shown) | |||
| Line 1: | Line 1: | ||
| + | {{external|rs}}{{Floor}} |
||
{{Relativelocation |
{{Relativelocation |
||
| ⚫ | |||
| ⚫ | |||
|location = Paterdomus |
|location = Paterdomus |
||
| − | |north = |
+ | |north = Slayer Tower |
| − | |west = |
+ | |west = Silvarea |
| − | |south = |
+ | |south = Mort Myre Swamp |
| − | |east = |
+ | |east = Canifis |
| + | }} |
||
| − | [[File:Paterdomus |
+ | [[File:Paterdomus map.png|thumb]] |
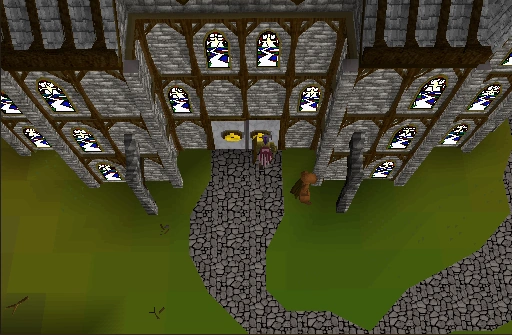
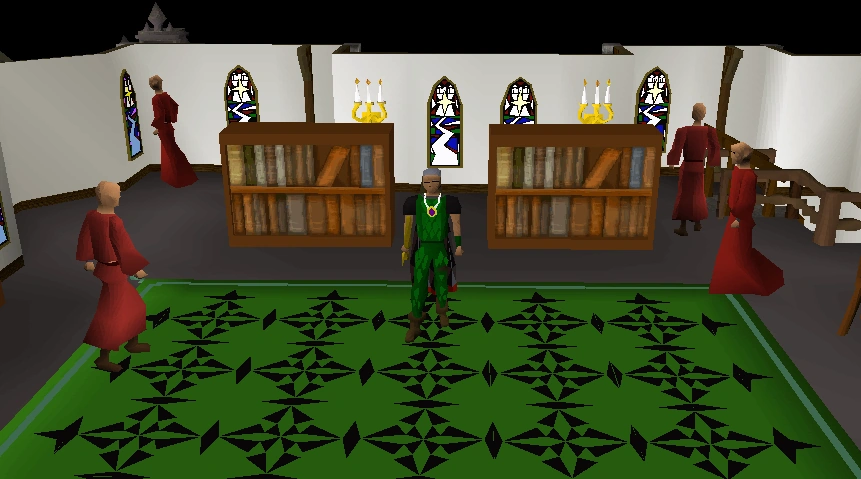
| + | '''Paterdomus''', or '''Temple of Saradomin''', is the temple marking [[Misthalin]]'s eastern border. It acts as the gateway into [[Morytania]] and is located on the [[River Salve]]. The priest [[Drezel]] is the owner of the temple, although it also plays host to some unwelcome [[Monks of Zamorak]], as discovered in the [[Priest in Peril]] [[quest]]. It is labeled "Paterdomus Temple" on the [[world map]]. You can get there quickly by using fairy ring ('''cks''') and traveling west. |
||
| ⚫ | |||
| − | The '''Temple of Saradomin''', or '''Paterdomus '''(latin for "father's house"), is a large temple located on the [[River Salve]], the border between the nations of [[Misthalin]] and [[Morytania]]. It has long been the first line of defence against the evils of Morytania. It is labelled '''Temple''' on the [[world map]]. |
||
| + | Long ago, the [[Seven Priestly Warriors]] held back the forces of [[Lord Lowerniel Vergidiyad Drakan]] and sanctified the [[River Salve]], thus preventing the hordes of Morytania from being able to cross over and invade [[Misthalin]]. The Paterdomus Temple was then built on the site of this famous battle. |
||
| + | During the Priest in Peril quest, it is discovered that the temple has been taken over by Zamorakian monks, who are working on a method to take down the barrier on the Salve. |
||
| − | Until recently, Paterdomus was largely abandoned, save for religious pilgrims and [[Saradomin]]ist monks. In the past year, though, Paterdomus has become a hive of activity, seeing conflict, conspiracies, and Misthalanian mercenary occupation. |
||
| ⚫ | |||
| ⚫ | |||
| + | ===Basement=== |
||
| ⚫ | |||
| ⚫ | |||
| − | The [[Fourth Age]] saw many conflicts between the peoples of [[Gielinor]], many of which sought to claim land they had fought for during the [[God Wars]]. Amongst the largest of these conflicts was a century-long war fought primarily between the [[human]]s of Misthalin and [[Asgarnia]] and the inhabitants of Morytania. |
||
| + | {{Col-begin}} |
||
| ⚫ | |||
| ⚫ | |||
| ⚫ | |||
| ⚫ | |||
| + | [[File:Drezel.png|120px|thumb|[[Drezel]], the current carer of the temple.]] |
||
| ⚫ | |||
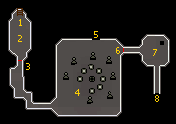
| + | #Staircase to the Columbarium - It is unaccessible at the moment. |
||
| + | #Gate to [[Drezel]]'s chamber |
||
| ⚫ | #Drezel's chamber - Once Drezel is released from the cell in the Paterdomus Temple, he inhabits this chamber to guard against an incursion from [[Morytania]]. During and after the [[In Aid of the Myreque]] quest, a trapdoor becomes accessible in this chamber, with a ladder leading down to a secret library. Inside are several books that outline the history of Morytania. |
||
| ⚫ | |||
| + | {{Col-end}} |
||
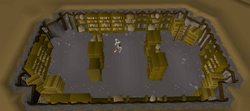
| + | [[File:Paterdomus library.png|thumb|250px|right|Drezel's secret library found in [[In Aid of the Myreque]].]] |
||
| + | The basement of the Temple is only accessible if you have started the [[Priest in Peril]] [[quest]]. It has a [[Combat level]] 30 [[Temple Guardian]] and is one of two ways into [[Morytania]]. In the quest [[In Aid of the Myreque]], you will be able to unlock the secret library filled with books. In addition, the well is a key feature of the temple: players can pass through this barrier to enter Morytania. |
||
| − | === |
+ | ===Ground floor=== |
| ⚫ | |||
| − | [[Lord Drakan]], a powerful [[vampyre]] lord, had been given Morytania by [[Zamorak]] for his assistance in overthrowing [[Zaros]]. Quickly wiping out the native inhabitants of [[Hallowvale]] during the God Wars, he had since claimed nearly all of Morytania for himself. Parts of eastern Misthalin and the northern [[Kharidian Desert]] were also under his control. Not content with this, he launched a major offensive on Misthalin in approximately Year 1100 of the Fourth Age. His army of [[werewolf|werewolves]], [[vampyre]]s, and other beasts proved nearly unstoppable. |
||
| + | The ground floor of the temple has been captured by [[Monks of Zamorak]]. For killing these, you will receive only 25% of normal experience. Also on this level is an [[altar]]. Just outside of the temple is an [[Agility shortcut]] requiring 65 [[Agility]]. |
||
| − | === |
+ | ===First floor=== |
| − | [[File: |
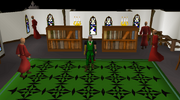
+ | [[File:Paterdom.png|thumb|180x180px]] |
| + | Monks of Zamorak can be found on the first two floors of the temple. For killing these, you will receive only 25% of normal experience. |
||
| − | Using his control of [[Silvarea]], a winding mountain pass, to their advantage, Drakan's forces began to push further into Misthalin. Detecting this threat, the emerging nation of Misthalin and the tribes of modern-day [[Asgarnia]] retaliated. |
||
| + | ===Second floor=== |
||
| − | At the time, there were few large human settlements, and [[Varrock]] (then called Avarrocka) was by far the largest in the area. Apart from this, there were only small outlying villages such as [[Draynor Village]] that payed homage to Avarrocka. This made organisation of an army difficult. |
||
| + | [[Drezel]] is held captive on the second floor and is freed by doing the following in [[Priest in Peril]]: |
||
| + | #Obtain the [[Golden key]] dropped from killing [[Monks of Zamorak]]. |
||
| + | #Swap it out for the [[Iron key]] in the [[#Basement|dungeon]]. |
||
| + | #Fill a [[bucket]] with [[holy water]] from the dungeon's well, and have him bless it. |
||
| + | #Use the blessed water on the coffin to seal the [[vampyre]]. |
||
| ⚫ | |||
| − | An army consisting largely of mercenaries and militias met Drakan's hordes at Silvarea, and for years held him back. As his strength in the Kharidian Desert was lost, Drakan put all of his effort into gaining Misthalin. For decades a continuous war raged in Silvarea. Slowly Drakan gained ground, and humanity's very survival came into question. |
||
| ⚫ | |||
| − | |||
| − | ===The Seven Priestly Warriors=== |
||
| − | Near Year 1200, [[Seven Priestly Warriors]] emerged as leaders in the war. Hailing from many small villages scattered throughout Asgarnia and Misthalin, they rallied support throughout the nations, travelling to small villages and telling the villagers of their cause. Soon thousands of soldiers gathered in Varrock, where the Priests blessed them in the name of [[Saradomin]]. |
||
| − | |||
| − | [[File:Paterdomus Columbarium.png|right|thumb|Paterdomus Columbarium, where many dead have been laid to rest in the tomb's walls.]] |
||
| − | |||
| − | A series of massive battles took place in Silvarea, the Saradominist army led by the Seven Warriors. Under their leadership, most of Drakan-controlled Misthalin was quickly reclaimed, and the war first turned in favour of the Saradominists and Guthixians. |
||
| − | |||
| − | A final battle took place near the site of modern-day Paterdomus. The Seven Warriors fought side by side, finally forcing the Morytanians from Misthalin. To ensure that they could not return, the [[River Salve]], which divided the nations, was blessed with holy power. Should the Morytanians try to cross it again, they would be burned by the water. This would mark the beginning of a period of little conflict between the nations for centuries. |
||
| − | |||
| − | ===The Construction of Paterdomus=== |
||
| − | Although the Salve would theoretically prevent the Morytanians from crossing, it was decided that a fortress was a necessary precaution. Thus the Paterdomus Temple was built near the site of the war's final battle as both a watchtower and symbolic edifice. |
||
| − | |||
| − | Built on the River Salve itself, the Paterdomus was built over the only clear entrance into Misthalin from Morytania. In it many priests served as protectors of Saradomin. When each of the Seven Priestly Warriors died, they were buried in the catacombs beneath the Paterdomus. A rumour persisted, though, that [[Ivandis Seergaze]], the most famous of Warriors, was buried in Morytania itself. |
||
| − | |||
| − | ===Fall from Use=== |
||
| − | As time progressed, it became apparent that Drakan had, for the time, given up on claiming any more land outside Morytania. The fear of Morytania faded away with time, and as it did, the Paterdomus was seen as somewhat useless. Fewer priests took residence in its halls, and contact with Varrock lessened. |
||
| − | |||
| − | The threat of Morytania diminished to the point that in the year 1777 of the [[Fourth age]] settlers foolishly travelled through the Paterdomus to begin colonising the northern part of the nation. Ultimately, this proved a mistake, and the settlers were almost entirely wiped out, or enslaved and forced to pay blood tithes. |
||
| − | |||
| − | ===The Zamorakian Invasion=== |
||
| − | ''The following takes place partially during the [[Priest in Peril]] quest.'' |
||
| − | |||
| − | In the year 169 of the [[Fifth Age]] (the current year), when contact between Varrock and the Paterdomus was almost non-existent, [[Monks of Zamorak]] invaded Paterdomus. As there was no longer any military presence in the Temple, the local monks were quickly dispatched and the temple captured. The temple's records were destroyed and its statues covered. |
||
| − | |||
| − | [[King Roald]] of Varrock was unaware as to why he had stopped receiving letters from [[Drezel]], one of the Temple's monks. He enlisted the help of an adventurer, whom he sent to Paterdomus to see what had happened. |
||
| − | |||
| − | [[File:Drezel Legacy.PNG|right|frame|Drezel, the last priest in Paterdomus.]] |
||
| − | Once there, the adventurer was denied access to the temple by a man inside. Claiming to be Drezel, he asked that the adventurer first killed the [[Temple Guardian]] that resided in the mausoleum beneath the Paterdomus. Unaware that the man inside was actually a Zamorakian monk, the adventurer killed the Guardian and returned to Roald to report what had happened. |
||
| − | |||
| − | King Roald ordered the adventurer's execution, as the Guardian had actually been put in place to guard the tunnel beneath Misthalin and Morytania. The adventurer, wanting to put things right, was instead sent to the temple to locate Drezel and fix the situation. |
||
| − | |||
| − | Eventually, Drezel was freed from the Zamorakians and took up residence in the mausoleum. The Salve had been tainted, weakening its power, but by placing [[rune essence]] in the well beneath the Temple, the unholy energy was removed. While the upper Temple remained in Zamorakian control, Drezel began to operate from the mausoleum, researching the area and planning to reclaim the Paterdomus. |
||
| − | |||
| − | ===A Conspiracy Unfolds=== |
||
| − | ''The following takes place during the [[Devious Minds]] quest.'' |
||
| − | |||
| − | Some time after falling into Zamorakian hands, a lone Saradominist monk was spotted wandering near the temple. Somehow avoiding capture by the Zamorakian monks inside, the lone wanderer managed to evade capture for some time. |
||
| − | |||
| − | Eventually, the monk revealed his purpose; claiming to be from [[Entrana]], he mysteriously recruited the help of an adventurer, asking them to create a "[[bow-sword]]". The monk then asked them to deliver an orb to the Church of Entrana, where he claimed the local priests were planning a festival which he wished to secretly deliver a gift for. |
||
| − | |||
| − | By travelling through the [[Abyss]], the adventurer was able to circumvent the closely-monitored ferries normally used to reach Entrana and arrive on the holy island without being detected. However, when the adventurer delivered the [[Orb (Devious Minds)|Orb]], it was revealed to be none other than a [[Orb (Devious Minds)|teleportation beacon]], allowing an [[Assassin (Devious Minds)|Assassin]] wielding a [[bow-sword]] to infiltrate the church. Slaying several monks and stealing an important artefact, the assassin escaped. A body was soon discovered near Paterdomus, although whether or not it was the stranger that initiated the attack remains unknown. The [[Temple Knights]], apparently monitoring Paterdomus already, are currently investigating. |
||
| − | |||
| − | ===The Involvement of The Myreque=== |
||
| − | ''The following takes place during the [[In Aid of the Myreque]] and the [[In Search of the Myreque]] quest.'' |
||
| − | |||
| − | The adventurer responsible for aiding Drezel, while on their travels, had become involved with [[The Myreque]], a group of guerrilla rebel soldiers intent on overthrowing Lord Drakan. Operating from their new base in the Morytanian town of [[Burgh De Rott]], they required the adventurer's assistance. |
||
| − | |||
| − | When Burgh De Rott was discovered by Drakan, the Myreque decided that the people of the town needed to be taken to Misthalin before the vampyres began enforcing blood tithes. To get them out of Morytania, they would need to be brought to Paterdomus, from which they could safely travel to Varrock. |
||
| − | |||
| − | With the assistance of Drezel, the Myreque were able to save one of their soldiers; [[Ivan Strom]], a young priest. Ivan remained at the Paterdomus as Drezel's aide. |
||
| − | |||
| − | ===Help from Misthalin=== |
||
| − | ''The following takes place during and after the [[Darkness of Hallowvale]] quest.'' |
||
| − | |||
| − | Within the heart of Morytania, in the vampyre-controlled [[Sanguinesti region]], exists [[Meiyerditch]]. This ghetto, operated by the vampyres, is filled with starved citizens, who are farmed for blood like cattle. The Myreque, looking to liberate the ghetto's citizens, called upon the adventurer to assist in their operations. |
||
| − | |||
| − | The adventurer discovered that Paterdomus was being targeted by werewolves, who were using it as a site to gain prey to appease the blood tithe. As travellers were traversing Silvarea, the werewolves were assaulting and kidnapping them, somehow bypassing the River Salve and entering Misthalin. |
||
| − | |||
| − | Looking for military support from Misthalin, the adventurer spoke to King Roald. However, as his advisor [[Aeonisig Raispher]] pointed out, this was not possible. The [[Edicts of Guthix]], which state that no large-scale wars can occur between the different religious factions, outlawed this. As a means of compromise, Roald authorised a [[Mercenary protocol]]. |
||
| − | |||
| − | Even as [[Temple Trekking|citizens were brought out of Morytania]], [[Burgh De Rott Ramble|mercenary soldiers were coming in]]. Paterdomus became a hive of activity, with hundreds passing through it daily. The mercenaries even today wait to be escorted to Burgh De Rott outside the Paterdomus. |
||
| − | |||
| − | ===A Plot Discovered and the Finding of the Columbarium=== |
||
| − | ''The following takes place during the [[Legacy of Seergaze]] quest.'' |
||
| − | |||
| − | [[File:Legacy 1.PNG|left|thumb|A conspiracy unfolds during the [[Legacy of Seergaze]] quest.]] |
||
| − | Whilst waiting for an escort, one of the mercenaries reported seeing a number of Saradomin and Zamorakian soldiers entering the Paterdomus. The adventurer investigated and uncovered a plot against the Guthixian Edicts. |
||
| − | |||
| − | Having entered the Paterdomus, the splinter group was discussing their plans within, apparently using it as a key point in their operation. However, before more information could be gathered, they teleported from the temple. |
||
| − | |||
| − | Meanwhile, Drezel had discovered an ancient columbarium in the depths of the Paterdomus. Here he found that many priests and settlers had been laid to rest, bound by an ancient religious ceremony. |
||
| − | |||
| − | ==Points of Interest== |
||
| − | [[File:Paterdomus basement statues.png|right|thumb|Beneath the Paterdomus six of the [[Seven Priestly Warriors]] have been buried.]] |
||
| − | |||
| ⚫ | |||
| − | The Paterdomus is three stores tall. The first two floors are populated by many attackable [[Monks of Zamorak]] at level 17, 22, and 30. Despite the temple being occupied and partly damaged by Zamorakians, with many of the images of Saradomin hidden or removed, the [[prayer]] [[altar]] on the ground floor can still be used. The ground floor also has an intact church organ. |
||
| − | |||
| ⚫ | |||
| − | Two staircases connect the ground floor to the first floor. This floor has several searchable bookcases. |
||
| − | |||
| − | A ladder connects the first floor to second. This floor has a prison cell, a Morytania coffin, and a blackboard. The floor features in some quests. In [[Priest in Peril]], [[Drezel]] must be freed from the cell. The vampire is present only in the quest. The floor is also visited during the [[Legacy of Seergaze]] quest. |
||
| − | |||
| − | [[File:Paterdomus shortcut.png|right|thumb|Paterdomus-Morytania shortcut.]] |
||
| − | Outside the temple is a small graveyard and, north of the Paterdomus temple, the trapdoor leading to the mausoleum. This is one of only two ways to enter Morytania by foot. By traversing the entire mausoleum and passing through the holy barrier on the other side, the player arrives on the bridge that crosses the River Salve into Mortyania. |
||
| − | |||
| − | The other foot route is immediately south-east of the Paterdomus temple and is quicker than the mausoleum route. This is an [[agility]] [[shortcut]], which can be used at level 65 agility. You squeeze through the cliff railing, climb down the cliff, and squeeze through the bridge railing. The shortcut can also be used going the other direction. Be aware that this is a multi-part shortcut: You must squeeze through both railings using level 65 agility. It is so far unconfirmed whether you can get stuck on the route if you used an agility boost to get to level 65 but the boost wore off before you got to the second railing. (If this happens, then you can escape by using the [[Home teleport]] spell) |
||
| − | |||
| − | ===Mausoleum=== |
||
| ⚫ | |||
| − | This dungeon is only accessible after you have reached a certain point in the [[Priest in Peril]] quest. It has the following features: |
||
| ⚫ | |||
| ⚫ | |||
| ⚫ | |||
| ⚫ | |||
| − | #The staircase to the Columbarium. This staircase can be used once the player has partially completed the [[Legacy of Seergaze]] quest. |
||
| − | #The gate to [[Drezel]]'s chamber.[[File:Paterdomus library.png|right|frame|Secret library room]] |
||
| ⚫ | #Drezel's chamber |
||
| ⚫ | |||
| − | |||
| − | ===The Columbarium=== |
||
| − | [[File:Paterdomus columbarium.png|right|thumb|The Columbarium appears to be shaped like a Saradomin symbol.]] |
||
| − | Beneath the mausoleum is the Columbarium, a unique place where dead bodies were burnt and placed in containers. Those containers were sealed into the walls of the Columbarium. The chamber is now used to free the tortured souls from [[Vyre corpse]]s. It can be reached by descending the staircase at the north end of the main room in the mausoleum, where the circle of monuments is (the room to the west of Drezel). |
||
| − | |||
| − | [[File:The process of burning a vyrewatch.gif|left|thumb|100px|The process of burning a vyrewatch]] |
||
| − | During and after the [[Legacy of Seergaze]] quest, the player discovers a way to kill the members of the dreaded [[Vyrewatch]]. The player can collect the resulting Vyre corpses and free their souls by cremating the corpses in the funeral pyres at the Columbarium. A [[Columbarium key]] appears for each soul that is freed. The keys unlock various coffins in the walls, which contain item rewards. This functions in much the same way as the [[Shades of Mort'ton (activity)|Shades of Mort'ton]] activity. |
||
| − | |||
| − | [[File:Message after cremating 500 Vyrewatches.PNG|thumb|The message a player receives when reading the book after having cremated 500 Vyre corpses]] |
||
| − | The southern end of the Columbarium contains a lectern which keeps track of how many Vyre corpses the player has burned, up to a maximum of 500. For every 50 Vyre corpses that have been cremated, the power of the player's [[Ivandis flail]] increases. |
||
| − | |||
| − | Players can be rewarded with the [[Blood talisman]] at the Columbarium by burning Vyre corpses. They also receive a blood talisman at the end of the [[Legacy of Seergaze]] quest. |
||
| ⚫ | |||
| − | |||
| ⚫ | |||
| ⚫ | |||
| − | |||
| − | This activity can be started just east of the Paterdomus, near a massive statue dedicated to Saradomin. |
||
| − | |||
| ⚫ | |||
| − | {{main|Silvarea}} |
||
| ⚫ | |||
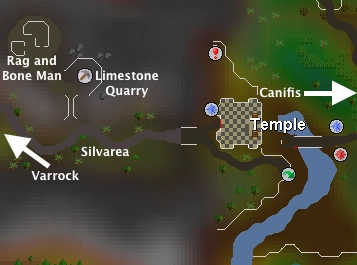
| + | [[File:Silvarea-Paterdomus.png|centre|frame|From [[Varrock]] past the [[Lumber Yard]], the road, [[Silvarea]], travels directly to Paterdomus Temple.]] |
||
===Odd Old Man's House=== |
===Odd Old Man's House=== |
||
| − | The [[Odd Old Man]] really has something for bones. He |
+ | The [[Odd Old Man]] really has something for [[bones]], and even stranger about him is the talking sack on his back. He might even like you to collect bones for him in the [[Rag and Bone Man]] [[quest]]. |
| − | ===Limestone |
+ | ===Limestone mine=== |
| − | Just outside the Odd Old Man's |
+ | Just outside the [[Odd Old Man]]'s house is a [[limestone]] quarry ([[Silvarea Mine]]). Using the [[Crafting]] skill these can be transformed into [[limestone brick]]s, which are used in many quests and in [[Construction]]. |
| − | ==Quests== |
+ | ===Quests=== |
| + | Various [[quest]]s can be started in Paterdomus and the surrounding area or a large part of the quest is located here. These include: |
||
| + | *[[Darkness of Hallowvale]] |
||
| ⚫ | |||
| + | *[[In Search of the Myreque]] |
||
| + | *[[Nature Spirit]] |
||
*[[Priest in Peril]] |
*[[Priest in Peril]] |
||
| − | *[[ |
+ | *[[Rag and Bone Man]] |
| ⚫ | |||
| − | *[[All Fired Up]] |
||
| − | |||
| − | ==Music== |
||
| − | [[Music]] unlocked: |
||
| − | *[[Mausoleum (music track)|Mausoleum]] |
||
| − | *[[The Columbarium]] |
||
| − | *[[Parade]] |
||
| − | *[[Morytania]] |
||
| − | |||
| − | ==Trivia== |
||
| − | {{wpalso|Columbarium}} |
||
| − | {{wpalso|Mausoleum}} |
||
| − | *The makeshift tables used by the conspirators on the top floor of Paterdomus appear to be made of boards from Meiyerditch, although why they were brought to the Paterdomus is unknown. |
||
| − | *The temple guardian beneath Paterdomus, prior to the area's graphics update, resembled the former appearance of [[Dark Beast]]s, but was coloured grey. |
||
| − | *At the entrance to Morytania, the doorway sounds like a portal |
||
| + | {{Dungeons}} |
||
| − | {{Featured article|June 2008}} |
||
| + | {{Priest in Peril}} |
||
| ⚫ | |||
| + | {{Devious Minds}} |
||
| − | [[Category:Locations]] |
||
[[Category:Misthalin]] |
[[Category:Misthalin]] |
||
| − | [[Category:Quest |
+ | [[Category:Quest locations]] |
| − | [[Category:Morytania]] |
||
| − | [[Category:Locations featured on the log-in screen]] |
||
Latest revision as of 11:47, 28 July 2019
| ||||
| Location on World Map | ||||
| Silvarea | ← | Paterdomus | → | Canifis |

Paterdomus, or Temple of Saradomin, is the temple marking Misthalin's eastern border. It acts as the gateway into Morytania and is located on the River Salve. The priest Drezel is the owner of the temple, although it also plays host to some unwelcome Monks of Zamorak, as discovered in the Priest in Peril quest. It is labeled "Paterdomus Temple" on the world map. You can get there quickly by using fairy ring (cks) and traveling west.
History
Long ago, the Seven Priestly Warriors held back the forces of Lord Lowerniel Vergidiyad Drakan and sanctified the River Salve, thus preventing the hordes of Morytania from being able to cross over and invade Misthalin. The Paterdomus Temple was then built on the site of this famous battle.
During the Priest in Peril quest, it is discovered that the temple has been taken over by Zamorakian monks, who are working on a method to take down the barrier on the Salve.
Temple
Basement
The mausoleum dungeon under Paterdomus lies just north of the temple.
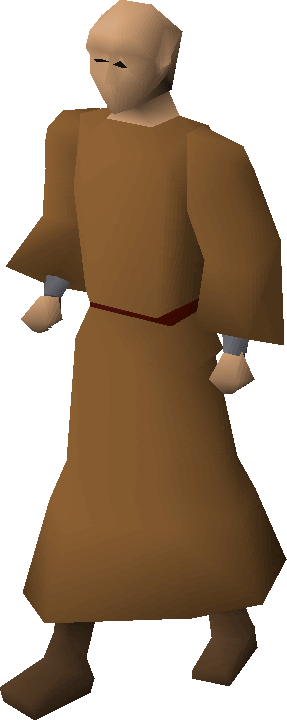  Drezel, the current carer of the temple.
|

Drezel's secret library found in In Aid of the Myreque.
The basement of the Temple is only accessible if you have started the Priest in Peril quest. It has a Combat level 30 Temple Guardian and is one of two ways into Morytania. In the quest In Aid of the Myreque, you will be able to unlock the secret library filled with books. In addition, the well is a key feature of the temple: players can pass through this barrier to enter Morytania.
Ground floor
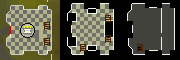
From left to right: Ground floor, 1st floor, and 2nd floor.
The ground floor of the temple has been captured by Monks of Zamorak. For killing these, you will receive only 25% of normal experience. Also on this level is an altar. Just outside of the temple is an Agility shortcut requiring 65 Agility.
First floor
Monks of Zamorak can be found on the first two floors of the temple. For killing these, you will receive only 25% of normal experience.
Second floor
Drezel is held captive on the second floor and is freed by doing the following in Priest in Peril:
- Obtain the Golden key dropped from killing Monks of Zamorak.
- Swap it out for the Iron key in the dungeon.
- Fill a bucket with holy water from the dungeon's well, and have him bless it.
- Use the blessed water on the coffin to seal the vampyre.
Temple Trekking/Burgh de Rott Ramble
The Paterdomus Temple also plays a role as the finish line in the Temple Trekking / Burgh de Rott Ramble mini-game for villagers and a starting point for mercenaries.
Surrounding area
From Varrock past the Lumber Yard, the road, Silvarea, travels directly to Paterdomus Temple.
Odd Old Man's House
The Odd Old Man really has something for bones, and even stranger about him is the talking sack on his back. He might even like you to collect bones for him in the Rag and Bone Man quest.
Limestone mine
Just outside the Odd Old Man's house is a limestone quarry (Silvarea Mine). Using the Crafting skill these can be transformed into limestone bricks, which are used in many quests and in Construction.
Quests
Various quests can be started in Paterdomus and the surrounding area or a large part of the quest is located here. These include:
- Darkness of Hallowvale
- Devious Minds
- In Search of the Myreque
- Nature Spirit
- Priest in Peril
- Rag and Bone Man
| NPCs |
| ||||
| Items |
| ||||
| Rewards | |||||
| Locations |
Paterdomus | ||||
| Music | |||||
| Miscellaneous | |||||
| NPCs |
|
| Items |
|
| Locations |
Doric's hut • Paterdomus • Entrana |
| Related | |