(→Heading to Rimmington: Don't try to explain irrelevant things that you don't understand.) Tag: Visual edit |
m (cleanup) |
||
| (41 intermediate revisions by 38 users not shown) | |||
| Line 1: | Line 1: | ||
{{External|rs}} |
{{External|rs}} |
||
{{Has quick guide}} |
{{Has quick guide}} |
||
| − | {{ |
+ | {{Quest |
|name = Regicide |
|name = Regicide |
||
|image = [[File:Regicide.png|300px]] |
|image = [[File:Regicide.png|300px]] |
||
| Line 26: | Line 26: | ||
Once there, you will see that everything is not as serene as it first appears. |
Once there, you will see that everything is not as serene as it first appears. |
||
|length = Long |
|length = Long |
||
| + | |requirements = *Completion of the following quests: |
||
| ⚫ | |||
| ⚫ | |||
| + | ***[[Biohazard]] |
||
| + | ****[[Plague City]] |
||
| ⚫ | |||
*{{Skill clickpic|Crafting|10}} [[Crafting]] (To make the strip of cloth. It is tradeable, but can't be traded on the [[Grand Exchange]], so if you want it without 10 Crafting you have to ask a friend to make one for you.) |
*{{Skill clickpic|Crafting|10}} [[Crafting]] (To make the strip of cloth. It is tradeable, but can't be traded on the [[Grand Exchange]], so if you want it without 10 Crafting you have to ask a friend to make one for you.) |
||
| ⚫ | |||
*The ability to defeat a level 110 [[Tyras guard]]. ([[Safespots]] are available.) |
*The ability to defeat a level 110 [[Tyras guard]]. ([[Safespots]] are available.) |
||
|items = *20+ [[coal]] in the bank, but it can be done with as little as 7-10 |
|items = *20+ [[coal]] in the bank, but it can be done with as little as 7-10 |
||
| Line 40: | Line 43: | ||
*A [[strip of cloth]] (made on a [[loom]] with 4 [[balls of wool]]) '''not''' a [[bolt of cloth]] (There's a [[loom]] at the [[Elf Camp]] that can be used or one at the [[Falador]] farm in preparation of the quest.) |
*A [[strip of cloth]] (made on a [[loom]] with 4 [[balls of wool]]) '''not''' a [[bolt of cloth]] (There's a [[loom]] at the [[Elf Camp]] that can be used or one at the [[Falador]] farm in preparation of the quest.) |
||
*A [[pestle and mortar]] |
*A [[pestle and mortar]] |
||
| − | *[[Gloves]] that completely cover the player's hands ( |
+ | *[[Gloves]] that completely cover the player's hands ([[Lunar gloves]] and [[Slayer gloves]] will '''NOT''' work.) |
| − | *A [[pot]] |
+ | *A [[pot]] |
*A [[cooked rabbit]] - can be obtained during the quest |
*A [[cooked rabbit]] - can be obtained during the quest |
||
'''Recommended:''' |
'''Recommended:''' |
||
| Line 48: | Line 51: | ||
*([[Super energy|Super]]-)[[energy potion]]s or [[Stamina potion]]s |
*([[Super energy|Super]]-)[[energy potion]]s or [[Stamina potion]]s |
||
*Good [[food]] ([[monkfish]], [[sharks]], etc.) |
*Good [[food]] ([[monkfish]], [[sharks]], etc.) |
||
| − | *Lots of [[agility potion]]s if you are level 53-55 {{Skill clickpic|Agility}} [[Agility]] |
+ | *Lots of [[agility potion]]s if you are level 53-55 {{Skill clickpic|Agility}} [[Agility]], or [[summer pie]]s if boosting from 51-55. Bring at least 6 doses / bites, although more may be needed. |
*An [[axe]] (for [[food]], chop [[logs]], kill [[rabbit]]s, cook the [[Raw rabbit|meat]]) |
*An [[axe]] (for [[food]], chop [[logs]], kill [[rabbit]]s, cook the [[Raw rabbit|meat]]) |
||
*[[Coins]] (for buying food in the [[Underground Pass]]) |
*[[Coins]] (for buying food in the [[Underground Pass]]) |
||
| Line 56: | Line 59: | ||
==Walkthrough== |
==Walkthrough== |
||
| − | :'''Note:''' When doing this quest, players should make sure that they have everything required before continuing. '''The coal, pot, strip of cloth, pestle and mortar and gloves do not need to be brought to [[Tirannwn]].''' If players reach Tirannwn and realize that they have forgotten something, it is a ''very'' long way between the [[bank]] and the quest areas, even if teleports are used. |
+ | :'''Note:''' When doing this quest, players should make sure that they have everything required before continuing. '''The coal, pot, strip of cloth, pestle and mortar, limestone, and gloves do not need to be brought to [[Tirannwn]].''' If players reach Tirannwn and realize that they have forgotten something, it is a ''very'' long way between the [[bank]] and the quest areas, even if teleports are used. |
| + | :'''Note:''' Players under 56 agility can use the fact that most dense forest only has an agility requirement one way through the forest. It is advised to attempt passing through the forest before taking a bite or sip from your boosting item. |
||
===Starting out=== |
===Starting out=== |
||
| Line 69: | Line 73: | ||
===Isafdar=== |
===Isafdar=== |
||
| − | Welcome to [[Tirannwn]]! |
+ | Welcome to [[Tirannwn]]! Go into the forest just a little bit and wait for an elf named [[Idris]] to spawn and start a dialogue with you. This may take a little while. He will question why you are here, but he is slain by [[Essyllt]] and [[Morvran]] before he has the chance to finish. They will tell you to talk to [[Lord Iorwerth]], who can be found at the camp in the north-west corner of the forest. |
Before proceding with the quest, here is a detailed map of [[Tirannwn]]:[[File:Isafdar map.png|thumb|600px|centre]] |
Before proceding with the quest, here is a detailed map of [[Tirannwn]]:[[File:Isafdar map.png|thumb|600px|centre]] |
||
| Line 91: | Line 95: | ||
*Head back down the path you took to reach the camp, but head south when you reach the stick trap. |
*Head back down the path you took to reach the camp, but head south when you reach the stick trap. |
||
The [[Elf Tracker]] is near the [[Poison Waste]]. He will not believe what you say since you are a human, so return to [[Lord Iorwerth]] to get a [[crystal pendant]]. Put it on and talk to the tracker again. He will tell you to find the [[Tyras Camp]]. |
The [[Elf Tracker]] is near the [[Poison Waste]]. He will not believe what you say since you are a human, so return to [[Lord Iorwerth]] to get a [[crystal pendant]]. Put it on and talk to the tracker again. He will tell you to find the [[Tyras Camp]]. |
||
| − | [[File:Tyras guard |
+ | [[File:Tyras guard safe spot.png|thumb|220px|A safespot is available to fight the Tyras guard.]] |
Click "Follow" on the footprints near the dense forest to the west before returning to the tracker. You will now be able to climb through dense forest if you have 56 [[Agility]]. '''You will have to pass through dense forest six times during the quest, bring at least 6 of the appropriate Agility boost.''' |
Click "Follow" on the footprints near the dense forest to the west before returning to the tracker. You will now be able to climb through dense forest if you have 56 [[Agility]]. '''You will have to pass through dense forest six times during the quest, bring at least 6 of the appropriate Agility boost.''' |
||
Climb through the nearest dense forest and a level-110 [[Tyras guard]] will attack you, equipped with a [[steel halberd]]. Despite having a halberd, he does not have a 2-square attack range. You can use a safespot or [[Protect from Melee]] to make the fight easier. If you take too long in killing him, he will despawn, and you will have to try to summon him again or kill the guard by the entrance to the Tyras camp. This guard does not despawn, but he does in fact have a 2-square attack range, and there is a lack of suitable safespots nearby. After you have killed him, proceed to the Tyras Camp, stepping over the tripwire to the north-west if you killed the first guard. Climb through the dense forest to the north and then head west. You will find [[Tyras Camp]] past the dense forest that is south of the catapult. |
Climb through the nearest dense forest and a level-110 [[Tyras guard]] will attack you, equipped with a [[steel halberd]]. Despite having a halberd, he does not have a 2-square attack range. You can use a safespot or [[Protect from Melee]] to make the fight easier. If you take too long in killing him, he will despawn, and you will have to try to summon him again or kill the guard by the entrance to the Tyras camp. This guard does not despawn, but he does in fact have a 2-square attack range, and there is a lack of suitable safespots nearby. After you have killed him, proceed to the Tyras Camp, stepping over the tripwire to the north-west if you killed the first guard. Climb through the dense forest to the north and then head west. You will find [[Tyras Camp]] past the dense forest that is south of the catapult. |
||
| − | Talk to [[General Hining]], and pick up a [[barrel]] before leaving the camp. '''Note:'' ''it is recommended that you pick up several barrels (at least three) since failing the distillation puzzle found later in the quest will require you to travel through the underground pass to collect another'''. Another [[barrel of |
+ | Talk to [[General Hining]], and pick up a [[barrel]] before leaving the camp. '''Note:'' ''it is recommended that you pick up several barrels (at least three) since failing the distillation puzzle found later in the quest will require you to travel through the underground pass to collect another'''. Another [[barrel of naphtha]] will be required for the [[Mourning's End Part I]] quest. Additionally, you can buy bread from the general store if you are low on food. Go back to the Elf Tracker; then, talk to Lord Iorwerth. |
===Getting the materials=== |
===Getting the materials=== |
||
| Line 102: | Line 106: | ||
[[File:Coal tar spot.png|thumb|217x217px|The location to obtain the coal-tar.]] |
[[File:Coal tar spot.png|thumb|217x217px|The location to obtain the coal-tar.]] |
||
#Head back to the [[Elf Tracker]]. Go to the poison waste swamp south of the tracker and fill your barrels with coal-tar. |
#Head back to the [[Elf Tracker]]. Go to the poison waste swamp south of the tracker and fill your barrels with coal-tar. |
||
| − | #Gather some of the [[sulphur]] from beside the poison waste swamp |
+ | #Gather some of the [[sulphur]] from beside the poison waste swamp. |
#If you don't have [[limestone]] yet, you can mine it in the forest. Cross the log balance and head east of the elf camp, through the dense forest, and north-east past the gates of the elven city. Find some [[limestone rock]]s and mine one piece of limestone. There is a limestone mine north-east of [[Varrock]] as well. |
#If you don't have [[limestone]] yet, you can mine it in the forest. Cross the log balance and head east of the elf camp, through the dense forest, and north-east past the gates of the elven city. Find some [[limestone rock]]s and mine one piece of limestone. There is a limestone mine north-east of [[Varrock]] as well. |
||
| Line 111: | Line 115: | ||
====Heading to Rimmington==== |
====Heading to Rimmington==== |
||
| − | Before heading to Rimmington, grind the sulphur with a pestle and mortar |
+ | Before heading to Rimmington, grind the sulphur''' '''with a pestle and mortar '''with gloves equipped'''. Use the limestone on a furnace, which produces [[quicklime]]. '''With gloves equipped and a pot in the inventory, grind the quicklime into dust using the pestle and mortar'''. The pestle and mortar and gloves are no longer needed. Grab at least 15 pieces of [[coal]] (taking extra coal noted is helpful in case you mess up, you can exchange for unnoted coal and 5 coins per banknote in the house near the [[POH]] portal). Finally, to distill the barrel of coal tar into naphtha, bring the [[barrel of coal tar]] (two if doing Mourning's End Part I, the second only needs to be distilled), the pot of [[quicklime]], [[ground sulphur]], [[strip of cloth]], coal (suggested 9 per barrel, but will likely only need 10 total) and the [[Big book of bangs|book]] regarding the bomb creation. Teleport to [[Falador]], or your house if it is in [[Rimmington]], or teleport to [[Pest Control]]/Port Sarim Rat Pits using the [[Minigame Group Finder|quick teleport]]. Now, find the [[Chemist]] that resides there (he is in a building south-west of the house portal). Talk about the quest, and he will give you permission to use the distiller. Now, use the barrel of coal tar on the large distiller outside. |
'''Read this whole section first before you distill! You will lose the barrel of coal tar if the pressure or heat rises in excess of the red zone.''' |
'''Read this whole section first before you distill! You will lose the barrel of coal tar if the pressure or heat rises in excess of the red zone.''' |
||
| − | [[File:Making |
+ | [[File:Making naphtha.png|thumb|220px|The interface when making a barrel of naphtha.]] |
The idea of using this distiller is to keep pressure and heat at an even ratio. Add coal to start raising heat levels, turn the valve for heat to the middle notch and keep it there. You may notice the pressure valve go up as well because the valve is closed. Let the pressure go up to the green area, but pay attention to the heat level. ''Add coal as needed, optimally to maintain the heat gauge in the green zone, but it could be played more safely by keeping it well below overheating.'' |
The idea of using this distiller is to keep pressure and heat at an even ratio. Add coal to start raising heat levels, turn the valve for heat to the middle notch and keep it there. You may notice the pressure valve go up as well because the valve is closed. Let the pressure go up to the green area, but pay attention to the heat level. ''Add coal as needed, optimally to maintain the heat gauge in the green zone, but it could be played more safely by keeping it well below overheating.'' |
||
| Line 126: | Line 130: | ||
===Making the bomb (skip to step 4 if you have all the items already)=== |
===Making the bomb (skip to step 4 if you have all the items already)=== |
||
| − | *If you did not already make the quicklime, equip your [[gloves]]. If you do not, you will take damage when making [[quicklime]]. |
+ | *If you did not already make the quicklime, equip your [[gloves]]. If you do not, you will take damage when making [[quicklime]]. Then, use your [[limestone]] on a [[furnace]], with a [[pot]] in your inventory, and grind your quicklime with a [[pestle and mortar]] to get a [[pot of quicklime]]. |
*If you did not already do so, grind your [[sulphur]] with your pestle and mortar to create [[ground sulphur]]. |
*If you did not already do so, grind your [[sulphur]] with your pestle and mortar to create [[ground sulphur]]. |
||
*If you have not yet made a [[strip of cloth]], use four [[balls of wool]] on a loom. There is one in the [[Elf Camp]], and another in the farm near [[Falador]]. |
*If you have not yet made a [[strip of cloth]], use four [[balls of wool]] on a loom. There is one in the [[Elf Camp]], and another in the farm near [[Falador]]. |
||
| Line 138: | Line 142: | ||
'''Note: '''The [[barrel bomb]] weighs a lot, and will make it more difficult to succeed during agility obstacles such as traps and gap-jumping. |
'''Note: '''The [[barrel bomb]] weighs a lot, and will make it more difficult to succeed during agility obstacles such as traps and gap-jumping. |
||
| − | Now that you have the [[barrel bomb]], go all the way through the [[Underground Pass (dungeon)|Underground Pass]] '''one last time.''' Kill a [[rabbit]] and cook it on any fire. If you did not bring an [[axe]], there are lit fires in the [[Elf Camp|Elven Camp]]. Then, go to the catapult outside the [[Tyras Camp]]. Talk to the guard, and give him some rabbit meat to distract him. Then, use the bomb on the catapult ([[tinderbox]] required, you may also buy one from the store at the camp), and it will explode on [[King Tyras]]. |
+ | Now that you have the [[barrel bomb]], go all the way through the [[Underground Pass (dungeon)|Underground Pass]] '''one last time.''' Kill a [[rabbit]] and cook it on any fire. If you did not bring an [[axe]], there are lit fires in the [[Elf Camp|Elven Camp]]. Then, go to the catapult outside the [[Tyras Camp]]. Talk to the guard, and give him some rabbit meat to distract him. Then, use the bomb on the catapult ([[tinderbox]] required, you may also buy one from the store at the camp), and it will explode on [[King Tyras]]. Using it on the catapult winch will result in a "Nothing interesting happens". |
Go back to [[Lord Iorwerth]]. He will give you [[Iorwerths message|a letter]] to take to [[King Lathas]] and then give you access to the overground pass of [[Arandar]]. Take the Underground Pass or teleport away; then, go to [[Ardougne Castle]]. On the way, an elf named [[Arianwyn]] will break the magic seal on the letter and tell you to read it. You will learn that King Tyras wasn't the main antagonist in the quest, and that his brother, King Lathas, is the main antagonist and is serving the Dark Lord in hopes of reclaiming [[Camelot]]. Return the letter to King Lathas to complete the quest. |
Go back to [[Lord Iorwerth]]. He will give you [[Iorwerths message|a letter]] to take to [[King Lathas]] and then give you access to the overground pass of [[Arandar]]. Take the Underground Pass or teleport away; then, go to [[Ardougne Castle]]. On the way, an elf named [[Arianwyn]] will break the magic seal on the letter and tell you to read it. You will learn that King Tyras wasn't the main antagonist in the quest, and that his brother, King Lathas, is the main antagonist and is serving the Dark Lord in hopes of reclaiming [[Camelot]]. Return the letter to King Lathas to complete the quest. |
||
Revision as of 10:21, 8 June 2019
Regicide is the fourth quest in the Elf quest series, where King Lathas sends the player to Tirannwn to kill his brother, King Tyras, and end his tyranny.
Details
| Start point | |
| Official difficulty | Master |
| Description | Continuing the Plague City series, the Regicide Quest takes you beyond the 'Well of Voyage' to a new realm.
King Lathas will employ you once again, this time for the grim task of disposing of his brother. Upon travelling to the realm you will find yourself surrounded by new and strange plants, animals and even a new race. Once there, you will see that everything is not as serene as it first appears. |
| Length | Long |
| Requirements |
|
| Items required |
Recommended:
|
| Enemies to defeat | Tyras guard (level 110) |
Walkthrough
- Note: When doing this quest, players should make sure that they have everything required before continuing. The coal, pot, strip of cloth, pestle and mortar, limestone, and gloves do not need to be brought to Tirannwn. If players reach Tirannwn and realize that they have forgotten something, it is a very long way between the bank and the quest areas, even if teleports are used.
- Note: Players under 56 agility can use the fact that most dense forest only has an agility requirement one way through the forest. It is advised to attempt passing through the forest before taking a bite or sip from your boosting item.
Starting out
You must speak to King Lathas after receiving the note; otherwise, you won't be able to make it into Iban's Temple.
- Note: Items needed for the first trip: only the items you need for the Underground Pass (dungeon) that have been mentioned in the details: a bow, a few arrows, a tinderbox, plank, spade, antipoison, rope, a pickaxe (if mining the limestone in Tirannwn), combat gear to kill a level 110 Tyras guard, and a ton of food. You will also need agility boosts at this point if boosting. There are no banks in Isafdar. You only gain access to a bank after you have started Mourning's Ends Part I.
After starting, go to King Lathas. He will tell you to go through the Underground Pass (dungeon) again to the western darklands. Once there, you will meet some scouts of his.
See the separate guide for instructions about how to get through the pass. If you have just enough agility potions to complete the required elf traps, do not waste them here as it takes another voyage through the pass to get back to the elf lands.
Once you are at Iban's temple, go in and talk to Koftik if you require food. Iban will no longer be there, so you can simply climb down the Well of Voyage. Go out the cave.
Isafdar
Welcome to Tirannwn! Go into the forest just a little bit and wait for an elf named Idris to spawn and start a dialogue with you. This may take a little while. He will question why you are here, but he is slain by Essyllt and Morvran before he has the chance to finish. They will tell you to talk to Lord Iorwerth, who can be found at the camp in the north-west corner of the forest.
Before proceding with the quest, here is a detailed map of Tirannwn:
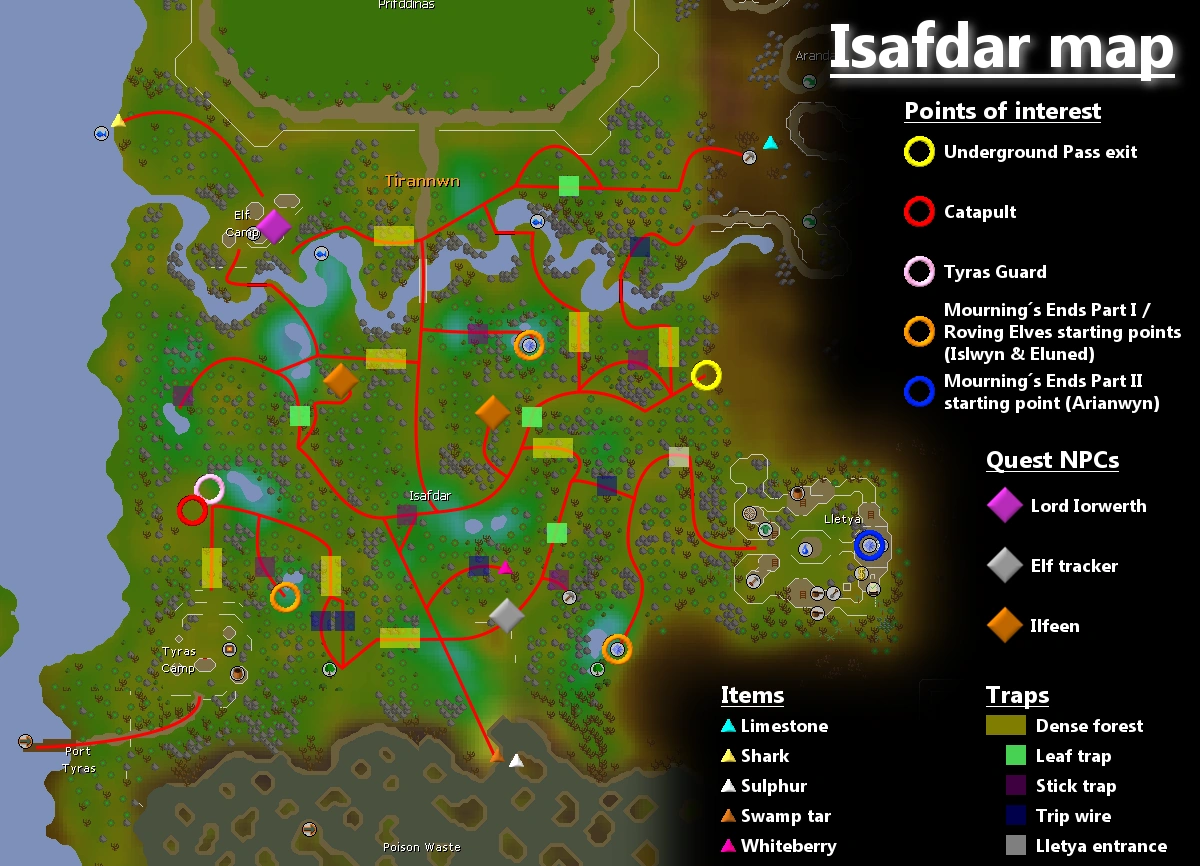

As you navigate the forest, you will encounter four different obstacles:
- Dense forest: You will learn how to navigate this obstacle after speaking to an Elf Tracker later in the quest. 56 Agility is required to push through the dense forest, though this is not required to return back to the starting point of this obstacle (e.g., returning from Tyras Camp to the forest). This obstacle cannot be failed.
- Leaf trap: This obstacle is a pitfall that appears as a circle of leaves on the ground. Click "Jump Over" on the side of the trap that is closest to where you are standing. If you ignore or fail the trap, you will fall through the leaves and lose 15 HP.
- Tripwire: You will see two rocks connected by a thin wire with four small crossbows pointing at them. Right click between the rocks to step over the tripwire. If you ignore or fail the trap, you will lose 10 HP and be poisoned.
- Stick trap: This obstacle appears as some sticks on the ground. Click "Pass" on the obstacle. If you ignore or fail the trap, you will lose 8 HP.
Getting through the forest
Make your way to the Elf Camp in the north-west corner. See the map above for reference.
- From the Underground Pass exit, head west and take the south split in the path to avoid the stick trap.
- Keep going west until you see a leaf trap (pitfall) to the south. Jump over it.
- Keep going south until you reach two small pools of water. Go west and cross the stick trap.
- Head up the north-west path and jump over the leaf trap. Keep heading north and cross the log balance to reach the camp.
At the camp, speak with Lord Iorwerth. He will tell you to talk to his tracker after you tell him that King Lathas sent you.
- Head back down the path you took to reach the camp, but head south when you reach the stick trap.
The Elf Tracker is near the Poison Waste. He will not believe what you say since you are a human, so return to Lord Iorwerth to get a crystal pendant. Put it on and talk to the tracker again. He will tell you to find the Tyras Camp.

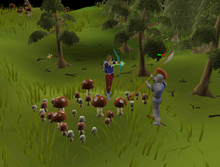
A safespot is available to fight the Tyras guard.
Click "Follow" on the footprints near the dense forest to the west before returning to the tracker. You will now be able to climb through dense forest if you have 56 Agility. You will have to pass through dense forest six times during the quest, bring at least 6 of the appropriate Agility boost.
Climb through the nearest dense forest and a level-110 Tyras guard will attack you, equipped with a steel halberd. Despite having a halberd, he does not have a 2-square attack range. You can use a safespot or Protect from Melee to make the fight easier. If you take too long in killing him, he will despawn, and you will have to try to summon him again or kill the guard by the entrance to the Tyras camp. This guard does not despawn, but he does in fact have a 2-square attack range, and there is a lack of suitable safespots nearby. After you have killed him, proceed to the Tyras Camp, stepping over the tripwire to the north-west if you killed the first guard. Climb through the dense forest to the north and then head west. You will find Tyras Camp past the dense forest that is south of the catapult.
Talk to General Hining, and pick up a barrel before leaving the camp. Note: it is recommended that you pick up several barrels (at least three) since failing the distillation puzzle found later in the quest will require you to travel through the underground pass to collect another. Another barrel of naphtha will be required for the Mourning's End Part I quest. Additionally, you can buy bread from the general store if you are low on food. Go back to the Elf Tracker; then, talk to Lord Iorwerth.
Getting the materials
Lord Iorwerth will give you the Big Book O' Bangs. Don't drop this book - you need it when in Rimmington later. In order to build the explosive, you will need a barrel of coal-tar, sulphur, and limestone. Here is how to gather the materials:
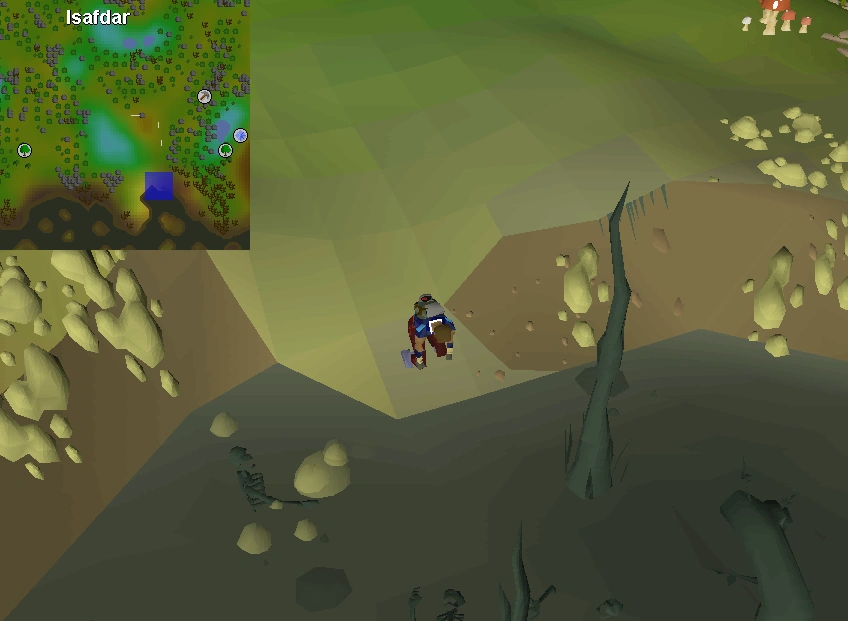
The location to obtain the coal-tar.
- Head back to the Elf Tracker. Go to the poison waste swamp south of the tracker and fill your barrels with coal-tar.
- Gather some of the sulphur from beside the poison waste swamp.
- If you don't have limestone yet, you can mine it in the forest. Cross the log balance and head east of the elf camp, through the dense forest, and north-east past the gates of the elven city. Find some limestone rocks and mine one piece of limestone. There is a limestone mine north-east of Varrock as well.
Making the barrel of naphtha
- Note: If you are planning to do Mourning's Ends Part I, make sure you make another barrel of naphtha (NOT a completed Barrel Bomb) and keep it in the bank. (Don't forget to collect twice the materials.)
Make sure you have at least one barrel of coal-tar, the big book of bangs, and some sulphur. After this, it is safe to teleport out of Isafdar. If you did not get the limestone, it can be mined on the path to Canifis, north-east of Varrock. Additionally, make a strip of cloth on the loom in the farm south of Falador if you haven't already.
Heading to Rimmington
Before heading to Rimmington, grind the sulphur with a pestle and mortar with gloves equipped. Use the limestone on a furnace, which produces quicklime. With gloves equipped and a pot in the inventory, grind the quicklime into dust using the pestle and mortar. The pestle and mortar and gloves are no longer needed. Grab at least 15 pieces of coal (taking extra coal noted is helpful in case you mess up, you can exchange for unnoted coal and 5 coins per banknote in the house near the POH portal). Finally, to distill the barrel of coal tar into naphtha, bring the barrel of coal tar (two if doing Mourning's End Part I, the second only needs to be distilled), the pot of quicklime, ground sulphur, strip of cloth, coal (suggested 9 per barrel, but will likely only need 10 total) and the book regarding the bomb creation. Teleport to Falador, or your house if it is in Rimmington, or teleport to Pest Control/Port Sarim Rat Pits using the quick teleport. Now, find the Chemist that resides there (he is in a building south-west of the house portal). Talk about the quest, and he will give you permission to use the distiller. Now, use the barrel of coal tar on the large distiller outside.
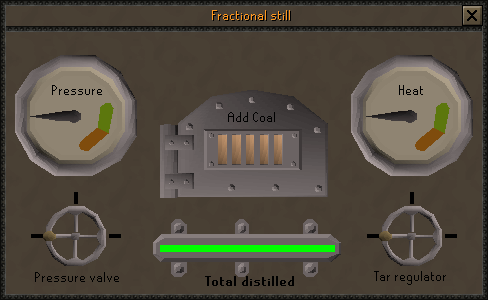
Read this whole section first before you distill! You will lose the barrel of coal tar if the pressure or heat rises in excess of the red zone.
The interface when making a barrel of naphtha.
The idea of using this distiller is to keep pressure and heat at an even ratio. Add coal to start raising heat levels, turn the valve for heat to the middle notch and keep it there. You may notice the pressure valve go up as well because the valve is closed. Let the pressure go up to the green area, but pay attention to the heat level. Add coal as needed, optimally to maintain the heat gauge in the green zone, but it could be played more safely by keeping it well below overheating.
A very easy way to do this is:
- Turn the valve on the right all the way to the third tick (all the way to the right).
- Wait for the pressure gauge to land in the green zone.
- Turn the valve on the left to the second tick (in the middle) to halt the pressure in the green zone. If it landed in the red zone, you could turn the valve right to relieve some pressure, then back to the middle.
- The valves never need to be touched again, and the pressure gauge can be ignored.
- Add 2 coal, and then 1 additional coal whenever the heat gauge falls too low (below, or counterclockwise from, the green zone). Don't spam click the "add coal" button. If you add 4 at once, it is likely to overheat and you will lose your barrel of coal-tar. The process is fast and may use only 4-5 coal.
The bar on the bottom should start turning green. When it is full, stop adding coal and close the window to replace your empty barrel with a barrel of naphtha.
Making the bomb (skip to step 4 if you have all the items already)
- If you did not already make the quicklime, equip your gloves. If you do not, you will take damage when making quicklime. Then, use your limestone on a furnace, with a pot in your inventory, and grind your quicklime with a pestle and mortar to get a pot of quicklime.
- If you did not already do so, grind your sulphur with your pestle and mortar to create ground sulphur.
- If you have not yet made a strip of cloth, use four balls of wool on a loom. There is one in the Elf Camp, and another in the farm near Falador.
- Add the ground sulphur and pot of quicklime to your barrel of naphtha to seal the bomb, then use the strip of cloth on it to complete the barrel bomb.
Regicide
Items required: Spade, bow, arrows, rope, plank, tinderbox, (to get through the Underground Pass again) a cooked rabbit, and of course, your completed barrel bomb. Agility potions and anti-poisons if you need any.
Recommended: axe (if you need to get a cooked rabbit), runes for Ardougne teleport.

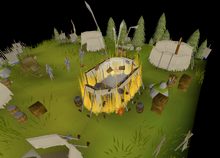
The barrel bomb destroys King Tyras' tent.
Note: The barrel bomb weighs a lot, and will make it more difficult to succeed during agility obstacles such as traps and gap-jumping.
Now that you have the barrel bomb, go all the way through the Underground Pass one last time. Kill a rabbit and cook it on any fire. If you did not bring an axe, there are lit fires in the Elven Camp. Then, go to the catapult outside the Tyras Camp. Talk to the guard, and give him some rabbit meat to distract him. Then, use the bomb on the catapult (tinderbox required, you may also buy one from the store at the camp), and it will explode on King Tyras. Using it on the catapult winch will result in a "Nothing interesting happens".
Go back to Lord Iorwerth. He will give you a letter to take to King Lathas and then give you access to the overground pass of Arandar. Take the Underground Pass or teleport away; then, go to Ardougne Castle. On the way, an elf named Arianwyn will break the magic seal on the letter and tell you to read it. You will learn that King Tyras wasn't the main antagonist in the quest, and that his brother, King Lathas, is the main antagonist and is serving the Dark Lord in hopes of reclaiming Camelot. Return the letter to King Lathas to complete the quest.
Rewards
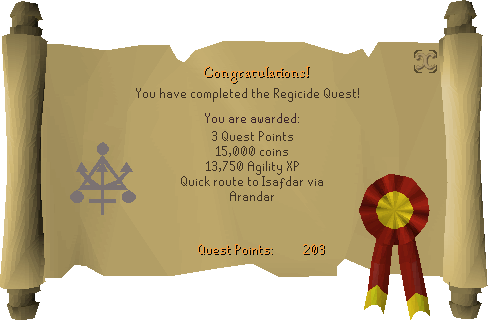
- 3
 Quest points
 - 13,750 Agility experience
- 15,000 Coins
- Access to the elven kingdom of Tirannwn and the overpass of Arandar
- Access to the dragon halberd (325,000 coins at the Tyras Camp)
- The ability to charter a ship to Port Tyras
- The ability to use Elf Camp teleport scrolls
- The ability to use Zul-andra teleport scrolls and kill Zulrah
Required for completing
Completion of Regicide is required for the following:
Regicide | |||||||||||
|---|---|---|---|---|---|---|---|---|---|---|---|
| NPCs |
| ||||||||||
| Items |
| ||||||||||
| Locations |
Underground Pass • Well of Voyage • Iban's Temple • Isafdar • Poison Waste • Elf Camp • Port Tyras • Tyras Camp • Rimmington | ||||||||||
| Music |
Breeze • Crystal Castle • Elven Mist • Everywhere • Forest • Lost Soul • Meridian • Overpass • Riverside • Well of Voyage • Woodland | ||||||||||
| Related | |||||||||||