Elven Core (talk | contribs) (updated equipment template) |
m (cleanup) |
||
| (21 intermediate revisions by 17 users not shown) | |||
| Line 12: | Line 12: | ||
*A [[Revenant cave teleport]] brings you directly to the north entrance of the caves, at 40 Wilderness. |
*A [[Revenant cave teleport]] brings you directly to the north entrance of the caves, at 40 Wilderness. |
||
| − | '''Note:''' Without 84 [[Agility]], using the lower levelled entrance is not recommended, as |
+ | '''Note:''' Without 84 [[Agility]], using the lower levelled entrance is not recommended, as players have to navigate around the whole dungeon to reach the [[revenants]]. The agility [[shortcut]] leading directly to the revenants requires 89 Agility, but this can be boosted with a [[summer pie]]. Using this shortcut is highly recommended to escape aggressive players, since most typically lack the requirement to use it. |
==Mechanics== |
==Mechanics== |
||
[[File:Revenant healing.gif|frame|A [[revenant imp]] healing itself.]] |
[[File:Revenant healing.gif|frame|A [[revenant imp]] healing itself.]] |
||
| − | [[Revenants]] use all three forms of attack. Their attacks have very high if not 100% accuracy, and will often deal high damage. They will react to a player's [[overhead prayers]] and defensive bonuses. By default, all revenants attack with [[Magic]], but |
+ | [[Revenants]] use all three forms of attack. Their attacks have very high if not 100% accuracy, and will often deal high damage. They will react to a player's [[overhead prayers]] and defensive bonuses. By default, all revenants attack with [[Magic]], but can quickly adapt based on the player's defensive bonuses and prayers. |
| − | A revenant's magic attack, which resembles a weaker form of [[Ice Barrage]], can momentarily freeze the player for several seconds. Revenants are also capable of healing whenever their health falls below 50%. Although they can constantly heal themselves, their healing ability is limited. |
+ | A revenant's magic attack, which resembles a weaker form of [[Ice Barrage]], can momentarily freeze the player for several seconds and hits up to nine other players on the same tile as their target. Revenants are also capable of healing whenever their health falls below 50%. Although they can constantly heal themselves, their healing ability is limited, and they don't eat as fast as they would normally do. |
To block a revenant's damage and [[aggression]], a charged [[bracelet of ethereum]] must be worn at all times. The bracelet is charged by [[revenant ether]]s, which all revenants are guaranteed to drop. For each attack the revenant does, it is nullified by a charged bracelet, with each attack consuming one charge. Note that it will not prevent the freezing capability of a revenant's magic attacks. The bracelet is always lost upon death, so it is not advised to put too many ethers on it. |
To block a revenant's damage and [[aggression]], a charged [[bracelet of ethereum]] must be worn at all times. The bracelet is charged by [[revenant ether]]s, which all revenants are guaranteed to drop. For each attack the revenant does, it is nullified by a charged bracelet, with each attack consuming one charge. Note that it will not prevent the freezing capability of a revenant's magic attacks. The bracelet is always lost upon death, so it is not advised to put too many ethers on it. |
||
| + | |||
| ⚫ | |||
| ⚫ | |||
| ⚫ | |||
| ⚫ | |||
| ⚫ | |||
| ⚫ | |||
| ⚫ | |||
==Equipment== |
==Equipment== |
||
As [[revenants]] have very high accuracy, the [[bracelet of ethereum]] is highly recommended when battling them. |
As [[revenants]] have very high accuracy, the [[bracelet of ethereum]] is highly recommended when battling them. |
||
| − | *Revenants are weak to the [[Salve amulet]] and [[crush]] |
+ | *Revenants are weak to the [[Salve amulet]] and [[crush]] attacks, though ranged works just as fine. |
*Appropriate [[prayer]] switching, [[black dragonhide armour]] and [[Dinh's bulwark]] can be used to protect the player by lowering the accuracy of [[PK'ers]], who bring [[teleblock]]s and freezes. |
*Appropriate [[prayer]] switching, [[black dragonhide armour]] and [[Dinh's bulwark]] can be used to protect the player by lowering the accuracy of [[PK'ers]], who bring [[teleblock]]s and freezes. |
||
*Alternatively, [[monks robes]] offer cheap [[prayer bonuses]] at the cost of less defensive bonuses |
*Alternatively, [[monks robes]] offer cheap [[prayer bonuses]] at the cost of less defensive bonuses |
||
*Players can use the ''Toggle'' option on the bracelet of ethereum to make it so the dropped ether is automatically added to the bracelet. |
*Players can use the ''Toggle'' option on the bracelet of ethereum to make it so the dropped ether is automatically added to the bracelet. |
||
| − | |||
| ⚫ | |||
| ⚫ | |||
| ⚫ | |||
| ⚫ | |||
| ⚫ | |||
| ⚫ | |||
| ⚫ | |||
<tabber> |
<tabber> |
||
| − | |-| |
||
Ranged = |
Ranged = |
||
| − | {{Recommended equipment|style = Ranged|helm1 = {{plink|Slayer helmet (i)}}|helm2 = {{plink|Archer helm}}|helm3 = {{plink|Snakeskin bandana}}|neck1 = {{plink|Salve amulet(ei)|Salve amulet(i)}}|neck2 = {{plink|Necklace of anguish}}|neck3 = {{plink|Amulet of glory}}|cape1 = {{plink|Ava's assembler}}|cape2 = {{plink|Ava's accumulator}}|cape3 = {{plink|Ranging cape}}|cape4 = {{plink|Ava's attractor}}|body1 = {{plink|Black d'hide body}}|body2 = {{plink|Red d'hide body}}|body3 = {{plink|Monk's robe top}}|legs1 = {{plink|Black d'hide chaps}}|legs2 = {{plink|Red d'hide chaps}}|legs3 = {{plink|Monk's robe}}|weapon1 = {{plink|Craw's bow}}|weapon2 = {{plink|Toxic blowpipe}} <ref name=ammo>With [[Dragon darts|Dragon]], [[Rune darts|Rune]], or [[Adamant darts]]</ref>|weapon3 = {{plink|Magic shortbow}}|shield1 = None |
+ | {{Recommended equipment|style = Ranged|helm1 = {{plink|Slayer helmet (i)}}|helm2 = {{plink|Archer helm}}|helm3 = {{plink|Snakeskin bandana}}|neck1 = {{plink|Salve amulet(ei)|Salve amulet(i)}}|neck2 = {{plink|Necklace of anguish}}|neck3 = {{plink|Amulet of glory}}|cape1 = {{plink|Ava's assembler}}|cape2 = {{plink|Ava's accumulator}}|cape3 = {{plink|Ranging cape}}|cape4 = {{plink|Ava's attractor}}|body1 = {{plink|Black d'hide body}}|body2 = {{plink|Red d'hide body}}|body3 = {{plink|Monk's robe top}}|legs1 = {{plink|Black d'hide chaps}}|legs2 = {{plink|Red d'hide chaps}}|legs3 = {{plink|Monk's robe}}|weapon1 = {{plink|Craw's bow}}|weapon2 = {{plink|Toxic blowpipe}} <ref name=ammo>With [[Dragon darts|Dragon]], [[Rune darts|Rune]], or [[Adamant darts]]</ref>|weapon3 = {{plink|Magic shortbow}}|shield1 = None if using [[Craw's bow]], [[Toxic blowpipe]] or [[Magic shortbow]]|shield2 = {{plink|Book of law}}|shield3 = {{plink|Unholy book}}|shield4 = {{plink|Book of balance}}|gloves1 = {{plink|Bracelet of ethereum}}|ammo1 = None if using [[Toxic blowpipe]]|ring1 = {{plink|Explorer's ring 4}}|ring2 = {{plink|Ring of wealth}}|ring3 = {{plink|Ring of dueling}}|boots1 = {{plink|Pegasian boots}}|boots2 = {{plink|Blessed boots|Armadyl d'hide boots}}|boots3 = {{plink|Snakeskin boots}}|ammo2 = {{plink|Diamond bolts (e)}} <ref name=weapon>With their respected weapon type</ref>|ammo3 = {{plink|Broad bolts}} <ref name=weapon />|ammo4 = {{plink|Rune arrows}}<ref name=weapon />|ammo5 = {{plink|Adamant arrows}}<ref name=weapon />}} |
==Inventory== |
==Inventory== |
||
| Line 58: | Line 57: | ||
Melee = |
Melee = |
||
| − | {{Recommended equipment|style = Melee|helm1 = {{plink|Slayer helmet (i)}}|helm2 = {{plink|Serpentine helm}}|helm3 = {{plink|Helm of neitiznot}} (Slash/Stab) / {{plink|Dwarven helmet}} (Crush)|helm4 = {{plink|Berserker helm}}|helm5 = {{plink|Warrior helm}}|neck1 = {{plink|Salve amulet(ei)|Salve amulet(i)}}|neck2 = {{plink|Amulet of torture}}|neck3 = {{plink|Amulet of glory}}|body1 = {{plink|Black d'hide body}}|body2 = {{plink|Monk's robe top}}|legs1 = {{plink|Black d'hide chaps}}|legs2 = {{plink|Monk's robe}}|cape1 = {{plink|Mythical cape}} / {{plink|Ardougne cloak 4}}|cape2 = [[File:Capes of accomplishments (trimmed).gif]] [[Cape of Accomplishment]]|cape3 = {{plink|Cape of legends}}|gloves1 = {{plink|Bracelet of ethereum}}|weapon1 = {{plink|Viggora's chainmace}}|weapon2 = {{plink|Elder maul}}|weapon3 = {{plink|Abyssal whip}}|weapon4 = {{plink|Saradomin sword}}|shield1 = None |
+ | {{Recommended equipment|style = Melee|helm1 = {{plink|Slayer helmet (i)}}|helm2 = {{plink|Serpentine helm}}|helm3 = {{plink|Helm of neitiznot}} (Slash/Stab) / {{plink|Dwarven helmet}} (Crush)|helm4 = {{plink|Berserker helm}}|helm5 = {{plink|Warrior helm}}|neck1 = {{plink|Salve amulet(ei)|Salve amulet(i)}}|neck2 = {{plink|Amulet of torture}}|neck3 = {{plink|Amulet of glory}}|body1 = {{plink|Black d'hide body}}|body2 = {{plink|Monk's robe top}}|legs1 = {{plink|Black d'hide chaps}}|legs2 = {{plink|Monk's robe}}|cape1 = {{plink|Mythical cape}} / {{plink|Ardougne cloak 4}}|cape2 = [[File:Capes of accomplishments (trimmed).gif]] [[Cape of Accomplishment]]|cape3 = {{plink|Cape of legends}}|gloves1 = {{plink|Bracelet of ethereum}}|weapon1 = {{plink|Viggora's chainmace}}|weapon2 = {{plink|Elder maul}}|weapon3 = {{plink|Abyssal whip}}|weapon4 = {{plink|Saradomin sword}}|shield1 = None if using a two-handed weapon|shield2 = {{plink|Dragon defender}}|shield3 = {{plink|Rune defender}}|boots1 = {{plink|Primordial boots}}|boots2 = {{plink|Dragon boots}}|boots3 = {{plink|Rune boots}}|boots4 = {{plink|Climbing boots}}|ring1 = {{plink|Explorer's ring 4}}|ring2 = {{plink|Ring of wealth}}|ring3 = {{plink|Ring of dueling}}}} |
==Inventory== |
==Inventory== |
||
| Line 74: | Line 73: | ||
Prayer = |
Prayer = |
||
| − | {{Recommended equipment|style = Prayer|helm1 = {{plink|Slayer helmet (i)}}|helm2 = {{plink|Serpentine helm}}|helm3 = {{plink|Helm of neitiznot}}|helm4 = {{plink|Proselyte sallet}}|helm5 = {{plink|Initiate sallet}}|neck1 = {{plink|Salve amulet(ei)|Salve amulet (e)}}|neck2 = {{plink|Amulet of torture}}|neck3 = {{plink|Amulet of glory}}|body1 = {{plink|Proselyte hauberk}}|body2 = {{plink|Initiate hauberk}}|body3 = {{plink|Monk's robe top}}|legs1 = {{plink|Proselyte cuisse}} / {{plink|Proselyte tasset}}|legs2 = {{plink|Initiate cuisse}}|legs3 = {{plink|Monk's robe}}|cape1 = {{plink|Ardougne cloak 4}}|cape2 = [[File:Capes of accomplishments.gif]] [[Cape of Accomplishment]]|cape3 = {{plink|Cape of legends}}|gloves1 = {{plink|Bracelet of ethereum}}|ring1 = {{plink|Explorer's ring 4}}|ring2 = {{plink|Ring of wealth}}|ring3 = {{plink|Ring of dueling}}|weapon1 = {{plink|Viggora's chainmace}}|weapon2 = {{plink|Elder maul}}|weapon3 = {{plink|Abyssal whip}} / {{plink|Abyssal bludgeon}} / {{plink|Abyssal dagger (p++)|Abyssal dagger}}|weapon4 = {{plink|Saradomin sword}}|weapon5 = [[Godsword]]|shield1 = None |
+ | {{Recommended equipment|style = Prayer|helm1 = {{plink|Slayer helmet (i)}}|helm2 = {{plink|Serpentine helm}}|helm3 = {{plink|Helm of neitiznot}}|helm4 = {{plink|Proselyte sallet}}|helm5 = {{plink|Initiate sallet}}|neck1 = {{plink|Salve amulet(ei)|Salve amulet (e)}}|neck2 = {{plink|Amulet of torture}}|neck3 = {{plink|Amulet of glory}}|body1 = {{plink|Proselyte hauberk}}|body2 = {{plink|Initiate hauberk}}|body3 = {{plink|Monk's robe top}}|legs1 = {{plink|Proselyte cuisse}} / {{plink|Proselyte tasset}}|legs2 = {{plink|Initiate cuisse}}|legs3 = {{plink|Monk's robe}}|cape1 = {{plink|Ardougne cloak 4}}|cape2 = [[File:Capes of accomplishments.gif]] [[Cape of Accomplishment]]|cape3 = {{plink|Cape of legends}}|gloves1 = {{plink|Bracelet of ethereum}}|ring1 = {{plink|Explorer's ring 4}}|ring2 = {{plink|Ring of wealth}}|ring3 = {{plink|Ring of dueling}}|weapon1 = {{plink|Viggora's chainmace}}|weapon2 = {{plink|Elder maul}}|weapon3 = {{plink|Abyssal whip}} / {{plink|Abyssal bludgeon}} / {{plink|Abyssal dagger (p++)|Abyssal dagger}}|weapon4 = {{plink|Saradomin sword}}|weapon5 = [[Godsword]]|shield1 = None if using a two-handed weapon|shield2 = {{plink|Dragon defender}}|shield3 = {{plink|Rune defender}}|boots1 = {{plink|Primordial boots}}|boots2 = {{plink|Dragon boots}}|boots3 = {{plink|Rune boots}}|boots4 = {{plink|Climbing boots}}}} |
==Inventory== |
==Inventory== |
||
| Line 98: | Line 97: | ||
* [[Stamina potion]] (optional) |
* [[Stamina potion]] (optional) |
||
* A [[gloves]] switch for charging [[Bracelet of ethereum]] with [[ether]] (optional) |
* A [[gloves]] switch for charging [[Bracelet of ethereum]] with [[ether]] (optional) |
||
| − | * [[Looting bag]] |
+ | * [[Looting bag]] (optional, not recomended) |
| − | * Some [[alch]]s (optional) |
+ | * Some [[alch]]s (optional, not recomended) |
* Rest [[food]] ([[monkfish]] or better) |
* Rest [[food]] ([[monkfish]] or better) |
||
[[Category:Wilderness]] |
[[Category:Wilderness]] |
||
Latest revision as of 10:22, 8 June 2019
Revenants are monsters that can be found in the Revenant Caves, which are located in multi-combat Wilderness. They have generous drop tables, consisting of valuable rewards, and are found within level 28-32 Wilderness in the Revenant Caves.
WARNING: The entire area counts as the Wilderness. Players will be able to attack you here.
How to get there
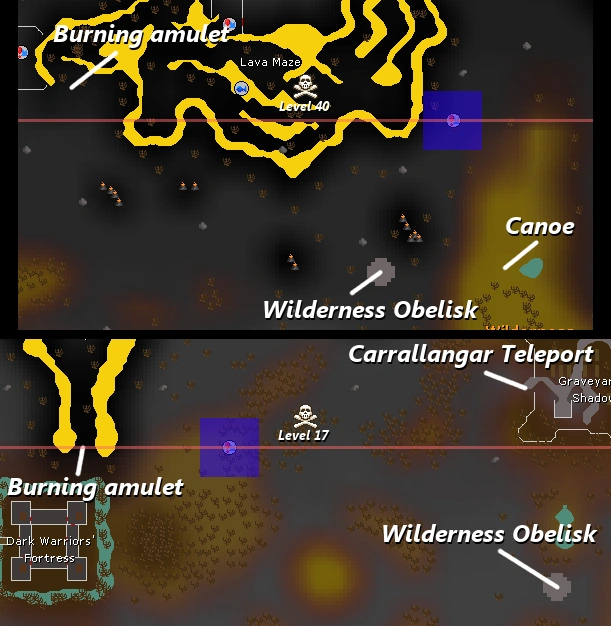
- Using a burning amulet, teleport to either outside the Lava Maze or the Bandit Camp.
- Use the Wilderness Obelisks to teleport to the level 35 obelisk, before running north to find the high levelled entrance.
- With 57 Woodcutting, one can make a waka canoe to head into the Wilderness. Upon arriving, run north-west to the high levelled entrance.
- A Revenant cave teleport brings you directly to the north entrance of the caves, at 40 Wilderness.
Note: Without 84 Agility, using the lower levelled entrance is not recommended, as players have to navigate around the whole dungeon to reach the revenants. The agility shortcut leading directly to the revenants requires 89 Agility, but this can be boosted with a summer pie. Using this shortcut is highly recommended to escape aggressive players, since most typically lack the requirement to use it.
Mechanics
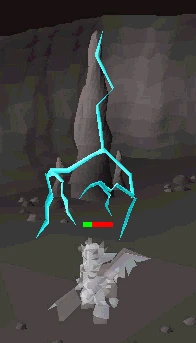
A revenant imp healing itself.
Revenants use all three forms of attack. Their attacks have very high if not 100% accuracy, and will often deal high damage. They will react to a player's overhead prayers and defensive bonuses. By default, all revenants attack with Magic, but can quickly adapt based on the player's defensive bonuses and prayers.
A revenant's magic attack, which resembles a weaker form of Ice Barrage, can momentarily freeze the player for several seconds and hits up to nine other players on the same tile as their target. Revenants are also capable of healing whenever their health falls below 50%. Although they can constantly heal themselves, their healing ability is limited, and they don't eat as fast as they would normally do.
To block a revenant's damage and aggression, a charged bracelet of ethereum must be worn at all times. The bracelet is charged by revenant ethers, which all revenants are guaranteed to drop. For each attack the revenant does, it is nullified by a charged bracelet, with each attack consuming one charge. Note that it will not prevent the freezing capability of a revenant's magic attacks. The bracelet is always lost upon death, so it is not advised to put too many ethers on it.
Suggested skills
- 70+

- 70+
- 40+
- 70+
- 37+ (Protect from Magic, 40+ Protect from Missiles, 43+ Protect from Melee, 70+ Piety, Protect Item)
- 89+ (optional, strongly recommended)
Equipment
As revenants have very high accuracy, the bracelet of ethereum is highly recommended when battling them.
- Revenants are weak to the Salve amulet and crush attacks, though ranged works just as fine.
- Appropriate prayer switching, black dragonhide armour and Dinh's bulwark can be used to protect the player by lowering the accuracy of PK'ers, who bring teleblocks and freezes.
- Alternatively, monks robes offer cheap prayer bonuses at the cost of less defensive bonuses
- Players can use the Toggle option on the bracelet of ethereum to make it so the dropped ether is automatically added to the bracelet.
| Slot | Item (most effective → least effective) | ||||
|---|---|---|---|---|---|
| N/A | N/A | ||||
| N/A | N/A | ||||
| N/A | |||||
| N/A | N/A | ||||
| N/A | N/A | ||||
| N/A | N/A | ||||
| None if using Craw's bow, Toxic blowpipe or Magic shortbow | N/A | ||||
| None if using Toxic blowpipe | |||||
| N/A | N/A | N/A | N/A | ||
| N/A | N/A | ||||
| N/A | N/A | ||||
Inventory
| Slot | Item (most effective → least effective) | ||||
|---|---|---|---|---|---|
| N/A | N/A | ||||
| N/A | N/A | ||||
| N/A | N/A | N/A | |||
| N/A | N/A | N/A | |||
| N/A | |||||
| None if using a two-handed weapon | N/A | N/A | |||
| N/A | N/A | N/A | N/A | ||
| N/A | |||||
| N/A | N/A | ||||
Inventory
| Slot | Item (most effective → least effective) | ||||
|---|---|---|---|---|---|
| N/A | N/A | ||||
| N/A | N/A | ||||
| N/A | N/A | ||||
| N/A | N/A | ||||
| Godsword | |||||
| None if using a two-handed weapon | N/A | N/A | |||
| N/A | N/A | N/A | N/A | ||
| N/A | |||||
| N/A | N/A | ||||
Inventory
Regardless of your inventory setup, you should have a teleportation item capable of bringing you to safety at or below level 30 Wilderness, such as a royal seed pod or charged dragonstone jewellery, in addition to the following:
- Dinh's bulwark (optional, but helps with tanking)
- Phoenix necklace (optional, for switching with Dinh's and emergency healing whilst tanking)
- A Ranging potion (if ranging)
- A Super combat/set (if melee)
- 2-3 Prayer potions (if using Prayer)
- Stamina potion (optional)
- A gloves switch for charging Bracelet of ethereum with ether (optional)
- Looting bag (optional, not recomended)
- Some alchs (optional, not recomended)
- Rest food (monkfish or better)