(Updating price) |
m (cleanup) |
||
| (5 intermediate revisions by 5 users not shown) | |||
| Line 1: | Line 1: | ||
| + | {{External|rs|rsc}} |
||
| − | #REDIRECT [[Spade]] |
||
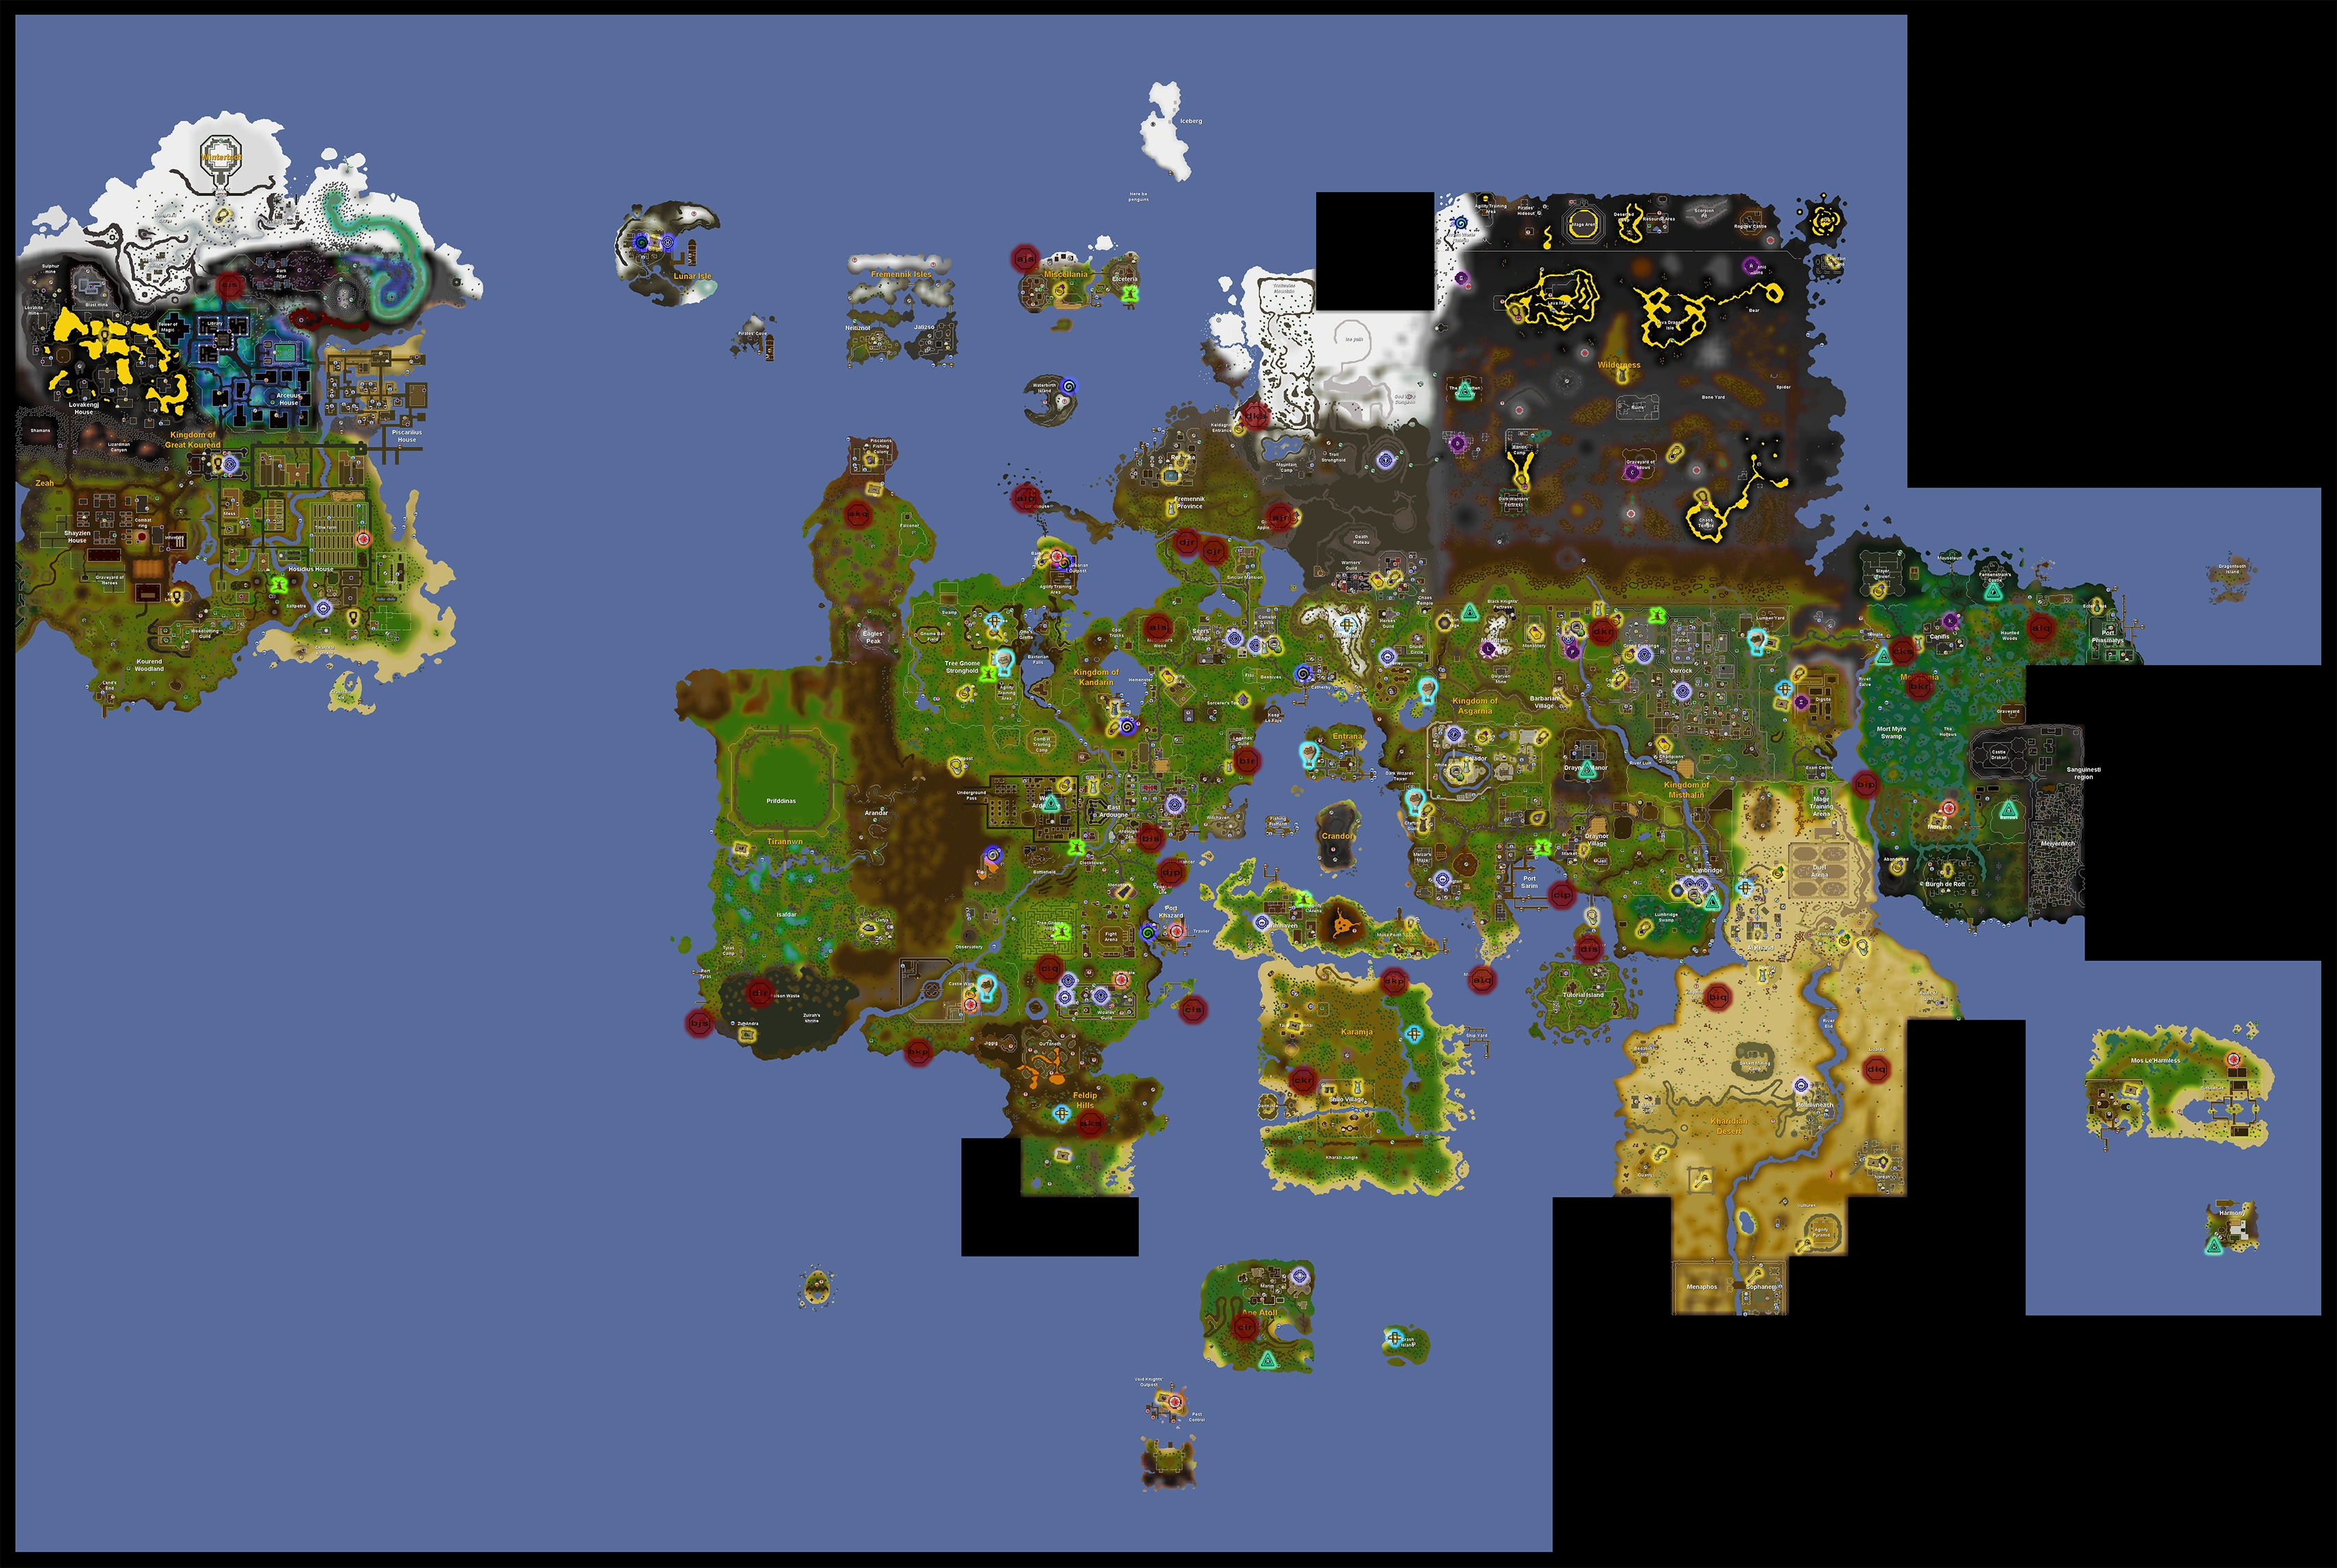
| + | [[File:Teleport map.png|thumb|A map of teleport locations.]] |
||
| + | '''Teleportation''' is the instant travel from any location to a specific location elsewhere. Teleportation may be performed by any of the following: |
||
| + | *Casting [[spells]] |
||
| + | *Walking through [[portal]]s |
||
| + | *Targeted by [[tele-other]] and [[Telegroup|group teleportation]] spells |
||
| + | *Speaking to various [[NPC]]s |
||
| + | *Rubbing [[enchanted jewellery]] |
||
| + | *Using the [[Spirit tree]] network |
||
| + | *Using the [[Fairy ring]] network |
||
| + | *Invoking certain items, such as: |
||
| + | **Emptying the [[Ectophial]] |
||
| + | **Playing the [[enchanted lyre]] |
||
| + | **Breaking [[magic tablet]]s |
||
| + | **Activating [[Karamja gloves 3]] or [[Karamja gloves 4|4]] |
||
| + | *Activating the various [[Wilderness Obelisk|teleportation obelisks]] in the [[Wilderness]] |
||
| + | *Being targeted by [[random events]] |
||
| + | *Using the [[Minigame Group Finder]] to join a [[clan chat]] and use the teleport option |
||
| + | |||
| + | ==Spells== |
||
| + | [[File:Home Teleport.gif|right|frame|A player using the Home Teleport spell.]]Players who do not have sufficient [[Magic]] levels to cast a [[spell]] can use a corresponding teleport tablets ([[Teleportation#Teleport tablets|see below]]) from a limited selection. |
||
| + | |||
| + | ===Standard spellbook=== |
||
| + | ''For more information, see [[Standard spells]].'' |
||
| + | |||
| + | ====Basic teleports==== |
||
| + | {| class="wikitable sortable" |
||
| + | ! class="unsortable" |Icon!!Spell!!Magic Level!! class="unsortable" |Runes Required!!Experience!! class="unsortable" |Notes |
||
| + | |- |
||
| + | |[[File:Home Teleport icon.png]] ||[[Lumbridge Home Teleport]]||1||none||0||This spell will transport you to [[Lumbridge]] free of charge. It takes around 10 seconds to cast and is interruptible by [[Combat]]. Additionally, it may only be cast every 30 minutes. |
||
| + | |- |
||
| + | |[[File:Varrock Teleport icon.png]]||[[Varrock Teleport]]||25||{{RuneReq|Law=1|Air=3|Fire=1}}||35||Transports you to the centre of [[Varrock]], by the fountain near the shop. |
||
| + | |- |
||
| + | |[[File:Lumbridge Teleport icon.png]]||[[Lumbridge Teleport]]||31||{{RuneReq|Law=1|Air=3|Earth=1}}||41||Transports you to the centre of [[Lumbridge Castle]], in the spot where you come if you die. |
||
| + | |- |
||
| + | |[[File:Telekinetic Grab icon.png]]||[[Telekinetic grab]]||33||{{RuneReq|Law=1|Air=1}}||43||Allows you to take an item remotely into your inventory. |
||
| + | |- |
||
| + | |[[File:Falador Teleport icon.png]]||[[Falador Teleport]]||37||{{RuneReq|Law=1|Air=3|Water=1}}||48||Transports you to the centre of [[Falador]], by the [[guard]]s. |
||
| + | |- |
||
| + | |[[File:House Teleport icon.png]]||''[[Teleport to House]]''||40||{{RuneReq|Law=1|Air=1|Earth=1}}||30||Transports you to your [[house]]. See [[Construction]] skill. |
||
| + | |- |
||
| + | |[[File:Camelot Teleport icon.png]]||''[[Camelot Teleport]]''||45||{{RuneReq|Law=1|Air=5}}||55.5||Transports you to [[Camelot]] south of the castle. |
||
| + | |- |
||
| + | |[[File:Ardougne Teleport icon.png]]||''[[Ardougne Teleport]]''||51||{{RuneReq|Law=2|Water=2}}||61||Transports you to [[Ardougne]] in the centre of the square. You must complete the [[Plague City]] quest to use this teleport. |
||
| + | |- |
||
| + | |[[File:Watchtower Teleport icon.png]]||''[[Watchtower Teleport]]''||58||{{RuneReq|Law=2|Earth=2}}||68||Transports you to the top of the [[Watchtower (building)|Watchtower]], next to [[Yanille]]. You must complete the [[Watchtower]] quest to use this spell. |
||
| + | |- |
||
| + | |[[File:Trollheim Teleport icon.png]]||''[[Trollheim Teleport]]''||61||{{RuneReq|Law=2|Fire=2}}||68||Transports you to the very top of [[Trollheim]], near Eadgar's cave. You must complete the [[Eadgar's Ruse]] quest to use this teleport. |
||
| + | |- |
||
| + | |[[File:Teleport to Ape Atoll icon.png]]||''[[Teleport to Ape Atoll]]''||64||{{RuneReq|Law=2|Fire=2|Water=2|Banana=1}}||74||Transports you to [[Ape Atoll]]. Requires completion of the [[Awowogei]] subquest of [[Recipe for Disaster]]. |
||
| + | |- |
||
| + | |[[File:Teleport to Kourend icon.png]]||''[[Teleport to Kourend]]''||69||{{RuneReq|Law=2|Soul=2|Water=4|Fire=5}}||82||Transports you to the centre of [[Great Kourend]]. Players must unlock the spell via searching for the book, [[transportation incantations]], in the [[Arceuus House Library]]. |
||
| + | |- |
||
| + | |[[File:Teleother Lumbridge icon.png]]||''[[Tele-other Lumbridge]]''||74||{{RuneReq|Law=1|Soul=1|Earth=1}}||84||Teleports another player who has [[Accept Aid]] switched on to [[Lumbridge]]. |
||
| + | |- |
||
| + | |[[File:Teleother Falador icon.png]]||''[[Tele-other Falador]]''||82||{{RuneReq|Law=1|Soul=1|Water=1}}||92||Teleports another player who has [[Accept Aid]] switched on to [[Falador]]. |
||
| + | |- |
||
| + | |[[File:Tele Block icon.png]]||''[[Tele-block]]''||85||{{RuneReq|Law=1|Chaos=1|Death=1}}||80||Can only be cast on another player in the [[Wilderness]], and if successful, will prevent that player from using teleportation spells for 5 minutes. |
||
| + | |- |
||
| + | |[[File:Teleport to Bounty Target icon.png]]||''[[Teleport to Bounty Target]]''||85||{{RuneReq|Law=1|Chaos=1|Death=1}}||45||Teleports you near your [[Bounty Hunter]] target. You can only use this spell after using a [[Bounty teleport scroll]]. |
||
| + | |- |
||
| + | |[[File:Teleother Camelot icon.png]]||''[[Tele-other Camelot]]''||90||{{RuneReq|Law=1|Soul=2}}||90||Teleports another player who has [[Accept Aid]] switched on to [[Camelot]]. |
||
| + | |} |
||
| + | |||
| + | ====Teleother==== |
||
| + | ''To teleport other players, they must have [[Accept Aid]] on and agree to be teleported.'' |
||
| + | {| class="wikitable" |
||
| + | |[[File:Teleother Lumbridge icon.png]] |
||
| + | |[[Teleother Lumbridge|Tele-other Lumbridge]] |
||
| + | |Teleport another player to [[Lumbridge]]. |
||
| + | |- |
||
| + | |[[File:Teleother Falador icon.png]] |
||
| + | |[[Teleother Falador|Tele-other Falador]] |
||
| + | |Teleport another player to [[Falador]]. |
||
| + | |- |
||
| + | |[[File:Teleother Camelot icon.png]] |
||
| + | |[[Teleother Camelot|Tele-other Camelot]] |
||
| + | |Teleport another player to [[Camelot]]. |
||
| + | |} |
||
| + | |||
| + | ===Ancient Magicks=== |
||
| + | ''Players must have completed [[Desert Treasure]] to use [[Ancient Magicks]].'' |
||
| + | [[File:Ancient teleport.gif|right|frame|A player using [[Ancient spells]] to teleport.]] |
||
| + | {| class="wikitable sortable" |
||
| + | !Icon |
||
| + | !Spell |
||
| + | ![[File:Magic icon.png]] level |
||
| + | !Runes |
||
| + | !Experience |
||
| + | !Description |
||
| + | |- |
||
| + | |[[File:Home Teleport icon.png]] |
||
| + | |[[Home Teleport]] |
||
| + | |0 |
||
| + | |None |
||
| + | |None |
||
| + | |Teleports to [[Edgeville]]. |
||
| + | |- |
||
| + | |[[File:Paddewwa_Teleport_icon.png]] |
||
| + | |[[Paddewwa Teleport]] |
||
| + | |54 |
||
| + | |{{RuneReq|Law=2|Air=1|Fire=1}} |
||
| + | |64 |
||
| + | |Teleports to the entrance of [[Edgeville Dungeon]]. |
||
| + | |- |
||
| + | |[[File:Senntisten_Teleport_icon.png]] |
||
| + | |[[Senntisten Teleport]] |
||
| + | |60 |
||
| + | |{{RuneReq|Law=2|Soul=1}} |
||
| + | |70 |
||
| + | |Teleports to the [[Digsite]] [[Exam Centre]]. This is one of the only two teleport spells that can be added to a [[Portal Chamber]] in a [[player-owned house]] that is from the [[Ancient Magicks]] spellbook. |
||
| + | |- |
||
| + | |[[File:Kharyrll_Teleport_icon.png]] |
||
| + | |[[Kharyrll Teleport]] |
||
| + | |66 |
||
| + | |{{RuneReq|Law=2|Blood=1}} |
||
| + | |76 |
||
| + | |Teleports to [[Canifis]]. This is one of the only two teleport spells that can be added to a [[Portal Chamber]] in a [[player-owned house]] that is from the [[Ancient Magicks]] spellbook. |
||
| + | |- |
||
| + | |[[File:Lassar_Teleport_icon.png]] |
||
| + | |[[Lassar Teleport]] |
||
| + | |72 |
||
| + | |{{RuneReq|Law=2|Water=4}} |
||
| + | |82 |
||
| + | |Teleports to the top of [[Ice Mountain]]. |
||
| + | |- |
||
| + | |[[File:Dareeyak_Teleport_icon.png]] |
||
| + | |[[Dareeyak Teleport]] |
||
| + | |78 |
||
| + | |{{RuneReq|Law=2|Air=2|Fire=3}} |
||
| + | |88 |
||
| + | |Teleports to the [[Ruins (west)|ruins]] west of the [[Bandit Camp (Wilderness)|Bandit Camp]] in the [[Wilderness]] (Level 23). |
||
| + | |- |
||
| + | |[[File:Carrallangar_Teleport_icon.png]] |
||
| + | |[[Carrallangar Teleport]] |
||
| + | |84 |
||
| + | |{{RuneReq|Law=2|Soul=2}} |
||
| + | |94 |
||
| + | |Teleports to the [[Graveyard of Shadows]] in the [[Wilderness]] (Level 19). |
||
| + | |- |
||
| + | |[[File:Annakarl_Teleport_icon.png]] |
||
| + | |[[Annakarl Teleport]] |
||
| + | |90 |
||
| + | |{{RuneReq|Law=2|Blood=2}} |
||
| + | |100 |
||
| + | |Teleports to the [[Demonic Ruins]] in the [[Wilderness]] (Level 47). |
||
| + | |- |
||
| + | |[[File:Ghorrock Teleport icon.png]] |
||
| + | |[[Ghorrock Teleport]] |
||
| + | |96 |
||
| + | |{{RuneReq|Law=2|Water=8}} |
||
| + | |106 |
||
| + | |Teleports to [[Ice Plateau]] in the [[Wilderness]] (Level 45). |
||
| + | |} |
||
| + | |||
| + | ===Lunar Spells=== |
||
| + | ''Players must have completed [[Lunar Diplomacy]] to use [[Lunar spells]].'' |
||
| + | [[File:Lunar teleport.gif|right|frame|A player using [[Lunar spells]] to teleport.]] |
||
| + | |||
| + | ====Basic teleports==== |
||
| + | {| class="wikitable sortable" |
||
| + | ! class="unsortable" |Icon!!Spell!![[Magic]] Level!! class="unsortable" |Runes Required!! class="unsortable" |Experience!! class="unsortable" |Notes |
||
| + | |- |
||
| + | |[[File:Home Teleport icon.png]]||''[[Lunar Home Teleport]]''||0||None||None||Teleports next to the bank of [[Lunar Isle]] free of charge. It takes around 10 seconds to cast and is interruptible by combat. Additionally, it may only be cast every 30 minutes. |
||
| + | |- |
||
| + | |[[File:Moonclan Teleport icon.png]]||[[Moonclan Teleport]]||69||{{RuneReq|Astral=2|Law=1|Earth=2}}||66||Teleports the player near the bank in the [[Moon Clan]] town. |
||
| + | |- |
||
| + | |[[File:Ourania Teleport icon.png]] |
||
| + | |[[Ourania Teleport]] |
||
| + | |71 |
||
| + | | nowrap="nowrap" |{{RuneReq|Astral=2|Law=1|Earth=6}} |
||
| + | |69 |
||
| + | |Teleports the caster to the [[red salamander (Hunter)|red salamanders]] outside of the [[Ourania Cave]]. Players must speak to [[Baba Yaga]] to unlock the ability to cast this spell. |
||
| + | |- |
||
| + | |[[File:Waterbirth Teleport icon.png]]||[[Waterbirth Teleport]]||72||{{RuneReq|Astral=2|Law=1|Water=1}}||71||Teleports the player beside [[Jarvald]]'s ship on [[Waterbirth Island]], right by the [[snape grass]] spawns. |
||
| + | |- |
||
| + | |[[File:Barbarian Teleport icon.png]]||[[Barbarian Teleport]]||75||{{RuneReq|Astral=2|Law=2|Fire=3}}||76||Teleports the player next to the [[Barbarian Outpost]]. |
||
| + | |- |
||
| + | |[[File:Khazard Teleport icon.png]]||[[Khazard Teleport]]||78||{{RuneReq|Astral=2|Law=2|Water=4}}||80||Teleports the player to [[Port Khazard]]. |
||
| + | |- |
||
| + | |[[File:Fishing Guild Teleport icon.png]]||[[Fishing Guild Teleport]]||85||{{RuneReq|Astral=3|Law=3|Water=10}}||89||Teleports the player outside the door of the [[Fishing Guild]]. |
||
| + | |- |
||
| + | |[[File:Catherby Teleport icon.png]]||[[Catherby Teleport]]||87||{{RuneReq|Astral=3|Law=3|Water=10}}||92||Teleports the player near the bank in [[Catherby]]. |
||
| + | |- |
||
| + | |[[File:Ice Plateau Teleport icon.png]]||[[Ice Plateau Teleport]]||89||{{RuneReq|Astral=3|Law=3|Water=8}}||96||Teleports the player to the members half of the [[Ice Plateau]] in level 53 [[Wilderness]]. Warns the player that they are about to teleport into the "Deep Wilderness" with an option to abort. |
||
| + | |} |
||
| + | |||
| + | ====Tele Group==== |
||
| + | ''Players wishing to be teleported by the caster must be within a 3x3 square, have '''[[Accept Aid]]''' turned on and agree to be teleported.'' |
||
| + | {| class="wikitable" {| |
||
| + | |[[File:Tele Group Moonclan icon.png]] |
||
| + | |[[Tele Group Moonclan]] |
||
| + | |- |
||
| + | |[[File:Tele Group Waterbirth icon.png]] |
||
| + | |[[Tele Group Waterbirth]] |
||
| + | |- |
||
| + | |[[File:Tele Group Barbarian icon.png]] |
||
| + | |[[Tele Group Barbarian]] |
||
| + | |- |
||
| + | |[[File:Tele Group Khazard icon.png]] |
||
| + | |[[Tele Group Khazard]] |
||
| + | |- |
||
| + | |[[File:Tele Group Fishing Guild icon.png]] |
||
| + | |[[Tele Group Fishing Guild]] |
||
| + | |- |
||
| + | |[[File:Tele Group Catherby icon.png]] |
||
| + | |[[Tele Group Catherby]] |
||
| + | |- |
||
| + | |[[File:Tele Group Ice Plateau icon.png]] |
||
| + | |[[Tele Group Ice Plateau]] |
||
| + | |} |
||
| + | |||
| + | ===Arceuus Spellbook=== |
||
| + | ''Players must have gained at least 60% favour with the [[Arceuus House]] in [[Great Kourend]]. For more information, see [[Arceuus spellbook]].'' |
||
| + | |||
| + | {| class="wikitable sortable" |
||
| + | ! class="unsortable" |Icon |
||
| + | !Spell |
||
| + | !Magic level |
||
| + | !Runes required |
||
| + | !Magic XP |
||
| + | !Notes |
||
| + | |- |
||
| + | |[[File:Home Teleport icon.png]] |
||
| + | |[[Arceuus Home Teleport]] |
||
| + | |1 |
||
| + | |None |
||
| + | |0 |
||
| + | |Teleports you to the [[Dark Altar]] on [[Great Kourend]]. |
||
| + | |- |
||
| + | |[[File:Lumbridge Graveyard Teleport icon.png]] |
||
| + | |[[Lumbridge Graveyard Teleport]] |
||
| + | |6 |
||
| + | | nowrap="nowrap" |{{RuneReq|Law=1|Earth=2}} |
||
| + | |10 |
||
| + | |Teleports you to the [[Lumbridge]] Graveyard. |
||
| + | |- |
||
| + | |[[File:Draynor Manor Teleport icon.png]] |
||
| + | |[[Draynor Manor Teleport]] |
||
| + | |17 |
||
| + | | nowrap="nowrap" |{{RuneReq|Law=1|Earth=1|Water=1}} |
||
| + | |16 |
||
| + | |Teleports you to the [[Draynor Manor]]. |
||
| + | |- |
||
| + | |[[File:Mind Altar Teleport icon.png]] |
||
| + | |[[Mind Altar Teleport]] |
||
| + | |28 |
||
| + | | nowrap="nowrap" |{{RuneReq|Law=1|Mind=2}} |
||
| + | |22 |
||
| + | |Teleports you to the [[Mind altar]]. |
||
| + | |- |
||
| + | |[[File:Respawn Teleport icon.png]] |
||
| + | |[[Respawn Teleport]] |
||
| + | |34 |
||
| + | | nowrap="nowrap" |{{RuneReq|Law=1|Soul=1}} |
||
| + | |27 |
||
| + | |Teleports you to your [[Spawning#Respawn_point|respawn point]]. |
||
| + | |- |
||
| + | |[[File:Salve Graveyard Teleport icon.png]] |
||
| + | |[[Salve Graveyard Teleport]] |
||
| + | |40 |
||
| + | | nowrap="nowrap" |{{RuneReq|Law=1|Soul=2}} |
||
| + | |30 |
||
| + | |Teleports you to the [[ghoul]] area by the entrance to [[Mort Myre Swamp]]. |
||
| + | |- |
||
| + | |[[File:Fenkenstrain’s Castle Teleport icon.png]] |
||
| + | |[[Fenkenstrain’s Castle Teleport]] |
||
| + | |48 |
||
| + | | nowrap="nowrap" |{{RuneReq|Law=1|Soul=1|Earth=1}} |
||
| + | |50 |
||
| + | |Teleports you to [[Fenkenstrain's Castle]]. |
||
| + | |- |
||
| + | |[[File:West Ardougne Teleport icon.png]] |
||
| + | |[[West Ardougne Teleport]] |
||
| + | |61 |
||
| + | | nowrap="nowrap" |{{RuneReq|Law=2|Soul=2}} |
||
| + | |68 |
||
| + | |Teleports you to [[West Ardougne]]. Requires completion of [[Biohazard]]. |
||
| + | |- |
||
| + | |[[File:Harmony Island Teleport icon.png]] |
||
| + | |[[Harmony Island Teleport]] |
||
| + | |65 |
||
| + | | nowrap="nowrap" |{{RuneReq|Law=1|Soul=1|Nature=1}} |
||
| + | |74 |
||
| + | |Teleports you to [[Harmony Island]]. Requires completion of [[The Great Brain Robbery]]. |
||
| + | |- |
||
| + | |[[File:Cemetery Teleport icon.png]] |
||
| + | |[[Cemetery Teleport]] |
||
| + | |71 |
||
| + | | nowrap="nowrap" |{{RuneReq|Law=1|Soul=1|Blood=1}} |
||
| + | |82 |
||
| + | |Teleports you to [[The Forgotten Cemetery]] in the [[Wilderness]]. |
||
| + | |- |
||
| + | |[[File:Barrows Teleport icon.png]] |
||
| + | |[[Barrows Teleport]] |
||
| + | |83 |
||
| + | | nowrap="nowrap" |{{RuneReq|Law=2|Soul=2|Blood=1}} |
||
| + | |90 |
||
| + | |Teleports you to the [[Barrows]]. |
||
| + | |- |
||
| + | |[[File:Ape Atoll Teleport icon.png]] |
||
| + | |[[Ape Atoll Teleport]] |
||
| + | |90 |
||
| + | | nowrap="nowrap" |{{RuneReq|Law=2|Soul=2|Blood=2}} |
||
| + | |100 |
||
| + | |Teleports you to the [[Ape Atoll]] temple underground. |
||
| + | |} |
||
| + | |||
| + | ==Portals== |
||
| + | {| class="wikitable" |
||
| + | |- |
||
| + | ! scope="col" |Location |
||
| + | ! scope="col" |Destination |
||
| + | |- |
||
| + | |East of [[Wizards' Guild]] second floor |
||
| + | |[[Wizards' Tower]] |
||
| + | |- |
||
| + | |South of [[Wizards' Guild]] second floor |
||
| + | |[[Dark Wizards' Tower]] |
||
| + | |- |
||
| + | |West of [[Wizards' Guild]] second floor |
||
| + | |[[Sorcerer's Tower]] |
||
| + | |- |
||
| + | |[[Draynor manor]] second floor |
||
| + | |[[Killerwatt plane]] |
||
| + | |- |
||
| + | |[[Entrana Dungeon]] |
||
| + | |Level 28 [[Wilderness]] |
||
| + | |- |
||
| + | | |
||
| + | [[Construction#House portals|House portals]] in [[Rimmington]], [[Taverley]], [[Pollnivneach]], [[Rellekka]], [[Brimhaven]], [[Yanille]] and [[Kourend]] |
||
| + | |[[Player-owned house]] |
||
| + | |- |
||
| + | |[[Portal Chamber]]s |
||
| + | | |
||
| + | Three of [[Lumbridge]], [[Camelot]], [[Ardougne]], [[Canifis]], [[Falador]], [[Varrock]] and [[Yanille|Yanille Watchtower]] |
||
| + | |} |
||
| + | |||
| + | ==Items== |
||
| + | ===Enchanted jewellery=== |
||
| + | {| class="wikitable" |
||
| + | |- |
||
| + | ! scope="col" |Item |
||
| + | ! scope="col" |Destination |
||
| + | ! scope="col" |Charges |
||
| + | ! scope="col" |Rechargeable? |
||
| + | |- |
||
| + | |{{plink|Games necklace}} |
||
| + | | |
||
| + | *[[Barbarian Assault]] |
||
| + | *[[Burthorpe Games Room]] |
||
| + | *[[Tears of Guthix (minigame)|Tears of Guthix]] |
||
| + | *[[Corporeal Beast]] |
||
| + | *[[Wintertodt Camp]] |
||
| + | |8 |
||
| + | |{{Not okay}} |
||
| + | |- |
||
| + | |{{plink|Ring of dueling}} |
||
| + | | |
||
| + | *[[Duel Arena]] |
||
| + | *[[Clan Wars]] |
||
| + | *[[Castle Wars]] |
||
| + | |8 |
||
| + | |{{Not okay}} |
||
| + | |- |
||
| + | |{{plink|Ring of life}} |
||
| + | | |
||
| + | *[[Respawn]] point, if [[Hitpoints]] is less than 10%, except for 0 |
||
| + | |1 |
||
| + | |{{Not okay}} |
||
| + | |- |
||
| + | |{{plink|Combat bracelet}} |
||
| + | | |
||
| + | *[[Warriors' Guild]] |
||
| + | *[[Champions' Guild]] |
||
| + | *[[Edgeville Monastery]] |
||
| + | *[[Ranging Guild]] |
||
| + | |4 or 6 |
||
| + | |{{Okay}}<br />[[Legends' Guild]] totem pole or [[Fountain of Rune]] |
||
| + | |- |
||
| + | |{{plink|Skills necklace}} |
||
| + | | |
||
| + | *[[Fishing Guild]] |
||
| + | *[[Mining Guild]] |
||
| + | *[[Crafting Guild]] |
||
| + | *[[Cooking Guild]] |
||
| + | *[[Woodcutting Guild]] |
||
| + | |4 or 6 |
||
| + | |{{Okay}}<br />[[Legends' Guild]] totem pole or [[Fountain of Rune]] |
||
| + | |- |
||
| + | |{{plink|Amulet of glory}} |
||
| + | | |
||
| + | *[[Edgeville]] |
||
| + | *[[Karamja]] |
||
| + | *[[Draynor Village]] |
||
| + | *[[Al-Kharid]] |
||
| + | |4 or 6 |
||
| + | |{{Okay}}<br />[[Fountain of Heroes]] or [[Fountain of Rune]] |
||
| + | |- |
||
| + | |{{plink|Amulet of eternal glory}} |
||
| + | | |
||
| + | *[[Edgeville]] |
||
| + | *[[Karamja]] |
||
| + | *[[Draynor Village]] |
||
| + | *[[Al-Kharid]] |
||
| + | |Unlimited |
||
| + | |N/A |
||
| + | |- |
||
| + | |{{plink|Ring of wealth}} |
||
| + | | |
||
| + | *[[Miscellania]] |
||
| + | *[[Grand Exchange]] |
||
| + | *[[Varrock Square]] |
||
| + | *[[Falador Park]] |
||
| + | *[[Dondakan]] |
||
| + | |5 |
||
| + | |{{Okay}}<br />[[Fountain of Rune]] |
||
| + | |- |
||
| + | |{{plink|Slayer ring}} |
||
| + | | |
||
| + | *[[Slayer Tower]] |
||
| + | *[[Fremennik Slayer Dungeon]] |
||
| + | *[[Tarn's Lair]] |
||
| + | *[[Stronghold Slayer Cave]] |
||
| + | *[[Dark Beast]]s |
||
| + | |8 |
||
| + | |{{Not okay}} |
||
| + | |- |
||
| + | |{{plink|Digsite pendant|Ruby necklace}} |
||
| + | | |
||
| + | *[[Digsite]] |
||
| + | *[[House on the Hill]] |
||
| + | *[[Lithkren]] |
||
| + | |5 |
||
| + | |{{Not okay}} |
||
| + | |- |
||
| + | |{{plink|Ring of returning}} |
||
| + | | |
||
| + | *[[Respawn]] point |
||
| + | |5 |
||
| + | |{{Not okay}} |
||
| + | |- |
||
| + | |{{plink|Necklace of passage}} |
||
| + | | |
||
| + | *[[Wizards' Tower]] |
||
| + | *[[Jorral]]'s [[Outpost]] |
||
| + | *[[Desert eagle]] station of the [[eagle transport system]] |
||
| + | |5 |
||
| + | |{{Not okay}} |
||
| + | |- |
||
| + | |{{plink|Burning amulet}} |
||
| + | | |
||
| + | *[[Chaos Temple (Wilderness)|Chaos Temple]] (level 15 Wilderness) |
||
| + | *[[Bandit Camp (Wilderness)|Bandit Camp]] (level 17 Wilderness) |
||
| + | *[[Lava Maze]] (level 41 Wilderness) |
||
| + | |5 |
||
| + | |{{Not okay}} |
||
| + | |} |
||
| + | |||
| + | ===Pharaoh's sceptre=== |
||
| + | The [[Pharaoh's sceptre]] is a rare and expensive item obtained during the [[Pyramid Plunder]] [[minigame]] based in [[Sophanem]]. The sceptre provides three charges (up to eight with the completion of the [[Desert Diary]]) of teleports between three pyramids in the [[Kharidian Desert]]: |
||
| + | *'''Jalsavrah''' - the [[Pyramid Plunder]] minigame. |
||
| + | *'''Jaleustrophos''' - the [[Agility Pyramid]], next to [[Simon Templeton]]. |
||
| + | *'''Jaldraocht''' - [[Jaldraocht Pyramid|Azzanadra's pyramid]] in [[Desert Treasure]], where the player can switch between [[Ancient Magicks]] and normal [[Magic]] [[spellbook]]s. |
||
| + | |||
| + | When the sceptre's charges are empty, players may recharge it using the [[Mummy]] in the Pyramid Plunder minigame. It is recommended that players use two charges, and teleport to Pyramid plunder to recharge if needed, saving time. In order to recharge, just "use" the sceptre on the Mummy. He will complain about the player owning it, but will go ahead and recharge it anyway. Players will need artefacts from the [[Pyramid Plunder]] [[minigame]] to recharge the staff - 24 pottery or ivory artefacts, 12 stone artefacts or six (6) gold artefacts are needed. |
||
| + | |||
| + | ===Skull sceptre=== |
||
| + | The [[Skull sceptre]] is obtained through defeating monsters in the [[Stronghold of Security]] and picking up the pieces of the sceptre. The Skull sceptre has five charges to teleport to the [[Barbarian Village]], though [[Varrock armour]] possesses the ability to double the number of charges to ten if you assemble the sceptre whilst wearing the armour. |
||
| + | |||
| + | It disappears afterwards, and it cannot be recharged unless players who have the [[RuneScape Authenticator]] active on their accounts show the completed sceptre and a pair of [[Fancy boots|fancy]] or [[fighting boots]] to [[Solztun]] to imbue the sceptre, which will increase its charges when any pieces are added and cause it not to break. The sceptre does not work over level 20 [[Wilderness]]. |
||
| + | |||
| + | Players can only make and keep one skull sceptre at a time - a new Skull sceptre can only be made once the old Skull sceptre is either lost, destroyed, or has disappeared. The Skull sceptre and all its parts cannot be traded. The pieces are: |
||
| + | {| |
||
| + | |[[File:Left skull half.png]] |
||
| + | |[[Left skull half]] (dropped by [[Ankou]]s) |
||
| + | |- |
||
| + | |[[File:Top of sceptre.png]] |
||
| + | |[[Top of sceptre]] (dropped by [[Catablepon]]s) |
||
| + | |- |
||
| + | |[[File:Bottom of sceptre.png]] |
||
| + | |[[Bottom of sceptre]] (dropped by [[Flesh Crawler]]s) |
||
| + | |- |
||
| + | |[[File:Right skull half.png]] |
||
| + | |[[Right skull half]] (dropped by [[Minotaur]]s) |
||
| + | |} |
||
| + | |||
| + | *Using the skull pieces together forms a [[Strange skull]]. |
||
| + | *Using the top and bottom Skull sceptre pieces form a [[Runed sceptre]]. |
||
| + | *Using the Strange skull and Runed sceptre together form a [[Skull sceptre]]. |
||
| + | |||
| + | ===Xeric's talisman=== |
||
| + | The [[Xeric's talisman]] is obtained as a rare drop from [[Lizardmen]]. It can be charged with [[Lizardman fang]]s, and extra talismans may be converted into 100 fangs. The talisman holds up to 1,000 charges. The talisman provides teleports to different parts of [[Great Kourend]]: |
||
| + | *'''Xeric's Lookout''' - a lookout tower southeast of the encampments in Shayzien House |
||
| + | *'''Xeric's Glade''' - by the magic trees in Hosidius House |
||
| + | *'''Xeric's Inferno''' - by the lovakite furnace in Lovakengj House |
||
| + | *'''Xeric's Heart''' - the center of Great Kourend, by the statue (unlocked after completing [[Architectural Alliance]]) |
||
| + | *'''Xeric's Honour''' - at Mount Quidamortem (unlocked after using an [[Ancient tablet]] on the talisman) |
||
| + | |||
| + | ===Oldak's spheres=== |
||
| + | [[Oldak]], a goblin scientist, has been experimenting with runes and has developed [[Moving-over-distance sphere]]. The moving-over-distance sphere isn't a perfect piece of arcane technology, though, so it will teleport you to any one of several locations in [[Dorgesh-Kaan]] when you break it. If you want a sphere simply take two [[law rune]]s and some [[molten glass]] to Oldak's laboratory in north-west Dorgesh-Kaan and you can exchange them for a teleportation sphere; different locations may be chosen if you've completed a corresponding [[quest]]. |
||
| + | |||
| + | {| |
||
| + | |[[File:Dorgesh-kaan sphere.png|left]] |
||
| + | |[[Dorgesh-kaan sphere]], requires you to have completed the [[Death to the Dorgeshuun]] [[quest]]. |
||
| + | |- |
||
| + | |[[File:Goblin village sphere.png|left]] |
||
| + | |[[Goblin village sphere]], requires you to have completed the [[Another Slice of H.A.M.]] [[quest]]. |
||
| + | |} |
||
| + | |||
| + | ===Spirit trees=== |
||
| + | [[File:Spirit tree.png|thumb|The [[Spirit Tree]] at the Grand Exchange]] |
||
| + | After completion of the [[Tree Gnome Village]] quest, you can use [[Spirit tree]]s to teleport. There are six different spirit tree locations, plus a choice of one player-grown Spirit Tree. They are: |
||
| + | *North-east of [[Grand Exchange]]. |
||
| + | *[[Battlefield]], north-west of the [[Clock Tower]]. |
||
| + | *Centre of the [[Tree Gnome Village (location)|Tree Gnome Village]] maze. |
||
| + | *[[Tree Gnome Stronghold]], west of the entrance to the [[Agility|Agility Course]]. |
||
| + | *Next to the Myths' Guild in the south-west corner of Feldip Hills. |
||
| + | *(Player grown: [[Etceteria]]) |
||
| + | *(Player grown: [[Brimhaven]]) |
||
| + | *(Player grown: [[Port Sarim]]) |
||
| + | *(Player grown: [[Great Kourend]]) |
||
| + | |||
| + | After completing Tree Gnome Village quest, players can access the Spirit Tree in the [[Tree Gnome Village (location)|Tree Gnome Village]] and the [[Tree Gnome Stronghold]] to transport to any of the other three spirit trees, the other (younger) trees will only return you to an older tree. |
||
| + | |||
| + | With a [[Farming]] level of 83, players are able to grow their own spirit tree. These will take you to the spirit tree in the Tree Gnome Stronghold. You may only have one at a time. For more information click [[Farming|here]]. Additionally, players who have achieved level 91 Farming may grow up to two spirit trees at once and unlimited at level 99. |
||
| + | |||
| + | ===Fairy rings=== |
||
| + | [[File:Fairy ring.png|200px|right|A fairy ring.]] |
||
| + | After getting permission from the [[Fairy Godfather]] during [[Fairytale II - Cure a Queen]], you will find a new network of transportation available to you: [[fairy rings]]. |
||
| + | |||
| + | It consists of over 45 fairy rings spread across the land and provides a relatively fast means for accessing often remote sites in ''RuneScape''. Players can enter the fairy ring system from any node while wielding either a [[dramen staff]] or a [[lunar staff]], ending up at the master fairy ring in [[Zanaris]]. From there, using three letter codes, they can teleport to most rings within the system. Several rings, however, require players to complete quests before they can be accessed. Some locations require a player to enter more than one code in the right order, returning to Zanaris after each trip, but this can be skipped after the first journey to that destination. If the selected code has no corresponding fairy ring, players will be teleported a few squares from the main ring. |
||
| + | |||
| + | The main fairy ring is located in Zanaris, just east of the bank. When you click on it to activate it, you will notice the three mushroom controllers pop up. Each controller has four letters assigned to it. Clicking on the right or left side of a mushroom controller will make it turn clockwise or counter-clockwise, respectively. You can make many combinations from these mushrooms, and click the teleport button to go the location. |
||
| + | |||
| + | Players who have completed the Elite [[Lumbridge & Draynor Diary]] will no longer need a [[Dramen staff|dramen]] or [[lunar staff]]. |
||
| + | |||
| + | ===Teleport tablets=== |
||
| + | ====Standard tablets==== |
||
| + | [[File:Teleport Tablet.gif|frame|right|A player breaking a magic tablet.]] |
||
| + | {| class="wikitable" |
||
| + | |- |
||
| + | ! scope="col" |Item |
||
| + | ! scope="col" |Destination |
||
| + | |- |
||
| + | |{{plink|Varrock teleport|alt=Varrock tablet}} |
||
| + | |[[Varrock]] |
||
| + | |- |
||
| + | |{{plink|Falador teleport|alt=Falador tablet}} |
||
| + | |[[Falador]] |
||
| + | |- |
||
| + | |{{plink|Lumbridge teleport|alt=Lumbridge tablet}} |
||
| + | |[[Lumbridge]] |
||
| + | |- |
||
| + | |{{plink|Camelot teleport|alt=Camelot tablet}} |
||
| + | |[[Camelot]] |
||
| + | |- |
||
| + | |{{plink|Ardougne teleport|alt=Ardougne tablet}} |
||
| + | |[[Ardougne]] |
||
| + | |- |
||
| + | |{{plink|Watchtower teleport|Watchtower teleport|alt=Watchtower tablet}} |
||
| + | |[[Watchtower]] |
||
| + | |- |
||
| + | |{{plink|Teleport to house|alt=House tablet}} |
||
| + | |[[Player-owned house|House]] |
||
| + | |- |
||
| + | |{{plink|Rimmington teleport|alt=Rimmington tablet}} |
||
| + | |[[Rimmington]] |
||
| + | |- |
||
| + | |{{plink|Taverley teleport|alt=Taverley tablet}} |
||
| + | |[[Taverley]] |
||
| + | |- |
||
| + | |{{plink|Pollnivneach teleport|alt=Pollnivneach tablet}} |
||
| + | |[[Pollnivneach]] |
||
| + | |- |
||
| + | |{{plink|Rellekka teleport|alt=Rellekka tablet}} |
||
| + | |[[Rellekka]] |
||
| + | |- |
||
| + | |{{plink|Brimhaven teleport|alt=Brimhaven tablet}} |
||
| + | |[[Brimhaven]] |
||
| + | |- |
||
| + | |{{plink|Yanille teleport|alt=Yanille tablet}} |
||
| + | |[[Yanille]] |
||
| + | |- |
||
| + | |{{plink|Trollheim teleport|alt=Trollheim tablet}} |
||
| + | |[[Trollheim]] |
||
| + | |- |
||
| + | |[[Kourend teleport|Kourend tablet]] |
||
| + | |[[Kourend Castle|Kourend]] |
||
| + | |} |
||
| + | |||
| + | ====Ancient tablets==== |
||
| + | These tablets cannot be made, but they can be bought from the [[Bounty Hunter Store]] or the [[Grand Exchange]]. |
||
| + | |||
| + | {| class="wikitable" |
||
| + | |- |
||
| + | ! scope="col" |Item |
||
| + | ! scope="col" |Desination |
||
| + | |- |
||
| + | |{{plink|Paddewwa teleport}} |
||
| + | |[[Edgeville Dungeon]] |
||
| + | |- |
||
| + | |{{plink|Senntisten teleport}} |
||
| + | |[[Digsite]] |
||
| + | |- |
||
| + | |{{plink|Kharyrll teleport}} |
||
| + | |[[Canifis]] |
||
| + | |- |
||
| + | |{{plink|Lassar teleport}} |
||
| + | |[[Ice Mountain]] |
||
| + | |- |
||
| + | |{{plink|Dareeyak teleport}} |
||
| + | |[[Ruins]], level 23 [[Wilderness]] |
||
| + | |- |
||
| + | |{{plink|Carrallangar teleport}} |
||
| + | |[[Graveyard of Shadows]], level 18 [[Wilderness]] |
||
| + | |- |
||
| + | |{{plink|Annakarl teleport}} |
||
| + | |[[Demonic Ruins]], level 47 [[Wilderness]] |
||
| + | |- |
||
| + | |{{plink|Ghorrock teleport}} |
||
| + | |[[Frozen Waste Plateau|Ice Plateau]], level 50 [[Wilderness]] |
||
| + | |} |
||
| + | |||
| + | ====Arceuus tablets==== |
||
| + | {| class="wikitable" |
||
| + | |- |
||
| + | ! scope="col" |Item |
||
| + | ! scope="col" |Destination |
||
| + | |- |
||
| + | |{{plink|Lumbridge graveyard teleport|alt=Lumbridge Graveyard tablet}} |
||
| + | |[[Lumbridge]] graveyard |
||
| + | |- |
||
| + | |{{plink|Draynor manor teleport|alt=Draynor Manor tablet}} |
||
| + | |[[Draynor Manor]] |
||
| + | |- |
||
| + | |{{plink|Mind altar teleport|alt=Mind Altar tablet}} |
||
| + | |[[Mind altar]] |
||
| + | |- |
||
| + | |{{plink|Salve graveyard teleport|alt=Salve Graveyard tablet}} |
||
| + | |[[River Salve]] graveyard |
||
| + | |- |
||
| + | |{{plink|Fenkenstrain's castle teleport|alt=Fenkenstrain’s Castle tablet}} |
||
| + | |[[Fenkenstrain's Castle]] |
||
| + | |- |
||
| + | |{{plink|West ardougne teleport|alt=West Ardougne tablet}} |
||
| + | |[[West Ardougne]] |
||
| + | |- |
||
| + | |{{plink|Harmony island teleport|alt=Harmony Island tablet}} |
||
| + | |[[Harmony Island]] |
||
| + | |- |
||
| + | |{{plink|Cemetery teleport|alt=Cemetery tablet}} |
||
| + | |[[The Forgotten Cemetery]] |
||
| + | |- |
||
| + | |{{plink|Barrows teleport|alt=Barrows tablet}} |
||
| + | |[[Barrows]] |
||
| + | |- |
||
| + | |{{plink|Ape atoll teleport|alt=Ape Atoll tablet}} |
||
| + | |[[Ape Atoll]] |
||
| + | |} |
||
| + | |||
| + | ===Teleport scrolls=== |
||
| + | {| class="wikitable" |
||
| + | |- |
||
| + | ! scope="col" |Item |
||
| + | ! scope="col" |Destination |
||
| + | |- |
||
| + | |{{plink|Digsite teleport}} |
||
| + | |West side of the [[Digsite]] |
||
| + | |- |
||
| + | |{{plink|Elf camp teleport}} |
||
| + | |[[Elf Camp]] |
||
| + | |- |
||
| + | |{{plink|Feldip hills teleport}} |
||
| + | |[[Feldip Hills]], near the [[Hunting expert]] |
||
| + | |- |
||
| + | |{{plink|Lumberyard teleport}} |
||
| + | |[[Lumber Yard]], next to the [[Sawmill operator]] |
||
| + | |- |
||
| + | |{{plink|Lunar isle teleport}} |
||
| + | |[[Lunar Isle]] |
||
| + | |- |
||
| + | |{{plink|Mort'ton teleport}} |
||
| + | |[[Mort'ton]], near the [[Swamp Boaty]] |
||
| + | |- |
||
| + | |{{plink|Mos le'harmless teleport}} |
||
| + | |[[Mos Le'Harmless]], north-east side of the town |
||
| + | |- |
||
| + | |{{plink|Nardah teleport}} |
||
| + | |[[Nardah]], near the [[Magic carpet]] |
||
| + | |- |
||
| + | |{{plink|Pest control teleport}} |
||
| + | |[[Pest Control]], near the bank |
||
| + | |- |
||
| + | |{{plink|Piscatoris teleport}} |
||
| + | |Outside the entrance to the [[Piscatoris Fishing Colony]] |
||
| + | |- |
||
| + | |{{plink|Tai bwo wannai teleport}} |
||
| + | |[[Tai Bwo Wannai]] |
||
| + | |- |
||
| + | |{{plink|Zul-andra teleport}} |
||
| + | |[[Zul-Andra]] |
||
| + | |- |
||
| + | |{{plink|Key master teleport}} |
||
| + | |[[Cerberus' Lair]] |
||
| + | |- |
||
| + | |[[revenant caves teleport|Revenant caves teleport]] |
||
| + | |Outside the South entrance to the [[Revenant Caves]] |
||
| + | |} |
||
| + | |||
| + | ===Basalts=== |
||
| + | [[Basalt]], when combined with various [[salts]], can be used to create [[stony basalt|stony]] and [[icy basalt]]. |
||
| + | |||
| + | {| class="wikitable" |
||
| + | |- |
||
| + | ! scope="col" |Item |
||
| + | ! scope="col" |Destination |
||
| + | |- |
||
| + | |{{plink|Stony basalt}} |
||
| + | |[[Troll Stronghold (location)|Troll Stronghold]] entrance |
||
| + | |- |
||
| + | |{{plink|Icy basalt}} |
||
| + | |[[Weiss]] |
||
| + | |} |
||
| + | |||
| + | ===Magic guild portals=== |
||
| + | On the second floor of the [[Magic Guild]] in [[Yanille]] (level 66 [[Magic]] required to enter), there are three portals that will teleport you to the following locations (note that these are one-way teleports): |
||
| + | |||
| + | *The '''east''' portal teleports you to the [[Wizards' Tower]] south of [[Draynor Village]]. |
||
| + | *The '''south''' portal teleports you to the [[Dark Wizards' Tower]] located north of the [[Crafting Guild]]. |
||
| + | *The '''west''' portal teleports you to [[Sorcerer's Tower|Thormac the Sorcerer's Tower]] south-west of [[Seers' Village]]. |
||
| + | |||
| + | ===Achievement diary items=== |
||
| + | {| class="wikitable" |
||
| + | |[[File:Explorer's ring 2.png]] [[File:Explorer's ring 3.png]] [[File:Explorer's ring 4.png]] |
||
| + | |[[Explorer's ring 2]]/[[Explorer's ring 3|3]]/[[Explorer's ring 4|4]] |
||
| + | |After completing at least the medium [[Lumbridge & Draynor Diary]], players will receive free teleports to the cabbage field south of [[Falador]] with the '''Explorer's ring'''. The teleport has limited charges from [[Explorer's ring 2]] and unlimited from [[Explorer's ring 3]] and [[Explorer's ring 4|4]]. |
||
| + | |- |
||
| + | |[[File:Karamja gloves 3.png]] [[File:Karamja gloves 4.png]] |
||
| + | |[[Karamja gloves 3]]/[[Karamja gloves 4]] |
||
| + | |'''Karamja gloves''' are your reward for completing all the Easy, Medium, Hard and/or Elite [[Karamja Diary]], given to you by the [[Jungle Forester]]s near the entrances to the [[Kharazi Jungle]]. They allow free, unlimited teleportation to a gem mine underneath [[Shilo Village (location)|Shilo Village]]. To activate the teleport, right-click on the gloves for the option or wear them and selecting the 'Operate' option. |
||
| + | |- |
||
| + | |[[File:Ardougne cloak 1.png]] [[File:Ardougne cloak 2.png]] [[File:Ardougne cloak 3.png]] [[File:Ardougne cloak 4.png]] |
||
| + | |[[Ardougne cloak 1]]/[[Ardougne cloak 2|2]]/[[Ardougne cloak 3|3]]/[[Ardougne cloak 4|4]] |
||
| + | |'''Ardougne cloak''' is your reward for completing all the Easy, Medium, Hard and/or Elite [[Ardougne Diary]], given to you by [[Two-pints]] in [[Ardougne]]. All versions of the cloaks allows their wearer to teleport to the [[Ardougne Monastery|monastery]] south of [[Ardougne]] unlimited number of times, while the Ardougne cloaks [[Ardougne cloak 2|2]] and [[Ardougne cloak 3|3]] can teleport you to the farm north of Ardougne ''once'' a day. This daily limit is removed upon completing the especially challenging elite tasks, with the ability to teleport yourself there an infinite number of times gained. |
||
| + | |- |
||
| + | |[[File:Desert amulet 2.png]] [[File:Desert amulet 3.png]] [[File:Desert amulet 4.png]] |
||
| + | |[[Desert amulet 2]]/[[Desert amulet 3|3]]/[[Desert amulet 4|4]] |
||
| + | |The '''Desert amulet''' is your reward for completing all the Easy, Medium, Hard, and/or Elite [[Desert Diary]]. It is given to you by [[Jarr]] at the [[Shantay Pass]]. Desert amulets [[Desert amulet 2]] and [[Desert amulet 3|3]] can teleport you to [[Nardah]] ''once'' per day. This daily limit is removed upon completing the elite diary, with the ability to teleport yourself there an infinite number of times gained. |
||
| + | |- |
||
| + | |[[File:Morytania legs 2.png]] [[File:Morytania legs 3.png]] [[File:Morytania legs 4.png]] |
||
| + | |[[Morytania legs 2]]/[[Morytania legs 3|3]]/[[Morytania legs 4|4]] |
||
| + | |The '''Morytania legs''' is your reward for completing all the Easy, Medium, Hard, and/or Elite [[Morytania Diary]]. It is given to you by [[Le-sabrè]] in [[Canifis]]. You can teleport to the Slime pit below the [[Ectofuntus]] five (5) times per day, whilst the [[Morytania legs 3]] and [[Morytania legs 4|4]] provide unlimited teleportation to [[Burgh de Rott]], and 4 allows for infinite teleports to both the slime pit and Burgh de Rott. |
||
| + | |- |
||
| + | |[[File:Fremennik sea boots 2.png]] [[File:Fremennik sea boots 3.png]] [[File:Fremennik sea boots 4.png]] |
||
| + | |[[Fremennik sea boots 2]]/[[Fremennik sea boots 3|3]]/[[Fremennik sea boots 4|4]] |
||
| + | |The '''Fremennik sea boots''' are your reward for completing all the Easy, Medium, Hard, and/or Elite [[Fremennik Diary]]. It is given to you by [[Thorodin]] south of [[Rellekka]]. You can teleport to [[Rellekka]] infinite times per day with the [[Fremennik sea boots 4]]. |
||
| + | |- |
||
| + | |[[File:Kandarin headgear 3.png]] [[File:Kandarin headgear 4.png]] |
||
| + | |[[Kandarin headgear 3]]/[[Kandarin headgear 4|4]] |
||
| + | |The '''Kandarin headgear''' is your reward for completing all the Easy, Medium, Hard, and/or Elite [[Kandarin Diary]]. It is given to you by [[The 'Wedge']] in [[Camelot]]. You can teleport to [[Sherlock]] once per day, or infinite times with the [[Kandarin headgear 4]]. |
||
| + | |- |
||
| + | |[[File:Wilderness sword 3.png]] [[File:Wilderness sword 4.png]] |
||
| + | |[[Wilderness sword 3]]/[[Wilderness sword 4|4]] |
||
| + | |The '''Wilderness sword''' is your reward for completing all the Easy, Medium, Hard, and/or Elite [[Wilderness Diary]]. It is given to you by the [[Lesser Fanatic]] in [[Edgeville]]. You can teleport to the [[Fountain of Rune]] once per day, or infinite times with the [[Wilderness sword 4]]. |
||
| + | |- |
||
| + | |[[File:Western banner 3.png]] [[File:Western banner 4.png]] |
||
| + | |[[Western banner 3]]/[[Western banner 4|4]] |
||
| + | |The '''Western banner''' is your reward for completing all the Easy, Medium, Hard, and/or Elite [[Western Provinces Diary]]. It is given to you by the [[Elder Gnome child]] in the [[Tree Gnome Stronghold]]. You can teleport to the [[Piscatoris Fishing Colony]] once per day. This daily limit is removed upon completing the elite diary, with the ability to teleport yourself there an infinite number of times gained. |
||
| + | |} |
||
| + | |||
| + | ==Skill capes== |
||
| + | {| class="wikitable" |
||
| + | |- |
||
| + | ! scope="col" |Item |
||
| + | ! scope="col" |Destination |
||
| + | ! scope="col" |Charges |
||
| + | |- |
||
| + | |{{plink|Crafting cape}} |
||
| + | |[[Crafting Guild]] |
||
| + | |Unlimited |
||
| + | |- |
||
| + | |{{plink|Construct. cape}} |
||
| + | |Any [[player-owned house]] portal |
||
| + | |Unlimited |
||
| + | |- |
||
| + | |{{plink|Fishing cape}} |
||
| + | |[[Fishing Guild]] dock |
||
| + | |Unlimited |
||
| + | |- |
||
| + | |{{plink|Hunter cape}} |
||
| + | |[[Black chinchompa (Hunter)|Black]]/[[Carnivorous chinchompa|red]] chinchompa hunter areas |
||
| + | |5 per day |
||
| + | |- |
||
| + | |{{plink|Strength cape}} |
||
| + | |[[Warriors' Guild]] |
||
| + | |Unlimited |
||
| + | |- |
||
| + | |{{plink|Quest point cape}} |
||
| + | |[[Legends' Guild]] |
||
| + | |Unlimited |
||
| + | |- |
||
| + | |{{plink|Music cape}} |
||
| + | |[[Falo the Bard]] |
||
| + | |Unlimited |
||
| + | |- |
||
| + | |{{plink|Achievement diary cape}} |
||
| + | |All Diary Masters, including [[Twiggy O'Korn]] |
||
| + | |10 per day |
||
| + | |- |
||
| + | |{{plink|Max cape}} |
||
| + | |All Skill cape teleports |
||
| + | |See above |
||
| + | |} |
||
| + | |||
| + | ==Other items== |
||
| + | * [[Teleportation lever]]s in [[Ardougne]] and [[Edgeville]] have no requirements to use. Teleport to the [[Deserted Keep]] in level 53 [[Wilderness]]. |
||
| + | * Teleportation lever in the ruins near the [[Mage Arena]] teleports to an underground area. |
||
| + | * Teleportation lever at the Mage Arena teleports to inside the arena. |
||
| + | * The [[Mythical cape]] provides unlimited teleport to the [[Myths' Guild]]. |
||
| + | * The [[Chronicle]] book, which can be bought from [[Diango]], teleports you right outside the [[Champions' Guild]]. The chronicle can be charged with 1000 [[teleport card]]s, which each of them gives you one teleport. The limit of a thousand charges cannot be exceeded. |
||
| + | * After completing the quest [[Making Friends with My Arm]], b[[Basalt|asalt]] can be combined with [[te salt]] and either [[efh salt]] or [[urt salt]] to create [[icy basalt]] and [[stony basalt]] respectively. Icy basalt teleports you to [[Weiss]] while stony basalt teleports you to the [[Troll Stronghold]] entrance. |
||
| + | |||
| + | ===Quest-related items=== |
||
| + | {| class="wikitable" |
||
| + | |- |
||
| + | ! scope="col" |Item |
||
| + | ! scope="col" |Destination |
||
| + | ! scope="col" |Charges |
||
| + | ! scope="col" |Recharge method |
||
| + | |- |
||
| + | |{{plink|Ectophial}} |
||
| + | |[[Ectofuntus]] |
||
| + | |1 |
||
| + | |[[Ectofuntus]] (Automatic) |
||
| + | |- |
||
| + | |{{plink|Teleport crystal}} |
||
| + | |[[Lletya]] |
||
| + | |3 |
||
| + | |[[Eluned]] |
||
| + | |- |
||
| + | |{{plink|Royal seed pod}} |
||
| + | |Grand Tree |
||
| + | |Unlimited |
||
| + | |N/A |
||
| + | |- |
||
| + | |{{plink|Enchanted lyre}} |
||
| + | |[[Rellekka]] dock |
||
| + | |2-4 |
||
| + | |[[Fossegrimen]]'s altar |
||
| + | |- |
||
| + | |{{plink|Camulet}} |
||
| + | |[[Enakhra's Temple]] |
||
| + | |4 |
||
| + | |[[Ugthanki dung]] (Unlimited for a one-off payment of 1,000,000 coins to [[Lazim]]) |
||
| + | |- |
||
| + | |{{plink|Kharedst's memoirs}} |
||
| + | |[[Great Kourend]] (different locations) |
||
| + | |8, increases by 8 with every Zeah quest's completion |
||
| + | |Inspecting the [[Old Memorial]] with a [[law rune|law]], [[body rune|body]], [[mind rune|mind]], and [[soul rune]] in inventory (One charge per set of runes) |
||
| + | |- |
||
| + | |{{plink|Drakan's medallion}} |
||
| + | |[[Ver Sinhaza]] |
||
| + | |Unlimited |
||
| + | |N/A |
||
| + | |} |
||
| + | [[Category:Transportation]] |
||
Latest revision as of 10:02, 8 June 2019
A map of teleport locations.
Teleportation is the instant travel from any location to a specific location elsewhere. Teleportation may be performed by any of the following:
- Casting spells
- Walking through portals
- Targeted by tele-other and group teleportation spells
- Speaking to various NPCs
- Rubbing enchanted jewellery
- Using the Spirit tree network
- Using the Fairy ring network
- Invoking certain items, such as:
- Emptying the Ectophial
- Playing the enchanted lyre
- Breaking magic tablets
- Activating Karamja gloves 3 or 4
- Activating the various teleportation obelisks in the Wilderness
- Being targeted by random events
- Using the Minigame Group Finder to join a clan chat and use the teleport option
Spells

A player using the Home Teleport spell.
Players who do not have sufficient Magic levels to cast a spell can use a corresponding teleport tablets (see below) from a limited selection.
Standard spellbook
For more information, see Standard spells.
Basic teleports
| Icon | Spell | Magic Level | Runes Required | Experience | Notes |
|---|---|---|---|---|---|
| Lumbridge Home Teleport | 1 | none | 0 | This spell will transport you to Lumbridge free of charge. It takes around 10 seconds to cast and is interruptible by Combat. Additionally, it may only be cast every 30 minutes. | |
| Varrock Teleport | 25 | 1 |
35 | Transports you to the centre of Varrock, by the fountain near the shop. | |
| Lumbridge Teleport | 31 | 1 |
41 | Transports you to the centre of Lumbridge Castle, in the spot where you come if you die. | |
| Telekinetic grab | 33 | 1 |
43 | Allows you to take an item remotely into your inventory. | |
| Falador Teleport | 37 | 1 |
48 | Transports you to the centre of Falador, by the guards. | |
| Teleport to House | 40 | 1 |
30 | Transports you to your house. See Construction skill. | |
| Camelot Teleport | 45 | 1 |
55.5 | Transports you to Camelot south of the castle. | |
| Ardougne Teleport | 51 | 2 |
61 | Transports you to Ardougne in the centre of the square. You must complete the Plague City quest to use this teleport. | |
| Watchtower Teleport | 58 | 2 |
68 | Transports you to the top of the Watchtower, next to Yanille. You must complete the Watchtower quest to use this spell. | |
| Trollheim Teleport | 61 | 2 |
68 | Transports you to the very top of Trollheim, near Eadgar's cave. You must complete the Eadgar's Ruse quest to use this teleport. | |
| Teleport to Ape Atoll | 64 | 2 |
74 | Transports you to Ape Atoll. Requires completion of the Awowogei subquest of Recipe for Disaster. | |
| Teleport to Kourend | 69 | 2 |
82 | Transports you to the centre of Great Kourend. Players must unlock the spell via searching for the book, transportation incantations, in the Arceuus House Library. | |
| Tele-other Lumbridge | 74 | 1 |
84 | Teleports another player who has Accept Aid switched on to Lumbridge. | |
| Tele-other Falador | 82 | 1 |
92 | Teleports another player who has Accept Aid switched on to Falador. | |
| Tele-block | 85 | 1 |
80 | Can only be cast on another player in the Wilderness, and if successful, will prevent that player from using teleportation spells for 5 minutes. | |
| Teleport to Bounty Target | 85 | 1 |
45 | Teleports you near your Bounty Hunter target. You can only use this spell after using a Bounty teleport scroll. | |
| Tele-other Camelot | 90 | 2 |
90 | Teleports another player who has Accept Aid switched on to Camelot. |
Teleother
To teleport other players, they must have Accept Aid on and agree to be teleported.
| Tele-other Lumbridge | Teleport another player to Lumbridge. | |
| Tele-other Falador | Teleport another player to Falador. | |
| Tele-other Camelot | Teleport another player to Camelot. |
Ancient Magicks
Players must have completed Desert Treasure to use Ancient Magicks.

A player using Ancient spells to teleport.
| Icon | Spell | Runes | Experience | Description | |
|---|---|---|---|---|---|
| Home Teleport | 0 | None | None | Teleports to Edgeville. | |
| Paddewwa Teleport | 54 | 2 |
64 | Teleports to the entrance of Edgeville Dungeon. | |
| Senntisten Teleport | 60 | 1 |
70 | Teleports to the Digsite Exam Centre. This is one of the only two teleport spells that can be added to a Portal Chamber in a player-owned house that is from the Ancient Magicks spellbook. | |
| Kharyrll Teleport | 66 | 1 |
76 | Teleports to Canifis. This is one of the only two teleport spells that can be added to a Portal Chamber in a player-owned house that is from the Ancient Magicks spellbook. | |
| Lassar Teleport | 72 | 2 |
82 | Teleports to the top of Ice Mountain. | |
| Dareeyak Teleport | 78 | 2 |
88 | Teleports to the ruins west of the Bandit Camp in the Wilderness (Level 23). | |
| Carrallangar Teleport | 84 | 2 |
94 | Teleports to the Graveyard of Shadows in the Wilderness (Level 19). | |
| Annakarl Teleport | 90 | 2 |
100 | Teleports to the Demonic Ruins in the Wilderness (Level 47). | |
| Ghorrock Teleport | 96 | 2 |
106 | Teleports to Ice Plateau in the Wilderness (Level 45). |
Lunar Spells
Players must have completed Lunar Diplomacy to use Lunar spells.

A player using Lunar spells to teleport.
Basic teleports
| Icon | Spell | Magic Level | Runes Required | Experience | Notes |
|---|---|---|---|---|---|
| Lunar Home Teleport | 0 | None | None | Teleports next to the bank of Lunar Isle free of charge. It takes around 10 seconds to cast and is interruptible by combat. Additionally, it may only be cast every 30 minutes. | |
| Moonclan Teleport | 69 | 1 |
66 | Teleports the player near the bank in the Moon Clan town. | |
| Ourania Teleport | 71 | 1 |
69 | Teleports the caster to the red salamanders outside of the Ourania Cave. Players must speak to Baba Yaga to unlock the ability to cast this spell. | |
| Waterbirth Teleport | 72 | 1 |
71 | Teleports the player beside Jarvald's ship on Waterbirth Island, right by the snape grass spawns. | |
| Barbarian Teleport | 75 | 2 |
76 | Teleports the player next to the Barbarian Outpost. | |
| Khazard Teleport | 78 | 2 |
80 | Teleports the player to Port Khazard. | |
| Fishing Guild Teleport | 85 | 3 |
89 | Teleports the player outside the door of the Fishing Guild. | |
| Catherby Teleport | 87 | 3 |
92 | Teleports the player near the bank in Catherby. | |
| Ice Plateau Teleport | 89 | 3 |
96 | Teleports the player to the members half of the Ice Plateau in level 53 Wilderness. Warns the player that they are about to teleport into the "Deep Wilderness" with an option to abort. |
Tele Group
Players wishing to be teleported by the caster must be within a 3x3 square, have Accept Aid turned on and agree to be teleported.
| Tele Group Moonclan | |
| Tele Group Waterbirth | |
| Tele Group Barbarian | |
| Tele Group Khazard | |
| Tele Group Fishing Guild | |
| Tele Group Catherby | |
| Tele Group Ice Plateau |
Arceuus Spellbook
Players must have gained at least 60% favour with the Arceuus House in Great Kourend. For more information, see Arceuus spellbook.
| Icon | Spell | Magic level | Runes required | Magic XP | Notes |
|---|---|---|---|---|---|
| Arceuus Home Teleport | 1 | None | 0 | Teleports you to the Dark Altar on Great Kourend. | |
| Lumbridge Graveyard Teleport | 6 | 1 |
10 | Teleports you to the Lumbridge Graveyard. | |
| Draynor Manor Teleport | 17 | 1 |
16 | Teleports you to the Draynor Manor. | |
| Mind Altar Teleport | 28 | 1 |
22 | Teleports you to the Mind altar. | |
| Respawn Teleport | 34 | 1 |
27 | Teleports you to your respawn point. | |
| Salve Graveyard Teleport | 40 | 2 |
30 | Teleports you to the ghoul area by the entrance to Mort Myre Swamp. | |
| Fenkenstrain’s Castle Teleport | 48 | 1 |
50 | Teleports you to Fenkenstrain's Castle. | |
| West Ardougne Teleport | 61 | 2 |
68 | Teleports you to West Ardougne. Requires completion of Biohazard. | |
| Harmony Island Teleport | 65 | 1 |
74 | Teleports you to Harmony Island. Requires completion of The Great Brain Robbery. | |
| Cemetery Teleport | 71 | 1 |
82 | Teleports you to The Forgotten Cemetery in the Wilderness. | |
| Barrows Teleport | 83 | 2 |
90 | Teleports you to the Barrows. | |
| Ape Atoll Teleport | 90 | 2 |
100 | Teleports you to the Ape Atoll temple underground. |
Portals
| Location | Destination |
|---|---|
| East of Wizards' Guild second floor | Wizards' Tower |
| South of Wizards' Guild second floor | Dark Wizards' Tower |
| West of Wizards' Guild second floor | Sorcerer's Tower |
| Draynor manor second floor | Killerwatt plane |
| Entrana Dungeon | Level 28 Wilderness |
|
House portals in Rimmington, Taverley, Pollnivneach, Rellekka, Brimhaven, Yanille and Kourend |
Player-owned house |
| Portal Chambers |
Three of Lumbridge, Camelot, Ardougne, Canifis, Falador, Varrock and Yanille Watchtower |
Items
Enchanted jewellery
| Item | Destination | Charges | Rechargeable? |
|---|---|---|---|
| 8 | |||
| 8 | |||
| 1 | |||
| 4 or 6 | Legends' Guild totem pole or Fountain of Rune | ||
| 4 or 6 | Legends' Guild totem pole or Fountain of Rune | ||
| 4 or 6 | Fountain of Heroes or Fountain of Rune | ||
| Unlimited | N/A | ||
| 5 | Fountain of Rune | ||
| 8 | |||
| 5 | |||
|
5 | ||
|
5 | ||
|
5 |
Pharaoh's sceptre
The Pharaoh's sceptre is a rare and expensive item obtained during the Pyramid Plunder minigame based in Sophanem. The sceptre provides three charges (up to eight with the completion of the Desert Diary) of teleports between three pyramids in the Kharidian Desert:
- Jalsavrah - the Pyramid Plunder minigame.
- Jaleustrophos - the Agility Pyramid, next to Simon Templeton.
- Jaldraocht - Azzanadra's pyramid in Desert Treasure, where the player can switch between Ancient Magicks and normal Magic spellbooks.
When the sceptre's charges are empty, players may recharge it using the Mummy in the Pyramid Plunder minigame. It is recommended that players use two charges, and teleport to Pyramid plunder to recharge if needed, saving time. In order to recharge, just "use" the sceptre on the Mummy. He will complain about the player owning it, but will go ahead and recharge it anyway. Players will need artefacts from the Pyramid Plunder minigame to recharge the staff - 24 pottery or ivory artefacts, 12 stone artefacts or six (6) gold artefacts are needed.
Skull sceptre
The Skull sceptre is obtained through defeating monsters in the Stronghold of Security and picking up the pieces of the sceptre. The Skull sceptre has five charges to teleport to the Barbarian Village, though Varrock armour possesses the ability to double the number of charges to ten if you assemble the sceptre whilst wearing the armour.
It disappears afterwards, and it cannot be recharged unless players who have the RuneScape Authenticator active on their accounts show the completed sceptre and a pair of fancy or fighting boots to Solztun to imbue the sceptre, which will increase its charges when any pieces are added and cause it not to break. The sceptre does not work over level 20 Wilderness.
Players can only make and keep one skull sceptre at a time - a new Skull sceptre can only be made once the old Skull sceptre is either lost, destroyed, or has disappeared. The Skull sceptre and all its parts cannot be traded. The pieces are:
| Left skull half (dropped by Ankous) | |
| Top of sceptre (dropped by Catablepons) | |
| Bottom of sceptre (dropped by Flesh Crawlers) | |
| Right skull half (dropped by Minotaurs) |
- Using the skull pieces together forms a Strange skull.
- Using the top and bottom Skull sceptre pieces form a Runed sceptre.
- Using the Strange skull and Runed sceptre together form a Skull sceptre.
Xeric's talisman
The Xeric's talisman is obtained as a rare drop from Lizardmen. It can be charged with Lizardman fangs, and extra talismans may be converted into 100 fangs. The talisman holds up to 1,000 charges. The talisman provides teleports to different parts of Great Kourend:
- Xeric's Lookout - a lookout tower southeast of the encampments in Shayzien House
- Xeric's Glade - by the magic trees in Hosidius House
- Xeric's Inferno - by the lovakite furnace in Lovakengj House
- Xeric's Heart - the center of Great Kourend, by the statue (unlocked after completing Architectural Alliance)
- Xeric's Honour - at Mount Quidamortem (unlocked after using an Ancient tablet on the talisman)
Oldak's spheres
Oldak, a goblin scientist, has been experimenting with runes and has developed Moving-over-distance sphere. The moving-over-distance sphere isn't a perfect piece of arcane technology, though, so it will teleport you to any one of several locations in Dorgesh-Kaan when you break it. If you want a sphere simply take two law runes and some molten glass to Oldak's laboratory in north-west Dorgesh-Kaan and you can exchange them for a teleportation sphere; different locations may be chosen if you've completed a corresponding quest.
| Dorgesh-kaan sphere, requires you to have completed the Death to the Dorgeshuun quest. | |
| Goblin village sphere, requires you to have completed the Another Slice of H.A.M. quest. |
Spirit trees


The Spirit Tree at the Grand Exchange
After completion of the Tree Gnome Village quest, you can use Spirit trees to teleport. There are six different spirit tree locations, plus a choice of one player-grown Spirit Tree. They are:
- North-east of Grand Exchange.
- Battlefield, north-west of the Clock Tower.
- Centre of the Tree Gnome Village maze.
- Tree Gnome Stronghold, west of the entrance to the Agility Course.
- Next to the Myths' Guild in the south-west corner of Feldip Hills.
- (Player grown: Etceteria)
- (Player grown: Brimhaven)
- (Player grown: Port Sarim)
- (Player grown: Great Kourend)
After completing Tree Gnome Village quest, players can access the Spirit Tree in the Tree Gnome Village and the Tree Gnome Stronghold to transport to any of the other three spirit trees, the other (younger) trees will only return you to an older tree.
With a Farming level of 83, players are able to grow their own spirit tree. These will take you to the spirit tree in the Tree Gnome Stronghold. You may only have one at a time. For more information click here. Additionally, players who have achieved level 91 Farming may grow up to two spirit trees at once and unlimited at level 99.
Fairy rings
After getting permission from the Fairy Godfather during Fairytale II - Cure a Queen, you will find a new network of transportation available to you: fairy rings.
It consists of over 45 fairy rings spread across the land and provides a relatively fast means for accessing often remote sites in RuneScape. Players can enter the fairy ring system from any node while wielding either a dramen staff or a lunar staff, ending up at the master fairy ring in Zanaris. From there, using three letter codes, they can teleport to most rings within the system. Several rings, however, require players to complete quests before they can be accessed. Some locations require a player to enter more than one code in the right order, returning to Zanaris after each trip, but this can be skipped after the first journey to that destination. If the selected code has no corresponding fairy ring, players will be teleported a few squares from the main ring.
The main fairy ring is located in Zanaris, just east of the bank. When you click on it to activate it, you will notice the three mushroom controllers pop up. Each controller has four letters assigned to it. Clicking on the right or left side of a mushroom controller will make it turn clockwise or counter-clockwise, respectively. You can make many combinations from these mushrooms, and click the teleport button to go the location.
Players who have completed the Elite Lumbridge & Draynor Diary will no longer need a dramen or lunar staff.
Teleport tablets
Standard tablets

A player breaking a magic tablet.
Ancient tablets
These tablets cannot be made, but they can be bought from the Bounty Hunter Store or the Grand Exchange.
| Item | Desination |
|---|---|
| Edgeville Dungeon | |
| Digsite | |
| Canifis | |
| Ice Mountain | |
| Ruins, level 23 Wilderness | |
| Graveyard of Shadows, level 18 Wilderness | |
| Demonic Ruins, level 47 Wilderness | |
| Ice Plateau, level 50 Wilderness |
Arceuus tablets
Teleport scrolls
| Item | Destination |
|---|---|
| West side of the Digsite | |
| Elf Camp | |
| Feldip Hills, near the Hunting expert | |
| Lumber Yard, next to the Sawmill operator | |
| Lunar Isle | |
| Mort'ton, near the Swamp Boaty | |
| Mos Le'Harmless, north-east side of the town | |
| Nardah, near the Magic carpet | |
| Pest Control, near the bank | |
| Outside the entrance to the Piscatoris Fishing Colony | |
| Tai Bwo Wannai | |
| Zul-Andra | |
| Cerberus' Lair | |
| Revenant caves teleport | Outside the South entrance to the Revenant Caves |
Basalts
Basalt, when combined with various salts, can be used to create stony and icy basalt.
| Item | Destination |
|---|---|
| Troll Stronghold entrance | |
| Weiss |
Magic guild portals
On the second floor of the Magic Guild in Yanille (level 66 Magic required to enter), there are three portals that will teleport you to the following locations (note that these are one-way teleports):
- The east portal teleports you to the Wizards' Tower south of Draynor Village.
- The south portal teleports you to the Dark Wizards' Tower located north of the Crafting Guild.
- The west portal teleports you to Thormac the Sorcerer's Tower south-west of Seers' Village.
Achievement diary items
| Explorer's ring 2/3/4 | After completing at least the medium Lumbridge & Draynor Diary, players will receive free teleports to the cabbage field south of Falador with the Explorer's ring. The teleport has limited charges from Explorer's ring 2 and unlimited from Explorer's ring 3 and 4. | |
| Karamja gloves 3/Karamja gloves 4 | Karamja gloves are your reward for completing all the Easy, Medium, Hard and/or Elite Karamja Diary, given to you by the Jungle Foresters near the entrances to the Kharazi Jungle. They allow free, unlimited teleportation to a gem mine underneath Shilo Village. To activate the teleport, right-click on the gloves for the option or wear them and selecting the 'Operate' option. | |
| Ardougne cloak 1/2/3/4 | Ardougne cloak is your reward for completing all the Easy, Medium, Hard and/or Elite Ardougne Diary, given to you by Two-pints in Ardougne. All versions of the cloaks allows their wearer to teleport to the monastery south of Ardougne unlimited number of times, while the Ardougne cloaks 2 and 3 can teleport you to the farm north of Ardougne once a day. This daily limit is removed upon completing the especially challenging elite tasks, with the ability to teleport yourself there an infinite number of times gained. | |
| Desert amulet 2/3/4 | The Desert amulet is your reward for completing all the Easy, Medium, Hard, and/or Elite Desert Diary. It is given to you by Jarr at the Shantay Pass. Desert amulets Desert amulet 2 and 3 can teleport you to Nardah once per day. This daily limit is removed upon completing the elite diary, with the ability to teleport yourself there an infinite number of times gained. | |
| Morytania legs 2/3/4 | The Morytania legs is your reward for completing all the Easy, Medium, Hard, and/or Elite Morytania Diary. It is given to you by Le-sabrè in Canifis. You can teleport to the Slime pit below the Ectofuntus five (5) times per day, whilst the Morytania legs 3 and 4 provide unlimited teleportation to Burgh de Rott, and 4 allows for infinite teleports to both the slime pit and Burgh de Rott. | |
| Fremennik sea boots 2/3/4 | The Fremennik sea boots are your reward for completing all the Easy, Medium, Hard, and/or Elite Fremennik Diary. It is given to you by Thorodin south of Rellekka. You can teleport to Rellekka infinite times per day with the Fremennik sea boots 4. | |
| Kandarin headgear 3/4 | The Kandarin headgear is your reward for completing all the Easy, Medium, Hard, and/or Elite Kandarin Diary. It is given to you by The 'Wedge' in Camelot. You can teleport to Sherlock once per day, or infinite times with the Kandarin headgear 4. | |
| Wilderness sword 3/4 | The Wilderness sword is your reward for completing all the Easy, Medium, Hard, and/or Elite Wilderness Diary. It is given to you by the Lesser Fanatic in Edgeville. You can teleport to the Fountain of Rune once per day, or infinite times with the Wilderness sword 4. | |
| Western banner 3/4 | The Western banner is your reward for completing all the Easy, Medium, Hard, and/or Elite Western Provinces Diary. It is given to you by the Elder Gnome child in the Tree Gnome Stronghold. You can teleport to the Piscatoris Fishing Colony once per day. This daily limit is removed upon completing the elite diary, with the ability to teleport yourself there an infinite number of times gained. |
Skill capes
| Item | Destination | Charges |
|---|---|---|
| Crafting Guild | Unlimited | |
| Any player-owned house portal | Unlimited | |
| Fishing Guild dock | Unlimited | |
| Black/red chinchompa hunter areas | 5 per day | |
| Warriors' Guild | Unlimited | |
| Legends' Guild | Unlimited | |
| Falo the Bard | Unlimited | |
| All Diary Masters, including Twiggy O'Korn | 10 per day | |
| All Skill cape teleports | See above |
Other items
- Teleportation levers in Ardougne and Edgeville have no requirements to use. Teleport to the Deserted Keep in level 53 Wilderness.
- Teleportation lever in the ruins near the Mage Arena teleports to an underground area.
- Teleportation lever at the Mage Arena teleports to inside the arena.
- The Mythical cape provides unlimited teleport to the Myths' Guild.
- The Chronicle book, which can be bought from Diango, teleports you right outside the Champions' Guild. The chronicle can be charged with 1000 teleport cards, which each of them gives you one teleport. The limit of a thousand charges cannot be exceeded.
- After completing the quest Making Friends with My Arm, basalt can be combined with te salt and either efh salt or urt salt to create icy basalt and stony basalt respectively. Icy basalt teleports you to Weiss while stony basalt teleports you to the Troll Stronghold entrance.
| Item | Destination | Charges | Recharge method |
|---|---|---|---|
| Ectofuntus | 1 | Ectofuntus (Automatic) | |
| Lletya | 3 | Eluned | |
| Grand Tree | Unlimited | N/A | |
| Rellekka dock | 2-4 | Fossegrimen's altar | |
| Enakhra's Temple | 4 | Ugthanki dung (Unlimited for a one-off payment of 1,000,000 coins to Lazim) | |
| Great Kourend (different locations) | 8, increases by 8 with every Zeah quest's completion | Inspecting the Old Memorial with a law, body, mind, and soul rune in inventory (One charge per set of runes) | |
| Ver Sinhaza | Unlimited | N/A |