Zasezaac021 (talk | contribs) (Updating the GE prices.) |
m (cleanup) |
||
| (One intermediate revision by one other user not shown) | |||
| Line 1: | Line 1: | ||
| + | {{External|rs}} |
||
| − | aaaaaaaaa |
||
| + | {{Has quick guide}} |
||
| − | aaaaaaaa |
||
| + | {{Quest |
||
| − | aaaaaaa |
||
| + | |name = The Golem |
||
| − | aaaaaaaaaaaaaaaaaaaaaaaaaaaaaaaaaaaaaaaaaaaaaaaaaaaaaaaaaaaaaaa |
||
| + | |number = 76 |
||
| − | aaaaaaaaaaaaaaaaaaaaaaaaaaaaaaaaaaa |
||
| + | |image = [[File:The Golem.png|300px]] |
||
| − | aaa |
||
| + | |members = Yes |
||
| − | a |
||
| + | |release = 11 April [[2005]] |
||
| − | aaaaaaaaaaaaaaa |
||
| + | |update = The Golem |
||
| + | |series = None |
||
| + | |difficulty = Intermediate |
||
| + | |developer = John A |
||
| + | }} |
||
| + | ==Details== |
||
| + | {{Quest details |
||
| + | |description=Deep in the desert stand the ruins of the once great city of Uzer, where a lone survivor, an ancient clay golem, forever paces back and forth. It is badly damaged, and its mind cannot rest until it has completed the task for which it was created. |
||
| + | It is up to you to uncover the secret of the lost city, and add the final chapter to a story started in the violence of the Third Age. |
||
| − | a |
||
| + | |start=Talk to the [[clay golem]] in the ruins of [[Uzer]], east of the [[Shantay Pass]] in the [[Kharidian Desert]]. |
||
| − | aaaaaaaaaaaaaaaaaaaaaaaaaaaaaaaaaaaaaaaaaaaaaaaaaaaaaaaaaaaaaaaaaaaaaaaaaaaaaaaaaaaaaaa |
||
| + | |difficulty=2 |
||
| − | aaaaaaaaaaaa |
||
| + | |length=Medium |
||
| − | aaaaaaaaaaaaaa |
||
| + | |requirements=*20 {{Skill clickpic|Crafting}} [[Crafting]] |
||
| − | aaaaaaaaaaaaaaaaaaaaaaaaaaaaaaaaa |
||
| + | *25 {{Skill clickpic|Thieving}} [[Thieving]] |
||
| − | aaaaaaaaaaaaaaaaaaaaaaaaaaaaaaaaaaaaaaaaaaaaaaaaaaaaaaaa |
||
| + | |items=*A [[vial]] |
||
| − | aaaaaaaaaaaaaa |
||
| + | *A [[knife]] |
||
| − | aaaaaaaaaaaaaaaaaaaaaaaaa |
||
| + | *A [[pestle and mortar]] |
||
| − | aaaaaaaaaaaaaaaaaaaaaaaaaaaaaaaaaaaaaaaaaaaaaaaaaaaaaaaa |
||
| + | *A [[hammer]] |
||
| − | aaaaaa |
||
| + | *A [[chisel]] |
||
| − | aaaaaaaaaaaaaaaaa |
||
| + | *[[Papyrus]] (can be bought from [[Ali Morrisane]] for 10gp after a small talking sequence and agreeing to meet his cousin, Ali can be found east of [[gem trader]] in [[Al Kharid]]) |
||
| − | aaaaaaaaa |
||
| + | *2 [[Shantay pass]] (none, if you are using [[teleport]]/[[fairy rings]]) |
||
| − | aaaaaaaaaaaaaaaaaaaaaaaaaaaaaaaaaaaaaaaaaaaaaaaaaa |
||
| + | *4 [[soft clay]] '''or''' a [[bracelet of clay]] and a [[pickaxe]] ('''Note:''' [[Jug]]s or [[bucket]]s of water evaporate in the [[desert heat]]) |
||
| − | aaaaaaaaaaaaaaaaaaaaaaaaaaaaaaa |
||
| + | *[[Phoenix feather]] (can be obtained during quest when mining your own clay) |
||
| − | aaaaaaaaaaaaaaaaaaaa |
||
| + | |recommended = |
||
| − | aaaaaaaaaaaaaaaaaaaaaaaaaaaaaaaa |
||
| + | '''Recommended:''' |
||
| − | aaaaaaaaaaaaaaaaaaaaaaaaaaaa |
||
| + | *Protective clothing for the [[desert heat]] ([[Desert boots]], [[Desert robe]], [[Desert shirt]]) |
||
| − | aaaaaaaaaaaaaaaaaaaaaaaaaaaaaaaaaa |
||
| + | *[[Waterskin]]s (about 3 full should do) |
||
| − | a |
||
| + | *Some [[energy potion]]s |
||
| − | aaaaaaaaaaaaaaaaaaaaaaaaaaaaaaaaa |
||
| + | *[[Lumbridge teleport]]s, [[Amulet of glory]] or [[Ring of dueling]] to teleport to [[Al Kharid]] |
||
| − | aaaaaaaaaaaaaaaaaaa |
||
| + | *[[Digsite pendant]]/[[Digsite teleport]]/[[Gnome glider]] |
||
| − | aaaaaaaaaaaaaaaaaaaaaaaaaa |
||
| + | *2 [[Varrock teleport]]s |
||
| − | aaaaaaaaaaaaaaaaa |
||
| + | *[[Dramen staff|Dramen]] or [[Lunar staff]] |
||
| − | aaaaaaaaaaaaaaaaaaaaaa |
||
| + | *[[Necklace of passage]] for Eagles' Eyrie teleport}} |
||
| − | aaaaaaaaaaaaaaaaaaaaaaaaaaaaaaaaaaaaaaaaaaaaaaaaaaaaaaaaaaaaaaaaaaaaaaaaaaaaaaaaaaaaaaa |
||
| − | aaaaaaaaaaaaaaaaaaaaaaaaaaaaaaaa |
||
| − | aaaaaaaaaaaaaaaaaaaa |
||
| − | aaaaaaaaaaaaaaaaaaaaaaaaaaaaaaaaaa |
||
| − | aaaaaaaaaaaaaaaaaa |
||
| − | aaaaaaaaaaaaaaaaaaaaaaaaaaaaaaaaaaaaaaaaaaaaaaaaa |
||
| − | aaa |
||
| − | aaaaaaaaa |
||
| − | aaaaaaaaaaaaaaaaaaaa |
||
| − | aaaa |
||
| − | aaaaaaaaaaaaaaaaaaaaaaaaaaaaaaaaaaaaaa |
||
| − | aaaaaaaaaaaaaaaaaaaaaaaaaaaaaaaaaaaaaaaaaaaaaaaaaaaaaaaaaaaaaaaaaaaaaaaaaaaaaaaaaaaaaaa |
||
| − | aaaaaaaaaaaaaaaaaaaaaaaaaaaaaaaaaaaaaaaaaaaaaaaaaaaaaaaaaaaaaaaaaaaaaaa |
||
| − | aaaaaaaaaaaaa |
||
| − | aaaaaaaaaaaaaaaaaaaaaaaa |
||
| − | aaaaaaaaaaaaaaaaaaaaaaaaaaaaaa |
||
| − | aaaaaaaaaaaaaaaaaaaaaaaaaaaaaaaaaaaaaaaaaaaaaaaaaaaaaaaaaaaaaaaaaaaaaaaaaaaaaaaaaaaaaaa |
||
| − | aaaaaaaaaaaaaaaaaa |
||
| − | aaaaaaaaaaaaaaaaaaaa |
||
| − | aaaaaaaaaaaaaaaaaaaaaaaaaaaaaaaaaaaaaaaaaaaaaaaaaaaaaaaaaaaaaaaaaaaaaaaaaaaaaaaaaaaaaaaaaaaaaaaaaaaaaaaaaaaaaaaaaaaaaaaaaaaaaaaaa |
||
| − | aaaaaaaaaaaaaaaaaaaaaaaaaaaaaaaaaaaaaaaaaaaaaaaaaaaaaaaaaaaaaaaaaaaaaaaaaaaaaaaaaaaaaaaaaaaaaaaaaaaaaaaaaaaaaaaaa |
||
| − | aaaaaaaaaaaaaaaaaaaaaaaaaaaaaaaaaaaaaaaaaaa |
||
| − | aaaaaaaaaaaaaaaaaaaaaaaaaaaaaaaaaaaaaa |
||
| − | aaaaaaaaaaaaaaaaaaaaaa |
||
| − | a |
||
| − | aaaaaaaaaa |
||
| − | aaaaaaaaaaaaaaaaaaaaaaaaaaaaaaaaaaaaaaaaaaaaaaaaaaaaaaaaaaaaaaaaaaa |
||
| − | aaaaaaaaaaaaaaaaaaaaaaaaaaaaaaaaaaaaaaaaaaaaaaaaaaaaaaaaaaaaaaaaaaaaaaaaaaaaaaaaaaaaaaaaaaaaaaaaaaaaaaaaaaaaaaaaa |
||
| − | aaaaaaaaaaaaaaaaaa |
||
| − | aaaaaaaa |
||
| − | aaaaaaaaaaa |
||
| − | aaaaaaaaaaaaaaaaaaaaaaaaaaaaaaaaaaaaaaaaaaaaaaa |
||
| − | aaaaaaaaaaaaaaaaaaaaaaaaaaaaaaa |
||
| − | aaaaaaaaaaaaaaaaaaaaaaaaaaaaaaaaaaaaaaaaaaaaaaaaaaaaaaaaaaaaaaaaaaaaaaaaaaaaaaaaaaaaaaaaaaaaaaaaaaaaaaaaaaaaaaaaa |
||
| − | aaaaaaaaaaaaaaaaaaaaaaaaaaaa |
||
| − | aaaaaaaaaaaaaaa |
||
| − | a |
||
| − | aaaaaaaaaaaa |
||
| − | aaaaaaaaaaaaaaaaaaaaaaaaaaaaaaaaaaaaaaaaaaaaaaaaaaaaaaaaaaaaaaaa |
||
| − | aaaaaaaaaaaaaaaaaaaaaaaaaaaaaaaaaaaaaaaaaaaaaaaaa |
||
| − | aaaaaaaaaaaaaaaaaaaaaaaaaaaaaaaaaaaaaaaaaaaaaaaaaaaaaa |
||
| − | aaaaaaaaaaaaaaa |
||
| − | aaaaaaaaaaaaaaaaaaaaaaaaaaaaaaaaaaaaaaaaaaaaaaaaaaaaaaaaaaaaaaaaaaaaaaaaaaaaaaaaa |
||
| − | aaaaaaaaaaaaaaaaaaaaaaaaaaaaaaaaaaaaaaa |
||
| − | aaaaaaaaaaaaaaaaaaaaaaaaaaaaaaaaaaaaaaaaaaaaaaaaa |
||
| − | aaaaaaaaaaaaaaaa |
||
| − | aaaaaaaaaaaaaaaaaaaaaaaaaaaaaaaaaaaaaaaaaaaaaaaaaaaaaaaaaaaaaaaaaaaaaaaaaaaaaaaaaaaaa |
||
| − | aaaaaa |
||
| − | a |
||
| − | aaaaaaaaaaaaaaaaaaaaaaaaaaaaaa |
||
| − | aaaaaaaaaaaaaaaaaaaaaaaaaaaaaaaaaaaaaaaaaaaaaaaaaaaaaaaaaaaaaaaa |
||
| − | aaaaaaaaaaaaaaaaaaaaaaaaaaaaaaaaaaaaaaaaaaaaaaaaaaaaaaaaaaaaaaaaaaaaaaaaaaaaaaaaaaaaaaaaaaaaaaaaaaaaaaaaaaaaaaaaaaaaaaaaaaaaaaaaaaaaaaaaaaaaaaaaaa |
||
| − | aaaaaaaaaaa |
||
| − | aaaaaaaaaaaaaaaaaaaaaaaaaaaaaaaa |
||
| − | aaaaaaaaaaaaaaaaaaaaaaaaaaaaaaaaaaaaaaaaaaaaaaaaaaaaaaaaaaaaaaaaaaa |
||
| − | aaaaaaaaaaaaaaaaaaaaaaaaaaaaaaaaaaaaaa |
||
| − | aaaaaaaaaaaaaaaaaaaaaaaaaaaaaaaaa |
||
| − | aaaaaaaaaaaaaaaaaaaaaaaaaaaaaaaaaaaaaaa |
||
| − | aaaaaaaaaaaaaaaaaaaaaaaaaaaa |
||
| − | aaaaaa |
||
| − | aaaaaaaaaaaaaaaaaaaaaaaa |
||
| − | aaaaaaa |
||
| − | aaaaaaaaaaaaaaaaaaaaaaaaaaaaaaaa |
||
| − | aaa |
||
| − | aaaaaaaaaaa |
||
| − | aaaaaaaaaaaaaaaaaaaaaaaaaaa |
||
| − | aaaaaaaaaaaaaaaaaaaaaaaaaaaaa |
||
| − | aaaaaaaaaaaaaaaaaaaaaaaaaaaaaaaa |
||
| − | aaaaaaaaaaaaaaaaaaaaaaaa |
||
| − | aaaaaaaaaaa |
||
| − | aaaaaaaaaaaaaaaaaaaaaaa |
||
| − | aaaaaa |
||
| − | aaaaaaaaaaaaaaaaaaaaaaaaaaaaaaaaaaaaaaaaaaaaaaaaaaaaaaaaaaa |
||
| − | aaaaaaaaaaaaaaaaaaaaaaaaaaaaaaaaaaaaaaaaaaaaaaaaaaaaaaaaaaaaaaaaaaaaaaaaaaaaaa |
||
| − | aaaaaaaaaaaaaaaaaaaaaaaaaaaaaaaaa |
||
| − | aaaaaaaaaaaaaaaaaaaaaaaaaa |
||
| − | aaaaaaaaaaaaaaaaaaaaaaaaaaaaaaaaaaaaaaaaaaaaaaaaaaaaaaaaaaaaaaaaaaaaaaaaaaaaaaaaaaaaaaaaaaaaaaaaaaaaaaaa |
||
| − | aaaaaaaa |
||
| − | aaaaaaaaaaaaaaaaaaaaaaaaaaaaaaaaaaaaaaaaaaaaaaaaaaaaaaaaaaaaaaaaaa |
||
| − | aaaaaaaaaaaaaaaaaaaaaaaaaaaaaaaaaaaaaaaaaaaaaaaaaaaaaaaaaaaaaaaaaaaaaaaaaaaaaaaaaaaaaaaaaaaaaaaaaaa |
||
| − | aa |
||
| − | aaaaaaaaaaaaaaaaaaaaaaaaaaaaaa |
||
| − | aaaaaaaaaa |
||
| − | aaaaaaaaaaaaaaaaaaaaaaaaaaaaaaaaaaaaaaaaaaaaa |
||
| − | aaaaaaaaaaaaaaaaaaaaaaaaaaa |
||
| − | aaaaaaaaaaaaaaaaaaaaaaaaaaaaaaaaaaaaaaaaaaaaaaaaaaaa |
||
| − | aaaaaaaaaaaaaaaaaaaaaaa |
||
| − | aaaaaaaaaaa |
||
| − | aaaaaaaaaaaaaaaaaaaaaaaaaaaaaaaaaaaaaaaaaaaaaaaaaaaaaaaaaaaaaaaaaaaaaaaaaaaaaaaaaaaaaaaaaaaaaaaaaaaaaaaaaaaaaa |
||
| − | aaaaaaaaaaaaaaaa |
||
| + | ==Walkthrough== |
||
| − | aaaaaaaa |
||
| + | ===Getting started=== |
||
| − | aaaaaaaaaaaa |
||
| + | To start this quest travel to the Ruins of [[Uzer]] (take [[fairy ring]] code {{Fairycode|dlq}} and run northeast, or use a [[necklace of passage]] to teleport to Eagle's Eyrie), and speak to [[Clay golem|the golem]]. Offer to repair him to begin the quest. |
||
| − | aaaaaaaaaaaaaaaaaaaaaaaaaaaaaaaaaaaaaaaaaaaaaaaaaaaaaaaaaaaaa |
||
| + | |||
| − | aaaaaaaaaaaaaaaaaaaaaaaaaaaaaaaaaaaa |
||
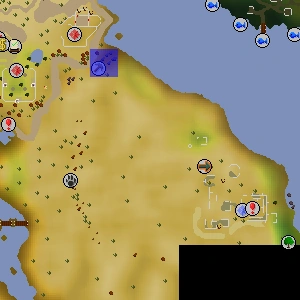
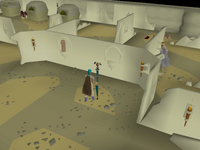
| + | [[File:The Golem location.png|thumb|200px|The mining spot. The desert phoenix is also nearby.]] |
||
| − | aaaaaaaaaaaa |
||
| + | |||
| − | aaaaaaaaaaaaaaaaaaaaaaaaaaaaaaaaaaaaaaaaaaaaaaaaaaaaaaaaaaaaaaaaaaaaaaaaaaa |
||
| + | The first thing you should do is repair the broken clay golem. If you did not bring your own [[clay]], go north-west and mine four pieces of clay while wearing a [[bracelet of clay]] to mine [[soft clay]]. While there, you can steal the [[phoenix feather]] needed for later. It may take a few tries (depending on your [[Thieving]] level). Stealing a phoenix feather gives you 26 Thieving [[experience]]. |
||
| − | aaaaaaaaaaaaaaaaa |
||
| + | |||
| − | aaaaaaaaaaaaaaaaaaaaaaaaaaaaaaaaaaaaaaaaaaaaaaaaaaaaaaaaaaaaaaaaaaaaaaaa |
||
| + | As you use the soft clay on the Broken Golem, he will become less damaged and later, repaired. He will tell you that he was programmed to destroy a powerful demon, [[Thammaron]]. You need to help him slay the demon. Make sure to ask him how to open the portal. Outside the temple ruins near the golem there's a [[Letter (The Golem)|letter]] take it and read it. |
||
| − | aaaaaaaaaaaaaaaaaaaa |
||
| + | |||
| − | aaaaaaaaaaaaaaaaaaaaaaaaaaaaaaaaaaaaaaaaaaaaaaaaaaaaa |
||
| + | Enter the temple ruins behind the golem. Before climbing down the stairs, pick up two [[black mushroom]]s (one for the quest and one for the quest's sequel, [[Shadow of the Storm]]) next to the staircase. Once inside, head to the north-west corner of the room and pick up the [[strange implement]]. The implement is also used during Shadow of the Storm, so it is advised to keep it as well. |
||
| − | aaaaaaaaaaaaaaaaaaaaaaaaaaaa |
||
| + | |||
| − | aaaaaaaaaaaaaaaaaaaaaaaaaaaaaaaaaaaaaaaaaaaaaaaaaaaaaaaaaaaaaaaaaaaaaaaaaaaaaaaaaaaaaaaaaaaaaaaaaaaaaaaaaaaaaaaaaaaaaaaaaaaaaaaaaaaaaaaaaaaaaaaaaaaaaaaaaaaaaaaaaaaaaaaaaaaaaaaaaaaaaaaaaaaaaaaaaaaaa |
||
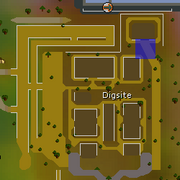
| + | [[File:Elissa location.png|thumb|left|The location of Elissa.]] |
||
| − | aaaaaa |
||
| + | |||
| − | aaaaaaaaaaaaaaaaaaaaaaaaaaaaaaaaaaaaaaaaaaaaaaaaaa |
||
| + | Then, go to the [[Digsite]] south-east of [[Varrock]]. (''Optional:'' You can use [[gnome glider]] to get to the Digsite and then use ring of dueling to return back.) Find [[Elissa]] in the north-eastern part of the Digsite, and tell her you found a letter with her name on it—she is wearing green/brown robes. She will tell you about her late husband's notes and where they are located. After talking to her, go to the [[Exam Centre]] and search the south-eastern most bookcase—you will find [[Varmen's notes]]; then, read them. |
||
| − | aaaaaaaaaaaaaaaaaaaaaaaaaaaaaaaaaaaaaaaaaaa |
||
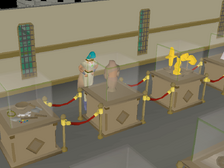
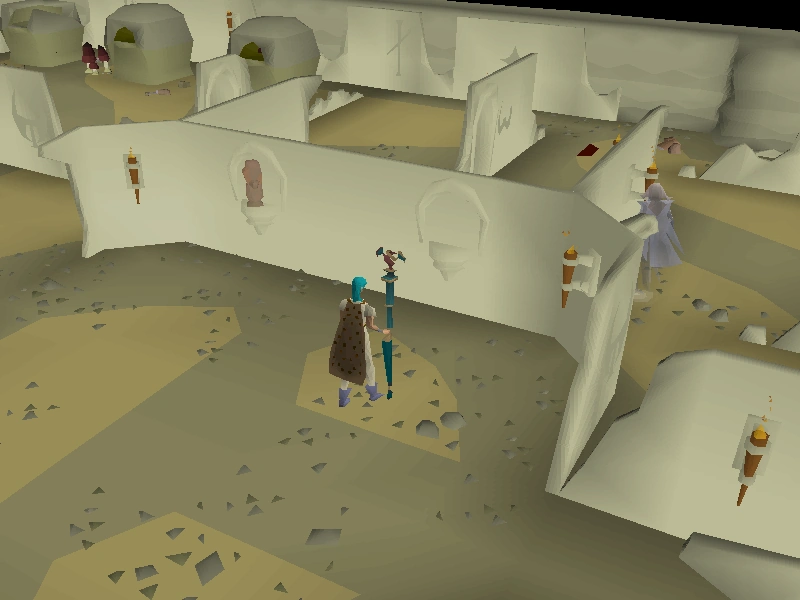
| + | [[File:The Golem - stealing statuette.png|thumb|224px|The player steals the statuette.]] |
||
| − | aaaaaaaaaaaaaaaaaaaaaaaaaaaaaaaaa |
||
| + | |||
| − | aaaaaaaaaaaaaaaaaaaaaaaaaaaaaaaaaaaaaaaaaaaaaaaaaaaaaaaaaaaaa |
||
| + | Go to the [[Varrock Museum]]. Ask the [[Curator]] about a missing statuette. Then, [[pickpocket]] him to get a [[display cabinet key]]. Unlock the display case upstairs to steal the [[statuette (The Golem)|statuette]]. It is on the {{FloorNumber|2}} in the first row of display cases and the fourth case when you ascend the stairs (display case 30). |
||
| − | aaaaaaaaaaaaaaaaaaaaaaaaaaaaaaaaaaaaaaaaaa |
||
| + | |||
| − | aaaa |
||
| + | '''Note:''' If you lose the statuette, you can use the display cabinet key on the empty display cabinet to receive a new one. |
||
| − | aaaaaaaaa |
||
| + | |||
| − | aaaaaaaaaaaaaaaaaaaaaaaaaaaa |
||
| + | Before going back to Uzer, make sure you have an empty [[vial]], [[chisel]] and [[hammer]] (for optional [[gems]]), [[pestle and mortar]], and [[papyrus]] in your inventory. |
||
| − | aaaaaaaaaaaaaaaaaaaaaaaaaaaaaaaaaa |
||
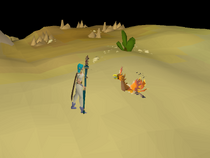
| + | [[File:The Golem - desert phoenix.png|thumb|left|210px|The Desert Phoenix, near the clay mine.]] |
||
| − | aaaaaaaaaaaaaaaaaaaaaaaaaaaaaaaaaaaaaaaaaaaaaaaaaaaaaaaaaaaaaaaaaaaaaaaaaaaaaaaaaaaaaaaaaaaaaaaaaaaaaaaaaaaaaaaaaaa |
||
| + | |||
| − | aaaaaaaaaaaaaaaaaaaaaaaaaaaaaaaaaaaaaaaaaaaaaaaaaaaaaaaaaaaaaaaaaaaaaaaaaaaaaaaaaaaaaa |
||
| + | Head towards the ruins of Uzer from the [[Shantay Pass]]. If you have not already done so, while walking back to the ruins, after you cross the bridge, go north along the east bank of the river to up near the clay mine and grab a phoenix feather from the [[Desert Phoenix]]. |
||
| − | aaaaaaaaaaaaaaaaaaaaaaaaaaaaaaaa |
||
| + | |||
| − | aaaaaaaaaaaaaaaaaaaaaaaaaaaaaaaaaaaaaaaaaaaaaa |
||
| + | [[File:The Golem - the alcove.png|thumb|200px|The alcove in the centre where the statuette goes.]] |
||
| − | aaaaaaaaaaaaaaaaaaaaaaaaaaaaaaaaaaaaaaaaaaaaaaaaaaaaaaaaaaaaaaaaaaaaaaaaaaaaaaaaaaaa |
||
| + | [[File:The Golem - Thammaron's remains.png|thumb|200px|The dead demon.]] |
||
| − | aaaaaaaaaaaaaaaaaaaaaaaaaaaaaaaaaaaaaa |
||
| + | At Uzer, enter the dungeon near the golem and go to the middle. Use the statuette on the empty alcove. Turn all of them to face the double doors to unlock the demon's lair. Go inside to discover that [[Thammaron]] had perished from his wounds from the battle long ago. Should you wish to do so, use your chisel and hammer on the throne to get six gems which you can keep, and then go outside and talk to the clay golem again. He was not programmed to believe that the demon is dead, so you'll need to reprogram him. |
||
| − | aaaaaaaaaaaaaaaaaaaaaaaaaaaaaaaaaaaaaaaaaaaaaaaaaaaaaaaaaaaaaaaaaaaaaaaaaaaaaaaaaaa |
||
| + | |||
| − | aaaaaaaaaaaaaaaaaaaaaaaaaaaaaaaaaaaaaaaaaaaaaaaaa |
||
| + | With an empty vial in your inventory, use your pestle and mortar on the black mushroom to make [[black mushroom ink]]. Use the phoenix feather on your ink to make a [[phoenix quill pen]], then use it on your papyrus to write a [[Golem program]]. Go back to the clay golem. Use the strange implement on him, and then the golem program to get your reward. |
||
| − | aaaaaaaaaaaaaaaaaaaaaaaaaaaaaaaaaaaaaaaa |
||
| + | |||
| − | aaaaaaaaaaaaaaaaaaaaaaaaaaaaaaaaa |
||
| + | '''Congratulations! Quest complete!''' |
||
| − | aaaaaaaaaaaaaaaaaaa |
||
| + | |||
| − | aaaaaaaaaa |
||
| + | ==Rewards== |
||
| − | aaaaaaaaaaaaaaaaaaaaaaaaaaaaa |
||
| + | {{Quest rewards |
||
| − | aaaaaaaaaaaaaaaaaaaaaaaaaaaaaaaaaaaaaaaaaaaaaaaaa |
||
| + | |name = The Golem |
||
| − | aa |
||
| + | |image = [[File:The Golem reward scroll.png|centre]] |
||
| − | aa |
||
| + | |qp = 1 |
||
| − | aaaaaaaaaa |
||
| + | |rewards = |
||
| − | aaaaaaaaaaaaaaaaaaaaaaaaaaaaaaaa |
||
| + | *{{skill clickpic|Thieving|1,000}}[[Thieving]] experience |
||
| − | aaaaaaaaaaaaaaaaaaaaaaaaaaaaaaaaa |
||
| + | *{{skill clickpic|Crafting|1,000}}[[Crafting]] experience |
||
| − | aaaaaaaaaaaaaaaaaaaaaaaaaaaa |
||
| + | *2 cut [[Ruby|rubies]], [[emerald]]s, and [[sapphire]]s (collect these by using a [[chisel]] and [[hammer]] on the throne) |
||
| − | aaaaaaaaaaaa |
||
| + | *Unlock the carpet ride from [[Shantay Pass]] to [[Uzer]] |
||
| − | aaaaaaaaaaaaaaaaaaaaaaaaaaaaaaaaaaaaaaaaaaaaaaaaaaa |
||
| + | }} |
||
| − | aaaaaaaaaaaaa |
||
| + | |||
| − | aaaaaaaaaaaaaa |
||
| + | ==Required for completing== |
||
| − | a |
||
| + | Completion of The Golem is required for the following: |
||
| − | aaaaaaaaaaaaaaaaaaaaaaaaaaaaaaaaaaaaaaaaaaaaaaaaaaaaaaaaaaaaaaaaaaaaaaaaaaaaaaaaaaaaaaaaaaaa |
||
| + | *[[Shadow of the Storm]] |
||
| − | aaaaaaaaaaaaaaaaaaaaaaaaaaaaaaaaaaaaaaaaaaaaaaaaaaaaaaaaaaaaaaaaaa |
||
| + | |||
| − | aaaaaaaaaaaaaaaaaaaaaaaaaaaaaaaaaaaaaaaaaaaaaaaaaaaaaaaaaaaaaaaaaaaaaaaaaaaaaaaaaaaaaaaaaaaaaaaaaaaa |
||
| + | {{The Golem}} |
||
| − | aaaaaaaaaaaaaaaaaaaaaaaaaaaaaaaaaaaaaaaaaaaaaaaaaaaaaaaaaaaaaaaaaaaaaaaaaaaaaaaaaaaaaaaaaaaaaaaaaaaaaaaaaaaaa |
||
| + | [[Category:Quests|Golem]] |
||
| − | aaaaaaaa |
||
| + | [[Category:Intermediate quests]] |
||
| − | aaaaaaaaaaaaaaaaaaa |
||
| − | aaaaaaaaaaaaaaaaaaaaaaaaaaaaaaaaaa |
||
| − | aaaaaaaaaaaaaaaaaaaaaaaaaaaaaaaaaaaaaaaaaaaaaaaaaaaaaaaaaaaaaaaaaaaaaaaaaaaaaaaaaaaaaaaaaaaaaaaaaaaaaaaaaaaaaaaaaaaaaaaaaaaaaaaaaaaaaaa |
||
| − | aaaaaaaaaaaaaaaaaaaaaaaaaaaaaaaaaaaaaaaaaaaaaaaaaaaaaaaaaaaaaaaaaaaaaaaaaaaaaaa |
||
| − | aaaaaaaaaaaaaaaaaaaaaaaaaaaaaaaa |
||
Latest revision as of 10:14, 8 June 2019
Details
| Start point | |
| Official difficulty | Intermediate |
| Description | Deep in the desert stand the ruins of the once great city of Uzer, where a lone survivor, an ancient clay golem, forever paces back and forth. It is badly damaged, and its mind cannot rest until it has completed the task for which it was created.
It is up to you to uncover the secret of the lost city, and add the final chapter to a story started in the violence of the Third Age. |
| Length | Medium |
| Requirements | |
| Items required |
Recommended:
|
| Enemies to defeat | None |
Walkthrough
Getting started
To start this quest travel to the Ruins of Uzer (take fairy ring code dlq and run northeast, or use a necklace of passage to teleport to Eagle's Eyrie), and speak to the golem. Offer to repair him to begin the quest.

The mining spot. The desert phoenix is also nearby.
The first thing you should do is repair the broken clay golem. If you did not bring your own clay, go north-west and mine four pieces of clay while wearing a bracelet of clay to mine soft clay. While there, you can steal the phoenix feather needed for later. It may take a few tries (depending on your Thieving level). Stealing a phoenix feather gives you 26 Thieving experience.
As you use the soft clay on the Broken Golem, he will become less damaged and later, repaired. He will tell you that he was programmed to destroy a powerful demon, Thammaron. You need to help him slay the demon. Make sure to ask him how to open the portal. Outside the temple ruins near the golem there's a letter take it and read it.
Enter the temple ruins behind the golem. Before climbing down the stairs, pick up two black mushrooms (one for the quest and one for the quest's sequel, Shadow of the Storm) next to the staircase. Once inside, head to the north-west corner of the room and pick up the strange implement. The implement is also used during Shadow of the Storm, so it is advised to keep it as well.

The location of Elissa.
Then, go to the Digsite south-east of Varrock. (Optional: You can use gnome glider to get to the Digsite and then use ring of dueling to return back.) Find Elissa in the north-eastern part of the Digsite, and tell her you found a letter with her name on it—she is wearing green/brown robes. She will tell you about her late husband's notes and where they are located. After talking to her, go to the Exam Centre and search the south-eastern most bookcase—you will find Varmen's notes; then, read them.

The player steals the statuette.
Go to the Varrock Museum. Ask the Curator about a missing statuette. Then, pickpocket him to get a display cabinet key. Unlock the display case upstairs to steal the statuette. It is on the 1st floor[?] in the first row of display cases and the fourth case when you ascend the stairs (display case 30).
Note: If you lose the statuette, you can use the display cabinet key on the empty display cabinet to receive a new one.
Before going back to Uzer, make sure you have an empty vial, chisel and hammer (for optional gems), pestle and mortar, and papyrus in your inventory.

The Desert Phoenix, near the clay mine.
Head towards the ruins of Uzer from the Shantay Pass. If you have not already done so, while walking back to the ruins, after you cross the bridge, go north along the east bank of the river to up near the clay mine and grab a phoenix feather from the Desert Phoenix.
The alcove in the centre where the statuette goes.


The dead demon.
At Uzer, enter the dungeon near the golem and go to the middle. Use the statuette on the empty alcove. Turn all of them to face the double doors to unlock the demon's lair. Go inside to discover that Thammaron had perished from his wounds from the battle long ago. Should you wish to do so, use your chisel and hammer on the throne to get six gems which you can keep, and then go outside and talk to the clay golem again. He was not programmed to believe that the demon is dead, so you'll need to reprogram him.
With an empty vial in your inventory, use your pestle and mortar on the black mushroom to make black mushroom ink. Use the phoenix feather on your ink to make a phoenix quill pen, then use it on your papyrus to write a Golem program. Go back to the clay golem. Use the strange implement on him, and then the golem program to get your reward.
Congratulations! Quest complete!
Rewards
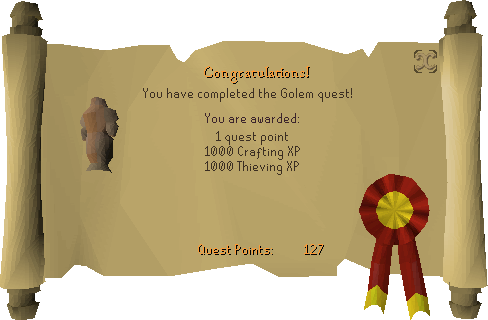
- 1
 Quest point
 - 1,000 Thieving experience
- 1,000 Crafting experience
- 2 cut rubies, emeralds, and sapphires (collect these by using a chisel and hammer on the throne)
- Unlock the carpet ride from Shantay Pass to Uzer
Required for completing
Completion of The Golem is required for the following:
The Golem | |
|---|---|
| NPCs |
|
| Items |
|
| Locations | |
| Music | |
| Related | |