Ace of Risk (talk | contribs) No edit summary |
(cleanup) |
||
| (675 intermediate revisions by more than 100 users not shown) | |||
| Line 1: | Line 1: | ||
| + | {{External|rs|rsc}} |
||
| − | '''The Knight's Sword''' is a [[quests|quest]] for both [[free-to-play]] and [[pay-to-play]] ''[[RuneScape]]'' players. |
||
| + | {{Has quick guide}} |
||
| + | {{Quest |
||
| + | |name = The Knight's Sword |
||
| + | |image = [[File:The Knight's Sword.png|300px]] |
||
| + | |number = 14 |
||
| + | |members = No |
||
| + | |release = 6 April [[2001]] |
||
| + | |update = Massive update! |
||
| + | |series = None |
||
| + | |difficulty = Intermediate |
||
| + | |developer = Paul Gower |
||
| + | }} |
||
| + | ==Details== |
||
| + | {{Quest details |
||
| ⚫ | |||
| + | |difficulty = Intermediate |
||
| + | |description = Sir Vyvin's squire is in trouble. He has accidentally lost Sir Vyvin's ceremonial sword. Help him find a replacement without Sir Vyvin finding out. |
||
| + | |length = Medium |
||
| + | |requirements = *10 {{Skill clickpic|Mining}} [[Mining]] |
||
| + | *The ability to run from [[combat level|level]] 57 [[Ice warrior]]s and level 53 [[Ice giant]]s could help. |
||
| + | |items = *[[Redberry pie]] |
||
| + | *A [[pickaxe]] (one spawns in south Falador) |
||
| + | *2 [[iron bar]]s (4 if you want your own [[blurite sword]]) |
||
| + | *1 [[blurite ore]] (2 if you want your own blurite sword; it can be obtained during the quest) |
||
| + | *[[Varrock teleport|Varrock]] and 4 [[Falador teleport]]s (optional) |
||
| + | }} |
||
| − | == |
+ | ==Walkthrough== |
| + | ===Getting started=== |
||
| − | The objective of The Knight's Sword is to replace a lost sword made from an uncommon material. |
||
| + | [[File:Squire location.png|thumb|The location of Sir Vyvin's squire.]] |
||
| + | '''''Items required:''' (suggested ''{{Link|Falador}}''[[Falador teleport| teleport]])'' |
||
| + | You start this quest by talking to the {{Link|Squire|type=chat}} in the {{Link|White Knights' Castle}} in {{Link|Falador}}. The {{Link|Squire|type=chat}} will tell you he lost {{Link|Sir Vyvin|type=chat}}'s sword, and would like you to help him replace it. He will tell you to talk to {{Link|Reldo|type=chat}}, {{Link|Varrock}}'s librarian. |
||
| − | ==Requirements== |
||
| − | *A [[mining#pickaxes|pickaxe]] |
||
| − | *A [[mining ]]level of 10[[#Footnotes|<sup>1</sup>]] |
||
| − | *2 Iron bars |
||
| − | *A [[cooking]] level of 10[[#Footnotes|<sup>2</sup>]] |
||
| + | ''Note: If you have completed [[The Giant Dwarf]], you may skip talking to Reldo and go straight to Thurgo. (Your character will mention to the squire that they already know an [[Imcando dwarf]])'' |
||
| − | ==Initiation== |
||
| ⚫ | |||
| − | *He's in trouble, if Sir Vyvin finds out about this. |
||
| + | '''Speak to Reldo''' |
||
| − | ==Completion== |
||
| − | *Get the information required |
||
| − | *Take the raw materials (two Iron bars and a Blurite ore) to the dwarf |
||
| − | *Bring the sword back to the squire. |
||
| + | '''''Items required:''' none'' |
||
| − | ===Hints=== |
||
| − | *The drop trick - if you collect two lots of materials (4 bars and 2 Blurite), then you can drop the first sword and get a second one made. Be sure to drop the spare one before talking to the squire, or he will take both. He cannot take the one if you are wielding it, but it's uncertain if he will demand the second one in that case. |
||
| − | *The Blurite is deep within a very tough dungeon close to the Dwarf's hut, and is untradeable, so getting it is tough, with some popular ways: |
||
| − | *#Have a good combat level - especially in [[defence]] and [[hitpoints]], good food, and fight/run your way in and out, or use teleport to get out. |
||
| − | *#Bank everything except your pick, even minor items like boots and gloves. Run, avoid fighting, mine one or two ores and then die. If you carry food, eat it all before you die. If you have not been "skulled" for wilderness atacks, you will be back in Lumbridge with your three most expensive items - if carrying and wearing nothing else, this will be your pickaxe and one or two Blurite ores. |
||
| − | *#Luck and skill: If you run to the rocky area just before the Ice Warrior's chamber, you can normally find a safe place to recover and collect yourself. Rotating the map, you can observe the first of the Blurite rocks, and if the chamber is busy with people training combat against the Ice Warriors, you may be able to slip through without being set upon. You should still take no more than 3 expensive items in, if you do not have the combat level to reliably stand up to a fairly tough dungeon. |
||
| − | * Useful quests to take on before this one, especially if taking it on early, are the [[Cook's Assistant]] and [[Doric's Quest]] |
||
| + | Go to {{Link|Varrock Palace}}, and go to the far north room on the ground floor of the palace to find Reldo. Ask Reldo about Imcando dwarves. He will tell you that one is located south of {{Link|Port Sarim}}. If you haven't already made or bought a {{Link|redberry pie|img=Redberry pie.png}}, do it now. {{Link|Members}} can buy one from {{Link|Romily Weaklax}} in the {{Link|Cooks' Guild}} just west of Varrock (entry requires level 32 in {{Link|Cooking|type=skill}} and a {{Link|chef's hat|type=item}}) (note: if you are an {{Link|Ironman Mode|Ironman}} and have a low Cooking level it is useful to get the materials to bake multiple pies in case you burn one). When you have one, continue to Port Sarim and then head south. |
||
| ⚫ | |||
| − | *1 [[Quest Point]] |
||
| ⚫ | |||
| − | *Using the drop trick, you can keep a blurite sword - looks cool, but it's inferior to a Steel longsword |
||
| + | ===Thurgo the Imcando dwarf=== |
||
| − | ==Footnotes== |
||
| + | [[File:Thurgo location.png|thumb|Thurgo the Imcando Dwarf]] |
||
| − | <sup>1</sup>If you cannot find anyone to buy Iron bars from, [[mining]] and [[smithing]] levels of 15 are required. |
||
| + | '''''Items required:''' [[Redberry pie]], suggested [[Falador teleport]] or [[fairy ring]] ({{Fairycode|aiq}}) (teleport to [[Pest Control]] via [[minigame teleport]]s is faster than walking)'' |
||
| + | |||
| + | You should see a small house on the side of a hill with a red exclamation mark. Look for {{Link|Thurgo|type=chat}}, who is an Imcando dwarf. Ask him if he would like some {{Link|redberry pie|img=Redberry pie.png}}. He'll take the one you have and eat it. Talk to him again to ask him about the sword. He says he'll need a picture of it. So, go back to {{Link|Falador}} and talk to the {{Link|Squire|type=chat}} again. |
||
| + | |||
| + | ===Acquiring the picture=== |
||
| + | '''''Items required:''' none'' |
||
| + | |||
| + | '''Note:''' You have to talk to the Squire first before searching for the portrait. |
||
| + | |||
| + | You ''must'' go talk to the squire again who will tell you that {{Link|Sir Vyvin|type=chat}} has a portrait in his room. From the courtyard of the {{Link|White Knights' Castle}} in {{Link|Falador}}, go east through three doors, and then up the ladder. Go west through the door and then through another doorway and up the stairs. Sir Vyvin's room will be directly south of you. Open and search the cupboard inside his room. You will obtain a portrait that shows the sword. However, Sir Vyvin will stop you if he is in the room. There are four ways to avoid this: |
||
| + | |||
| + | *Have a friend talk to {{Link|Sir Vyvin|type=chat}} while you open and search the cupboard. You can also wait for Sir Vyvin to be out of the cupboard room if you don't have friend near. |
||
| + | *Open the door to his room and wait for him to walk out. |
||
| + | *Have the door open, and wait next to the cupboard. When Sir Vyvin walks behind the door, quickly search the cupboard. |
||
| + | *The cupboard is searched while Sir Vyvin is not looking towards the player. |
||
| + | |||
| + | Once you have the portrait, you're done at {{Link|White Knights' Castle|White Knight's Castle}} for now. |
||
| + | |||
| + | ===Getting the iron bars (optional)=== |
||
| + | '''''Note: '''If you already have 2 iron bars (4 if you want your own sword), or will definitely buy them, skip this part. Bring food for all four of the alternative options below.'' |
||
| + | |||
| + | If you don't already have the iron bars, you can get them very easily by buying them from the {{Link|Grand Exchange}}. Make sure you bring them when you're going to {{Link|Thurgo|type=chat}} next, as it saves you a trip to a nearby bank. If you're an {{Link|Ironman Mode|Ironman}}, and you wish to obtain them without buying or {{Link|Smithing|type=skill}}, you have 4 options. The first three involve killing (so at least the ability to survive a fight is necessary), the last one involves a trip to the {{Link|Wilderness}}. |
||
| + | |||
| + | '''Killing dwarves''' |
||
| + | |||
| + | The first one is to kill {{Link|Dwarf|Dwarves|img=Dwarf.png}}, head to either the ground floor or beneath the {{Link|Dwarven Mine|Dwarven Mines}} to find groups between combat level 10 & 14, which have a rare chance of dropping one iron bar. |
||
| + | |||
| + | ====Killing pirates==== |
||
| + | The second one is to take food from your bank, go to {{Link|Thurgo|type=chat}} without iron bars, talking to him, heading to the {{Link|Asgarnian Ice Dungeon|Asgarnia Ice Dungeon}} on the hill nearby and killing the {{Link|Pirate|Pirates|img=Pirate (Brimhaven).png}} there, as they have a rare chance of dropping one iron bar. They have a combat level of 26, and can be easily {{Link|Safe spot|safespot}}ted. |
||
| + | |||
| + | ====Killing white knights==== |
||
| + | The third one is to go to the {{Link|White Knights' Castle|White Knight's Castle}}, bring some {{Link|Magic|type=skill}} (they have a weakness to Magic) or {{Link|Ranged|type=skill}} gear, and safespot {{Link|White Knights}} on the second floor of the castle, in the jail-like room. Compared to the {{Link|Pirate|img=Pirate (Brimhaven).png}}-option above, this requires more effort to get there and to kill a single one, but the drop rate of iron bars for {{Link|White Knights}} (level 36, 38 and 42; '''not''' the level 39 ones) is uncommon instead of rare, and they can drop max. 2, instead of one. That makes it a viable option if you want to save time. They do have twice as many hitpoints compared to Pirates, so a high combat level (45+) is recommended. |
||
| + | |||
| + | ====Wilderness spawn==== |
||
| + | [[File:The Knight's Sword - Iron bar spawn.png|thumb|220x220px|The location of the iron bar.]] |
||
| + | The fourth option: a single iron bar can be found west of the {{Link|Graveyard of Shadows}} next to the {{Link|bear}}s in some trees in level 18 Wilderness (hop to another world for more). Bring a {{Link|Teleportation|teleport}} to get out of the {{Link|Wilderness}} quickly after you have what you need. |
||
| + | |||
| + | ===Enter the dungeon=== |
||
| + | '''''Items required:''' A [[pickaxe]], food (recommended), 2 [[Iron bar]]s (to save a bank trip).'' |
||
| + | |||
| + | ''Don't forget to bring your pickaxe for this next step, and if you are at a low [[combat level]], make sure that you take food with you as well! If needed there is an altar just north of the dungeon to restore prayer points.'' |
||
| + | |||
| + | Now that you have the portrait, talk to {{Link|Thurgo|type=chat}}, and give it to him. He now knows what kind of a sword he is making, a {{Link|blurite sword|type=item}}, and he will need the materials to make the sword. You will have to enter the {{Link|Asgarnian Ice Dungeon|Asgarnia Ice Dungeon}} on the hill nearby to obtain the {{Link|blurite ore|type=item}}s. All enemies in the cave are {{Link|Aggressiveness|aggressive}}, so bringing {{Link|food}} could save your life. It is also recommended that you only bring a good pickaxe if you want two blurite ores so that you can get your own sword (you also need a Blurite ore for the Falador Easy Achievement Diary - to smith Blurite limbs on {{Link|Doric|type=chat}}'s anvil). So, go down the ladder and walk through. When you see snow/ice ahead of you, be prepared to run. Run along the southern walls to find blurite ores. The rocks are bright blue. Mine one ore or two if you want your own sword. When you have the amount of blurite you want, run out. If you want to do the {{Link|Falador Diary|Falador Achievement Diaries}}, mine an extra blurite ore as it is necessary for a one of the easy tasks. |
||
| + | |||
| + | It may be helpful to have a bodyguard to protect you from the aggressive monsters; however, if done correctly, a level 3 player can get the ore. If you die you will retain the ore, however, this obviously doesn't apply to {{Link|Ironman Mode#Hardcore|Hardcore Ironman}} characters. |
||
| + | |||
| + | ''Note that there is a spot where the monsters cannot attack you. It is right next to the entrance to the members-only area of this dungeon. It is recommended that you mine at the blurite ore rock right next to this area, so you can easily retreat to safety if necessary.'' |
||
| + | |||
| + | ===Creating the sword=== |
||
| + | '''''Items required:''' 2 [[Iron bar]]s, and a [[blurite ore]]. (Or 4 Iron bars, and two blurite ore if you want your own sword)'' |
||
| + | |||
| + | Get back to {{Link|Thurgo|type=chat}} with your {{Link|blurite ore|type=item}}s and your iron bars. He will make you a sword. If you want a sword for yourself, drop the sword Thurgo just made and talk to him again with the materials (you could also wield the sword instead of dropping it). He will make a second sword. Then, pick up the sword you dropped. You now have two swords. |
||
| + | |||
| + | ===Finishing up=== |
||
| + | '''''Items required:''' [[Blurite sword]] (suggested [[Falador teleport]]).'' |
||
| + | |||
| + | Go back to the {{Link|Squire|type=chat}} and he will take one of your blurite swords. After handing over the sword you will be done with the quest. |
||
| + | |||
| ⚫ | |||
| + | {{Quest rewards |
||
| + | |name = The Knight's Sword |
||
| + | |image = [[File:The Knight's Sword reward scroll.png|centre]] |
||
| + | |qp = 1 |
||
| + | |rewards = |
||
| ⚫ | |||
| + | *A [[blurite sword]] (if you got [[Thurgo]] to make you an extra one) |
||
| + | *The ability to smelt [[blurite ore]] into [[blurite bar]]s (members) |
||
| + | }} |
||
| + | ==Trivia== |
||
| − | <sup>2</sup>Without level 10 [[cooking]] you will have to find someone to sell you the Dwarf's treat. |
||
| + | *When trying to complete the quest while having the {{Link|blurite sword|type=item}} equipped, the {{Link|Squire|type=chat}} would say "So can you un-equip it and hand it over to me now please?" |
||
| + | *If the player's {{Link|Smithing|type=skill}} level is 1, they will have it levelled up to 29 after this quest. If they start at 15 Smithing (to smelt the iron), it will be levelled up to 31. |
||
| + | {{The Knight's Sword}} |
||
| − | [[Category:Quests]] |
||
Revision as of 11:47, 28 July 2019
Details
| Start point | |
| Official difficulty | Intermediate |
| Description | Sir Vyvin's squire is in trouble. He has accidentally lost Sir Vyvin's ceremonial sword. Help him find a replacement without Sir Vyvin finding out. |
| Length | Medium |
| Requirements |
|
| Items required |
|
| Enemies to defeat | None |
Walkthrough
Getting started

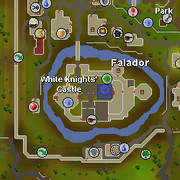
The location of Sir Vyvin's squire.
Items required: (suggested ![]() Falador teleport)
Falador teleport)
You start this quest by talking to the ![]() Squire in the
Squire in the ![]() White Knights' Castle in
White Knights' Castle in ![]() Falador. The
Falador. The ![]() Squire will tell you he lost
Squire will tell you he lost ![]() Sir Vyvin's sword, and would like you to help him replace it. He will tell you to talk to
Sir Vyvin's sword, and would like you to help him replace it. He will tell you to talk to ![]() Reldo,
Reldo, ![]() Varrock's librarian.
Varrock's librarian.
Note: If you have completed The Giant Dwarf, you may skip talking to Reldo and go straight to Thurgo. (Your character will mention to the squire that they already know an Imcando dwarf)
Speak to Reldo
Items required: none
Go to ![]() Varrock Palace, and go to the far north room on the ground floor of the palace to find Reldo. Ask Reldo about Imcando dwarves. He will tell you that one is located south of
Varrock Palace, and go to the far north room on the ground floor of the palace to find Reldo. Ask Reldo about Imcando dwarves. He will tell you that one is located south of ![]() Port Sarim. If you haven't already made or bought a
Port Sarim. If you haven't already made or bought a ![]() redberry pie, do it now.
redberry pie, do it now. ![]() Members can buy one from
Members can buy one from ![]() Romily Weaklax in the
Romily Weaklax in the ![]() Cooks' Guild just west of Varrock (entry requires level 32 in
Cooks' Guild just west of Varrock (entry requires level 32 in ![]() Cooking and a
Cooking and a ![]() chef's hat) (note: if you are an
chef's hat) (note: if you are an ![]() Ironman and have a low Cooking level it is useful to get the materials to bake multiple pies in case you burn one). When you have one, continue to Port Sarim and then head south.
Ironman and have a low Cooking level it is useful to get the materials to bake multiple pies in case you burn one). When you have one, continue to Port Sarim and then head south.
Thurgo the Imcando dwarf

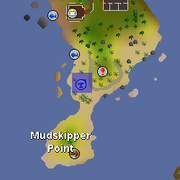
Thurgo the Imcando Dwarf
Items required: Redberry pie, suggested Falador teleport or fairy ring (aiq) (teleport to Pest Control via minigame teleports is faster than walking)
You should see a small house on the side of a hill with a red exclamation mark. Look for ![]() Thurgo, who is an Imcando dwarf. Ask him if he would like some
Thurgo, who is an Imcando dwarf. Ask him if he would like some ![]() redberry pie. He'll take the one you have and eat it. Talk to him again to ask him about the sword. He says he'll need a picture of it. So, go back to
redberry pie. He'll take the one you have and eat it. Talk to him again to ask him about the sword. He says he'll need a picture of it. So, go back to ![]() Falador and talk to the
Falador and talk to the ![]() Squire again.
Squire again.
Acquiring the picture
Items required: none
Note: You have to talk to the Squire first before searching for the portrait.
You must go talk to the squire again who will tell you that ![]() Sir Vyvin has a portrait in his room. From the courtyard of the
Sir Vyvin has a portrait in his room. From the courtyard of the ![]() White Knights' Castle in
White Knights' Castle in ![]() Falador, go east through three doors, and then up the ladder. Go west through the door and then through another doorway and up the stairs. Sir Vyvin's room will be directly south of you. Open and search the cupboard inside his room. You will obtain a portrait that shows the sword. However, Sir Vyvin will stop you if he is in the room. There are four ways to avoid this:
Falador, go east through three doors, and then up the ladder. Go west through the door and then through another doorway and up the stairs. Sir Vyvin's room will be directly south of you. Open and search the cupboard inside his room. You will obtain a portrait that shows the sword. However, Sir Vyvin will stop you if he is in the room. There are four ways to avoid this:
- Have a friend talk to
 Sir Vyvin while you open and search the cupboard. You can also wait for Sir Vyvin to be out of the cupboard room if you don't have friend near.
 - Open the door to his room and wait for him to walk out.
- Have the door open, and wait next to the cupboard. When Sir Vyvin walks behind the door, quickly search the cupboard.
- The cupboard is searched while Sir Vyvin is not looking towards the player.
Once you have the portrait, you're done at ![]() White Knight's Castle for now.
White Knight's Castle for now.
Getting the iron bars (optional)
Note: If you already have 2 iron bars (4 if you want your own sword), or will definitely buy them, skip this part. Bring food for all four of the alternative options below.
If you don't already have the iron bars, you can get them very easily by buying them from the ![]() Grand Exchange. Make sure you bring them when you're going to
Grand Exchange. Make sure you bring them when you're going to ![]() Thurgo next, as it saves you a trip to a nearby bank. If you're an
Thurgo next, as it saves you a trip to a nearby bank. If you're an ![]() Ironman, and you wish to obtain them without buying or
Ironman, and you wish to obtain them without buying or ![]() Smithing, you have 4 options. The first three involve killing (so at least the ability to survive a fight is necessary), the last one involves a trip to the
Smithing, you have 4 options. The first three involve killing (so at least the ability to survive a fight is necessary), the last one involves a trip to the ![]() Wilderness.
Wilderness.
Killing dwarves
The first one is to kill ![]() Dwarves, head to either the ground floor or beneath the
Dwarves, head to either the ground floor or beneath the ![]() Dwarven Mines to find groups between combat level 10 & 14, which have a rare chance of dropping one iron bar.
Dwarven Mines to find groups between combat level 10 & 14, which have a rare chance of dropping one iron bar.
Killing pirates
The second one is to take food from your bank, go to ![]() Thurgo without iron bars, talking to him, heading to the
Thurgo without iron bars, talking to him, heading to the ![]() Asgarnia Ice Dungeon on the hill nearby and killing the
Asgarnia Ice Dungeon on the hill nearby and killing the ![]() Pirates there, as they have a rare chance of dropping one iron bar. They have a combat level of 26, and can be easily
Pirates there, as they have a rare chance of dropping one iron bar. They have a combat level of 26, and can be easily ![]() safespotted.
safespotted.
Killing white knights
The third one is to go to the ![]() White Knight's Castle, bring some
White Knight's Castle, bring some ![]() Magic (they have a weakness to Magic) or
Magic (they have a weakness to Magic) or ![]() Ranged gear, and safespot
Ranged gear, and safespot ![]() White Knights on the second floor of the castle, in the jail-like room. Compared to the
White Knights on the second floor of the castle, in the jail-like room. Compared to the ![]() Pirate-option above, this requires more effort to get there and to kill a single one, but the drop rate of iron bars for
Pirate-option above, this requires more effort to get there and to kill a single one, but the drop rate of iron bars for ![]() White Knights (level 36, 38 and 42; not the level 39 ones) is uncommon instead of rare, and they can drop max. 2, instead of one. That makes it a viable option if you want to save time. They do have twice as many hitpoints compared to Pirates, so a high combat level (45+) is recommended.
White Knights (level 36, 38 and 42; not the level 39 ones) is uncommon instead of rare, and they can drop max. 2, instead of one. That makes it a viable option if you want to save time. They do have twice as many hitpoints compared to Pirates, so a high combat level (45+) is recommended.
Wilderness spawn
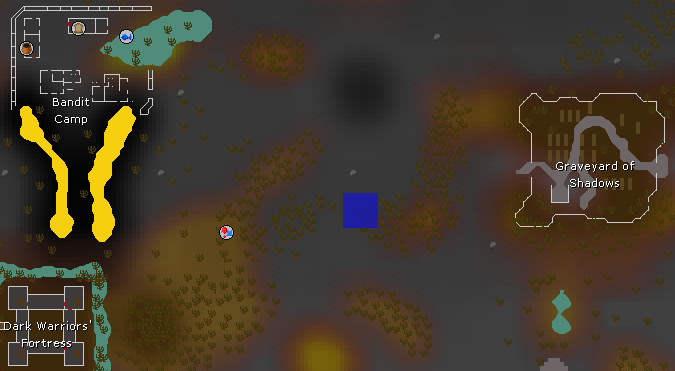
The location of the iron bar.
The fourth option: a single iron bar can be found west of the ![]() Graveyard of Shadows next to the
Graveyard of Shadows next to the ![]() bears in some trees in level 18 Wilderness (hop to another world for more). Bring a
bears in some trees in level 18 Wilderness (hop to another world for more). Bring a ![]() teleport to get out of the
teleport to get out of the ![]() Wilderness quickly after you have what you need.
Wilderness quickly after you have what you need.
Enter the dungeon
Items required: A pickaxe, food (recommended), 2 Iron bars (to save a bank trip).
Don't forget to bring your pickaxe for this next step, and if you are at a low combat level, make sure that you take food with you as well! If needed there is an altar just north of the dungeon to restore prayer points.
Now that you have the portrait, talk to ![]() Thurgo, and give it to him. He now knows what kind of a sword he is making, a
Thurgo, and give it to him. He now knows what kind of a sword he is making, a ![]() blurite sword, and he will need the materials to make the sword. You will have to enter the
blurite sword, and he will need the materials to make the sword. You will have to enter the ![]() Asgarnia Ice Dungeon on the hill nearby to obtain the
Asgarnia Ice Dungeon on the hill nearby to obtain the ![]() blurite ores. All enemies in the cave are
blurite ores. All enemies in the cave are ![]() aggressive, so bringing
aggressive, so bringing ![]() food could save your life. It is also recommended that you only bring a good pickaxe if you want two blurite ores so that you can get your own sword (you also need a Blurite ore for the Falador Easy Achievement Diary - to smith Blurite limbs on
food could save your life. It is also recommended that you only bring a good pickaxe if you want two blurite ores so that you can get your own sword (you also need a Blurite ore for the Falador Easy Achievement Diary - to smith Blurite limbs on ![]() Doric's anvil). So, go down the ladder and walk through. When you see snow/ice ahead of you, be prepared to run. Run along the southern walls to find blurite ores. The rocks are bright blue. Mine one ore or two if you want your own sword. When you have the amount of blurite you want, run out. If you want to do the
Doric's anvil). So, go down the ladder and walk through. When you see snow/ice ahead of you, be prepared to run. Run along the southern walls to find blurite ores. The rocks are bright blue. Mine one ore or two if you want your own sword. When you have the amount of blurite you want, run out. If you want to do the ![]() Falador Achievement Diaries, mine an extra blurite ore as it is necessary for a one of the easy tasks.
Falador Achievement Diaries, mine an extra blurite ore as it is necessary for a one of the easy tasks.
It may be helpful to have a bodyguard to protect you from the aggressive monsters; however, if done correctly, a level 3 player can get the ore. If you die you will retain the ore, however, this obviously doesn't apply to ![]() Hardcore Ironman characters.
Hardcore Ironman characters.
Note that there is a spot where the monsters cannot attack you. It is right next to the entrance to the members-only area of this dungeon. It is recommended that you mine at the blurite ore rock right next to this area, so you can easily retreat to safety if necessary.
Creating the sword
Items required: 2 Iron bars, and a blurite ore. (Or 4 Iron bars, and two blurite ore if you want your own sword)
Get back to ![]() Thurgo with your
Thurgo with your ![]() blurite ores and your iron bars. He will make you a sword. If you want a sword for yourself, drop the sword Thurgo just made and talk to him again with the materials (you could also wield the sword instead of dropping it). He will make a second sword. Then, pick up the sword you dropped. You now have two swords.
blurite ores and your iron bars. He will make you a sword. If you want a sword for yourself, drop the sword Thurgo just made and talk to him again with the materials (you could also wield the sword instead of dropping it). He will make a second sword. Then, pick up the sword you dropped. You now have two swords.
Finishing up
Items required: Blurite sword (suggested Falador teleport).
Go back to the ![]() Squire and he will take one of your blurite swords. After handing over the sword you will be done with the quest.
Squire and he will take one of your blurite swords. After handing over the sword you will be done with the quest.
Rewards

- 1 Quest point
- 12,725 Smithing experience
- A blurite sword (if you got Thurgo to make you an extra one)
- The ability to smelt blurite ore into blurite bars (members)
Trivia
- When trying to complete the quest while having the blurite sword equipped, the Squire would say "So can you un-equip it and hand it over to me now please?"
- If the player's Smithing level is 1, they will have it levelled up to 29 after this quest. If they start at 15 Smithing (to smelt the iron), it will be levelled up to 31.
The Knight's Sword | |
|---|---|
| NPCs | |
| Items | |
| Locations |
White Knights' Castle • Mudskipper Point • Asgarnian Ice Dungeon |
| Related | |