Tag: Visual edit |
m (cleanup) |
||
| (34 intermediate revisions by 26 users not shown) | |||
| Line 2: | Line 2: | ||
{{Floor}} |
{{Floor}} |
||
{{Has quick guide}} |
{{Has quick guide}} |
||
| − | {{ |
+ | {{Quest |
|name = The Lost Tribe |
|name = The Lost Tribe |
||
|image = [[File:The Lost Tribe.png|300px]] |
|image = [[File:The Lost Tribe.png|300px]] |
||
| Line 25: | Line 25: | ||
|length = Medium |
|length = Medium |
||
|requirements = *Completion of [[Goblin Diplomacy]] and [[Rune Mysteries]] (Goblin Diplomacy can be completed when speaking with the goblin generals as part of The Lost Tribe quest; it is not required to start The Lost Tribe.) |
|requirements = *Completion of [[Goblin Diplomacy]] and [[Rune Mysteries]] (Goblin Diplomacy can be completed when speaking with the goblin generals as part of The Lost Tribe quest; it is not required to start The Lost Tribe.) |
||
| + | |||
*{{Skill clickpic|Agility|13}} [[Agility]] |
*{{Skill clickpic|Agility|13}} [[Agility]] |
||
*{{Skill clickpic|Thieving|13}} [[Thieving]] |
*{{Skill clickpic|Thieving|13}} [[Thieving]] |
||
*{{Skill clickpic|Mining|17}} [[Mining]] |
*{{Skill clickpic|Mining|17}} [[Mining]] |
||
| + | |||
| + | '''Note: '''(Goblin Diplomacy can be completed when speaking with the goblin generals as part of The Lost Tribe quest; it is not required to start The Lost Tribe.) |
||
| + | |||
|items = *A [[pickaxe]] |
|items = *A [[pickaxe]] |
||
| − | *A [[light source]] (An open light source like a [[candle]] or [[torch]] are not recommended as they can go out, resulting in significant damage. A [[Bullseye lantern]] is recommended.) |
+ | *A [[light source]] (An open light source like a [[candle]] or [[torch]] are not recommended as they can go out, resulting in significant damage. A [[Bullseye lantern]] is recommended, but you need 49 [[firemaking]] to light it.) |
*A [[tinderbox]] |
*A [[tinderbox]] |
||
'''Recommended:''' |
'''Recommended:''' |
||
*[[Teleportation|Teleports]] to [[Varrock]], [[Falador]] and [[Lumbridge]] to reduce walking |
*[[Teleportation|Teleports]] to [[Varrock]], [[Falador]] and [[Lumbridge]] to reduce walking |
||
| − | *A [[Lockpick]] (optional) |
+ | *A [[Lockpick]] (optional door can be picked without it) |
}} |
}} |
||
==Walkthrough== |
==Walkthrough== |
||
===Crashing in the cellar=== |
===Crashing in the cellar=== |
||
| ⚫ | |||
| − | [[File:The lost tribe 1.png|thumb|left|200px|The start of the quest on the {{FloorNumber|2}} in [[Lumbridge Castle]].]] |
||
| − | [[File:The lost tribe 2.png|thumb|220px|Talking to [[Sigmund]].]] |
||
| ⚫ | |||
| − | Talk to all of the people in |
+ | Talk to all of the people in {{Link|Lumbridge}}, including {{Link|Duke Horacio|type=chat}}, the {{Link|Cook (Lumbridge)|cook|type=chat}}, {{Link|Hans|type=chat}}, {{Link|Father Aereck|type=chat}}, {{Link|Donie|type=chat}}, {{Link|Bob (smith)|Bob|type=chat}}, as well as anyone else you find. One of them will tell you that they saw a goblin with huge eyes in the castle basement. Note: Once someone has told you that they saw a goblin, you do not need to question anyone else. |
{{Clear|left}} |
{{Clear|left}} |
||
| − | [[File:The |
+ | [[File:The Lost Tribe - the goblin brooch.png|thumb|220px|Finding the [[brooch]].]] |
| − | Report this to Sigmund |
+ | Report this to the duke. Sigmund will join in on the conversation, which will be slightly different if you have completed {{Link|Dragon Slayer}}. After the conversation is finished, you'll be able to go down to the basement and use your {{Link|pickaxe}} on the rubble. |
| − | Go down the trapdoor in the kitchen, and look for a blocked tunnel (rubble) on the east side of the cellar. |
+ | Go down the trapdoor in the kitchen, and look for a blocked tunnel (rubble) on the east side of the cellar. Use your pickaxe on it. Light your {{Link|Light sources|light source}}, then squeeze through, grab the {{Link|brooch|type=item}}, and turn back. Otherwise, you'll fall into a pit. |
| − | + | Go back to the duke and show him the brooch. You will be asked to show it to {{Link|Reldo|type=chat}} in the library (located north of the ground floor) in {{Link|Varrock Palace}}. |
|
===Investigating in the library=== |
===Investigating in the library=== |
||
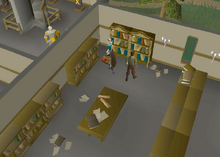
| − | [[File:The |
+ | [[File:The Lost Tribe - goblin symbol book location.png|thumb|220px|The bookshelf where the book is located]] |
| − | Show the |
+ | Show the {{Link|brooch|type=item}} to {{Link|Reldo|type=chat}}, the librarian. He'll tell you to search the bookcases for a book on goblin history. The book is at the northwestern portion of the room - the furthest up the west wall of the room. |
| − | Turn to the last page to see that the symbol on the brooch translates to " |
+ | Turn to the last page to see that the symbol on the brooch translates to "{{Link|Dorgeshuun}}, goblins of the strong spears". Keep the book for the remainder of the quest since it's very important. |
===Goblin history=== |
===Goblin history=== |
||
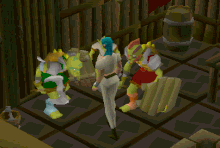
| − | Head to |
+ | Head to {{Link|Goblin Village}}, and talk to {{Link|General Wartface|type=chat}} and {{Link|General Bentnoze|type=chat}}. They'll argue about minor things just like they did in {{Link|Goblin Diplomacy}} but eventually teach you the goblin victory dance and ceremonial bow {{Link|emotes}}. |
During the dialogue with the Generals, you should choose the following options: |
During the dialogue with the Generals, you should choose the following options: |
||
| + | [[File:The Lost Tribe - goblin generals teach greetings.gif|thumb|220px|The goblin generals teach the player the goblin greetings.]] |
||
| ⚫ | |||
| + | # Have you ever heard of the Dorgeshuun? |
||
| − | # '''"Well either way they refused to fight."''' |
||
| ⚫ | |||
| ⚫ | |||
| − | # |
+ | # Well either way they refused to fight |
| ⚫ | |||
| + | # Well why not show me both greetings? |
||
| + | |||
You will then receive confirmation you've learned both emotes. Double check your emote page to be sure, then move on to the next section. |
You will then receive confirmation you've learned both emotes. Double check your emote page to be sure, then move on to the next section. |
||
===The tunnel system=== |
===The tunnel system=== |
||
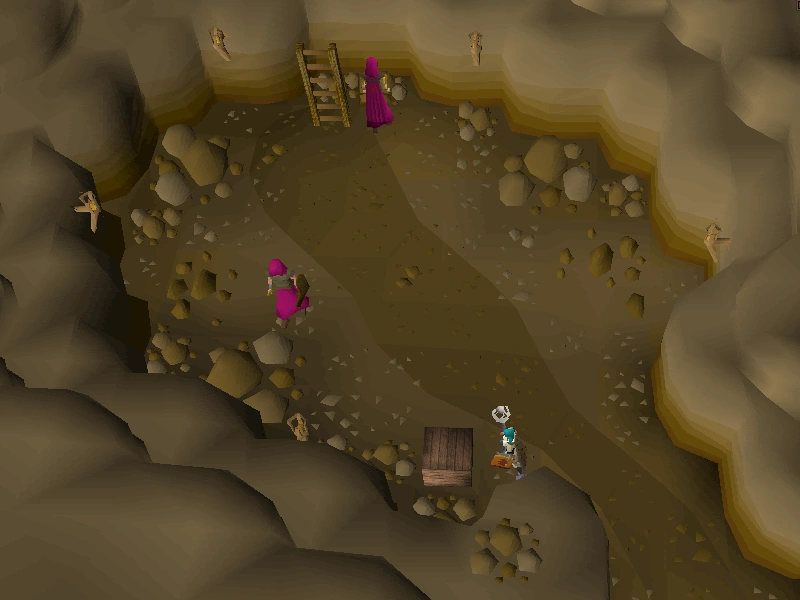
[[File:Dorgeshuun Tunnels.png|frame|centre|A map of the tunnels.]] |
[[File:Dorgeshuun Tunnels.png|frame|centre|A map of the tunnels.]] |
||
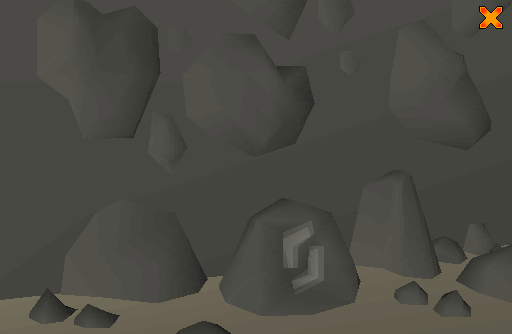
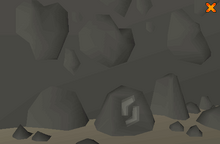
| − | Go back to |
+ | Go back to {{Link|Lumbridge}}, and talk to the duke. He will tell you to investigate the caves further. Go back into the tunnel. '''See the map for the correct path.''' If you go the wrong way, one of two things will happen: |
| − | [[File:The |
+ | [[File:The Lost Tribe - tunnel symbol.png|thumb|220px|One of the symbols on the rock.]] |
#A rock will fall in front of you or on top of you (if you're lucky). |
#A rock will fall in front of you or on top of you (if you're lucky). |
||
| − | #You'll fall down a trapdoor and end up in the main part of the |
+ | #You'll fall down a trapdoor and end up in the main part of the {{Link|Lumbridge Swamp Caves}}. If you're using a {{Link|candle|type=item}}, you will almost certainly die because the candle will constantly cause gas explosions, so use the {{Link|Home Teleport}} or another {{Link|Teleportation|teleport}}. (Alternatively, you can try to find your way back through the hole you created earlier, using {{Link|food}} and {{Link|Prayer|type=skill}} as necessary.) |
The way through the cave is the same for all players. See the map. |
The way through the cave is the same for all players. See the map. |
||
| − | [[File:The lost tribe 7.png|thumb|left|200px|The end of the tunnel journey.]] |
||
===Contact=== |
===Contact=== |
||
| − | When you reach the end, you'll find the |
+ | When you reach the end, you'll find the {{Link|Dorgeshuun}} tribe. Talk to {{Link|Mistag|type=chat}}, and do your {{Link|Goblin Bow}} in front of him. He will tell you that the Dorgeshuun are actually peaceful, and the Lumbridge kitchen thing was an accident. You'll also learn about the {{Link|goblin|type=chat}}s' backstory. Mistag will offer to take you back to {{Link|Lumbridge}} if you ask him to show you the way out. Agree. |
| ⚫ | |||
| − | [[File:The lost tribe 9.png|thumb|left|200px|The location of the [[H.A.M. Hideout]], just west of [[Lumbridge]]'s [[general store]].]] |
||
===Missing silverware=== |
===Missing silverware=== |
||
| + | [[File:The Lost Tribe - H.A.M. cult location.png|thumb|150px|Trapdoor location]] |
||
| − | Speak with the duke. Some |
+ | Speak with the duke. Some {{Link|silverware|type=item}} was stolen from the castle basement, and the goblins are being blamed for it. {{Link|Thieving#Pickpocketing|Pickpocket}} {{Link|Sigmund|type=chat}} and unlock his chest (located in the {{Link|spinning wheel}} room) to find some {{Link|H.A.M. robes}} (keep them as you'll need these for {{Link|Death to the Dorgeshuun}}, the sequel {{Link|Quests|quest}}). |
{{Clear}} |
{{Clear}} |
||
| − | [[File:The |
+ | [[File:The Lost Tribe - silverware location.png|thumb|160px|The [[silverware]]!]] |
| + | [[File:The Lost Tribe - the peace summit.png|thumb|220px|The meeting between Duke Horacio and Ur-tag.]] |
||
| − | Tell the |
+ | Tell the {{Link|Duke Horacio|duke|type=chat}} that Sigmund is part of {{Link|H.A.M.|Humans Against Monsters}}. Then exit through the west side of Lumbridge castle and go to the {{Link|H.A.M. Hideout}} (the trapdoor is directly west of the {{Link|general store}}; pick the lock, YOU DO NOT NEED A LOCK PICK). You will find the stolen silverware in the crates in the first room. Give it back to the duke, who will fire Sigmund. |
===Peace=== |
===Peace=== |
||
| − | The |
+ | The {{Link|Duke Horacio|duke|type=chat}} will give you a peace treaty. He will sign it and tell you to get the leader of the {{Link|Dorgeshuun}} to sign it as well. Go into the tunnel. This time, you won't have to navigate through yourself because you'll see a new goblin there, {{Link|Kazgar|type=chat}}, that you will follow to the mines. |
| + | {{Listen |
||
| − | |||
| + | |title = Peace summit |
||
| ⚫ | |||
| + | |align = right |
||
| + | |filename = The Lost Tribe - peace summit.ogg |
||
| + | |desc = The music track that only plays during the cutscene.}} |
||
| ⚫ | Talk to {{Link|Mistag|type=chat}}. He'll get the leader to sign it in the Lumbridge dining room with you and Mistag as witnesses. After the signing, you will see {{Link|Sigmund|type=chat}} outside, saying that the goblins will soon be destroyed. This leads to the sequel {{Link|Quests|quest}}, {{Link|Death to the Dorgeshuun}}. |
||
'''Congratulations! Quest complete!''' |
'''Congratulations! Quest complete!''' |
||
| ⚫ | |||
| − | |||
==Rewards== |
==Rewards== |
||
{{Quest rewards |
{{Quest rewards |
||
| Line 109: | Line 117: | ||
==Required for completing== |
==Required for completing== |
||
| − | * |
+ | *{{Link|Death to the Dorgeshuun}} |
| + | *{{Link|Wanted!|img=Sir Amik Varze chathead.png}} |
||
| − | *[[Wanted!]] |
||
| − | * |
+ | *{{Link|The Slug Menace}} |
| + | |||
| + | {{The Lost Tribe}} |
||
[[Category:Dorgeshuun]] |
[[Category:Dorgeshuun]] |
||
Latest revision as of 10:17, 8 June 2019
Details
| Start point | |
| Official difficulty | Intermediate |
| Description | Sigmund is the advisor to the Duke of Lumbridge, but the duke does not always take his advice.
When part of the cellar wall collapses the duke insists the damage was caused by an earthquake, but Sigmund is worried about a monster attack. If you investigate this mystery it will lead you through treacherous caves to uncover something lost by the Gods for thousands of years. |
| Length | Medium |
| Requirements |
Note: (Goblin Diplomacy can be completed when speaking with the goblin generals as part of The Lost Tribe quest; it is not required to start The Lost Tribe.) |
| Items required |
Recommended: |
| Enemies to defeat | None |
Walkthrough
Crashing in the cellar
Start by talking to ![]() Sigmund.
Sigmund.
Talk to all of the people in ![]() Lumbridge, including
Lumbridge, including ![]() Duke Horacio, the
Duke Horacio, the ![]() cook,
cook, ![]() Hans,
Hans, ![]() Father Aereck,
Father Aereck, ![]() Donie,
Donie, ![]() Bob, as well as anyone else you find. One of them will tell you that they saw a goblin with huge eyes in the castle basement. Note: Once someone has told you that they saw a goblin, you do not need to question anyone else.
Bob, as well as anyone else you find. One of them will tell you that they saw a goblin with huge eyes in the castle basement. Note: Once someone has told you that they saw a goblin, you do not need to question anyone else.


Finding the brooch.
Report this to the duke. Sigmund will join in on the conversation, which will be slightly different if you have completed ![]() Dragon Slayer. After the conversation is finished, you'll be able to go down to the basement and use your
Dragon Slayer. After the conversation is finished, you'll be able to go down to the basement and use your ![]() pickaxe on the rubble.
pickaxe on the rubble.
Go down the trapdoor in the kitchen, and look for a blocked tunnel (rubble) on the east side of the cellar. Use your pickaxe on it. Light your ![]() light source, then squeeze through, grab the
light source, then squeeze through, grab the ![]() brooch, and turn back. Otherwise, you'll fall into a pit.
brooch, and turn back. Otherwise, you'll fall into a pit.
Go back to the duke and show him the brooch. You will be asked to show it to ![]() Reldo in the library (located north of the ground floor) in
Reldo in the library (located north of the ground floor) in ![]() Varrock Palace.
Varrock Palace.
Investigating in the library

The bookshelf where the book is located
Show the ![]() brooch to
brooch to ![]() Reldo, the librarian. He'll tell you to search the bookcases for a book on goblin history. The book is at the northwestern portion of the room - the furthest up the west wall of the room.
Reldo, the librarian. He'll tell you to search the bookcases for a book on goblin history. The book is at the northwestern portion of the room - the furthest up the west wall of the room.
Turn to the last page to see that the symbol on the brooch translates to "![]() Dorgeshuun, goblins of the strong spears". Keep the book for the remainder of the quest since it's very important.
Dorgeshuun, goblins of the strong spears". Keep the book for the remainder of the quest since it's very important.
Goblin history
Head to ![]() Goblin Village, and talk to
Goblin Village, and talk to ![]() General Wartface and
General Wartface and ![]() General Bentnoze. They'll argue about minor things just like they did in
General Bentnoze. They'll argue about minor things just like they did in ![]() Goblin Diplomacy but eventually teach you the goblin victory dance and ceremonial bow
Goblin Diplomacy but eventually teach you the goblin victory dance and ceremonial bow ![]() emotes.
emotes.
During the dialogue with the Generals, you should choose the following options:

The goblin generals teach the player the goblin greetings.
- Have you ever heard of the Dorgeshuun?
- It doesn't really matter
- Well either way they refused to fight
- Well I found a brooch underground...
- Well why not show me both greetings?
You will then receive confirmation you've learned both emotes. Double check your emote page to be sure, then move on to the next section.
The tunnel system

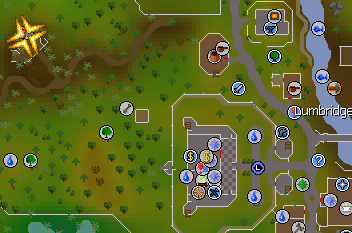
Go back to ![]() Lumbridge, and talk to the duke. He will tell you to investigate the caves further. Go back into the tunnel. See the map for the correct path. If you go the wrong way, one of two things will happen:
Lumbridge, and talk to the duke. He will tell you to investigate the caves further. Go back into the tunnel. See the map for the correct path. If you go the wrong way, one of two things will happen:
One of the symbols on the rock.
- A rock will fall in front of you or on top of you (if you're lucky).
- You'll fall down a trapdoor and end up in the main part of the
 Lumbridge Swamp Caves. If you're using a candle, you will almost certainly die because the candle will constantly cause gas explosions, so use the Home Teleport or another teleport. (Alternatively, you can try to find your way back through the hole you created earlier, using food and Prayer as necessary.)
The way through the cave is the same for all players. See the map.
Contact
When you reach the end, you'll find the ![]() Dorgeshuun tribe. Talk to
Dorgeshuun tribe. Talk to ![]() Mistag, and do your
Mistag, and do your ![]() Goblin Bow in front of him. He will tell you that the Dorgeshuun are actually peaceful, and the Lumbridge kitchen thing was an accident. You'll also learn about the
Goblin Bow in front of him. He will tell you that the Dorgeshuun are actually peaceful, and the Lumbridge kitchen thing was an accident. You'll also learn about the ![]() goblins' backstory. Mistag will offer to take you back to
goblins' backstory. Mistag will offer to take you back to ![]() Lumbridge if you ask him to show you the way out. Agree.
Lumbridge if you ask him to show you the way out. Agree.
Missing silverware

Trapdoor location
Speak with the duke. Some ![]() silverware was stolen from the castle basement, and the goblins are being blamed for it.
silverware was stolen from the castle basement, and the goblins are being blamed for it. ![]() Pickpocket
Pickpocket ![]() Sigmund and unlock his chest (located in the
Sigmund and unlock his chest (located in the ![]() spinning wheel room) to find some
spinning wheel room) to find some ![]() H.A.M. robes (keep them as you'll need these for
H.A.M. robes (keep them as you'll need these for ![]() Death to the Dorgeshuun, the sequel
Death to the Dorgeshuun, the sequel ![]() quest).
quest).

The silverware!

The meeting between Duke Horacio and Ur-tag.
Tell the ![]() duke that Sigmund is part of
duke that Sigmund is part of ![]() Humans Against Monsters. Then exit through the west side of Lumbridge castle and go to the
Humans Against Monsters. Then exit through the west side of Lumbridge castle and go to the ![]() H.A.M. Hideout (the trapdoor is directly west of the
H.A.M. Hideout (the trapdoor is directly west of the ![]() general store; pick the lock, YOU DO NOT NEED A LOCK PICK). You will find the stolen silverware in the crates in the first room. Give it back to the duke, who will fire Sigmund.
general store; pick the lock, YOU DO NOT NEED A LOCK PICK). You will find the stolen silverware in the crates in the first room. Give it back to the duke, who will fire Sigmund.
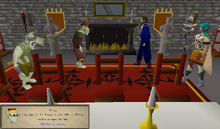
Peace
The ![]() duke will give you a peace treaty. He will sign it and tell you to get the leader of the
duke will give you a peace treaty. He will sign it and tell you to get the leader of the ![]() Dorgeshuun to sign it as well. Go into the tunnel. This time, you won't have to navigate through yourself because you'll see a new goblin there,
Dorgeshuun to sign it as well. Go into the tunnel. This time, you won't have to navigate through yourself because you'll see a new goblin there, ![]() Kazgar, that you will follow to the mines.
Kazgar, that you will follow to the mines.
Talk to ![]() Mistag. He'll get the leader to sign it in the Lumbridge dining room with you and Mistag as witnesses. After the signing, you will see
Mistag. He'll get the leader to sign it in the Lumbridge dining room with you and Mistag as witnesses. After the signing, you will see ![]() Sigmund outside, saying that the goblins will soon be destroyed. This leads to the sequel
Sigmund outside, saying that the goblins will soon be destroyed. This leads to the sequel ![]() quest,
quest, ![]() Death to the Dorgeshuun.
Death to the Dorgeshuun.
Congratulations! Quest complete!
Rewards
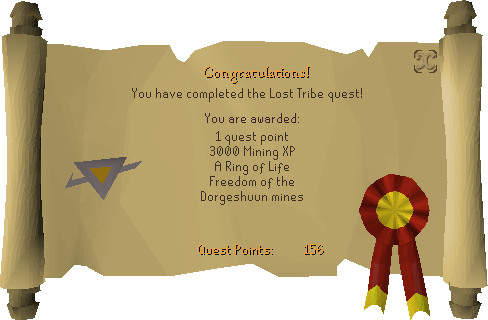
- 1 Quest point
- 3,000 Mining experience
- The ability to use the Goblin Bow and Goblin Salute emotes
- Access to the Dorgesh-Kaan mine
- A ring of life
- Access to Nardok's Bone Weapon's store where players can purchase the Dorgeshuun crossbow, Bone bolts and other bone weapons.
Required for completing
The Lost Tribe | |||||
|---|---|---|---|---|---|
| NPCs |
| ||||
| Items |
| ||||
| Locations | |||||
| Music | |||||
| Related | |||||