During a Treasure Trail, a coordinate clue is a clue scroll that contains a set of coordinates. Much like the real-world longitude & latitude geographic coordinate system, coordinates in RuneScape indicate a precise point somewhere on the surface where the next clue scroll, or potentially the treasure casket, is buried. Coordinates are presented in the following format:
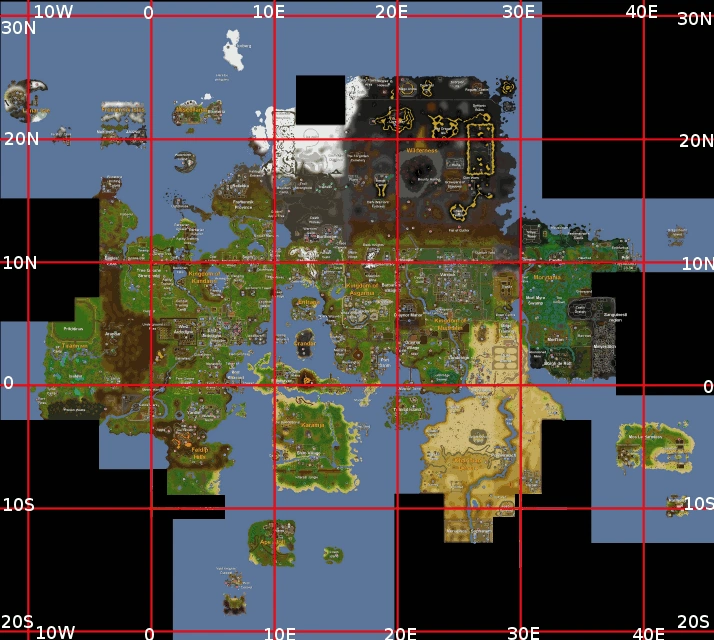
03 degrees 00 minutes north/south
02 degrees 00 minutes east/west
In RuneScape, one square of space is equivalent to 1.875 minutes.
Although a chart, sextant and watch may be used to determine one's present coordinates, players only need a spade in their inventory to dig up the clue.
On hard Treasure Trails, digging on the correct spot will cause a level 108 Saradomin wizard to appear, which must be defeated before the next clue scroll or the treasure casket may be dug up. If the coordinates are located in the Wilderness, a weaker level 65 Zamorak wizard will appear instead, which must also be defeated in order to dig up the next clue scroll or the treasure casket. Saradomin wizards are poisonous and use both Melee, using a Dragon dagger (p++), and the Magic spell Saradomin Strike. It is advised to wear dragonhide armour and use the Protect from Melee prayer when fighting Saradomin wizards. Zamorak wizards use only the spell Flames of Zamorak. It is advised to use the Protect from Magic prayer when fighting the Zamorak wizard in the Wilderness, and to look out for player-killers, as other players can interrupt your fight.
On elite Treasure Trails, digging on the correct spot will cause either a level 97 Armadylian guard or a level 125 Bandosian guard to appear, which must be defeated before the next clue scroll or the treasure casket may be dug up. Armadylian guards must be killed with either Ranged or Magic attacks, since they are in the form of an Aviansie. It is advised to use the Protect from Missiles prayer when fighting them, and Protect from Melee when fighting Bandosian guards.
Due to the current threat of player-killers, if the coordinates for your scroll is near level 36 Wilderness, it is advisable to use the waka canoe, which requires 57 Woodcutting. This can take you to level 36 Wilderness so that potential player-killers don't immediately spot you going into the Wilderness and kill you. In addition, potential player-killers won't know whether you went into the Wilderness or to a different area. As a result, you should go to one or more different locations, and then take the waka to the Wilderness. This is because if another player spots you in the Wilderness, they might attempt to kill you. Using a games necklace and teleporting to Corporeal Beast works in similar fashion.
On master Treasure Trails, digging in the correct spot will cause either three Ancient Wizards (levels 112, 98, 98) in multi-combat, or a level 140 Brassican Mage, which need to be defeated before the next clue scroll or the treasure casket may be dug up. If the coordinates are located in a multi-combat area, three Ancient wizards each attacking with a unique attack style. Melee wizards are poisonous with poison dealing 8 damage to a player. In single-combat zones, a Brassican Mage will appear, and its attacks cannot be stopped by protection prayers.
Following is a list of all known coordinate clues and their corresponding locations. The list is organised into ascending numerical value (for example, 00:00 north first, then 00:05 south, then 00:13 north, continuing accordingly). Shorthand writing is used together with normal writing. An example: 09.34N, 25.12E = 09 degrees and 34 minutes north, 25 degrees and 12 minutes east.
Remember: You must have a spade with you to dig up coordinate clues.
Note that some of the clues may require skill or quest requirements before you will be able to get to that location.' These quests, which must be finished or partially completed, include: Bone Voyage, Regicide, Legends' Quest, Nature Spirit, The Grand Tree, Fairytale II - Cure a Queen, Troll Stronghold, Cabin Fever, The Fremennik Trials, and Watchtower. Some coordinates will also require a certain skill levels to complete the clue, though the required level is low.
Medium Coordinates
| Coordinates | Shorthand | Requirements | Fight |
|---|---|---|---|
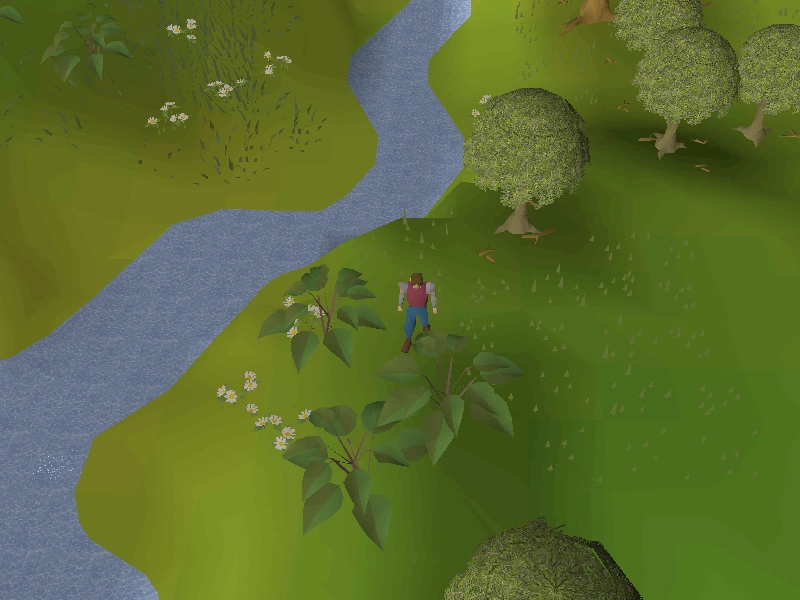
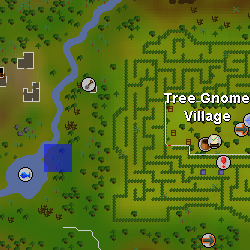
| 00 degrees 05 minutes south, 01 degrees 13 minutes east |
00.05S, 01.13E |
None. | |
| Image | Map | ||
|
| ||
| Location notes | |||
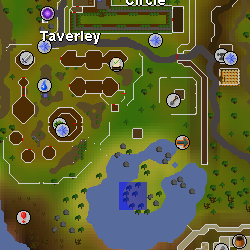
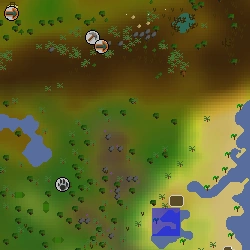
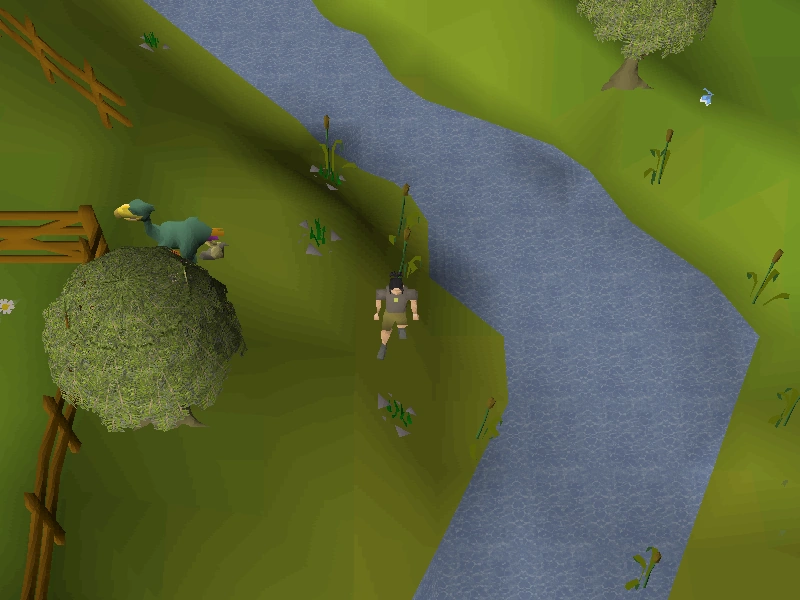
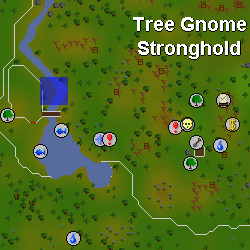
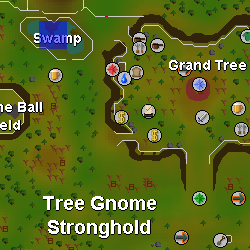
| West of the Tree Gnome Village, almost directly south of the fruit tree patch. On the east side of the river from the Observatory. | |||
| Coordinates | Shorthand | Requirements | Fight |
|---|---|---|---|
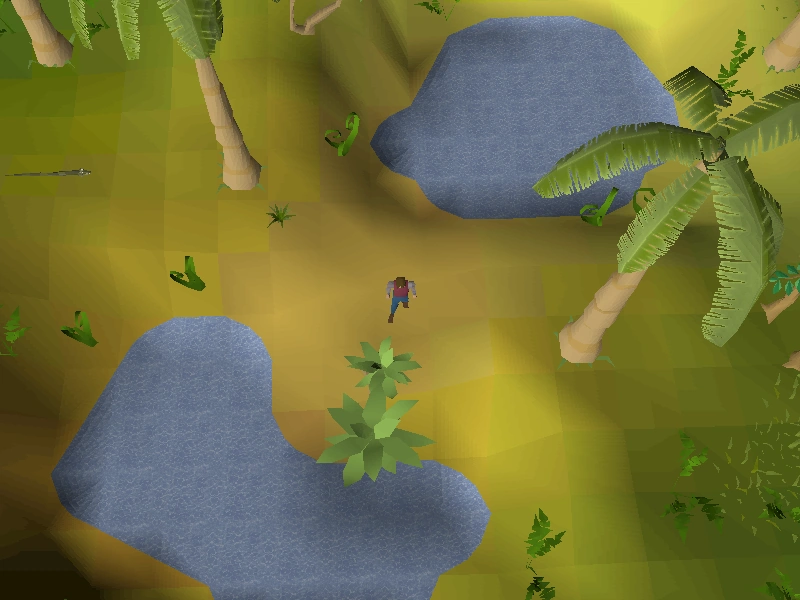
| 00 degrees 13 minutes south, 13 degrees 58 minutes east |
00.13S, 13.58E |
None. | |
| Image | Map | ||
|
| ||
| Location notes | |||
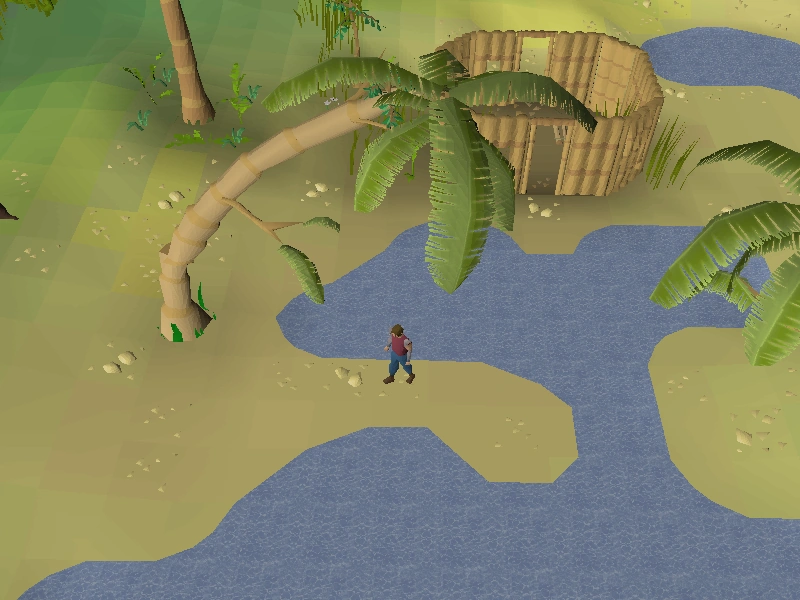
| On Karamja, west of the general store in the free-to-play section of the island, in the middle of the two small lakes. Close to Amulet of glory teleport. | |||
| Coordinates | Shorthand | Requirements | Fight |
|---|---|---|---|
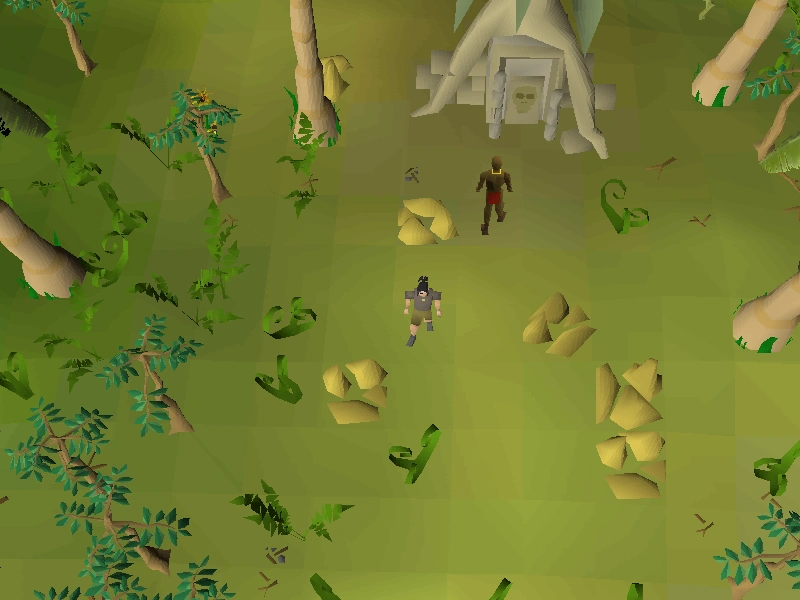
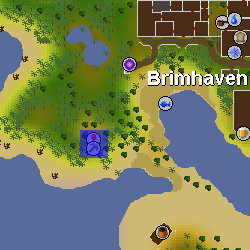
| 00 degrees 18 minutes south, 09 degrees 28 minutes east |
00.18S, 09.28E |
None. | |
| Image | Map | ||
|
| ||
| Location notes | |||
| South-west of Brimhaven at the gold mine near the entrance to the Brimhaven Dungeon. Dig one space south of the gold rock in front of the dungeon door. | |||
| Coordinates | Shorthand | Requirements | Fight |
|---|---|---|---|
| 00 degrees 20 minutes south, 23 degrees 15 minutes east |
00.20S, 23.15E |
None. | |
| Image | Map | ||
|
| ||
| Location notes | |||
| South of the Water altar ruins. | |||
| Coordinates | Shorthand | Requirements | Fight |
|---|---|---|---|
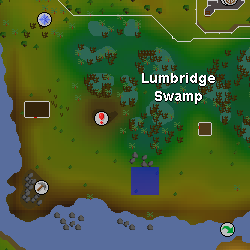
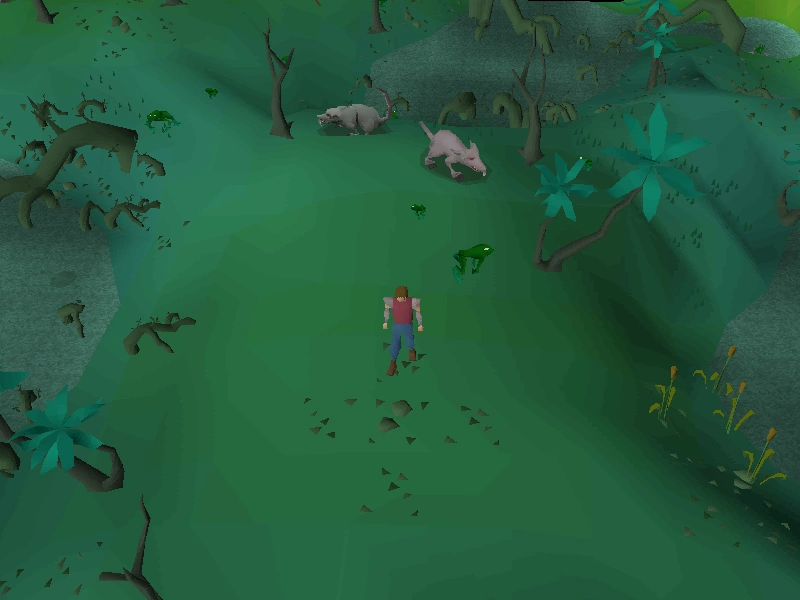
| 00 degrees 30 minutes north, 24 degrees 16 minutes east |
00.30N, 24.16E |
None. | |
| Image | Map | ||
|
| ||
| Location notes | |||
| North-east of the Zanaris shed entrance located in the Lumbridge Swamp. | |||
| Coordinates | Shorthand | Requirements | Fight |
|---|---|---|---|
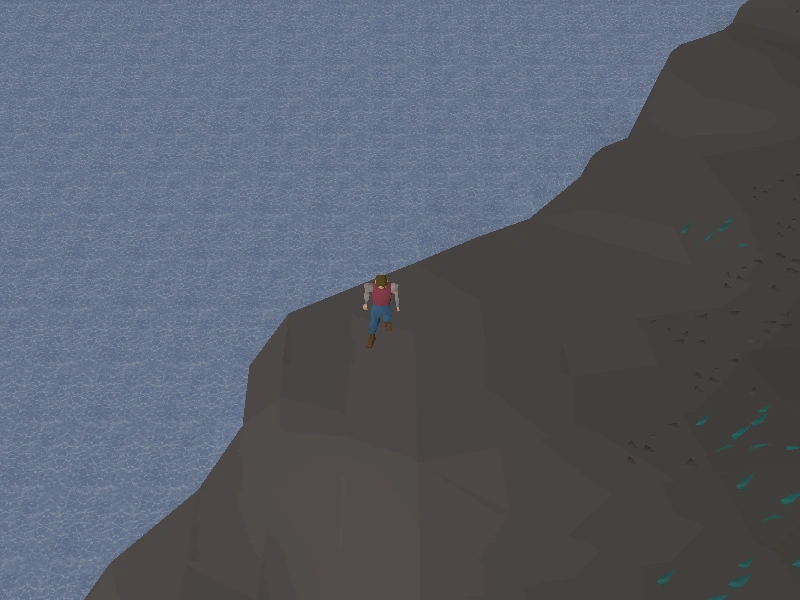
| 00 degrees 31 minutes south, 17 degrees 43 minutes east |
00.31S, 17.43E |
None. | |
| Image | Map | ||
|
| ||
| Location notes | |||
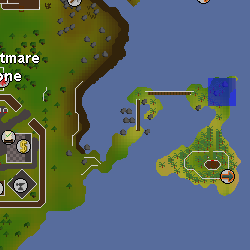
| South of Port Sarim, just south of the ladder to the Asgarnian Ice Dungeon, on the edge of the cliff. Close to fairy ring AIQ. | |||
| Coordinates | Shorthand | Requirements | Fight |
|---|---|---|---|
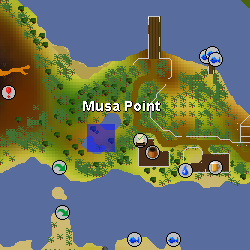
| 01 degrees 18 minutes south, 14 degrees 15 minutes east |
01.18S, 14.15E |
None. | |
| Image | Map | ||
|

| ||
| Location notes | |||
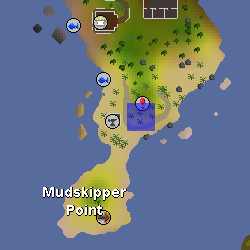
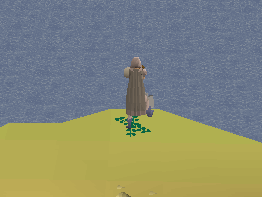
| Across the water from Musa Point, on the western seaweed spawn next to the river. Tiadeche from the Tai Bwo Wannai Trio quest can be found to the east. Use fairy ring code DKP or the gnome glider transport to Karamja. | |||
| Coordinates | Shorthand | Requirements | Fight |
|---|---|---|---|
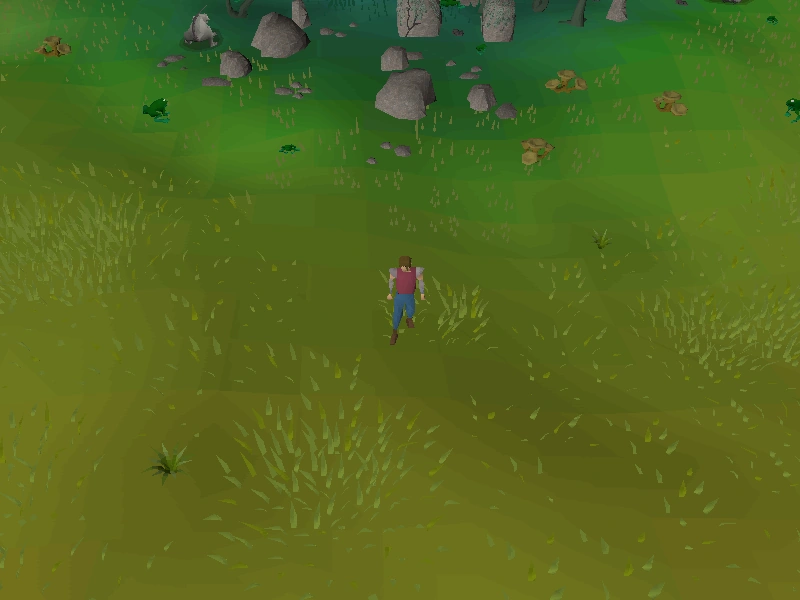
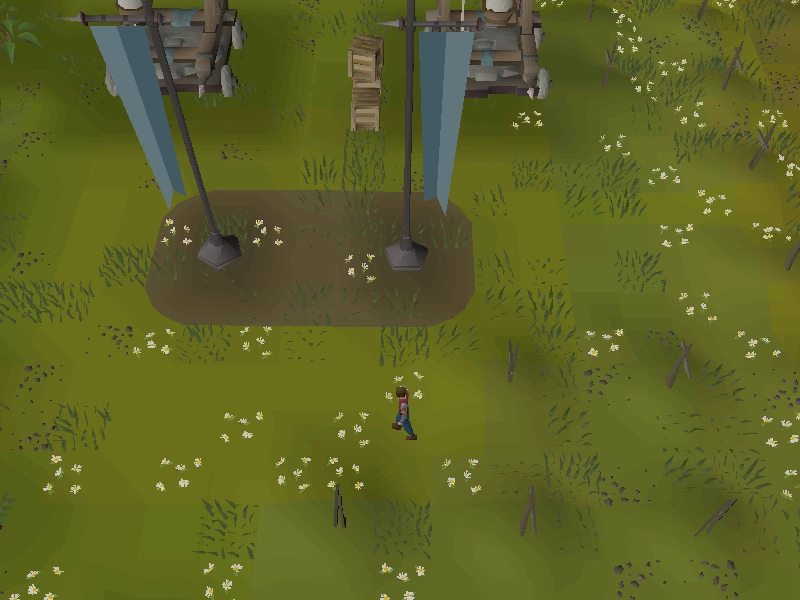
| 01 degrees 26 minutes north, 08 degrees 01 minutes east |
01.26N, 08.01E |
10 |
|
| Image | Map | ||
|
| ||
| Location notes | |||
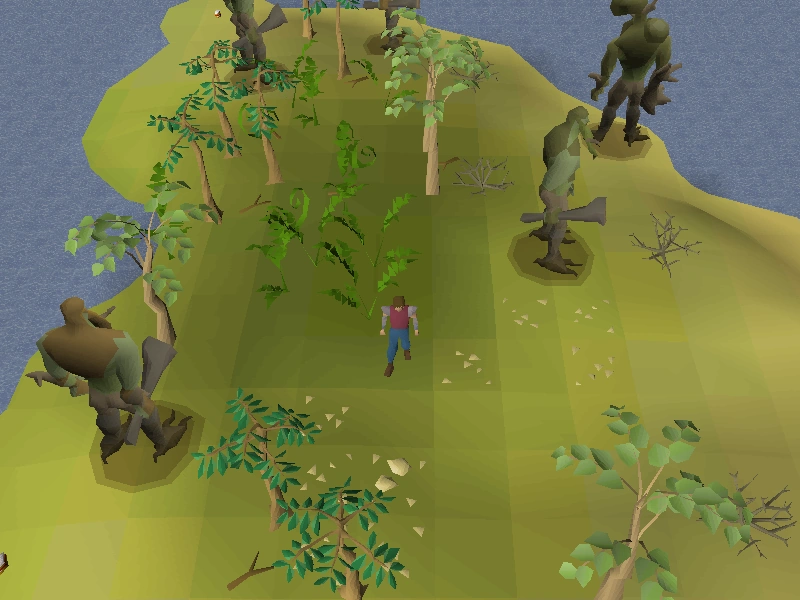
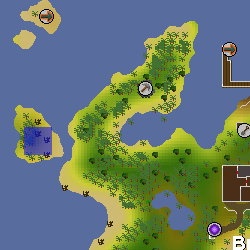
| In the centre of Moss Giant Island west of Brimhaven. The island can be found by swinging on the rope swings west of Brimhaven. | |||
| Coordinates | Shorthand | Requirements | Fight |
|---|---|---|---|
| 01 degrees 35 minutes south, 07 degrees 28 minutes east |
01.35S, 07.28E |
None. | |
| Image | Map | ||
|
| ||
| Location notes | |||
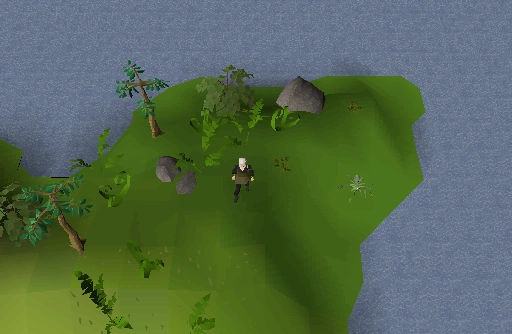
| On the penisula to Hazelmere's house, directly east of Yanille. Use the fairy ring code CLS and run north. Dig between a boulder, a leafy tree, and a creeping plant. | |||
| Coordinates | Shorthand | Requirements | Fight |
|---|---|---|---|
| 02 degrees 43 minutes south, 33 degrees 26 minutes east |
02.43S, 33.26E |
None. | |
| Image | Map | ||
|
| ||
| Location notes | |||
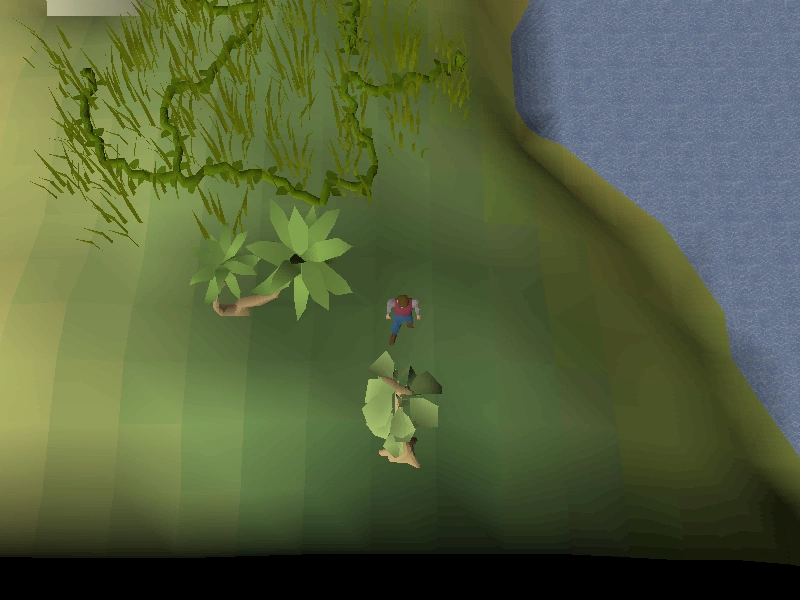
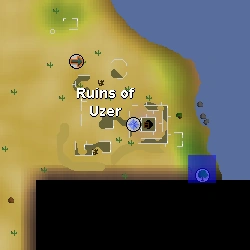
| Directly north of the teak tree south-east of Uzer. Can be reached relatively easily via fairy ring DLQ in Nardah by running north and then east following the map border. | |||
| Coordinates | Shorthand | Requirements | Fight |
|---|---|---|---|
| 02 degrees 48 minutes north, 22 degrees 30 minutes east |
02.48N, 22.30E |
None. | |
| Image | Map | ||

|
| ||
| Location notes | |||
| Just west of the trapdoor leading to the H.A.M. Hideout, dig 2 spaces east and 1 south of the nearest tree to the building. | |||
| Coordinates | Shorthand | Requirements | Fight |
|---|---|---|---|
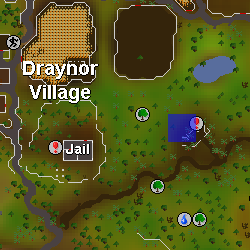
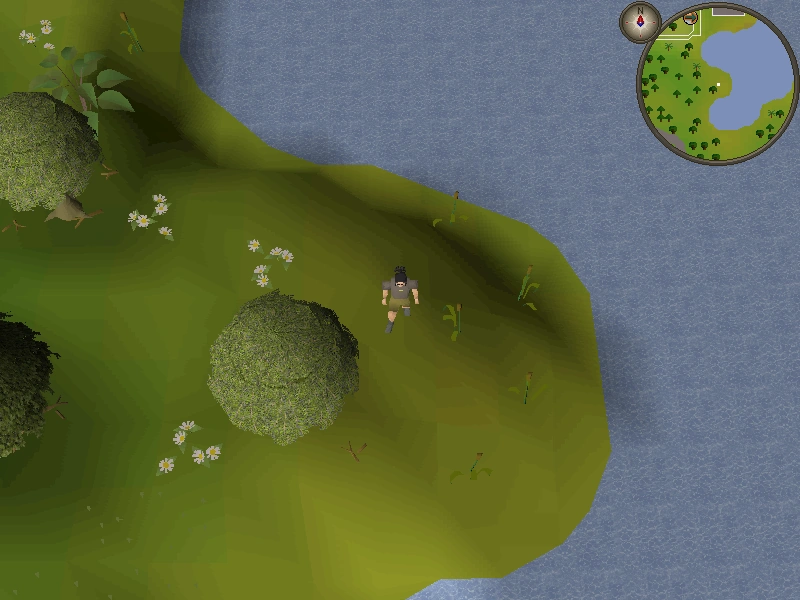
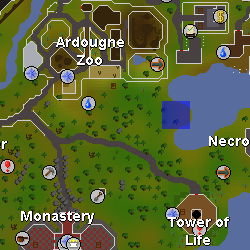
| 02 degrees 50 minutes north, 06 degrees 20 minutes east |
02.50N, 06.20E |
None. | |
| Image | Map | ||
|
| ||
| Location notes | |||
| South of Ardougne Zoo, on a small cape. Can be reached easily via DJP next to the Tower of Life. | |||
| Coordinates | Shorthand | Requirements | Fight |
|---|---|---|---|
| 03 degrees 07 minutes south, 03 degrees 41 minutes west |
03.07S, 03.41W |
None. | |
| Image | Map | ||
|
| ||
| Location notes | |||
| Just south-west of Castle Wars, fairy ring code BKP. | |||
| Coordinates | Shorthand | Requirements | Fight |
|---|---|---|---|
| 03 degrees 35 minutes south, 13 degrees 35 minutes east |
03.35S, 13.35E |
None. | |
| Image | Map | ||
|
| ||
| Location notes | |||
| On Karamja, north of the nature altar. | |||
| Coordinates | Shorthand | Requirements | Fight |
|---|---|---|---|
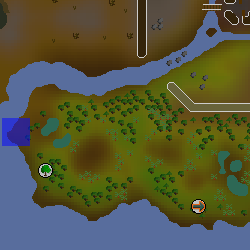
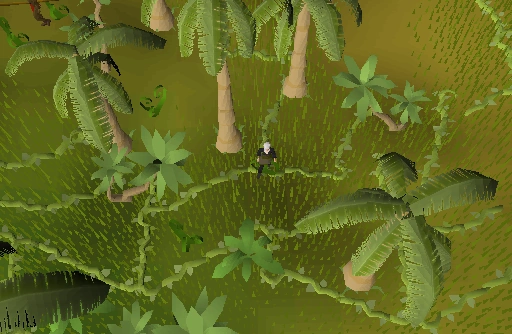
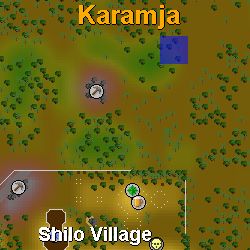
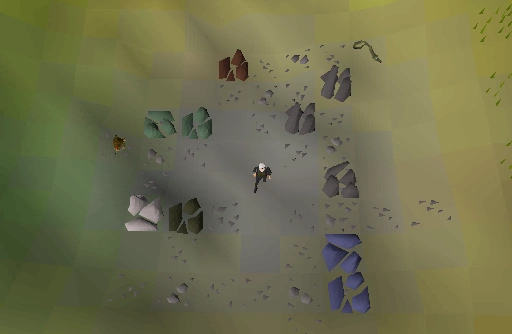
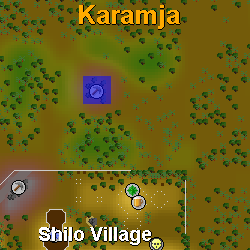
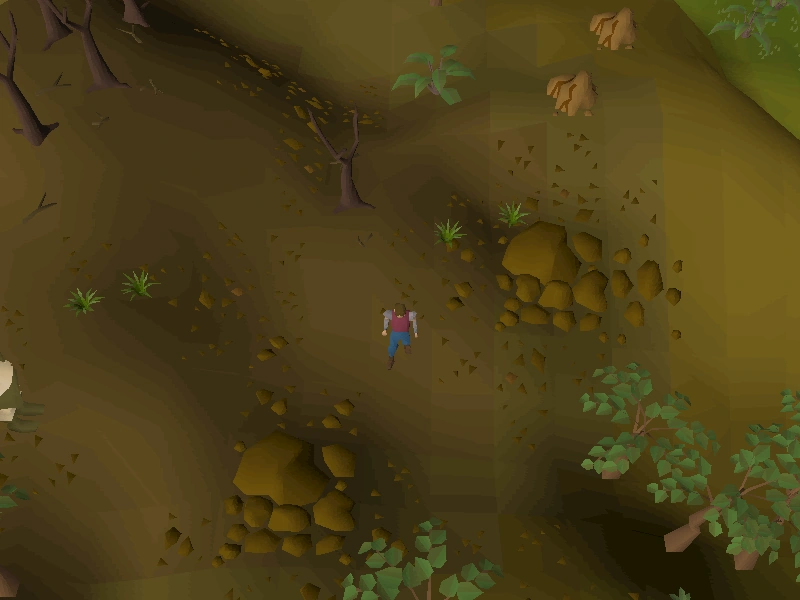
| 04 degrees 00 minutes south, 12 degrees 46 minutes east |
04.00S, 12.46E |
None. | |
| Image | Map | ||
|
| ||
| Location notes | |||
| In the centre of the mine, north of Shilo Village. This is not the gem rock mine, but rather the one just north-west of the nature altar, where you find volencia moss during the Jungle Potion quest. Dig two spaces north-west of a mithril rock. You can use fairy ring code CKR and run north. | |||
| Coordinates | Shorthand | Requirements | Fight |
|---|---|---|---|
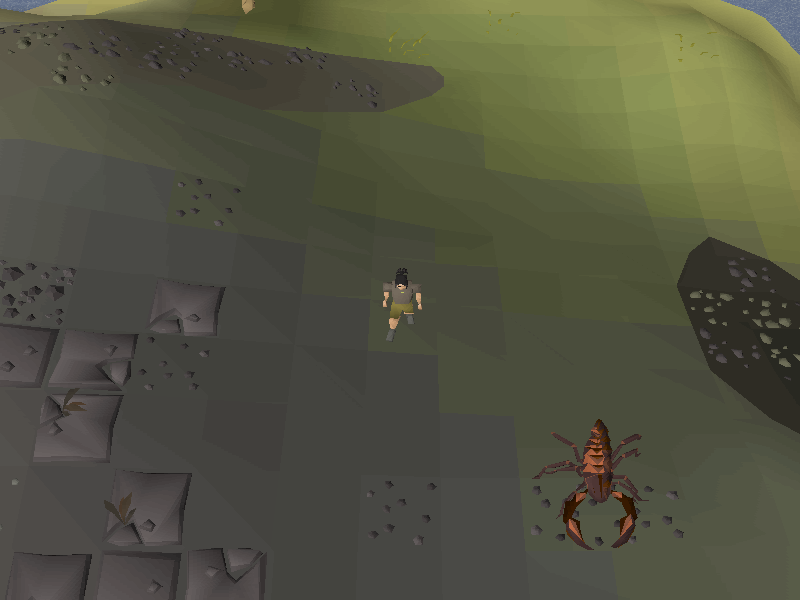
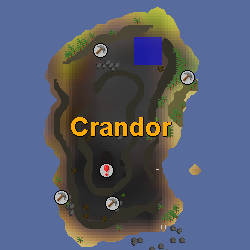
| 04 degrees 13 minutes north, 12 degrees 45 minutes east |
04.13N, 12.45E |
Partial completion of Dragon Slayer | |
| Image | Map | ||
|
| ||
| Location notes | |||
| North side of Crandor. King Scorpions can be aggressive to low levelled players. | |||
| Coordinates | Shorthand | Requirements | Fight |
|---|---|---|---|
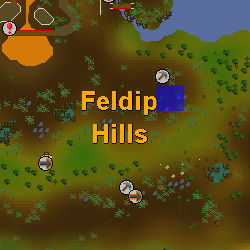
| 05 degrees 20 minutes south, 04 degrees 28 minutes east |
05.20S, 04.28E |
None. | |
| Image | Map | ||
|
| ||
| Location notes | |||
| Feldip Hills, south-east of Gu'Tanoth and north of fairy ring code AKS. | |||
| Coordinates | Shorthand | Requirements | Fight |
|---|---|---|---|
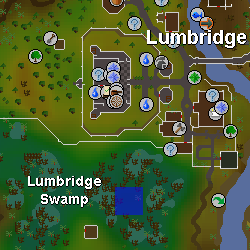
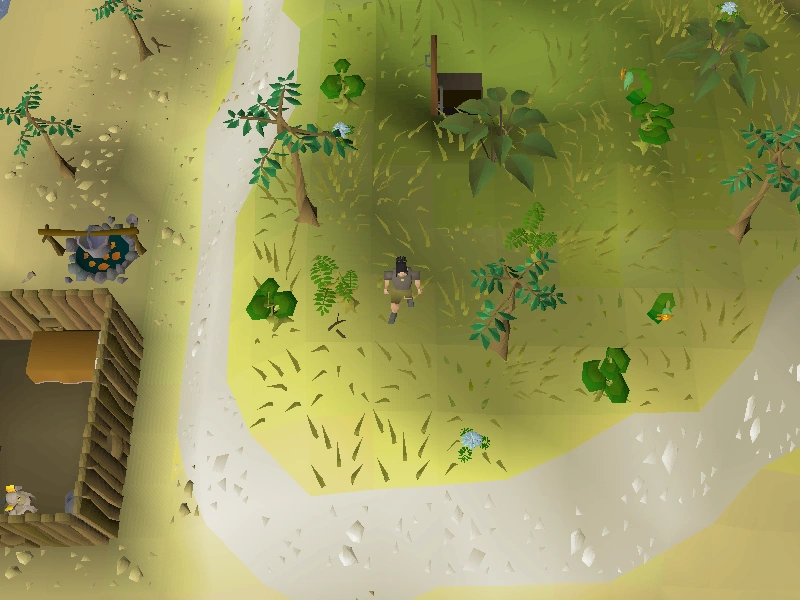
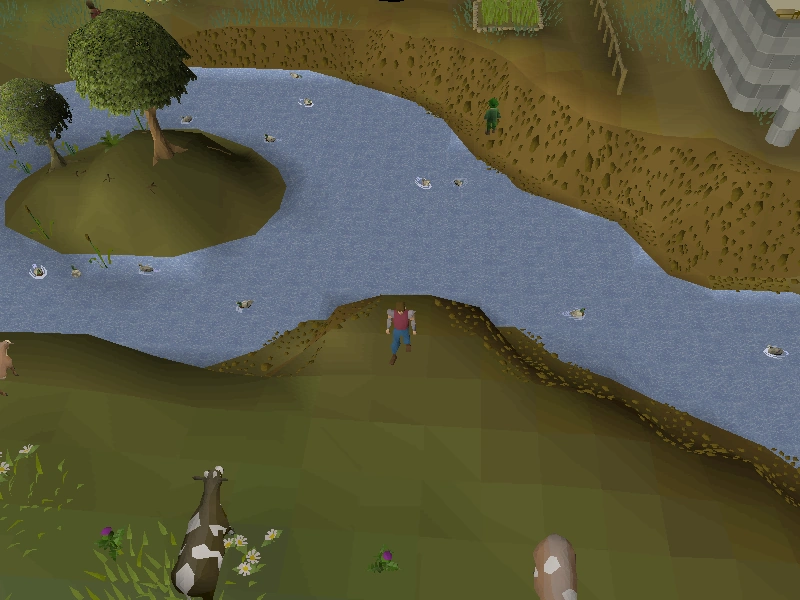
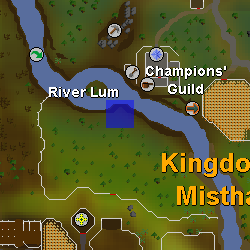
| 05 degrees 43 minutes north, 23 degrees 05 minutes east |
05.43N, 23.05E |
None. | |
| Image | Map | ||
|
| ||
| Location notes | |||
| Just south of the Champions' Guild, opposite side of the River Lum in Lumbridge | |||
| Coordinates | Shorthand | Requirements | Fight |
|---|---|---|---|
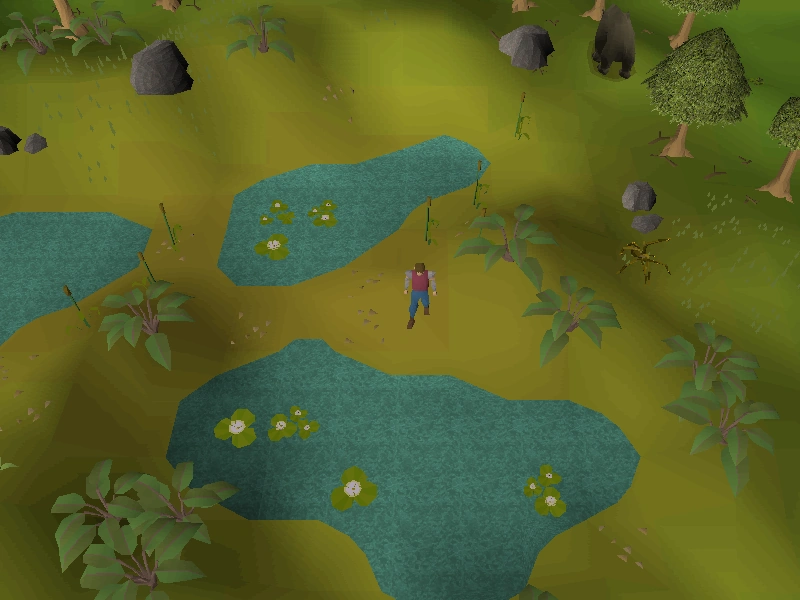
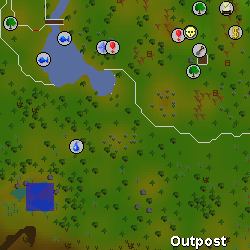
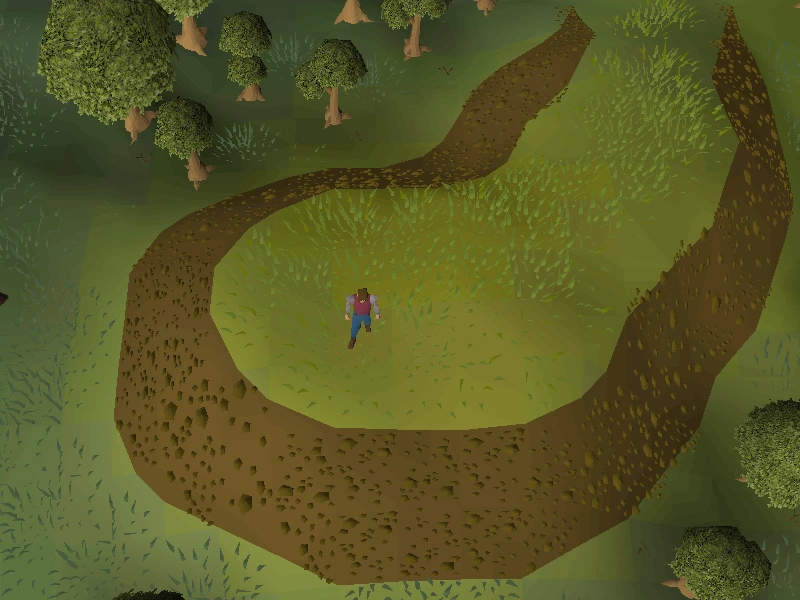
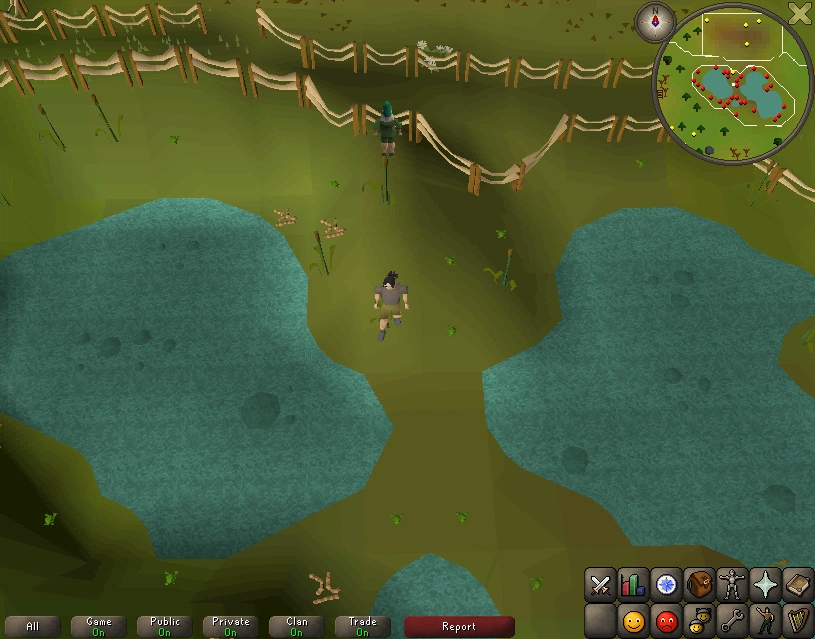
| 06 degrees 31 minutes north, 01 degrees 46 minutes west |
06.31N, 01.46W |
None. | |
| Image | Map | ||
|
| ||
| Location notes | |||
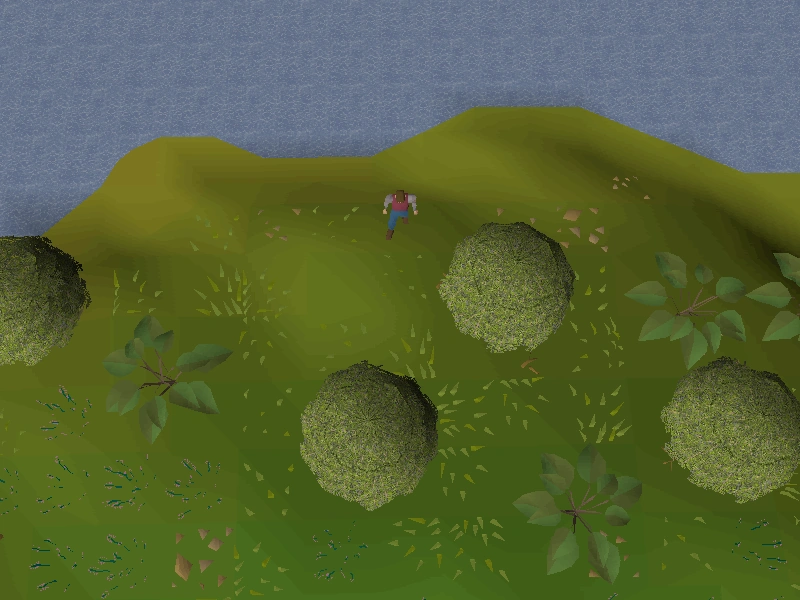
| Travel south-west of the Tree Gnome Stronghold, and you will come across three ponds. Dig in between the two eastern ponds. Easily reached by teleporting with the Necklace of passage by teleporting to the Outpost. | |||
| Coordinates | Shorthand | Requirements | Fight |
|---|---|---|---|
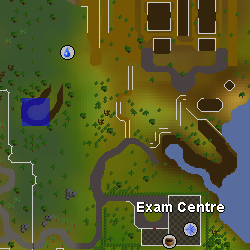
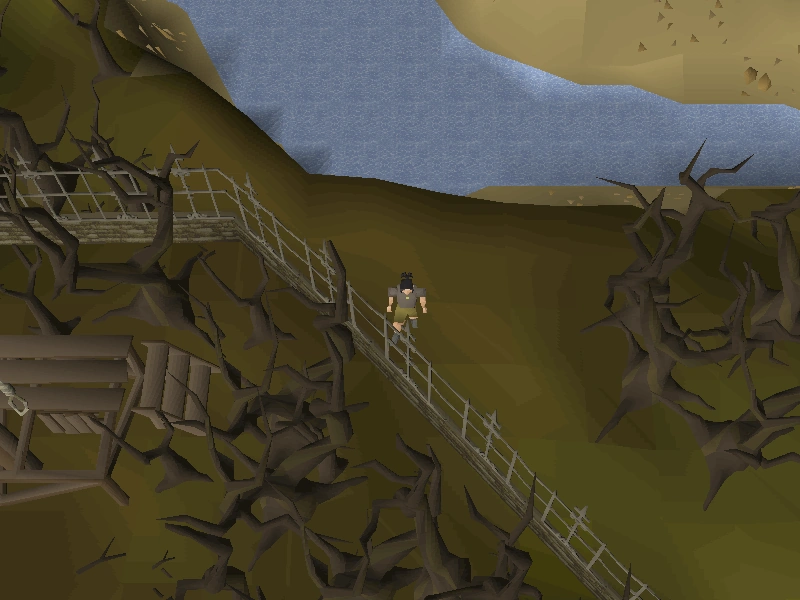
| 06 degrees 41 minutes north, 27 degrees 15 minutes east |
06.41N, 27.15E |
None | |
| Image | Map | ||
|
| ||
| Location notes | |||
| Dig on the hill north-west of the Exam Centre. | |||
| Coordinates | Shorthand | Requirements | Fight |
|---|---|---|---|
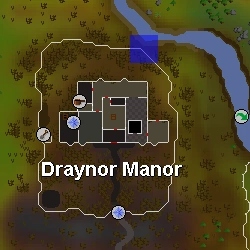
| 06 degrees 58 minutes north, 21 degrees 16 minutes east |
06.58N, 21.16E |
None. | |
| Image | Map | ||
|
| ||
| Location notes | |||
| Located at the north-east fence outside of Draynor Manor, on the southern side of the River Lum. | |||
| Coordinates | Shorthand | Requirements | Fight |
|---|---|---|---|
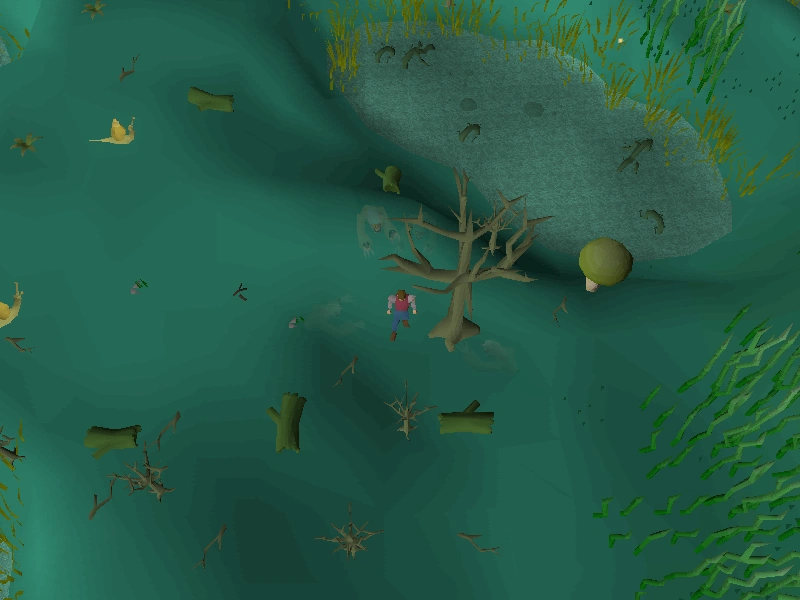
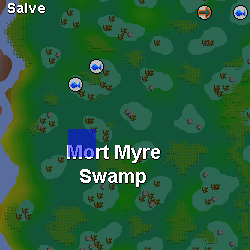
| 07 degrees 05 minutes north, 30 degrees 56 minutes east |
07.05N, 30.56E |
Priest in Peril (to enter Canifis) | |
| Image | Map | ||
|
| ||
| Location notes | |||
| In Mort Myre Swamp, north of the Nature Grotto. Next pond south of the two most western fishing spots. Dig west of a rotting swamp tree. Note that there are ghasts in the swamp, so be sure to bring some druid pouches. One can use fairy ring BKR and run south-west. | |||
| Coordinates | Shorthand | Requirements | Fight |
|---|---|---|---|
| 07 degrees 33 minutes north, 15 degrees 00 minutes east |
07.33N, 15.00E |
None. | |
| Image | Map | ||
|
| ||
| Location notes | |||
| South-east of Taverley, on the peninsula where the Lady of the Lake wanders around. Dig north of the non-examinable bush on the western part of the peninsula. | |||
| Coordinates | Shorthand | Requirements | Fight |
|---|---|---|---|
| 08 degrees 11 minutes south, 04 degrees 48 minutes east |
08.11S, 04.48E |
Spade | |
| Image | Map | ||
|
| ||
| Location notes | |||
| South-east edge of Feldip Hills, by the crimson swifts. South-east of fairy ring AKS. | |||
| Coordinates | Shorthand | Requirements | Fight |
|---|---|---|---|
| 08 degrees 33 minutes north, 01 degrees 39 minutes west |
08.33N, 01.39W |
None. | |
| Image | Map | ||
|
| ||
| Location notes | |||
| At Tree Gnome Stronghold, in the south-western section there is a bridge, and a pen containing terrorbirds. Open the gate in the east of the pen and go to the edge of the river as far east as possible and dig there. | |||
| Coordinates | Shorthand | Requirements | Fight |
|---|---|---|---|
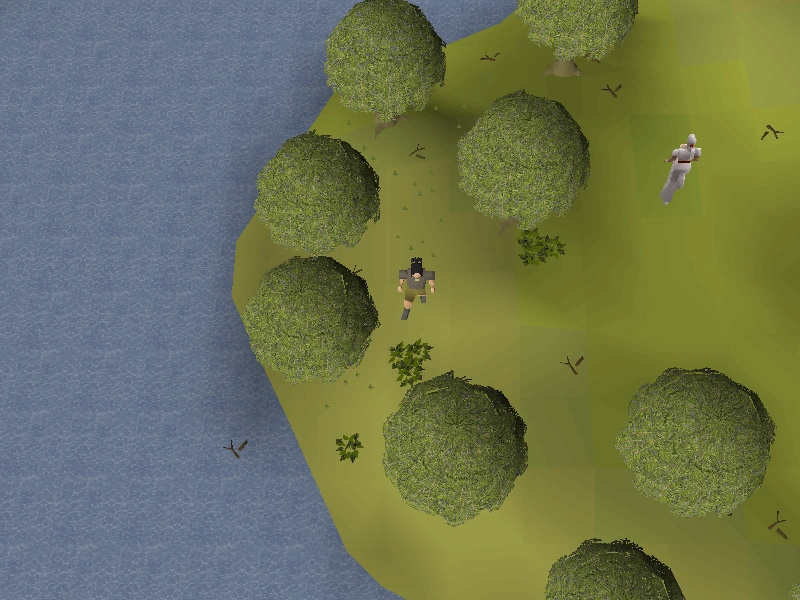
| 09 degrees 33 minutes north, 02 degrees 15 minutes east |
09.33N, 02.15E |
Started Waterfall Quest
Rope |
|
| Image | Map | ||
|
| ||
| Location notes | |||
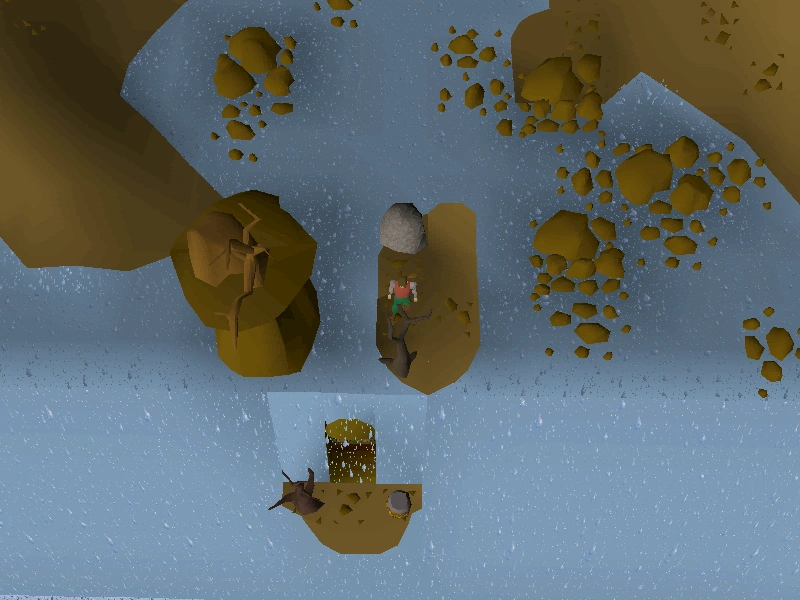
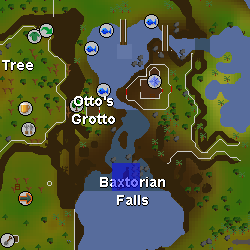
| Go to the Baxtorian Falls, board the log raft, use a rope with the rock to get to the second island with the dead tree. Dig north of the dead tree. | |||
| Coordinates | Shorthand | Requirements | Fight |
|---|---|---|---|
| 09 degrees 35 minutes north, 01 degrees 50 minutes west |
09.35N, 01.50W |
None. | |
| Image | Map | ||
|
| ||
| Location notes | |||
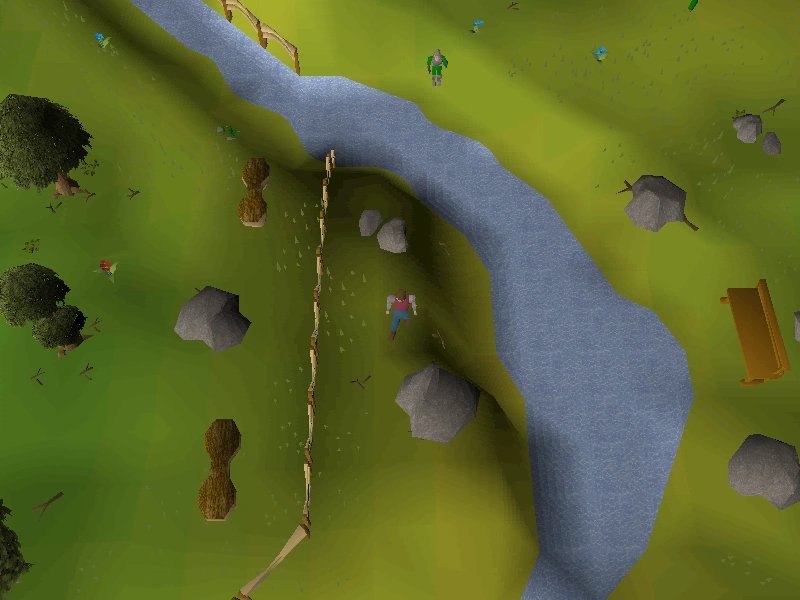
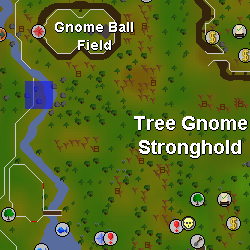
| This is on the west side of the river in the Gnome Stronghold. Walk north of the terrorbird pen and dig right above the rock. | |||
| Coordinates | Shorthand | Requirements | Fight |
|---|---|---|---|
| 09 degrees 48 minutes north, 17 degrees 39 minutes east |
09.48N, 17.39E |
None. | |
| Image | Map | ||
|
| ||
| Location notes | |||
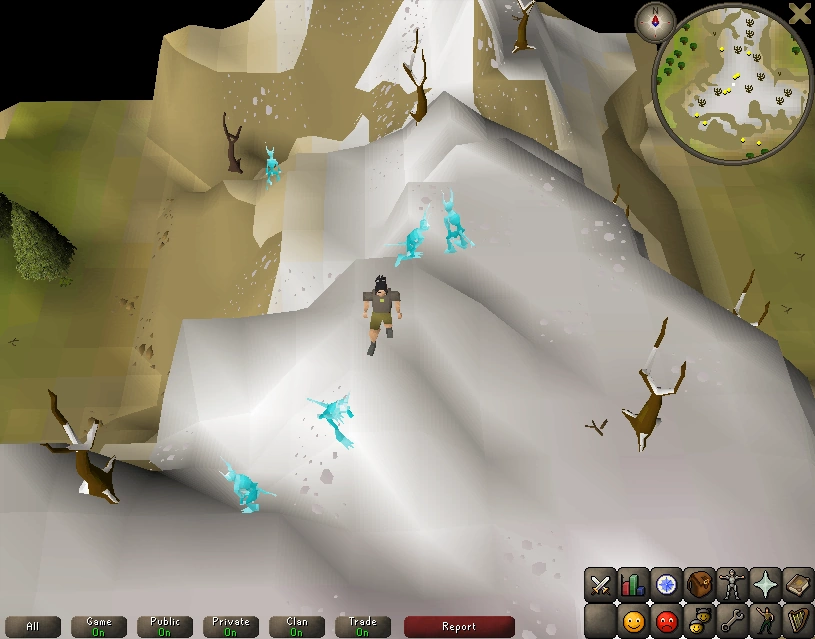
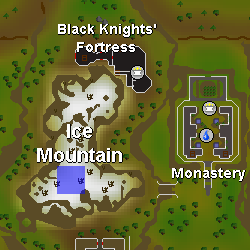
| Ice Mountain, located north of Barbarian Village. | |||
| Coordinates | Shorthand | Requirements | Fight |
|---|---|---|---|
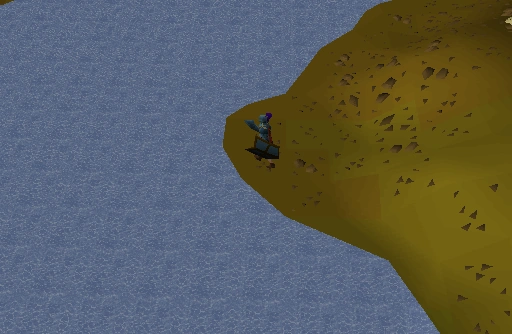
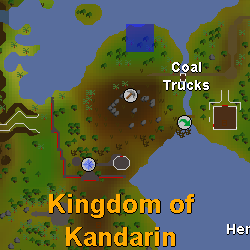
| 10 degrees 45 minutes north, 04 degrees 31 minutes east |
10.45N, 04.31E |
20 Agility for Shortcut | |
| Image | Map | ||
|
| ||
| Location notes | |||
| By the shore line north of the Coal Trucks. | |||
| Coordinates | Shorthand | Requirements | Fight |
|---|---|---|---|
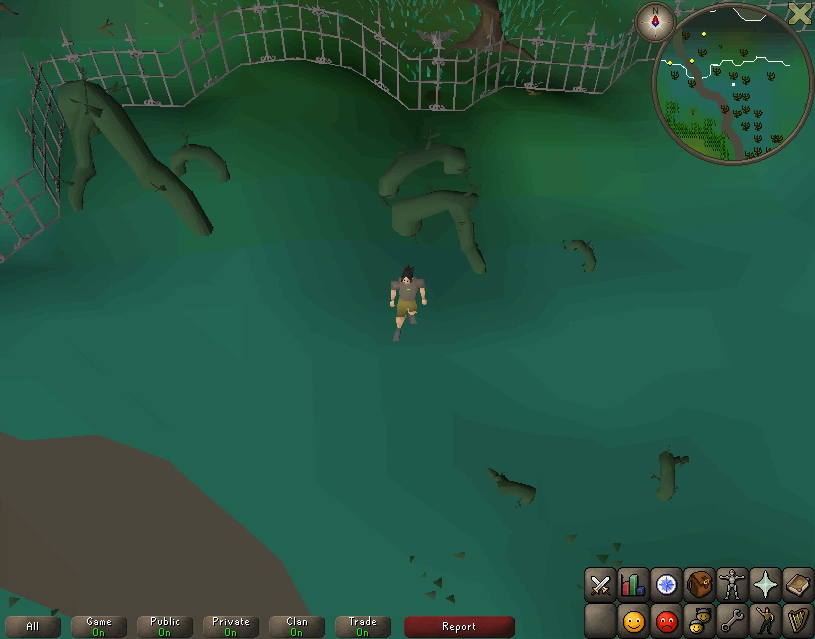
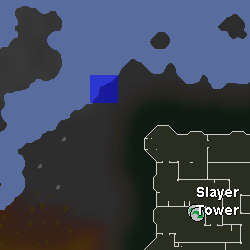
| 11 degrees 03 minutes north, 31 degrees 20 minutes east |
11.03N, 31.20E |
Completion of Priest in Peril | |
| Image | Map | ||
|
| ||
| Location notes | |||
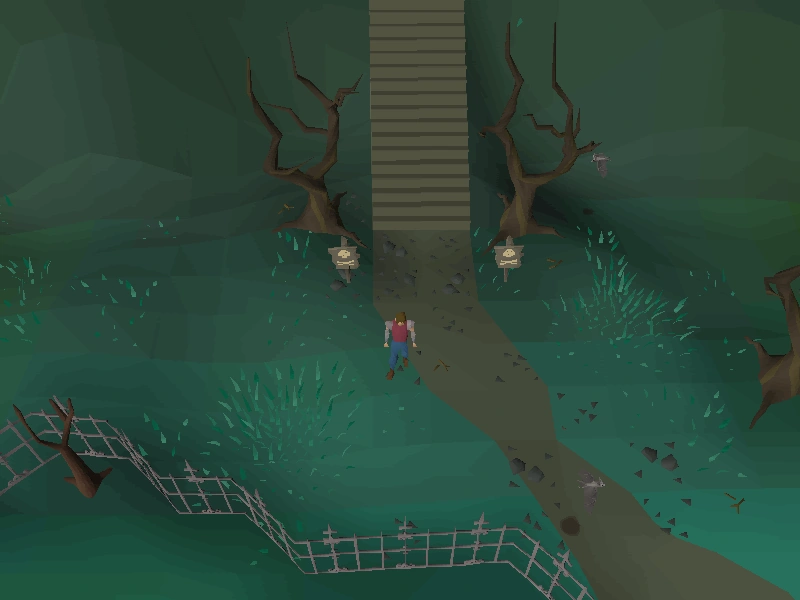
| South of the big roots that are found east of the path to the Slayer Tower. North of the fairy ring code CKS. | |||
| Coordinates | Shorthand | Requirements | Fight |
|---|---|---|---|
| 11 degrees 05 minutes north, 00 degrees 45 minutes west |
11.05N, 00.45W |
None. | |
| Image | Map | ||
|
| ||
| Location notes | |||
| In the swamp located in the north-west corner of the Tree Gnome Stronghold, west of the Grand Tree, directly south of the tortoise pen. | |||
| Coordinates | Shorthand | Requirements | Fight |
|---|---|---|---|
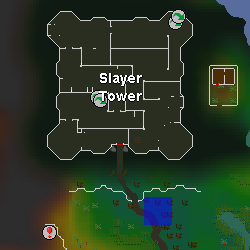
| 11 degrees 18 minutes north, 30 degrees 54 minutes east |
11.18N, 30.54E |
Completion of Priest in Peril. | |
| Image | Map | ||
|
| ||
| Location notes | |||
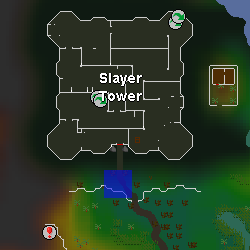
| On the path to the Slayer Tower, just before the entrance. Easily reached by teleporting with fairy ring code CKS. | |||
| Coordinates | Shorthand | Requirements | Fight |
|---|---|---|---|
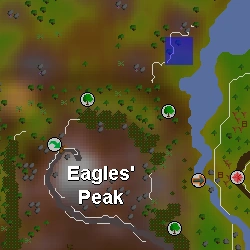
| 11 degrees 33 minutes north, 02 degrees 24 minutes west |
11.33N, 02.24W |
None. | |
| Image | Map | ||
|
| ||
| Location notes | |||
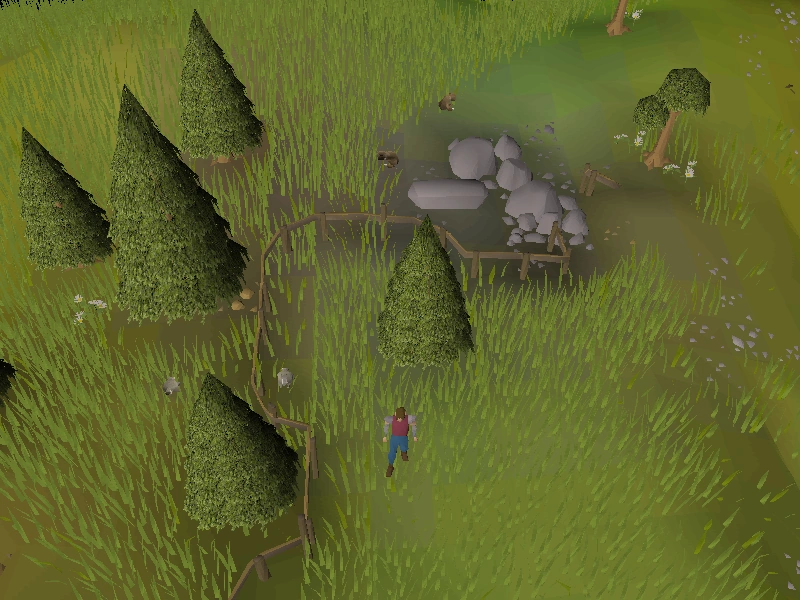
| North-east of Eagles' Peak. Dig on the eastern side of the fence just slightly south of the coniferous tree. Easily reached by teleporting with the fairy rings with code AKQ. | |||
| Coordinates | Shorthand | Requirements | Fight |
|---|---|---|---|
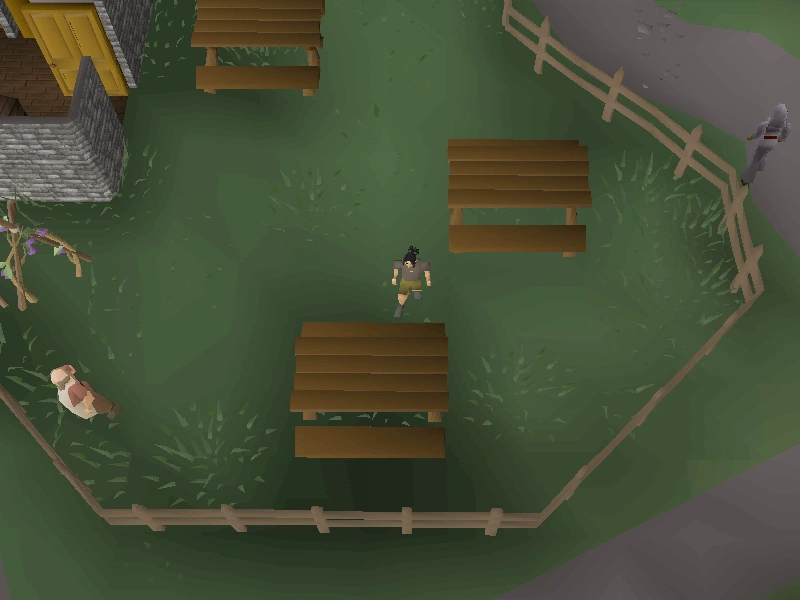
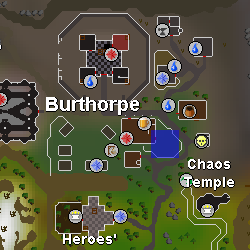
| 11 degrees 41 minutes north, 14 degrees 58 minutes east |
11.41N, 14.58E |
None. | |
| Image | Map | ||
|
| ||
| Location notes | |||
| Immediately north of a table in Burthorpe located east of the pub and west of Turael's house. | |||
| Coordinates | Shorthand | Requirements | Fight |
|---|---|---|---|
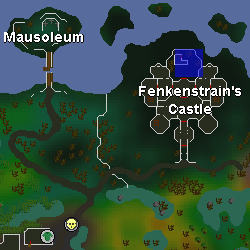
| 12 degrees 28 minutes north, 34 degrees 37 minutes east |
12.28N, 34.37E |
Priest in Peril | |
| Image | Map | ||

|
| ||
| Location notes | |||
| In the castle grounds of Fenkenstrain's Castle in Morytania. Dig two steps north of the northernmost door. | |||
| Coordinates | Shorthand | Requirements | Fight |
|---|---|---|---|
| 13 degrees 28 minutes north, 29 degrees 43 minutes east |
13.28N, 29.43E |
None. | |
| Image | Map | ||
|
| ||
| Location notes | |||
| As far as you can go east in level 9 Wilderness, north-west of the Slayer Tower on the map. | |||
| Coordinates | Shorthand | Requirements | Fight |
|---|---|---|---|
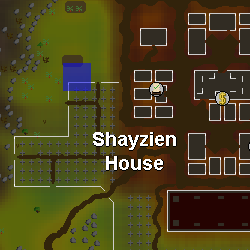
| 14 degrees 20 minutes north, 30 degrees 45 minutes west |
14.20N, 30.45W |
None. | |
| Image | Map | ||
|
| ||
| Location notes | |||
| Dig in the graveyard just east of the hill giants west of the Shayzien House bank in Great Kourend. Easily reached by teleporting with the fairy rings with code DJR. | |||
| Coordinates | Shorthand | Requirements | Fight |
|---|---|---|---|
| 14 degrees 54 minutes north, 9 degrees 13 minutes east |
14.54N, 9.13E |
None. | |
| Image | Map | ||
|
| ||
| Location notes | |||
| Two paces west of the Swaying tree, located east of Rellekka. Easily reached by using the fairy ring code AJR. | |||
| Coordinates | Shorthand | Requirements | Fight |
|---|---|---|---|
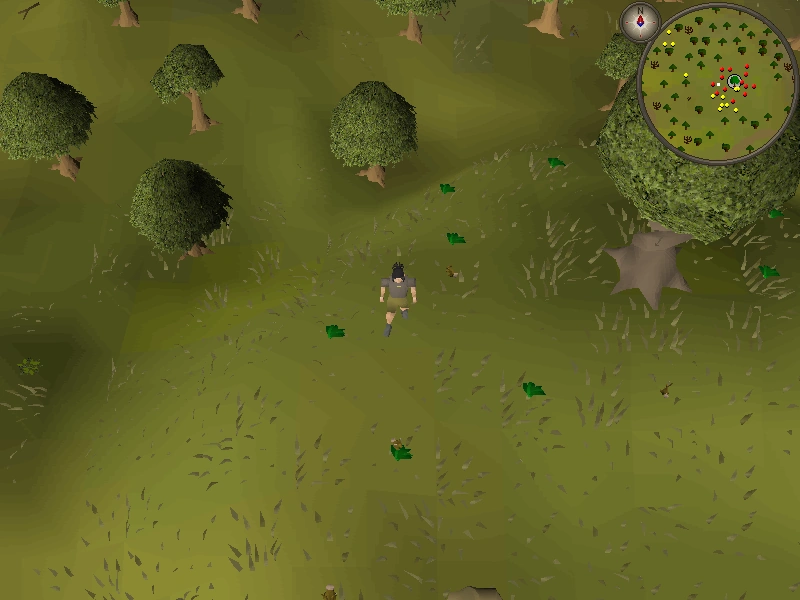
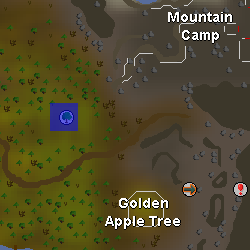
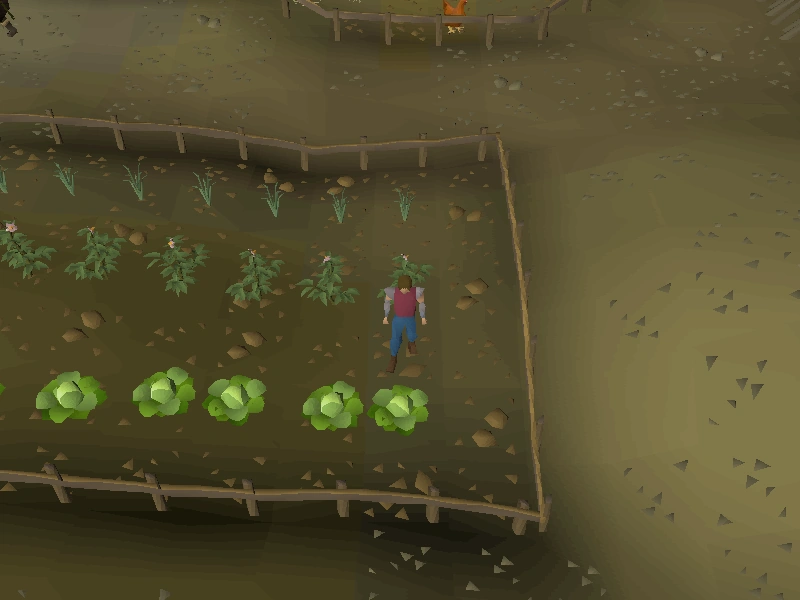
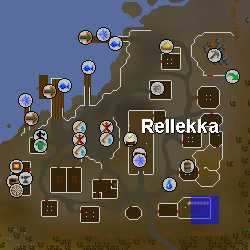
| 15 degrees 22 minutes north, 07 degrees 31 minutes east |
15.22N, 07.31E |
None. | |
| Image | Map | ||
|
| ||
| Location notes | |||
| In Pontak's garden in south-eastern Rellekka, between the cabbages and the potatoes. Easily reached by teleporting with the lyre or Fremennik sea boots. | |||
| Coordinates | Shorthand | Requirements | Fight |
|---|---|---|---|
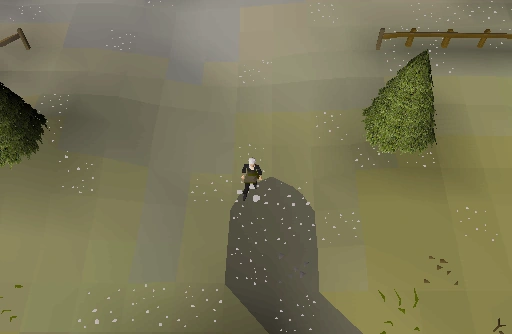
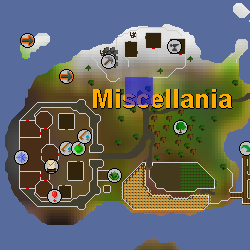
| 22 degrees 30 minutes north, 03 degrees 01 minutes east |
22.30N, 03.01E |
Completion of the Fremennik Trials quest | |
| Image | Map | ||
|
| ||
| Location notes | |||
| At the end of the path leading to the mining area on Miscellania. Accessible via fairy ring code CIP or teleporting with the Ring of wealth. | |||