m (→02) |
(cleanup) |
||
| (416 intermediate revisions by more than 100 users not shown) | |||
| Line 1: | Line 1: | ||
| − | <noinclude>{{ |
+ | <noinclude>{{external|rs}}__NOTOC__</noinclude>{{shortcut|ttgc}} |
| + | '''[[#Medium Coordinates|Medium Coordinates]]:''' [[#200|00]] [[#201|01]] [[#202|02]] [[#203|03]] [[#204|04]] [[#205|05]] [[#206|06]] [[#207|07]] [[#208|08]] [[#209|09]] [[#210|10]] [[#211|11]] [[#212|12]] [[#213|13]] [[#214|14]] [[#215|15]] [[#216|16]] [[#217|17]] [[#218|18]] [[#219|19]] [[#220|20]] [[#221|21]] [[#222|22]] [[#223|23]] [[#224|24]] [[#225|25]] |
||
| − | __NOTOC__ |
||
| − | ''' |
+ | '''[[#Hard Coordinates|Hard Coordinates]]:''' [[#300|00]] [[#301|01]] [[#302|02]] [[#303|03]] [[#304|04]] [[#305|05]] [[#306|06]] [[#307|07]] [[#308|08]] [[#309|09]] [[#310|10]] [[#311|11]] [[#312|12]] [[#313|13]] [[#314|14]] [[#315|15]] [[#316|16]] [[#317|17]] [[#318|18]] [[#319|19]] [[#320|20]] [[#321|21]] [[#322|22]] [[#323|23]] [[#324|24]] [[#325|25]] |
| + | '''[[#Elite Coordinates|Elite Coordinates]]:''' [[#400|00]] [[#401|01]] [[#402|02]] [[#403|03]] [[#404|04]] [[#405|05]] [[#406|06]] [[#407|07]] [[#408|08]] [[#409|09]] [[#410|10]] [[#411|11]] [[#412|12]] [[#413|13]] [[#414|14]] [[#415|15]] [[#416|16]] [[#417|17]] [[#418|18]] [[#419|19]] [[#420|20]] [[#421|21]] [[#422|22]] [[#423|23]] [[#424|24]] [[#425|25]] |
||
| − | ==Coordinate clues== |
||
| − | During a [[Treasure Trails|Treasure Trail]], a '''coordinate clue''' is a clue-scroll that contains a set of coordinates. Much like the real-world [[wikipedia:Geographic coordinate system|longitude & latitude geographic coordinate system]], coordinates in ''RuneScape'' indicate a precise point somewhere on the surface where the next clue scroll, or potentially the treasure casket, is buried. Coordinate clues will only appear in Treasure Trails of medium, hard or elite difficulty. The coordinates are presented in the following format: |
||
| + | '''[[#Master Coordinates|Master Coordinates]]:''' [[#500|00]] [[#501|01]] [[#502|02]] [[#503|03]] [[#504|04]] [[#505|05]] [[#506|06]] [[#507|07]] [[#508|08]] [[#509|09]] [[#510|10]] [[#511|11]] [[#512|12]] [[#513|13]] [[#514|14]] [[#515|15]] [[#516|16]] [[#517|17]] [[#518|18]] [[#519|19]] [[#520|20]] [[#521|21]] [[#522|22]] [[#523|23]] [[#524|24]] [[#525|25]] |
||
| − | <blockquote>'''00 degrees 00 minutes north/south<br />00 degrees 00 minutes east/west'''</blockquote> |
||
| + | {{Treasure Trails Guide Coordinates Intro}} |
||
| − | In ''RuneScape'', one square of space is roughly equivalent to two minutes (exactly 1.875 minutes). As there are sixty minutes in a degree, each degree is roughly equivalent to thirty-two squares. (Note: The above location is the exact centre of the [[Observatory]] and is not actually a coordinate clue location.) |
||
| + | ===Medium Coordinates=== |
||
| + | Quick links: [[#200|00]] [[#201|01]] [[#202|02]] [[#203|03]] [[#204|04]] [[#205|05]] [[#206|06]] [[#207|07]] [[#208|08]] [[#209|09]] [[#210|10]] [[#211|11]] [[#212|12]] [[#213|13]] [[#214|14]] [[#215|15]] [[#216|16]] [[#217|17]] [[#218|18]] [[#219|19]] [[#220|20]] [[#221|21]] [[#222|22]] [[#223|23]] [[#224|24]] [[#225|25]] |
||
| + | {{:Treasure Trails/Guide/Coordinates/Medium}} |
||
| + | ===Hard Coordinates=== |
||
| + | Quick links: [[#300|00]] [[#301|01]] [[#302|02]] [[#303|03]] [[#304|04]] [[#305|05]] [[#306|06]] [[#307|07]] [[#308|08]] [[#309|09]] [[#310|10]] [[#311|11]] [[#312|12]] [[#313|13]] [[#314|14]] [[#315|15]] [[#316|16]] [[#317|17]] [[#318|18]] [[#319|19]] [[#320|20]] [[#321|21]] [[#322|22]] [[#323|23]] [[#324|24]] [[#325|25]] |
||
| + | {{:Treasure Trails/Guide/Coordinates/Hard}} |
||
| + | ===Elite Coordinates=== |
||
| + | Quick links: [[#400|00]] [[#401|01]] [[#402|02]] [[#403|03]] [[#404|04]] [[#405|05]] [[#406|06]] [[#407|07]] [[#408|08]] [[#409|09]] [[#410|10]] [[#411|11]] [[#412|12]] [[#413|13]] [[#414|14]] [[#415|15]] [[#416|16]] [[#417|17]] [[#418|18]] [[#419|19]] [[#420|20]] [[#421|21]] [[#422|22]] [[#423|23]] [[#424|24]] [[#425|25]] |
||
| + | {{:Treasure Trails/Guide/Coordinates/Elite}} |
||
| + | ===Master Coordinates=== |
||
| + | Quick links: [[#500|00]] [[#501|01]] [[#502|02]] [[#503|03]] [[#504|04]] [[#505|05]] [[#506|06]] [[#507|07]] [[#508|08]] [[#509|09]] [[#510|10]] [[#511|11]] [[#512|12]] [[#513|13]] [[#514|14]] [[#515|15]] [[#516|16]] [[#517|17]] [[#518|18]] [[#519|19]] [[#520|20]] [[#521|21]] [[#522|22]] [[#523|23]] [[#524|24]] [[#525|25]] |
||
| + | {{:Treasure Trails/Guide/Coordinates/Master}} |
||
| + | <noinclude>==Trivia== |
||
| + | * A [[chart]], [[watch]], and [[sextant]] used to be required to complete coordinate [[clue scrolls]], until an update in the summer of 2014. The items are not required to be in the player's inventory or bank. |
||
| + | * Assuming [[Gielinor]] is canonically on an Earth-sized planet, the continent's width (from the west shore of [[Lunar Isle]] to the east shore of [[Mos Le'Harmless]]) is approximately 56° 10' 12" (6,234 km or 3,874 miles). The continent's length from the north tip of the [[Iceberg]] to the south shore of the [[Pest Control Island]] is approximately 47° 48' 00" (5,285 km or 3,284 miles). |
||
| + | {{Clue}}</noinclude> |
||
| − | After receiving a coordinate clue, players must locate the exact position (more precisely, the exact square) that the clue scroll indicates, using a [[Chart]], [[Sextant]] and [[Watch]]. Players can get these by going to the Observatory and talking to the professor. The sextant can be collected from [[Murphy]] in the docks of Port Khazard. [[Brother Kojo]], in the Clock Tower, gives the player a watch (only after having spoken to the professor and Murphy). Players must have a chart, watch and [[spade]] in their inventory. The next clue, or the treasure casket if the Treasure Trail is complete, can be dug up with a spade. Coordinate clues may take players all over ''RuneScape'', to nearly any geographic region in the game (including the deepest levels of the [[Wilderness]]), although coordinate clues will never point players underground or into dungeons or buildings. |
||
| − | |||
| − | ===Saradomin/Zamorak Wizards=== |
||
| − | On hard or elite Treasure Trails, digging on the correct spot will cause a level 140 [[Saradomin wizard]] to appear, which must be defeated before the next clue scroll or the treasure casket may be dug up. If the coordinates are located in the Wilderness, a weaker level 100 [[Zamorak wizard]] will appear instead. Saradomin wizards are [[poison]]ous and use both melee and the [[Magic]] spell [[Saradomin Strike]], whereas Zamorak wizards use only the spell [[Flames of Zamorak]]. When fighting the [[Zamorak wizard]] in the [[Wilderness]], other players can interrupt your fight. Players may encounter an [[Armadylian guard]] or [[Bandosian guard]] instead. |
||
| − | |||
| − | Due to the current threat of [[Player killing|player-killers]], if the coordinates for your scroll is near level 36 wilderness it is advisable to use the [[waka canoe]] which requires 57 [[Woodcutting]]. This can take you to level 36 wilderness so that potential player-killers don't immediately spot you going into the wilderness and kill you. In addition, potential player-killers won't know whether you went into the wilderness or to a different area. As a result, you should go to one or more different locations, and then take the waka to the [[Wilderness]]. This is because if another player spots you in the wilderness, they might attempt to kill you. |
||
| − | |||
| − | The following map may be used to roughly determine the location of a given coordinate clue: |
||
| − | |||
| − | [[File:Coordinate map.png|center|500px|(click to enlarge)]] |
||
| − | |||
| − | However, precise descriptions for each coordinate clue are listed below. |
||
| − | |||
| − | ===List of clues=== |
||
| − | Following is a list of all known coordinate clues and their corresponding locations. The list is organised into ascending numerical value (for example, 00:00 north first, then 00:05 south, then 00:13 north, continuing accordingly). Shorthand writing is used together with normal writing. An example: 09.34N, 25.12E = 09 degrees and 34 minutes north, 25 degrees and 12 minutes east. |
||
| − | |||
| − | '''Remember: You must have a [[chart]], [[sextant]], and [[watch]] in your inventory or nothing will happen when you dig with your [[spade]].''' |
||
| − | |||
| − | '''Note that some of the clues may require skill or quest requirements before you will be able to get to that location.''' |
||
| − | These quests, which must be finished or partially completed, include: [[Regicide]], [[Legends' Quest]], [[Nature Spirit]], [[The Grand Tree]], [[Fairytale II - Cure a Queen]], [[Troll Stronghold]], [[Cabin Fever]], [[The Fremennik Trials]], and [[Watchtower]]. Some coordinates will also require a certain skill levels to complete the clue, though the required level is low. |
||
| − | |||
| − | ====00==== |
||
| − | {{Coordinates |
||
| − | |coords = 00 degrees 00 minutes north,<br> |
||
| − | 07 degrees 13 minutes west |
||
| − | |req = [[Regicide]] |
||
| − | |fight = [[Saradomin wizard]] |
||
| − | |image = Coordinate clue 00.00N 07.13W.png |
||
| − | |map = 00.00N 07.13W map |
||
| − | |notes = In [[Tirannwn]], dig by the western spawn point of the roving elves south-east of the catapult, near the [[Tyras Camp]]. Watch out for the [[stick trap]]. [[Port Tyras]] is accessible via the charter network if the player wishes to avoid walking long distances. |
||
| − | |||
| − | From Tyras Camp: go north past the dense forest, walk a few steps east and go south past the stick traps. |
||
| − | |||
| − | From Lletya: go out of the city, past the trip wire, south over the leaf trap, past the elf tracker, west through the dense forest, over a second trip wire, north through another dense forest, then west and south past the stick trap. |
||
| − | |level=}} |
||
| − | {{Coordinates |
||
| − | |coords = 00 degrees 05 minutes south,<br> |
||
| − | 01 degrees 13 minutes east |
||
| − | |req = None |
||
| − | |map = 00.05S 01.13E map |
||
| − | |image = Coordinate clue 00.05S 01.13E.png |
||
| − | |notes = West of the [[Tree Gnome Village]], almost directly south of the [[Farming/Patch locations#Fruit Tree patches|fruit tree patch]]. On the east side of the river from the [[Observatory]], |
||
| − | |level = 2}} |
||
| − | {{Coordinates |
||
| − | |coords = 00 degrees 13 minutes south,<br> |
||
| − | 13 degrees 58 minutes east |
||
| − | |req = None |
||
| − | |image = Coordinate clue 00.13S 13.58E.png |
||
| − | |map = 00.13S 13.58E map |
||
| − | |notes = On [[Karamja]], west of the general store in the free-to-play section of the island, in the middle of the two small lakes. |
||
| − | Level=}} |
||
| − | {{Coordinates |
||
| − | |coords = 00 degrees 18 minutes south,<br> |
||
| − | 09 degrees 28 minutes east |
||
| − | |req = None |
||
| − | |image = Coordinate clue 00.18S 09.28E.png |
||
| − | |map = 00.18S 09.28E map |
||
| − | |notes = South-west of [[Brimhaven]] at the gold mine near the entrance to the [[Brimhaven Dungeon]]. Dig 1 space south of the gold rock in front of the dungeon door. |
||
| − | Level=}} |
||
| − | {{Coordinates |
||
| − | |coords = 00 degrees 20 minutes south,<br> |
||
| − | 23 degrees 15 minutes east |
||
| − | |req = None |
||
| − | |image = Coordinate clue 00.20S 23.15E.png |
||
| − | |map = 00.20S 23.15E map |
||
| − | |notes = South of the [[Lumbridge Swamp]]. |
||
| − | Level=}} |
||
| − | {{Coordinates |
||
| − | |coords = 00 degrees 30 minutes north,<br> |
||
| − | 24 degrees 16 minutes east |
||
| − | |req = None |
||
| − | |image = Coordinate clue 00.30N 24.16E.png |
||
| − | |map = 00.30N 24.16E map |
||
| − | |notes = Northeast of the [[Zanaris]] shed entrance located in the [[Lumbridge Swamp]]. |
||
| − | |level = 2}} |
||
| − | {{Coordinates |
||
| − | |coords = 00 degrees 31 minutes south,<br> |
||
| − | 17 degrees 43 minutes east |
||
| − | |req = None |
||
| − | |image = Coordinate clue 00.31S 17.43E.png |
||
| − | |map = 00.31S 17.43E map |
||
| − | |notes = South of [[Port Sarim]], just south of the ladder to the [[Asgarnian Ice Dungeon]], on the edge of the cliff. |
||
| − | |level=2}} |
||
| − | {{Coordinates |
||
| − | |coords = 00 degrees 35 minutes north,<br> |
||
| − | 35 degrees 50 minutes east |
||
| − | |req = Partial completion of [[Darkness of Hallowvale]]. |
||
| − | |fight = [[Armadylian guard]] |
||
| − | |image = Coordinate clue 00.35N 35.50E.png |
||
| − | |map = 00.35N 35.50E map |
||
| − | |notes = After arriving at Meiyerditch, walk up the wall until you pass a section where the boards creak (you are informed in the chat pane). Kick the boards and then climb down into the passage below. Dig west of the wall rubble. |
||
| − | |level=4}} |
||
| − | |||
| − | ====01==== |
||
| − | {{Coordinates |
||
| − | |coords = 01 degrees 18 minutes south,<br> |
||
| − | 14 degrees 15 minutes east |
||
| − | |req = None |
||
| − | |image = Coordinate clue 01.18S 14.15E.png |
||
| − | |map = 01.18S 14.15E map |
||
| − | |notes = Across the water from [[Musa Point]], on the western seaweed spawn next to the river. [[Tiadeche]] from the [[Tai Bwo Wannai Trio]] quest can be found to the east. Use [[Fairy Ring]] code {{fairycode|DKP}} or the [[Gnome glider]] transport to Karamja. |
||
| − | }} |
||
| − | {{Coordinates |
||
| − | |coords = 01 degrees 24 minutes north,<br> |
||
| − | 08 degrees 05 minutes west |
||
| − | |req = [[Regicide]] |
||
| − | |fight = [[Saradomin wizard]] |
||
| − | |image = Coordinate clue 01.24N 08.05W.png |
||
| − | |map = 01.24N 08.05W map |
||
| − | |notes = In the hunter area directly south of the [[Elf Camp]], past a stick trap, dig by the north-east edge of the pond. |
||
| − | |||
| − | From [[Lletya]]: Pass the tree, go west across the tripwire, continue west through the dense forest. Turn north and up the path to [[Prifddinas]]. Before the bridge and the water, head west through the dense forest. Then keep going west past the leaves pitfall trap, then south-west past a stick trap. |
||
| − | |||
| − | From [[Port Tyras]]: Go north through dense forest then east; go south through dense forest; step over tripwire; go east through the dense forest then north-west for quite a while; jump over the leaves. Finally, continue west till you arrive at a elven lamp next to mushrooms. Head south down the small path to the pond. Pass the stick trap and dig by the north-east edge of the pond. |
||
| − | |||
| − | This clue can be frustrating due to the frequency of activating the stick traps, which deal significant amounts of damage. There is a better success rate of passing the trap by turning off run and walking past the trap. |
||
| − | |||
| − | It's recommended to follow [[:File:Tirannwn map.png|this map]] in order to not get lost. |
||
| − | }} |
||
| − | {{Coordinates |
||
| − | |coords = 01 degrees 26 minutes north,<br> |
||
| − | 08 degrees 01 minutes east |
||
| − | |req = 10 {{Skill clickpic|Agility}} |
||
| − | |image = Coordinate clue 01.26N 08.01E.png |
||
| − | |map = 01.26N 08.01E map |
||
| − | |notes = In the centre of [[Moss Giant Island]] west of [[Brimhaven]]. The island can be found by swinging on the rope swings west of [[Brimhaven]]. |
||
| − | |level=}} |
||
| − | {{Coordinates |
||
| − | |coords = 01 degrees 30 minutes north,<br> |
||
| − | 20 degrees 01 minutes east |
||
| − | |req = *Partial completion of [[Fairytale II - Cure a Queen]] |
||
| − | *Either a [[Dramen staff|dramen]] or [[lunar staff]] |
||
| − | |fight = [[Zamorak wizard]] |
||
| − | |image = Coordinate clue 01.30N 20.01E.png |
||
| − | |map = 01.30N 20.01E map |
||
| − | |notes = Located on a small island that can only be accessed via [[Fairy Ring]] code {{Fairycode|CLP}}. |
||
| − | level=}} |
||
| − | {{Coordinates |
||
| − | |coords = 01 degrees 35 minutes south,<br> |
||
| − | 07 degrees 28 minutes east |
||
| − | |req = None |
||
| − | |image = Coordinate clue 01.35S 07.28E.png |
||
| − | |map = 01.35S 07.28E map |
||
| − | |notes = On the penisula to [[Hazelmere]]'s house, northeast of [[Yanille]]. Use the fairy code {{Fairycode|CLS}} and run north. Dig between a boulder, a leafy tree, and a creeping plant. |
||
| − | |level = 2}} |
||
| − | |||
| − | ====02==== |
||
| − | {{Coordinates |
||
| − | |coords = 02 degrees 35 minutes south,<br> |
||
| − | 11 degrees 52 minutes east |
||
| − | |req = [[Jungle Potion]] quest required. |
||
| − | |image = Coordinate clue 02.35S 11.52E.png |
||
| − | |map = 02.35S 11.52E map.png |
||
| − | |notes = Inside the [[Hardwood Grove]] at [[Tai Bwo Wannai]]. You will need 100 [[trading sticks]] for this. |
||
| − | |level=4}} |
||
| − | {{Coordinates |
||
| − | |coords = 02 degrees 43 minutes south, <br> |
||
| − | 33 degrees 26 minutes east |
||
| − | |req = None |
||
| − | |image = Coordinate clue 02.43S 33.26E.png |
||
| − | |map = 02.43S 33.26E map.png |
||
| − | |notes = Directly north of the [[Teak tree]] east of [[Uzer]]. |
||
| − | |level =2}} |
||
| − | {{Coordinates |
||
| − | |coords = 02 degrees 46 minutes north,<br> |
||
| − | 29 degrees 11 minutes east |
||
| − | |req = Another player's assistance |
||
| − | |fight = Another player |
||
| − | |image = Coordinate clue 02.46N 29.11E.png |
||
| − | |map = 02.46N 29.11E map |
||
| − | |notes = [[Duel Arena]] in combat area. You will need to duel another player to get to this spot. Make sure that the Obstacles option is '''on'''. |
||
| − | |level=}} |
||
| − | {{Coordinates |
||
| − | |coords = 02 degrees 48 minutes north,<br> |
||
| − | 22 degrees 30 minutes east |
||
| − | |req = None |
||
| − | |image = Coordinate clue 02.48N 22.30E.png |
||
| − | |map = 02.48N 22.30E map |
||
| − | |notes = Just west of the trapdoor leading to the [[H.A.M. Hideout]], dig 2 spaces east and 1 south of the nearest tree to the building. |
||
| − | |level=}} |
||
| − | {{Coordinates |
||
| − | |coords = 02 degrees 48 minutes north,<br> |
||
| − | 08 degrees 05 minutes east |
||
| − | |req = *Partial completion of [[Fairytale II - Cure a Queen]] |
||
| − | *Either a [[Dramen staff|dramen]] or [[lunar staff]] |
||
| − | |image = Coordinate clue 02.48N 08.05E.png |
||
| − | |map = 02.48N 08.05E map |
||
| − | |fight = Zamorak wizard |
||
| − | |notes = Little island, fairy ring teleport code A-I-R |
||
| − | |level=3}} |
||
| − | {{Coordinates |
||
| − | |coords = 02 degrees 50 minutes north,<br> |
||
| − | 06 degrees 20 minutes east |
||
| − | |req = None |
||
| − | |image = Coordinate clue 02.50N 06.20E.png |
||
| − | |map = 02.50N 06.20E map |
||
| − | |notes = South of [[Ardougne Zoo]], on a small cape. |
||
| − | |level = 2}} |
||
| − | |||
| − | ====03==== |
||
| − | {{Coordinates |
||
| − | |coords = 03 degrees 09 minutes south,<br> |
||
| − | 42 degrees 50 minutes east |
||
| − | |req = [[Cabin Fever]] |
||
| − | |fight = [[Bandosian guard]] or [[Armadylian guard]] |
||
| − | |image = Coordinate clue 03.09S 42.50E.png |
||
| − | |notes = Small island located north of [[Mos Le'Harmless]], accessible through the ladders located at the nort east corner of the [[cave horror]] dungeon. Remember to wear a[[witchwood icon]] when traversing the dungeon. It is possible that an [[Armadylian guard]] may appear which means you may have to bring range equipment. |
||
| − | }} |
||
| − | {{Coordinates |
||
| − | |coords = 03 degrees 07 minutes south,<br> |
||
| − | 03 degrees 41 minutes west |
||
| − | |req = |
||
| − | |image = Coordinate clue 03.07S 03.41W.png |
||
| − | |map = 03.07S 03.41W map |
||
| − | |notes |
||
| − | |level=2}} |
||
| − | {{Coordinates |
||
| − | |coords = 03 degrees 35 minutes south,<br> |
||
| − | 13 degrees 35 minutes east |
||
| − | |req = None |
||
| − | |image = Coordinate clue 03.35S 13.35E.png |
||
| − | |map = 03.35S 13.35E map |
||
| − | |notes = On [[Karamja]], north of the [[nature altar]]. |
||
| − | |level=2}} |
||
| − | {{Coordinates |
||
| − | |coords = 03 degrees 45 minutes south,<br> |
||
| − | 22 degrees 45 minutes east |
||
| − | |req = None |
||
| − | |fight = [[Saradomin wizard]] |
||
| − | |image = Coordinate clue 03.45S 22.45E.png |
||
| − | |map = 03.45S 22.45E map |
||
| − | |notes = In the [[Bedabin Camp]] in the [[Kharidian Desert]], just southwest of the [[Shanty Pass]]. Dig north side of the watering hole. |
||
| − | |level=3}} |
||
| − | |||
| − | ====04==== |
||
| − | {{Coordinates |
||
| − | |coords = 04 degrees 00 minutes south,<br> |
||
| − | 12 degrees 46 minutes east |
||
| − | |req = None |
||
| − | |image = Coordinate clue 04.00S 12.46E.png |
||
| − | |map = 04.00S 12.46E map |
||
| − | |notes = In the centre of the mine, north of [[Shilo Village]]. This is not the gem rock mine, but rather the one just north-west of the [[nature altar]], where you find [[volencia moss]] during the [[Jungle Potion]] quest. Dig two spaces north-west of a [[mithril rock]]. |
||
| − | }} |
||
| − | {{Coordinates |
||
| − | |coords = 04 degrees 03 minutes south,<br> |
||
| − | 03 degrees 11 minutes east |
||
| − | |req = Started [[Watchtower]] |
||
| − | |fight = [[Saradomin wizard]] |
||
| − | |image = Coordinate clue 04.03S 03.11E.png |
||
| − | |map = 04.03S 03.11E map |
||
| − | |notes = In [[Gu'Tanoth]]. You must have started the [[Watchtower]] quest to gain access. After crossing the fourth bridge, stand near the tree there and dig. Note: First time crossing you need 20 coins and a [[rock cake]]. |
||
| − | |level=3}} |
||
| − | {{Coordinates |
||
| − | |coords = 04 degrees 05 minutes south,<br> |
||
| − | 04 degrees 24 minutes east |
||
| − | |req = None |
||
| − | |fight = [[Saradomin wizard]] |
||
| − | |image = Coordinate clue 04.05S 04.24E.png |
||
| − | |map = 04.05S 04.24E map |
||
| − | |notes = On the island where [[Gorad]] is located. From [[Castle Wars]], go south-west around [[Jiggig]] then south-east along the coast. At the south-western side of [[Gu'Tanoth]] is a cave, enter this cave and you will end up on the island. Dig on the east side of the island, near a spear wall. Alternately, you can use [[fairy ring]] code {{Fairycode|AKS}} and run north-west. |
||
| − | }} |
||
| − | {{Coordinates |
||
| − | |coords = 04 degrees 13 minutes north,<br> |
||
| − | 12 degrees 45 minutes east |
||
| − | |req = Partial completion of [[Dragon Slayer]] |
||
| − | |image = Coordinate clue 04.13N 12.45E.png |
||
| − | |map = 04.13N 12.45E map |
||
| − | |notes = North side of [[Crandor]]. [[King Scorpion]]s can be aggressive to low levelled players. |
||
| − | |level=2}} |
||
| − | {{Coordinates |
||
| − | |coords = 04 degrees 16 minutes south,<br> |
||
| − | 16 degrees 16 minutes east |
||
| − | |req = Partial completion of [[The Grand Tree]] |
||
| − | |fight = [[Saradomin wizard]] |
||
| − | |image = Coordinate clue 04.16S 16.16E.png |
||
| − | |map = 04.16S 16.16E map |
||
| − | |notes = Outside the east wall of the [[Ship yard]] building with [[G.L.O. Caranock]], use the gnome glider and dig directly by the window. |
||
| − | |level=3}} |
||
| − | {{Coordinates |
||
| − | |coords = 04 degrees 41 minutes north,<br> |
||
| − | 03 degrees 09 minutes west |
||
| − | |req = Completion of [[Regicide]] |
||
| − | |fight = [[Saradomin wizard]] |
||
| − | |image = Coordinate_clue_04.41N_03.09W.png |
||
| − | |map = 04.41N 03.09W map |
||
| − | |notes = Located near the [[Red spiders' eggs]] on the [[Arandar]] mountain pass leading to [[Tirannwn]]. |
||
| − | }} |
||
| − | |||
| − | ====05==== |
||
| − | {{Coordinates |
||
| − | |coords = 05 degrees 07 minutes south,<br> |
||
| − | 13 degrees 26 minutes east |
||
| − | |req = Completion of the [[Shilo Village (quest)|Shilo Village]] quest |
||
| − | |fight = [[Bandosian guard]] |
||
| − | |image = Coordinate clue 05.07S 13.26E.png |
||
| − | |map = 05.07S 13.26E map |
||
| − | |notes = North-east [[Shilo Village]], dig in the centre of the bamboo pillars. |
||
| − | }} |
||
| − | {{Coordinates |
||
| − | |coords = 05 degrees 24 minutes south,<br> |
||
| − | 26 degrees 56 minutes east |
||
| − | |req = None |
||
| − | |fight = [[Bandosian guard]] or [[Armadylian guard]] |
||
| − | |image = Coordinate clue 05.24S 26.56E.png |
||
| − | |map = 05.24S 26.56E map |
||
| − | |notes = On top of a cliff to the west of [[Pollnivneach]]. |
||
| − | }} |
||
| − | {{Coordinates |
||
| − | |coords = 05 degrees 37 minutes north,<br> |
||
| − | 31 degrees 15 minutes east |
||
| − | |req = Started [[Nature Spirit]] |
||
| − | |fight = [[Saradomin wizard]] |
||
| − | |image = Coordinate clue 05.37N 31.15E.png |
||
| − | |map = 05.37N 31.15E map |
||
| − | |notes = In [[Mort Myre]] swamps, over Nature Spirit's grotto, dig to the north of the grotto tree. [[Druid pouch]]es are strongly recommended as [[ghast]]s may rot your food. |
||
| − | |level=3}} |
||
| − | {{Coordinates |
||
| − | |coords = 05 degrees 39 minutes south,<br> |
||
| − | 02 degrees 13 minutes east |
||
| − | |req = None |
||
| − | |fight = [[Armadylian guard]] or [[Bandosian guard]] |
||
| − | |image = Coordinate clue 05.39S 02.13E.png |
||
| − | |map = 05.39S 02.13E map |
||
| − | |notes = Just south of [[Gu'Tanoth]], west of [[Gnormadium Avlafrim]]'s gnome glider. |
||
| − | |level=4}} |
||
| − | {{Coordinates |
||
| − | |coords = 05 degrees 43 minutes north,<br> |
||
| − | 23 degrees 05 minutes east |
||
| − | |req = None |
||
| − | |fight = |
||
| − | |image = Coordinate clue 05.43N 23.05E.png |
||
| − | |map = 05.43N 23.05E map |
||
| − | |notes = Just south of the [[Champions Guild]], opposite side of the River Lum in [[Lumbridge]] |
||
| − | |level = 2}} |
||
| − | {{Coordinates |
||
| − | |coords = 05 degrees 50 minutes south,<br> |
||
| − | 10 degrees 05 minutes east |
||
| − | |req = 15 {{skill clickpic|Agility}} |
||
| − | |fight = [[Saradomin wizard]] |
||
| − | |image = Coordinate clue 05.50S 10.05E.png |
||
| − | |map = 05.50S 10.05E map |
||
| − | |notes = On [[Cairn Isle]], [[Karamja]], ([[Fairy ring]] code {{Fairycode|CKR}} is very close, area is south-west of the fairy ring) dig in the centre of the hut with the broken walls. |
||
| − | |level=3}} |
||
| − | |||
| − | ====06==== |
||
| − | {{Coordinates |
||
| − | |coords = 06 degrees 00 minutes south,<br> |
||
| − | 21 degrees 48 minutes east |
||
| − | |req = None |
||
| − | |fight = [[Saradomin wizard]] |
||
| − | |image = Coordinate clue 06.00S 21.48E.png |
||
| − | |map = 06.00S 21.48E map |
||
| − | |notes = West of the [[Bandit Camp]] in the [[Kharidian Desert]], at the small peninsula. Dig at the very edge. Bring [[waterskin]]s as this area is affected by desert heat. |
||
| − | }} |
||
| − | {{Coordinates |
||
| − | |coords = 06 degrees 11 minutes south,<br> |
||
| − | 15 degrees 07 minutes east |
||
| − | |req = None |
||
| − | |fight = [[Saradomin wizard]] |
||
| − | |image = Coordinate clue 06.11S 15.07E.png |
||
| − | |map = 06.11S 15.07E map |
||
| − | |notes = On the southern part of eastern [[Karamja]], just north of some stepping stones across a waterfall. Dig in the brown patch of ground near the [[jogre]]s. A [[gnome glider]] destination is close to the area. |
||
| − | }} |
||
| − | {{Coordinates |
||
| − | |coords = 06 degrees 31 minutes north,<br> |
||
| − | 01 degrees 46 minutes west |
||
| − | |req = None |
||
| − | |image = Coordinate clue 06.31N 01.46W.png |
||
| − | |map = 06.31N 01.46W map |
||
| − | |notes = Travel south-west of the [[Tree Gnome Stronghold]] and you will come across three ponds. Dig in between the two eastern ponds. |
||
| − | |level=2}} |
||
| − | {{Coordinates |
||
| − | |coords = 06 degrees 35 minutes north,<br> |
||
| − | 09 degrees 07 minutes east |
||
| − | |req = Started [[Legends' Quest]] |
||
| − | |fight = [[Bandosian guard]] or [[Armadylian guard]] |
||
| − | |image = Coordinate clue 06.35N 09.07E.png |
||
| − | |map = 06.35N 09.07E map |
||
| − | |notes = Outside the Legends guild, north of the fountain. |
||
| − | |level=4}} |
||
| − | {{Coordinates |
||
| − | |coords = 06 degrees 58 minutes north,<br> |
||
| − | 21 degrees 16 minutes east |
||
| − | |req = None |
||
| − | |fight = |
||
| − | |image = Coordinate clue 06.58N 21.16E.png |
||
| − | |map = 06.58N 21.16E map |
||
| − | |notes = Located at the northeast fence outside of [[Draynor Manor]], on the southern side of the [[River Lum]]. |
||
| − | |level = 2}} |
||
| − | |||
| − | ====07==== |
||
| − | {{Coordinates |
||
| − | |coords = 07 degrees 05 minutes north,<br> |
||
| − | 30 degrees 56 minutes east |
||
| − | |req = None |
||
| − | |image = Coordinate clue 07.05N 30.56E.png |
||
| − | |map = 07.05N 30.56E map |
||
| − | |notes = In Mort Myre Swamp north of the [[Nature Grotto]]. Next pond south of the two most western fishing spots. Dig west of a rotting swamp tree. Note that there are [[ghast]]s in the swamp, so be sure to bring some [[druid pouch]]es. |
||
| − | }} |
||
| − | {{Coordinates |
||
| − | |coords = 07 degrees 33 minutes north,<br> |
||
| − | 15 degrees 00 minutes east |
||
| − | |req = None |
||
| − | |image = Coordinate clue 07.33N 15.00E.png |
||
| − | |map = 07.33N 15.00E map |
||
| − | |notes = South-east of [[Taverley]], on the peninsula where the Lady of the Lake wanders around. Dig north of the non-examinable bush on the western part of the peninsula. |
||
| − | }} |
||
| − | {{Coordinates |
||
| − | |coords = 07 degrees 43 minutes south,<br> |
||
| − | 12 degrees 26 minutes east |
||
| − | |req = Partial completion of [[Legends' Quest]] |
||
| − | |fight = [[Saradomin wizard]] |
||
| − | |image = Coordinate clue 07.43S 12.26E.png |
||
| − | |map = 07.43S 12.26E map |
||
| − | |notes = In the middle of the [[Kharazi Jungle]], next to the water pool. Remember to bring Radimus notes if you have not completed Legends' Quest. |
||
| − | }} |
||
| − | |||
| − | ====08==== |
||
| − | {{Coordinates |
||
| − | |coords = 08 degrees 03 minutes north,<br> |
||
| − | 31 degrees 16 minutes east |
||
| − | |req = Completion of [[Priest in Peril]] |
||
| − | |fight = [[Saradomin wizard]] |
||
| − | |image = Coordinate clue 08.03N 31.16E.png |
||
| − | |map = 08.03N 31.16E map |
||
| − | |notes = South-west of fairy ring code {{Fairycode|BKR}} and slightly north-east of the fishing spot (the one just south-west of the word [[Morytania]] on the world map), in the centre of [[Mort Myre]] swamp. Dig between the easternmost and middle logs. Bring [[druid pouch]]es to prevent [[ghast]]s from rotting your food. |
||
| − | }} |
||
| − | {{Coordinates |
||
| − | |coords = 08 degrees 05 minutes south,<br> |
||
| − | 15 degrees 56 minutes east |
||
| − | |req = Partial completion of [[Legends' Quest]] |
||
| − | |fight = [[Saradomin wizard]] |
||
| − | |image = Coordinate clue 08.05S 15.56E.png |
||
| − | |map = 08.05S 15.56E map |
||
| − | |notes = South-east of the easternmost [[mahogany tree]] in the [[Kharazi Jungle]]. Remember to bring an axe and a machete (and your Radimus notes if you have not finished Legends' Quest) to cut through the jungle. |
||
| − | }} |
||
| − | {{Coordinates |
||
| − | |coords = 08 degrees 15 minutes north,<br> |
||
| − | 35 degrees 24 minutes east |
||
| − | |req = [[Priest in Peril]] |
||
| − | |fight = [[Armadylian guard]] |
||
| − | |image = Coordinate Clue 08.15N 35.24E.png |
||
| − | |map = 08.15N 35.24E map |
||
| − | |notes = North of [[Dessous]]'s tomb from [[Desert Treasure]]. |
||
| − | |level=4}} |
||
| − | {{Coordinates |
||
| − | |coords = 08 degrees 26 minutes south,<br> |
||
| − | 10 degrees 28 minutes east |
||
| − | |req = Partial completion of [[Legends' Quest]] |
||
| − | |fight = [[Saradomin wizard]] |
||
| − | |image = Coordinate clue 08.26S 10.28E.png |
||
| − | |map = 08.26S 10.28E map |
||
| − | |notes = In the south-west peninsula of the [[Kharazi Jungle]] on [[Karamja]]. Dig north of a skeleton. Remember to bring an axe and a machete (and your Radimus notes if you have not finished Legends' Quest) to cut through the jungle. |
||
| − | }} |
||
| − | {{Coordinates |
||
| − | |coords = 08 degrees 33 minutes north,<br> |
||
| − | 01 degrees 39 minutes west |
||
| − | |req = None |
||
| − | |image = Coordinate clue 08.33N 01.39W.png |
||
| − | |map = 08.33N 01.39W map |
||
| − | |notes = At [[Tree Gnome Stronghold]], in the south-western section there is a bridge, and a pen containing [[terrorbird]]s. Open the gate in the east of the pen and go to the edge of the river as far east as possible and dig there. |
||
| − | }} |
||
| − | |||
| − | ====09==== |
||
| − | {{Coordinates |
||
| − | |coords = 09 degrees 33 minutes north,<br> |
||
| − | 02 degrees 15 minutes east |
||
| − | |req = Started [[Waterfall Quest]] |
||
| − | |image = Coordinate clue 09.33N 02.15E.png |
||
| − | |notes = Go to the [[Baxtorian Falls]], board the log raft, use a rope with the rock to get to the second island with the dead tree. Dig north of the dead tree. |
||
| − | |map = 09.33N 02.15E map}} |
||
| − | {{Coordinates |
||
| − | |coords = 09 degrees 35 minutes north,<br> |
||
| − | 01 degrees 50 minutes west |
||
| − | |req = None |
||
| − | |image = Coordinate Clue 09.35N 01.50W.png |
||
| − | |notes = This is on the west hand side of the river in the [[Gnome Stronghold]]. Walk north of the terrorbird pen and dig right above the rock. |
||
| − | |map = 09.35N 01.50W map}} |
||
| − | {{Coordinates |
||
| − | |coords = 09 degrees 46 minutes south,<br> |
||
| − | 43 degrees 22 minutes east |
||
| − | |req = Started [[The Great Brain Robbery]] |
||
| − | |fight = [[Bandosian guard]] or [[Armadylian guard]] |
||
| − | |image = Coordinate clue 09.46S 43.22E.png |
||
| − | |map = 09.46S 43.22E map |
||
| − | |notes = East side of [[Harmony Island]]. It is suggested to bring ranged equipment as it is possible an [[Armadylian guard]] will appear. |
||
| − | }} |
||
| − | {{Coordinates |
||
| − | |coords = 09 degrees 48 minutes north, <br> |
||
| − | 17 degrees 39 minutes east |
||
| − | |req = |
||
| − | |image = Coordinate clue 09.48N 17.39E.png |
||
| − | |map = 09.48N 17.39E map |
||
| − | |notes = [[Ice Mountain]], located west of [[Barbarian Village]]. |
||
| − | |level = 2}} |
||
| − | |||
| − | ====10==== |
||
| − | |||
| − | {{Coordinates |
||
| − | |coords = 10 degrees 05 minutes south,<br> |
||
| − | 24 degrees 31 minutes east |
||
| − | |req = |
||
| − | |fight = [[Bandosian guard]] or [[Armadylian guard]] |
||
| − | |image = Coordinate clue 10.05S 24.31E.png |
||
| − | |map = 10.05S 24.31E map |
||
| − | |notes = South of the desert treasure pyramid. |
||
| − | |level = 4 |
||
| − | }} |
||
| − | {{Coordinates |
||
| − | |coords = 10 degrees 45 minutes north,<br> |
||
| − | 04 degrees 31 minutes east |
||
| − | |req = |
||
| − | |image = Coordinate clue 10.45N 04.31E.png |
||
| − | |map = 10.45N 04.31E map |
||
| − | |notes = By the shore line north of the [[Coal Trucks]]. |
||
| − | |level = 2 |
||
| − | }} |
||
| − | |||
| − | ====11==== |
||
| − | {{Coordinates |
||
| − | |coords = 11 degrees 03 minutes north,<br> |
||
| − | 31 degrees 20 minutes east |
||
| − | |req = Completion of [[Priest in Peril]] |
||
| − | |image = Coordinate clue 11.03N 31.20E.png |
||
| − | |map = 11.03N 31.20E map |
||
| − | |notes = South of the big roots that are found east of the path to the [[Slayer Tower]]. |
||
| − | }} |
||
| − | {{Coordinates |
||
| − | |coords = 11 degrees 05 minutes north,<br> |
||
| − | 00 degrees 45 minutes west |
||
| − | |req = None |
||
| − | |image = 11.05N 00.45W.png |
||
| − | |map = 11.05N 00.45W map |
||
| − | |notes = In the swamp located in the north-west corner of the [[Tree Gnome Stronghold]], west of the [[Grand Tree]], directly south of the tortoise pen. |
||
| − | }} |
||
| − | {{Coordinates |
||
| − | |coords = 11 degrees 33 minutes north,<br> |
||
| − | 02 degrees 24 minutes west |
||
| − | |req = None |
||
| − | |image = Coordinate clue 11.33N 02.24W.png |
||
| − | |map = 11.33N 02.24W map |
||
| − | |notes = Northeast of [[Eagles' Peak (location)|Eagles' Peak]]. Dig on the eastern side of the fence just slightly south of the coniferous tree. |
||
| − | |level = 2}} |
||
| − | {{Coordinates |
||
| − | |coords = 11 degrees 41 minutes north,<br> |
||
| − | 14 degrees 58 minutes east |
||
| − | |req = None |
||
| − | |image = Coordinate clue 11.41N 14.58E.png |
||
| − | |map = 11.41N 14.58E map |
||
| − | |notes = Immediately north of a table in [[Burthorpe]] located east of the pub and west of [[Turael]]'s house. |
||
| − | |level = 2}} |
||
| − | |||
| − | ====12 ==== |
||
| − | {{Coordinates |
||
| − | |coords = 12 degrees 28 minutes north,<br> |
||
| − | 34 degrees 37 minutes east |
||
| − | |req = None |
||
| − | |fight = |
||
| − | |image = Coordinate clue 12.28N 34.37E.png |
||
| − | |map = 12.28N 34.37E map |
||
| − | |notes = In the castle grounds of [[Fenkenstrain's Castle]] in [[Morytania]]. Dig two steps north of the gate. |
||
| − | |level = 2}} |
||
| − | {{Coordinates |
||
| − | |coords = 12 degrees 31 minutes north,<br> |
||
| − | 43 degrees 11 minutes east |
||
| − | |req = None |
||
| − | |fight = [[Bandosian guard]] or [[Armadylian guard]] |
||
| − | |image = Coordinate clue 12.31N 43.11E.png |
||
| − | |map = 12.31N 43.11E map |
||
| − | |notes = Dig south-west of the evergreen tree on the northeastern portion of [[Dragontooth Island]]. Players will require a [[ghostspeak amulet]] and 25 [[ecto-tokens]] (10 if wearing a [[Ring of Charos (a)]]). |
||
| − | |level = 4}} |
||
| − | |||
| − | ====13==== |
||
| − | {{Coordinates |
||
| − | |coords = 13 degrees 45 minutes south,<br> |
||
| − | 15 degrees 30 minutes east |
||
| − | |req = Partial completion of [[Monkey Madness]] |
||
| − | |fight = [[Bandosian guard]] |
||
| − | |image = Coordinate clue 13.45S 15.30E.png |
||
| − | |map = 13.45S 15.30E map |
||
| − | |notes = Eastern shore of [[Crash Island]], visited during the [[Monkey Madness]] quest. |
||
| − | }} |
||
| − | {{Coordinates |
||
| − | |coords = 13 degrees 46 minutes north,<br> |
||
| − | 21 degrees 01 minutes east |
||
| − | |req = None |
||
| − | |fight = [[Zamorak wizard]] |
||
| − | |image = Coordinate clue 13.46N 21.01E.png |
||
| − | |map = 13.46N 21.01E map |
||
| − | |notes = Just North of the [[Edgeville]] level 11 [[Wilderness]] Near horse shoe shaped mushroom patch. |
||
| − | }} |
||
| − | |||
| − | ====14==== |
||
| − | {{Coordinates |
||
| − | |coords = 14 degrees 15 minutes south,<br> |
||
| − | 08 degrees 01 minutes east |
||
| − | |req = Partial completion of [[Monkey Madness]] |
||
| − | |image = Coordinate clue 14.15S 08.01E.png |
||
| − | |notes = Dig on top of the starfish on the south-westernmost shore of [[Ape Atoll]]. |
||
| − | |map = 14.15S 08.01E map}} |
||
| − | {{Coordinates |
||
| − | |coords = 14 degrees 54 minutes north,<br> |
||
| − | 9 degrees 13 minutes east |
||
| − | |req = None |
||
| − | |image = Coordinate clue 14.54N 09.13E.png |
||
| − | |map = 14.54N 09.13E map |
||
| − | |notes = Two paces west of the [[Swaying tree]], located east of [[Rellekka]]. |
||
| − | |level=2}} |
||
| − | |||
| − | ====15==== |
||
| − | {{Coordinates |
||
| − | |coords = 15 degrees 22 minutes north,<br> |
||
| − | 07 degrees 31 minutes east |
||
| − | |req = None |
||
| − | |image = Coordinate clue 15.22N 07.31E.png |
||
| − | |notes = In [[Pontak]]'s garden in south-eastern [[Relleka]], between the cabbages and the potatoes. |
||
| − | |map = 15.22N 07.31E map |
||
| − | |level = 2}} |
||
| − | |||
| − | ====16==== |
||
| − | {{Coordinates |
||
| − | |coords = 16 degrees 03 minutes north,<br> |
||
| − | 14 degrees 07 minutes east |
||
| − | |req = Completion of [[Troll Stronghold]] |
||
| − | |fight = [[Saradomin wizard]] |
||
| − | |image = Coordinate clue 16.03N 14.07E.png |
||
| − | |map = 16.03N 14.07E map |
||
| − | |notes = On the summit of [[Trollheim]], near the entrance to [[Eadgar]]'s cave. |
||
| − | }} |
||
| − | {{Coordinates |
||
| − | |coords = 16 degrees 07 minutes north,<br> |
||
| − | 22 degrees 45 minutes east |
||
| − | |req = None |
||
| − | |fight = [[Zamorak wizard]] |
||
| − | |image = Coordinate clue 16.07N 22.45E.png |
||
| − | |map = 16.07N 22.45E map |
||
| − | |notes = In the [[Graveyard of Shadows]] in the [[Wilderness]], immediately north of a dead tree. |
||
| − | }} |
||
| − | {{Coordinates |
||
| − | |coords = 16 degrees 09 minutes north,<br> |
||
| − | 10 degrees 33 minutes east |
||
| − | |req = Partial completion of [[Mountain Daughter]] |
||
| − | |fight = [[Armadylian guard]] |
||
| − | |image = Coordinate clue 16.09N 10.33E.png |
||
| − | |map = 16.09N 10.33E map |
||
| − | |notes = By the lake north of the [[Mountain Camp]] in the [[Fremennik Province]]. |
||
| − | }} |
||
| − | {{Coordinates |
||
| − | |coords = 16 degrees 31 minutes north,<br> |
||
| − | 12 degrees 54 minutes east |
||
| − | |req = Partial completion of the [[Troll Stronghold]] quest |
||
| − | |fight = [[Saradomin wizard]] |
||
| − | |image = Coordinate clue 16.31N 12.54E.png |
||
| − | |map = 16.31N 12.54E map |
||
| − | |notes = At the entrance to the [[Troll Stronghold (area)|Troll Stronghold]], next to the sleeping troll called Mushroom. |
||
| − | |level=3}} |
||
| − | {{Coordinates |
||
| − | |coords = 16 degrees 35 minutes north,<br> |
||
| − | 27 degrees 01 minutes east |
||
| − | |req = None |
||
| − | |fight = [[Zamorak wizard]] |
||
| − | |image = Coordinate clue 16.35N 27.01E.png |
||
| − | |map = 16.35N 27.01E map |
||
| − | |notes = In level 22 [[Wilderness]], past the lizards. |
||
| − | }} |
||
| − | {{Coordinates |
||
| − | |coords = 16 degrees 43 minutes north,<br> |
||
| − | 19 degrees 13 minutes east |
||
| − | |req = None |
||
| − | |fight = [[Zamorak wizard]] |
||
| − | |image = Coordinate clue 16.43N 19.13E.png |
||
| − | |map = 16.43N 19.13E map |
||
| − | |notes = In the northern section of the [[Bandit Camp (Wilderness)|Bandit Camp]] in level 23 [[Wilderness]]. |
||
| − | }} |
||
| − | {{Coordinates |
||
| − | |coords = 16 degrees 43 minutes north,<br> |
||
| − | 26 degrees 56 minutes east |
||
| − | |req = None |
||
| − | |fight = [[Zamorak wizard]] |
||
| − | |image = Coordinate clue 16.43N 26.56E.png |
||
| − | |map = 16.43N 26.56E map |
||
| − | |notes = In the [[Black salamander (Hunter)|black salamander]] hunting area in the level 23 [[Wilderness]]. |
||
| − | }} |
||
| − | |||
| − | ====17==== |
||
| − | {{Coordinates |
||
| − | |coords = 17 degrees 50 minutes north,<br> |
||
| − | 08 degrees 30 minutes east |
||
| − | |req = None |
||
| − | |fight = [[Saradomin wizard]] |
||
| − | |image = Coordinate clue 17.50N 08.30E.png |
||
| − | |map = 17.50N 08.30E map |
||
| − | |notes = North-east of [[Rellekka]], immediately east of Larry and his boat, north of the [[rock crab]]s, and north-west of [[fairy ring]] code {{Fairycode|DKS}}. |
||
| − | }} |
||
| − | |||
| − | ====18==== |
||
| − | {{Coordinates |
||
| − | |coords = 18 degrees 05 minutes north,<br> |
||
| − | 12 degrees 05 minutes east |
||
| − | |req = None |
||
| − | |fight = |
||
| − | |image = Coordinate clue 18.05N 12.05E.png |
||
| − | |notes = West of the entrance to the [[Ice Path]], where the [[Troll child]] resides. |
||
| − | |map = 18.05N 12.05E map}} |
||
| − | {{Coordinates |
||
| − | |coords = 18 degrees 22 minutes north,<br> |
||
| − | 16 degrees 33 minutes east |
||
| − | |req = None |
||
| − | |fight = [[Zamorak wizard]] |
||
| − | |image = Coordinate clue 18.22N 16.33E.png |
||
| − | |map = 18.22N 16.33E map |
||
| − | |notes = In the south-west section of the [[Forgotten Cemetery]] in level 29 [[Wilderness]]. Dig immediately south of one of the graves, located in the second column from the south. |
||
| − | }} |
||
| − | {{Coordinates |
||
| − | |coords = 18 degrees 50 minutes north,<br> |
||
| − | 20 degrees 26 minutes east |
||
| − | |req = None |
||
| − | |fight = [[Zamorak wizard]] |
||
| − | |image = Coordinate clue 18.50N 20.26E.png |
||
| − | |map = 18.50N 20.26E map |
||
| − | |notes = In the [[bandit camp mining site]] in level 31 [[Wilderness]]. |
||
| − | }} |
||
| − | |||
| − | ====19==== |
||
| − | {{Coordinates |
||
| − | |coords = 19 degrees 00 minutes north,<br> |
||
| − | 27 degrees 13 minutes east |
||
| − | |req = None |
||
| − | |fight = [[Zamorak wizard]] |
||
| − | |image = Coordinate clue 19.00N 27.13E.png |
||
| − | |map = 19.00N 27.13E map |
||
| − | |notes = In level 32 [[Wilderness]], north of [[Venenatis]]. Dig in the area wherein there are several [[Black Knight]]s. |
||
| − | }} |
||
| − | {{Coordinates |
||
| − | |coords = 19 degrees 43 minutes north,<br> |
||
| − | 25 degrees 07 minutes east |
||
| − | |req = None |
||
| − | |fight = [[Zamorak wizard]] |
||
| − | |image = Coordinate clue 19.43N 25.07E.png |
||
| − | |map = 19.43N 25.07E map |
||
| − | |notes = In level 35 [[wilderness]]; just a little south-east of the [[Lava Dragon Isle]] by some [[Chaos dwarf|chaos dwarves]], you will come across four large cave like objects. Dig almost directly in the centre of them. This area can be accessed via the canoe system (requires 57 {{Skill clickpic|Woodcutting}}), just keep heading east from the pond at which you arrive. |
||
| − | }} |
||
| − | {{Coordinates |
||
| − | |coords = 19 degrees 56 minutes north,<br> |
||
| − | 02 degrees 31 minutes west |
||
| − | |req = Partial completion of [[The Fremennik Isles]] |
||
| − | |fight = [[Bandosian guard]] |
||
| − | |image = Coordinate clue 19.56N 02.31W.png |
||
| − | |map = 19.56N 02.31W map |
||
| − | |notes = At the very southeastern part of [[Neitiznot]]. Dig 3 spaces west of the ladder. |
||
| − | }} |
||
| − | |||
| − | ====20==== |
||
| − | {{Coordinates |
||
| − | |coords = 20 degrees 05 minutes north,<br> |
||
| − | 21 degrees 52 minutes east |
||
| − | |req = None |
||
| − | |fight = [[Zamorak wizard]] |
||
| − | |image = Coordinate clue 20.05N 21.52E.png |
||
| − | |map = 20.05N 21.52E map |
||
| − | |notes = In level 36 [[Wilderness]], just north of a pond by some [[moss giant]]s. This can be difficult because of the nearby moss giants and skeletons. The wilderness [[canoe]] destination is a quick way to get here. |
||
| − | |level=3}} |
||
| − | {{Coordinates |
||
| − | |coords = 20 degrees 11 minutes north,<br> |
||
| − | 07 degrees 41 minutes west |
||
| − | |req = None |
||
| − | |fight = [[Armadylian guard]] |
||
| − | |image = Coordinate clue 20.11N 07.41W.png |
||
| − | |map = 20.11N 07.41W map |
||
| − | |notes = In the southwestern area of the [[Pirates' Cove]], near the windswept tree. |
||
| − | |level=4}} |
||
| − | {{Coordinates |
||
| − | |coords = 20 degrees 33 minutes north,<br> |
||
| − | 15 degrees 48 minutes east |
||
| − | |req = None |
||
| − | |fight = [[Zamorak wizard]] |
||
| − | |image = Coordinate clue 20.33N 15.48E.png |
||
| − | |map = 20.33N 15.48E map |
||
| − | |notes = Level 38 [[Wilderness]], the very west side where there is a [[Chaos Temple]]. Dig outside the building, just to the south of the altar. |
||
| − | }} |
||
| − | |||
| − | ====21==== |
||
| − | {{Coordinates |
||
| − | |coords = 21 degrees 24 minutes north,<br> |
||
| − | 17 degrees 54 minutes east |
||
| − | |req = None |
||
| − | |fight = [[Zamorak wizard]] |
||
| − | |image = Coordinate clue 21.24N 17.54E.png |
||
| − | |map = 21.24N 17.54E map |
||
| − | |notes = Level 41 [[wilderness]], in the area with the [[lesser demon]]s, west of the [[Lava Maze]], about three squares west and two squares south of the ladder to the [[King Black Dragon]]'s lair. Do not enter the Lava Maze for this clue. |
||
| − | }} |
||
| − | |||
| − | ====22==== |
||
| − | {{Coordinates |
||
| − | |coords = 22 degrees 30 minutes north,<br> |
||
| − | 03 degrees 01 minutes east |
||
| − | |req = Completion of the [[The Fremennik Trials|Fremennik Trials]] quest |
||
| − | |image = Coordinate clue 22.30N 03.01E.png |
||
| − | |map = 22.30N 03.01E map |
||
| − | |notes = At the end of the path leading to the mining area on [[Miscellania]]. Accessible via [[fairy ring]] code {{Fairycode|CIP}}. |
||
| − | |level=2}} |
||
| − | {{Coordinates |
||
| − | |coords = 22 degrees 35 minutes north,<br> |
||
| − | 19 degrees 18 minutes east |
||
| − | |req = None |
||
| − | |fight = [[Zamorak wizard]] |
||
| − | |image = Coordinate clue 22.35N 19.18E.png |
||
| − | |map = 22.35N 19.18E map |
||
| − | |notes = In the [[Wilderness]] near the two [[runite rock]]s located north of the [[Lava Maze]]. |
||
| − | }} |
||
| − | {{Coordinates |
||
| − | |coords = 22 degrees 45 minutes north,<br> |
||
| − | 26 degrees 33 minutes east |
||
| − | |req = None |
||
| − | |fight = [[Zamorak wizard]] |
||
| − | |image = Coordinate clue 22.45N 26.33E.png |
||
| − | |map = 22.45N 26.33E map |
||
| − | |notes = In the [[Demonic Ruins]] in level 44 [[Wilderness]]. Dig on top of the north-east pentagram, immediately north-west of one of the [[burnt bones]] spawns. |
||
| − | }} |
||
| − | {{Coordinates |
||
| − | |coords = 22 degrees 54 minutes north,<br> |
||
| − | 29 degrees 01 minutes east |
||
| − | |req = None |
||
| − | |fight = [[Bandosian guard]] |
||
| − | |image = Coordinate clue 22.54N 29.01E.png |
||
| − | |map = 22.54N 29.01E map |
||
| − | |notes = At the [[Fountain of Rune]] in the northeastern [[Wilderness]], in the small 'C' shaped wall}} |
||
| − | |||
| − | ====23==== |
||
| − | {{Coordinates |
||
| − | |coords = 23 degrees 03 minutes north,<br> |
||
| − | 02 degrees 01 minutes east |
||
| − | |req = Partial completion of [[Fairytale II - Cure a Queen]] |
||
| − | |fight = [[Saradomin wizard]] |
||
| − | |image = Coordinate clue 23.03N 02.01E.png |
||
| − | |notes = Small island located north of [[Miscellania]]. Only reachable via [[fairy ring]] code {{Fairycode|AJS}}. |
||
| − | }} |
||
| − | |||
| − | ====24==== |
||
| − | {{Coordinates |
||
| − | |coords = 24 degrees 07 minutes north,<br> |
||
| − | 23 degrees 22 minutes east |
||
| − | |req = |
||
| − | |fight = Armadylian guard |
||
| − | |image = 24.07N 23.22E.png |
||
| − | |notes = Inside the [[Wilderness Resource Resource area (3 steps north of the fire). |
||
| − | |map = 24.07N 23.22E map |
||
| − | |level=4}} |
||
| − | {{Coordinates |
||
| − | |coords = 24 degrees 24 minutes north,<br> |
||
| − | 26 degrees 24 minutes east |
||
| − | |req = None |
||
| − | |fight = [[Zamorak wizard]] |
||
| − | |image = Coordinate clue 24.24N 26.24E.png |
||
| − | |map = 24.24N 26.24E map |
||
| − | |notes = In the northern area of the [[Rogues' Castle]] in the [[Wilderness]]. Take caution when travelling here as the deadly [[Chaos Elemental]] lurks nearby. |
||
| − | }} |
||
| − | {{Coordinates |
||
| − | |coords = 24 degrees 56 minutes north,<br> |
||
| − | 22 degrees 28 minutes east |
||
| − | |req = None |
||
| − | |fight = [[Zamorak wizard]] |
||
| − | |image = Coordinate clue 24.56N 22.28E.png |
||
| − | |map = 24.56N 22.28E map |
||
| − | |notes = North of the [[Deserted Keep]] in the [[Wilderness]]. Dig six squares north of the spider web that must be slashed. This area can be reached via the teleport lever in [[East Ardougne]]. |
||
| − | }} |
||
| − | {{Coordinates |
||
| − | |coords = 24 degrees 58 minutes north,<br> |
||
| − | 18 degrees 43 minutes east |
||
| − | |req = None |
||
| − | |fight = [[Zamorak wizard]] |
||
| − | |image = Coordinate clue 24.58N 18.43E.png |
||
| − | |map = 24.58N 18.43E map |
||
| − | |notes = One step north and then one step west of the northern door of the [[Pirates' Hideout]] in the [[Wilderness]]. |
||
| − | }} |
||
| − | |||
| − | ====25==== |
||
| − | {{Coordinates |
||
| − | |coords = 25 degrees 03 minutes north,<br> |
||
| − | 17 degrees 05 minutes east |
||
| − | |req = None |
||
| − | |fight = [[Zamorak wizard]] |
||
| − | |image = Coordinate clue 25.03N 17.05E.png |
||
| − | |map = 25.03N 17.05E map |
||
| − | |notes = North-west of the [[Wilderness Agility Course]] in level 56 [[Wilderness]]. North-eastern corner of the [[Frozen Waste Plateau]]. Reachable via the [[Ancient Magicks|ancient spell]], [[Ghorrock Teleport]] (requires 96 {{Skill clickpic|Magic}}). |
||
| − | |level = 3}} |
||
| − | {{Coordinates |
||
| − | |coords = 25 degrees 03 minutes north,<br> |
||
| − | 23 degrees 24 minutes east |
||
| − | |req = None |
||
| − | |fight = [[Zamorak wizard]] |
||
| − | |image = Coordinate clue 25.03N 23.24E.png |
||
| − | |map = 25.03N 23.24E map |
||
| − | |notes = Immediately north of the [[magic axe]] hut, which is located north-east of the [[Deserted Keep]] in the [[Wilderness]]. Quickly reachable by pulling the [[Ardougne teleport lever]] in [[East Ardougne]] and running north-east from the [[Deserted Keep]]. |
||
| − | }} |
||
| − | {{Coordinates |
||
| − | |coords = 25 degrees 03 minutes north,<br> |
||
| − | 29 degrees 22 minutes east |
||
| − | |req = None |
||
| − | |fight = [[Bandosian guard]] |
||
| − | |image = Coordinate clue 25.03N 29.22E.png |
||
| − | |map = 25.03N 29.22E map |
||
| − | |notes = On the peninsula in the north-easternmost corner of the [[Wilderness]], north of the [[Wilderness Volcano]]. |
||
| − | }} |
||
Latest revision as of 11:49, 28 July 2019
Medium Coordinates: 00 01 02 03 04 05 06 07 08 09 10 11 12 13 14 15 16 17 18 19 20 21 22 23 24 25
Hard Coordinates: 00 01 02 03 04 05 06 07 08 09 10 11 12 13 14 15 16 17 18 19 20 21 22 23 24 25
Elite Coordinates: 00 01 02 03 04 05 06 07 08 09 10 11 12 13 14 15 16 17 18 19 20 21 22 23 24 25
Master Coordinates: 00 01 02 03 04 05 06 07 08 09 10 11 12 13 14 15 16 17 18 19 20 21 22 23 24 25
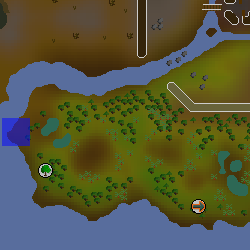
During a Treasure Trail, a coordinate clue is a clue scroll that contains a set of coordinates. Much like the real-world longitude & latitude geographic coordinate system, coordinates in RuneScape indicate a precise point somewhere on the surface where the next clue scroll, or potentially the treasure casket, is buried. Coordinates are presented in the following format:
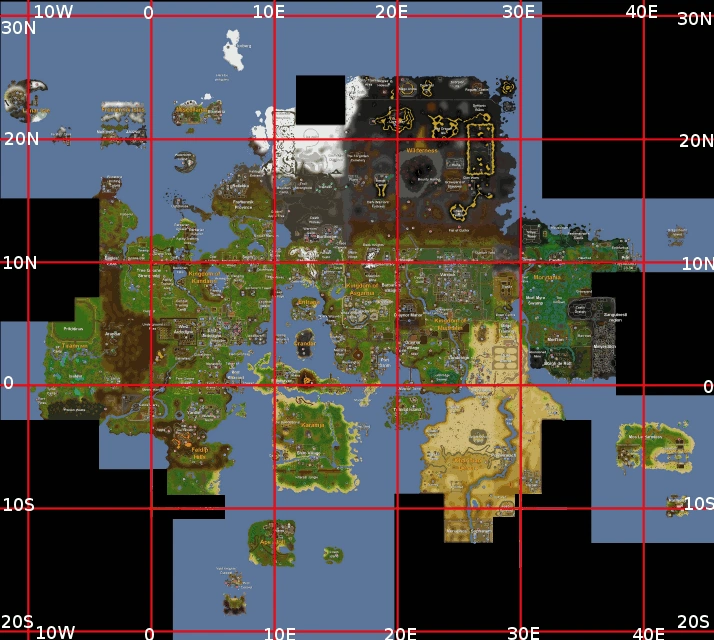
03 degrees 00 minutes north/south
02 degrees 00 minutes east/west
In RuneScape, one square of space is equivalent to 1.875 minutes.
Although a chart, sextant and watch may be used to determine one's present coordinates, players only need a spade in their inventory to dig up the clue.
On hard Treasure Trails, digging on the correct spot will cause a level 108 Saradomin wizard to appear, which must be defeated before the next clue scroll or the treasure casket may be dug up. If the coordinates are located in the Wilderness, a weaker level 65 Zamorak wizard will appear instead, which must also be defeated in order to dig up the next clue scroll or the treasure casket. Saradomin wizards are poisonous and use both Melee, using a Dragon dagger (p++), and the Magic spell Saradomin Strike. It is advised to wear dragonhide armour and use the Protect from Melee prayer when fighting Saradomin wizards. Zamorak wizards use only the spell Flames of Zamorak. It is advised to use the Protect from Magic prayer when fighting the Zamorak wizard in the Wilderness, and to look out for player-killers, as other players can interrupt your fight.
On elite Treasure Trails, digging on the correct spot will cause either a level 97 Armadylian guard or a level 125 Bandosian guard to appear, which must be defeated before the next clue scroll or the treasure casket may be dug up. Armadylian guards must be killed with either Ranged or Magic attacks, since they are in the form of an Aviansie. It is advised to use the Protect from Missiles prayer when fighting them, and Protect from Melee when fighting Bandosian guards.
Due to the current threat of player-killers, if the coordinates for your scroll is near level 36 Wilderness, it is advisable to use the waka canoe, which requires 57 Woodcutting. This can take you to level 36 Wilderness so that potential player-killers don't immediately spot you going into the Wilderness and kill you. In addition, potential player-killers won't know whether you went into the Wilderness or to a different area. As a result, you should go to one or more different locations, and then take the waka to the Wilderness. This is because if another player spots you in the Wilderness, they might attempt to kill you. Using a games necklace and teleporting to Corporeal Beast works in similar fashion.
On master Treasure Trails, digging in the correct spot will cause either three Ancient Wizards (levels 112, 98, 98) in multi-combat, or a level 140 Brassican Mage, which need to be defeated before the next clue scroll or the treasure casket may be dug up. If the coordinates are located in a multi-combat area, three Ancient wizards each attacking with a unique attack style. Melee wizards are poisonous with poison dealing 8 damage to a player. In single-combat zones, a Brassican Mage will appear, and its attacks cannot be stopped by protection prayers.
Following is a list of all known coordinate clues and their corresponding locations. The list is organised into ascending numerical value (for example, 00:00 north first, then 00:05 south, then 00:13 north, continuing accordingly). Shorthand writing is used together with normal writing. An example: 09.34N, 25.12E = 09 degrees and 34 minutes north, 25 degrees and 12 minutes east.
Remember: You must have a spade with you to dig up coordinate clues.
Note that some of the clues may require skill or quest requirements before you will be able to get to that location.' These quests, which must be finished or partially completed, include: Bone Voyage, Regicide, Legends' Quest, Nature Spirit, The Grand Tree, Fairytale II - Cure a Queen, Troll Stronghold, Cabin Fever, The Fremennik Trials, and Watchtower. Some coordinates will also require a certain skill levels to complete the clue, though the required level is low.
Medium Coordinates
Quick links: 00 01 02 03 04 05 06 07 08 09 10 11 12 13 14 15 16 17 18 19 20 21 22 23 24 25
| Coordinates | Shorthand | Requirements | Fight |
|---|---|---|---|
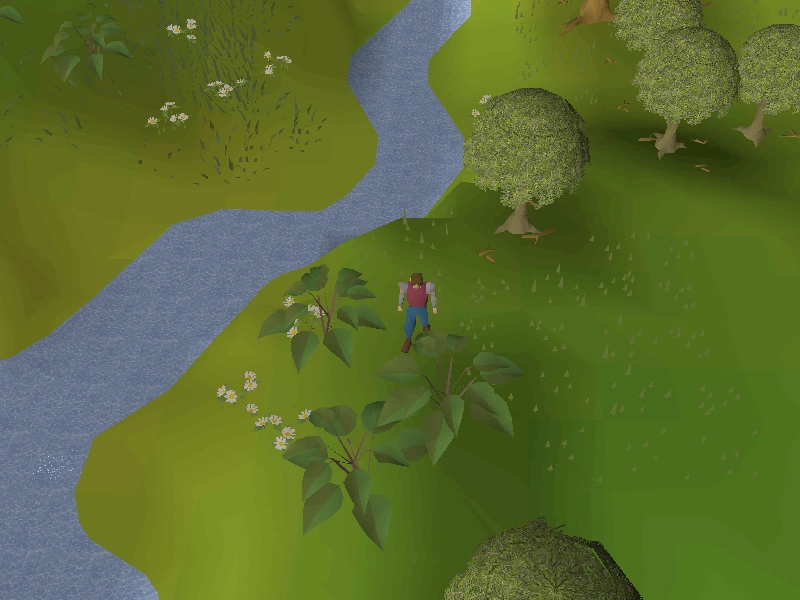
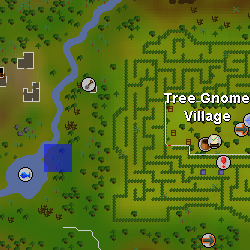
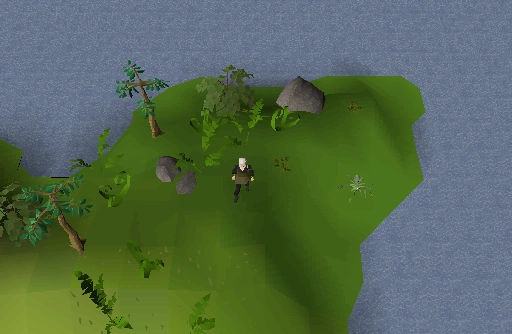
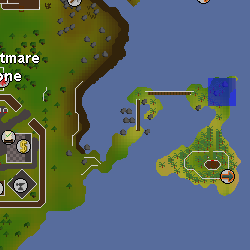
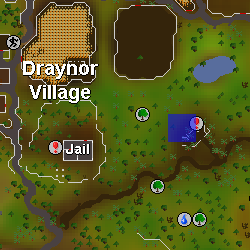
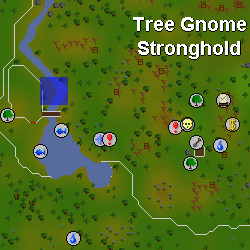
| 00 degrees 05 minutes south, 01 degrees 13 minutes east |
00.05S, 01.13E |
None. | |
| Image | Map | ||
|
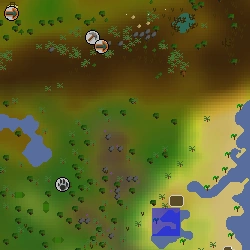
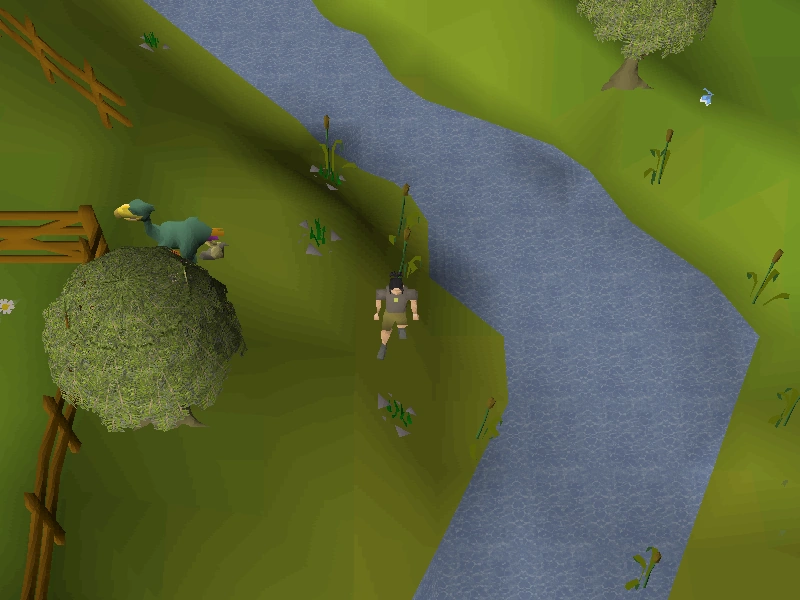
| ||
| Location notes | |||
| West of the Tree Gnome Village, almost directly south of the fruit tree patch. On the east side of the river from the Observatory. | |||
| Coordinates | Shorthand | Requirements | Fight |
|---|---|---|---|
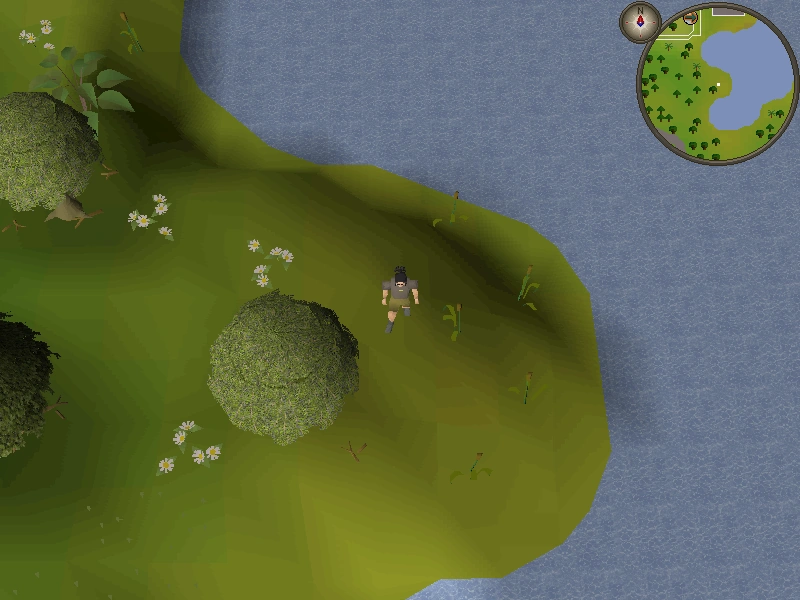
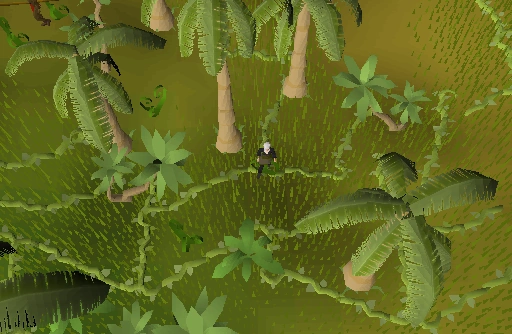
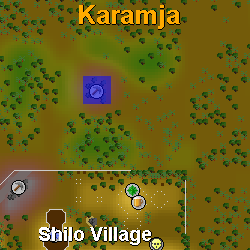
| 00 degrees 13 minutes south, 13 degrees 58 minutes east |
00.13S, 13.58E |
None. | |
| Image | Map | ||
|
| ||
| Location notes | |||
| On Karamja, west of the general store in the free-to-play section of the island, in the middle of the two small lakes. Close to Amulet of glory teleport. | |||
| Coordinates | Shorthand | Requirements | Fight |
|---|---|---|---|
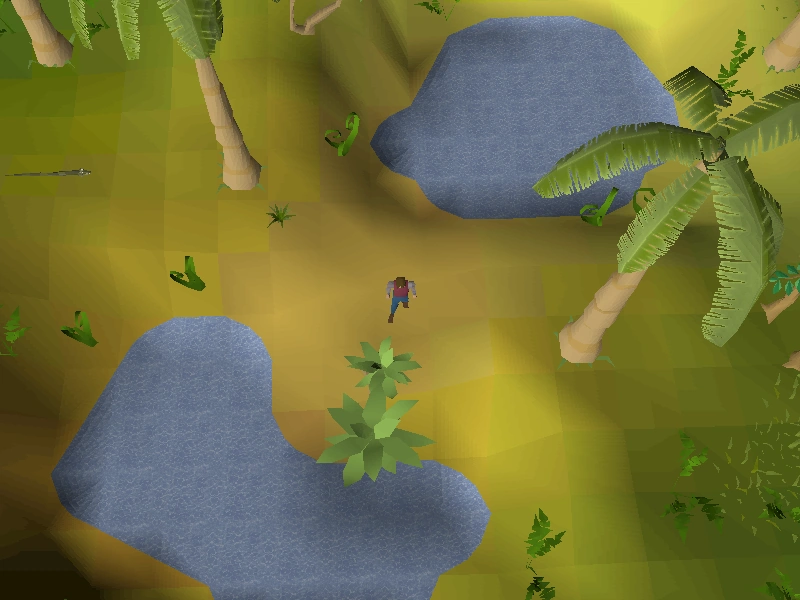
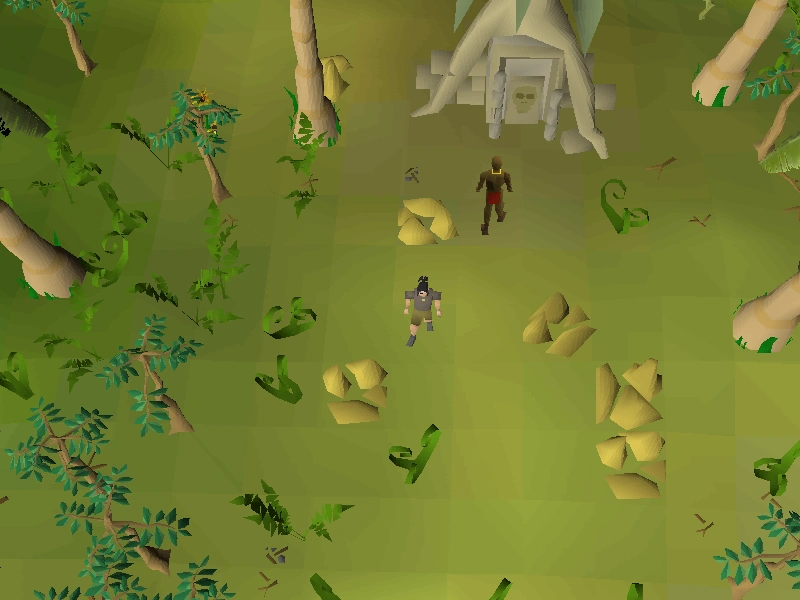
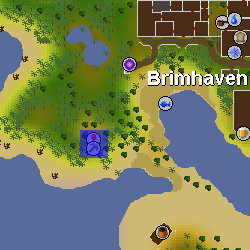
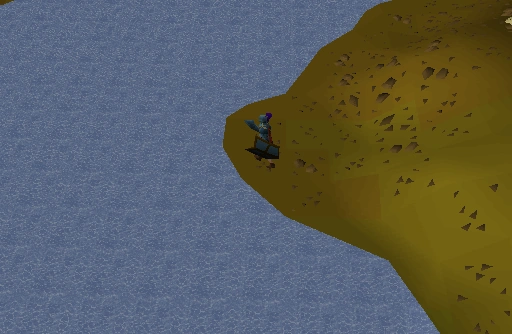
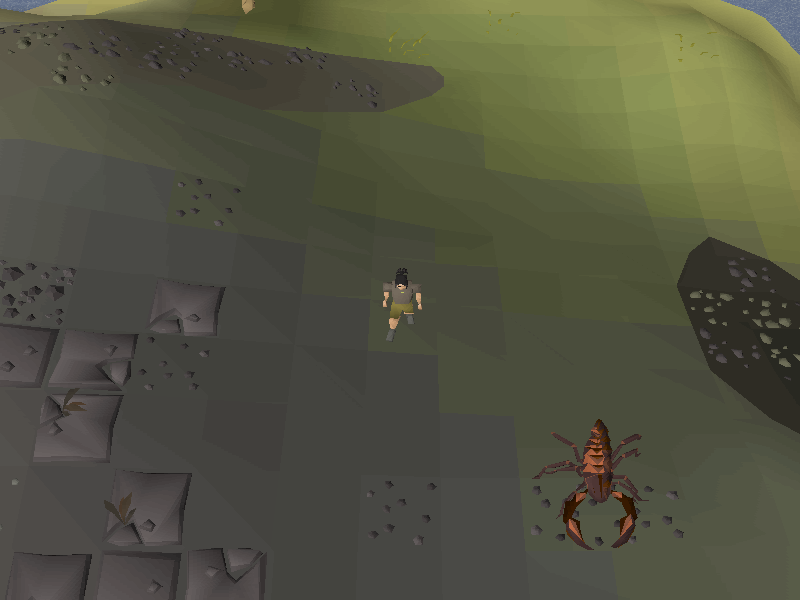
| 00 degrees 18 minutes south, 09 degrees 28 minutes east |
00.18S, 09.28E |
None. | |
| Image | Map | ||
|
| ||
| Location notes | |||
| South-west of Brimhaven at the gold mine near the entrance to the Brimhaven Dungeon. Dig one space south of the gold rock in front of the dungeon door. | |||
| Coordinates | Shorthand | Requirements | Fight |
|---|---|---|---|
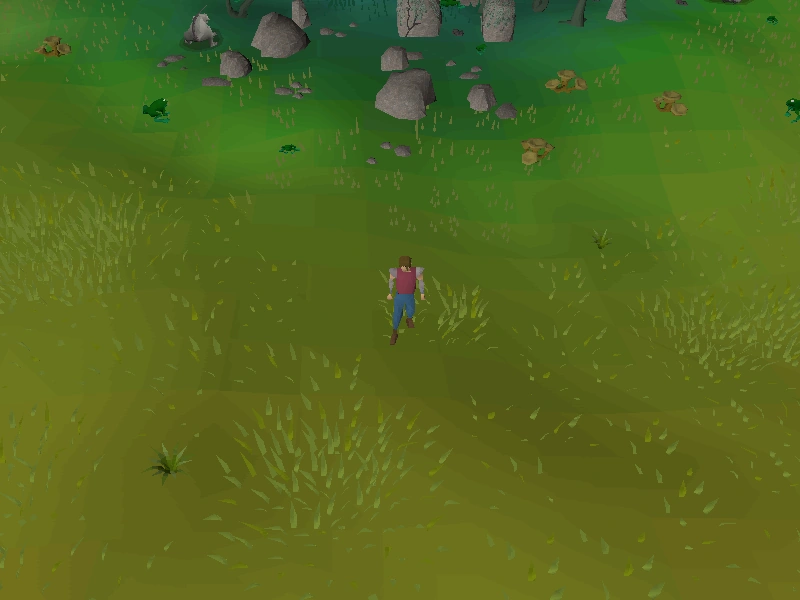
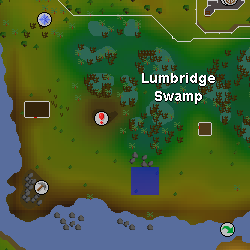
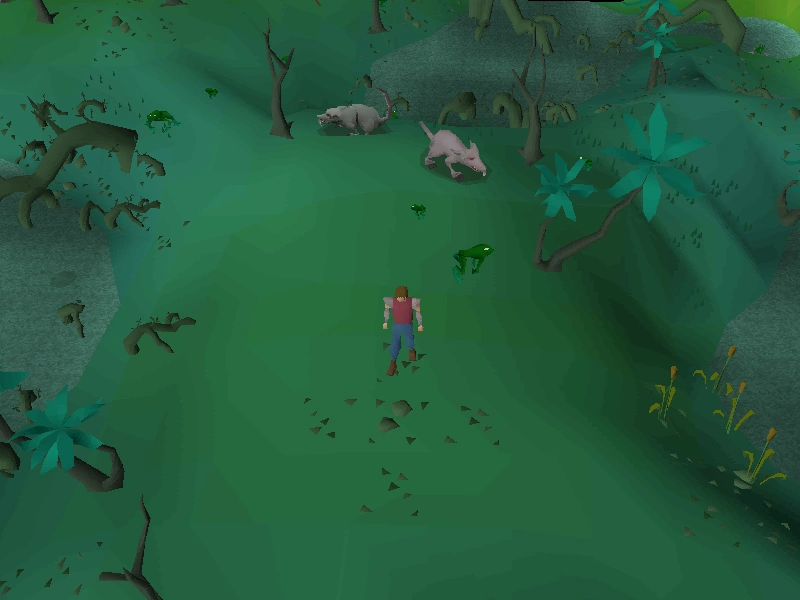
| 00 degrees 20 minutes south, 23 degrees 15 minutes east |
00.20S, 23.15E |
None. | |
| Image | Map | ||
|
| ||
| Location notes | |||
| South of the Water altar ruins. | |||
| Coordinates | Shorthand | Requirements | Fight |
|---|---|---|---|
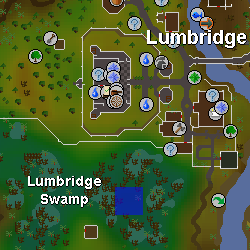
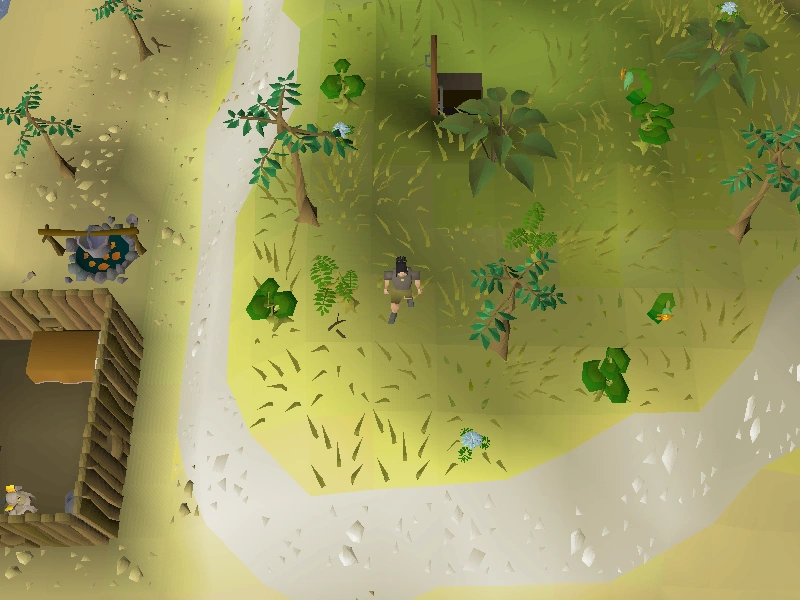
| 00 degrees 30 minutes north, 24 degrees 16 minutes east |
00.30N, 24.16E |
None. | |
| Image | Map | ||
|
| ||
| Location notes | |||
| North-east of the Zanaris shed entrance located in the Lumbridge Swamp. | |||
| Coordinates | Shorthand | Requirements | Fight |
|---|---|---|---|
| 00 degrees 31 minutes south, 17 degrees 43 minutes east |
00.31S, 17.43E |
None. | |
| Image | Map | ||
|
| ||
| Location notes | |||
| South of Port Sarim, just south of the ladder to the Asgarnian Ice Dungeon, on the edge of the cliff. Close to fairy ring AIQ. | |||
| Coordinates | Shorthand | Requirements | Fight |
|---|---|---|---|
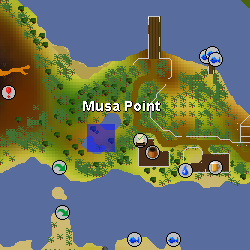
| 01 degrees 18 minutes south, 14 degrees 15 minutes east |
01.18S, 14.15E |
None. | |
| Image | Map | ||
|

| ||
| Location notes | |||
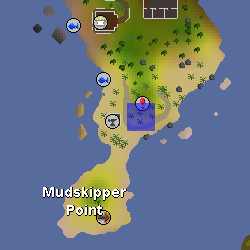
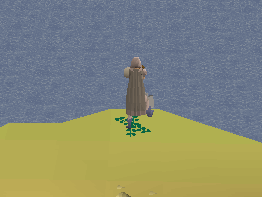
| Across the water from Musa Point, on the western seaweed spawn next to the river. Tiadeche from the Tai Bwo Wannai Trio quest can be found to the east. Use fairy ring code DKP or the gnome glider transport to Karamja. | |||
| Coordinates | Shorthand | Requirements | Fight |
|---|---|---|---|
| 01 degrees 26 minutes north, 08 degrees 01 minutes east |
01.26N, 08.01E |
10 |
|
| Image | Map | ||
|
| ||
| Location notes | |||
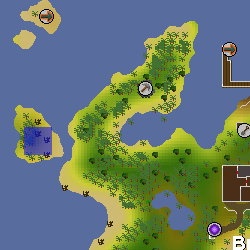
| In the centre of Moss Giant Island west of Brimhaven. The island can be found by swinging on the rope swings west of Brimhaven. | |||
| Coordinates | Shorthand | Requirements | Fight |
|---|---|---|---|
| 01 degrees 35 minutes south, 07 degrees 28 minutes east |
01.35S, 07.28E |
None. | |
| Image | Map | ||
|
| ||
| Location notes | |||
| On the penisula to Hazelmere's house, directly east of Yanille. Use the fairy ring code CLS and run north. Dig between a boulder, a leafy tree, and a creeping plant. | |||
| Coordinates | Shorthand | Requirements | Fight |
|---|---|---|---|
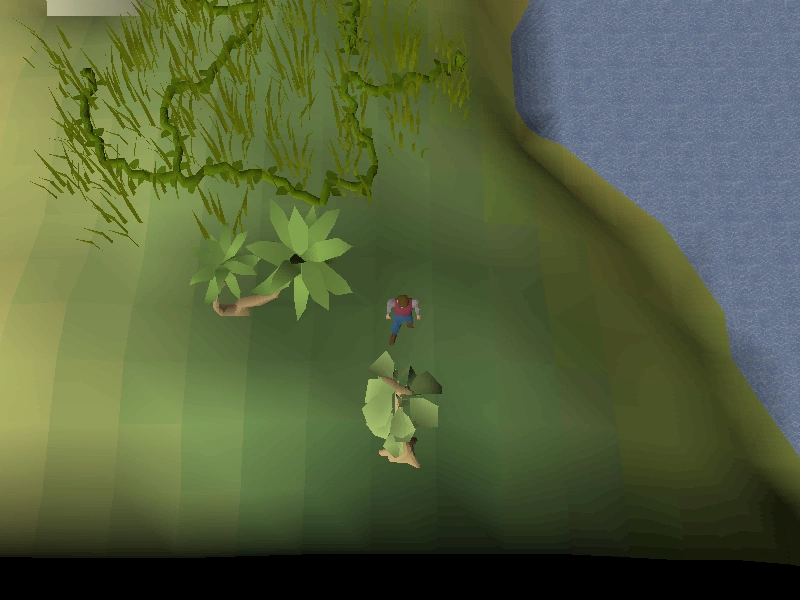
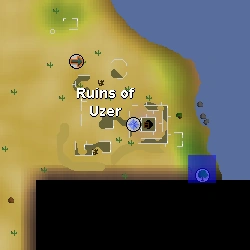
| 02 degrees 43 minutes south, 33 degrees 26 minutes east |
02.43S, 33.26E |
None. | |
| Image | Map | ||
|
| ||
| Location notes | |||
| Directly north of the teak tree south-east of Uzer. Can be reached relatively easily via fairy ring DLQ in Nardah by running north and then east following the map border. | |||
| Coordinates | Shorthand | Requirements | Fight |
|---|---|---|---|
| 02 degrees 48 minutes north, 22 degrees 30 minutes east |
02.48N, 22.30E |
None. | |
| Image | Map | ||

|
| ||
| Location notes | |||
| Just west of the trapdoor leading to the H.A.M. Hideout, dig 2 spaces east and 1 south of the nearest tree to the building. | |||
| Coordinates | Shorthand | Requirements | Fight |
|---|---|---|---|
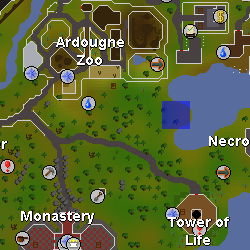
| 02 degrees 50 minutes north, 06 degrees 20 minutes east |
02.50N, 06.20E |
None. | |
| Image | Map | ||
|
| ||
| Location notes | |||
| South of Ardougne Zoo, on a small cape. Can be reached easily via DJP next to the Tower of Life. | |||
| Coordinates | Shorthand | Requirements | Fight |
|---|---|---|---|
| 03 degrees 07 minutes south, 03 degrees 41 minutes west |
03.07S, 03.41W |
None. | |
| Image | Map | ||
|
| ||
| Location notes | |||
| Just south-west of Castle Wars, fairy ring code BKP. | |||
| Coordinates | Shorthand | Requirements | Fight |
|---|---|---|---|
| 03 degrees 35 minutes south, 13 degrees 35 minutes east |
03.35S, 13.35E |
None. | |
| Image | Map | ||
|
| ||
| Location notes | |||
| On Karamja, north of the nature altar. | |||
| Coordinates | Shorthand | Requirements | Fight |
|---|---|---|---|
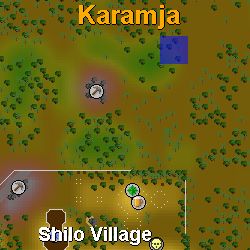
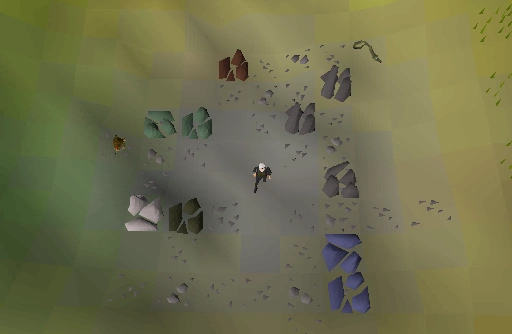
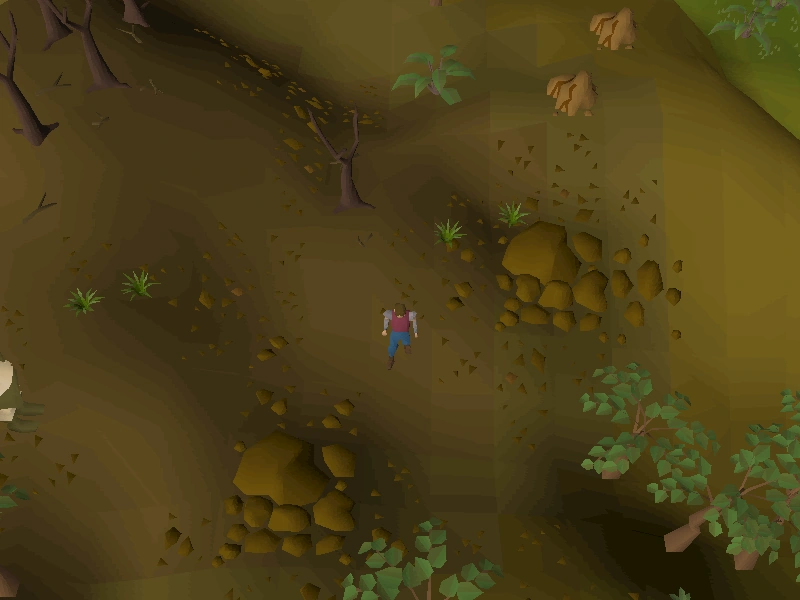
| 04 degrees 00 minutes south, 12 degrees 46 minutes east |
04.00S, 12.46E |
None. | |
| Image | Map | ||
|
| ||
| Location notes | |||
| In the centre of the mine, north of Shilo Village. This is not the gem rock mine, but rather the one just north-west of the nature altar, where you find volencia moss during the Jungle Potion quest. Dig two spaces north-west of a mithril rock. You can use fairy ring code CKR and run north. | |||
| Coordinates | Shorthand | Requirements | Fight |
|---|---|---|---|
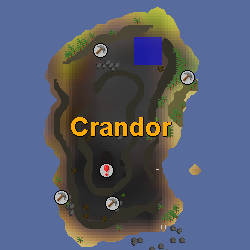
| 04 degrees 13 minutes north, 12 degrees 45 minutes east |
04.13N, 12.45E |
Partial completion of Dragon Slayer | |
| Image | Map | ||
|
| ||
| Location notes | |||
| North side of Crandor. King Scorpions can be aggressive to low levelled players. | |||
| Coordinates | Shorthand | Requirements | Fight |
|---|---|---|---|
| 05 degrees 20 minutes south, 04 degrees 28 minutes east |
05.20S, 04.28E |
None. | |
| Image | Map | ||
|
| ||
| Location notes | |||
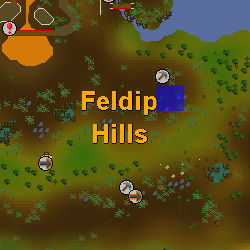
| Feldip Hills, south-east of Gu'Tanoth and north of fairy ring code AKS. | |||
| Coordinates | Shorthand | Requirements | Fight |
|---|---|---|---|
| 05 degrees 43 minutes north, 23 degrees 05 minutes east |
05.43N, 23.05E |
None. | |
| Image | Map | ||
|
| ||
| Location notes | |||
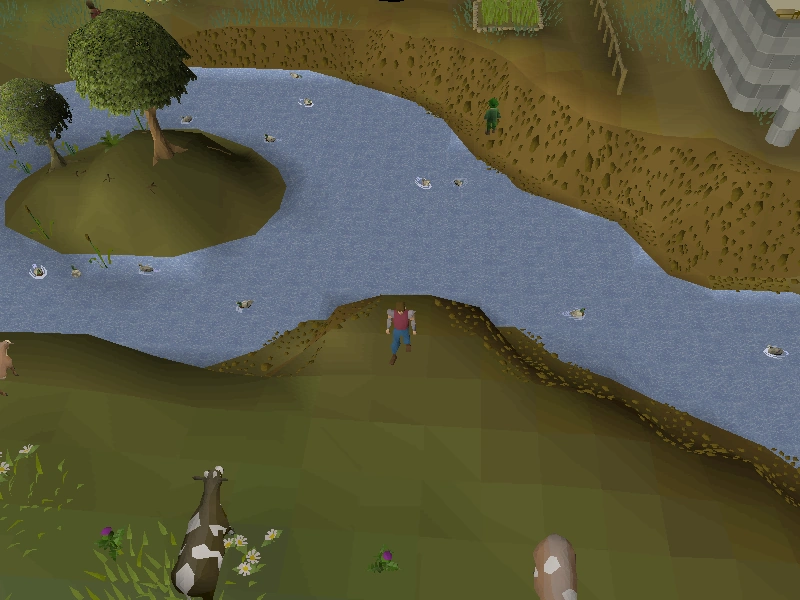
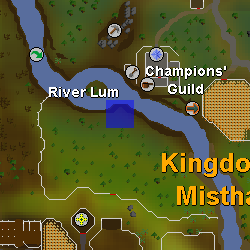
| Just south of the Champions' Guild, opposite side of the River Lum in Lumbridge | |||
| Coordinates | Shorthand | Requirements | Fight |
|---|---|---|---|
| 06 degrees 31 minutes north, 01 degrees 46 minutes west |
06.31N, 01.46W |
None. | |
| Image | Map | ||
|
| ||
| Location notes | |||
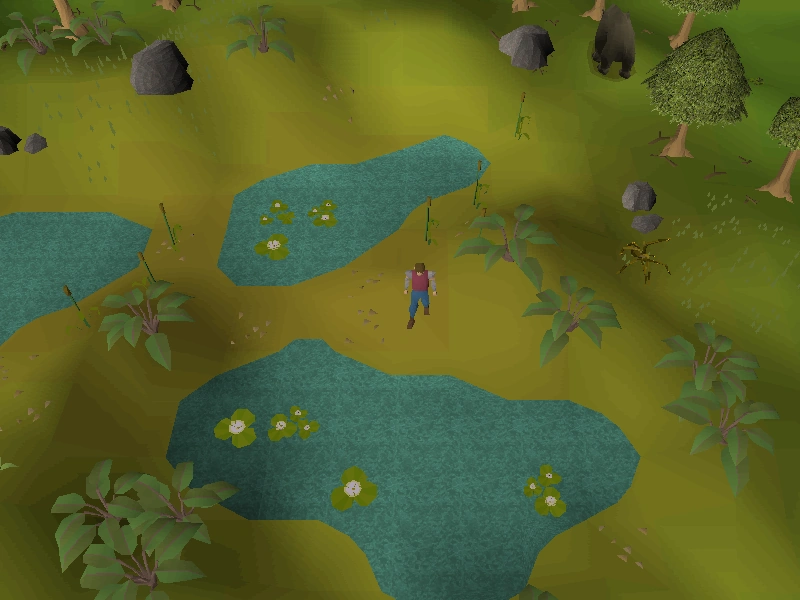
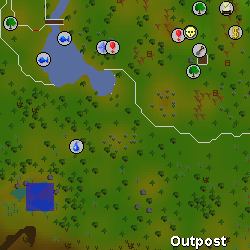
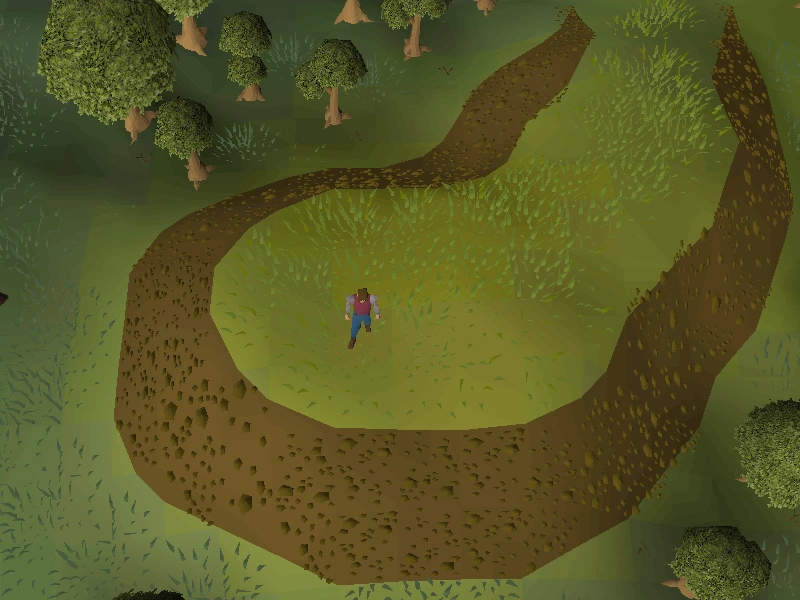
| Travel south-west of the Tree Gnome Stronghold, and you will come across three ponds. Dig in between the two eastern ponds. Easily reached by teleporting with the Necklace of passage by teleporting to the Outpost. | |||
| Coordinates | Shorthand | Requirements | Fight |
|---|---|---|---|
| 06 degrees 41 minutes north, 27 degrees 15 minutes east |
06.41N, 27.15E |
None | |
| Image | Map | ||
|
| ||
| Location notes | |||
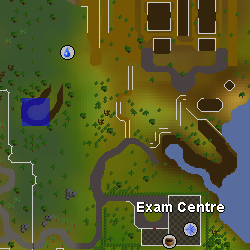
| Dig on the hill north-west of the Exam Centre. | |||
| Coordinates | Shorthand | Requirements | Fight |
|---|---|---|---|
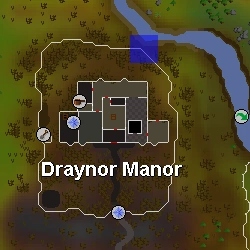
| 06 degrees 58 minutes north, 21 degrees 16 minutes east |
06.58N, 21.16E |
None. | |
| Image | Map | ||
|
| ||
| Location notes | |||
| Located at the north-east fence outside of Draynor Manor, on the southern side of the River Lum. | |||
| Coordinates | Shorthand | Requirements | Fight |
|---|---|---|---|
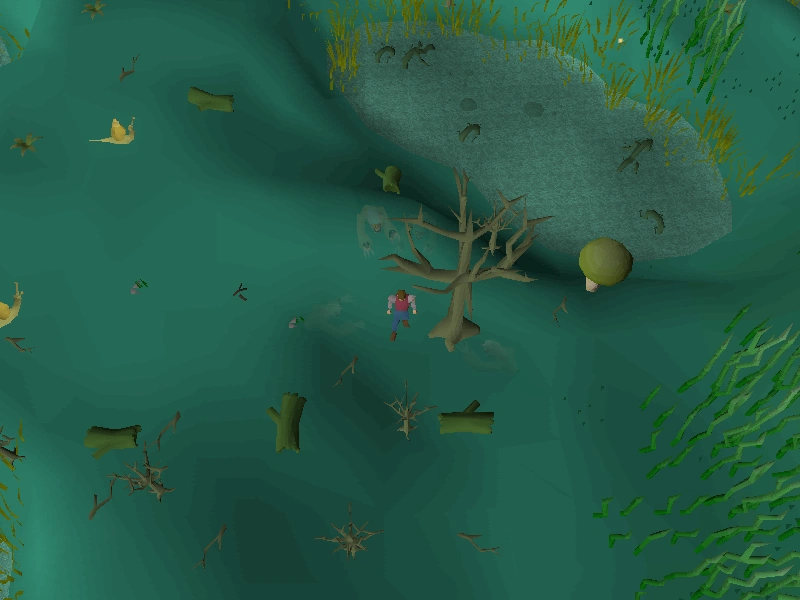
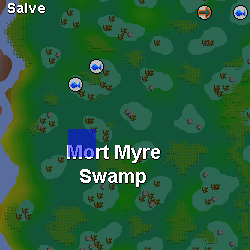
| 07 degrees 05 minutes north, 30 degrees 56 minutes east |
07.05N, 30.56E |
Priest in Peril (to enter Canifis) | |
| Image | Map | ||
|
| ||
| Location notes | |||
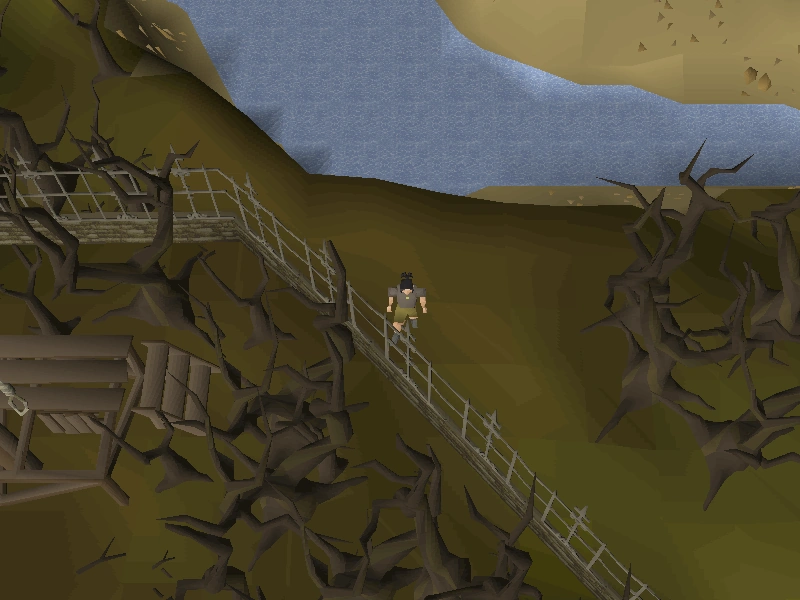
| In Mort Myre Swamp, north of the Nature Grotto. Next pond south of the two most western fishing spots. Dig west of a rotting swamp tree. Note that there are ghasts in the swamp, so be sure to bring some druid pouches. One can use fairy ring BKR and run south-west. | |||
| Coordinates | Shorthand | Requirements | Fight |
|---|---|---|---|
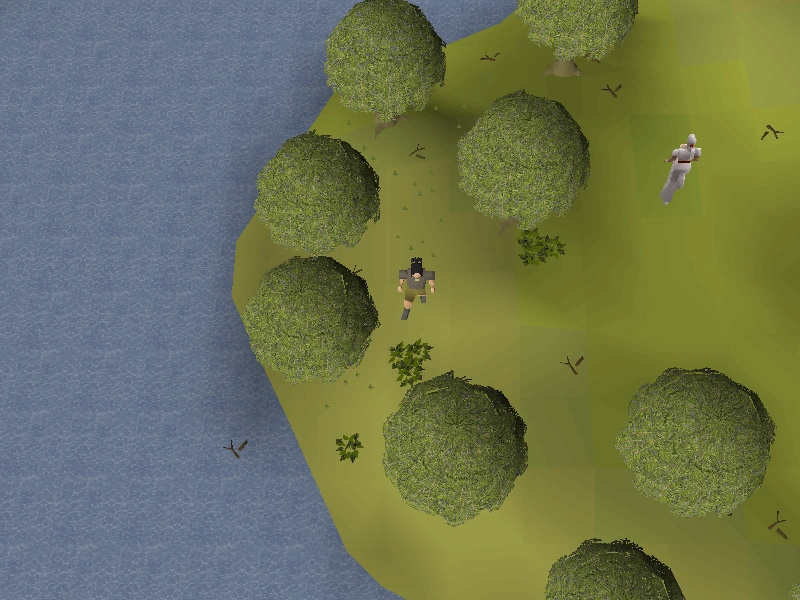
| 07 degrees 33 minutes north, 15 degrees 00 minutes east |
07.33N, 15.00E |
None. | |
| Image | Map | ||
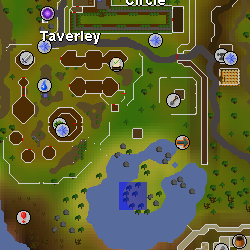
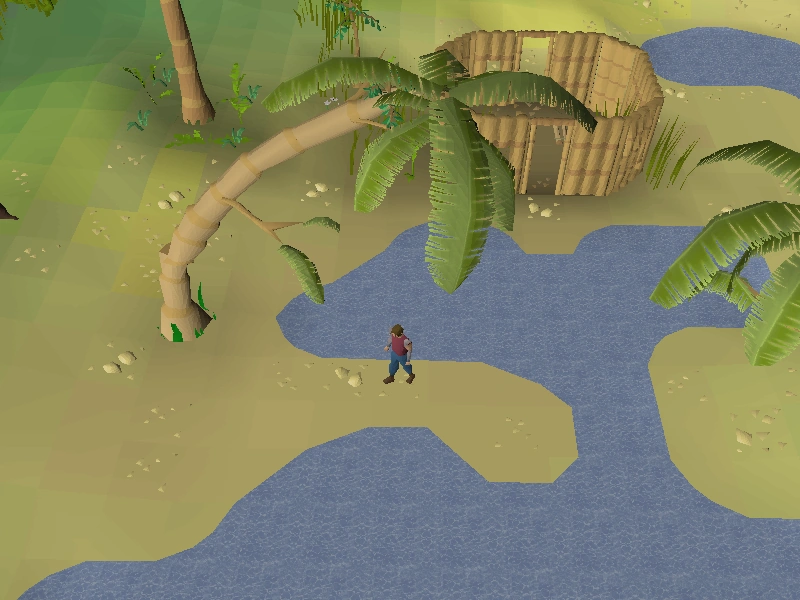
|
| ||
| Location notes | |||
| South-east of Taverley, on the peninsula where the Lady of the Lake wanders around. Dig north of the non-examinable bush on the western part of the peninsula. | |||
| Coordinates | Shorthand | Requirements | Fight |
|---|---|---|---|
| 08 degrees 11 minutes south, 04 degrees 48 minutes east |
08.11S, 04.48E |
Spade | |
| Image | Map | ||
|
| ||
| Location notes | |||
| South-east edge of Feldip Hills, by the crimson swifts. South-east of fairy ring AKS. | |||
| Coordinates | Shorthand | Requirements | Fight |
|---|---|---|---|
| 08 degrees 33 minutes north, 01 degrees 39 minutes west |
08.33N, 01.39W |
None. | |
| Image | Map | ||
|
| ||
| Location notes | |||
| At Tree Gnome Stronghold, in the south-western section there is a bridge, and a pen containing terrorbirds. Open the gate in the east of the pen and go to the edge of the river as far east as possible and dig there. | |||
| Coordinates | Shorthand | Requirements | Fight |
|---|---|---|---|
| 09 degrees 33 minutes north, 02 degrees 15 minutes east |
09.33N, 02.15E |
Started Waterfall Quest
Rope |
|
| Image | Map | ||
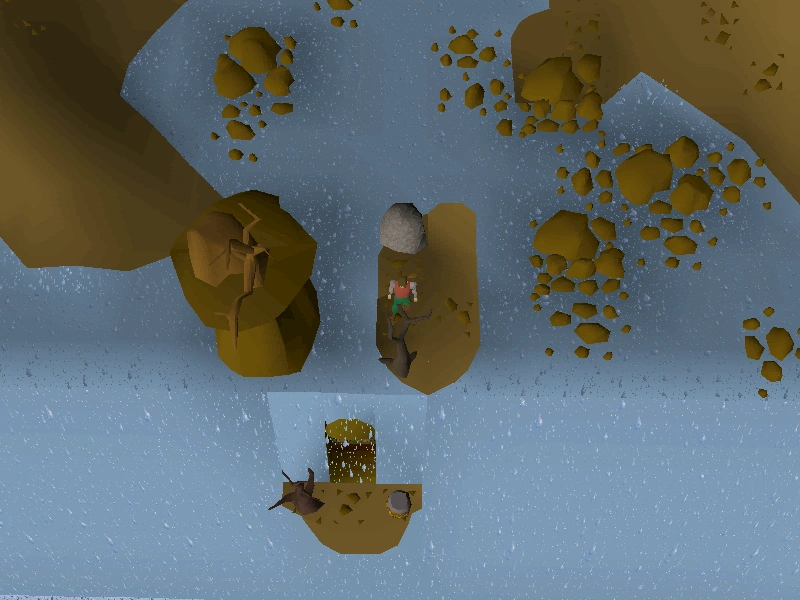
|
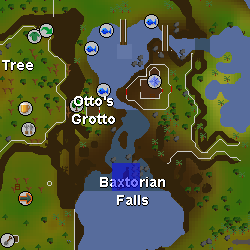
| ||
| Location notes | |||
| Go to the Baxtorian Falls, board the log raft, use a rope with the rock to get to the second island with the dead tree. Dig north of the dead tree. | |||
| Coordinates | Shorthand | Requirements | Fight |
|---|---|---|---|
| 09 degrees 35 minutes north, 01 degrees 50 minutes west |
09.35N, 01.50W |
None. | |
| Image | Map | ||
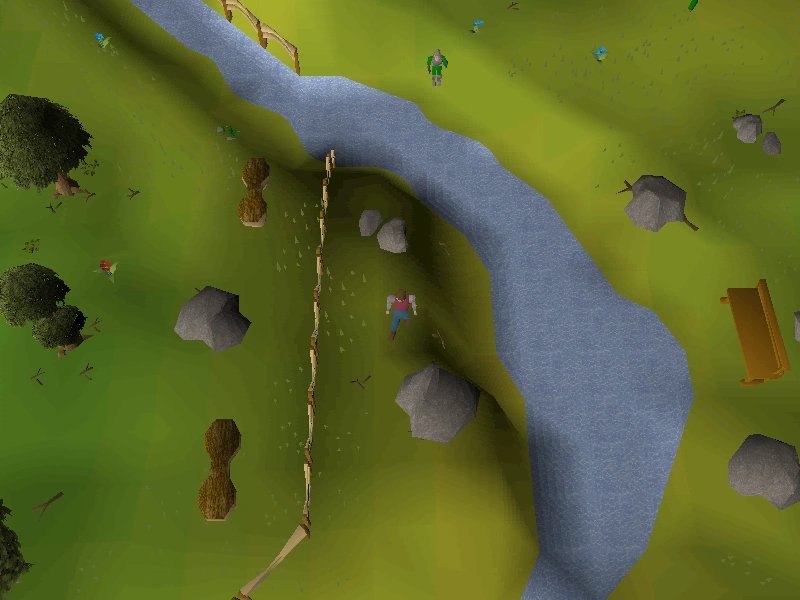
|
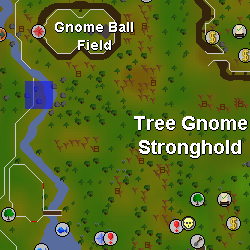
| ||
| Location notes | |||
| This is on the west side of the river in the Gnome Stronghold. Walk north of the terrorbird pen and dig right above the rock. | |||
| Coordinates | Shorthand | Requirements | Fight |
|---|---|---|---|
| 09 degrees 48 minutes north, 17 degrees 39 minutes east |
09.48N, 17.39E |
None. | |
| Image | Map | ||
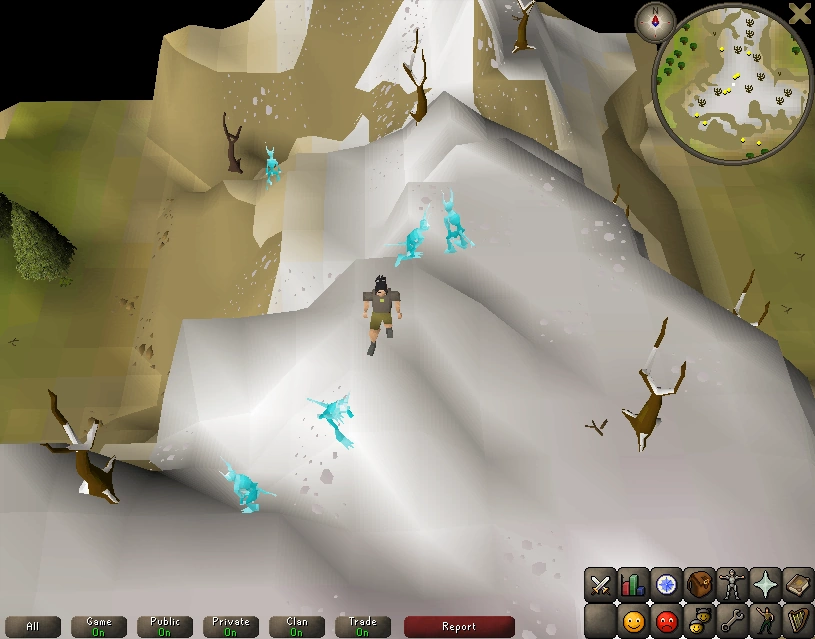
|
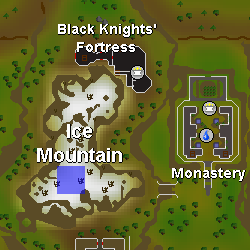
| ||
| Location notes | |||
| Ice Mountain, located north of Barbarian Village. | |||
| Coordinates | Shorthand | Requirements | Fight |
|---|---|---|---|
| 10 degrees 45 minutes north, 04 degrees 31 minutes east |
10.45N, 04.31E |
20 Agility for Shortcut | |
| Image | Map | ||
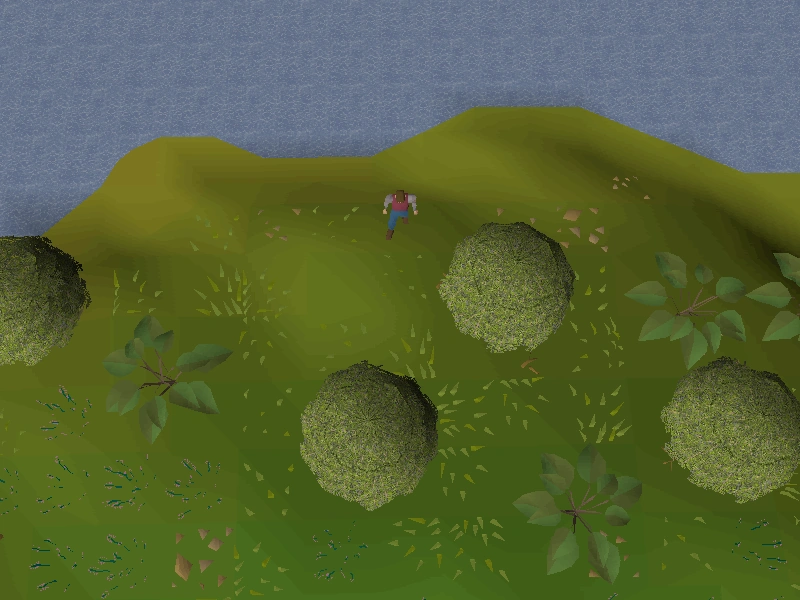
|
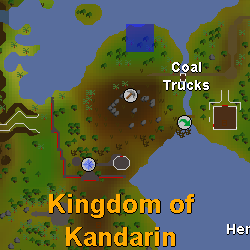
| ||
| Location notes | |||
| By the shore line north of the Coal Trucks. | |||
| Coordinates | Shorthand | Requirements | Fight |
|---|---|---|---|
| 11 degrees 03 minutes north, 31 degrees 20 minutes east |
11.03N, 31.20E |
Completion of Priest in Peril | |
| Image | Map | ||
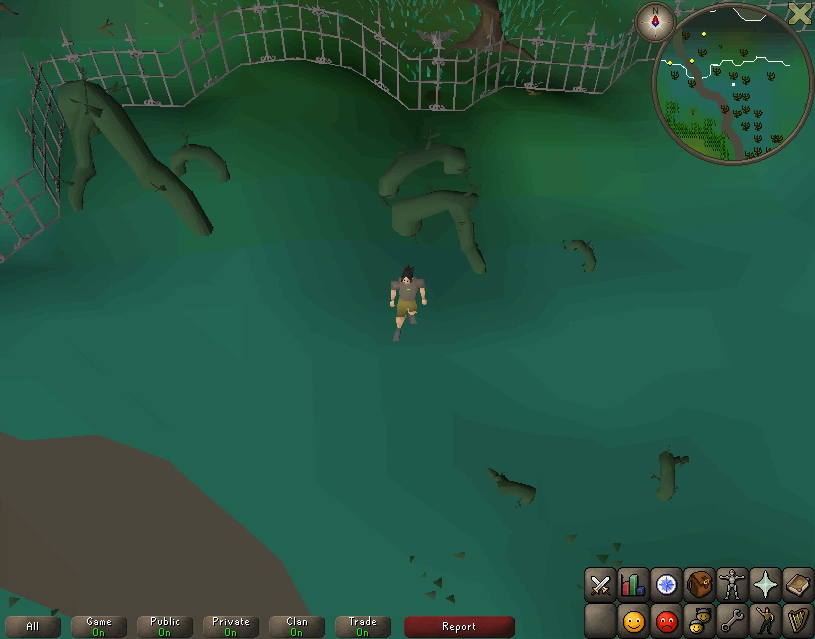
|
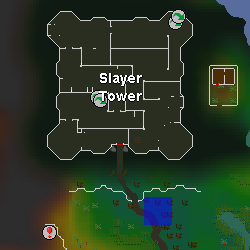
| ||
| Location notes | |||
| South of the big roots that are found east of the path to the Slayer Tower. North of the fairy ring code CKS. | |||
| Coordinates | Shorthand | Requirements | Fight |
|---|---|---|---|
| 11 degrees 05 minutes north, 00 degrees 45 minutes west |
11.05N, 00.45W |
None. | |
| Image | Map | ||
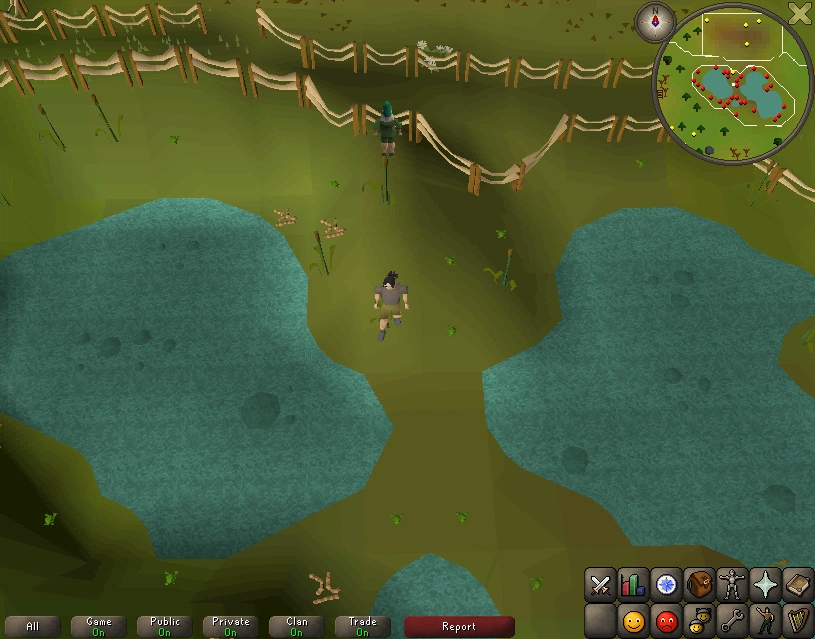
|
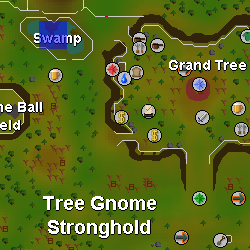
| ||
| Location notes | |||
| In the swamp located in the north-west corner of the Tree Gnome Stronghold, west of the Grand Tree, directly south of the tortoise pen. | |||
| Coordinates | Shorthand | Requirements | Fight |
|---|---|---|---|
| 11 degrees 18 minutes north, 30 degrees 54 minutes east |
11.18N, 30.54E |
Completion of Priest in Peril. | |
| Image | Map | ||
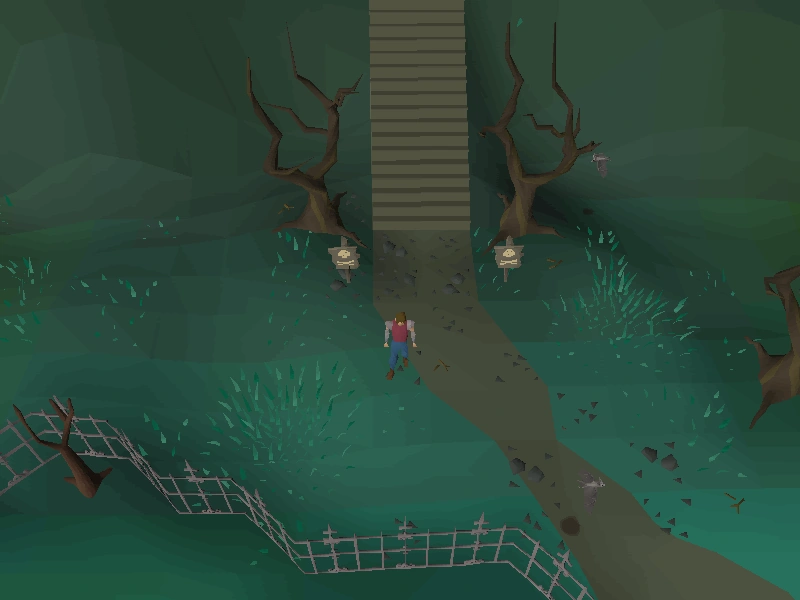
|
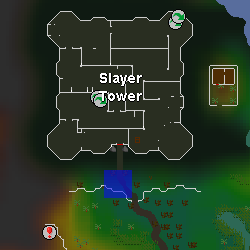
| ||
| Location notes | |||
| On the path to the Slayer Tower, just before the entrance. Easily reached by teleporting with fairy ring code CKS. | |||
| Coordinates | Shorthand | Requirements | Fight |
|---|---|---|---|
| 11 degrees 33 minutes north, 02 degrees 24 minutes west |
11.33N, 02.24W |
None. | |
| Image | Map | ||
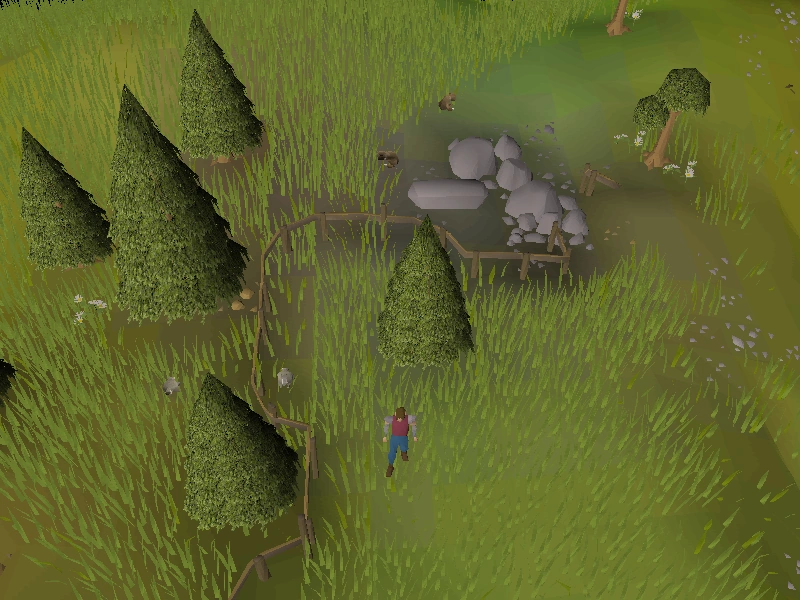
|
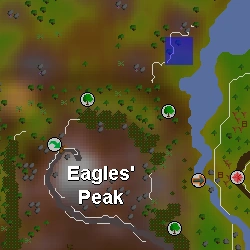
| ||
| Location notes | |||
| North-east of Eagles' Peak. Dig on the eastern side of the fence just slightly south of the coniferous tree. Easily reached by teleporting with the fairy rings with code AKQ. | |||
| Coordinates | Shorthand | Requirements | Fight |
|---|---|---|---|
| 11 degrees 41 minutes north, 14 degrees 58 minutes east |
11.41N, 14.58E |
None. | |
| Image | Map | ||
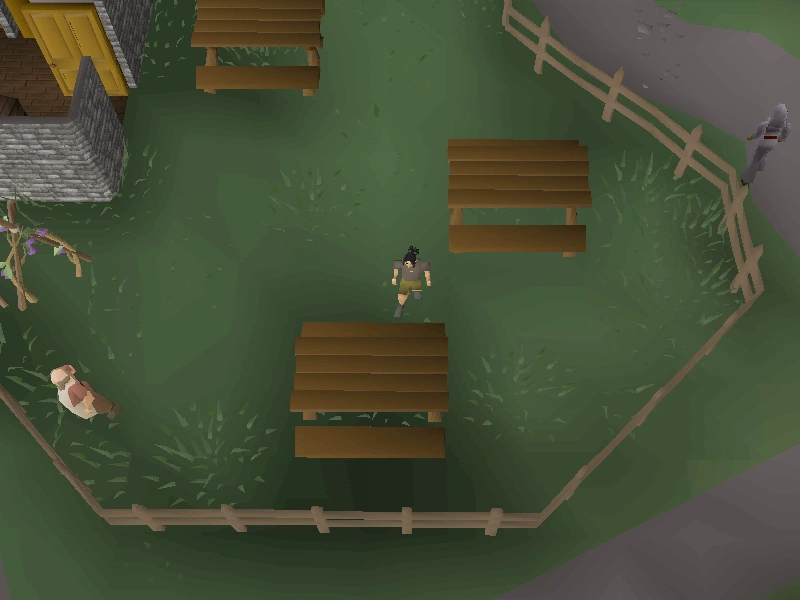
|
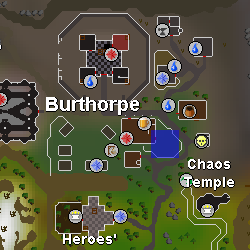
| ||
| Location notes | |||
| Immediately north of a table in Burthorpe located east of the pub and west of Turael's house. | |||
| Coordinates | Shorthand | Requirements | Fight |
|---|---|---|---|
| 12 degrees 28 minutes north, 34 degrees 37 minutes east |
12.28N, 34.37E |
Priest in Peril | |
| Image | Map | ||

|
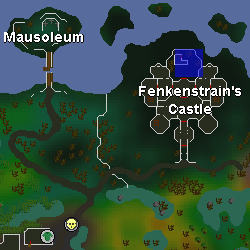
| ||
| Location notes | |||
| In the castle grounds of Fenkenstrain's Castle in Morytania. Dig two steps north of the northernmost door. | |||
| Coordinates | Shorthand | Requirements | Fight |
|---|---|---|---|
| 13 degrees 28 minutes north, 29 degrees 43 minutes east |
13.28N, 29.43E |
None. | |
| Image | Map | ||
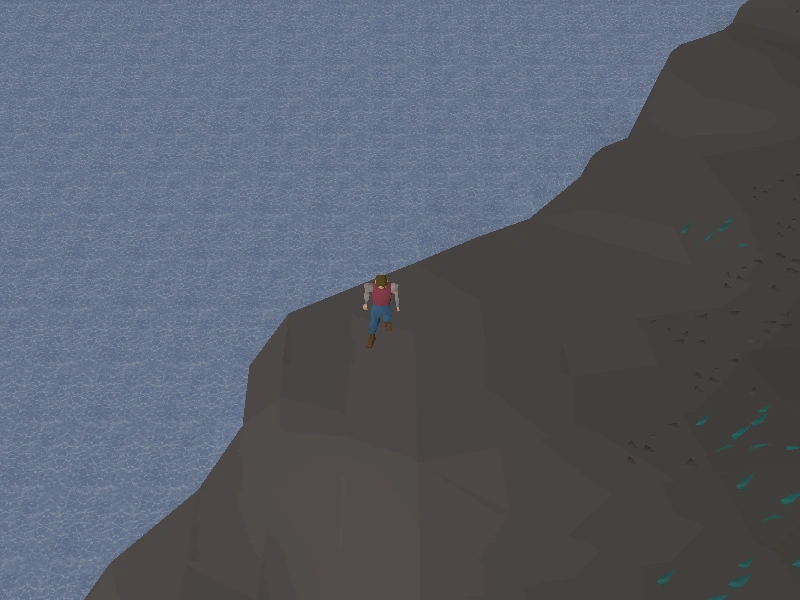
|
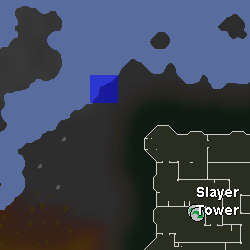
| ||
| Location notes | |||
| As far as you can go east in level 9 Wilderness, north-west of the Slayer Tower on the map. | |||
| Coordinates | Shorthand | Requirements | Fight |
|---|---|---|---|
| 14 degrees 20 minutes north, 30 degrees 45 minutes west |
14.20N, 30.45W |
None. | |
| Image | Map | ||
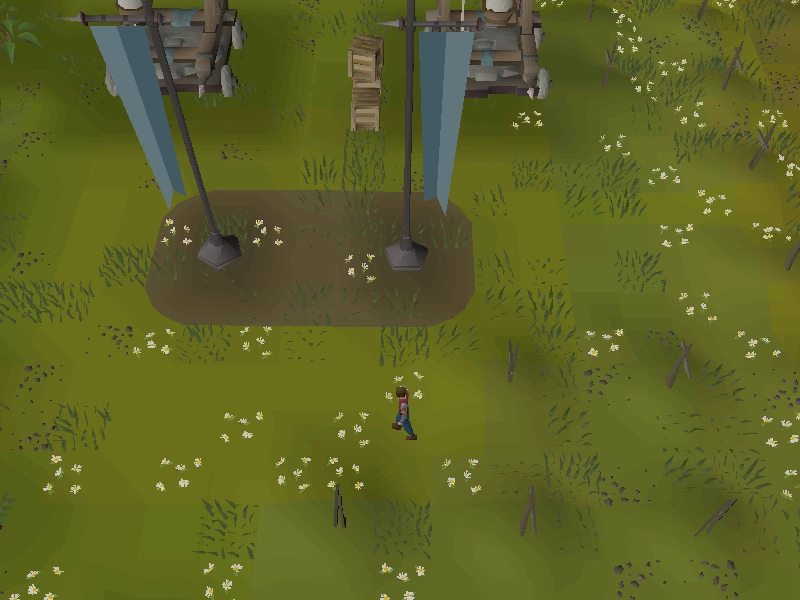
|
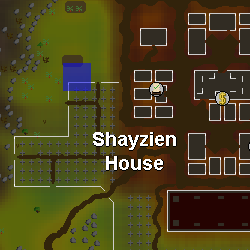
| ||
| Location notes | |||
| Dig in the graveyard just east of the hill giants west of the Shayzien House bank in Great Kourend. Easily reached by teleporting with the fairy rings with code DJR. | |||
| Coordinates | Shorthand | Requirements | Fight |
|---|---|---|---|
| 14 degrees 54 minutes north, 9 degrees 13 minutes east |
14.54N, 9.13E |
None. | |
| Image | Map | ||
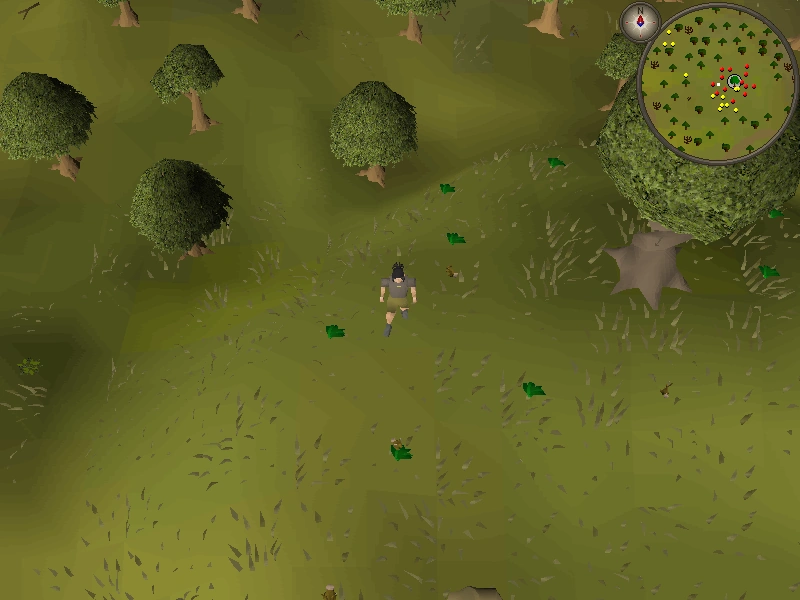
|
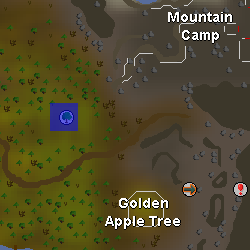
| ||
| Location notes | |||
| Two paces west of the Swaying tree, located east of Rellekka. Easily reached by using the fairy ring code AJR. | |||
| Coordinates | Shorthand | Requirements | Fight |
|---|---|---|---|
| 15 degrees 22 minutes north, 07 degrees 31 minutes east |
15.22N, 07.31E |
None. | |
| Image | Map | ||
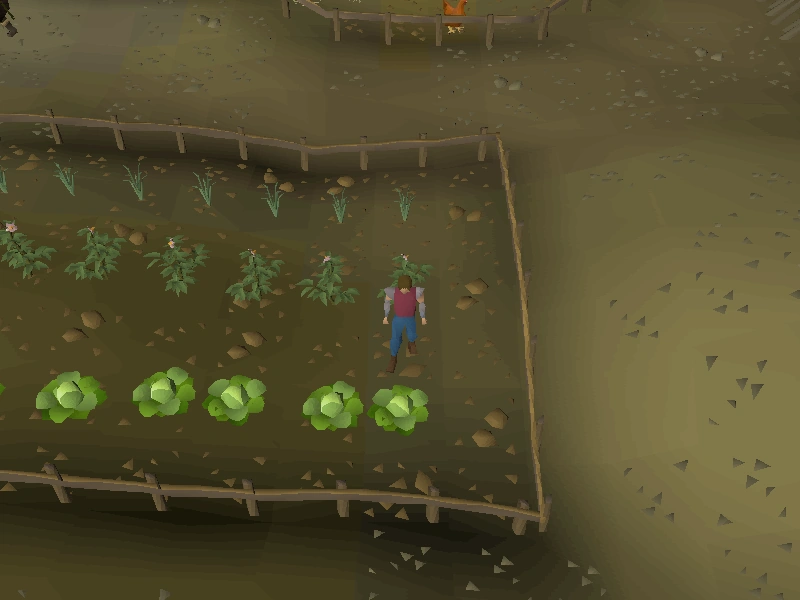
|
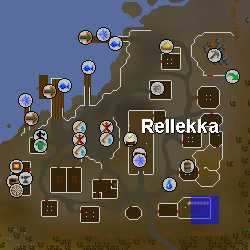
| ||
| Location notes | |||
| In Pontak's garden in south-eastern Rellekka, between the cabbages and the potatoes. Easily reached by teleporting with the lyre or Fremennik sea boots. | |||
| Coordinates | Shorthand | Requirements | Fight |
|---|---|---|---|
| 22 degrees 30 minutes north, 03 degrees 01 minutes east |
22.30N, 03.01E |
Completion of the Fremennik Trials quest | |
| Image | Map | ||
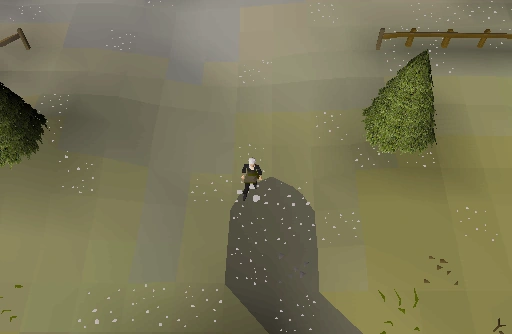
|
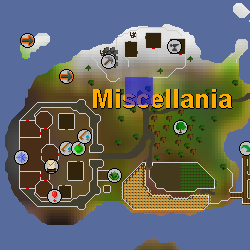
| ||
| Location notes | |||
| At the end of the path leading to the mining area on Miscellania. Accessible via fairy ring code CIP or teleporting with the Ring of wealth. | |||
Hard Coordinates
Quick links: 00 01 02 03 04 05 06 07 08 09 10 11 12 13 14 15 16 17 18 19 20 21 22 23 24 25
| Coordinates | Shorthand | Requirements | Fight |
|---|---|---|---|
| 00 degrees 00 minutes north, 07 degrees 13 minutes west |
00.00N, 07.13W |
Regicide | Saradomin wizard |
| Image | Map | ||
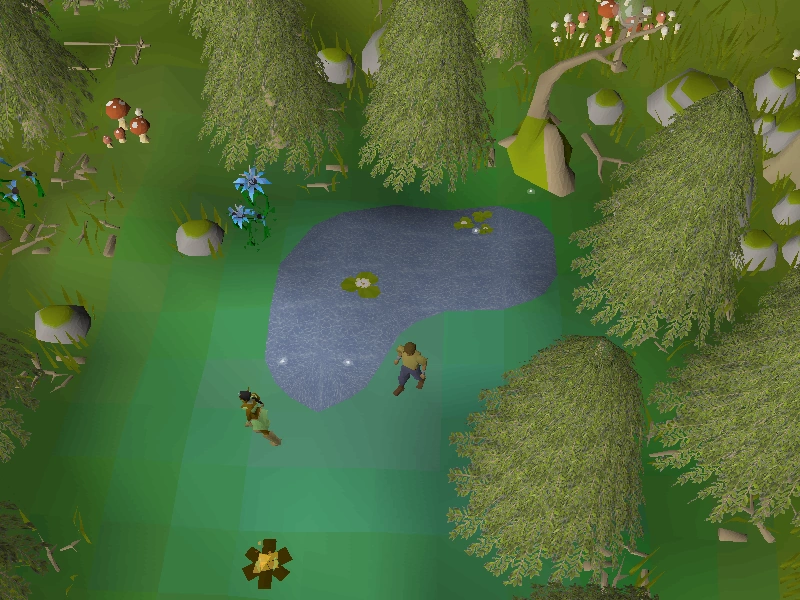
|
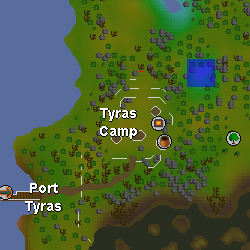
| ||
| Location notes | |||
| In Tirannwn, dig by the western spawn point of the roving elves south-east of the catapult, near the Tyras Camp. Watch out for the stick trap. Port Tyras is accessible via the charter network if the player wishes to avoid walking long distances.
From Tyras Camp: go north past the dense forest, walk a few steps east and go south past the stick traps. Also can use fairy ring BJS and run north to Tyras Camp (requires 76 From Lletya: go out of the city, past the trip wire, south over the leaf trap, past the Elf Tracker, west through the dense forest, over a second trip wire, north through another dense forest, then west and south past the stick trap. | |||
| Coordinates | Shorthand | Requirements | Fight |
|---|---|---|---|
| 01 degrees 24 minutes north, 08 degrees 05 minutes west |
01.24N, 08.05W |
Regicide | Saradomin wizard |
| Image | Map | ||
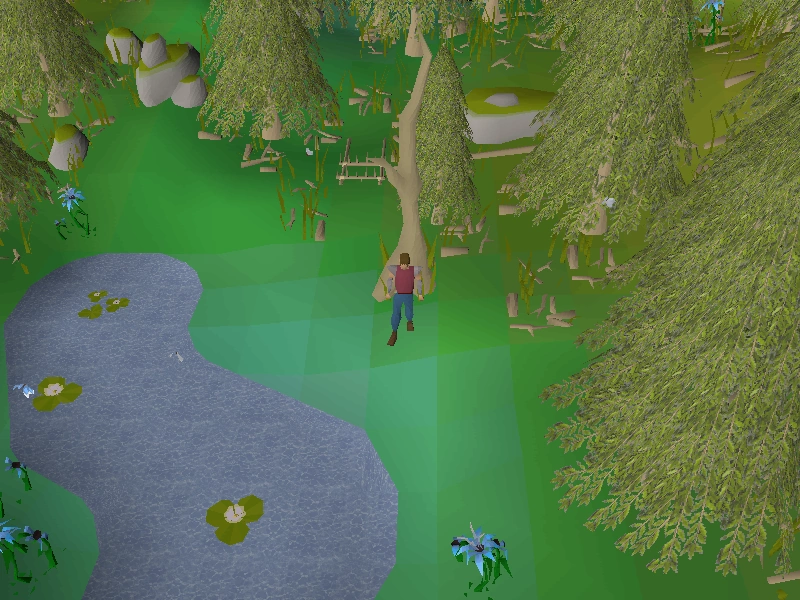
|
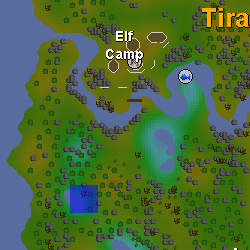
| ||
| Location notes | |||
| In the hunter area directly south of the Elf Camp, past a stick trap, dig by the north-east edge of the pond. An Elf camp teleport can greatly reduce the difficulty in reaching this position.
From Lletya: Pass the tree, go west across the tripwire, continue west through the dense forest. Turn north and up the path to Prifddinas. Before the bridge and the water, head west through the dense forest. Then, keep going west past the leaves pitfall trap, then south-west past a stick trap. From Port Tyras: Go north through dense forest then east; go south through dense forest; step over tripwire; go east through the dense forest then north-west for quite a while; jump over the leaves. Finally, continue west till you arrive at a elven lamp next to mushrooms. Head south down the small path to the pond. Pass the stick trap and dig by the north-east edge of the pond. This clue can be frustrating due to the frequency of activating the stick traps, which deal significant amounts of damage. There is a better success rate of passing the trap by turning off run and walking past the trap. It's recommended to follow this map in order to not get lost. | |||
| Coordinates | Shorthand | Requirements | Fight |
|---|---|---|---|
| 01 degrees 30 minutes north, 20 degrees 01 minutes east |
01.30N, 20.01E |
|
Saradomin wizard |
| Image | Map | ||
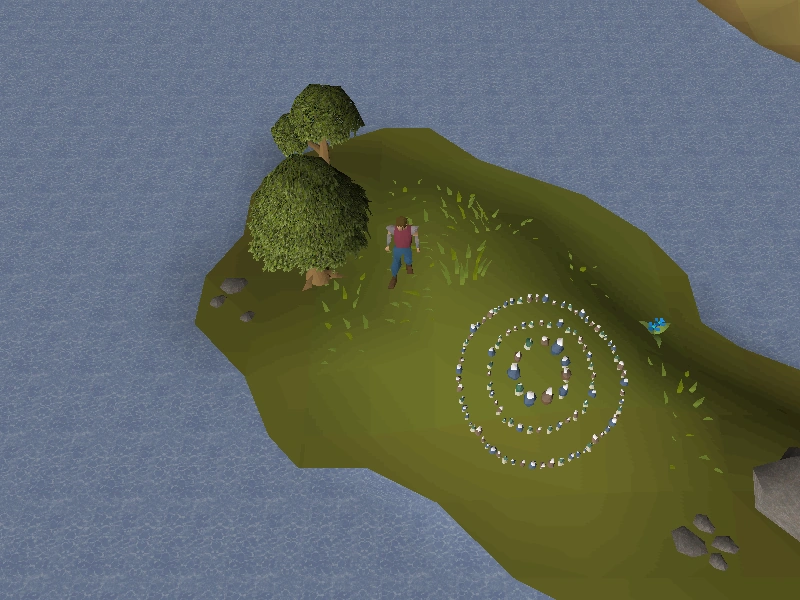
|
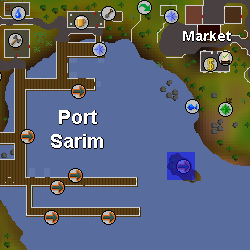
| ||
| Location notes | |||
| Located on a small island that can only be accessed via fairy ring code CLP. | |||
| Coordinates | Shorthand | Requirements | Fight |
|---|---|---|---|
| 02 degrees 46 minutes north, 29 degrees 11 minutes east |
02.46N, 29.11E |
Another player's assistance | Another player |
| Image | Map | ||
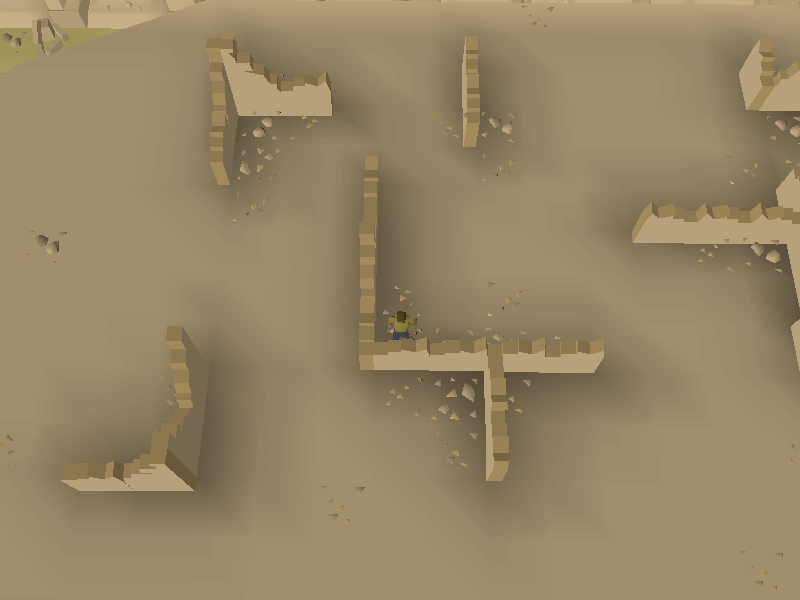
|
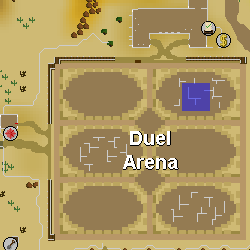
| ||
| Location notes | |||
| Duel Arena in combat area. You will need to duel another player to get to this spot. Make sure that the Obstacles option is on. | |||
| Coordinates | Shorthand | Requirements | Fight |
|---|---|---|---|
| 02 degrees 48 minutes north, 08 degrees 05 minutes east |
02.48N, 08.05E |
|
Saradomin wizard |
| Image | Map | ||
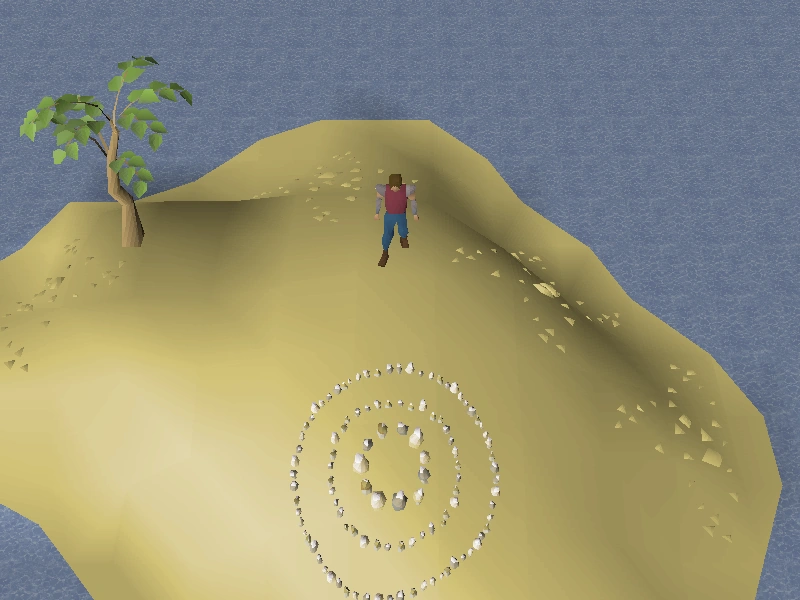
|
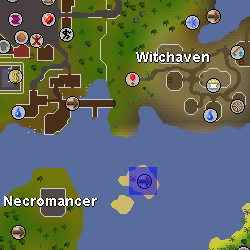
| ||
| Location notes | |||
| Little island, fairy ring code AIR. | |||
| Coordinates | Shorthand | Requirements | Fight |
|---|---|---|---|
| 02 degrees 48 minutes north, 34 degrees 33 minutes east |
02.48N, 34.33E |
Started In Aid of the Myreque | Saradomin wizard |
| Image | Map | ||
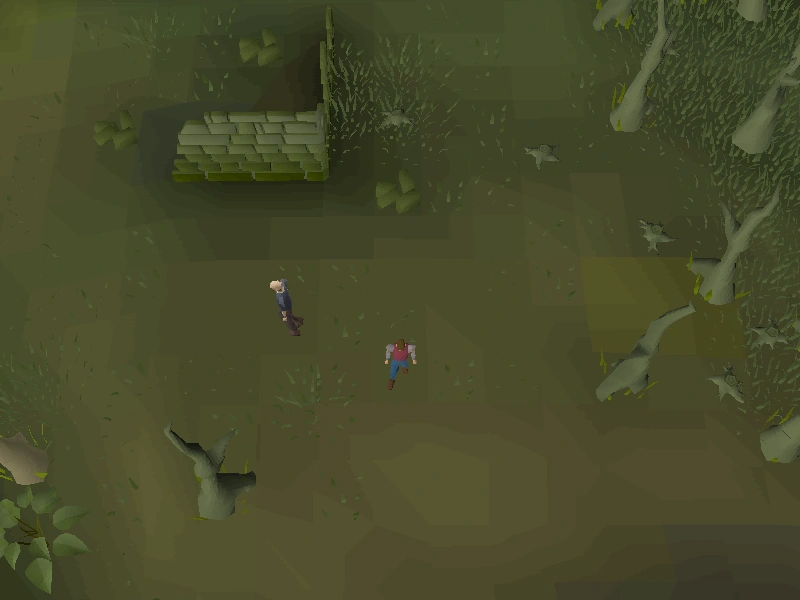
|
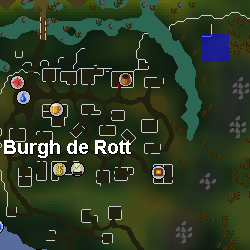
| ||
| Location notes | |||
| Dig 4 steps south of the pile of bricks east of the broken wall. Teleporting with the Morytania legs is the quickest way. | |||
| Coordinates | Shorthand | Requirements | Fight |
|---|---|---|---|
| 02 degrees 58 minutes north, 34 degrees 30 minutes east |
02.58N, 34.30E |
Started In Aid of the Myreque | Saradomin wizard |
| Image | Map | ||
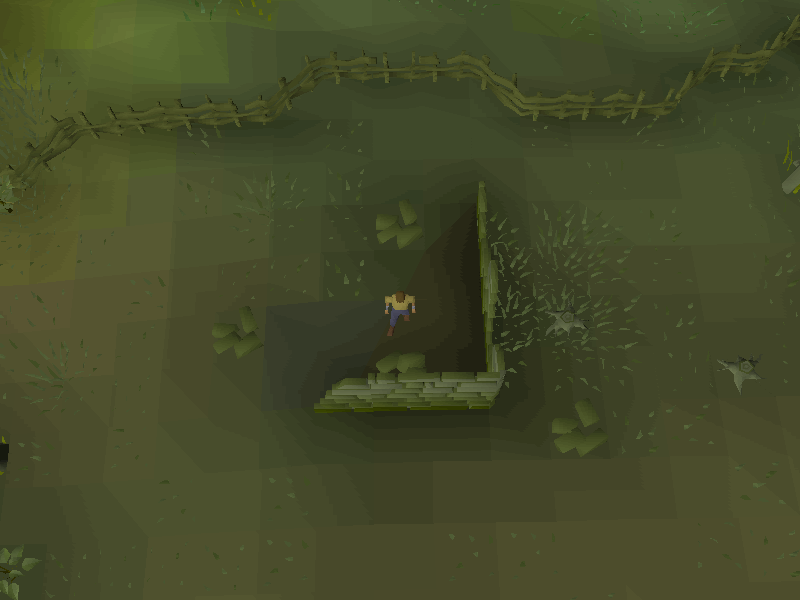
|
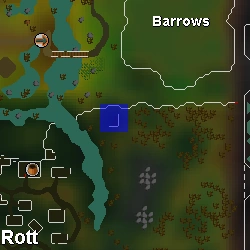
| ||
| Coordinates | Shorthand | Requirements | Fight |
|---|---|---|---|
| 03 degrees 18 minutes north, 12 degrees 31 minutes east |
03.18N, 12.31E |
Partial completion of Dragon Slayer | Saradomin wizard |
| Image | Map | ||
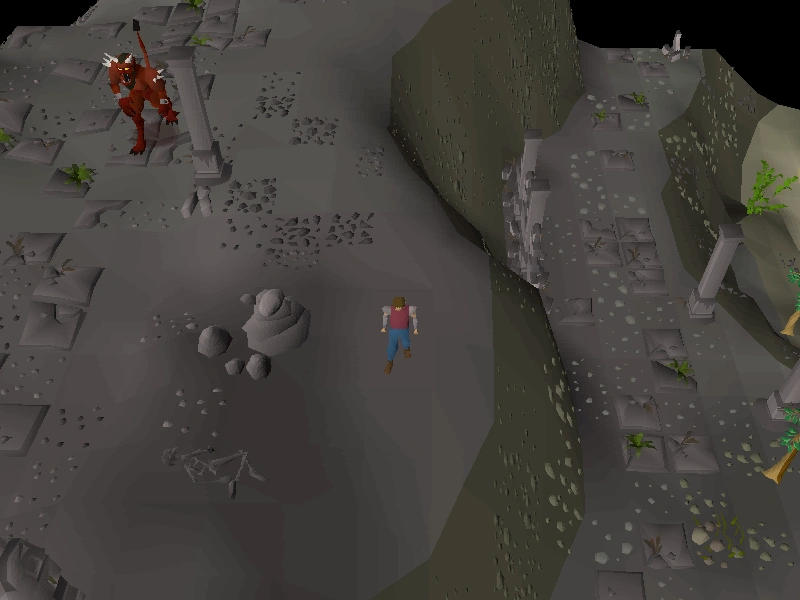
|
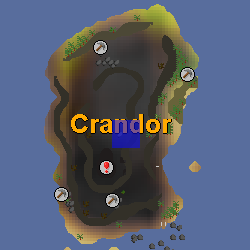
| ||
| Location notes | |||
| Crandor, centre of the island. | |||
| Coordinates | Shorthand | Requirements | Fight |
|---|---|---|---|
| 03 degrees 45 minutes south, 22 degrees 45 minutes east |
03.45S, 22.45E |
None. | Saradomin wizard |
| Image | Map | ||
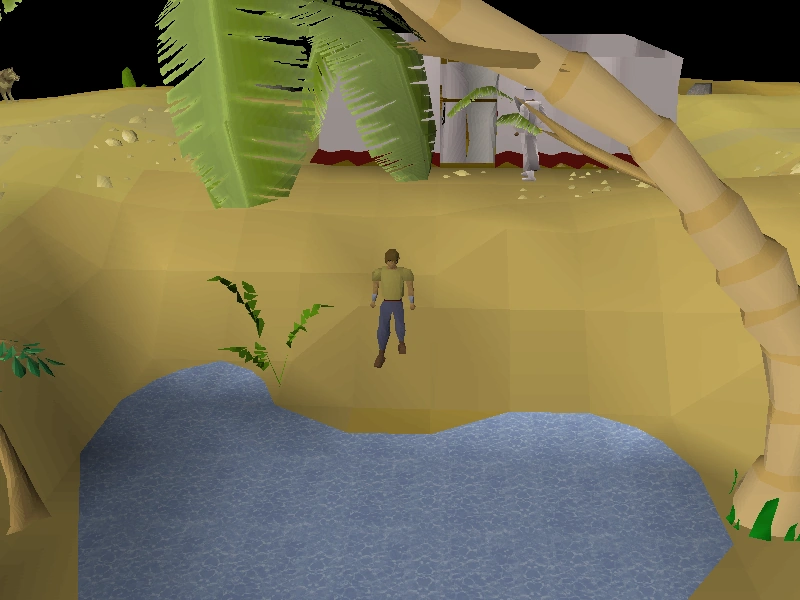
|
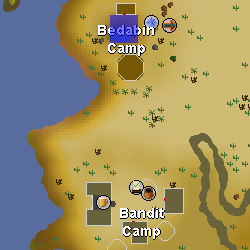
| ||
| Location notes | |||
| In the Bedabin Camp in the Kharidian Desert, just south-west of the Shanty Pass. Dig north side of the watering hole. | |||
| Coordinates | Shorthand | Requirements | Fight |
|---|---|---|---|
| 04 degrees 03 minutes south, 03 degrees 11 minutes east |
04.03S, 03.11E |
Started Watchtower
20 coins |
Saradomin wizard |
| Image | Map | ||
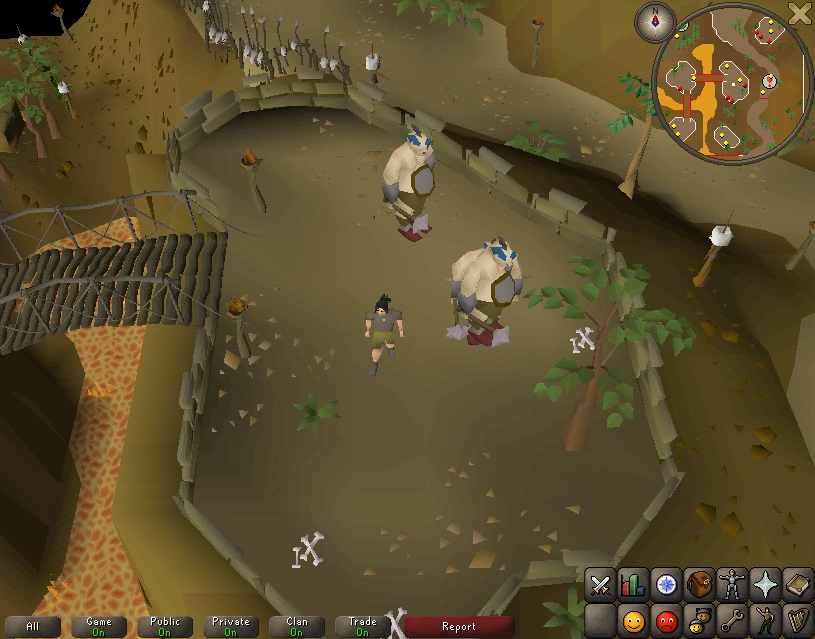
|
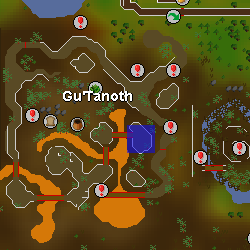
| ||
| Location notes | |||
| In Gu'Tanoth. You must have started the Watchtower quest to gain access. After crossing the fourth bridge, stand near the tree there and dig. You need 20gp to pay the guard to cross the bridge. | |||
| Coordinates | Shorthand | Requirements | Fight |
|---|---|---|---|
| 04 degrees 05 minutes south, 04 degrees 24 minutes east |
04.05S, 04.24E |
None. | Saradomin wizard |
| Image | Map | ||
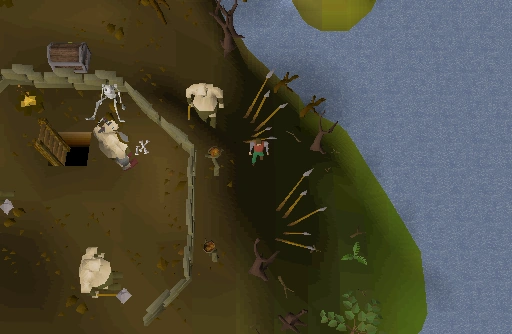
|
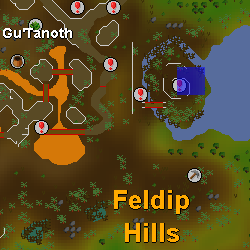
| ||
| Location notes | |||
| On the island where Gorad is located. From Castle Wars, go south-west around Jiggig then south-east along the coast. At the south-western side of Gu'Tanoth is a cave; enter this cave, and you will end up on the island. Dig on the east side of the island, near a spear wall. Alternately, you can use the Feldip Hills gnome glider or fairy ring code AKS and run north-west. | |||
| Coordinates | Shorthand | Requirements | Fight |
|---|---|---|---|
| 04 degrees 16 minutes south, 16 degrees 16 minutes east |
04.16S, 16.16E |
Partial completion of The Grand Tree | Saradomin wizard |
| Image | Map | ||
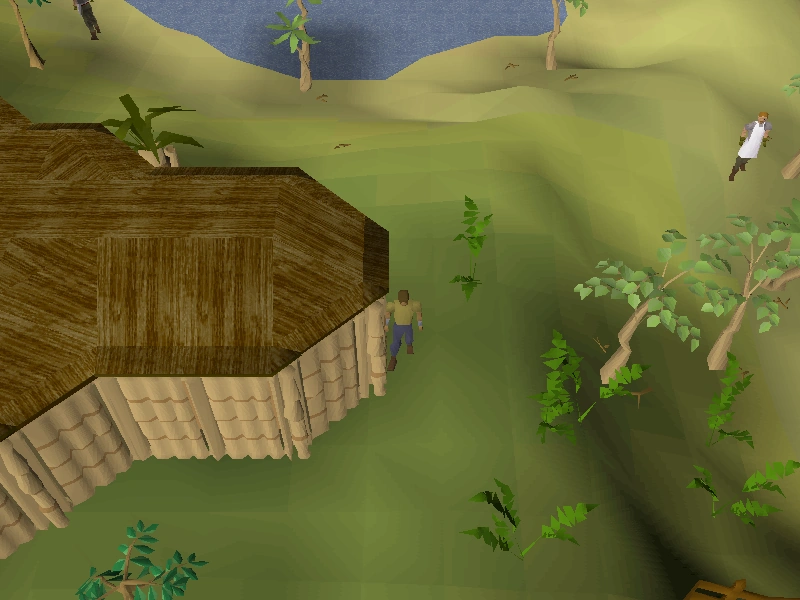
|
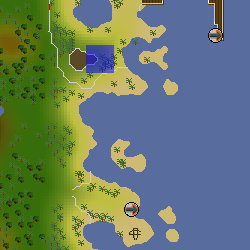
| ||
| Location notes | |||
| Outside the east wall of the Ship yard building with G.L.O. Caranock, use the gnome glider and dig directly by the window. It may also be faster to get there by using fairy ring (DKP). | |||
| Coordinates | Shorthand | Requirements | Fight |
|---|---|---|---|
| 04 degrees 41 minutes north, 03 degrees 09 minutes west |
04.41N, 03.09W |
Completion of Regicide | Saradomin wizard |
| Image | Map | ||
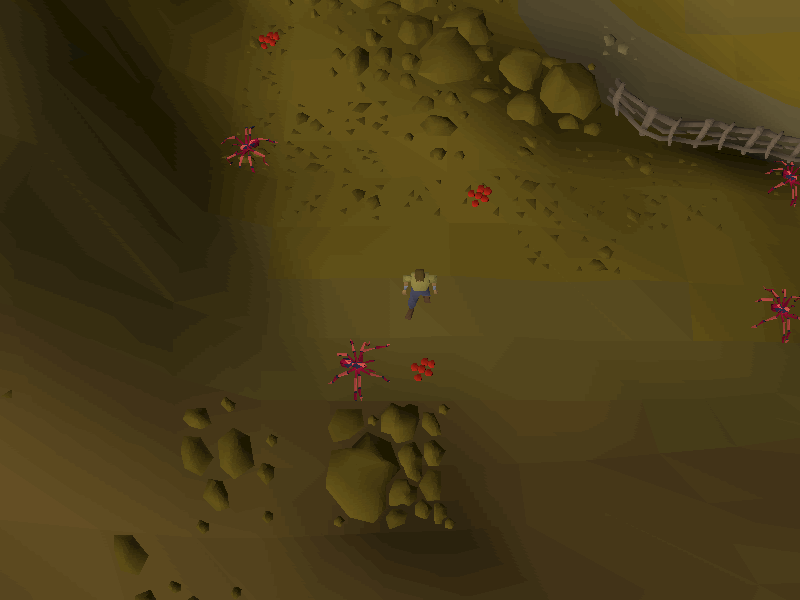
|
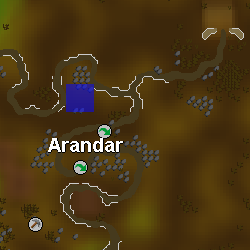
| ||
| Location notes | |||
| Located near the Red spiders' eggs on the Arandar mountain pass leading to Tirannwn. | |||
| Coordinates | Shorthand | Requirements | Fight |
|---|---|---|---|
| 05 degrees 37 minutes north, 31 degrees 15 minutes east |
05.37N, 31.15E |
None. | Saradomin wizard |
| Image | Map | ||
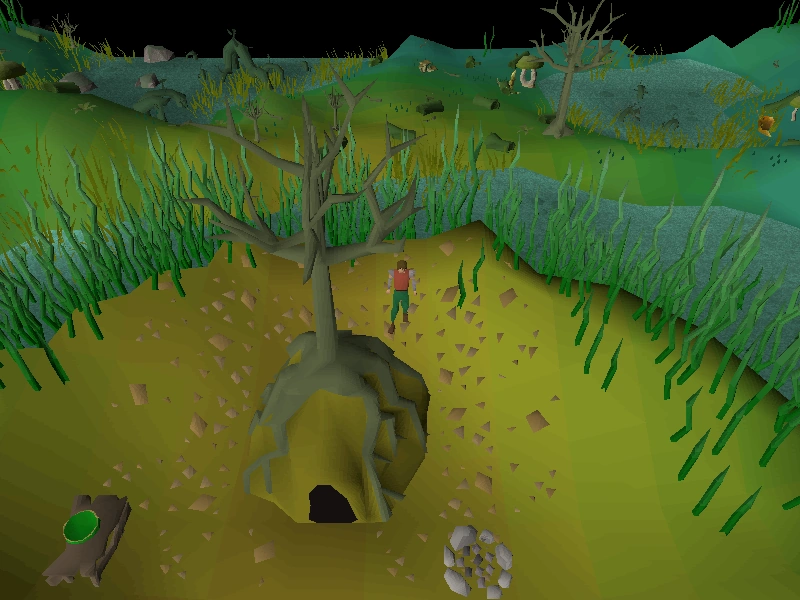
|
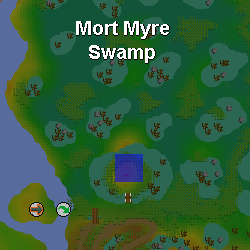
| ||
| Location notes | |||
| In Mort Myre Swamp, over Nature Spirit's grotto, dig to the north of the grotto tree. Druid pouches are strongly recommended as ghasts may rot your food. (Fairy ring BIP) | |||
| Coordinates | Shorthand | Requirements | Fight |
|---|---|---|---|
| 05 degrees 50 minutes south, 10 degrees 05 minutes east |
05.50S, 10.05E |
15 |
Saradomin wizard |
| Image | Map | ||
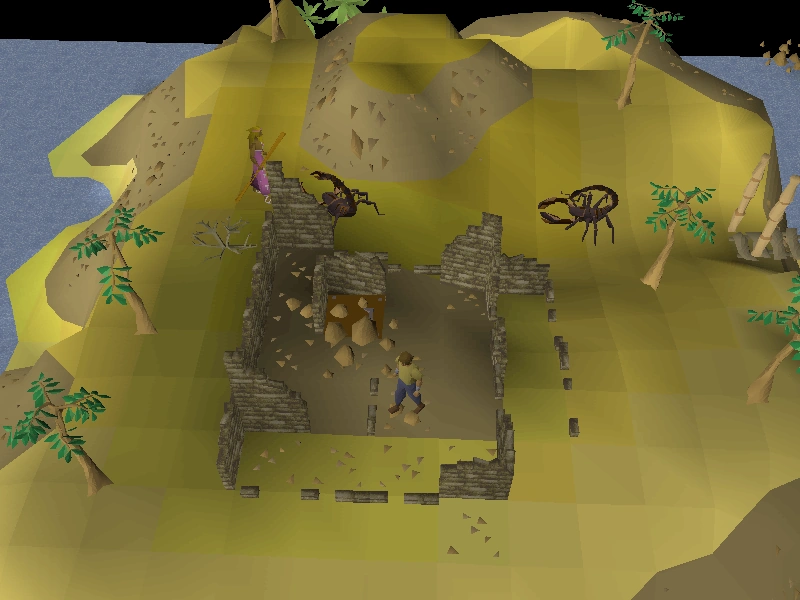
|
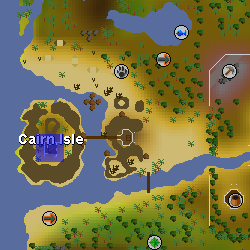
| ||
| Location notes | |||
| On Cairn Isle, Karamja. Fairy ring code CKR is very close; area is south-west of the fairy ring). Dig in the centre of the hut with the broken walls. | |||
| Coordinates | Shorthand | Requirements | Fight |
|---|---|---|---|
| 06 degrees 00 minutes south, 21 degrees 48 minutes east |
06.00S, 21.48E |
None. | Saradomin wizard |
| Image | Map | ||
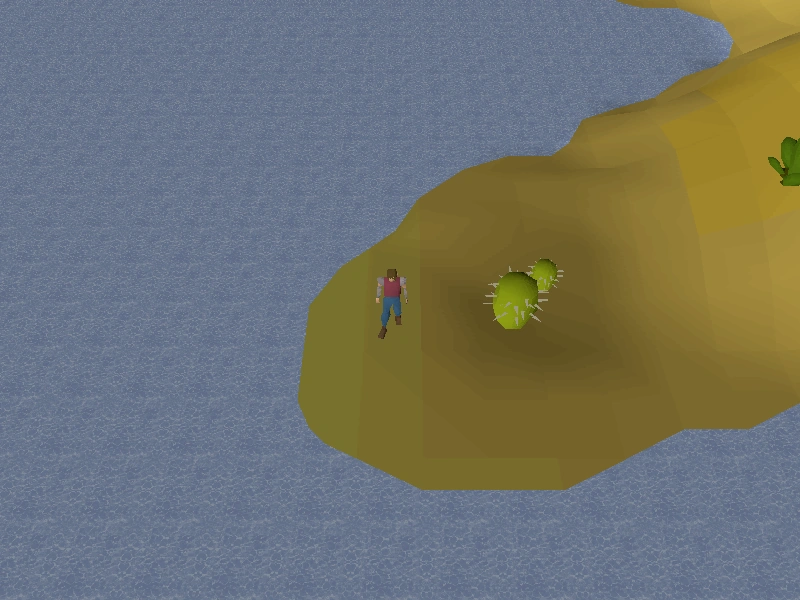
|
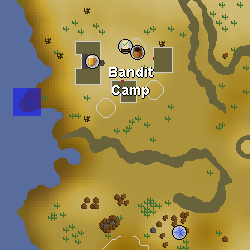
| ||
| Location notes | |||
| West of the Bandit Camp in the Kharidian Desert, at the small peninsula. Dig at the very edge. Bring waterskins or Desert amulet 4 as this area is affected by desert heat. | |||
| Coordinates | Shorthand | Requirements | Fight |
|---|---|---|---|
| 06 degrees 11 minutes south, 15 degrees 07 minutes east |
06.11S, 15.07E |
None. | Saradomin wizard |
| Image | Map | ||
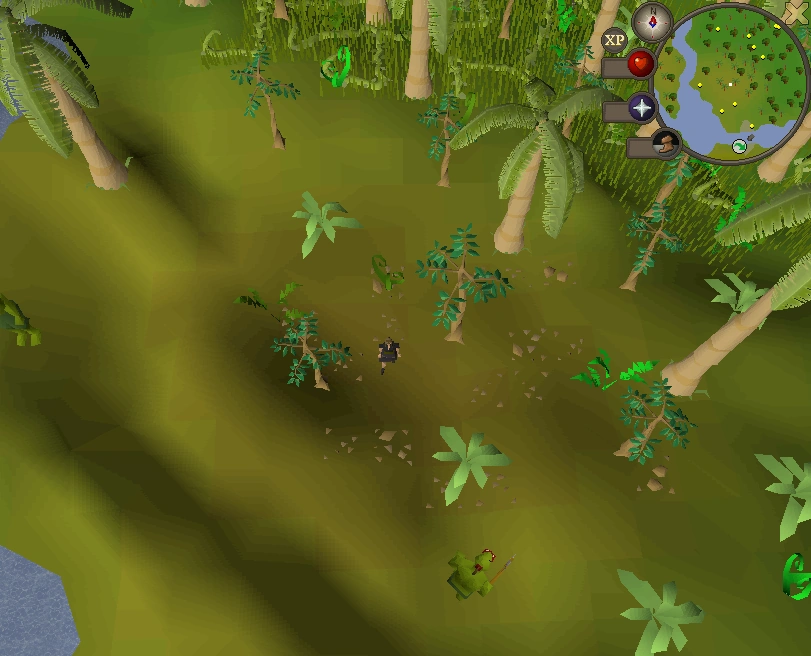
|
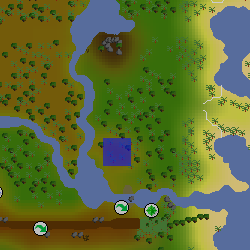
| ||
| Location notes | |||
| On the southern part of eastern Karamja, just north of some stepping stones across a waterfall. Dig in the brown patch of ground near the jogres. A gnome glider destination is close to the area. | |||
| Coordinates | Shorthand | Requirements | Fight |
|---|---|---|---|
| 07 degrees 43 minutes south, 12 degrees 26 minutes east |
07.43S, 12.26E |
Partial completion of Legends' Quest | Saradomin wizard |
| Image | Map | ||
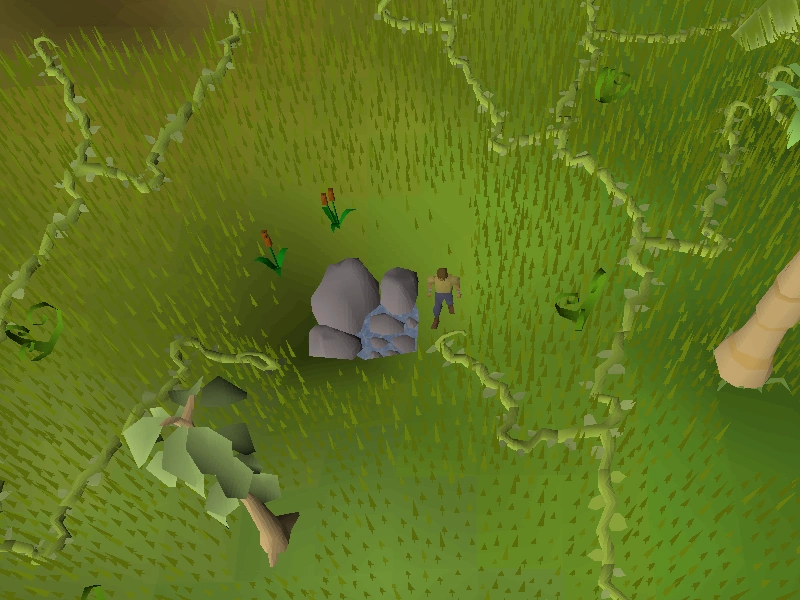
|
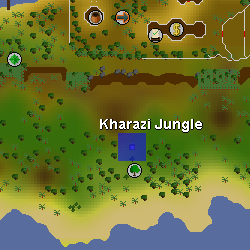
| ||
| Location notes | |||
| An axe and machete is required, or have 79 Agility for the vine shortcuts!
In the middle of the Kharazi Jungle, next to the water pool. Remember to bring Radimus notes if you have not completed Legends' Quest. One can use fairy ring CKR and run south. | |||
| Coordinates | Shorthand | Requirements | Fight |
|---|---|---|---|
| 08 degrees 03 minutes north, 31 degrees 16 minutes east |
08.03N, 31.16E |
Started Priest in Peril | Saradomin wizard |
| Image | Map | ||

|
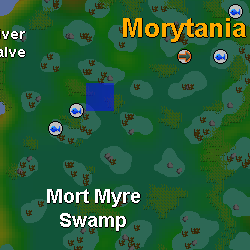
| ||
| Location notes | |||
| South-west of fairy ring code BKR and slightly north-east of the fishing spot (the one just south-west of the word Morytania on the world map), in the centre of Mort Myre swamp. Dig between the easternmost and middle logs. Bring druid pouches to prevent ghasts from rotting your food. | |||
| Coordinates | Shorthand | Requirements | Fight |
|---|---|---|---|
| 08 degrees 05 minutes south, 15 degrees 56 minutes east |
08.05S, 15.56E |
Partial completion of Legends' Quest | Saradomin wizard |
| Image | Map | ||
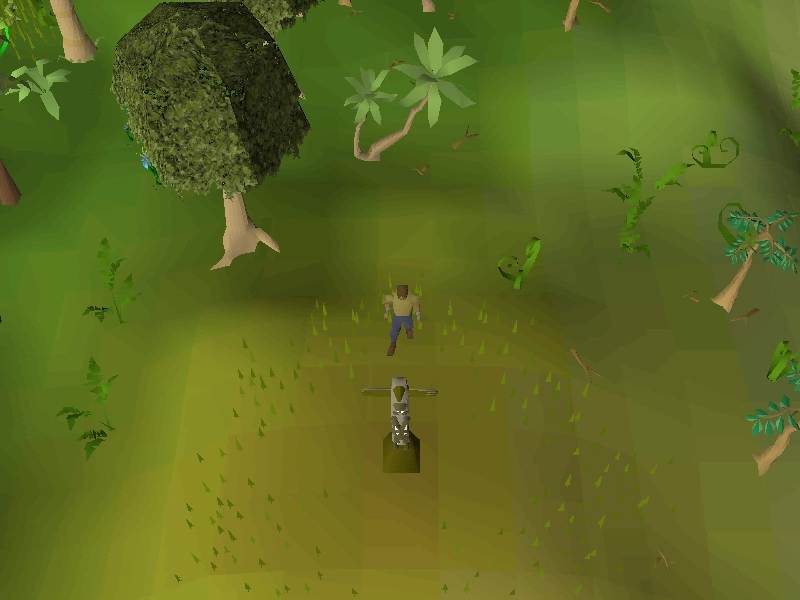
|
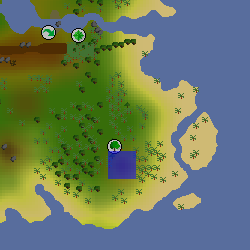
| ||
| Location notes | |||
| South-east of the easternmost mahogany tree in the Kharazi Jungle. Remember to bring an axe and a machete (and your Radimus notes if you have not finished Legends' Quest) to cut through the jungle. (Note: There may or may not be a totem pole at this location). | |||
| Coordinates | Shorthand | Requirements | Fight |
|---|---|---|---|
| 08 degrees 26 minutes south, 10 degrees 28 minutes east |
08.26S, 10.28E |
Partial completion of Legends' Quest | Saradomin wizard |
| Image | Map | ||
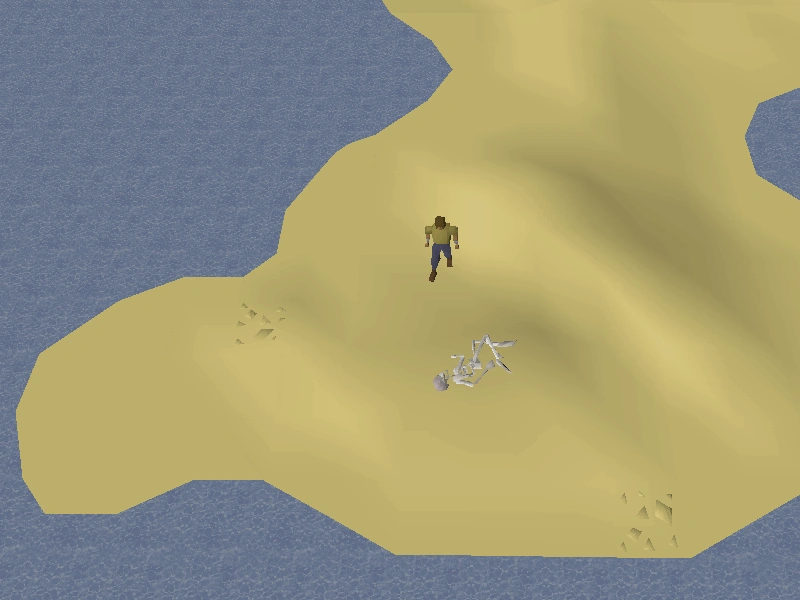
|
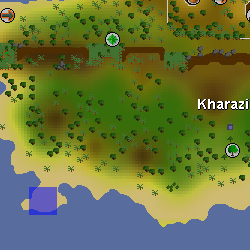
| ||
| Location notes | |||
| In the south-west peninsula of the Kharazi Jungle on Karamja. Dig north of a skeleton. Remember to bring an axe and a machete (and your Radimus notes if you have not finished Legends' Quest) to cut through the jungle. | |||
| Coordinates | Shorthand | Requirements | Fight |
|---|---|---|---|
| 13 degrees 46 minutes north, 21 degrees 01 minutes east |
13.46N, 21.01E |
None. | Zamorak wizard |
| Image | Map | ||
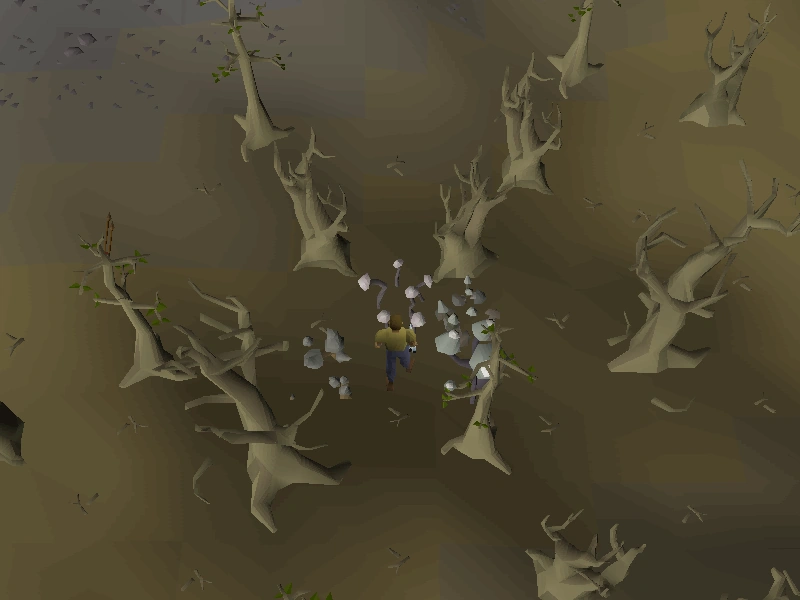
|
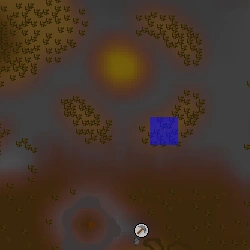
| ||
| Location notes | |||
| Just north of the Edgeville level 11 Wilderness, near horseshoe-shaped mushroom patch. | |||
| Coordinates | Shorthand | Requirements | Fight |
|---|---|---|---|
| 16 degrees 03 minutes north, 14 degrees 07 minutes east |
16.03N, 14.07E |
Start Troll Stronghold | Saradomin wizard |
| Image | Map | ||
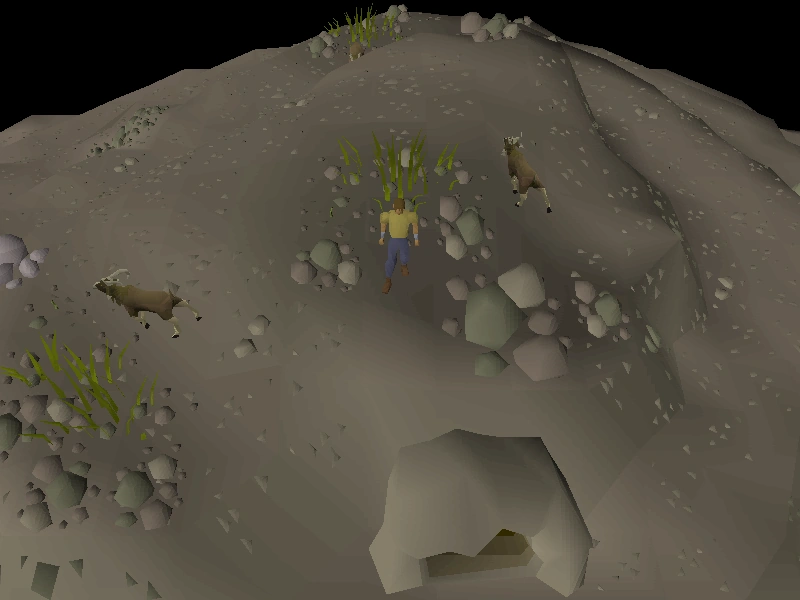
|
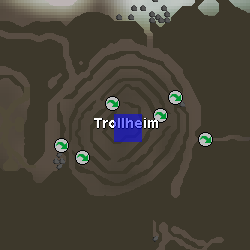
| ||
| Location notes | |||
| On the summit of Trollheim, near the entrance to Eadgar's cave. | |||
| Coordinates | Shorthand | Requirements | Fight |
|---|---|---|---|
| 16 degrees 07 minutes north, 22 degrees 45 minutes east |
16.07N, 22.45E |
None. | Zamorak wizard |
| Image | Map | ||
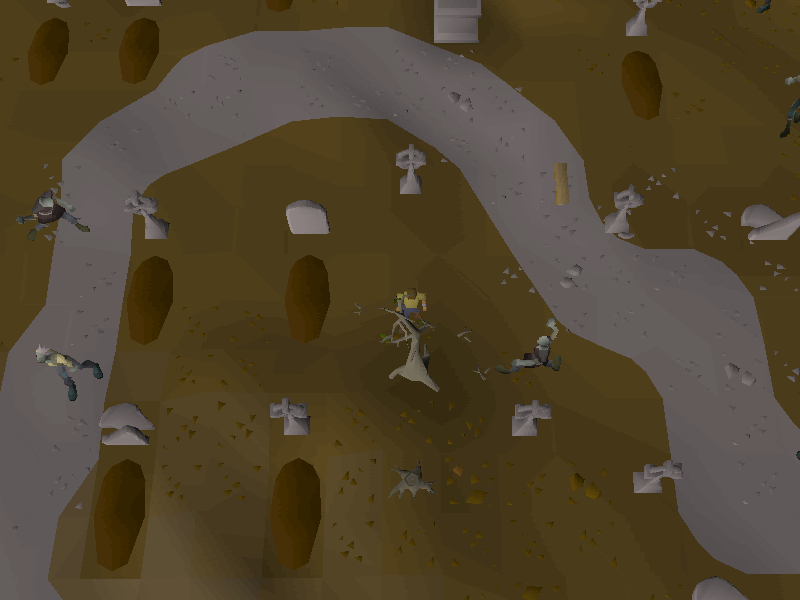
|
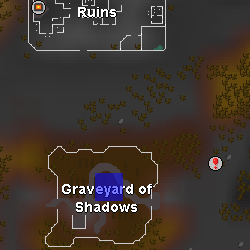
| ||
| Location notes | |||
| In the Graveyard of Shadows in the Wilderness, immediately north of a dead tree. | |||
| Coordinates | Shorthand | Requirements | Fight |
|---|---|---|---|
| 16 degrees 31 minutes north, 12 degrees 54 minutes east |
16.31N, 12.54E |
Partial completion of the Troll Stronghold quest | Saradomin wizard |
| Image | Map | ||
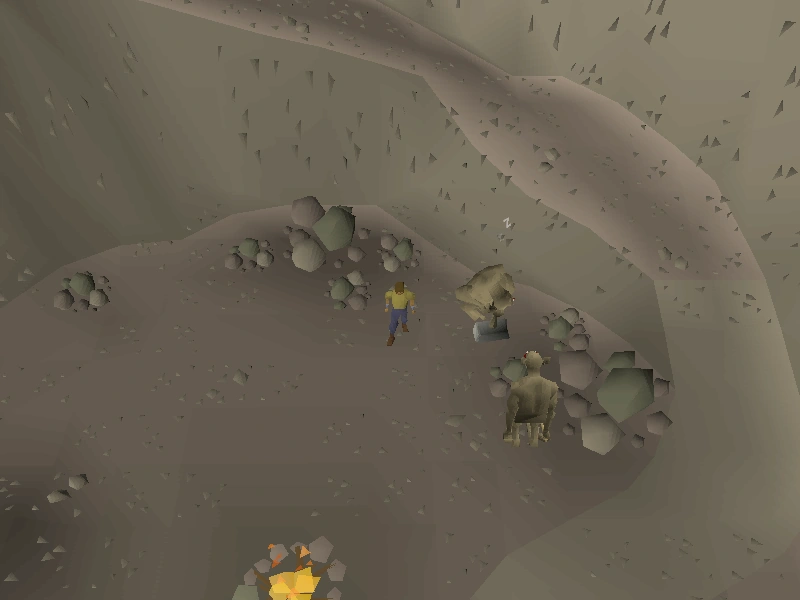
|
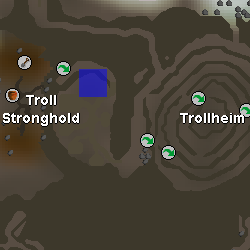
| ||
| Location notes | |||
| At the entrance to the Troll Stronghold, next to the sleeping troll called Mushroom. | |||
| Coordinates | Shorthand | Requirements | Fight |
|---|---|---|---|
| 16 degrees 35 minutes north, 27 degrees 01 minutes east |
16.35N, 27.01E |
None. | Zamorak wizard |
| Image | Map | ||
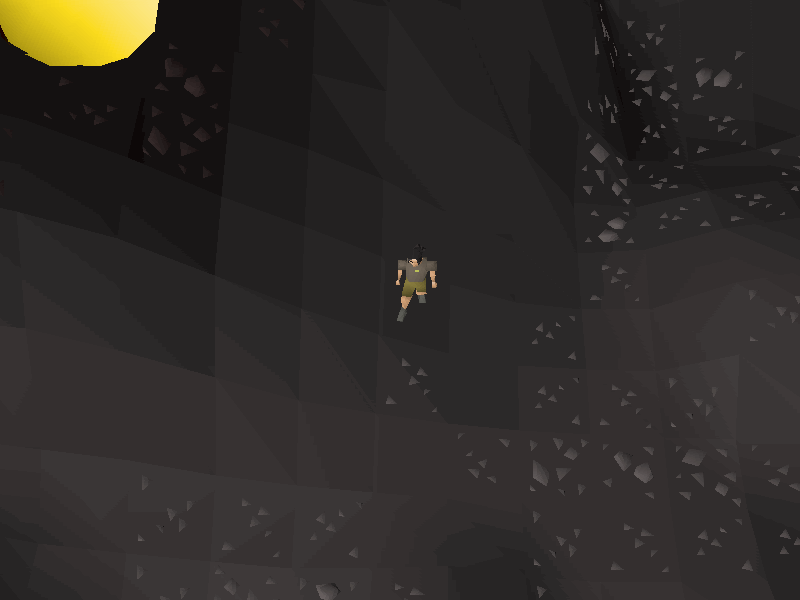
|
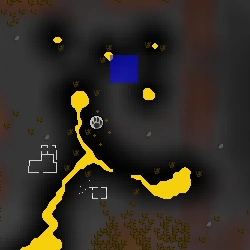
| ||
| Location notes | |||
| In level 22 Wilderness, past the Black Salamanders. | |||
| Coordinates | Shorthand | Requirements | Fight |
|---|---|---|---|
| 16 degrees 43 minutes north, 19 degrees 13 minutes east |
16.43N, 19.13E |
None. | Zamorak wizard |
| Image | Map | ||
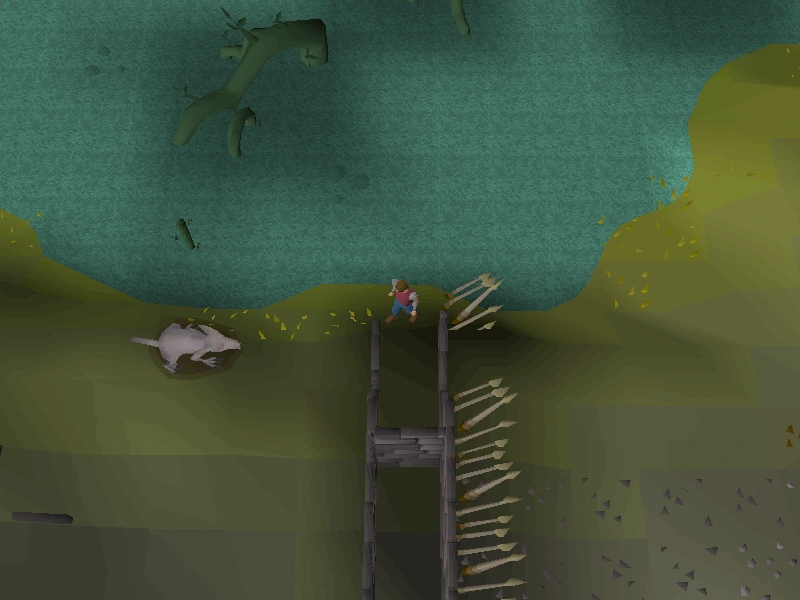
|
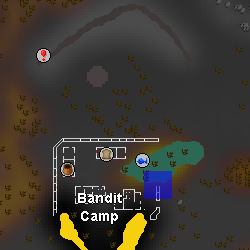
| ||
| Location notes | |||
| In the northern section of the Bandit Camp in level 23 Wilderness. | |||
| Coordinates | Shorthand | Requirements | Fight |
|---|---|---|---|
| 16 degrees 43 minutes north, 26 degrees 56 minutes east |
16.43N, 26.56E |
None. | Zamorak wizard |
| Image | Map | ||
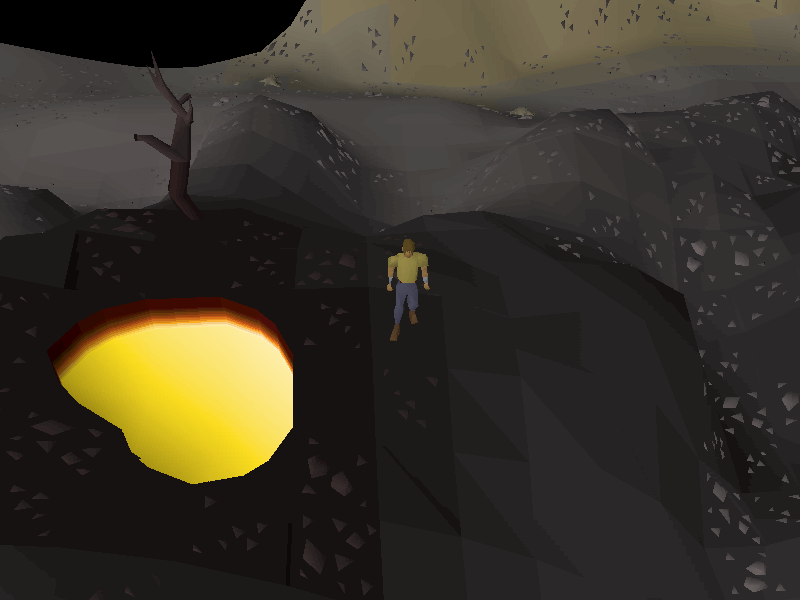
|
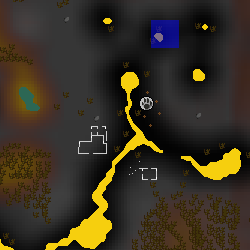
| ||
| Location notes | |||
| In the black salamander hunting area in the level 23 Wilderness. | |||
| Coordinates | Shorthand | Requirements | Fight |
|---|---|---|---|
| 16 degrees 43 minutes north, 30 degrees 01 minutes west |
16.43N, 30.01W |
5% favour with the Shayzien House. | Saradomin wizard |
| Image | Map | ||
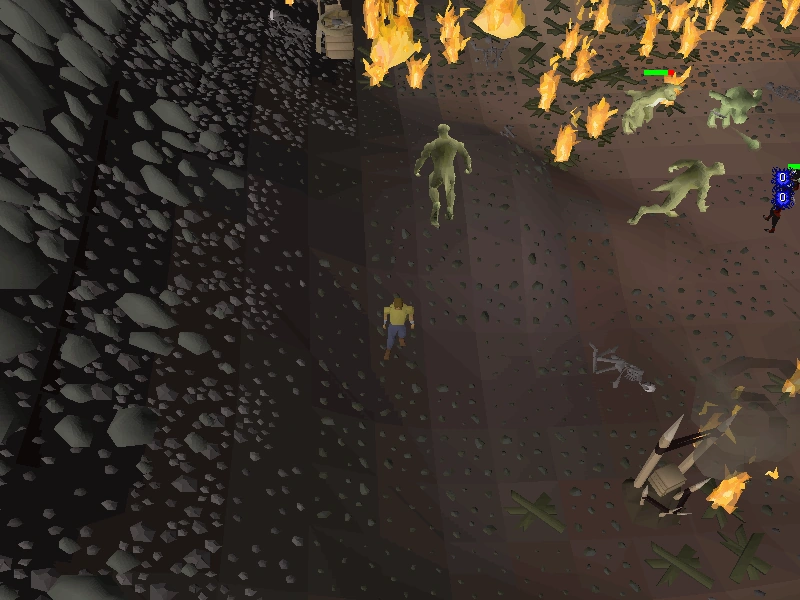
|
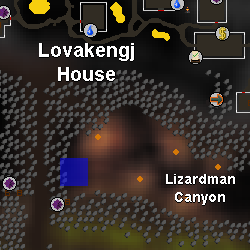
| ||
| Location notes | |||
| In the west end of the Lizardman Canyon between Great Kourend's Lovakengj House and Shayzien House. Entering the Canyon requires 5% favour with the Shayzien House. Use fairy ring code DJR to get there quickly. | |||
| Coordinates | Shorthand | Requirements | Fight |
|---|---|---|---|
| 17 degrees 50 minutes north, 08 degrees 30 minutes east |
17.50N, 08.30E |
None. | Saradomin wizard |
| Image | Map | ||
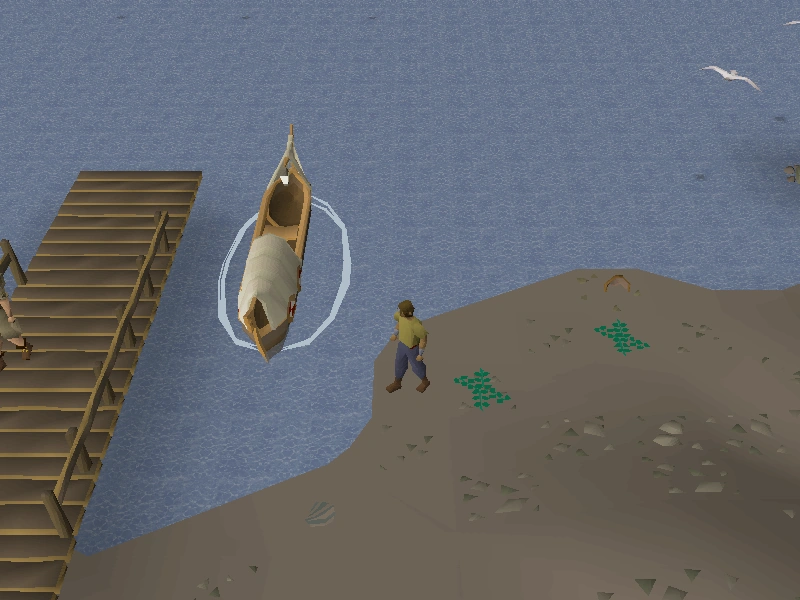
|
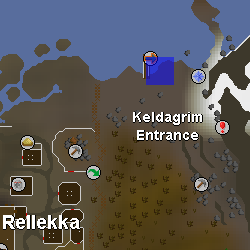
| ||
| Location notes | |||
| North-east of Rellekka, immediately east of Larry and his boat, north of the rock crabs, and north-west of fairy ring code DKS. | |||
| Coordinates | Shorthand | Requirements | Fight |
|---|---|---|---|
| 18 degrees 22 minutes north, 16 degrees 33 minutes east |
18.22N, 16.33E |
None. | Zamorak wizard |
| Image | Map | ||
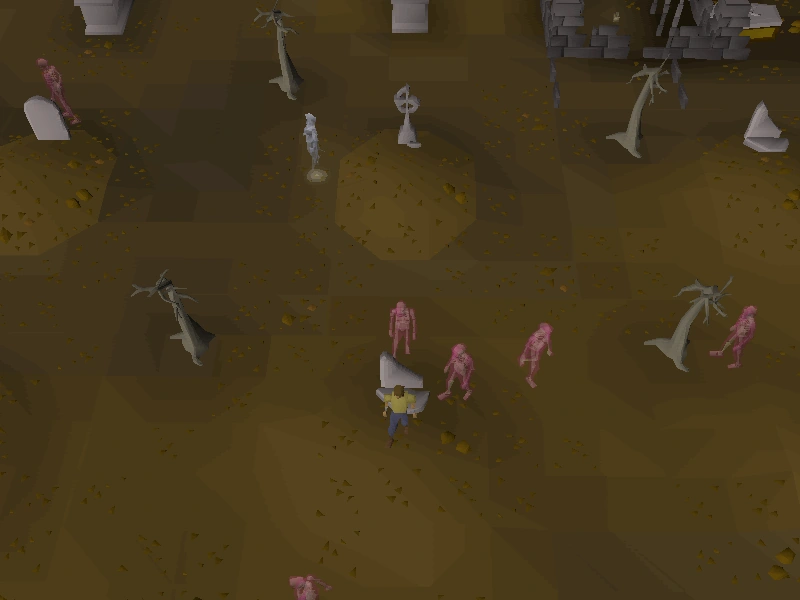
|
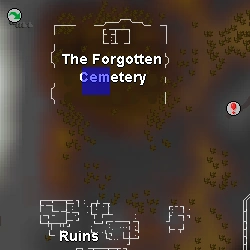
| ||
| Location notes | |||
| In the south-west section of the Forgotten Cemetery in level 29 Wilderness. Dig immediately south of one of the graves, located in the second column from the south. A cemetery teleport will teleport a player here. | |||
| Coordinates | Shorthand | Requirements | Fight |
|---|---|---|---|
| 18 degrees 50 minutes north, 20 degrees 26 minutes east |
18.50N, 20.26E |
None. | Zamorak wizard |
| Image | Map | ||
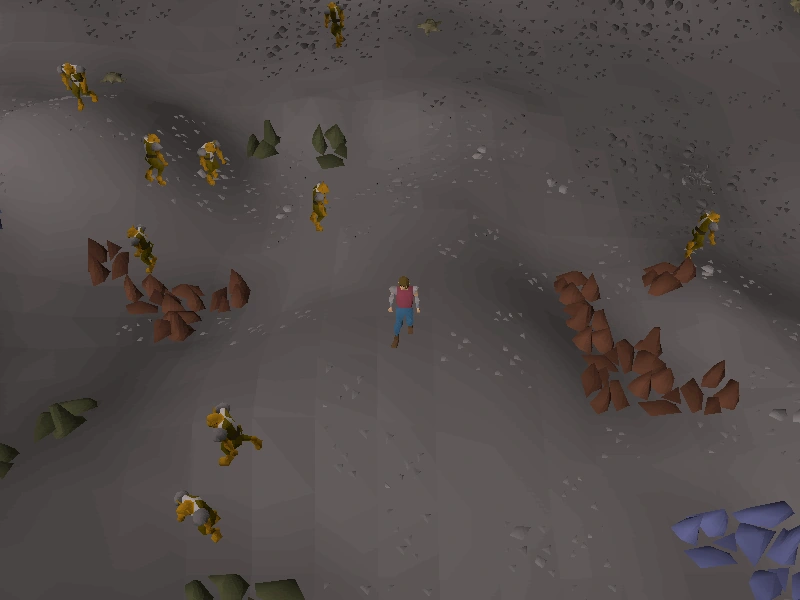
|
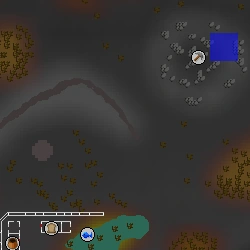
| ||
| Location notes | |||
| In the Bandit camp mining site in level 31 Wilderness. | |||
| Coordinates | Shorthand | Requirements | Fight |
|---|---|---|---|
| 19 degrees 00 minutes north, 27 degrees 13 minutes east |
19.00N, 27.13E |
None. | Zamorak wizard |
| Image | Map | ||
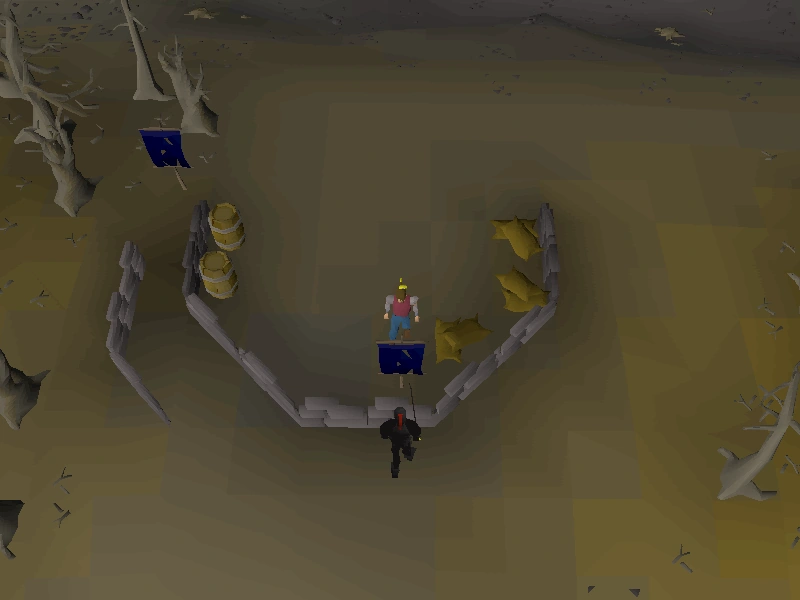
|
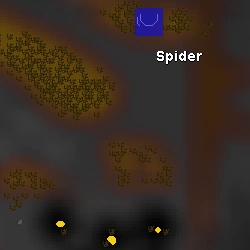
| ||
| Location notes | |||
| In level 32 Wilderness, north of Venenatis. Dig in the area wherein there are several Black Knights. | |||
| Coordinates | Shorthand | Requirements | Fight |
|---|---|---|---|
| 19 degrees 24 minutes north, 30 degrees 37 minutes west |
19.24N, 30.37W |
None. | Saradomin wizard |
| Image | Map | ||
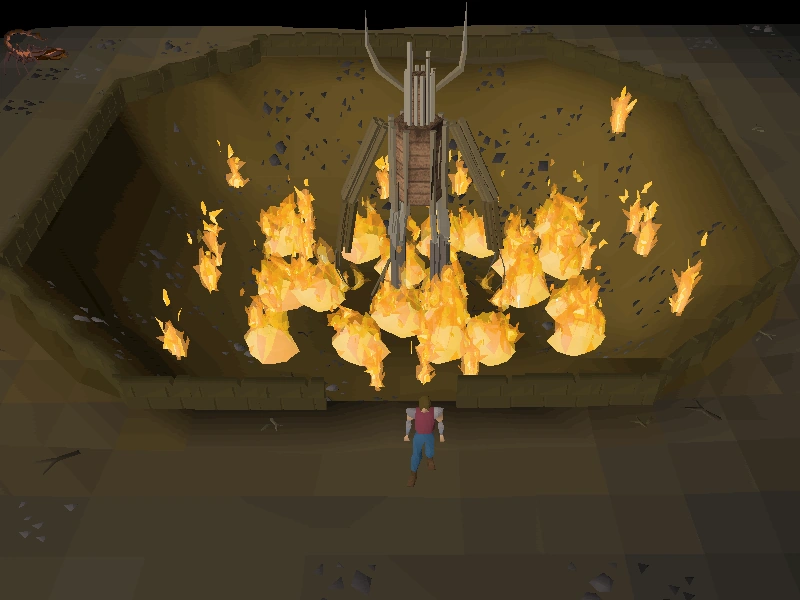
|
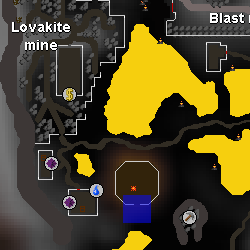
| ||
| Location notes | |||
| In Great Kourend's Lovakengj House, dig south of the burning man located south-east of the lovakite mine. | |||
| Coordinates | Shorthand | Requirements | Fight |
|---|---|---|---|
| 19 degrees 43 minutes north, 25 degrees 07 minutes east |
19.43N, 25.07E |
None. | Zamorak wizard |
| Image | Map | ||
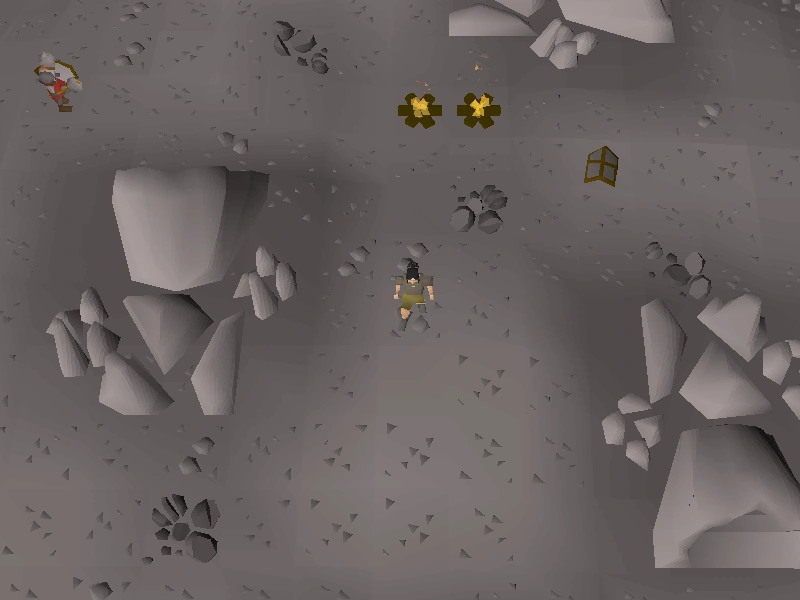
|
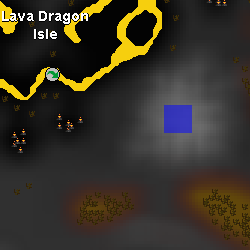
| ||
| Location notes | |||
| In level 35 Wilderness just a little south-east of the Lava Dragon Isle by some Chaos dwarves, you will come across four large cave like objects. Dig almost directly in the centre of them. This area can be accessed via the canoe system (requires 57 | |||
| Coordinates | Shorthand | Requirements | Fight |
|---|---|---|---|
| 20 degrees 05 minutes north, 21 degrees 52 minutes east |
20.05N, 21.52E |
None. | Zamorak wizard |
| Image | Map | ||
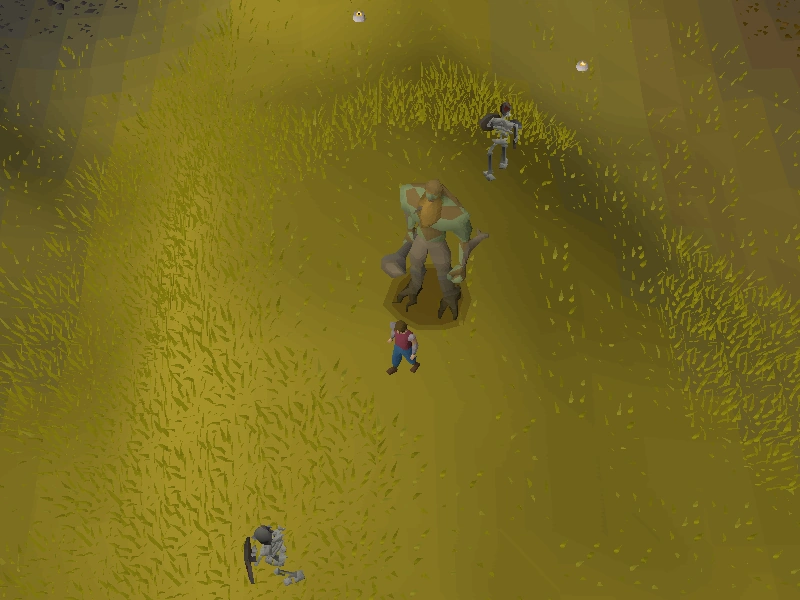
|
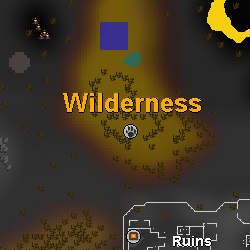
| ||
| Location notes | |||
| In level 36 Wilderness, just north of a pond by some moss giants. This can be difficult because of the nearby moss giants and skeletons. The Wilderness canoe destination is a quick way to get here. | |||
| Coordinates | Shorthand | Requirements | Fight |
|---|---|---|---|
| 20 degrees 33 minutes north, 15 degrees 48 minutes east |
20.33N, 15.48E |
None. | Zamorak wizard |
| Image | Map | ||
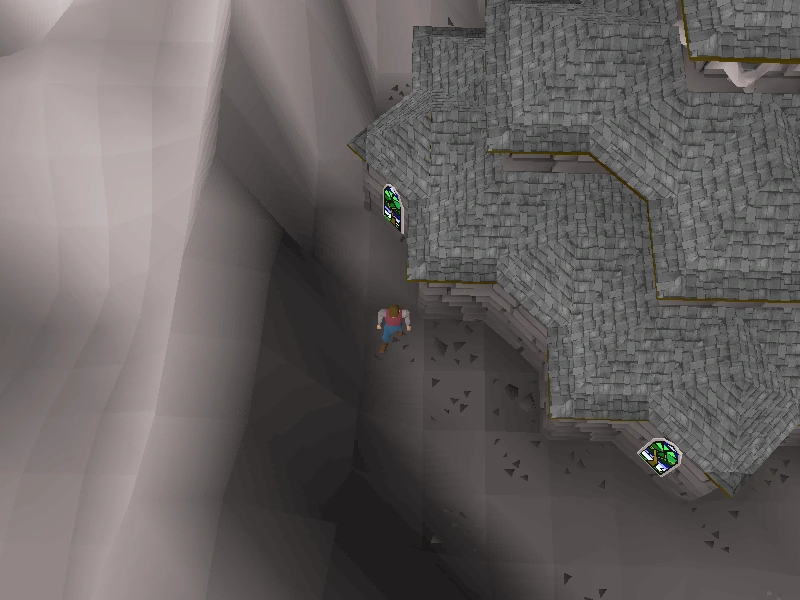
|
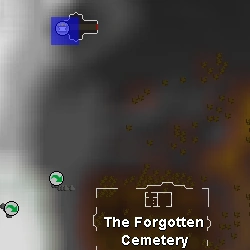
| ||
| Location notes | |||
| North-west of The Forgotten Cemetery, at level 38 Wilderness, there is a Chaos Temple. Dig outside the building, just to the south of the altar. A cemetery teleport can be used to reach the coordinates relatively quickly. | |||
| Coordinates | Shorthand | Requirements | Fight |
|---|---|---|---|
| 20 degrees 45 minutes north, 41 degrees 35 minutes east |
20.45N, 41.35E |
Completed Bone Voyage | Saradomin wizard |
| Image | Map | ||
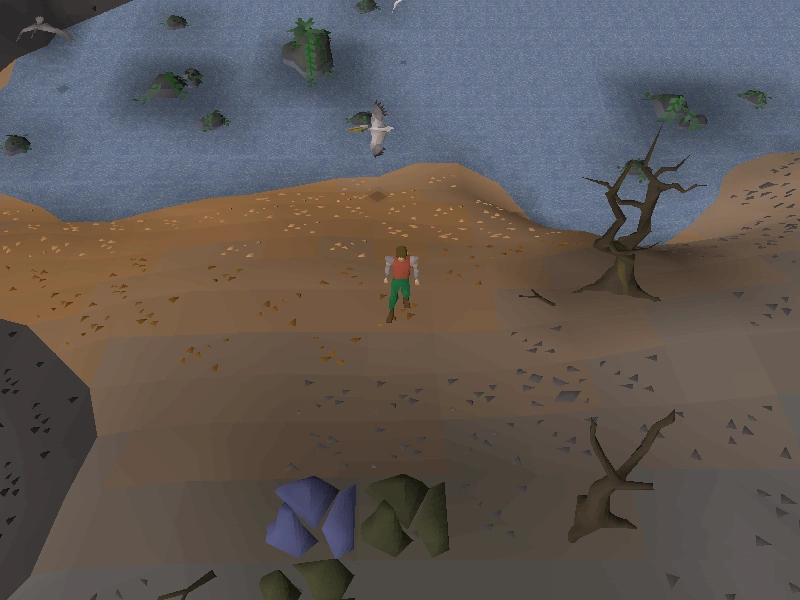
|
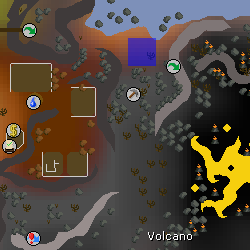
| ||
| Location notes | |||
| On Fossil Island, east of the Museum Camp. | |||
| Coordinates | Shorthand | Requirements | Fight |
|---|---|---|---|
| 21 degrees 24 minutes north, 17 degrees 54 minutes east |
21.24N, 17.54E |
None. | Zamorak wizard |
| Image | Map | ||
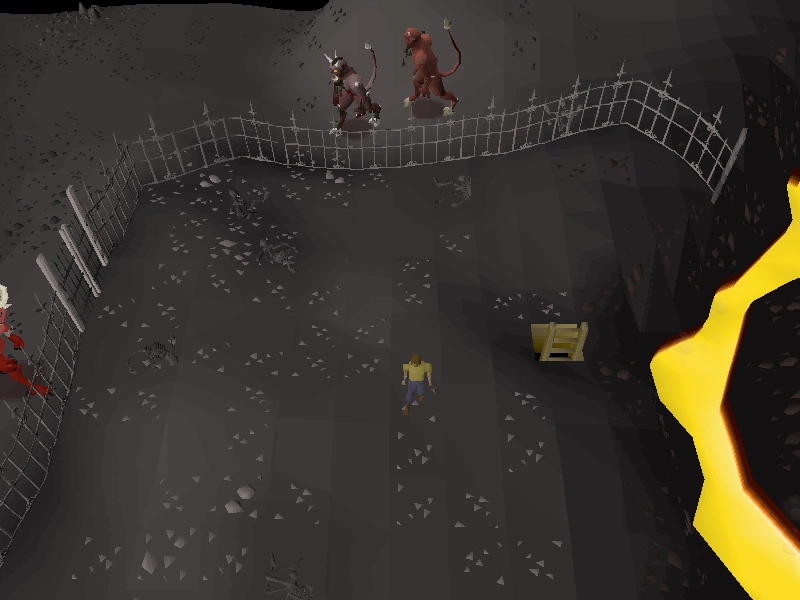
|
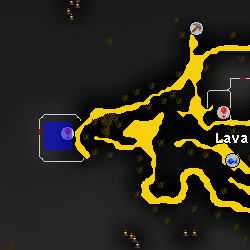
| ||
| Location notes | |||
| Level 41 Wilderness, in the area with the lesser demons, west of the Lava Maze, about three squares west and two squares south of the ladder to the King Black Dragon's lair. A burning amulet will take players close to this location. | |||
| Coordinates | Shorthand | Requirements | Fight |
|---|---|---|---|
| 22 degrees 35 minutes north, 19 degrees 18 minutes east |
22.35N, 19.18E |
None. | Zamorak wizard |
| Image | Map | ||
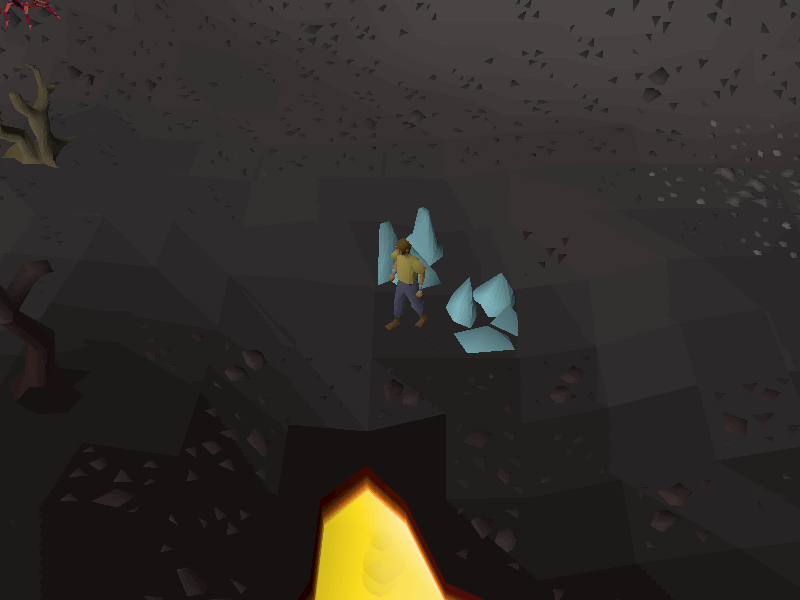
|
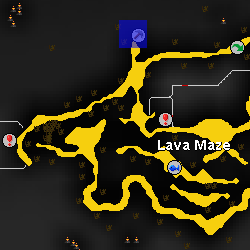
| ||
| Location notes | |||
| In the Wilderness near the two runite rocks located north of the Lava Maze. | |||
| Coordinates | Shorthand | Requirements | Fight |
|---|---|---|---|
| 22 degrees 45 minutes north, 26 degrees 33 minutes east |
22.45N, 26.33E |
None. | Zamorak wizard |
| Image | Map | ||
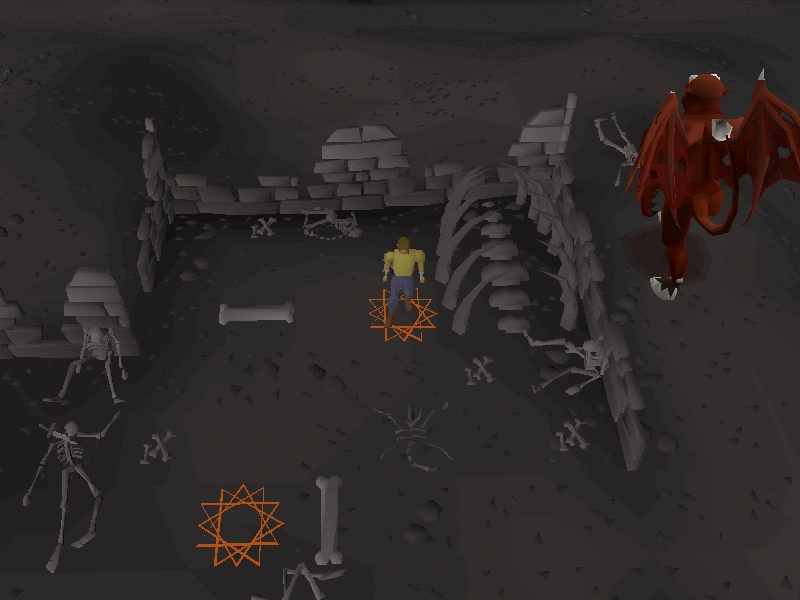
|
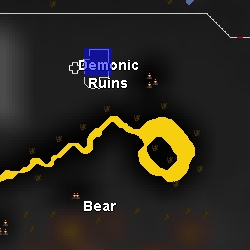
| ||
| Location notes | |||
| In the Demonic Ruins in level 44 Wilderness. Dig on top of the north-east icosagram, immediately north-west of one of the burnt bones spawns.
Easily reached by casting Annakarl Teleport or using its magic tablet equivalent. | |||
| Coordinates | Shorthand | Requirements | Fight |
|---|---|---|---|
| 23 degrees 00 minutes north, 41 degrees 33 minutes east |
23.00N, 41.33E |
Completion of Bone Voyage | Saradomin wizard |
| Image | Map | ||

|
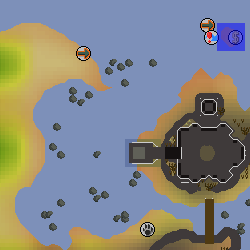
| ||
| Location notes | |||
| Small island located north of Fossil island. Only reachable via the rowboat found in the north-east corner of the Mushroom Forest. Select 'Row to Sea'. | |||
| Coordinates | Shorthand | Requirements | Fight |
|---|---|---|---|
| 23 degrees 03 minutes north, 02 degrees 01 minutes east |
23.03N, 02.01E |
Partial completion of Fairytale II - Cure a Queen | Saradomin wizard |
| Image | Map | ||
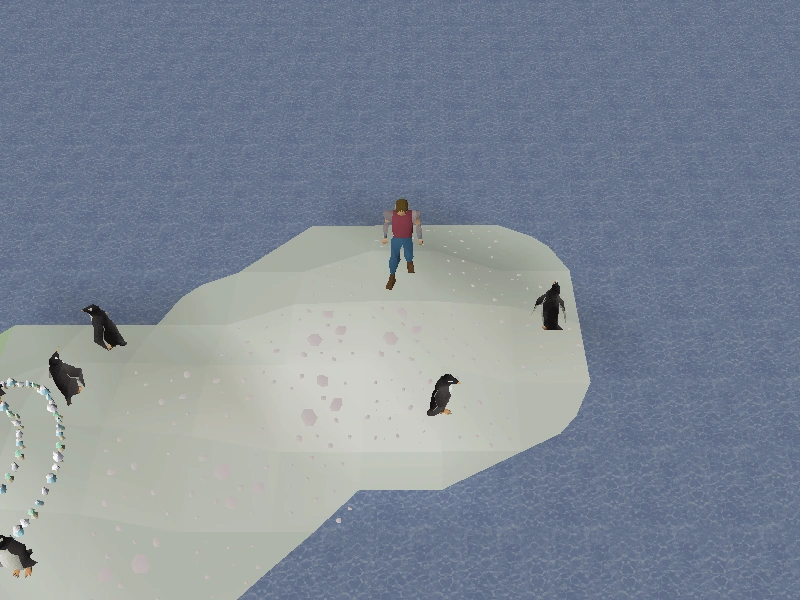
|
| ||
| Location notes | |||
| Small island located north of Miscellania. Only reachable via fairy ring code AJS. | |||
| Coordinates | Shorthand | Requirements | Fight |
|---|---|---|---|
| 24 degrees 24 minutes north, 26 degrees 24 minutes east |
24.24N, 26.24E |
None. | Zamorak wizard |
| Image | Map | ||
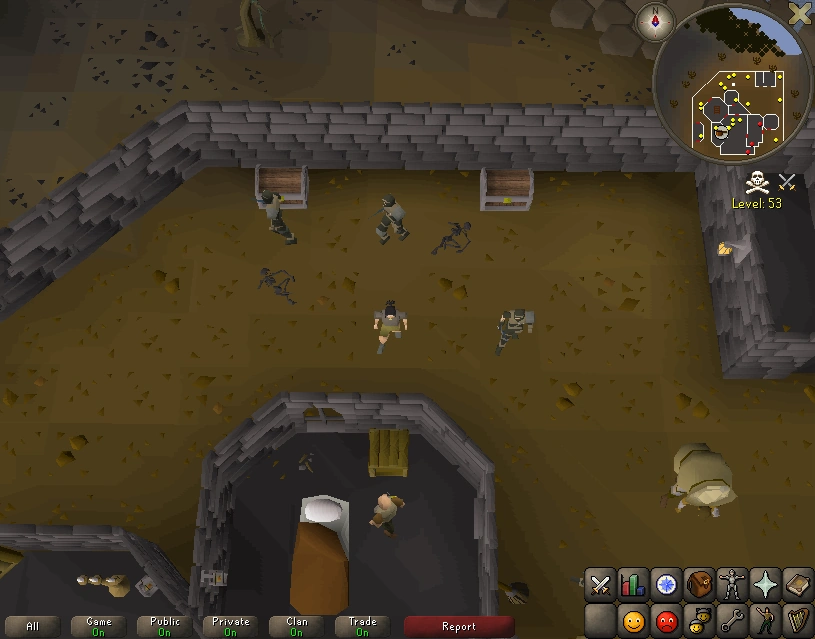
|
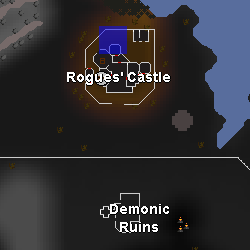
| ||
| Location notes | |||
| In the northern area of the Rogues' Castle in the Wilderness. Take caution when travelling here as the deadly Chaos Elemental lurks nearby. | |||
| Coordinates | Shorthand | Requirements | Fight |
|---|---|---|---|
| 24 degrees 56 minutes north, 22 degrees 28 minutes east |
24.56N, 22.28E |
None. | Zamorak wizard |
| Image | Map | ||
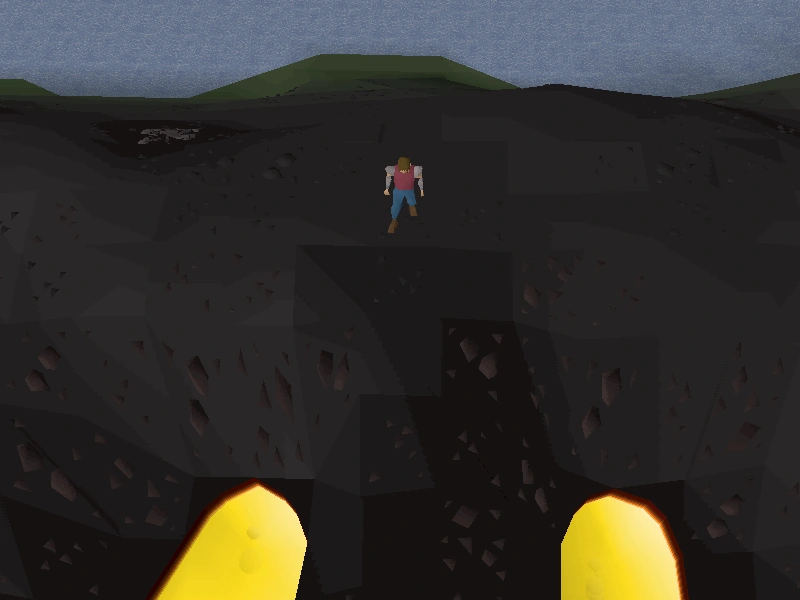
|
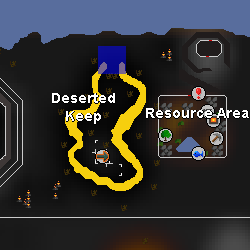
| ||
| Location notes | |||
| North of the Deserted Keep in the Wilderness. Dig six squares north of the spider web that must be slashed. This area can be reached via the teleport lever. | |||
| Coordinates | Shorthand | Requirements | Fight |
|---|---|---|---|
| 24 degrees 58 minutes north, 18 degrees 43 minutes east |
24.58N, 18.43E |
None. | Zamorak wizard |
| Image | Map | ||
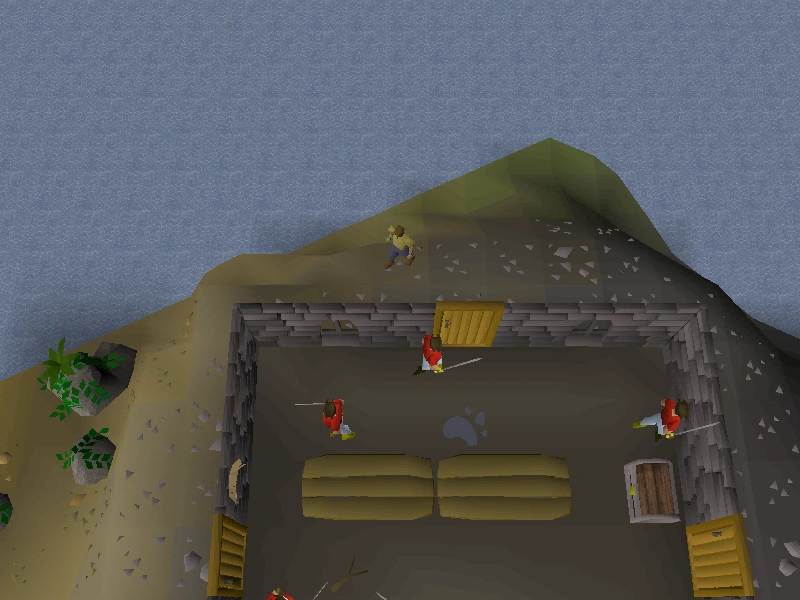
|
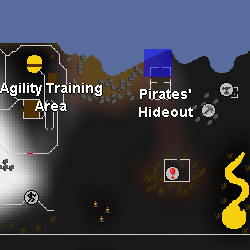
| ||
| Location notes | |||
| One step north and then one step west of the northern door of the Pirates' Hideout in the Wilderness. | |||
| Coordinates | Shorthand | Requirements | Fight |
|---|---|---|---|
| 25 degrees 03 minutes north, 17 degrees 05 minutes east |
25.03N, 17.05E |
None. | Zamorak wizard |
| Image | Map | ||
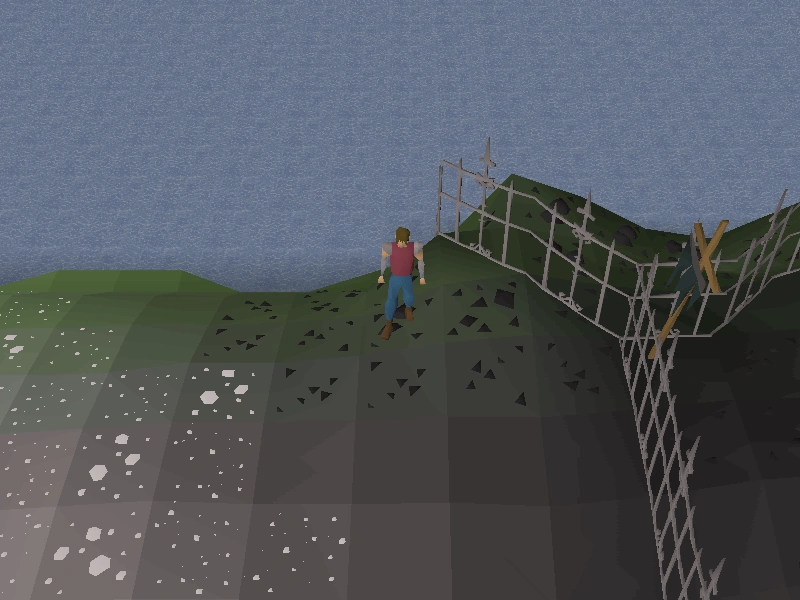
|
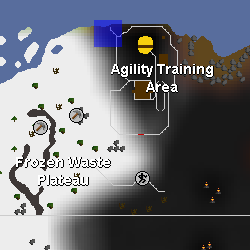
| ||
| Location notes | |||
| North-west of the Wilderness Agility Course in level 56 Wilderness. North-eastern corner of the Frozen Waste Plateau. Reachable via the ancient spell, Ghorrock Teleport (requires 96 | |||
| Coordinates | Shorthand | Requirements | Fight |
|---|---|---|---|
| 25 degrees 03 minutes north, 23 degrees 24 minutes east |
25.03N, 23.24E |
None. | Zamorak wizard |
| Image | Map | ||
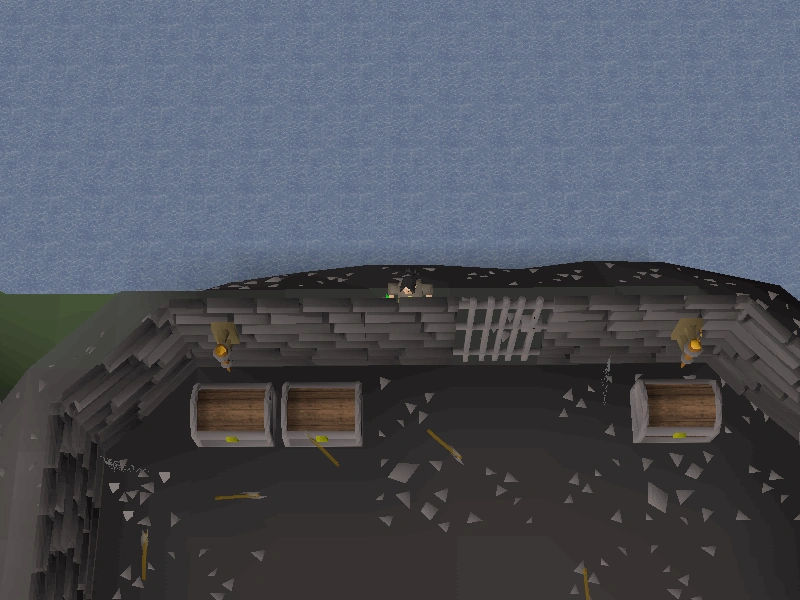
|
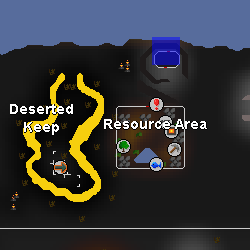
| ||
| Location notes | |||
| Immediately north of the magic axe hut, which is located north-east of the Deserted Keep in the Wilderness. Quickly reachable by pulling the Ardougne teleport lever in East Ardougne and running north-east from the Deserted Keep. | |||
Elite Coordinates
Quick links: 00 01 02 03 04 05 06 07 08 09 10 11 12 13 14 15 16 17 18 19 20 21 22 23 24 25
| Coordinates | Shorthand | Requirements | Fight |
|---|---|---|---|
| 00 degrees 18 minutes south, 02 degrees 35 minutes west |
00.18S, 02.35W |
Started Mourning's Ends Part I | Armadylian guard or Bandosian guard |
| Image | Map | ||
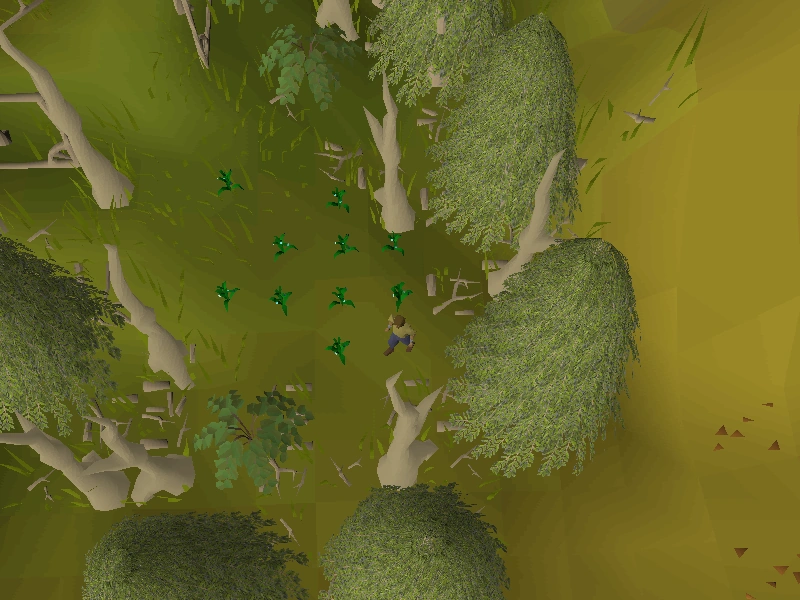
|
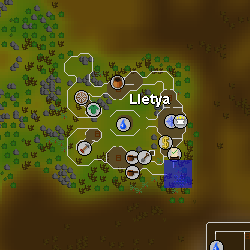
| ||
| Location notes | |||
| Flax field south of the Lletya bank. The image has the north compass facing east to provide a proper orientation. | |||
| Coordinates | Shorthand | Requirements | Fight |
|---|---|---|---|
| 00 degrees 35 minutes north, 35 degrees 50 minutes east |
00.35N, 35.50E |
Partial completion of Darkness of Hallowvale. | Armadylian guard or Bandosian guard |
| Image | Map | ||
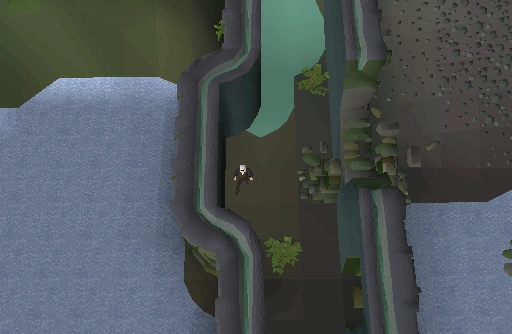
|
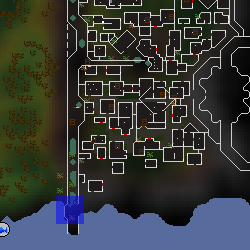
| ||
| Location notes | |||
| After arriving at Meiyerditch, walk up the wall until you pass a section where the boards creak (you are informed in the chat pane). Kick the boards, and then climb down into the passage below. Dig west of the wall rubble. If you already completed Darkness of Hallowvale, then right-click on the boards for the option to climb down. | |||
| Coordinates | Shorthand | Requirements | Fight |
|---|---|---|---|
| 02 degrees 35 minutes south, 11 degrees 52 minutes east |
02.35S, 11.52E |
Jungle Potion quest and 100 trading sticks are required to enter. | Armadylian guard or Bandosian guard |
| Image | Map | ||

|
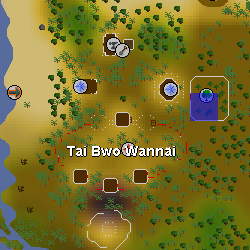
| ||
| Location notes | |||
| Inside the Hardwood Grove at Tai Bwo Wannai. You will need 100 trading sticks for this. | |||
| Coordinates | Shorthand | Requirements | Fight |
|---|---|---|---|
| 03 degrees 09 minutes south, 42 degrees 50 minutes east |
03.09S, 42.50E |
Cabin Fever | Bandosian guard or Armadylian guard |
| Image | Map | ||
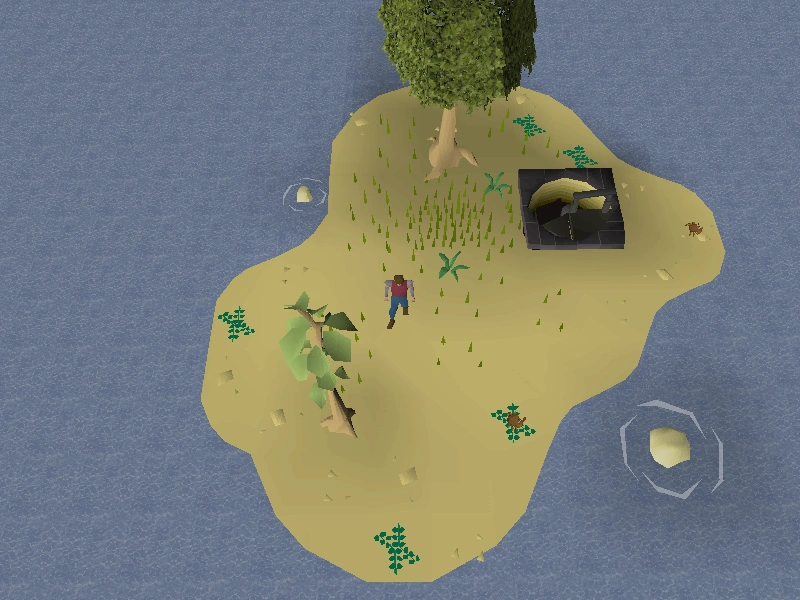
|
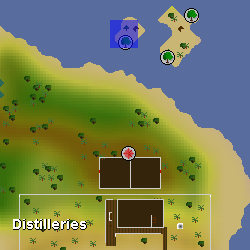
| ||
| Location notes | |||
| Small island located north-east of Mos Le'Harmless, accessible through the western staircase located at the north-east corner of the Mos Le'Harmless Caves. Remember to wear a Witchwood icon when traversing the dungeon, as well as bringing a light source for players who haven't lit the fire pit (requires completion of Making Friends with My Arm). It is possible that an Armadylian guard may appear, which means you may have to bring Ranged equipment. | |||
| Coordinates | Shorthand | Requirements | Fight |
|---|---|---|---|
| 03 degrees 46 minutes north, 08 degrees 07 minutes west |
03.46N, 08.07W |
Regicide | Bandosian guard or Armadylian guard |
| Image | Map | ||
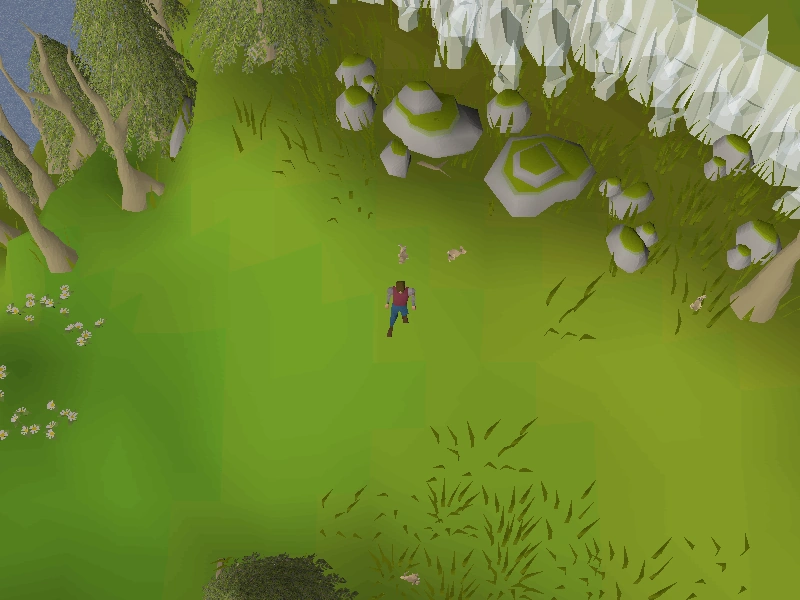
|
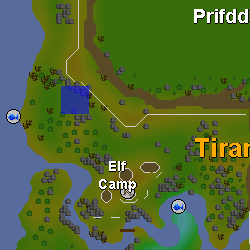
| ||
| Location notes | |||
| North-west of Elf Camp near some rabbits. East of Shark fishing spot. | |||
| Coordinates | Shorthand | Requirements | Fight |
|---|---|---|---|
| 05 degrees 07 minutes south, 13 degrees 26 minutes east |
05.07S, 13.26E |
Completion of the Shilo Village quest | Bandosian guard or Armadylian guard |
| Image | Map | ||
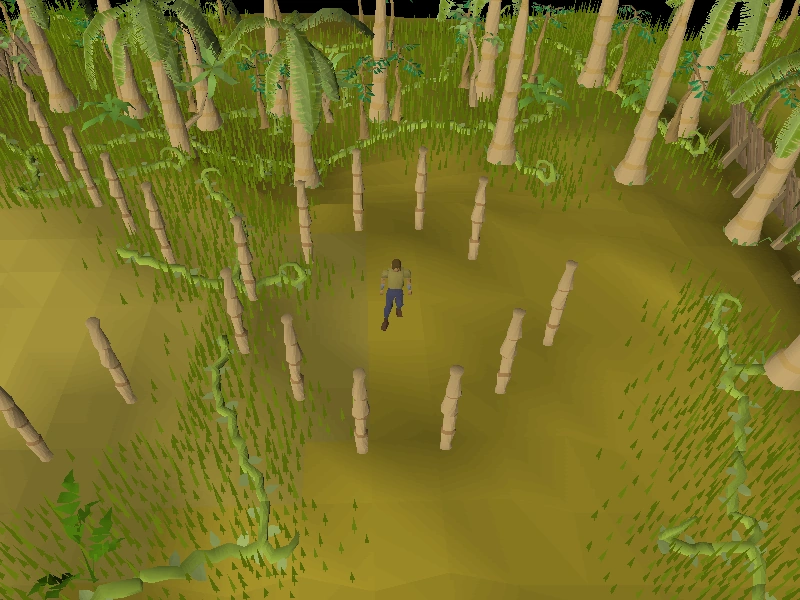
|
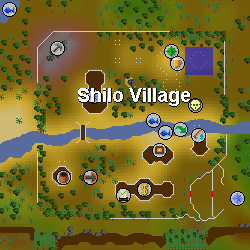
| ||
| Location notes | |||
| North-east Shilo Village, dig in the centre of the bamboo pillars. | |||
| Coordinates | Shorthand | Requirements | Fight |
|---|---|---|---|
| 05 degrees 24 minutes south, 26 degrees 56 minutes east |
05.24S, 26.56E |
None. | Bandosian guard or Armadylian guard |
| Image | Map | ||
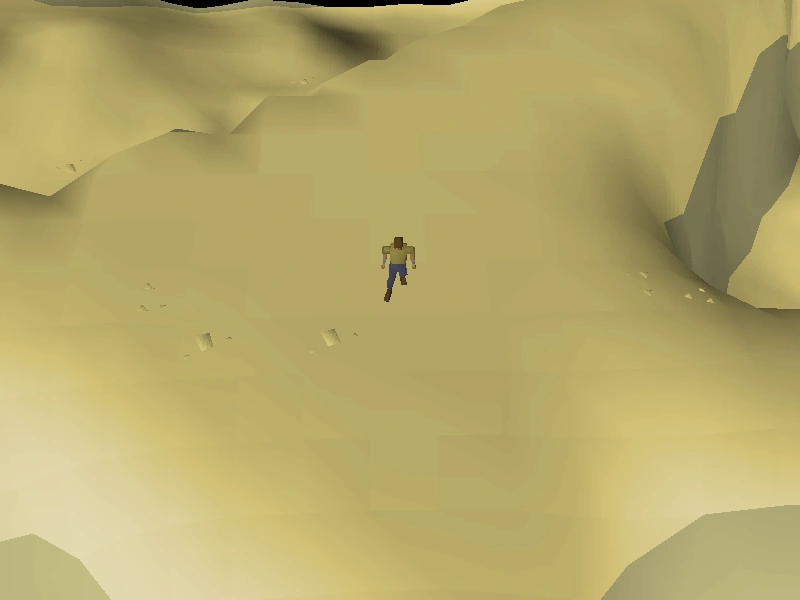
|
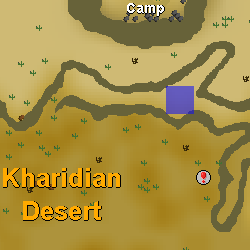
| ||
| Location notes | |||
| On top of a cliff to the west of Pollnivneach. | |||
| Coordinates | Shorthand | Requirements | Fight |
|---|---|---|---|
| 05 degrees 39 minutes south, 02 degrees 13 minutes east |
05.39S, 02.13E |
None. | Armadylian guard or Bandosian guard |
| Image | Map | ||
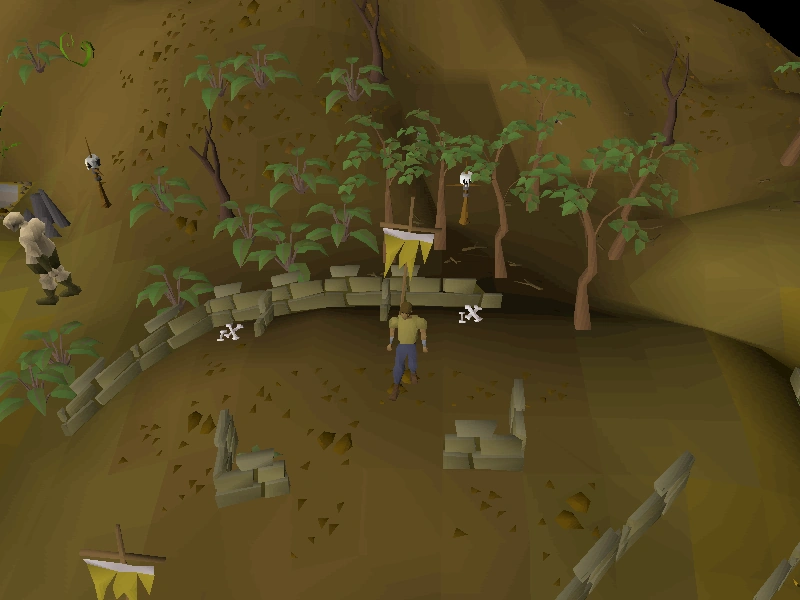
|
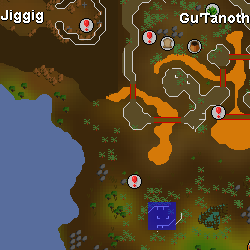
| ||
| Location notes | |||
| Just south of Gu'Tanoth, west of Gnormadium Avlafrim's gnome glider. | |||
| Coordinates | Shorthand | Requirements | Fight |
|---|---|---|---|
| 06 degrees 35 minutes north, 09 degrees 07 minutes east |
06.35N, 09.07E |
Started Legends' Quest | Bandosian guard or Armadylian guard |
| Image | Map | ||
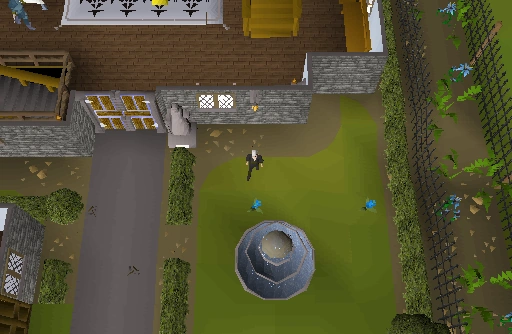
|
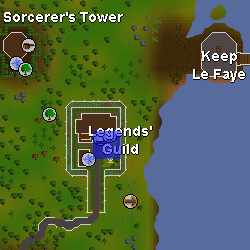
| ||
| Location notes | |||
| Outside the Legends' Guild, north of the fountain. | |||
| Coordinates | Shorthand | Requirements | Fight |
|---|---|---|---|
| 08 degrees 15 minutes north, 35 degrees 24 minutes east |
08.15N, 35.24E |
Priest in Peril | Bandosian guard or Armadylian guard |
| Image | Map | ||
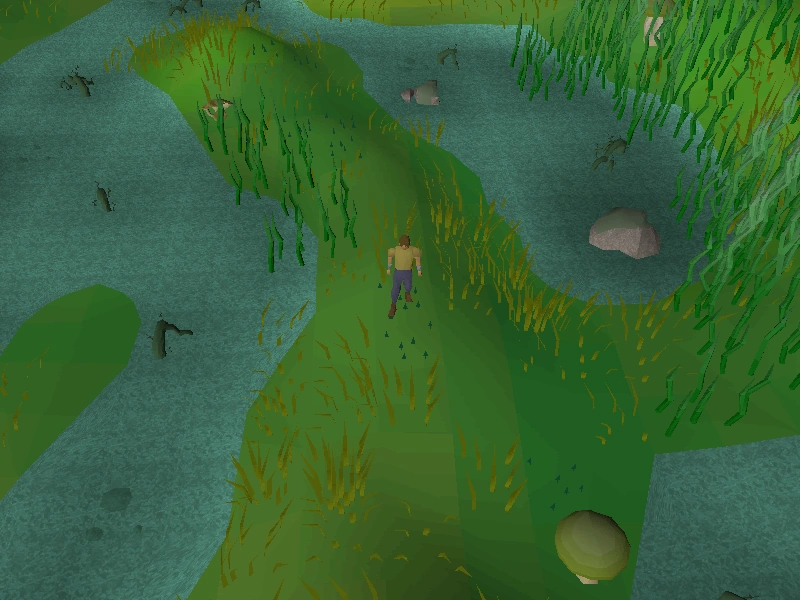
|
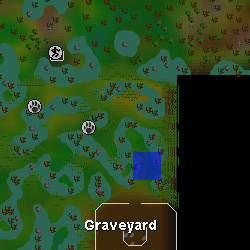
| ||
| Location notes | |||
| North of Dessous's tomb from Desert Treasure. | |||
| Coordinates | Shorthand | Requirements | Fight |
|---|---|---|---|
| 09 degrees 46 minutes south, 43 degrees 22 minutes east |
09.46S, 43.22E |
Started The Great Brain Robbery | Bandosian guard or Armadylian guard |
| Image | Map | ||
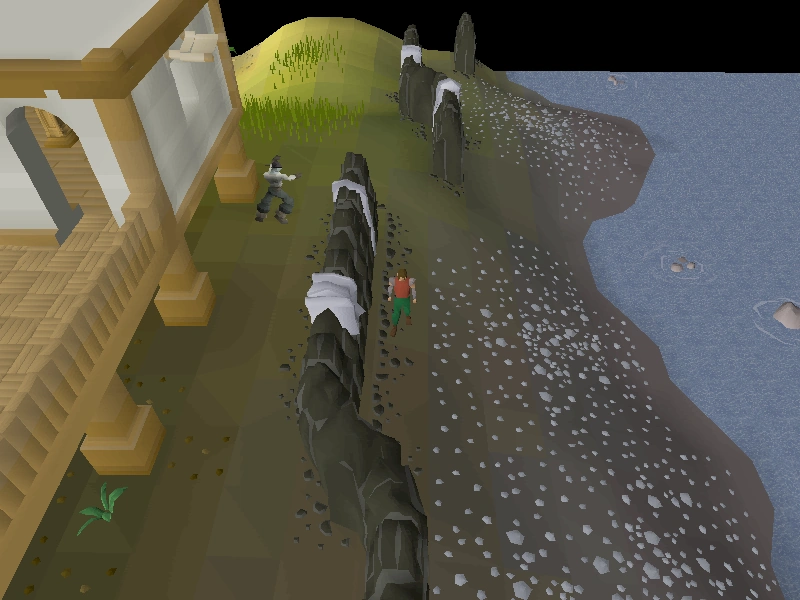
|
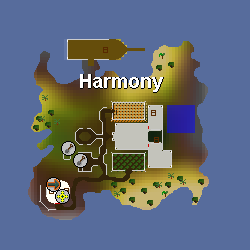
| ||
| Location notes | |||
| East side of Harmony Island. It is suggested to bring Ranged equipment as it is possible an Armadylian guard will appear. | |||
| Coordinates | Shorthand | Requirements | Fight |
|---|---|---|---|
| 10 degrees 05 minutes south, 24 degrees 31 minutes east |
10.05S, 24.31E |
None. | Bandosian guard or Armadylian guard |
| Image | Map | ||
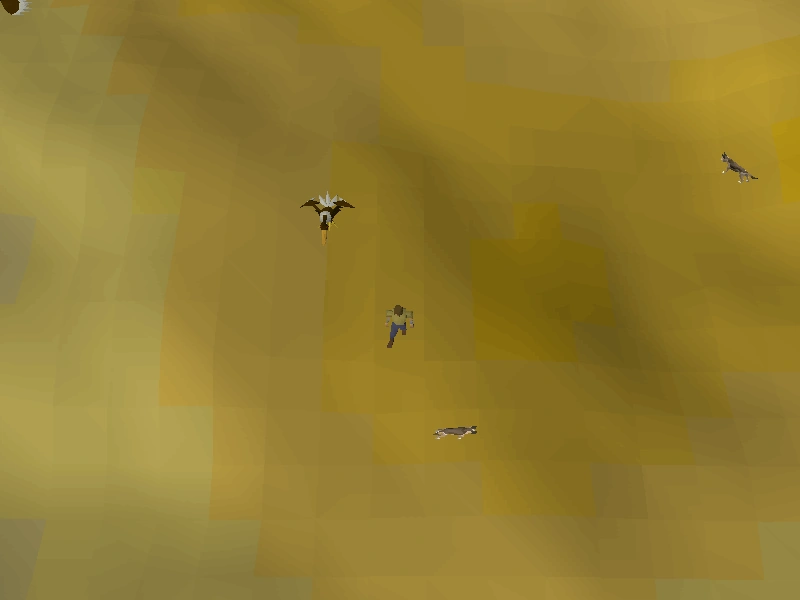
|
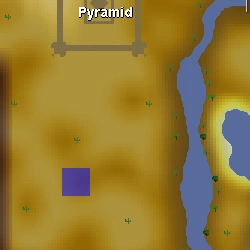
| ||
| Location notes | |||
| South of the Desert Treasure pyramid. If you are having trouble finding the exact spot, increase the brightness to max to help see the contrast in sand colour. 16 blocks south of the northern cactus. | |||
| Coordinates | Shorthand | Requirements | Fight |
|---|---|---|---|
| 10 degrees 54 minutes north, 20 degrees 50 minutes west |
10.54N, 20.50W |
None. | Bandosian guard or Armadylian guard |
| Image | Map | ||

|
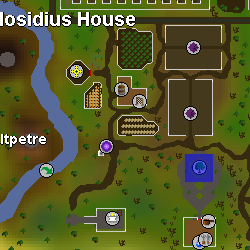
| ||
| Location notes | |||
| Between the magic trees north of Logava Gricoller's Cooking Supplies. Easily accessible by using Xeric's talisman to teleport to Xeric's Glade. | |||
| Coordinates | Shorthand | Requirements | Fight |
|---|---|---|---|
| 12 degrees 31 minutes north, 43 degrees 11 minutes east |
12.31N, 43.11E |
None. | Bandosian guard or Armadylian guard |
| Image | Map | ||
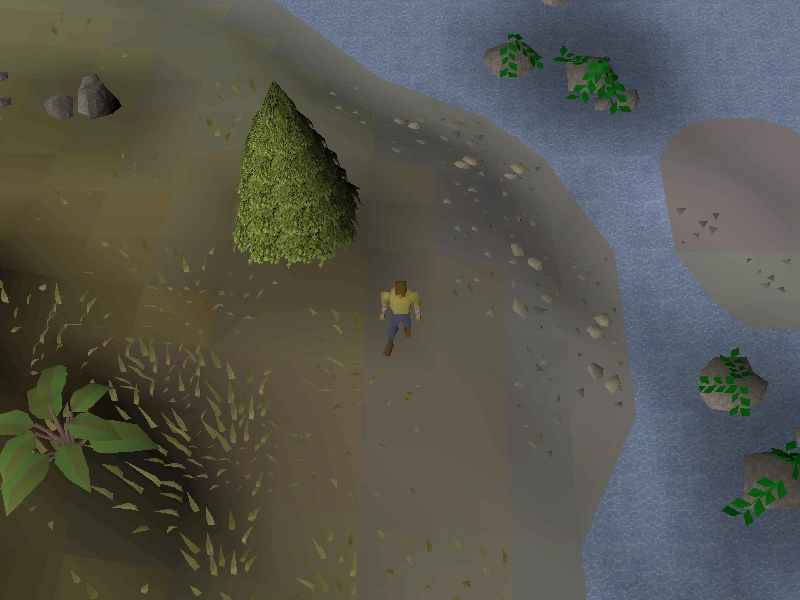
|
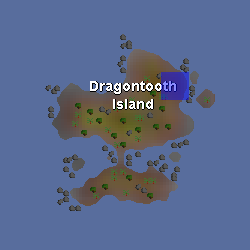
| ||
| Location notes | |||
| Dig south-east of the evergreen tree on the northeastern portion of Dragontooth Island. Players will require a ghostspeak amulet and 25 ecto-tokens (10 if wearing a Ring of charos (a)) or a one-time payment of 500 ecto-tokens at the Ghost captain to get to the island. | |||
| Coordinates | Shorthand | Requirements | Fight |
|---|---|---|---|
| 12 degrees 35 minutes north, 36 degrees 20 minutes east |
12.35N, 36.20E |
25 |
Bandosian guard or Armadylian guard |
| Image | Map | ||
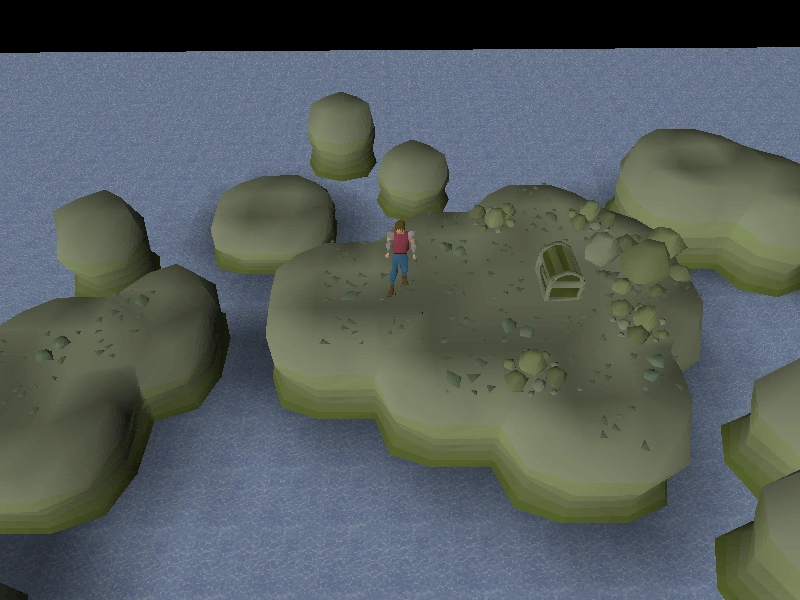
|
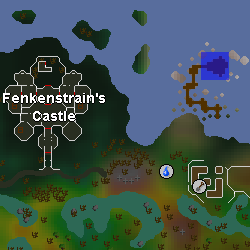
| ||
| Location notes | |||
| Dig on the rocks, north of the wrecked ship, outside of Port Phasmatys. Climb the ladder of the wrecked ship, cross the gangplank, and jump on the rocks until the end is reached. Each jump requires 5% of your running energy. | |||
| Coordinates | Shorthand | Requirements | Fight |
|---|---|---|---|
| 13 degrees 45 minutes south, 15 degrees 30 minutes east |
13.45S, 15.30E |
Partial completion of Monkey Madness I | Bandosian guard or |
| Image | Map | ||
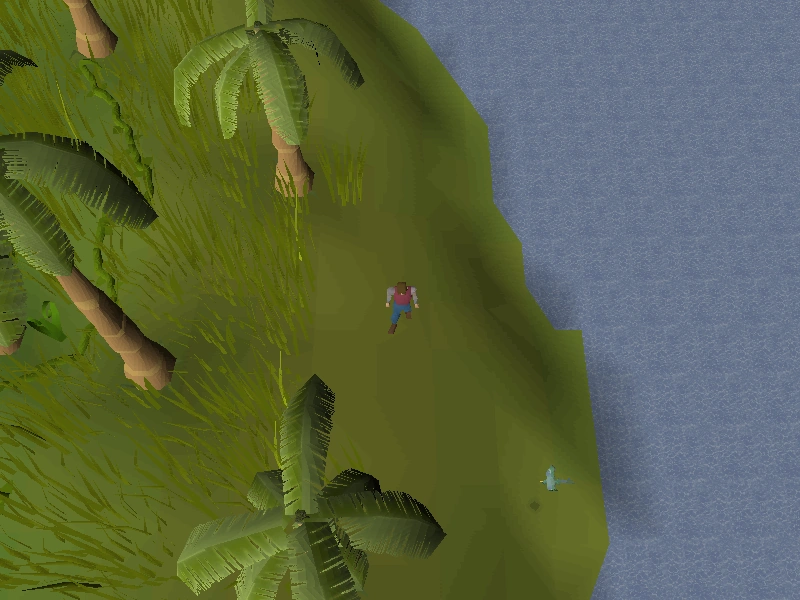
|
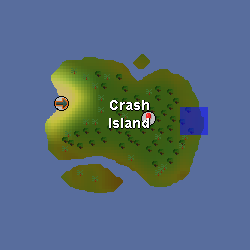
| ||
| Location notes | |||
| Eastern shore of Crash Island, visited during the Monkey Madness I quest. There are poisonous scorpions there-bring an anti-poison. | |||
| Coordinates | Shorthand | Requirements | Fight |
|---|---|---|---|
| 14 degrees 15 minutes south, 08 degrees 01 minutes east |
14.15S, 08.01E |
Partial completion of Monkey Madness I | Armadylian guard or Bandosian guard |
| Image | Map | ||
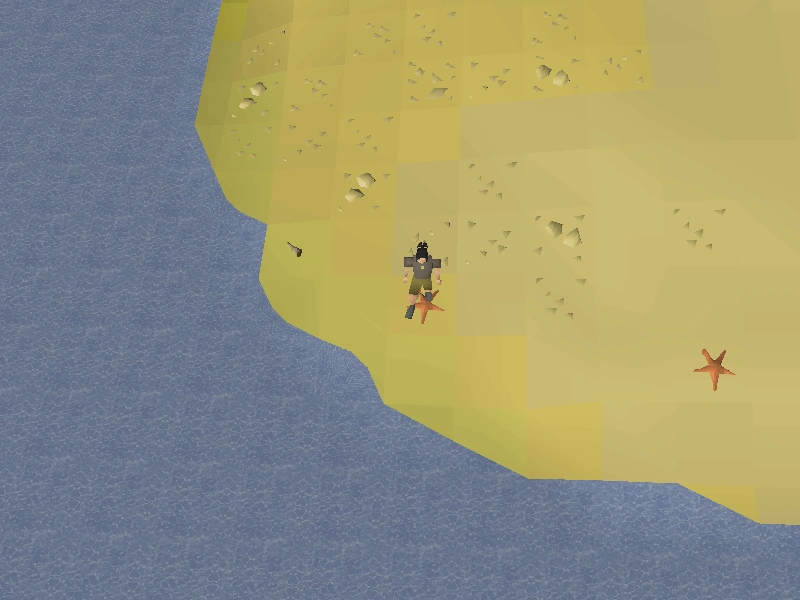
|
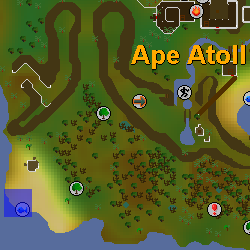
| ||
| Location notes | |||
| Dig on top of the starfish on the south-westernmost shore of Ape Atoll. | |||
| Coordinates | Shorthand | Requirements | Fight |
|---|---|---|---|
| 16 degrees 09 minutes north, 10 degrees 33 minutes east |
16.09N, 10.33E |
A rope (if Mountain Daughter not completed) | Bandosian guard or armadylian guard |
| Image | Map | ||

|

| ||
| Location notes | |||
| By the lake north of the Mountain Camp in the Fremennik Province. | |||
| Coordinates | Shorthand | Requirements | Fight |
|---|---|---|---|
| 18 degrees 05 minutes north, 12 degrees 05 minutes east |
18.05N, 12.05E |
Access to Trollheim, requires quests | Bandosian guard or armadylian guard |
| Image | Map | ||
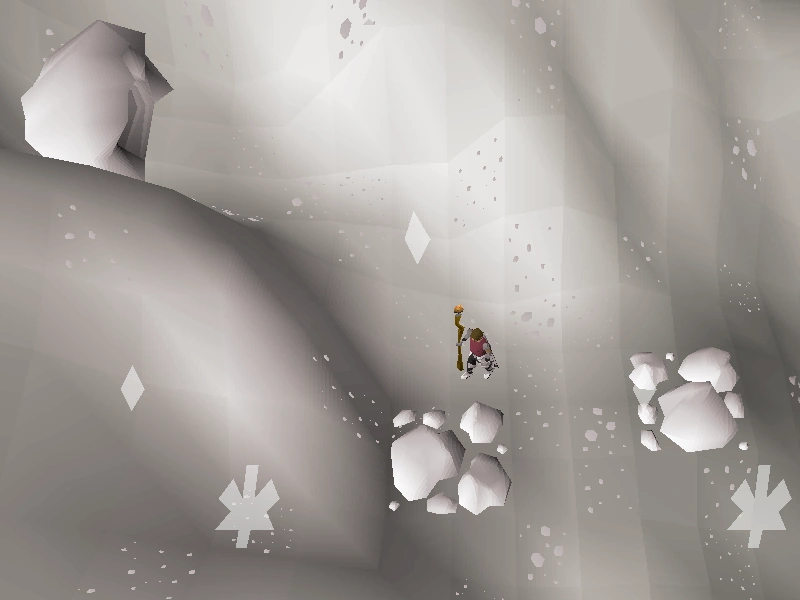
|
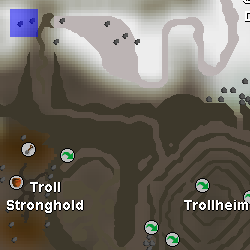
| ||
| Location notes | |||
| West of the entrance to the Ice Path, where the Troll child resides. | |||
| Coordinates | Shorthand | Requirements | Fight |
|---|---|---|---|
| 19 degrees 56 minutes north, 02 degrees 31 minutes west |
19.56N, 02.31W |
Partial completion of The Fremennik Isles | Bandosian guard or Armadylian guard |
| Image | Map | ||
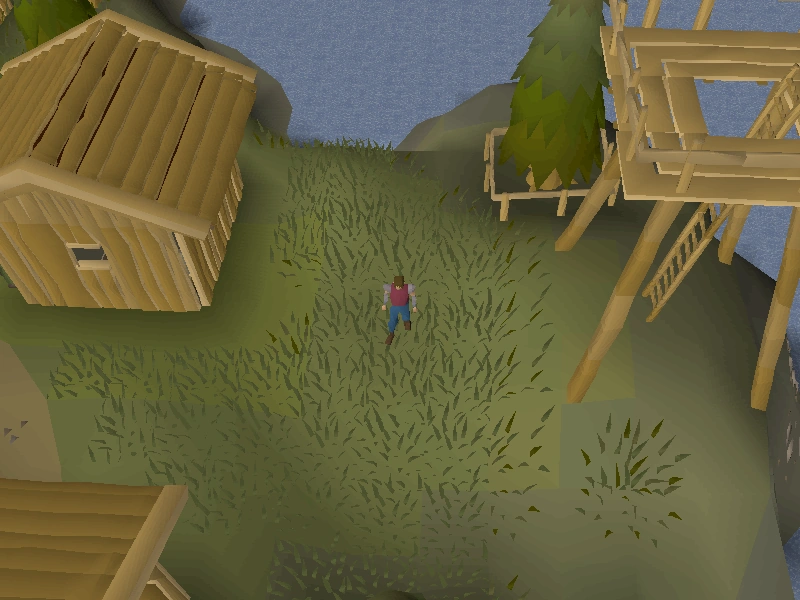
|
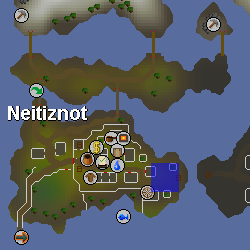
| ||
| Location notes | |||
| At the very southeastern part of Neitiznot. Dig 4 spaces west of the ladder. | |||
| Coordinates | Shorthand | Requirements | Fight |
|---|---|---|---|
| 20 degrees 11 minutes north, 07 degrees 41 minutes west |
20.11N, 07.41W |
Started Lunar Diplomacy to access Pirates' Cove | Bandosian guard or Armadylian guard |
| Image | Map | ||
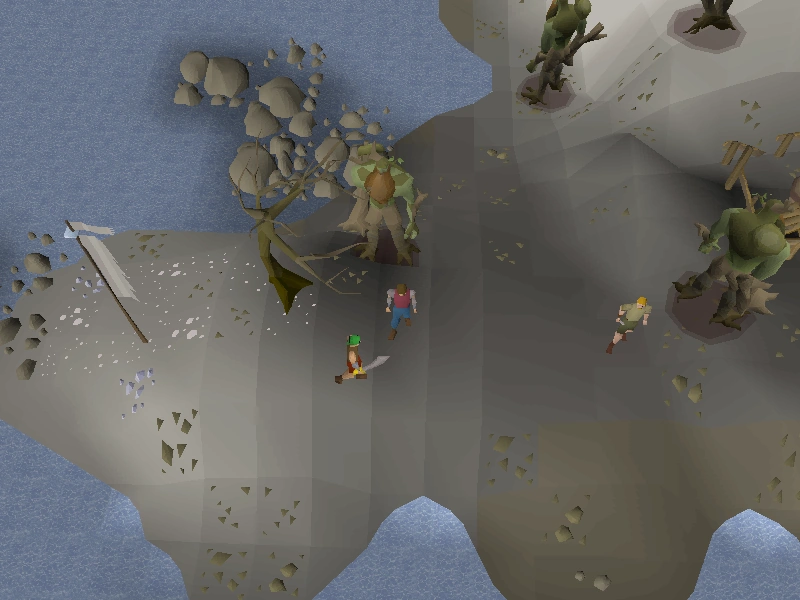
|

| ||
| Location notes | |||
| In the southwestern area of the Pirates' Cove, near the windswept tree. | |||
| Coordinates | Shorthand | Requirements | Fight |
|---|---|---|---|
| 20 degrees 13 minutes north, 08 degrees 07 minutes east |
20.13N, 08.07E |
None. | Bandosian guard or Armadylian guard |
| Image | Map | ||
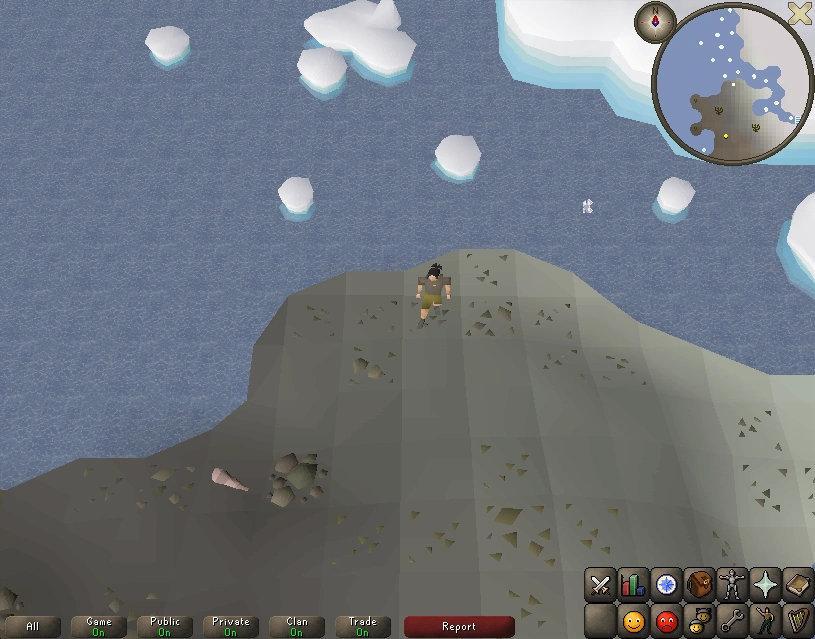
|
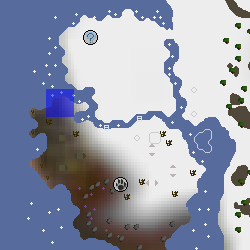
| ||
| Location notes | |||
| In the northwestern part of the Trollweiss and Rellekka Hunter area. The fairy ring code DKS can be used to teleport nearby. | |||
| Coordinates | Shorthand | Requirements | Fight |
|---|---|---|---|
| 21 degrees 03 minutes north, 24 degrees 13 minutes east |
21.03N, 24.13E |
None. | Armadylian guard |
| Image | Map | ||
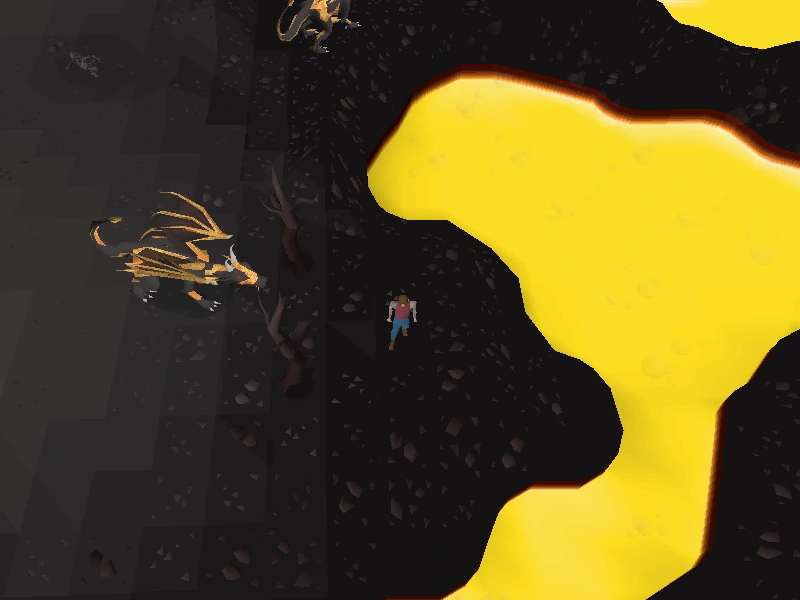
|
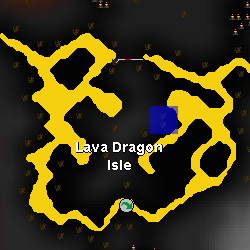
| ||
| Location notes | |||
| Level 40 Wilderness, in the Lava Dragon Isle. An Anti-dragon shield
or Antifire potion is recommended to bring for some protection against dragonfire attacks. | |||
| Coordinates | Shorthand | Requirements | Fight |
|---|---|---|---|
| 22 degrees 54 minutes north, 29 degrees 01 minutes east |
22.54N, 29.01E |
None. | Armadylian guard or Bandosian guard |
| Image | Map | ||
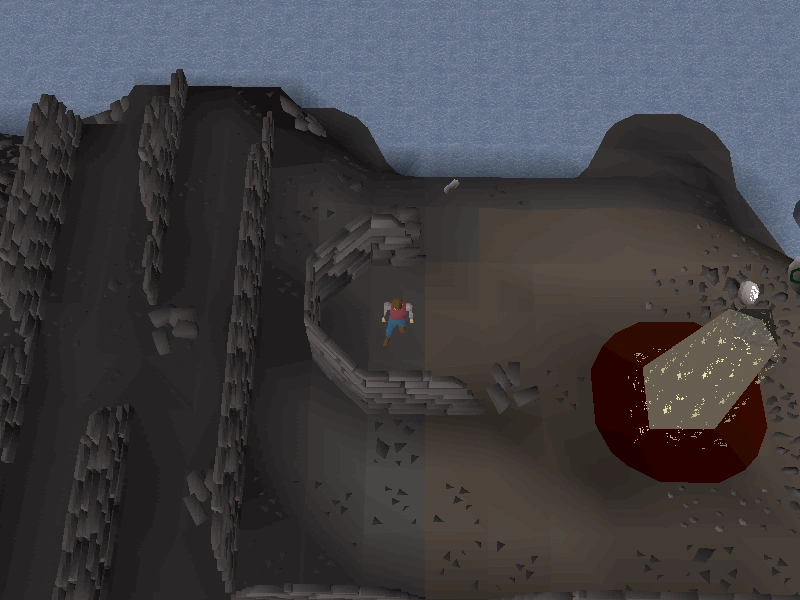
|
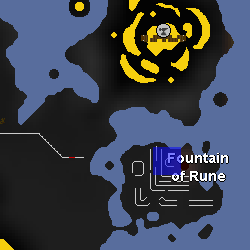
| ||
| Location notes | |||
| At the Fountain of Rune in the north-eastern Wilderness, in the small 'C' shaped wall. | |||
| Coordinates | Shorthand | Requirements | Fight |
|---|---|---|---|
| 23 degrees 48 minutes north, 11 degrees 43 minutes west |
23.48N, 11.43W |
Started Lunar Diplomacy to access Lunar Isle | Armadylian guard or Bandosian guard |
| Image | Map | ||
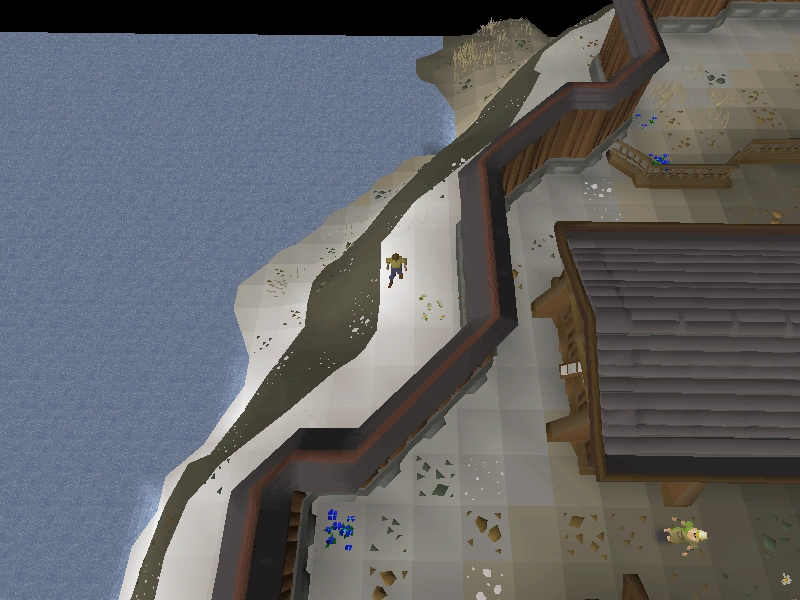
|

| ||
| Location notes | |||
| Outside the western wall on Lunar Isle. | |||
| Coordinates | Shorthand | Requirements | Fight |
|---|---|---|---|
| 24 degrees 07 minutes north, 23 degrees 22 minutes east |
24.07N, 23.22E |
None. | Armadylian guard or Bandosian guard |
| Image | Map | ||
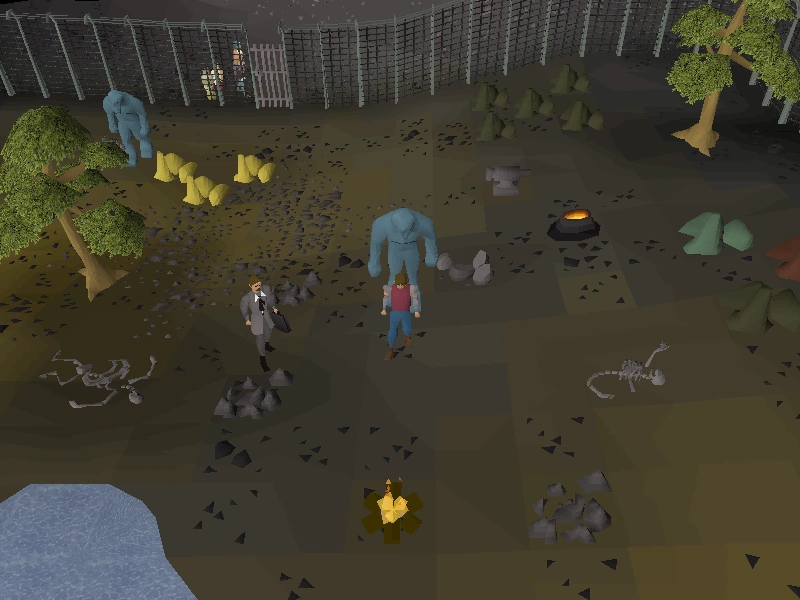
|
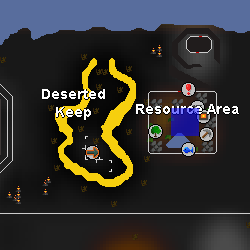
| ||
| Location notes | |||
| Inside the Resource Area (3 steps north of the fire). Requires 7,500 coins to enter. | |||
| Coordinates | Shorthand | Requirements | Fight |
|---|---|---|---|
| 24 degrees 45 minutes north, 17 degrees 24 minutes east |
24.45N, 17.24E |
52 |
Armadylian guard |
| Image | Map | ||
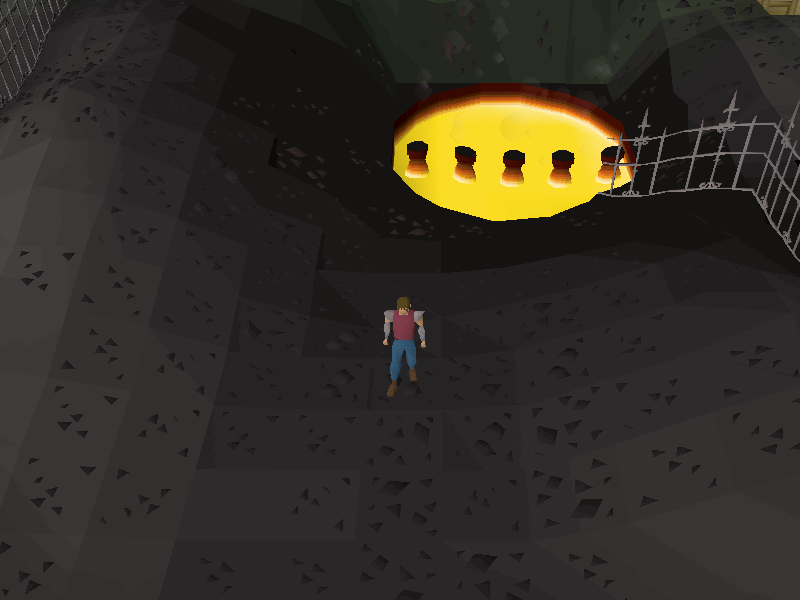
|
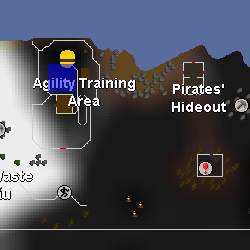
| ||
| Location notes | |||
| In the Wilderness Agility Course in level 55 Wilderness. | |||
| Coordinates | Shorthand | Requirements | Fight |
|---|---|---|---|
| 25 degrees 03 minutes north, 29 degrees 22 minutes east |
25.03N, 29.22E |
None. | Armadylian guard or Bandosian guard |
| Image | Map | ||
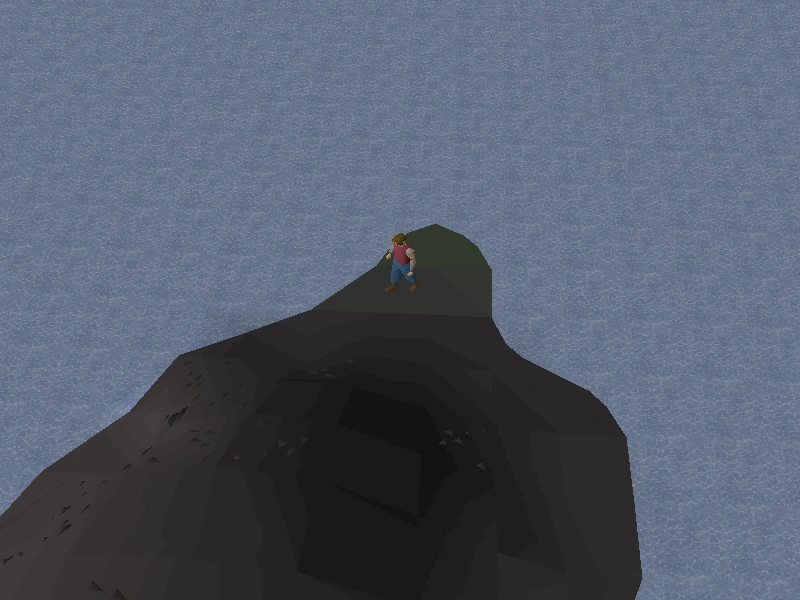
|
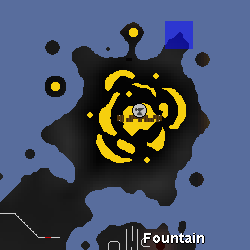
| ||
| Location notes | |||
| On the peninsula in the north-easternmost corner of the Wilderness, north of the Wilderness Volcano. | |||
Master Coordinates
Quick links: 00 01 02 03 04 05 06 07 08 09 10 11 12 13 14 15 16 17 18 19 20 21 22 23 24 25
| Coordinates | Shorthand | Requirements | Fight |
|---|---|---|---|
| 01 degrees 30 minutes north, 08 degrees 11 minutes west |
01.30N, 08.11W |
Regicide | Brassican Mage |
| Image | Map | ||
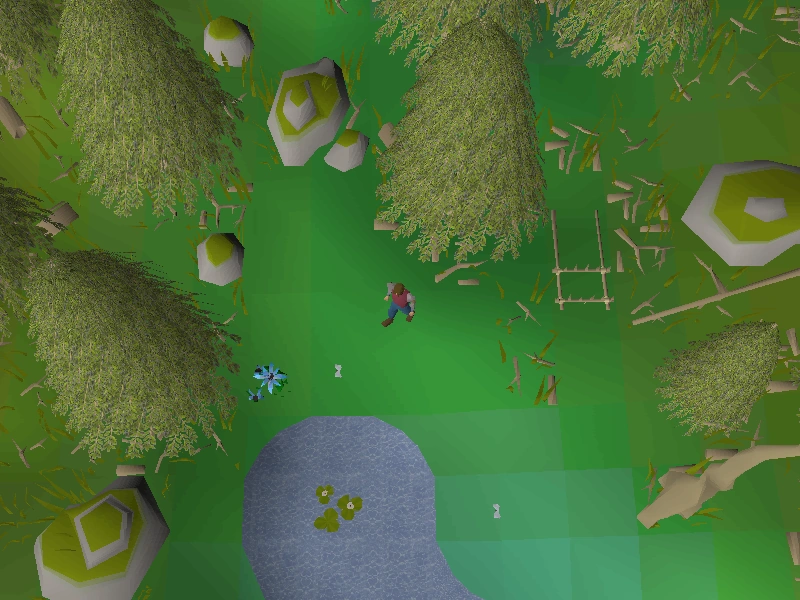
|

| ||
| Location notes | |||
| In the hunter area directly south of the Elf Camp, past a stick trap, dig by the north-east edge of the pond. An Elf camp teleport can greatly reduce the difficulty in reaching this position.
From Lletya: Pass the tree, go west across the tripwire, continue west through the dense forest. Turn north and up the path to Prifddinas. Before the bridge and the water, head west through the dense forest. Then, keep going west past the leaves pitfall trap, then south-west past a stick trap. From Port Tyras: Go north through dense forest then east; go south through dense forest; step over tripwire; go east through the dense forest then north-west for quite a while; jump over the leaves. Finally, continue west till you arrive at a elven lamp next to mushrooms. Head south down the small path to the pond. Pass the stick trap and dig by the north-east edge of the pond. This clue can be frustrating due to the frequency of activating the stick traps, which deal significant amounts of damage. There is a better success rate of passing the trap by turning off run and walking past the trap. It's recommended to follow this map in order to not get lost. | |||
| Coordinates | Shorthand | Requirements | Fight |
|---|---|---|---|
| 01 degrees 54 minutes south, 08 degrees 54 minutes west |
01.54S, 08.54W |
Partial completion of Regicide | Brassican Mage |
| Image | Map | ||
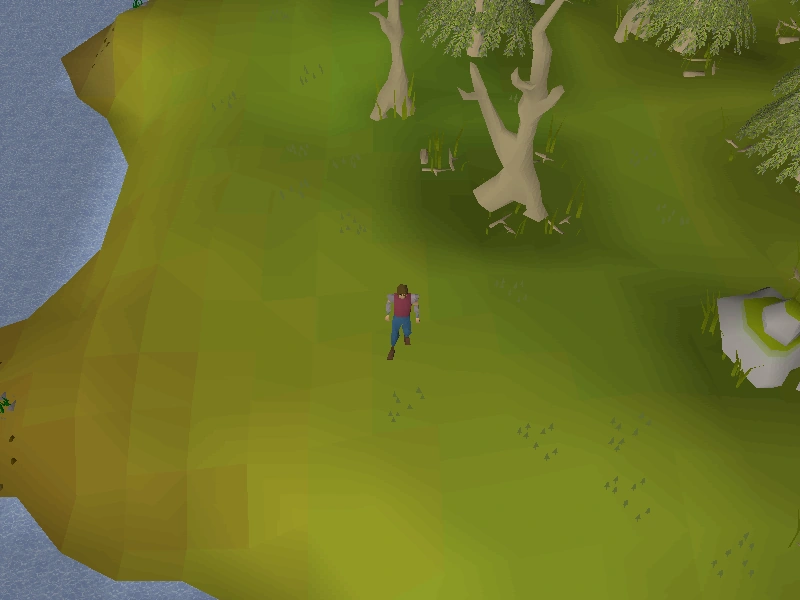
|
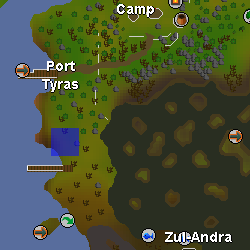
| ||
| Location notes | |||
| South of Port Tyras, easily accessible by charter ship or fairy ring code BJS (requires 76 | |||
| Coordinates | Shorthand | Requirements | Fight |
|---|---|---|---|
| 02 degrees 09 minutes south, 06 degrees 58 minutes west |
02.09S, 06.58W |
Access to fairy rings | Brassican Mage |
| Image | Map | ||
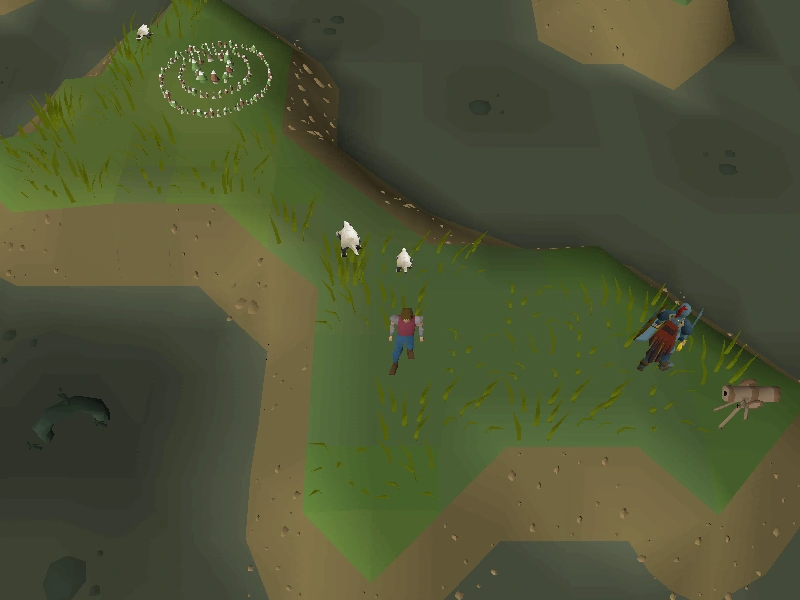
|
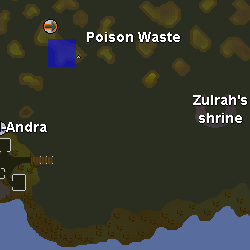
| ||
| Location notes | |||
| Code (DLR) at the Poison Waste. | |||
| Coordinates | Shorthand | Requirements | Fight |
|---|---|---|---|
| 03 degrees 09 minutes south, 43 degrees 26 minutes east |
03.09S, 43.26E |
Cabin Fever | Brassican Mage |
| Image | Map | ||
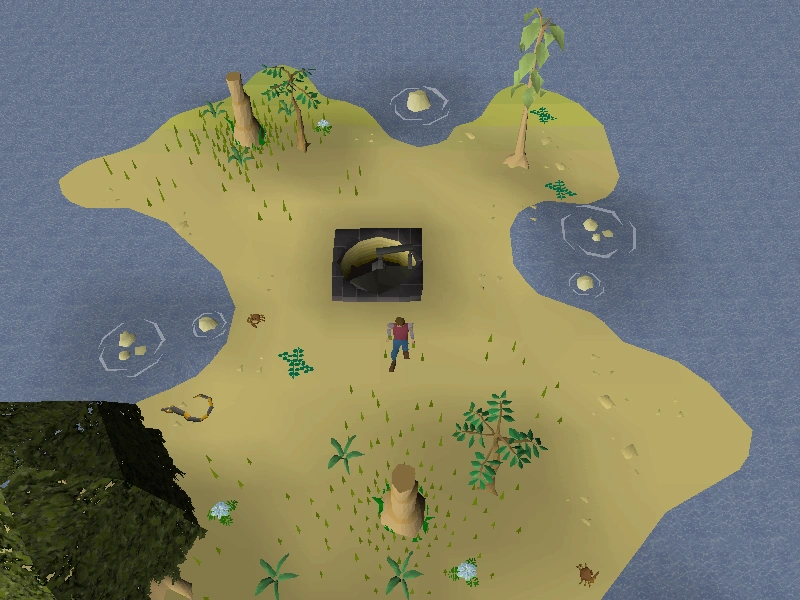
|
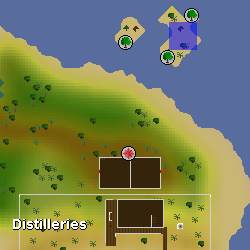
| ||
| Location notes | |||
| Small island located north-east of Mos Le'Harmless, accessible through the eastern staircase located at the north-east corner of the Mos Le'Harmless Caves. Remember to wear a Witchwood icon when traversing the dungeon, as well as bringing a light source for players who haven't lit the fire pit (requires completion of Making Friends with My Arm). | |||
| Coordinates | Shorthand | Requirements | Fight |
|---|---|---|---|
| 03 degrees 26 minutes north,
12 degrees 18 minutes east |
03.26N,
12.18E |
Partial completion of Dragon Slayer | Brassican Mage (Level 140) |
| Image | Map | ||
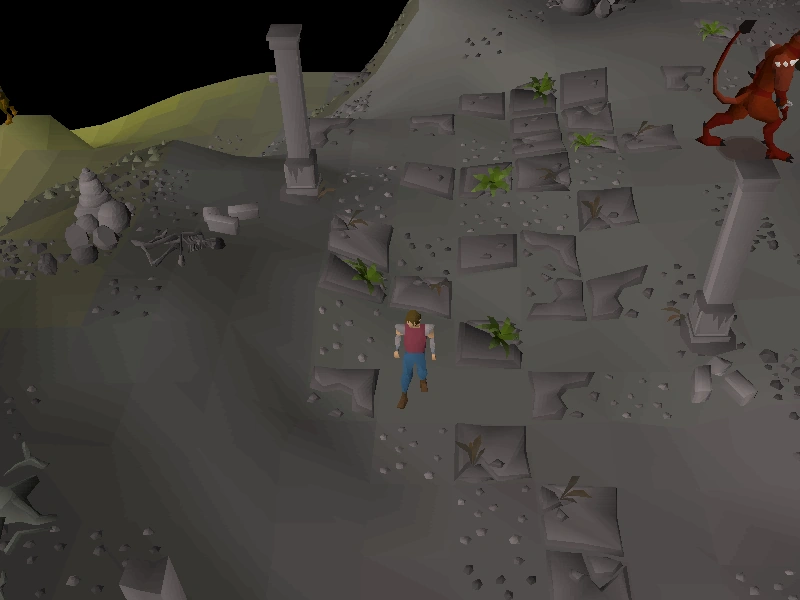
|
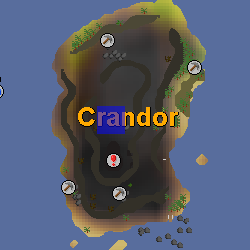
| ||
| Location notes | |||
| Crandor, centre of the island. | |||
| Coordinates | Shorthand | Requirements | Fight |
|---|---|---|---|
| 03 degrees 50 minutes north,
09 degrees 07 minutes east |
03.50N,
09.07E |
None | Brassican Mage (Level 140) |
| Image | Map | ||
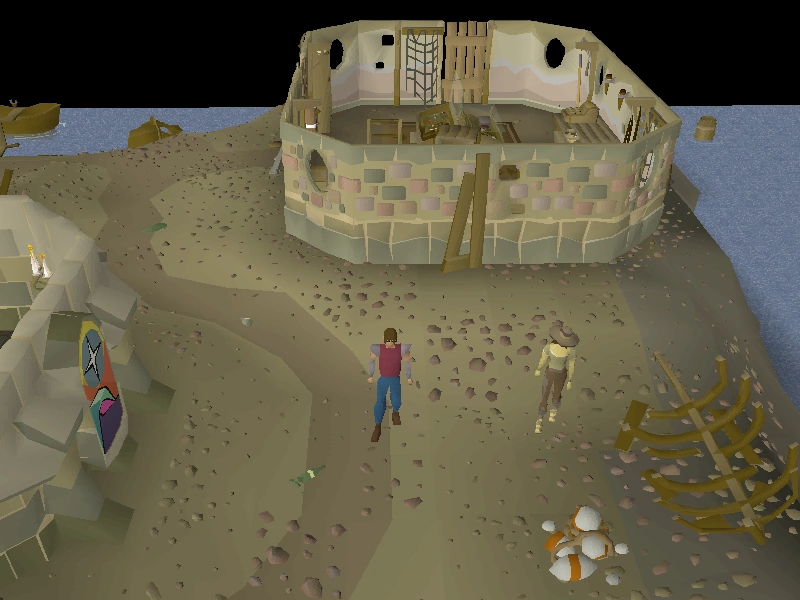
|
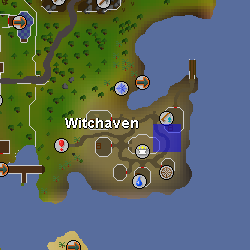
| ||
| Location notes | |||
| Witchaven, east from the chapel. | |||
| Coordinates | Shorthand | Requirements | Fight |
|---|---|---|---|
| 04 degrees 58 minutes north, 36 degrees 56 minutes east |
04.58N, 36.56E |
Partial completion of Darkness of Hallowvale | Brassican Mage |
| Image | Map | ||
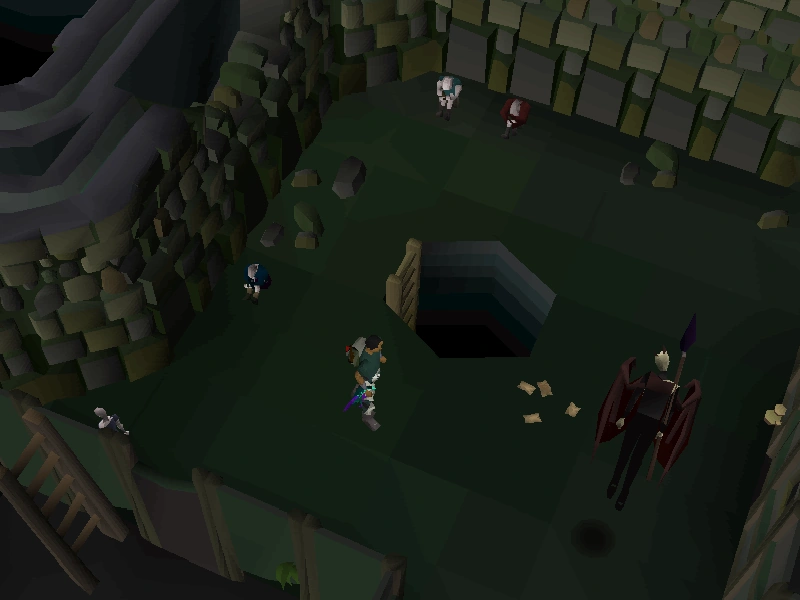
|
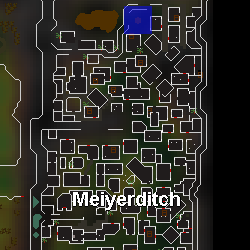
| ||
| Location notes | |||
| Located outside the entrance to the Meiyerditch Mine. An easy way to reach the mine is to ask a vyrewatch to send you to the mines, and then mining 15 daeyalt ores to leave. | |||
| Coordinates | Shorthand | Requirements | Fight |
|---|---|---|---|
| 05 degrees 13 minutes north, 04 degrees 16 minutes west |
05.13N, 04.16W |
Partial completion of Regicide | Brassican Mage |
| Image | Map | ||
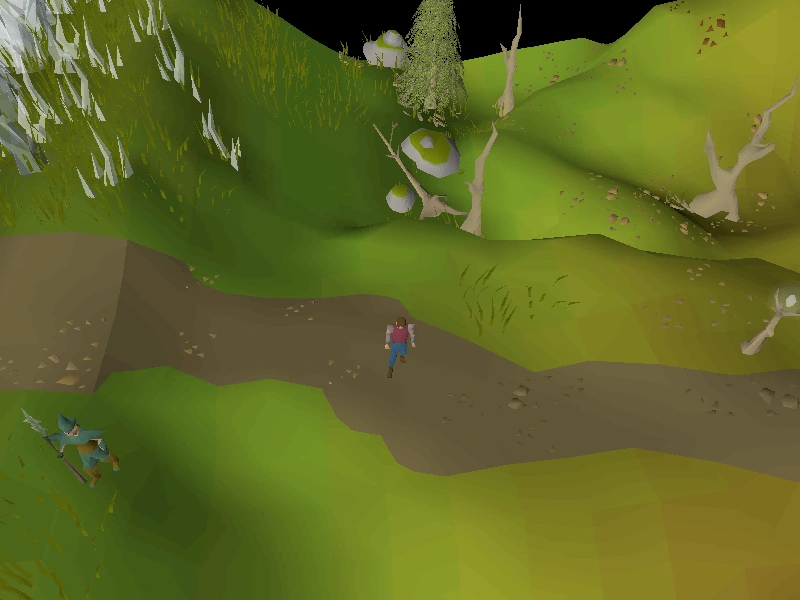
|
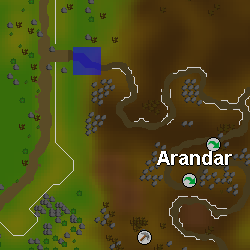
| ||
| Location notes | |||
| East of the eastern entrance to Prifddinas. | |||
| Coordinates | Shorthand | Requirements | Fight |
|---|---|---|---|
| 07 degrees 37 minutes north, 35 degrees 18 minutes east |
07.37N, 35.18E |
None | Brassican Mage |
| Image | Map | ||

|
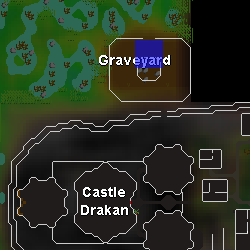
| ||
| Location notes | |||
| The graveyard where players fight Dessous during Desert Treasure. | |||
| Coordinates | Shorthand | Requirements | Fight |
|---|---|---|---|
| 08 degrees 11 minutes north, 12 degrees 30 minutes east |
08.11N, 12.30E |
None. | Brassican Mage |
| Image | Map | ||
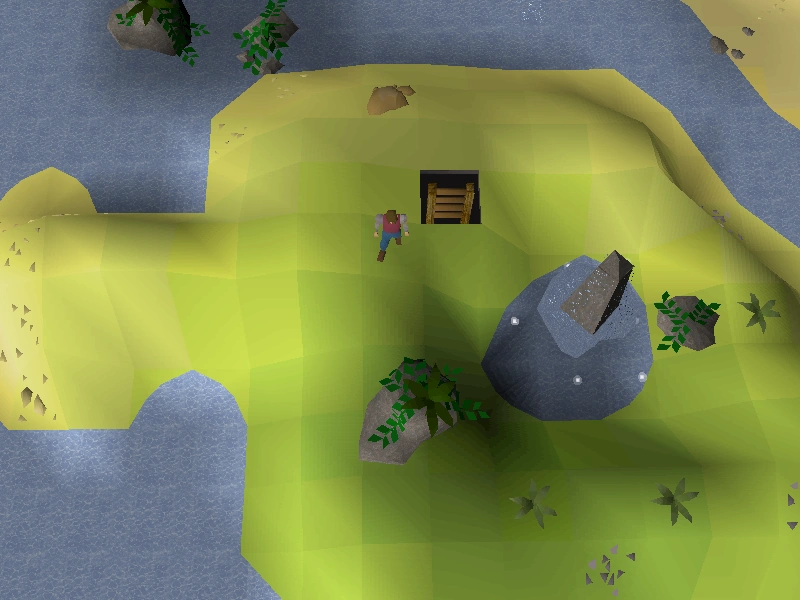
|
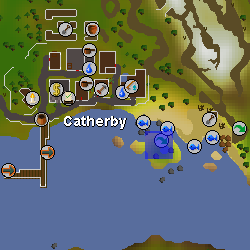
| ||
| Location notes | |||
| Next to the ladder on the Water Obelisk Island. | |||
| Coordinates | Shorthand | Requirements | Fight |
|---|---|---|---|
| 12 degrees 35 minutes north, 36 degrees 22 minutes east |
12.35N, 36.22E |
25 |
Brassican Mage |
| Image | Map | ||
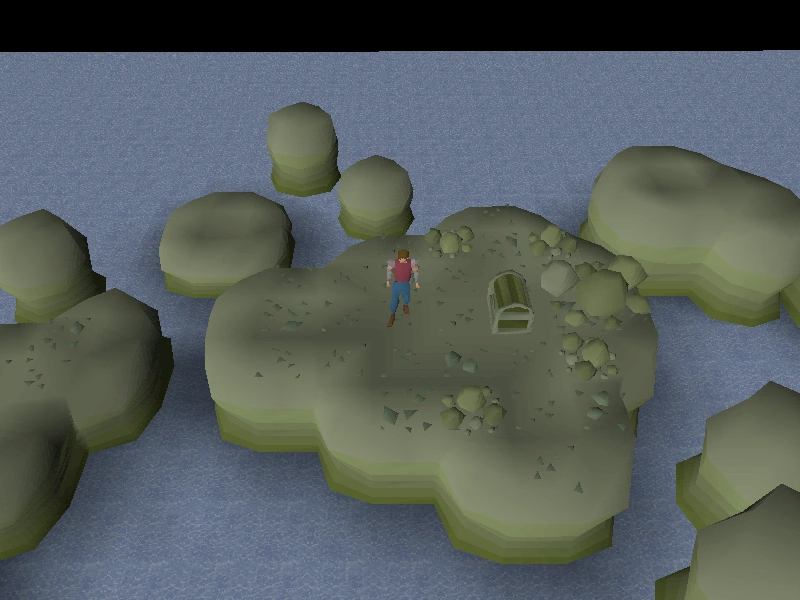
|
| ||
| Location notes | |||
| Dig on the rocks, north of the wrecked ship, outside of Port Phasmatys. Climb the ladder of the wrecked ship, cross the gangplank, and jump on the rocks until the end is reached. Each jump requires 5% of your running energy. | |||
| Coordinates | Shorthand | Requirements | Fight |
|---|---|---|---|
| 12 degrees 45 minutes north, 20 degrees 09 minutes east |
12.45N, 20.09E |
None. | Brassican Mage |
| Image | Map | ||
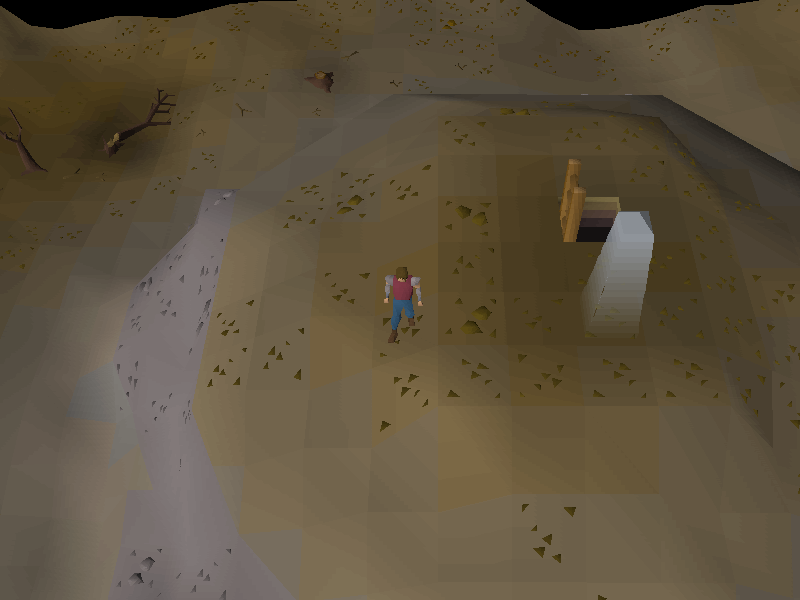
|
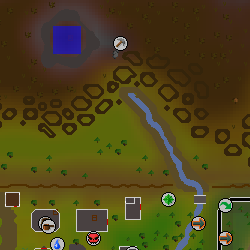
| ||
| Location notes | |||
| By the Obelisk of Air in the Wilderness. Must be accessed through the Edgeville Dungeon. | |||
| Coordinates | Shorthand | Requirements | Fight |
|---|---|---|---|
| 13 degrees 33 minutes south, 15 degrees 26 minutes east |
13.33S, 15.26E |
Partial completion of Monkey Madness | Brassican Mage |
| Image | Map | ||
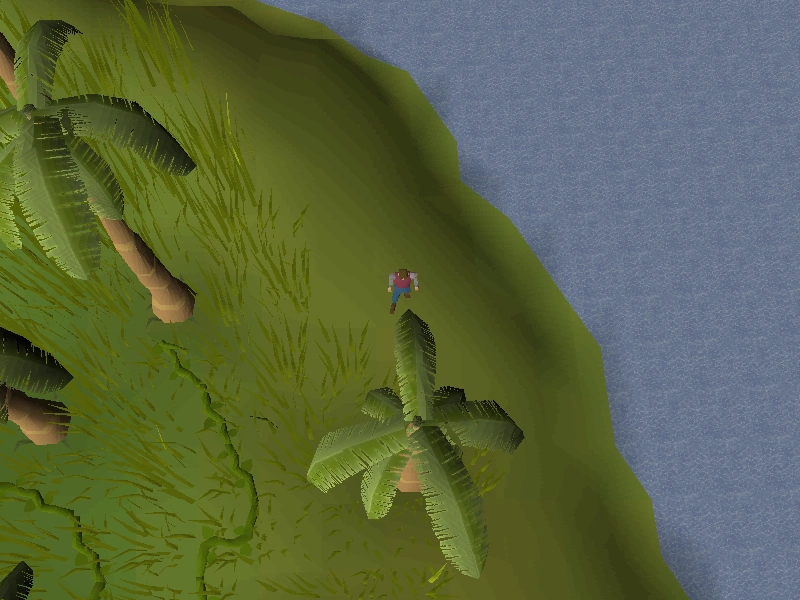
|
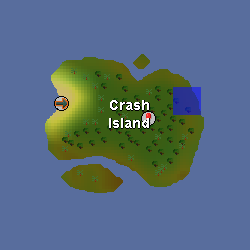
| ||
| Location notes | |||
| Eastern shore of Crash Island. | |||
| Coordinates | Shorthand | Requirements | Fight |
|---|---|---|---|
| 16 degrees 41 minutes north, 30 degrees 54 minutes west |
16.41N, 30.54W |
100% favour with Great Kourend's Shayzien House | Ancient Wizards |
| Image | Map | ||
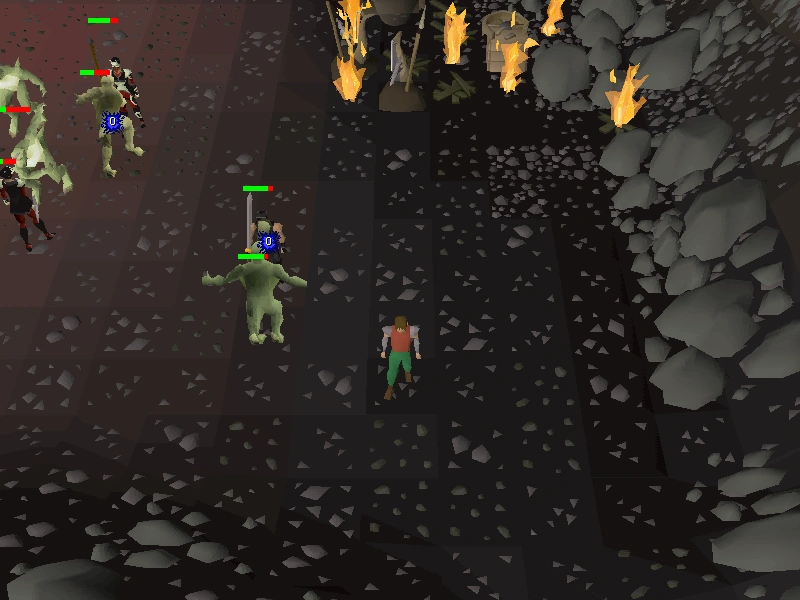
|
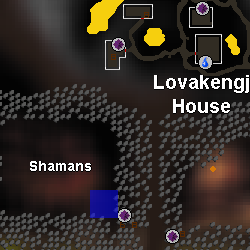
| ||
| Location notes | |||
| By the lizardman shaman area west of Lizardman Canyon. | |||
| Coordinates | Shorthand | Requirements | Fight |
|---|---|---|---|
| 18 degrees 03 minutes north, 03 degrees 03 minutes east |
18.03N, 03.03E |
1,000 coins (or completion of The Fremennik Trials) | Brassican Mage |
| Image | Map | ||
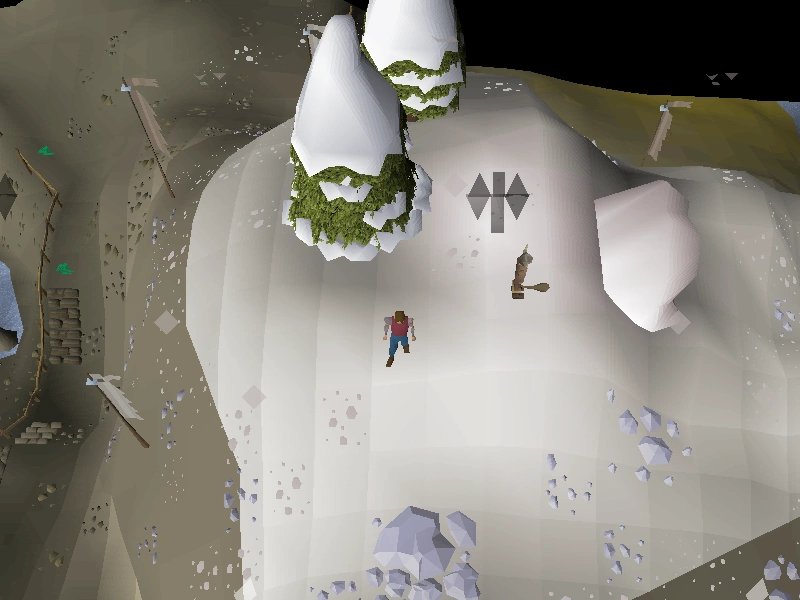
|
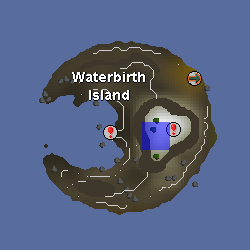
| ||
| Location notes | |||
| On top of Waterbirth Island. Must be accessed through the dungeon. A pet rock/another player and a rune thrownaxe are required to reach the island's summit. | |||
| Coordinates | Shorthand | Requirements | Fight |
|---|---|---|---|
| 19 degrees 43 minutes north, 23 degrees 11 minutes west |
19.43N, 23.11W |
none | Ancient Wizards |
| Image | Map | ||
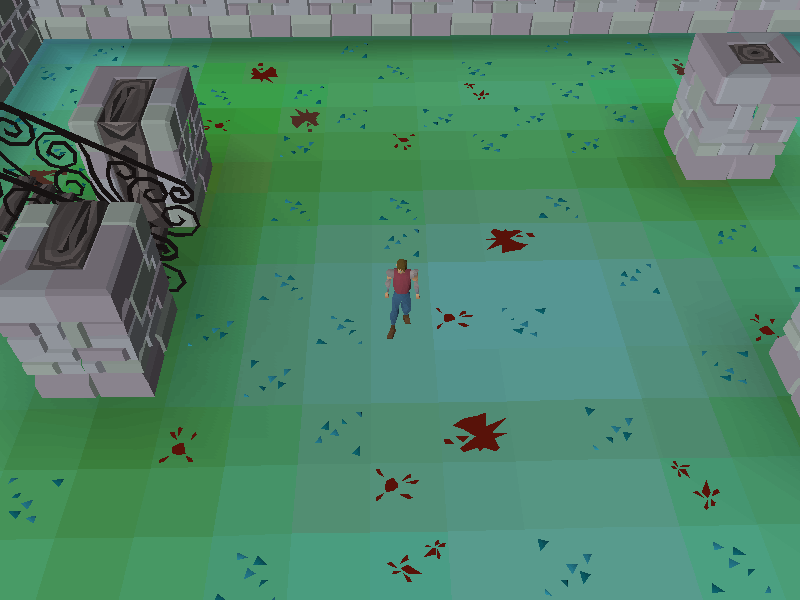
|
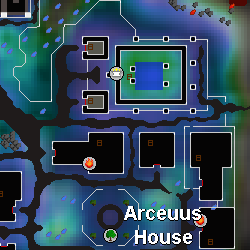
| ||
| Location notes | |||
| The coordinate is located in the crypt of the Arceuus House church. To reach the crypt, head to the church and climb up the stairs, and then, climb down the stairs that follow.
Players can make the ancient wizards unaggressive by going up the stairs and climbing down immediately. | |||
| Coordinates | Shorthand | Requirements | Fight |
|---|---|---|---|
| 20 degrees 35 minutes north, 15 degrees 58 minutes east |
20.35N, 15.58E |
None. | Ancient Wizards |
| Image | Map | ||
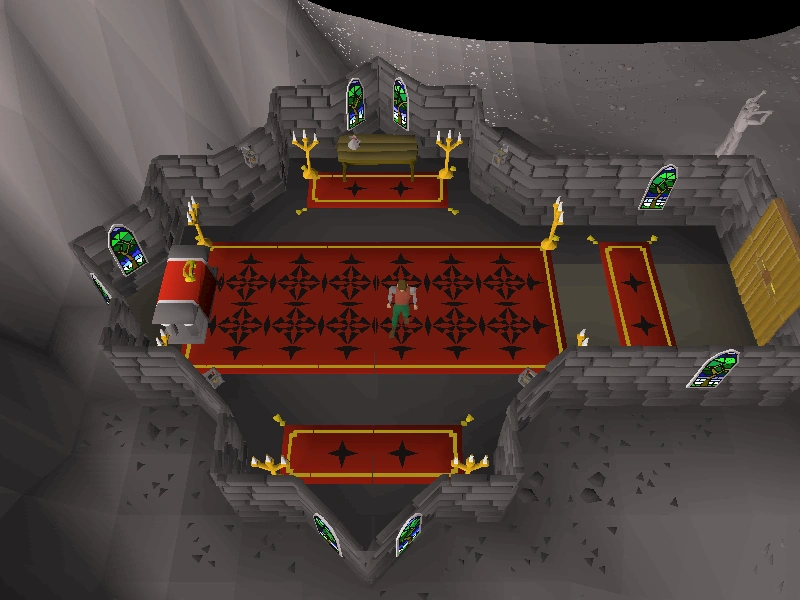
|

| ||
| Location notes | |||
| North-west of The Forgotten Cemetery, at level 38 Wilderness, there is a Chaos Temple. Dig inside the building. A cemetery teleport can be used to reach the coordinates relatively quickly. | |||
| Coordinates | Shorthand | Requirements | Fight |
|---|---|---|---|
| 20 degrees 45 minutes north, 7 degrees 26 degrees west |
20.45N, 7.26.W |
Started Lunar Diplomacy to access Pirates' Cove | Ancient Wizards |
| Image | Map | ||
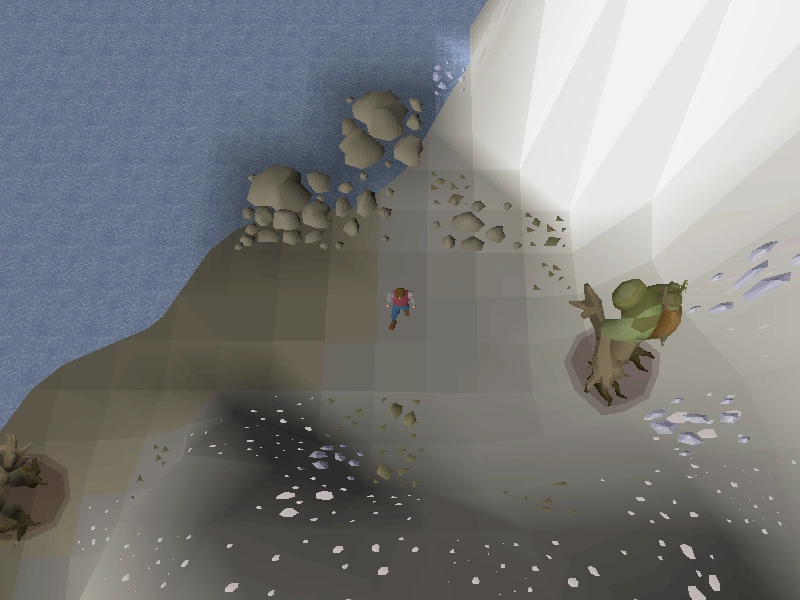
|
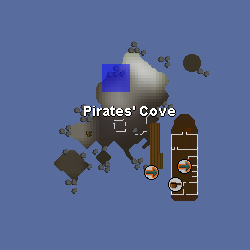
| ||
| Location notes | |||
| Pirates' Cove | |||
| Coordinates | Shorthand | Requirements | Fight |
|---|---|---|---|
| 21 degrees 37 minutes north, 21 degrees 13 minutes west |
21.37N, 21.13W |
None. | Brassican Mage |
| Image | Map | ||

|
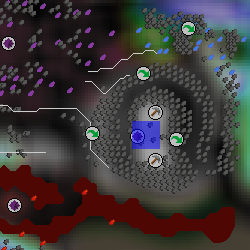
| ||
| Location notes | |||
| In the Arceuus essence mine. Easily reached with the fairy ring code CIS, but requires paying Trossa 80,000 coins to unlock. | |||
| Coordinates | Shorthand | Requirements | Fight |
|---|---|---|---|
| 21 degrees 56 minutes north, 10 degrees 56 minutes west |
21.56N, 10.56W |
Started Lunar Diplomacy | Ancient Wizards |
| Image | Map | ||
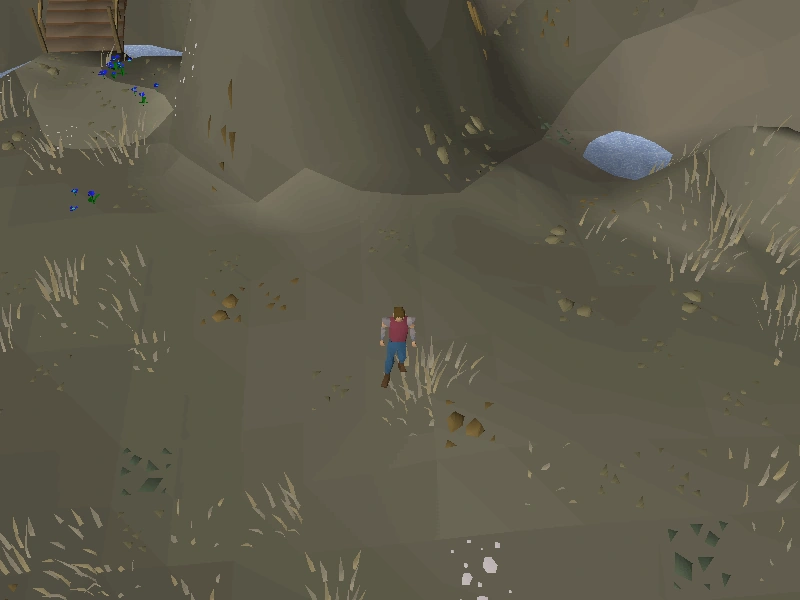
|
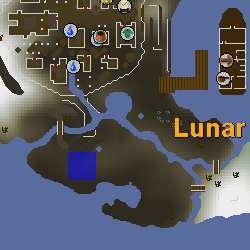
| ||
| Location notes | |||
| On Lunar Isle, dig on the island west of the astral altar. | |||
| Coordinates | Shorthand | Requirements | Fight |
|---|---|---|---|
| 22 degrees 24 minutes north, 31 degrees 11 minutes west |
22.24N, 31.11W |
None | Brassican Mage |
| Image | Map | ||
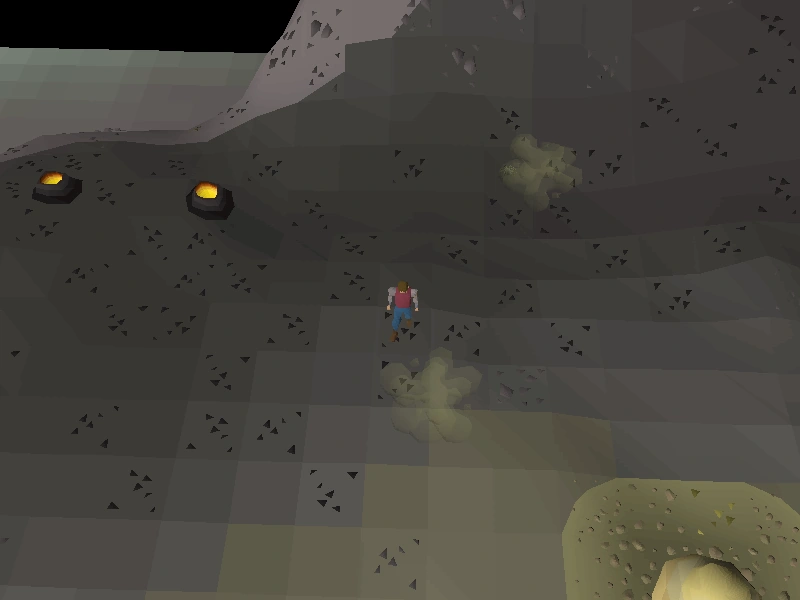
|
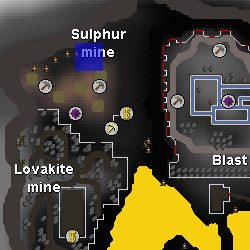
| ||
| Location notes | |||
| Northern area of the sulphur mine in Great Kourend's Lovakengj House. | |||
| Coordinates | Shorthand | Requirements | Fight |
|---|---|---|---|
| 24 degrees 00 minutes north, 29 degrees 22 minutes east |
24.00N, 29.22E |
None. | Ancient Wizards |
| Image | Map | ||
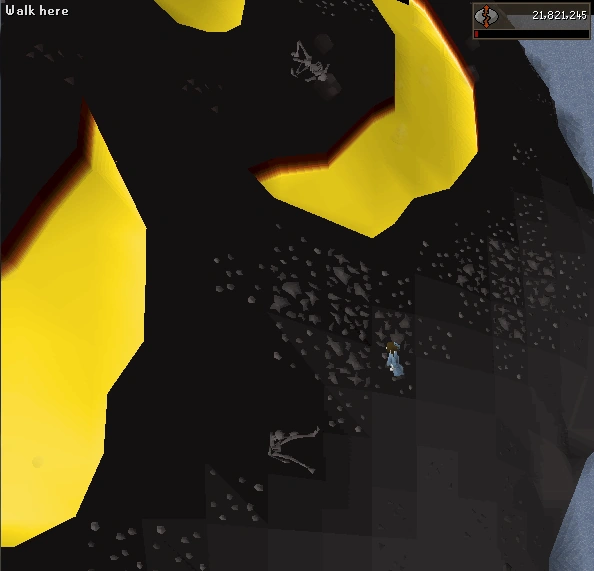
|
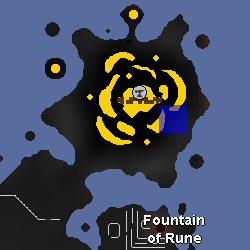
| ||
| Location notes | |||
| Wilderness Volcano at level 51 Wilderness. | |||
| Coordinates | Shorthand | Requirements | Fight |
|---|---|---|---|
| 24 degrees 18 minutes north, 23 degrees 22 minutes east |
24.18N, 23.22E |
None. | Brassican Mage |
| Image | Map | ||
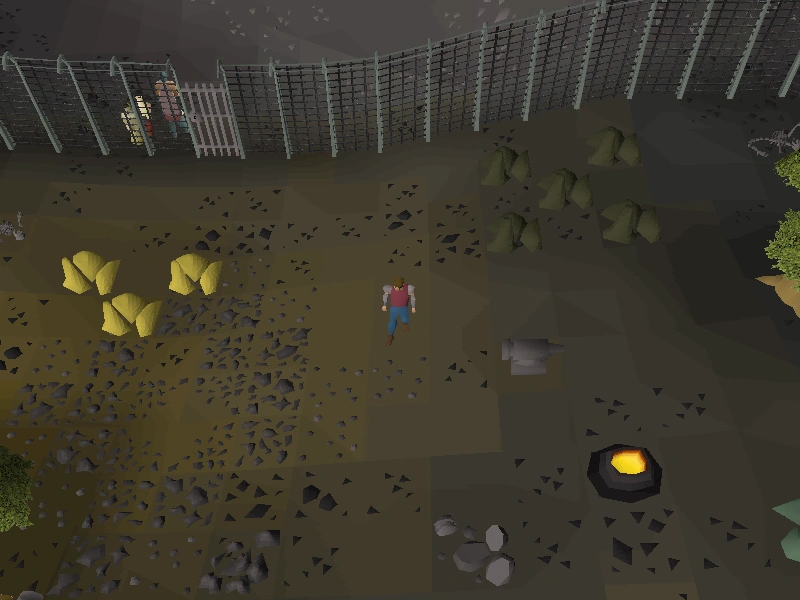
|
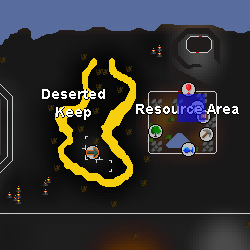
| ||
| Location notes | |||
| Inside the Resource Area, near the anvil. Requires 7,500 coins to enter. | |||
| Coordinates | Shorthand | Requirements | Fight |
|---|---|---|---|
| 24 degrees 22 minutes north, 27 degrees 00 minutes east |
24.22N, 27.00E |
None. | Ancient Wizards |
| Image | Map | ||
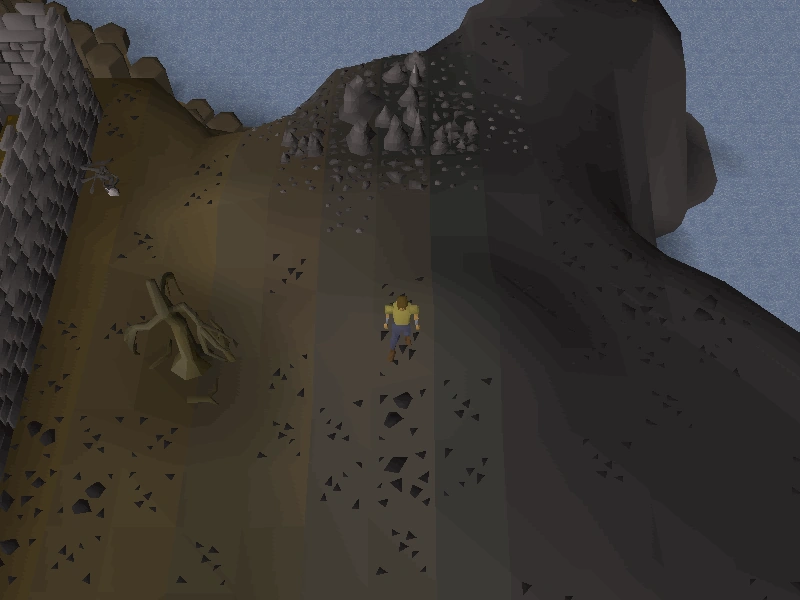
|
| ||
| Location notes | |||
| Outside Rogues' Castle, north of the Wilderness Obelisk. | |||
| Coordinates | Shorthand | Requirements | Fight |
|---|---|---|---|
| 25 degrees 00 minutes north, 17 degrees 18 minutes east |
25.00N, 17.18E |
Brassican Mage | |
| Image | Map | ||
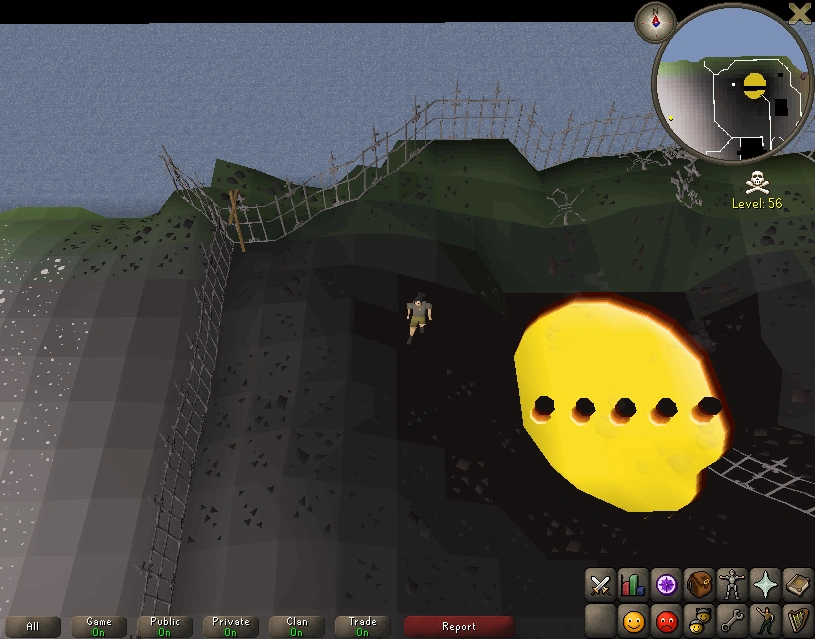
|
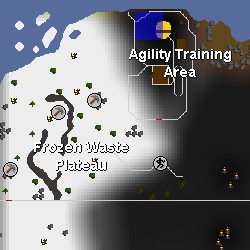
| ||
| Location notes | |||
| Players can boost their Agility to enter the Wilderness Agility Course. | |||
Trivia
- A chart, watch, and sextant used to be required to complete coordinate clue scrolls, until an update in the summer of 2014. The items are not required to be in the player's inventory or bank.
- Assuming Gielinor is canonically on an Earth-sized planet, the continent's width (from the west shore of Lunar Isle to the east shore of Mos Le'Harmless) is approximately 56° 10' 12" (6,234 km or 3,874 miles). The continent's length from the north tip of the Iceberg to the south shore of the Pest Control Island is approximately 47° 48' 00" (5,285 km or 3,284 miles).
| Items | |||||
| Guides |
| ||||
| NPCs |
Uri • Sherlock • Falo the Bard • Double agent • Ancient Wizard • Armadylian guard • Bandosian guard • Brassican Mage • Saradomin wizard • Zamorak wizard | ||||
| Other |
Clue droppers (Easy • Medium • Hard • Elite) • Emote items • Rewards • STASH • World map | ||||