No edit summary |
Ultraporygon (talk | contribs) No edit summary |
||
| (27 intermediate revisions by 25 users not shown) | |||
| Line 2: | Line 2: | ||
{{Floor}} |
{{Floor}} |
||
{{Has quick guide}} |
{{Has quick guide}} |
||
| − | {{ |
+ | {{Quest |
|name = Underground Pass |
|name = Underground Pass |
||
|image = [[File:Underground Pass.png|300px]] |
|image = [[File:Underground Pass.png|300px]] |
||
| Line 13: | Line 13: | ||
|developer = Tom W |
|developer = Tom W |
||
}} |
}} |
||
| − | '''Underground Pass''' is a quest named after the |
+ | '''Underground Pass''' is a quest named after the {{Link|Underground Pass (dungeon)|location}} in which it takes place. You must venture into an underground pathway that leads to a new land, at the request of {{Link|King Lathas|type=chat}} of {{Link|Ardougne}}, in order to help him destroy his corrupted brother {{Link|King Tyras|Tyras}}. |
==Details== |
==Details== |
||
| Line 30: | Line 30: | ||
*{{Skill clickpic|Prayer|43}} [[Prayer]] for [[Protection prayers]] |
*{{Skill clickpic|Prayer|43}} [[Prayer]] for [[Protection prayers]] |
||
*Level 79 combat will make [[Blessed spider]]s non-aggressive, which saves some time while killing [[Kalrag]]. |
*Level 79 combat will make [[Blessed spider]]s non-aggressive, which saves some time while killing [[Kalrag]]. |
||
| − | |items = *1 [[rope]] (2 recommended) |
+ | |items = *at least 1 [[rope]] (2 recommended, more if not doing the whole quest in a single run) |
*A [[bow]] and 1-5 [[arrows]] (cannot use [[broad arrows|broad]], [[training arrows|training]], [[ogre arrows|ogre]], or [[poison]]ed arrows) |
*A [[bow]] and 1-5 [[arrows]] (cannot use [[broad arrows|broad]], [[training arrows|training]], [[ogre arrows|ogre]], or [[poison]]ed arrows) |
||
*A [[spade]] (obtainable prior to quest, [[spawn]]s at [[Edmond]]'s house north of [[Ardougne Castle]]) |
*A [[spade]] (obtainable prior to quest, [[spawn]]s at [[Edmond]]'s house north of [[Ardougne Castle]]) |
||
*A [[plank]] (obtainable during quest, technically not necessary) |
*A [[plank]] (obtainable during quest, technically not necessary) |
||
*A [[bucket]] (obtainable during quest) |
*A [[bucket]] (obtainable during quest) |
||
| − | *A [[tinderbox]] (obtainable during quest) |
+ | *A [[tinderbox]] (obtainable during quest) ('''NOTE''': NPC who gives tinderbox is bugged so bring a tinderbox) |
*Combat [[equipment]] for dealing with multiple mid-level foes |
*Combat [[equipment]] for dealing with multiple mid-level foes |
||
'''Recommended:''' |
'''Recommended:''' |
||
| Line 51: | Line 51: | ||
==Walkthrough== |
==Walkthrough== |
||
| − | :'''Note:''' The walkthrough for the dungeon '''after''' completing the quest can be found |
+ | :'''Note:''' The walkthrough for the dungeon '''after''' completing the quest can be found {{Link|Underground Pass (dungeon)|here}}. |
| − | This quest relies heavily on your |
+ | This quest relies heavily on your {{Link|Agility|type=skill}} skill, often making you complete a number of obstacles in succession. In most cases, failing any of the obstacles in an area will send you back to the beginning of the area, which can be quite frustrating, especially if your Agility is low. |
| − | Many of the traps in the dungeon damage you based on your '''current''' health. This means that by keeping your health relatively low, you will have to use less |
+ | Many of the traps in the dungeon damage you based on your '''current''' health. This means that by keeping your health relatively low, you will have to use less {{Link|food}} through the dungeon than you would if you were to eat to full {{Link|Hitpoints|type=skill}} each time you get damaged. |
===Starting the quest=== |
===Starting the quest=== |
||
'''''Items required:''' None.'' |
'''''Items required:''' None.'' |
||
| − | To begin, talk to |
+ | To begin, talk to {{Link|King Lathas|type=chat}} on the {{FloorNumber|2}} floor of {{Link|Ardougne Castle}}. He'll tell you about the {{Link|Underground Pass (dungeon)|Underground Pass}} and the evil {{Link|Lord Iban|Iban|img=Lord Iban.png}} guarding it, who claims to be the son of {{Link|Zamorak}}. He'll ask you to check in with {{Link|Koftik|type=chat}} who is waiting for you just outside the entrance to the Underground Pass. |
| − | This time, you'll be allowed to go right through the front gates to |
+ | This time, you'll be allowed to go right through the front gates to {{Link|West Ardougne}}, so head through and walk all the way west through the city until you find the cave entrance with Koftik standing outside. Talk to him, and he'll explain more about the Pass and tell you to meet him next to the bridge further inside. |
===Getting in and across the bridge=== |
===Getting in and across the bridge=== |
||
'''''Items required:''' A [[bow]], [[arrows]], and [[rope]]. Bring the rest of your supplies now, as after this section there is no turning back unless you want to restart the entire dungeon.'' |
'''''Items required:''' A [[bow]], [[arrows]], and [[rope]]. Bring the rest of your supplies now, as after this section there is no turning back unless you want to restart the entire dungeon.'' |
||
| − | When you walk inside '''(#1)''', you'll see three paths branching off in different directions. ''('''<span style="color:red">WARNING:</span> DO NOT TAKE THE MIDDLE PATH'''; the swamp will drag you down and send you tumbling down a hillside forcing you to crawl back up.)'' Instead, take the northern most path. Climb over a series of rocks around the swamp and get to where |
+ | When you walk inside '''(#1)''', you'll see three paths branching off in different directions. ''('''<span style="color:red">WARNING:</span> DO NOT TAKE THE MIDDLE PATH'''; the swamp will drag you down and send you tumbling down a hillside forcing you to crawl back up.)'' Instead, take the northern most path, as it requires the fewest amounts of rock slides, since you can skip the first rock slide. Climb over a series of rocks around the swamp and get to where {{Link|Koftik|type=chat}} is standing next to a fire '''(#2)'''. |
| − | Talk to him, and he'll tell you it looks like there have been others in the cave already. He'll give you a |
+ | Talk to him, and he'll tell you it looks like there have been others in the cave already. He'll give you a {{Link|damp cloth|type=item}}. If you later need another one, you can talk to him at any time to get more. '''Use the damp cloth on an arrow, and then use the result on the fire to get a [[fire arrow]].''' Equip a {{Link|bow}} and this {{Link|Arrows|arrow}}. |
[[File:Underground Pass - firing guide rope.png|thumb|230px|Shooting the guide rope with a fire arrow.]] |
[[File:Underground Pass - firing guide rope.png|thumb|230px|Shooting the guide rope with a fire arrow.]] |
||
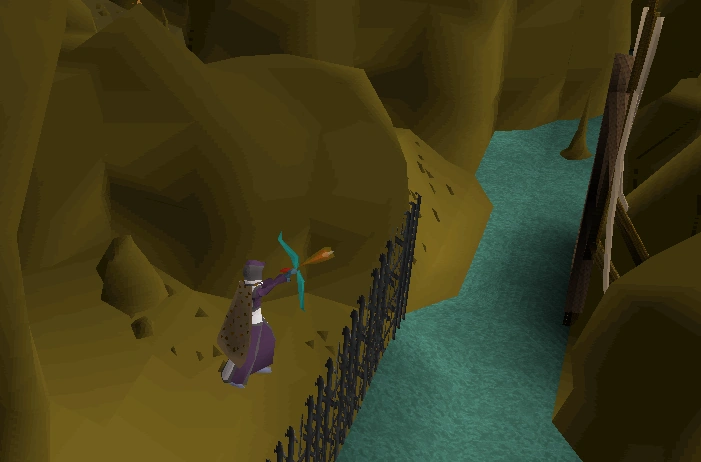
Go north to get to the small area '''(#3)'''. Look across the subterranean river, and you can see where the guide rope holds up the bridge. Fire your lit arrow at the rope. If you succeed, the bridge will drop, and you'll automatically walk across the bridge. |
Go north to get to the small area '''(#3)'''. Look across the subterranean river, and you can see where the guide rope holds up the bridge. Fire your lit arrow at the rope. If you succeed, the bridge will drop, and you'll automatically walk across the bridge. |
||
| Line 79: | Line 79: | ||
{{Col-begin}} |
{{Col-begin}} |
||
{{Col-2}} |
{{Col-2}} |
||
| − | #Cave entrance from |
+ | #Cave entrance from {{Link|West Ardougne}} |
| − | # |
+ | #{{Link|Koftik|type=chat}} |
| − | #Fire your |
+ | #Fire your {{Link|Fire arrows|lit arrow}} here! |
| − | # |
+ | #{{Link|Plank|type=item}} spawn by {{Link|blessed spider|img=Blessed spider.png}}s |
| − | #Use a |
+ | #Use a {{Link|rope|type=item}} on the overhang to cross the pit. |
#Grid |
#Grid |
||
| − | # |
+ | #{{Link|Furnace}} |
#Wall traps |
#Wall traps |
||
#Well to the second area |
#Well to the second area |
||
{{Col-2}} |
{{Col-2}} |
||
| − | :B - |
+ | :B - {{Link|Giant bat|img=Giant bat.png}}s |
| − | :G - |
+ | :G - {{Link|Goblin|type=chat}}s |
| − | :O - |
+ | :O - {{Link|Ogre|img=Ogre.png}}s |
| − | :S - |
+ | :S - {{Link|Blessed spider|img=Blessed spider.png}}s |
| − | :Z - |
+ | :Z - {{Link|Zombie}}s |
{{Col-end}} |
{{Col-end}} |
||
| Line 99: | Line 99: | ||
'''''Items required:''' [[Food]] (strongly recommended) and 1 or more [[rope]].'' |
'''''Items required:''' [[Food]] (strongly recommended) and 1 or more [[rope]].'' |
||
| − | Walk south from where you picked up the plank. Do not walk into the swampy area filled with |
+ | Walk south from where you picked up the plank. Do not walk into the swampy area filled with {{Link|blessed spider|img=Blessed spider.png}}s and instead head back east '''(#5)'''. You will come up on a pit and a small water crossing with a rope swing. Use your {{Link|rope|type=item}} on the rock hanging from the ceiling. |
[[File:Underground Pass - crossing pit.png|thumb|230px|A player successfully swings across the pit.]] |
[[File:Underground Pass - crossing pit.png|thumb|230px|A player successfully swings across the pit.]] |
||
'''IF YOU FAIL AND FALL''','' you will fall into a rocky pit and lose your rope. Follow the path on your mini-map climbing over rocks when needed to get to the muddy rock pile. You'll be placed at the very beginning of [[Underground Pass (dungeon)|Underground Pass]]. You will need another rope to attempt the obstacle again.'' |
'''IF YOU FAIL AND FALL''','' you will fall into a rocky pit and lose your rope. Follow the path on your mini-map climbing over rocks when needed to get to the muddy rock pile. You'll be placed at the very beginning of [[Underground Pass (dungeon)|Underground Pass]]. You will need another rope to attempt the obstacle again.'' |
||
| Line 107: | Line 107: | ||
===The grid=== |
===The grid=== |
||
| − | Continue down the path going east and then south. Eventually, you'll see |
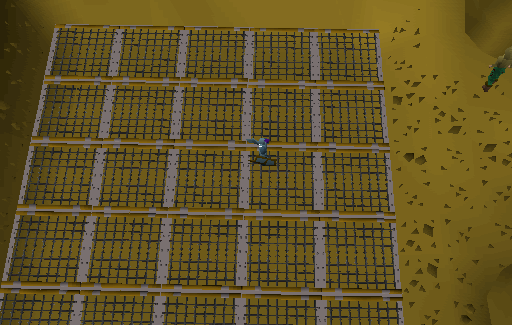
+ | Continue down the path going east and then south. Eventually, you'll see {{Link|Koftik|type=chat}} standing in front of a grid '''(#6)'''. |
| − | Many of the tiles will drop you into a pit '''''dealing 15 damage to your health'''''. You'll need to use trial and error finding a safe path across. Once you've found a safe way across, remember it; you'll need it for |
+ | Many of the tiles will drop you into a pit '''''dealing 15 damage to your health'''''. You'll need to use trial and error finding a safe path across. Once you've found a safe way across, remember it; you'll need it for {{Link|Regicide}}. Pull the lever once you are across to lift the gate. (The path is different for everyone.) |
| − | The grid puzzle '''always''' does 15 damage upon falling into a pit. Keep this in mind while trying new squares. Should you die from falling, your items will stay in the pit. To retrieve what you lost then, you must intentionally step on a square that will drop you into the pit. Once you get across the grid, there is an altar in the next important room, so you can use |
+ | The grid puzzle '''always''' does 15 damage upon falling into a pit. Keep this in mind while trying new squares. Should you die from falling, your items will stay in the pit. To retrieve what you lost then, you must intentionally step on a square that will drop you into the pit. Once you get across the grid, there is an altar in the next important room, so you can use {{Link|Rapid Heal}} to save some food. '''Remember or write down the path you used to get across. You have to come back through here *twice* during [[Regicide]] later; the correct path is permanent and unique to each player.''' |
It can be useful to keep track of the route you have to take using the following grid: |
It can be useful to keep track of the route you have to take using the following grid: |
||
| Line 123: | Line 123: | ||
|} |
|} |
||
| − | :'''Note:''' Previously, there was a bug in which |
+ | :'''Note:''' Previously, there was a bug in which {{Link|mithril seeds|type=item}} could be used to cross the grid without falling into pits or taking damage, as planting a mithril seed moves you one square west. This no longer works as of October 2016. Some people have said if you find your first tile you can still use mithril seeds after standing on that one, but '''this is not true''' as of 2018. |
===The orbs and the well=== |
===The orbs and the well=== |
||
'''''Items required:''' A [[plank]] (optional but suggested).'' |
'''''Items required:''' A [[plank]] (optional but suggested).'' |
||
| − | To the north of you is a |
+ | To the north of you is a {{Link|furnace}} '''(#7)'''. For the moment, ignore it, but remember where it is. |
'''<span style="color:red">WARNING:</span>''' '''If you use the obstacle pipe, it will cause you to go back to the rope swing with no return.''' |
'''<span style="color:red">WARNING:</span>''' '''If you use the obstacle pipe, it will cause you to go back to the rope swing with no return.''' |
||
| Line 138: | Line 138: | ||
#Heal up as much as possible and run through the traps with no regard, possibly dying. |
#Heal up as much as possible and run through the traps with no regard, possibly dying. |
||
| − | Whichever way you choose, you will eventually get through into an area with a large, rather sinister-looking well in the middle and an |
+ | Whichever way you choose, you will eventually get through into an area with a large, rather sinister-looking well in the middle and an {{Link|altar}} '''(#9)'''. There are four different paths branching off from this room. |
'''<span style="color:red">WARNING:</span>''' '''Attempting to climb down the well at this point will result in being hurt 10 damage.''' |
'''<span style="color:red">WARNING:</span>''' '''Attempting to climb down the well at this point will result in being hurt 10 damage.''' |
||
| − | #Start with the very north one. The same trick works by simply standing a square before the trap and running ahead. Otherwise, Use the |
+ | #Start with the very north one. The same trick works by simply standing a square before the trap and running ahead. Otherwise, Use the {{Link|plank|type=item}} you picked up earlier on the flat rock to disarm the trap. Go past the traps and pick up the {{Link|orb of light|type=item}} at the end of the tunnel. |
| − | #The next one (the next one to the left, north-west) is fairly easy as well. Fight or run through the various |
+ | #The next one (the next one to the left, north-west) is fairly easy as well. Fight or run through the various {{Link|spider|img=Spider.png}}s and level 53 {{Link|ogre|img=Ogre.png}}s to grab the orb and run back again. |
#Go through the middle path next. Navigate the traps the same way as you did for the northern path. |
#Go through the middle path next. Navigate the traps the same way as you did for the northern path. |
||
#Traverse through the tunnel (south-west path). However, when you get to where the orb is, '''don't''' pick it up. Disarm the trap underneath it, and then grab the orb. |
#Traverse through the tunnel (south-west path). However, when you get to where the orb is, '''don't''' pick it up. Disarm the trap underneath it, and then grab the orb. |
||
| Line 150: | Line 150: | ||
Now that you have all four of the orbs, back track a little bit. Go back to where the furnace was '''(#7)''' (remembering to be careful of the traps in the wall). Use each of the orbs on the furnace to destroy them. |
Now that you have all four of the orbs, back track a little bit. Go back to where the furnace was '''(#7)''' (remembering to be careful of the traps in the wall). Use each of the orbs on the furnace to destroy them. |
||
| − | Make sure to top off your prayer if needed and head down the well '''(#9)''' descending another level. If you need food, search the crates at the west (crates give two |
+ | Make sure to top off your prayer if needed and head down the well '''(#9)''' descending another level. If you need food, search the crates at the west (crates give two {{Link|salmon|type=item}} and two {{Link|meat pie|img=Meat pie.png}}s). |
===The cages and the obstacle maze=== |
===The cages and the obstacle maze=== |
||
| Line 156: | Line 156: | ||
[[File:UP Area 2.png|thumb|centre|250px]] |
[[File:UP Area 2.png|thumb|centre|250px]] |
||
#Entrance from the first area via climbing down the well |
#Entrance from the first area via climbing down the well |
||
| − | #Dig by the mud patch with your |
+ | #Dig by the mud patch with your {{Link|spade|type=item}}. |
#Narrow ledge |
#Narrow ledge |
||
| − | # |
+ | #{{Link|Agility|type=skill}} maze |
| − | #50 |
+ | #50 {{Link|Thieving|type=skill}} shortcut to bypass the maze |
#To the third area |
#To the third area |
||
There is some food in the crates right when you arrive down the well '''(#1)'''. |
There is some food in the crates right when you arrive down the well '''(#1)'''. |
||
| − | Head west through the cave, and you'll find yourself in an area with a few cages. Pick the lock on the first one on the left (south-east). You'll notice that there's a rather odd-looking patch of ground at the back of it. Use your |
+ | Head west through the cave, and you'll find yourself in an area with a few cages. Pick the lock on the first one on the left (south-east). You'll notice that there's a rather odd-looking patch of ground at the back of it. Use your {{Link|spade|type=item}} on this to dig through, and you'll find a hidden tunnel that will take you through to the other side '''(#2)'''. |
Edge across the narrow ledge '''(#3)''', and you'll be near a maze of raised beams '''(#4)'''. '''(ATTENTION: You can skip this step with 50 [[Thieving]] as seen in the next paragraph.)''' To get through it, you'll need to hop over a number of obstacles. If you fail, you need to climb back up one of the ramps nearby, often setting you back a few steps. |
Edge across the narrow ledge '''(#3)''', and you'll be near a maze of raised beams '''(#4)'''. '''(ATTENTION: You can skip this step with 50 [[Thieving]] as seen in the next paragraph.)''' To get through it, you'll need to hop over a number of obstacles. If you fail, you need to climb back up one of the ramps nearby, often setting you back a few steps. |
||
| Line 181: | Line 181: | ||
{{Col-2}} |
{{Col-2}} |
||
#Entrance from the second area |
#Entrance from the second area |
||
| − | # |
+ | #{{Link|Unicorn|img=Unicorn.png}} |
| − | # |
+ | #{{Link|Sir Carl|type=chat}}, {{Link|Sir Harry|type=chat}}, and {{Link|Sir Jerro|type=chat}} |
#Well |
#Well |
||
#To the fourth area (Iban's Lair) |
#To the fourth area (Iban's Lair) |
||
{{Col-2}} |
{{Col-2}} |
||
| − | :S - |
+ | :S - {{Link|Skeleton|img=Skeleton.png}}s |
| − | :Z - |
+ | :Z - {{Link|Zombie}}s |
{{Col-end}} |
{{Col-end}} |
||
| − | In the next room, you'll find a group of |
+ | In the next room, you'll find a group of {{Link|skeleton|img=Skeleton.png}}s and a {{Link|unicorn|img=Unicorn.png}} in a cage '''(#2)'''. |
[[File:Underground Pass - the unicorn.png|thumb|230px|The boulder that players must push down with the piece of railing.]] |
[[File:Underground Pass - the unicorn.png|thumb|230px|The boulder that players must push down with the piece of railing.]] |
||
| − | You'll need its horn, but you can't get into the cage to get it. If you search the cage, you'll find a loose |
+ | You'll need its horn, but you can't get into the cage to get it. If you search the cage, you'll find a loose {{Link|piece of railing|type=item}}.'''(<span style="color:red">WARNING:</span>''' '''If ''' '''you drop an item to make space for the railing, you will lose it and will not be able to retrieve what you drop after moving the boulder)''' Take this, and head (south) up the path above where the cage is you'll find a large boulder. Use the loose railing to pry it loose, and crush the unicorn. Now, you can go back down and retrieve the {{Link|Unicorn horn (Underground Pass)|unicorn horn|type=item}} by searching the wreckage of the cage. Proceed through the tunnel entrance and head north. |
===The paladins=== |
===The paladins=== |
||
'''''Items required:''' [[Food]], [[combat]] [[equipment]], 3 [[paladin's badge]]s (red, blue, and green), and the [[Unicorn horn (Underground Pass)|unicorn horn]].'' |
'''''Items required:''' [[Food]], [[combat]] [[equipment]], 3 [[paladin's badge]]s (red, blue, and green), and the [[Unicorn horn (Underground Pass)|unicorn horn]].'' |
||
| − | Heading north through the cave, you'll come to a small group of |
+ | Heading north through the cave, you'll come to a small group of {{Link|Paladin|img=Paladin.png}}s who have made a sort of camp '''(#3)'''. |
| − | They're all level 62, named |
+ | They're all level 62, named {{Link|Sir Carl|type=chat}}, {{Link|Sir Jerro|type=chat}}, and {{Link|Sir Harry|type=chat}}. If you talk to Sir Jerro, he'll give you some more food to restock your supplies. |
| − | The food Sir Jerro gives you is: 2 |
+ | The food Sir Jerro gives you is: 2 {{Link|Bread|type=item}}, 2 {{Link|Meat pie|img=Meat pie.png}}, 1 {{Link|Stew|type=item}}, 1 {{Link|Prayer potion|Prayer potion (2)|img=Prayer potion(1).png}} and 1 {{Link|Attack potion|Attack potion (2)|img=Attack potion(1).png}}. (If you kill Sir Jerro before recieving supplies, you will not be able to get it, and he will attack you.) |
| − | Unluckily for them, you need the |
+ | Unluckily for them, you need the {{Link|paladin's badge}}s that they carry, and the only way to get those is to slaughter them. '''Make sure to talk to them before attacking them.''' It is possible to {{Link|Safe spot|safespot}} the paladins by attacking them and running just south where they will not follow you. |
| − | Once you have all three badges (red, blue, and green), head west keeping your eyes out for the traps there. Again, you can foil them by placing the |
+ | Once you have all three badges (red, blue, and green), head west keeping your eyes out for the traps there. Again, you can foil them by placing the {{Link|plank|type=item}} on them. ''These traps can also be foiled by standing on the square right before the trap, and running to the square immediately after the trap with run on. This method does not require a plank.'' |
| − | Keep going west to where there's another well '''(#4)'''. Use the |
+ | Keep going west to where there's another well '''(#4)'''. Use the {{Link|Unicorn horn (Underground Pass)|unicorn horn|type=item}} and the three crests on the well to open the large doors '''(#5)'''. |
| − | :'''Note:''' Remember this Well if you want to use the |
+ | :'''Note:''' Remember this Well if you want to use the {{Link|Iban's staff|type=item}} later. This is where you recharge it after use. |
===The dwarves=== |
===The dwarves=== |
||
| Line 217: | Line 217: | ||
For now, ignore the walkways, though do take note of the locations where you can get onto them. Head as far south as you can, and walk along the south wall until you find a small staircase leading down. |
For now, ignore the walkways, though do take note of the locations where you can get onto them. Head as far south as you can, and walk along the south wall until you find a small staircase leading down. |
||
| − | When you walk down it, |
+ | When you walk down it, {{Link|Koftik|type=chat}} will appear, ranting insanely before disappearing again. Before he goes, though, he'll mention some {{Link|Dwarf|dwarves|img=Dwarf.png}} that have taken up residence there. Walk west to find them. ''(Map of bottom level is found in next section.)'' There are three dwarves named {{Link|Niloof|type=chat}}, {{Link|Klank|type=chat}}, and {{Link|Kamen|type=chat}} in a small fenced area with two buildings. |
Niloof will give you some food when you talk to him. Kamen also gives an unlimited amount of food after you talk to him (see below). |
Niloof will give you some food when you talk to him. Kamen also gives an unlimited amount of food after you talk to him (see below). |
||
| Line 223: | Line 223: | ||
===The witch=== |
===The witch=== |
||
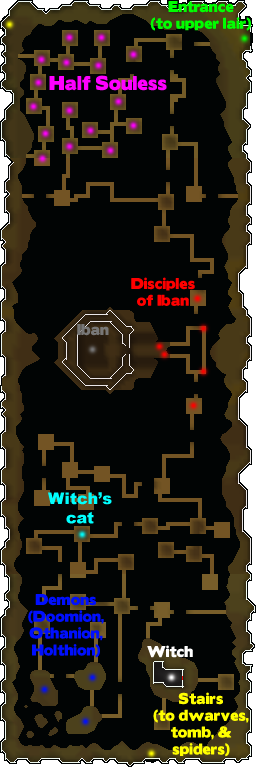
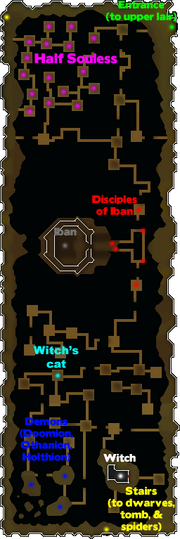
[[File:UP Area 5 (Under Iban's Lair).png|thumb|This is the level beneath Iban's Lair.|333x333px]] |
[[File:UP Area 5 (Under Iban's Lair).png|thumb|This is the level beneath Iban's Lair.|333x333px]] |
||
| − | *Talk to |
+ | *Talk to {{Link|Niloof|type=chat}} first about a witch named {{Link|Kardia|img=Kardia.png}} who knows how to kill {{Link|Lord Iban|Iban|img=Lord Iban.png}}. |
| − | *Then, talk to |
+ | *Then, talk to {{Link|Klank|type=chat}} and ask about the {{Link|Soulless|img=Soulless.png}}. |
| − | *Talk to |
+ | *Talk to {{Link|Kamen|type=chat}} next, who will tell you he is a little fried and asks you if you want some of his brew ''(if you '''decline''', he will offer to sell you some [[bread]], [[stew]] and a [[meat pie]] for 75 coins; if you '''accept''', you will be hit 5 HP and your [[Agility]] level will temporarily decrease by 4; however, he will give you the food).'' |
Climb up the staircase again, and head a little to the north-east where you can see a house. |
Climb up the staircase again, and head a little to the north-east where you can see a house. |
||
| Line 233: | Line 233: | ||
Walk along it, and take the first turn south to find Kardia's house. '''<span style="color:red">WARNING:</span>''' '''Do not click on the door; it will deal a lot of damage to you.''' |
Walk along it, and take the first turn south to find Kardia's house. '''<span style="color:red">WARNING:</span>''' '''Do not click on the door; it will deal a lot of damage to you.''' |
||
| − | Search the window, and you'll hear her talking to herself about her missing |
+ | Search the window, and you'll hear her talking to herself about her missing {{Link|cat}}. Head north, take the western path, hop across the gap, and then take the north branch of the path. |
Follow it until you find the cat. It will be a yellow dot on your minimap. Grab it and go back to the witch's house again (if you drop the cat, you'll have to wait for a moment before you can grab it back). |
Follow it until you find the cat. It will be a yellow dot on your minimap. Grab it and go back to the witch's house again (if you drop the cat, you'll have to wait for a moment before you can grab it back). |
||
| − | Use the cat on the door. You'll automatically hide behind the corner while the witch gets her cat. While she's distracted, sneak into her house and search the chest. You'll get a |
+ | Use the cat on the door. You'll automatically hide behind the corner while the witch gets her cat. While she's distracted, sneak into her house and search the chest. You'll get a {{Link|Restore potion|stat restore potion|img=Restore potion(1).png}}, a {{Link|Super attack|super attack potion|img=Super attack(1).png}}, the {{Link|history of iban|type=item}} (an old journal that relates some info about Iban), and a {{Link|doll of iban|type=item}}. ''The doll is the most important part. You now need to collect four elements of Iban to imbue the doll.'' |
====Iban's shadow==== |
====Iban's shadow==== |
||
'''''Items required:''' [[Combat]] [[equipment]] and the [[doll of Iban]].'' |
'''''Items required:''' [[Combat]] [[equipment]] and the [[doll of Iban]].'' |
||
| − | To get |
+ | To get {{Link|Iban's shadow|type=item}}, you need to kill three level 91 {{Link|demons}} named {{Link|Doomion|img=Doomion.png}}, {{Link|Othainian|img=Othainian.png}}, and {{Link|Holthion|img=Holthion.png}}. Head north and then west from the witch's house, and take the first left (south) all the way down until you reach where the demons are. |
[[File:Underground Pass - fighting Othanian.png|thumb|230px|A player uses a stone bridge to safely attack Othainian.]] |
[[File:Underground Pass - fighting Othanian.png|thumb|230px|A player uses a stone bridge to safely attack Othainian.]] |
||
| − | Kill each one any way you like and pick up the |
+ | Kill each one any way you like and pick up the {{Link|amulet of doomion|type=item}}, {{Link|amulet of othanian|type=item}} and {{Link|amulet of holthion|type=item}} that they drop respectively. If you are a low level or are using {{Link|Ranged|type=skill}} or {{Link|Magic|type=skill}}, there are {{Link|Safe spot|safespot}}s for killing the demons by standing on the narrow pathways. |
| − | The last demon, |
+ | The last demon, {{Link|Othainian|Othanian|img=Othainian.png}}, may be difficult to safespot; lure him to the southern edge of the island, then run back to the narrow pathway and he will be stuck on the corner or safespot the demon from doomions isle. If using a halberd, you can safespot Othanian by staying on the narrow pathway segment that you land on after jumping over the narrow pathway. by standing Once you have all three of them, head just north of where Doomion was to the chest. Opening it will destroy the amulets and give you Iban's shadow. Use it on the {{Link|Doll of iban|doll|type=item}}. |
====Iban's body==== |
====Iban's body==== |
||
'''''Items required:''' A [[bucket]] and a [[tinderbox]].'' |
'''''Items required:''' A [[bucket]] and a [[tinderbox]].'' |
||
[[File:Underground Pass - burning Iban's tomb.png|thumb|220px|Iban's tomb set ablaze.]] |
[[File:Underground Pass - burning Iban's tomb.png|thumb|220px|Iban's tomb set ablaze.]] |
||
| − | Either fall or jump back to the staircase to get back downstairs. Go back to the dwarves and talk to |
+ | Either fall or jump back to the staircase to get back downstairs. Go back to the dwarves and talk to {{Link|Klank|type=chat}}. He'll give you {{Link|Klank's gauntlets|type=item}} and a {{Link|tinderbox|type=item}}. Make sure you keep it. |
| − | Next, grab a |
+ | Next, grab a {{Link|bucket|type=item}} from the larger of the two buildings if you don't already have one, and go into the smaller building. Use the bucket on the barrel inside one of the houses to get some of the {{Link|dwarf brew|type=item}} that {{Link|Kamen|type=chat}} was giving you earlier. |
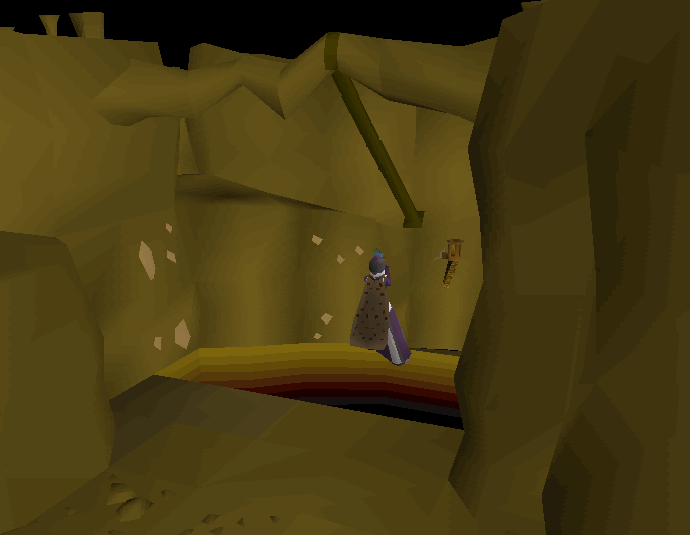
| − | Take this and head to the far south-east corner of the area where Iban's tomb is. ''Note that if you try to search the tomb, you will take damage''. Dump the bucket of alcohol on top of the tomb, and light it up with your tinderbox. After you're done watching it burn, a pile of |
+ | Take this and head to the far south-east corner of the area where Iban's tomb is. ''Note that if you try to search the tomb, you will take damage''. Dump the bucket of alcohol on top of the tomb, and light it up with your tinderbox. After you're done watching it burn, a pile of {{Link|Iban's ashes|type=item}} will appear in your inventory (or drop on the ground). Use these ashes on the {{Link|Doll of iban|doll|type=item}}. |
It is now safe to drop the bucket and tinderbox. |
It is now safe to drop the bucket and tinderbox. |
||
| Line 262: | Line 262: | ||
'''''Items required:''' [[Food]], [[combat]] [[equipment]], and the [[doll of Iban]].'' |
'''''Items required:''' [[Food]], [[combat]] [[equipment]], and the [[doll of Iban]].'' |
||
| − | Head straight north from the tomb, and keep going until you reach a corridor full of |
+ | Head straight north from the tomb, and keep going until you reach a corridor full of {{Link|blessed spider|img=Blessed spider.png}}s. Walk inside until you find a giant level 89 spider named {{Link|Kalrag|img=Kalrag.png}}. Kalrag can hit somewhat hard (at least 9), but is very inaccurate. The biggest challenge with this boss fight is fighting Kalrag alone. Kill him, it may take many tries to get the spiders off of you if you are below 79 combat. |
[[File:Underground Pass - fighting Kalrag.png|thumb|230px|A player uses a skeleton as a safespot to attack Kalrag.]] |
[[File:Underground Pass - fighting Kalrag.png|thumb|230px|A player uses a skeleton as a safespot to attack Kalrag.]] |
||
| − | When you defeat him, you'll automatically soak up the blood with your |
+ | When you defeat him, you'll automatically soak up the blood with your {{Link|Doll of iban|doll|type=item}}. '''The spiders nearby will attack you and can pile up on you despite not being a [[multi-combat area]]. They will interrupt the fight with Kalrag if they are attacking you. Once you kill Kalrag, you will be [[Stun (status)|stunned]] for about two seconds (and can be attacked by all spiders at once) so heal up before dealing the finishing blow.''' While stunned, you will automatically smear Iban's blood onto the doll. |
| − | Low levels might have a problem with Kalrag as the blessed spiders will keep attacking, preventing the player from attacking him. This can be avoided by running alongside Kalrag, killing blessed spiders in the hope that Kalrag will be the next to |
+ | Low levels might have a problem with Kalrag as the blessed spiders will keep attacking, preventing the player from attacking him. This can be avoided by running alongside Kalrag, killing blessed spiders in the hope that Kalrag will be the next to {{Link|Aggressiveness|aggro}} on you. You can also try trapping Kalrag in the north-western corner of the cave, to make sure he's next to you after you kill a spider. |
====Iban's dove==== |
====Iban's dove==== |
||
'''''Items required:''' [[Klank's gauntlets]] and the [[doll of Iban]].'' |
'''''Items required:''' [[Klank's gauntlets]] and the [[doll of Iban]].'' |
||
| ⚫ | |||
| − | [[File:Fix.png|thumb|659x659px]] |
||
| ⚫ | |||
| − | Near you, there will be several cages with |
+ | Near you, there will be several cages with {{Link|Soulless|half-soulless|img=Soulless.png}} in them. Do not bother with the first batch of cages; skip the first set and instead continue a bit south. Make your way across the agility jump. |
Walk to the fourth cage from the start (from the first, walk east to the next, then search the cage just to the north-west), and search it for the dove bones. |
Walk to the fourth cage from the start (from the first, walk east to the next, then search the cage just to the north-west), and search it for the dove bones. |
||
| − | Eventually, you will find the skeletal remains of |
+ | Eventually, you will find the skeletal remains of {{Link|Iban's dove|type=item}}. It could take a while, but when you find them, use them on the {{Link|Doll of iban|doll|type=item}}. |
:'''Note:''' If you're not wearing your gauntlets, the half-soulless will bite you and cause some damage. |
:'''Note:''' If you're not wearing your gauntlets, the half-soulless will bite you and cause some damage. |
||
| Line 285: | Line 284: | ||
Now, to finally destroy Iban and bring an end to this quest. You'll need to jump your way to Iban's temple in the center of the area. |
Now, to finally destroy Iban and bring an end to this quest. You'll need to jump your way to Iban's temple in the center of the area. |
||
| − | Once you're there, kill a |
+ | Once you're there, kill a {{Link|disciple of Iban|type=chat}} and take his {{Link|Zamorak robes}}. '''Make sure the robes are ''all'' you're wearing, and free up at least one inventory space for Iban's staff, and 2 more spaces for a tiny amount of fire and death runes. Note anything you drop to free up space WILL be lost here as you will be teleported back to the entrance room of the cave.''' |
'''(Should you die attempting to dispose of the doll, you will have to run through the entirety of the dungeon again, so be sure to bring the items required with you.)''' |
'''(Should you die attempting to dispose of the doll, you will have to run through the entirety of the dungeon again, so be sure to bring the items required with you.)''' |
||
| Line 291: | Line 290: | ||
Enter the temple wearing both upper and lower Zamorak Robes. |
Enter the temple wearing both upper and lower Zamorak Robes. |
||
| − | Use the |
+ | Use the {{Link|Doll of iban|doll|type=item}} on the well in the center of the room. <u>You may have to do this a few times, as his attacks may interrupt you.</u> When you do manage to get the doll into the well, Iban will be destroyed and the temple will begin to collapse. |
| − | You will receive |
+ | You will receive {{Link|Iban's staff|type=item}}, 15 {{Link|Death rune|type=item}}s, and 30 {{Link|Fire rune|type=item}}s. If you do not have space in your inventory for anything else, you will receive Iban's staff but lose the runes you would have gotten since you are immediately teleported after placing the doll in the well and have no chance to pick them up. |
'''Note:''''' A method to never get hit by Lord Iban's spell is to wait for the eight ticks he sends his spell and then walk in to his lair. Now, wait for the seventh spell to show, and then run to the well in the center of the room and use the doll.'' |
'''Note:''''' A method to never get hit by Lord Iban's spell is to wait for the eight ticks he sends his spell and then walk in to his lair. Now, wait for the seventh spell to show, and then run to the well in the center of the room and use the doll.'' |
||
| − | You'll be teleported to a cavern with |
+ | You'll be teleported to a cavern with {{Link|Koftik|type=chat}}, who'll be sane again. Talk to him to be teleported right next to the entrance. Leave the cavern and return to {{Link|Ardougne}}, and tell {{Link|King Lathas|type=chat}} of your success to finish the quest. |
'''Congratulations! Quest complete!''' |
'''Congratulations! Quest complete!''' |
||
| Line 314: | Line 313: | ||
==Required for completing== |
==Required for completing== |
||
Completion of Underground Pass is required for the following: |
Completion of Underground Pass is required for the following: |
||
| − | * |
+ | *{{Link|Legends' Quest}} |
| − | * |
+ | *{{Link|Regicide}} |
| − | * |
+ | *{{Link|Recipe for Disaster/Freeing Sir Amik Varze|Freeing Sir Amik Varze}} |
==Trivia== |
==Trivia== |
||
| − | Prior to being fixed, |
+ | Prior to being fixed, {{Link|mithril seeds|type=item}} could be exploited to cross the grid puzzle effortlessly. When automatically moving west one space each time a flower is planted, the player will safely move across the grid without triggering the trap. This is still possible; however, you can only place the seeds after stepping onto the first tile, so there is a chance of failure. Theoretically, it was also possible to burn logs to cross the grid in the same fashion; however, doing so would require too much inventory space to be effective. As of October 2016, the use of mithril seeds will still cause damage to the player. |
| − | If you speak to |
+ | If you speak to {{Link|Koftik|type=chat}} at the mesh grid, he will say, "The path of the righteous man is beset on all sides by the inequities of the selfish and the tyranny of evil men." This is the beginning of the misquoted Bible verse "Ezekiel 25:17" that Samuel L. Jackson's character recites in the movie ''{{wp|Pulp Fiction}}''. |
{{Underground Pass}} |
{{Underground Pass}} |
||
Revision as of 17:45, 16 October 2019
Underground Pass is a quest named after the ![]() location in which it takes place. You must venture into an underground pathway that leads to a new land, at the request of
location in which it takes place. You must venture into an underground pathway that leads to a new land, at the request of ![]() King Lathas of
King Lathas of ![]() Ardougne, in order to help him destroy his corrupted brother
Ardougne, in order to help him destroy his corrupted brother ![]() Tyras.
Tyras.
Details
| Start point | |
| Official difficulty | Experienced |
| Description | There are rumours of a secret passageway that can be used to get to the other side of the mountains west of Ardougne. Now it's just a matter of finding it. |
| Length | Long |
| Requirements |
Recommended:
|
| Items required |
Recommended:
|
| Enemies to defeat |
|
Walkthrough
- Note: The walkthrough for the dungeon after completing the quest can be found
 here.
here.
This quest relies heavily on your ![]() Agility skill, often making you complete a number of obstacles in succession. In most cases, failing any of the obstacles in an area will send you back to the beginning of the area, which can be quite frustrating, especially if your Agility is low.
Agility skill, often making you complete a number of obstacles in succession. In most cases, failing any of the obstacles in an area will send you back to the beginning of the area, which can be quite frustrating, especially if your Agility is low.
Many of the traps in the dungeon damage you based on your current health. This means that by keeping your health relatively low, you will have to use less ![]() food through the dungeon than you would if you were to eat to full
food through the dungeon than you would if you were to eat to full ![]() Hitpoints each time you get damaged.
Hitpoints each time you get damaged.
Starting the quest
Items required: None.
To begin, talk to ![]() King Lathas on the 1st floor[?] floor of
King Lathas on the 1st floor[?] floor of ![]() Ardougne Castle. He'll tell you about the
Ardougne Castle. He'll tell you about the ![]() Underground Pass and the evil
Underground Pass and the evil ![]() Iban guarding it, who claims to be the son of
Iban guarding it, who claims to be the son of ![]() Zamorak. He'll ask you to check in with
Zamorak. He'll ask you to check in with ![]() Koftik who is waiting for you just outside the entrance to the Underground Pass.
Koftik who is waiting for you just outside the entrance to the Underground Pass.
This time, you'll be allowed to go right through the front gates to ![]() West Ardougne, so head through and walk all the way west through the city until you find the cave entrance with Koftik standing outside. Talk to him, and he'll explain more about the Pass and tell you to meet him next to the bridge further inside.
West Ardougne, so head through and walk all the way west through the city until you find the cave entrance with Koftik standing outside. Talk to him, and he'll explain more about the Pass and tell you to meet him next to the bridge further inside.
Getting in and across the bridge
Items required: A bow, arrows, and rope. Bring the rest of your supplies now, as after this section there is no turning back unless you want to restart the entire dungeon.
When you walk inside (#1), you'll see three paths branching off in different directions. (WARNING: DO NOT TAKE THE MIDDLE PATH; the swamp will drag you down and send you tumbling down a hillside forcing you to crawl back up.) Instead, take the northern most path, as it requires the fewest amounts of rock slides, since you can skip the first rock slide. Climb over a series of rocks around the swamp and get to where ![]() Koftik is standing next to a fire (#2).
Koftik is standing next to a fire (#2).
Talk to him, and he'll tell you it looks like there have been others in the cave already. He'll give you a ![]() damp cloth. If you later need another one, you can talk to him at any time to get more. Use the damp cloth on an arrow, and then use the result on the fire to get a fire arrow. Equip a
damp cloth. If you later need another one, you can talk to him at any time to get more. Use the damp cloth on an arrow, and then use the result on the fire to get a fire arrow. Equip a ![]() bow and this
bow and this ![]() arrow.
arrow.

Shooting the guide rope with a fire arrow.
Go north to get to the small area (#3). Look across the subterranean river, and you can see where the guide rope holds up the bridge. Fire your lit arrow at the rope. If you succeed, the bridge will drop, and you'll automatically walk across the bridge.
DO NOT pull the lever right after the bridge (it will send you back to the beginning).
Before you continue, take the plank north of the lever (#4).

|
|
The pit
Items required: Food (strongly recommended) and 1 or more rope.
Walk south from where you picked up the plank. Do not walk into the swampy area filled with ![]() blessed spiders and instead head back east (#5). You will come up on a pit and a small water crossing with a rope swing. Use your
blessed spiders and instead head back east (#5). You will come up on a pit and a small water crossing with a rope swing. Use your ![]() rope on the rock hanging from the ceiling.
rope on the rock hanging from the ceiling.
A player successfully swings across the pit.
IF YOU FAIL AND FALL, you will fall into a rocky pit and lose your rope. Follow the path on your mini-map climbing over rocks when needed to get to the muddy rock pile. You'll be placed at the very beginning of Underground Pass. You will need another rope to attempt the obstacle again.
You no longer need a rope unless you have to go through the Underground Pass again.
The grid.
The grid
Continue down the path going east and then south. Eventually, you'll see ![]() Koftik standing in front of a grid (#6).
Koftik standing in front of a grid (#6).
Many of the tiles will drop you into a pit dealing 15 damage to your health. You'll need to use trial and error finding a safe path across. Once you've found a safe way across, remember it; you'll need it for ![]() Regicide. Pull the lever once you are across to lift the gate. (The path is different for everyone.)
Regicide. Pull the lever once you are across to lift the gate. (The path is different for everyone.)
The grid puzzle always does 15 damage upon falling into a pit. Keep this in mind while trying new squares. Should you die from falling, your items will stay in the pit. To retrieve what you lost then, you must intentionally step on a square that will drop you into the pit. Once you get across the grid, there is an altar in the next important room, so you can use ![]() Rapid Heal to save some food. Remember or write down the path you used to get across. You have to come back through here *twice* during Regicide later; the correct path is permanent and unique to each player.
Rapid Heal to save some food. Remember or write down the path you used to get across. You have to come back through here *twice* during Regicide later; the correct path is permanent and unique to each player.
It can be useful to keep track of the route you have to take using the following grid:
- Note: Previously, there was a bug in which mithril seeds could be used to cross the grid without falling into pits or taking damage, as planting a mithril seed moves you one square west. This no longer works as of October 2016. Some people have said if you find your first tile you can still use mithril seeds after standing on that one, but this is not true as of 2018.
The orbs and the well
Items required: A plank (optional but suggested).
To the north of you is a ![]() furnace (#7). For the moment, ignore it, but remember where it is.
furnace (#7). For the moment, ignore it, but remember where it is.
WARNING: If you use the obstacle pipe, it will cause you to go back to the rope swing with no return.
Head west, to a narrow corridor (#8). Approach it carefully, as there are five traps (odd markings) in the wall. (There's two on the north side followed by three on the south side.) There are three ways of passing the traps.
- The traps can be foiled by standing on the square right before the trap, then running to the square immediately after the trap.
- The traps can be disarmed normally, with a chance to fail and be hit for 5 damage.
- Heal up as much as possible and run through the traps with no regard, possibly dying.
Whichever way you choose, you will eventually get through into an area with a large, rather sinister-looking well in the middle and an ![]() altar (#9). There are four different paths branching off from this room.
altar (#9). There are four different paths branching off from this room.
WARNING: Attempting to climb down the well at this point will result in being hurt 10 damage.
- Start with the very north one. The same trick works by simply standing a square before the trap and running ahead. Otherwise, Use the plank you picked up earlier on the flat rock to disarm the trap. Go past the traps and pick up the orb of light at the end of the tunnel.
- The next one (the next one to the left, north-west) is fairly easy as well. Fight or run through the various spiders and level 53 ogres to grab the orb and run back again.
- Go through the middle path next. Navigate the traps the same way as you did for the northern path.
- Traverse through the tunnel (south-west path). However, when you get to where the orb is, don't pick it up. Disarm the trap underneath it, and then grab the orb.
- Note: Disarming can be failed, triggering a swinging log, dealing 6 to 12 damage.
Now that you have all four of the orbs, back track a little bit. Go back to where the furnace was (#7) (remembering to be careful of the traps in the wall). Use each of the orbs on the furnace to destroy them.
Make sure to top off your prayer if needed and head down the well (#9) descending another level. If you need food, search the crates at the west (crates give two ![]() salmon and two
salmon and two ![]() meat pies).
meat pies).
The cages and the obstacle maze
Items required: Spade and food.
- Entrance from the first area via climbing down the well
- Dig by the mud patch with your spade.
- Narrow ledge
- Agility maze
- 50 Thieving shortcut to bypass the maze
- To the third area
There is some food in the crates right when you arrive down the well (#1).
Head west through the cave, and you'll find yourself in an area with a few cages. Pick the lock on the first one on the left (south-east). You'll notice that there's a rather odd-looking patch of ground at the back of it. Use your ![]() spade on this to dig through, and you'll find a hidden tunnel that will take you through to the other side (#2).
spade on this to dig through, and you'll find a hidden tunnel that will take you through to the other side (#2).
Edge across the narrow ledge (#3), and you'll be near a maze of raised beams (#4). (ATTENTION: You can skip this step with 50 Thieving as seen in the next paragraph.) To get through it, you'll need to hop over a number of obstacles. If you fail, you need to climb back up one of the ramps nearby, often setting you back a few steps.
To get through the maze:
- Take the first RIGHT.
- Then LEFT.
- Then another LEFT.
If you have 50 Thieving, you can go a little bit farther south past the maze. There's a door that you can pick the lock of. It completely bypasses the whole maze (#5). Carefully walk around swamp patches and do not attempt to cross them, or you will fall into a long cavern that takes you to the start of the Pass. Once through, head south and squeeze through the pipe entrance to get into the next area.
The caged unicorn
Items required: None.
In the next room, you'll find a group of ![]() skeletons and a
skeletons and a ![]() unicorn in a cage (#2).
unicorn in a cage (#2).

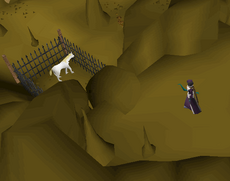
The boulder that players must push down with the piece of railing.
You'll need its horn, but you can't get into the cage to get it. If you search the cage, you'll find a loose ![]() piece of railing.(WARNING: If you drop an item to make space for the railing, you will lose it and will not be able to retrieve what you drop after moving the boulder) Take this, and head (south) up the path above where the cage is you'll find a large boulder. Use the loose railing to pry it loose, and crush the unicorn. Now, you can go back down and retrieve the
piece of railing.(WARNING: If you drop an item to make space for the railing, you will lose it and will not be able to retrieve what you drop after moving the boulder) Take this, and head (south) up the path above where the cage is you'll find a large boulder. Use the loose railing to pry it loose, and crush the unicorn. Now, you can go back down and retrieve the ![]() unicorn horn by searching the wreckage of the cage. Proceed through the tunnel entrance and head north.
unicorn horn by searching the wreckage of the cage. Proceed through the tunnel entrance and head north.
The paladins
Items required: Food, combat equipment, 3 paladin's badges (red, blue, and green), and the unicorn horn.
Heading north through the cave, you'll come to a small group of ![]() Paladins who have made a sort of camp (#3).
Paladins who have made a sort of camp (#3).
They're all level 62, named ![]() Sir Carl,
Sir Carl, ![]() Sir Jerro, and
Sir Jerro, and ![]() Sir Harry. If you talk to Sir Jerro, he'll give you some more food to restock your supplies.
Sir Harry. If you talk to Sir Jerro, he'll give you some more food to restock your supplies.
The food Sir Jerro gives you is: 2 ![]() Bread, 2
Bread, 2 ![]() Meat pie, 1
Meat pie, 1 ![]() Stew, 1
Stew, 1 ![]() Prayer potion (2) and 1
Prayer potion (2) and 1 ![]() Attack potion (2). (If you kill Sir Jerro before recieving supplies, you will not be able to get it, and he will attack you.)
Attack potion (2). (If you kill Sir Jerro before recieving supplies, you will not be able to get it, and he will attack you.)
Unluckily for them, you need the ![]() paladin's badges that they carry, and the only way to get those is to slaughter them. Make sure to talk to them before attacking them. It is possible to
paladin's badges that they carry, and the only way to get those is to slaughter them. Make sure to talk to them before attacking them. It is possible to ![]() safespot the paladins by attacking them and running just south where they will not follow you.
safespot the paladins by attacking them and running just south where they will not follow you.
Once you have all three badges (red, blue, and green), head west keeping your eyes out for the traps there. Again, you can foil them by placing the ![]() plank on them. These traps can also be foiled by standing on the square right before the trap, and running to the square immediately after the trap with run on. This method does not require a plank.
plank on them. These traps can also be foiled by standing on the square right before the trap, and running to the square immediately after the trap with run on. This method does not require a plank.
Keep going west to where there's another well (#4). Use the ![]() unicorn horn and the three crests on the well to open the large doors (#5).
unicorn horn and the three crests on the well to open the large doors (#5).
- Note: Remember this Well if you want to use the Iban's staff later. This is where you recharge it after use.
The dwarves
Items required: None.
.png)
Iban's Lair
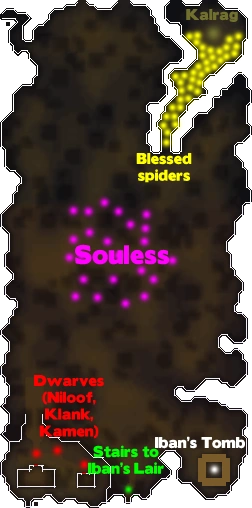
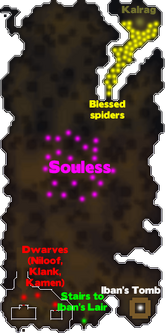
Now, you're in the largest area of the Underground Pass (and indeed all of RuneScape) and one of the most frustrating. Around all edges of the area is a rock ledge to walk on. The middle is a large, open area with a maze of walkways, most of which are broken. If you try to jump across them, sometimes, you will fall and end up taking big damage when you hit the ground below, as well as being in a large area filled with Soulless. Keep in mind that this area has been known to take well over an hour to clear, so be persistent.
For now, ignore the walkways, though do take note of the locations where you can get onto them. Head as far south as you can, and walk along the south wall until you find a small staircase leading down.
When you walk down it, ![]() Koftik will appear, ranting insanely before disappearing again. Before he goes, though, he'll mention some
Koftik will appear, ranting insanely before disappearing again. Before he goes, though, he'll mention some ![]() dwarves that have taken up residence there. Walk west to find them. (Map of bottom level is found in next section.) There are three dwarves named
dwarves that have taken up residence there. Walk west to find them. (Map of bottom level is found in next section.) There are three dwarves named ![]() Niloof,
Niloof, ![]() Klank, and
Klank, and ![]() Kamen in a small fenced area with two buildings.
Kamen in a small fenced area with two buildings.
Niloof will give you some food when you talk to him. Kamen also gives an unlimited amount of food after you talk to him (see below).
The witch
.png)
This is the level beneath Iban's Lair.
- Talk to Niloof first about a witch named Kardia who knows how to kill Iban.
- Then, talk to Klank and ask about the Soulless.
- Talk to Kamen next, who will tell you he is a little fried and asks you if you want some of his brew (if you decline, he will offer to sell you some bread, stew and a meat pie for 75 coins; if you accept, you will be hit 5 HP and your Agility level will temporarily decrease by 4; however, he will give you the food).
Climb up the staircase again, and head a little to the north-east where you can see a house.
From there, walk a little north where you can jump onto a path.
Walk along it, and take the first turn south to find Kardia's house. WARNING: Do not click on the door; it will deal a lot of damage to you.
Search the window, and you'll hear her talking to herself about her missing ![]() cat. Head north, take the western path, hop across the gap, and then take the north branch of the path.
cat. Head north, take the western path, hop across the gap, and then take the north branch of the path.
Follow it until you find the cat. It will be a yellow dot on your minimap. Grab it and go back to the witch's house again (if you drop the cat, you'll have to wait for a moment before you can grab it back).
Use the cat on the door. You'll automatically hide behind the corner while the witch gets her cat. While she's distracted, sneak into her house and search the chest. You'll get a ![]() stat restore potion, a
stat restore potion, a ![]() super attack potion, the
super attack potion, the ![]() history of iban (an old journal that relates some info about Iban), and a
history of iban (an old journal that relates some info about Iban), and a ![]() doll of iban. The doll is the most important part. You now need to collect four elements of Iban to imbue the doll.
doll of iban. The doll is the most important part. You now need to collect four elements of Iban to imbue the doll.
Iban's shadow
Items required: Combat equipment and the doll of Iban.
To get ![]() Iban's shadow, you need to kill three level 91
Iban's shadow, you need to kill three level 91 ![]() demons named
demons named ![]() Doomion,
Doomion, ![]() Othainian, and
Othainian, and ![]() Holthion. Head north and then west from the witch's house, and take the first left (south) all the way down until you reach where the demons are.
Holthion. Head north and then west from the witch's house, and take the first left (south) all the way down until you reach where the demons are.

A player uses a stone bridge to safely attack Othainian.
Kill each one any way you like and pick up the ![]() amulet of doomion,
amulet of doomion, ![]() amulet of othanian and
amulet of othanian and ![]() amulet of holthion that they drop respectively. If you are a low level or are using
amulet of holthion that they drop respectively. If you are a low level or are using ![]() Ranged or
Ranged or ![]() Magic, there are
Magic, there are ![]() safespots for killing the demons by standing on the narrow pathways.
safespots for killing the demons by standing on the narrow pathways.
The last demon, ![]() Othanian, may be difficult to safespot; lure him to the southern edge of the island, then run back to the narrow pathway and he will be stuck on the corner or safespot the demon from doomions isle. If using a halberd, you can safespot Othanian by staying on the narrow pathway segment that you land on after jumping over the narrow pathway. by standing Once you have all three of them, head just north of where Doomion was to the chest. Opening it will destroy the amulets and give you Iban's shadow. Use it on the
Othanian, may be difficult to safespot; lure him to the southern edge of the island, then run back to the narrow pathway and he will be stuck on the corner or safespot the demon from doomions isle. If using a halberd, you can safespot Othanian by staying on the narrow pathway segment that you land on after jumping over the narrow pathway. by standing Once you have all three of them, head just north of where Doomion was to the chest. Opening it will destroy the amulets and give you Iban's shadow. Use it on the ![]() doll.
doll.
Iban's body
Items required: A bucket and a tinderbox.
Iban's tomb set ablaze.
Either fall or jump back to the staircase to get back downstairs. Go back to the dwarves and talk to ![]() Klank. He'll give you
Klank. He'll give you ![]() Klank's gauntlets and a
Klank's gauntlets and a ![]() tinderbox. Make sure you keep it.
tinderbox. Make sure you keep it.
Next, grab a ![]() bucket from the larger of the two buildings if you don't already have one, and go into the smaller building. Use the bucket on the barrel inside one of the houses to get some of the
bucket from the larger of the two buildings if you don't already have one, and go into the smaller building. Use the bucket on the barrel inside one of the houses to get some of the ![]() dwarf brew that
dwarf brew that ![]() Kamen was giving you earlier.
Kamen was giving you earlier.
Take this and head to the far south-east corner of the area where Iban's tomb is. Note that if you try to search the tomb, you will take damage. Dump the bucket of alcohol on top of the tomb, and light it up with your tinderbox. After you're done watching it burn, a pile of ![]() Iban's ashes will appear in your inventory (or drop on the ground). Use these ashes on the
Iban's ashes will appear in your inventory (or drop on the ground). Use these ashes on the ![]() doll.
doll.
It is now safe to drop the bucket and tinderbox.
Iban's blood
Items required: Food, combat equipment, and the doll of Iban.
Head straight north from the tomb, and keep going until you reach a corridor full of ![]() blessed spiders. Walk inside until you find a giant level 89 spider named
blessed spiders. Walk inside until you find a giant level 89 spider named ![]() Kalrag. Kalrag can hit somewhat hard (at least 9), but is very inaccurate. The biggest challenge with this boss fight is fighting Kalrag alone. Kill him, it may take many tries to get the spiders off of you if you are below 79 combat.
Kalrag. Kalrag can hit somewhat hard (at least 9), but is very inaccurate. The biggest challenge with this boss fight is fighting Kalrag alone. Kill him, it may take many tries to get the spiders off of you if you are below 79 combat.
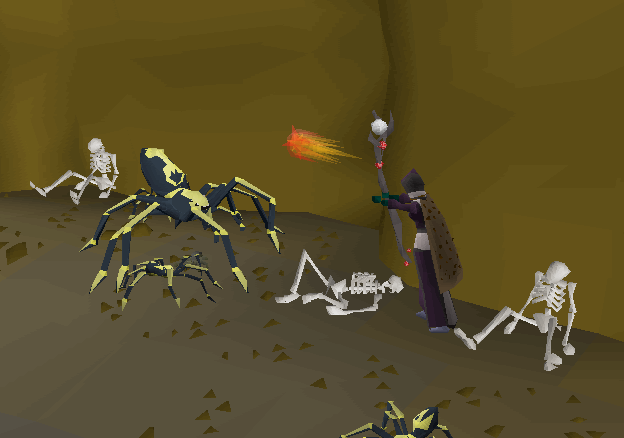
A player uses a skeleton as a safespot to attack Kalrag.
When you defeat him, you'll automatically soak up the blood with your ![]() doll. The spiders nearby will attack you and can pile up on you despite not being a multi-combat area. They will interrupt the fight with Kalrag if they are attacking you. Once you kill Kalrag, you will be stunned for about two seconds (and can be attacked by all spiders at once) so heal up before dealing the finishing blow. While stunned, you will automatically smear Iban's blood onto the doll.
doll. The spiders nearby will attack you and can pile up on you despite not being a multi-combat area. They will interrupt the fight with Kalrag if they are attacking you. Once you kill Kalrag, you will be stunned for about two seconds (and can be attacked by all spiders at once) so heal up before dealing the finishing blow. While stunned, you will automatically smear Iban's blood onto the doll.
Low levels might have a problem with Kalrag as the blessed spiders will keep attacking, preventing the player from attacking him. This can be avoided by running alongside Kalrag, killing blessed spiders in the hope that Kalrag will be the next to ![]() aggro on you. You can also try trapping Kalrag in the north-western corner of the cave, to make sure he's next to you after you kill a spider.
aggro on you. You can also try trapping Kalrag in the north-western corner of the cave, to make sure he's next to you after you kill a spider.
Iban's dove
Items required: Klank's gauntlets and the doll of Iban.
Make sure you put on ![]() Klank's gauntlets. From the entrance to the spider den where you fought Kalrag, head north-west to the far corner of the cave system. There's another staircase you can climb up to reach the upper area.
Klank's gauntlets. From the entrance to the spider den where you fought Kalrag, head north-west to the far corner of the cave system. There's another staircase you can climb up to reach the upper area.
Near you, there will be several cages with ![]() half-soulless in them. Do not bother with the first batch of cages; skip the first set and instead continue a bit south. Make your way across the agility jump.
half-soulless in them. Do not bother with the first batch of cages; skip the first set and instead continue a bit south. Make your way across the agility jump.
Walk to the fourth cage from the start (from the first, walk east to the next, then search the cage just to the north-west), and search it for the dove bones.
Eventually, you will find the skeletal remains of ![]() Iban's dove. It could take a while, but when you find them, use them on the
Iban's dove. It could take a while, but when you find them, use them on the ![]() doll.
doll.
- Note: If you're not wearing your gauntlets, the half-soulless will bite you and cause some damage.
Killing Iban
Items required: Doll of Iban.
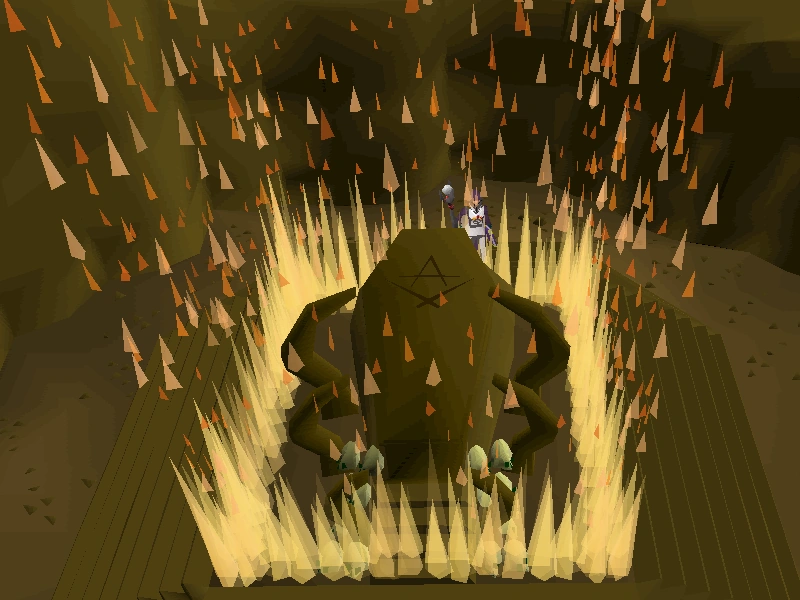
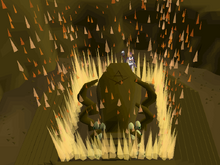
Now, to finally destroy Iban and bring an end to this quest. You'll need to jump your way to Iban's temple in the center of the area.
Once you're there, kill a ![]() disciple of Iban and take his
disciple of Iban and take his ![]() Zamorak robes. Make sure the robes are all you're wearing, and free up at least one inventory space for Iban's staff, and 2 more spaces for a tiny amount of fire and death runes. Note anything you drop to free up space WILL be lost here as you will be teleported back to the entrance room of the cave.
Zamorak robes. Make sure the robes are all you're wearing, and free up at least one inventory space for Iban's staff, and 2 more spaces for a tiny amount of fire and death runes. Note anything you drop to free up space WILL be lost here as you will be teleported back to the entrance room of the cave.
(Should you die attempting to dispose of the doll, you will have to run through the entirety of the dungeon again, so be sure to bring the items required with you.)
Enter the temple wearing both upper and lower Zamorak Robes.
Use the ![]() doll on the well in the center of the room. You may have to do this a few times, as his attacks may interrupt you. When you do manage to get the doll into the well, Iban will be destroyed and the temple will begin to collapse.
doll on the well in the center of the room. You may have to do this a few times, as his attacks may interrupt you. When you do manage to get the doll into the well, Iban will be destroyed and the temple will begin to collapse.
You will receive ![]() Iban's staff, 15
Iban's staff, 15 ![]() Death runes, and 30
Death runes, and 30 ![]() Fire runes. If you do not have space in your inventory for anything else, you will receive Iban's staff but lose the runes you would have gotten since you are immediately teleported after placing the doll in the well and have no chance to pick them up.
Fire runes. If you do not have space in your inventory for anything else, you will receive Iban's staff but lose the runes you would have gotten since you are immediately teleported after placing the doll in the well and have no chance to pick them up.
Note: A method to never get hit by Lord Iban's spell is to wait for the eight ticks he sends his spell and then walk in to his lair. Now, wait for the seventh spell to show, and then run to the well in the center of the room and use the doll.
You'll be teleported to a cavern with ![]() Koftik, who'll be sane again. Talk to him to be teleported right next to the entrance. Leave the cavern and return to
Koftik, who'll be sane again. Talk to him to be teleported right next to the entrance. Leave the cavern and return to ![]() Ardougne, and tell
Ardougne, and tell ![]() King Lathas of your success to finish the quest.
King Lathas of your success to finish the quest.
Congratulations! Quest complete!
Rewards
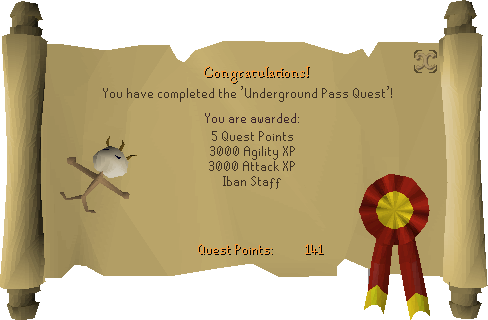
- 5 Quest points
- 3,000 Agility experience
- 3,000 Attack experience
- 15 Death runes and 30 Fire runes
- Iban's staff and use of the Iban Blast spell.
Required for completing
Completion of Underground Pass is required for the following:
Trivia
Prior to being fixed, ![]() mithril seeds could be exploited to cross the grid puzzle effortlessly. When automatically moving west one space each time a flower is planted, the player will safely move across the grid without triggering the trap. This is still possible; however, you can only place the seeds after stepping onto the first tile, so there is a chance of failure. Theoretically, it was also possible to burn logs to cross the grid in the same fashion; however, doing so would require too much inventory space to be effective. As of October 2016, the use of mithril seeds will still cause damage to the player.
mithril seeds could be exploited to cross the grid puzzle effortlessly. When automatically moving west one space each time a flower is planted, the player will safely move across the grid without triggering the trap. This is still possible; however, you can only place the seeds after stepping onto the first tile, so there is a chance of failure. Theoretically, it was also possible to burn logs to cross the grid in the same fashion; however, doing so would require too much inventory space to be effective. As of October 2016, the use of mithril seeds will still cause damage to the player.
If you speak to ![]() Koftik at the mesh grid, he will say, "The path of the righteous man is beset on all sides by the inequities of the selfish and the tyranny of evil men." This is the beginning of the misquoted Bible verse "Ezekiel 25:17" that Samuel L. Jackson's character recites in the movie Pulp Fiction.
Koftik at the mesh grid, he will say, "The path of the righteous man is beset on all sides by the inequities of the selfish and the tyranny of evil men." This is the beginning of the misquoted Bible verse "Ezekiel 25:17" that Samuel L. Jackson's character recites in the movie Pulp Fiction.
Underground Pass | |||||||||||
|---|---|---|---|---|---|---|---|---|---|---|---|
| NPCs |
| ||||||||||
| Items |
| ||||||||||
| Reward | |||||||||||
| Locations |
East Ardougne • Underground Pass • Iban's Temple • Well of Voyage • West Ardougne | ||||||||||
| Music |
Cursed • Expecting • Iban • Intrepid • Moody • Underground Pass | ||||||||||
| Related | |||||||||||