m (cleanup) |
|||
| (44 intermediate revisions by 37 users not shown) | |||
| Line 1: | Line 1: | ||
{{External|rs|rsc=Watchtower (quest)}}{{Has quick guide}}{{otheruses|the quest|the building|Watchtower (building)}} |
{{External|rs|rsc=Watchtower (quest)}}{{Has quick guide}}{{otheruses|the quest|the building|Watchtower (building)}} |
||
| − | {{ |
+ | {{Quest |
|name = Watchtower |
|name = Watchtower |
||
|image = [[File:Watchtower.png|300px]] |
|image = [[File:Watchtower.png|300px]] |
||
| Line 9: | Line 9: | ||
|series = [[List of quest series#Ogre series|Ogre]] |
|series = [[List of quest series#Ogre series|Ogre]] |
||
|difficulty = Intermediate |
|difficulty = Intermediate |
||
| − | |||
|developer = Ian T |
|developer = Ian T |
||
}} |
}} |
||
| − | |||
==Details== |
==Details== |
||
{{Quest details |
{{Quest details |
||
| − | |start = Begin the quest by speaking to [[Watchtower Wizard]] |
+ | |start = Begin the quest by speaking to [[Watchtower Wizard]] north of [[Yanille]] in the [[Watchtower (building)|Watchtower]]. You must climb the trellis on the north side of the tower to get up for the first time. |
|difficulty = 2 |
|difficulty = 2 |
||
|description = The Wizards of the Yanille Watch Tower have been reporting increased ogre sightings recently. Use a wide variety of your skills to help the wizards recover their stolen power crystals and stop the advance of the ogre hordes! |
|description = The Wizards of the Yanille Watch Tower have been reporting increased ogre sightings recently. Use a wide variety of your skills to help the wizards recover their stolen power crystals and stop the advance of the ogre hordes! |
||
| Line 21: | Line 19: | ||
|requirements = *{{Skill clickpic|Magic|15}} [[Magic]] |
|requirements = *{{Skill clickpic|Magic|15}} [[Magic]] |
||
*{{Skill clickpic|Thieving|15}} [[Thieving]] |
*{{Skill clickpic|Thieving|15}} [[Thieving]] |
||
| − | *{{Skill clickpic|Agility|25}} [[Agility]] ( |
+ | *{{Skill clickpic|Agility|25}} [[Agility]] (level 39 means that you can grapple over [[Yanille]]'s south wall, making the quest a little shorter along with 21 [[Ranged]] and 38 [[Strength]]) |
*{{Skill clickpic|Herblore|14}} [[Herblore]] |
*{{Skill clickpic|Herblore|14}} [[Herblore]] |
||
*{{Skill clickpic|Mining|40}} [[Mining]] |
*{{Skill clickpic|Mining|40}} [[Mining]] |
||
| Line 30: | Line 28: | ||
*A [[pickaxe]] |
*A [[pickaxe]] |
||
*[[Dragon bones]] |
*[[Dragon bones]] |
||
| − | *2 [[ |
+ | *2 [[rope]]s (the 2nd rope can be obtained during the quest) |
*A [[guam leaf]] |
*A [[guam leaf]] |
||
| − | *A [[ |
+ | *A [[light source]] (can be obtained during the quest) |
*A [[vial of water]] (can be obtained during the quest) |
*A [[vial of water]] (can be obtained during the quest) |
||
*A [[pestle and mortar]] (can be obtained during the quest) |
*A [[pestle and mortar]] (can be obtained during the quest) |
||
*A [[death rune]] (can be obtained during the quest) |
*A [[death rune]] (can be obtained during the quest) |
||
| − | *[[Bat bones]] (can be obtained during the quest, a knife or |
+ | *[[Bat bones]] (can be obtained during the quest, a [[knife]] or [[slash weapon]] is needed) |
*[[Jangerberries]] (can be obtained during the quest) |
*[[Jangerberries]] (can be obtained during the quest) |
||
'''Recommended:''' |
'''Recommended:''' |
||
*A single-click [[Teleportation|teleport]] for low levelled players, for the [[blue dragon]] encounter |
*A single-click [[Teleportation|teleport]] for low levelled players, for the [[blue dragon]] encounter |
||
*Good [[food]] ([[lobster]], [[swordfish]] or better) and [[armour]] |
*Good [[food]] ([[lobster]], [[swordfish]] or better) and [[armour]] |
||
| − | *An [[Anti-dragon shield|anti-dragon]]/[[dragonfire shield]] or [[antifire potion]]s to greatly reduce the damage taken from the [[blue dragon]]s in the [[Ogre Enclave]] ( |
+ | *An [[Anti-dragon shield|anti-dragon]]/[[dragonfire shield]] or [[antifire potion]]s to greatly reduce the damage taken from the [[blue dragon]]s in the [[Ogre Enclave]] (using both completely eliminates the damage taken from the blue dragons' [[dragonfire]] attack—[[Protect from Magic]] may also be used) |
| − | |kills = [[Gorad]] ''(level 68)'' |
+ | |kills = *[[Gorad]] ''(level 68)'' |
| + | *[[Giant Bat]] (only if bat bones are needed) |
||
}} |
}} |
||
==Walkthrough== |
==Walkthrough== |
||
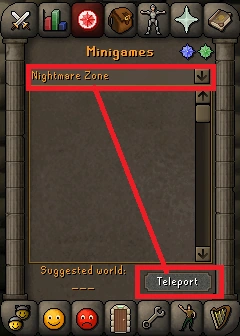
[[File:Teleport nightmarezone.png|thumb|220px|Teleport to the Minigame Nightmare Zone.]] |
[[File:Teleport nightmarezone.png|thumb|220px|Teleport to the Minigame Nightmare Zone.]] |
||
| − | :'''Note:''' If you do not have a |
+ | :'''Note:''' If you do not have a {{Link|Player-owned house|house}} in {{Link|Yanille}}, you can use the {{Link|Nightmare Zone}} or Fishing Trawler {{Link|Minigame Group Finder|Minigame teleport}} and run west to get there; ''it may only be used once every 20 minutes, and you need to meet the requirements to play Nightmare Zone''. (See picture to the right.) |
:'''Note:''' Throughout this quest, there are many Ogres that can be talked to, and some of them will damage and/or inconvenience the player for talking to them, '''especially the Ogre Shamans who will hit the player for 20 hitpoints'''.. Read the guide ahead to avoid this! |
:'''Note:''' Throughout this quest, there are many Ogres that can be talked to, and some of them will damage and/or inconvenience the player for talking to them, '''especially the Ogre Shamans who will hit the player for 20 hitpoints'''.. Read the guide ahead to avoid this! |
||
:'''Additional note:''' Before reaching the necessary point in the quest, the guam leaf can be added to the vial of water and the bat bones can be crushed with the pestle and mortar. The pestle and mortar can then be banked, freeing up two inventory spaces. |
:'''Additional note:''' Before reaching the necessary point in the quest, the guam leaf can be added to the vial of water and the bat bones can be crushed with the pestle and mortar. The pestle and mortar can then be banked, freeing up two inventory spaces. |
||
| − | There is also a |
+ | There is also a {{Link|Fairy rings|fairy ring}} located northwest of Yanille (code: {{Fairycode|ciq}}). From the ring, enter Yanille, and use the {{Link|Shortcuts|shortcut}} by the {{Link|Farming/Patch locations|farming patch}} (requires 16 {{Link|Agility|type=skill}}). Another ring is located east of Yanille (code: {{Fairycode|cls}}). This ring is slightly closer to the {{Link|Watchtower (building)|Watchtower}} but has level 44 {{Link|jungle spider|img=Jungle spider.png}}s, which are {{Link|Aggressiveness|aggressive}} to medium and low level players. |
===Getting started=== |
===Getting started=== |
||
'''''Items needed:''' [[Armour]], [[food]], 2 [[rope]]s, and [[dragon bones]].'' |
'''''Items needed:''' [[Armour]], [[food]], 2 [[rope]]s, and [[dragon bones]].'' |
||
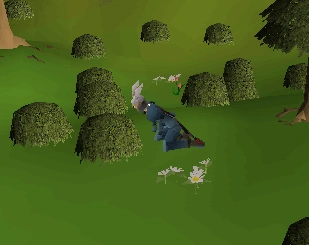
| − | Make your way to the |
+ | Make your way to the {{Link|Watchtower (building)|Watchtower}} just north of {{Link|Yanille}}. Climb the trellis on the northern side of the tower. Then, climb up the ladder and talk to the {{Link|Watchtower wizard|type=chat}}. He will explain that the Watchtower is not working, because the spell created does not keep out {{Link|Ogre|ogres|img=Ogre.png}}. He tells you that the {{Link|Crystal (Watchtower)|crystals|img=Watchtower Crystal 1.png}} that make the spell have been stolen! After starting, you will be asked to search the grounds of the Watchtower. You can now use the tower's main ladder, but using the trellis avoids a conversation with the guard and gives you 31 {{Link|Agility|type=skill}} {{Link|experience}} each time. Search the '''far northwest''' bush for some {{Link|fingernails|type=item}}. You'll find some other things in other bushes ({{Link|old robe|type=item}}, {{Link|unusual armour|type=item}}, {{Link|damaged dagger|type=item}}, {{Link|tattered eye patch|type=item}}) but you only need to search until you find the fingernails. Go back to the Watchtower wizard, and show him the fingernails. You can drop the remaining items, as they have no value. |
[[File:Searching the bushes.png|thumb|220px|Searching the bushes near the Watchtower.]] |
[[File:Searching the bushes.png|thumb|220px|Searching the bushes near the Watchtower.]] |
||
| − | The wizard will tell you that the fingernails belong to |
+ | The wizard will tell you that the fingernails belong to {{Link|Skavid|type=chat}}s, the servants of the ogres, and that they have stolen the four {{Link|Crystal (Watchtower)|power crystals|img=Watchtower Crystal 1.png}} that protect the city from ogres. Your job is to recover the crystals. |
| − | The first thing you need to do is gain access to the city. In order to enter, you'll need to help out three |
+ | The first thing you need to do is gain access to the city. In order to enter, you'll need to help out three {{Link|Ogre chieftain|ogre tribe chieftains|type=chat}} to get pieces of an {{Link|ogre relic|type=item}}. This can then be given to the gate guards to prove that you're a friend to the ogres. |
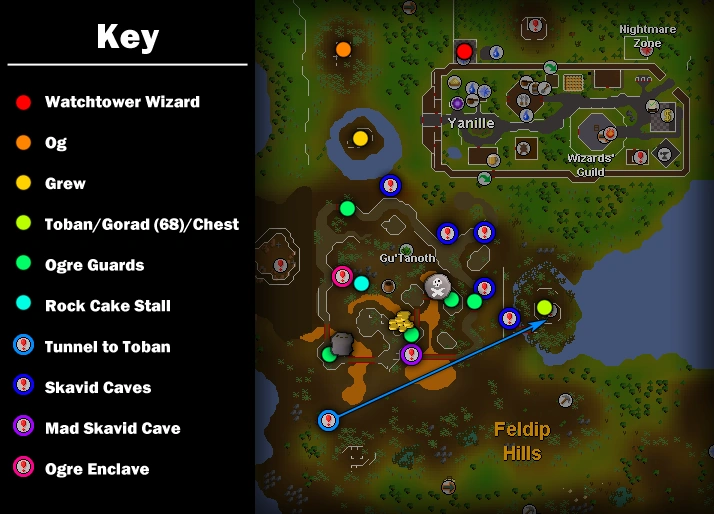
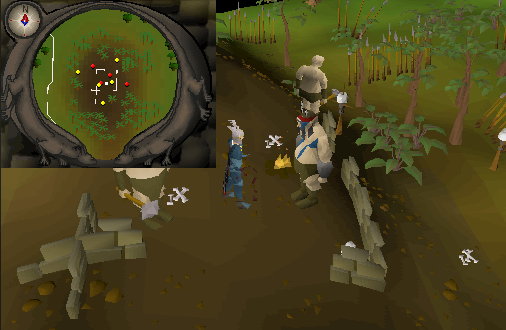
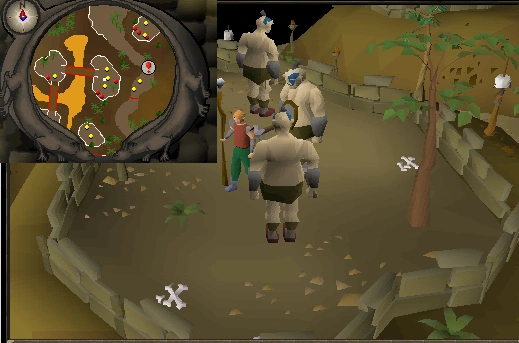
[[File:Watchtower map guide.png|thumb|centre|500px|All the important locations throughout the quest.]] |
[[File:Watchtower map guide.png|thumb|centre|500px|All the important locations throughout the quest.]] |
||
===Og=== |
===Og=== |
||
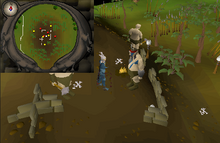
''Note: The Ogres near all three camps are non-aggressive.''[[File:Og location.png|thumb|220px|Og's location.]] |
''Note: The Ogres near all three camps are non-aggressive.''[[File:Og location.png|thumb|220px|Og's location.]] |
||
| − | First, go through the city of |
+ | First, go through the city of {{Link|Yanille}} using the {{Link|Shortcuts|agility shortcut}} or the east entrance. Stop at the bank to grab your {{Link|armour}}, {{Link|food}}, two {{Link|rope|type=item}}s, and one set of {{Link|dragon bones|type=item}} if you haven't already. Head out the west gate and turn northwest to find a tribe of ogres. Note that, as a general rule of thumb, any ogre that wields a {{Link|mace}} is {{Link|Tolerance|non-aggressive}}. Talk to {{Link|Og|type=chat}} to learn that his nemesis, {{Link|Toban|type=chat}}, stole a {{Link|Toban's gold|bar of gold|type=item}} from him. Your job is to get it back. Og will give you a {{Link|Toban's key|key|type=item}} to Toban's chest. Keep this key with you for later. |
===Grew=== |
===Grew=== |
||
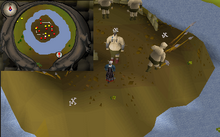
[[File:Grew location.png|thumb|220px|Grew's location.]] |
[[File:Grew location.png|thumb|220px|Grew's location.]] |
||
| − | Head south of |
+ | Head south of {{Link|Og|type=chat}}'s tribe. You should see an island with an ogre tribe on it and some {{Link|jangerberries|type=item}}. Find the long-branched tree on the west shore. Use one {{Link|rope|type=item}} on the branch of the tree (not the tree itself) to swing to the island. Note that you will lose the rope. Take some jangerberries because you'll need them later in the quest. Talk to {{Link|Grew|type=chat}}. Grew will tell you to teach his enemy, {{Link|Gorad|type=chat}}, a lesson by knocking one of his {{Link|Ogre tooth|teeth|type=item}} out (make sure that you have room in your inventory for this tooth, or you will have to kill him again). |
===Toban, and Gorad's tooth=== |
===Toban, and Gorad's tooth=== |
||
| − | The next stop is a third tribe of ogres. Leave the island using the tree with the rope swing on the north side. Head southeast then go around |
+ | The next stop is a third tribe of ogres. Leave the island using the tree with the rope swing on the north side. Head southeast then go around {{Link|Gu'Tanoth}} headed east. You will see a broken bridge leading to a small island. The next tribe you will need to meet is on that island, but the bridge is out so you will need to find another way across. Keep going a little bit south of the bridge, then turn west and continue along the southern edge of Gu'tanoth until you reach a hole surrounded by rocks. Pick up the death rune a ways south of this hole if you need it. ''The hole is west-northwest of the [[Gnome Glider|gnome glider]]. ''(See map above). |
| − | Enter the hole to reach an island with |
+ | Enter the hole to reach an island with {{Link|Toban|type=chat}}'s tribe on it. South of the ladder, you should find a level 68 chieftain called {{Link|Gorad|type=chat}}. Talk to him and tell him that you have come to knock his teeth out. He will attack you. Kill him to get a {{Link|Ogre tooth|tooth|type=item}}. Keep the tooth for later. |
| − | :'''Note:''' If you have a full inventory, you will not be able to get the tooth because the dialogue box will not load. Keep a few spots open for need of claiming items later on in the quest. |
||
| − | Next, speak to Toban. He will ask you to give him the bones of a dragon to chew on. Give him your |
+ | Next, speak to Toban. He will ask you to give him the bones of a dragon to chew on. Give him your {{Link|dragon bones|type=item}}. '''<u>Make sure not to bury them!</u>''' Toban will give you the {{Link|Relic part 3|third piece|type=item}} of the {{Link|Ogre relic|relic|type=item}} in return. |
| − | Open Toban's chest on the island, and you will find |
+ | Open Toban's chest on the island, and you will find {{Link|Og|type=chat}}'s {{Link|Toban's gold|stolen gold|type=item}}. |
| − | A |
+ | A {{Link|rope|type=item}} spawns on the island if you don't already have one for travelling back to {{Link|Grew|type=chat}}'s island. |
===Completing the relic=== |
===Completing the relic=== |
||
[[File:Combining relic parts.gif|frame|The Watchtower Wizard combines the three relic parts.]] |
[[File:Combining relic parts.gif|frame|The Watchtower Wizard combines the three relic parts.]] |
||
| − | Leave the island via the ladder. Make your way around the west side of the ogre city or teleport by either walking or using a |
+ | Leave the island via the ladder. Make your way around the west side of the ogre city or teleport by either walking or using a {{Link|Ring of dueling|type=item}} or {{Link|Minigame Group Finder}} teleport to {{Link|Castle Wars}} and walk back to {{Link|Grew|type=chat}}'s island (with the {{Link|jangerberries|type=item}}). Use your second {{Link|rope|type=item}} on the tree. Talk to Grew to give him {{Link|Gorad|Gorad's|type=chat}} {{Link|Ogre tooth|tooth|type=item}}. You will receive another {{Link|Relic part 2|piece of the relic|type=item}} in return for your deed. He will also give you the first {{Link|Crystal (Watchtower)|crystal|img=Watchtower Crystal 1.png}}! Keep this for later. '''If you don't have jangerberries yet, pick some from the island <u>before you leave</u>.''' Then, leave the island using the rope swing and head north back to {{Link|Og|type=chat}}. Talk to him to give him his stolen {{Link|Toban's gold|gold bar|type=item}}. You will receive the final {{Link|Relic part 1|piece of the relic|type=item}}. |
| − | Once you have all three parts of the relic, take them to the |
+ | Once you have all three parts of the relic, take them to the {{Link|Watchtower wizard|type=chat}} to get them assembled. Head through {{Link|Yanille}}, and use the {{Link|Shortcuts|agility shortcut}} if possible. While at the Watchtower, pick up a {{Link|candle|type=item}} at the spawn on the ground level if you need a {{Link|Light sources|light source}}. Stop at the bank to pick up a '''[[tinderbox]]''', '''[[light source]]''', '''[[anti-dragon shield]]''', '''[[death rune]],''' 20 coins ''(27 coins if you need to buy a [[pestle and mortar]] and a [[vial]])'', and a '''[[gold bar]].''' You can '''deposit the crystal''' for safe keeping. |
===Access to Gu'Tanoth=== |
===Access to Gu'Tanoth=== |
||
'''''Items needed:''' 20 [[coins]] (27 coins if you need to buy a [[pestle and mortar]] and [[vial]]), [[anti-dragon shield]], a [[death rune]], and the [[Ogre relic]]. Bring your [[gold bar]], [[tinderbox]], and [[light source]] as well to save a bank trip.'' |
'''''Items needed:''' 20 [[coins]] (27 coins if you need to buy a [[pestle and mortar]] and [[vial]]), [[anti-dragon shield]], a [[death rune]], and the [[Ogre relic]]. Bring your [[gold bar]], [[tinderbox]], and [[light source]] as well to save a bank trip.'' |
||
| − | After you have the full relic, head back through |
+ | After you have the full relic, head back through {{Link|Yanille}} and out the west gate. Head southeast until you see a path leading up into {{Link|Gu'Tanoth}}. Go south and follow the path up the hill. At the split, take the northwest trail to the {{Link|Ogre guard|type=chat}}s. Use your Ogre Relic on one of them to gain access to the city—'''do not talk to them''', or else they will just knock you back down the hill. |
| − | Once you're inside the city, go east to the market. The ogres aren't aggressive, but watch out for the |
+ | Once you're inside the city, go east and then south to the market. The ogres aren't aggressive, but watch out for the {{Link|Ogre trader|type=chat}}s, who will attack if spoken to. There is also a non-aggressive merchant named {{Link|Ogre merchant|Grud|type=chat}} (labelled Ogre merchant) who will sell you {{Link|Herblore|type=skill}} supplies. Buy a pestle and mortar and vial (7 coins total) from him for later use if you do not already have them in your inventory. Find the southern stall in the market with food (grey cylinders) on it, and then steal a {{Link|rock cake|type=item}}. Be careful with the cake as the left-click option eats it, dealing damage and forcing you to go steal another. |
Go back on the main path to the west and follow it south. You'll find two more guards. Talk to one. '''Be careful of what you say, '''the guard will knock you out of the area if you mess up. They will ask for some food from the market. '''Do not eat the rock cake!''' Give them your rock cake to get by. Then, continue on until you find a broken bridge. Attempt to jump the gap in the bridge. (Find the "attempt to jump" by clicking on your side of the gap for a red X option). The guards will ask for money, so pay them 20gp to cross the gap. Grab the knife here if you need a slash weapon, you will need it later for webs. |
Go back on the main path to the west and follow it south. You'll find two more guards. Talk to one. '''Be careful of what you say, '''the guard will knock you out of the area if you mess up. They will ask for some food from the market. '''Do not eat the rock cake!''' Give them your rock cake to get by. Then, continue on until you find a broken bridge. Attempt to jump the gap in the bridge. (Find the "attempt to jump" by clicking on your side of the gap for a red X option). The guards will ask for money, so pay them 20gp to cross the gap. Grab the knife here if you need a slash weapon, you will need it later for webs. |
||
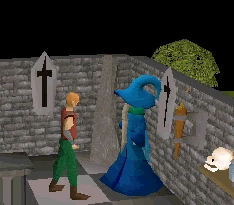
[[File:Watchtower Skavid.png|thumb|220px|The guards who give you the [[Skavid map]].]] |
[[File:Watchtower Skavid.png|thumb|220px|The guards who give you the [[Skavid map]].]] |
||
| − | Pass the aggressive ogre and you will find several city guards. If you talk to them, they'll give you a word puzzle. The answer to the puzzle is "''death rune''". Give the guard the death rune you grabbed earlier and he will give you a map of the |
+ | Pass the aggressive ogre and you will find several city guards. If you talk to them, they'll give you a word puzzle. The answer to the puzzle is "''death rune''". Give the guard the death rune you grabbed earlier and he will give you a map of the {{Link|Skavid caves|Skavid Caves}}. |
| − | :'''Note:''' One of the medium tasks in the |
+ | :'''Note:''' One of the medium tasks in the {{Link|Ardougne Diary|Ardougne achievement diary}} requires you to have a {{Link|Skavid map|type=item}}. If you ever plan on doing these tasks, you should keep the map so that you don't have to come back here to get another. |
===Skavid caves=== |
===Skavid caves=== |
||
'''''Items needed:''' [[Skavid map]], a [[light source]] and a [[gold bar]].'' |
'''''Items needed:''' [[Skavid map]], a [[light source]] and a [[gold bar]].'' |
||
[[File:A skavid is silenced.png|thumb|220px|A skavid is silenced while speaking to the player.]] |
[[File:A skavid is silenced.png|thumb|220px|A skavid is silenced while speaking to the player.]] |
||
| − | The |
+ | The {{Link|Skavid caves|Skavid Caves}} are a series of caves located beneath the ogre city. Their entrances are scattered around the north and east sides of the city. You need the {{Link|Skavid map|type=item}} and a {{Link|Light sources|light source}} to get in. Their locations are: |
*(Scared Skavid) East of Gu'Tanoth along the southeast branch of the entrance path to the city |
*(Scared Skavid) East of Gu'Tanoth along the southeast branch of the entrance path to the city |
||
*Northeast of Gu'Tanoth along the main entrance path to the city |
*Northeast of Gu'Tanoth along the main entrance path to the city |
||
*North of Gu'Tanoth near the opening of the main entrance path to the city |
*North of Gu'Tanoth near the opening of the main entrance path to the city |
||
| − | *North of Gu'Tanoth south of the west gate to |
+ | *North of Gu'Tanoth south of the west gate to {{Link|Yanille}} |
*East of Gu'Tanoth outside the city around the east side of the mountain |
*East of Gu'Tanoth outside the city around the east side of the mountain |
||
You can also refer to the map above to find the cave entrances. |
You can also refer to the map above to find the cave entrances. |
||
| − | You will need to enter all of the caves until you find the |
+ | You will need to enter all of the caves until you find the {{Link|Scared skavid|img=Skavid chathead.png}}, who will teach you some basic Skavid words. Then, go to the other four caves and talk to each (regular) {{Link|Skavid|type=chat}}, trying each word until it says that they understood you, and then move on to the next cave with the next Skavid. |
| − | Return to the |
+ | Return to the {{Link|Scared skavid|img=Skavid chathead.png}}. It will tell you that you're ready to take on the {{Link|Mad skavid|type=chat}}. |
Go past the Skavid caves along the southeast path of the entrance to the Ogre City and '''use the gold bar on one of the guards''' to gain access. Go south and west across the bridge and enter the cave. Talk to the mad skavid and respond with the language you just learned. |
Go past the Skavid caves along the southeast path of the entrance to the Ogre City and '''use the gold bar on one of the guards''' to gain access. Go south and west across the bridge and enter the cave. Talk to the mad skavid and respond with the language you just learned. |
||
| Line 127: | Line 125: | ||
:If he says "''Gor cur''", the correct response is "''Ar''". |
:If he says "''Gor cur''", the correct response is "''Ar''". |
||
| − | If you respond correctly, the Skavid will give you a |
+ | If you respond correctly, the Skavid will give you a {{Link|Crystal (Watchtower)|crystal|img=Watchtower Crystal 1.png}}. Take two {{Link|cave nightshade|type=item}}s at the spawn inside. '''Do NOT''' eat the nightshade as it will cause damage to you. You can enter and exit the cave in order for the nightshade to respawn faster. The hole in the corner will take you back to {{Link|Yanille}}. |
===The Ogre Enclave=== |
===The Ogre Enclave=== |
||
'''''Items needed:''' [[Anti-dragon shield]], [[food]] and 2 [[cave nightshade]]s.'' |
'''''Items needed:''' [[Anti-dragon shield]], [[food]] and 2 [[cave nightshade]]s.'' |
||
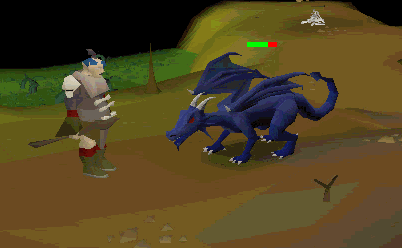
[[File:Shaman kills dragon.gif|frame|The Ogre shaman deals a powerful hit to a Blue dragon.]] |
[[File:Shaman kills dragon.gif|frame|The Ogre shaman deals a powerful hit to a Blue dragon.]] |
||
| − | Make sure you have your |
+ | Make sure you have your {{Link|anti-dragon shield|type=item}} equipped. Go back to the {{Link|Gu'Tanoth}} marketplace (just west of where you stole the {{Link|rock cake|type=item}}) and use one of your {{Link|Cave nightshade|nightshade|type=item}}s on an enclave guard to distract them. '''Make sure you complete the dialogue by using the spacebar or pressing 'Click here' to continue, or else you will have to get another cave nightshade.''' After continuing the dialogue, you will automatically enter the {{Link|Ogre Enclave}}. You'll see a short cutscene with an {{Link|Ogre shaman|type=chat}} and a {{Link|Blue dragon|img=Blue dragon.png}}. '''Do not attack or talk to the shamans, or you will instantly lose 20 [[Hitpoints]].''' The last two {{Link|Crystal (Watchtower)|crystals|img=Watchtower Crystal 1.png}} are here, but you can't get them without some help. Run past the blue dragons and out the exit at the north end. You will appear outside one of the northern {{Link|Skavid caves}}. |
===Magic ogre potion=== |
===Magic ogre potion=== |
||
'''''Items needed:''' An empty or water-filled [[vial]], [[guam leaf]], [[pestle and mortar]], [[jangerberries]], and [[bat bones]].'' |
'''''Items needed:''' An empty or water-filled [[vial]], [[guam leaf]], [[pestle and mortar]], [[jangerberries]], and [[bat bones]].'' |
||
| − | Head north into |
+ | Head north into {{Link|Yanille}}. Stop at the bank to grab a vial (with or without water), a guam leaf, a pestle and mortar, jangerberries, and bat bones if you have them. |
| − | Head back toward the |
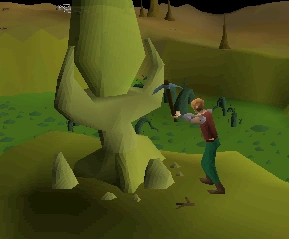
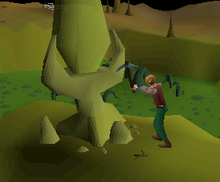
+ | Head back toward the {{Link|Watchtower (building)|Watchtower}}. If you need bat bones, a little east of the Watchtower, you'll find a house whose entrance is covered in webs. Take a {{Link|Slash weapons|slashing weapon}} or a {{Link|knife|type=item}}, cut through the web and enter the building. You will find several {{Link|giant bat|img=Giant bat.png}}s. Kill one and take its bones. |
| − | Return to the Watchtower. If your vial is empty, fill it at the fountain outside. Climb the ladders and talk to the |
+ | Return to the Watchtower. If your vial is empty, fill it at the fountain outside. Climb the ladders and talk to the {{Link|Watchtower wizard|type=chat}}. He will tell you that you can make a potion to destroy the {{Link|ogre shaman|type=chat}}. '''You must add the ingredients in this order:''' |
| − | #Add a |
+ | #Add a {{Link|guam leaf|type=item}} to a {{Link|vial of water|type=item}}. |
| − | #Add some |
+ | #Add some {{Link|jangerberries|type=item}}. '''Be careful because the left-click option is to eat.''' If accidentally eaten, they respawn on {{Link|Grew|type=chat}}'s island - you'll need another {{Link|rope|type=item}}. |
| − | #Use your |
+ | #Use your {{Link|pestle and mortar|type=item}} on the {{Link|bat bones|type=item}} to grind them. Add the {{Link|ground bat bones|type=item}} to the vial mixture. |
| − | #Give the mixture to the |
+ | #Give the mixture to the {{Link|Watchtower wizard|type=chat}} to get it enchanted, turning it into {{Link|magic ogre potion|type=item}}. |
===Shaman slaying=== |
===Shaman slaying=== |
||
'''''Items needed:''' Some [[food]], [[Anti-dragon shield]], a [[pickaxe]], [[cave nightshade]] and the [[magic ogre potion]].'' |
'''''Items needed:''' Some [[food]], [[Anti-dragon shield]], a [[pickaxe]], [[cave nightshade]] and the [[magic ogre potion]].'' |
||
[[File:Killing ogre shaman.gif|right|frame|Using the magic ogre potion to kill the ogre shamans.]] |
[[File:Killing ogre shaman.gif|right|frame|Using the magic ogre potion to kill the ogre shamans.]] |
||
| − | Return to the |
+ | Return to the {{Link|Yanille}} bank to prepare for the {{Link|blue dragon|img=Blue dragon.png}} and shaman enclave. Bring your pickaxe, an anti-dragonfire shield, cave nightshade and some food. Now, go back to the market place in {{Link|Gu'Tanoth}}. Distract the cave guards using your second nightshade, and enter the cave. Again, you must complete the dialogue by using the spacebar or pressing ''click here'' to continue, or else you will have to get another cave nightshade. |
| − | Run around the cave and use the |
+ | Run around the cave and use the {{Link|magic ogre potion|type=item}} on each of the six {{Link|Ogre shaman|type=chat}}s while avoiding the blue dragons as much as possible. The potion will instantly kill the shamans and you won't take any damage. The last shaman you kill will drop the {{Link|Crystal (Watchtower)|blue crystal|img=Watchtower Crystal 1.png}}, which is automatically put into your inventory. |
[[File:Crystal mining.png|thumb|left|220px|Mining the final crystal.]] |
[[File:Crystal mining.png|thumb|left|220px|Mining the final crystal.]] |
||
| − | If you somehow lose the blue crystal, there is a |
+ | If you somehow lose the blue crystal, there is a {{Link|Shaman robe|type=item}} in the southeast corner, amongst some bones where you can pick it up and search it for the crystal. |
| − | To get the last |
+ | To get the last {{Link|Crystal (Watchtower)|crystal|img=Watchtower Crystal 1.png}}, find the Rock of Dalgroth in the {{Link|Ogre Enclave}} in the centre of the Enclave and mine it with your pickaxe. '''This is in the cave with the blue dragons.''' Mine the rock before leaving the cave, otherwise you will need to get nightshades again. |
===Reviving the Watchtower=== |
===Reviving the Watchtower=== |
||
'''''Items needed:''' All 4 [[Crystal (Watchtower)|crystals]].'' |
'''''Items needed:''' All 4 [[Crystal (Watchtower)|crystals]].'' |
||
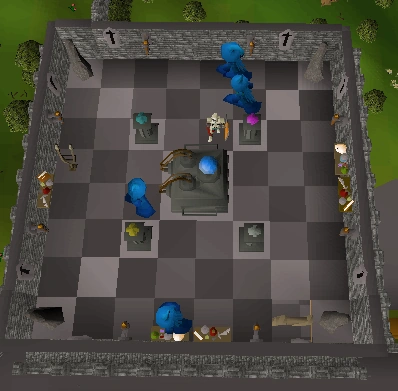
[[File:Watchtower crystals alignment.png|thumb|228x228px|The correct crystal positioning.]] |
[[File:Watchtower crystals alignment.png|thumb|228x228px|The correct crystal positioning.]] |
||
| − | Leave the |
+ | Leave the {{Link|Ogre Enclave|enclave}} using the far north exit again (or use a {{Link|Nightmare Zone}} {{Link|Minigame Group Finder|minigame teleport}}). Grab the yellow crystal if you banked it earlier, and take all four crystals back to the {{Link|Watchtower (building)|Watchtower}}. Talk to the {{Link|Watchtower wizard|type=chat}}, and he will ask you to fix the machine for him. |
The crystals must be placed in these places: |
The crystals must be placed in these places: |
||
| Line 172: | Line 170: | ||
==Rewards== |
==Rewards== |
||
| + | {{Quest rewards |
||
| ⚫ | |||
| + | |name = Watchtower |
||
| − | *{{Skill clickpic|Quest|4}} [[Quest points]] |
||
| ⚫ | |||
| + | |qp = 4 |
||
| + | |rewards = |
||
*{{Skill clickpic|Magic|15,250}} [[Magic]] [[experience]] |
*{{Skill clickpic|Magic|15,250}} [[Magic]] [[experience]] |
||
*5,000 [[Coins]] |
*5,000 [[Coins]] |
||
*A scroll, the reading of which gives you the ability to use [[Watchtower Teleport]] |
*A scroll, the reading of which gives you the ability to use [[Watchtower Teleport]] |
||
*Access to the ogre city (and [[Ogre Enclave]] where you can fight [[blue dragon]]s. You will not need an extra nightshade to enter after the quest is complete.) |
*Access to the ogre city (and [[Ogre Enclave]] where you can fight [[blue dragon]]s. You will not need an extra nightshade to enter after the quest is complete.) |
||
| + | }} |
||
==Required for completing== |
==Required for completing== |
||
Completion of Watchtower is required for the following: |
Completion of Watchtower is required for the following: |
||
| − | * |
+ | *{{Link|Monkey Madness II|img=King Narnode Shareen chathead.png}} |
| + | |||
| + | {{Watchtower}} |
||
Latest revision as of 10:13, 8 June 2019
Details
| Start point | |
| Official difficulty | Intermediate |
| Description | The Wizards of the Yanille Watch Tower have been reporting increased ogre sightings recently. Use a wide variety of your skills to help the wizards recover their stolen power crystals and stop the advance of the ogre hordes! |
| Length | Long |
| Requirements | |
| Items required |
Recommended:
|
| Enemies to defeat |
Walkthrough
Teleport to the Minigame Nightmare Zone.
- Note: If you do not have a
 house in Yanille, you can use the Nightmare Zone or Fishing Trawler Minigame teleport and run west to get there; it may only be used once every 20 minutes, and you need to meet the requirements to play Nightmare Zone. (See picture to the right.)
 - Note: Throughout this quest, there are many Ogres that can be talked to, and some of them will damage and/or inconvenience the player for talking to them, especially the Ogre Shamans who will hit the player for 20 hitpoints.. Read the guide ahead to avoid this!
- Additional note: Before reaching the necessary point in the quest, the guam leaf can be added to the vial of water and the bat bones can be crushed with the pestle and mortar. The pestle and mortar can then be banked, freeing up two inventory spaces.
There is also a ![]() fairy ring located northwest of Yanille (code: ciq). From the ring, enter Yanille, and use the
fairy ring located northwest of Yanille (code: ciq). From the ring, enter Yanille, and use the ![]() shortcut by the
shortcut by the ![]() farming patch (requires 16
farming patch (requires 16 ![]() Agility). Another ring is located east of Yanille (code: cls). This ring is slightly closer to the
Agility). Another ring is located east of Yanille (code: cls). This ring is slightly closer to the ![]() Watchtower but has level 44
Watchtower but has level 44 ![]() jungle spiders, which are
jungle spiders, which are ![]() aggressive to medium and low level players.
aggressive to medium and low level players.
Getting started
Items needed: Armour, food, 2 ropes, and dragon bones.
Make your way to the ![]() Watchtower just north of
Watchtower just north of ![]() Yanille. Climb the trellis on the northern side of the tower. Then, climb up the ladder and talk to the
Yanille. Climb the trellis on the northern side of the tower. Then, climb up the ladder and talk to the ![]() Watchtower wizard. He will explain that the Watchtower is not working, because the spell created does not keep out
Watchtower wizard. He will explain that the Watchtower is not working, because the spell created does not keep out ![]() ogres. He tells you that the
ogres. He tells you that the ![]() crystals that make the spell have been stolen! After starting, you will be asked to search the grounds of the Watchtower. You can now use the tower's main ladder, but using the trellis avoids a conversation with the guard and gives you 31
crystals that make the spell have been stolen! After starting, you will be asked to search the grounds of the Watchtower. You can now use the tower's main ladder, but using the trellis avoids a conversation with the guard and gives you 31 ![]() Agility
Agility ![]() experience each time. Search the far northwest bush for some
experience each time. Search the far northwest bush for some ![]() fingernails. You'll find some other things in other bushes (
fingernails. You'll find some other things in other bushes (![]() old robe,
old robe, ![]() unusual armour,
unusual armour, ![]() damaged dagger,
damaged dagger, ![]() tattered eye patch) but you only need to search until you find the fingernails. Go back to the Watchtower wizard, and show him the fingernails. You can drop the remaining items, as they have no value.
tattered eye patch) but you only need to search until you find the fingernails. Go back to the Watchtower wizard, and show him the fingernails. You can drop the remaining items, as they have no value.

Searching the bushes near the Watchtower.
The wizard will tell you that the fingernails belong to ![]() Skavids, the servants of the ogres, and that they have stolen the four
Skavids, the servants of the ogres, and that they have stolen the four ![]() power crystals that protect the city from ogres. Your job is to recover the crystals.
power crystals that protect the city from ogres. Your job is to recover the crystals.
The first thing you need to do is gain access to the city. In order to enter, you'll need to help out three ![]() ogre tribe chieftains to get pieces of an
ogre tribe chieftains to get pieces of an ![]() ogre relic. This can then be given to the gate guards to prove that you're a friend to the ogres.
ogre relic. This can then be given to the gate guards to prove that you're a friend to the ogres.

Og
Note: The Ogres near all three camps are non-aggressive.
Og's location.
First, go through the city of ![]() Yanille using the
Yanille using the ![]() agility shortcut or the east entrance. Stop at the bank to grab your
agility shortcut or the east entrance. Stop at the bank to grab your ![]() armour,
armour, ![]() food, two
food, two ![]() ropes, and one set of
ropes, and one set of ![]() dragon bones if you haven't already. Head out the west gate and turn northwest to find a tribe of ogres. Note that, as a general rule of thumb, any ogre that wields a
dragon bones if you haven't already. Head out the west gate and turn northwest to find a tribe of ogres. Note that, as a general rule of thumb, any ogre that wields a ![]() mace is
mace is ![]() non-aggressive. Talk to
non-aggressive. Talk to ![]() Og to learn that his nemesis,
Og to learn that his nemesis, ![]() Toban, stole a
Toban, stole a ![]() bar of gold from him. Your job is to get it back. Og will give you a
bar of gold from him. Your job is to get it back. Og will give you a ![]() key to Toban's chest. Keep this key with you for later.
key to Toban's chest. Keep this key with you for later.
Grew

Grew's location.
Head south of ![]() Og's tribe. You should see an island with an ogre tribe on it and some
Og's tribe. You should see an island with an ogre tribe on it and some ![]() jangerberries. Find the long-branched tree on the west shore. Use one
jangerberries. Find the long-branched tree on the west shore. Use one ![]() rope on the branch of the tree (not the tree itself) to swing to the island. Note that you will lose the rope. Take some jangerberries because you'll need them later in the quest. Talk to
rope on the branch of the tree (not the tree itself) to swing to the island. Note that you will lose the rope. Take some jangerberries because you'll need them later in the quest. Talk to ![]() Grew. Grew will tell you to teach his enemy,
Grew. Grew will tell you to teach his enemy, ![]() Gorad, a lesson by knocking one of his
Gorad, a lesson by knocking one of his ![]() teeth out (make sure that you have room in your inventory for this tooth, or you will have to kill him again).
teeth out (make sure that you have room in your inventory for this tooth, or you will have to kill him again).
Toban, and Gorad's tooth
The next stop is a third tribe of ogres. Leave the island using the tree with the rope swing on the north side. Head southeast then go around ![]() Gu'Tanoth headed east. You will see a broken bridge leading to a small island. The next tribe you will need to meet is on that island, but the bridge is out so you will need to find another way across. Keep going a little bit south of the bridge, then turn west and continue along the southern edge of Gu'tanoth until you reach a hole surrounded by rocks. Pick up the death rune a ways south of this hole if you need it. The hole is west-northwest of the gnome glider. (See map above).
Gu'Tanoth headed east. You will see a broken bridge leading to a small island. The next tribe you will need to meet is on that island, but the bridge is out so you will need to find another way across. Keep going a little bit south of the bridge, then turn west and continue along the southern edge of Gu'tanoth until you reach a hole surrounded by rocks. Pick up the death rune a ways south of this hole if you need it. The hole is west-northwest of the gnome glider. (See map above).
Enter the hole to reach an island with ![]() Toban's tribe on it. South of the ladder, you should find a level 68 chieftain called
Toban's tribe on it. South of the ladder, you should find a level 68 chieftain called ![]() Gorad. Talk to him and tell him that you have come to knock his teeth out. He will attack you. Kill him to get a
Gorad. Talk to him and tell him that you have come to knock his teeth out. He will attack you. Kill him to get a ![]() tooth. Keep the tooth for later.
tooth. Keep the tooth for later.
Next, speak to Toban. He will ask you to give him the bones of a dragon to chew on. Give him your ![]() dragon bones. Make sure not to bury them! Toban will give you the
dragon bones. Make sure not to bury them! Toban will give you the ![]() third piece of the
third piece of the ![]() relic in return.
relic in return.
Open Toban's chest on the island, and you will find ![]() Og's
Og's ![]() stolen gold.
stolen gold.
A ![]() rope spawns on the island if you don't already have one for travelling back to
rope spawns on the island if you don't already have one for travelling back to ![]() Grew's island.
Grew's island.
Completing the relic
The Watchtower Wizard combines the three relic parts.
Leave the island via the ladder. Make your way around the west side of the ogre city or teleport by either walking or using a ![]() Ring of dueling or
Ring of dueling or ![]() Minigame Group Finder teleport to
Minigame Group Finder teleport to ![]() Castle Wars and walk back to
Castle Wars and walk back to ![]() Grew's island (with the
Grew's island (with the ![]() jangerberries). Use your second
jangerberries). Use your second ![]() rope on the tree. Talk to Grew to give him
rope on the tree. Talk to Grew to give him ![]() Gorad's
Gorad's ![]() tooth. You will receive another
tooth. You will receive another ![]() piece of the relic in return for your deed. He will also give you the first
piece of the relic in return for your deed. He will also give you the first ![]() crystal! Keep this for later. If you don't have jangerberries yet, pick some from the island before you leave. Then, leave the island using the rope swing and head north back to
crystal! Keep this for later. If you don't have jangerberries yet, pick some from the island before you leave. Then, leave the island using the rope swing and head north back to ![]() Og. Talk to him to give him his stolen
Og. Talk to him to give him his stolen ![]() gold bar. You will receive the final
gold bar. You will receive the final ![]() piece of the relic.
piece of the relic.
Once you have all three parts of the relic, take them to the ![]() Watchtower wizard to get them assembled. Head through
Watchtower wizard to get them assembled. Head through ![]() Yanille, and use the
Yanille, and use the ![]() agility shortcut if possible. While at the Watchtower, pick up a
agility shortcut if possible. While at the Watchtower, pick up a ![]() candle at the spawn on the ground level if you need a
candle at the spawn on the ground level if you need a ![]() light source. Stop at the bank to pick up a tinderbox, light source, anti-dragon shield, death rune, 20 coins (27 coins if you need to buy a pestle and mortar and a vial), and a gold bar. You can deposit the crystal for safe keeping.
light source. Stop at the bank to pick up a tinderbox, light source, anti-dragon shield, death rune, 20 coins (27 coins if you need to buy a pestle and mortar and a vial), and a gold bar. You can deposit the crystal for safe keeping.
Access to Gu'Tanoth
Items needed: 20 coins (27 coins if you need to buy a pestle and mortar and vial), anti-dragon shield, a death rune, and the Ogre relic. Bring your gold bar, tinderbox, and light source as well to save a bank trip.
After you have the full relic, head back through ![]() Yanille and out the west gate. Head southeast until you see a path leading up into
Yanille and out the west gate. Head southeast until you see a path leading up into ![]() Gu'Tanoth. Go south and follow the path up the hill. At the split, take the northwest trail to the
Gu'Tanoth. Go south and follow the path up the hill. At the split, take the northwest trail to the ![]() Ogre guards. Use your Ogre Relic on one of them to gain access to the city—do not talk to them, or else they will just knock you back down the hill.
Ogre guards. Use your Ogre Relic on one of them to gain access to the city—do not talk to them, or else they will just knock you back down the hill.
Once you're inside the city, go east and then south to the market. The ogres aren't aggressive, but watch out for the ![]() Ogre traders, who will attack if spoken to. There is also a non-aggressive merchant named
Ogre traders, who will attack if spoken to. There is also a non-aggressive merchant named ![]() Grud (labelled Ogre merchant) who will sell you
Grud (labelled Ogre merchant) who will sell you ![]() Herblore supplies. Buy a pestle and mortar and vial (7 coins total) from him for later use if you do not already have them in your inventory. Find the southern stall in the market with food (grey cylinders) on it, and then steal a
Herblore supplies. Buy a pestle and mortar and vial (7 coins total) from him for later use if you do not already have them in your inventory. Find the southern stall in the market with food (grey cylinders) on it, and then steal a ![]() rock cake. Be careful with the cake as the left-click option eats it, dealing damage and forcing you to go steal another.
rock cake. Be careful with the cake as the left-click option eats it, dealing damage and forcing you to go steal another.
Go back on the main path to the west and follow it south. You'll find two more guards. Talk to one. Be careful of what you say, the guard will knock you out of the area if you mess up. They will ask for some food from the market. Do not eat the rock cake! Give them your rock cake to get by. Then, continue on until you find a broken bridge. Attempt to jump the gap in the bridge. (Find the "attempt to jump" by clicking on your side of the gap for a red X option). The guards will ask for money, so pay them 20gp to cross the gap. Grab the knife here if you need a slash weapon, you will need it later for webs.
The guards who give you the Skavid map.
Pass the aggressive ogre and you will find several city guards. If you talk to them, they'll give you a word puzzle. The answer to the puzzle is "death rune". Give the guard the death rune you grabbed earlier and he will give you a map of the ![]() Skavid Caves.
Skavid Caves.
- Note: One of the medium tasks in the Ardougne achievement diary requires you to have a Skavid map. If you ever plan on doing these tasks, you should keep the map so that you don't have to come back here to get another.
Skavid caves
Items needed: Skavid map, a light source and a gold bar.

A skavid is silenced while speaking to the player.
The ![]() Skavid Caves are a series of caves located beneath the ogre city. Their entrances are scattered around the north and east sides of the city. You need the
Skavid Caves are a series of caves located beneath the ogre city. Their entrances are scattered around the north and east sides of the city. You need the ![]() Skavid map and a
Skavid map and a ![]() light source to get in. Their locations are:
light source to get in. Their locations are:
- (Scared Skavid) East of Gu'Tanoth along the southeast branch of the entrance path to the city
- Northeast of Gu'Tanoth along the main entrance path to the city
- North of Gu'Tanoth near the opening of the main entrance path to the city
- North of Gu'Tanoth south of the west gate to Yanille
- East of Gu'Tanoth outside the city around the east side of the mountain
You can also refer to the map above to find the cave entrances.
You will need to enter all of the caves until you find the ![]() Scared skavid, who will teach you some basic Skavid words. Then, go to the other four caves and talk to each (regular)
Scared skavid, who will teach you some basic Skavid words. Then, go to the other four caves and talk to each (regular) ![]() Skavid, trying each word until it says that they understood you, and then move on to the next cave with the next Skavid.
Skavid, trying each word until it says that they understood you, and then move on to the next cave with the next Skavid.
Return to the ![]() Scared skavid. It will tell you that you're ready to take on the
Scared skavid. It will tell you that you're ready to take on the ![]() Mad skavid.
Mad skavid.
Go past the Skavid caves along the southeast path of the entrance to the Ogre City and use the gold bar on one of the guards to gain access. Go south and west across the bridge and enter the cave. Talk to the mad skavid and respond with the language you just learned.
- If he says "Ar cur", the correct response is "Gor".
- If he says "Bidith ig", the correct response is "Cur".
- If he says "Gor nod", the correct response is "Tanath".
- If he says "Cur tanath", the correct response is "Bidith".
- If he says "Bidith tanath", the correct response is "Cur".
- If he says "Tanath gor", the correct response is "Nod".
- If he says "Cur bidith", the correct response is "Ig".
- If he says "Gor cur", the correct response is "Ar".
If you respond correctly, the Skavid will give you a ![]() crystal. Take two
crystal. Take two ![]() cave nightshades at the spawn inside. Do NOT eat the nightshade as it will cause damage to you. You can enter and exit the cave in order for the nightshade to respawn faster. The hole in the corner will take you back to
cave nightshades at the spawn inside. Do NOT eat the nightshade as it will cause damage to you. You can enter and exit the cave in order for the nightshade to respawn faster. The hole in the corner will take you back to ![]() Yanille.
Yanille.
The Ogre Enclave
Items needed: Anti-dragon shield, food and 2 cave nightshades.
The Ogre shaman deals a powerful hit to a Blue dragon.
Make sure you have your ![]() anti-dragon shield equipped. Go back to the
anti-dragon shield equipped. Go back to the ![]() Gu'Tanoth marketplace (just west of where you stole the
Gu'Tanoth marketplace (just west of where you stole the ![]() rock cake) and use one of your
rock cake) and use one of your ![]() nightshades on an enclave guard to distract them. Make sure you complete the dialogue by using the spacebar or pressing 'Click here' to continue, or else you will have to get another cave nightshade. After continuing the dialogue, you will automatically enter the
nightshades on an enclave guard to distract them. Make sure you complete the dialogue by using the spacebar or pressing 'Click here' to continue, or else you will have to get another cave nightshade. After continuing the dialogue, you will automatically enter the ![]() Ogre Enclave. You'll see a short cutscene with an
Ogre Enclave. You'll see a short cutscene with an ![]() Ogre shaman and a
Ogre shaman and a ![]() Blue dragon. Do not attack or talk to the shamans, or you will instantly lose 20 Hitpoints. The last two
Blue dragon. Do not attack or talk to the shamans, or you will instantly lose 20 Hitpoints. The last two ![]() crystals are here, but you can't get them without some help. Run past the blue dragons and out the exit at the north end. You will appear outside one of the northern
crystals are here, but you can't get them without some help. Run past the blue dragons and out the exit at the north end. You will appear outside one of the northern ![]() Skavid caves.
Skavid caves.
Magic ogre potion
Items needed: An empty or water-filled vial, guam leaf, pestle and mortar, jangerberries, and bat bones.
Head north into ![]() Yanille. Stop at the bank to grab a vial (with or without water), a guam leaf, a pestle and mortar, jangerberries, and bat bones if you have them.
Yanille. Stop at the bank to grab a vial (with or without water), a guam leaf, a pestle and mortar, jangerberries, and bat bones if you have them.
Head back toward the ![]() Watchtower. If you need bat bones, a little east of the Watchtower, you'll find a house whose entrance is covered in webs. Take a
Watchtower. If you need bat bones, a little east of the Watchtower, you'll find a house whose entrance is covered in webs. Take a ![]() slashing weapon or a
slashing weapon or a ![]() knife, cut through the web and enter the building. You will find several
knife, cut through the web and enter the building. You will find several ![]() giant bats. Kill one and take its bones.
giant bats. Kill one and take its bones.
Return to the Watchtower. If your vial is empty, fill it at the fountain outside. Climb the ladders and talk to the ![]() Watchtower wizard. He will tell you that you can make a potion to destroy the
Watchtower wizard. He will tell you that you can make a potion to destroy the ![]() ogre shaman. You must add the ingredients in this order:
ogre shaman. You must add the ingredients in this order:
- Add a guam leaf to a vial of water.
- Add some jangerberries. Be careful because the left-click option is to eat. If accidentally eaten, they respawn on Grew's island - you'll need another rope.
- Use your pestle and mortar on the bat bones to grind them. Add the ground bat bones to the vial mixture.
- Give the mixture to the Watchtower wizard to get it enchanted, turning it into magic ogre potion.
Shaman slaying
Items needed: Some food, Anti-dragon shield, a pickaxe, cave nightshade and the magic ogre potion.
Using the magic ogre potion to kill the ogre shamans.
Return to the ![]() Yanille bank to prepare for the
Yanille bank to prepare for the ![]() blue dragon and shaman enclave. Bring your pickaxe, an anti-dragonfire shield, cave nightshade and some food. Now, go back to the market place in
blue dragon and shaman enclave. Bring your pickaxe, an anti-dragonfire shield, cave nightshade and some food. Now, go back to the market place in ![]() Gu'Tanoth. Distract the cave guards using your second nightshade, and enter the cave. Again, you must complete the dialogue by using the spacebar or pressing click here to continue, or else you will have to get another cave nightshade.
Run around the cave and use the
Gu'Tanoth. Distract the cave guards using your second nightshade, and enter the cave. Again, you must complete the dialogue by using the spacebar or pressing click here to continue, or else you will have to get another cave nightshade.
Run around the cave and use the ![]() magic ogre potion on each of the six
magic ogre potion on each of the six ![]() Ogre shamans while avoiding the blue dragons as much as possible. The potion will instantly kill the shamans and you won't take any damage. The last shaman you kill will drop the
Ogre shamans while avoiding the blue dragons as much as possible. The potion will instantly kill the shamans and you won't take any damage. The last shaman you kill will drop the ![]() blue crystal, which is automatically put into your inventory.
blue crystal, which is automatically put into your inventory.
Mining the final crystal.
If you somehow lose the blue crystal, there is a ![]() Shaman robe in the southeast corner, amongst some bones where you can pick it up and search it for the crystal.
Shaman robe in the southeast corner, amongst some bones where you can pick it up and search it for the crystal.
To get the last ![]() crystal, find the Rock of Dalgroth in the
crystal, find the Rock of Dalgroth in the ![]() Ogre Enclave in the centre of the Enclave and mine it with your pickaxe. This is in the cave with the blue dragons. Mine the rock before leaving the cave, otherwise you will need to get nightshades again.
Ogre Enclave in the centre of the Enclave and mine it with your pickaxe. This is in the cave with the blue dragons. Mine the rock before leaving the cave, otherwise you will need to get nightshades again.
Reviving the Watchtower
Items needed: All 4 crystals.

The correct crystal positioning.
Leave the ![]() enclave using the far north exit again (or use a
enclave using the far north exit again (or use a ![]() Nightmare Zone
Nightmare Zone ![]() minigame teleport). Grab the yellow crystal if you banked it earlier, and take all four crystals back to the
minigame teleport). Grab the yellow crystal if you banked it earlier, and take all four crystals back to the ![]() Watchtower. Talk to the
Watchtower. Talk to the ![]() Watchtower wizard, and he will ask you to fix the machine for him.
Watchtower wizard, and he will ask you to fix the machine for him.
The crystals must be placed in these places:
- Yellow crystal in the southwest pillar
- Grey crystal in the southeast pillar
- Cyan crystal in the northwest pillar
- Magenta crystal in the northeast pillar
Finally, pull the lever on the west side of the room to complete the quest.
Rewards
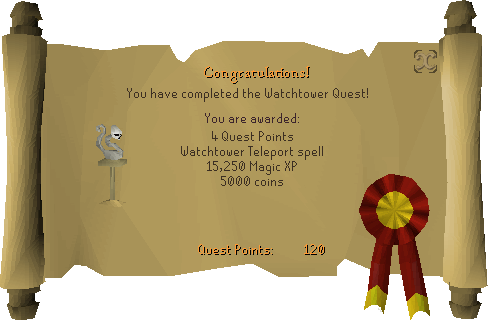
- 4 Quest points
- 15,250 Magic experience
- 5,000 Coins
- A scroll, the reading of which gives you the ability to use Watchtower Teleport
- Access to the ogre city (and Ogre Enclave where you can fight blue dragons. You will not need an extra nightshade to enter after the quest is complete.)
Required for completing
Completion of Watchtower is required for the following:
Watchtower | |||||||
|---|---|---|---|---|---|---|---|
| NPCs |
| ||||||
| Items |
| ||||||
| Locations | |||||||
| Music | |||||||
| Related | |||||||